高可用系列文章之三
前文連結
四 NGINX 高可用實施方案
高可用的實施, 主要步驟概述如下:
- NGINX 的安裝及基礎設定
- 負載均衡層高可用: NGINX + Keepalived設定
- 應用服務層高可用: NGINX -> 應用服務層 轉發設定
系統軟 硬體詳細設定清單
根據製造業高可用架構設計, 以及業務需求, 部署模型建議設定如下:
- 負載均衡伺服器(即 NGINX + Keepalived): 2臺, 作業系統 Linux. 設定建議如下:
| 名稱 | 規格 | 備註 |
|---|---|---|
| CPU | 2 core | |
| 記憶體 | 4 GB | |
| 硬碟 | 50 GB | |
| 作業系統 | SUSE12 64位元及修補程式 | |
| 網路卡 | 至少1塊網路卡, 支援VRRP 技術 |
- 軟體執行設定環境:
| 軟體 | 規格 | |
|---|---|---|
| NGINX | 1.16.1 | |
| Keepalived | 2.0.10 | |
4.1 NGINX 安裝及設定
4.1.1 分割區及目錄
建議至少分為以下3個區:
| 分割區及目錄 | 大小 | 備註 |
|---|---|---|
主分割區( /) |
預設 | nginx程式及組態檔位於該分割區(/etc/nginx) |
紀錄檔分割區(/var/log/nginx) |
10G-20G | |
程式目錄分割區(/usr/share/nginx/html) |
10G | 可選, nginx用作web server時需要用到此目錄. |
4.1.2 程式及依賴版本
| 程式元件 | 安裝包名 | 版本 | md5 |
|---|---|---|---|
| nginx | nginx-1.16.1-1.sles12.ngx.x86_64.rpm | 1.16.1 | 396A359F26DD0100CD59545BAFFAFE85 |
4.1.3 NGINX程式規範
- nginx程式目錄:
/etc/nginx - 執行程式路徑:
/usr/sbin/nginx - 主組態檔路徑:
/etc/nginx/conf/nginx.conf - 各個應用系統轉發組態檔目錄:
/etc/nginx/conf.d/ - 紀錄檔目錄:
/var/log/nginx - 各個應用系統靜態檔案目錄:
/usr/share/nginx/html
4.1.4 系統級別設定優化
❕ 注意:
需要
root使用者執行.
- 安裝元件:
logrotate - 修改連線數:
vi /etc/security/limits.conf
# vi編輯
*               soft    nofile          65535
*               hard    nofile          65535
- 修改系統核心設定:
vi /etc/sysctl.conf
# vi編輯

# NGINX Tuning Performance
fs.file-max = 65535

vm.zone_reclaim_mode = 0

net.core.somaxconn = 2048

net.ipv4.tcp_tw_recycle = 0
net.ipv4.tcp_timestamps = 1
net.ipv4.tcp_slow_start_after_idle = 0
net.ipv4.tcp_mtu_probing = 1

# 生效
sysctl -p
4.1.5 設定NGINX repo
❕ 注意:
本節命令可以根據具體情況, 在公司內部 repo 倉庫機器上進行操作.
其他機器只需要設定內部 repo 地址即可.
鍵入以下 zypper 命令以新增 SLES 的 zypper 儲存庫
$ sudo zypper addrepo -G -t yum -c 'http://nginx.org/packages/sles/12' nginx
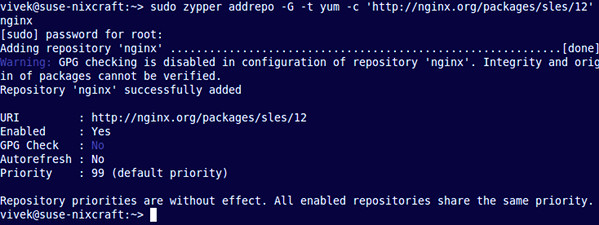
接下來,您必須驗證數位簽章以保持下載包的完整性和來源。使用wget命令獲取nginx簽名金鑰:
$ wget http://nginx.org/keys/nginx_signing.key
範例輸出:
--2020-01-09 23:48:48--  http://nginx.org/keys/nginx_signing.key
Resolving nginx.org (nginx.org)... 206.251.255.63, 95.211.80.227, 2001:1af8:4060:a004:21::e3, ...
Connecting to nginx.org (nginx.org)|206.251.255.63|:80... connected.
HTTP request sent, awaiting response... 200 OK
Length: 1561 (1.5K) [text/plain]
Saving to: ‘nginx_signing.key’

100%[==================================================>] 1,561       --.-K/s   in 0s

2020-01-09 23:48:49 (117 MB/s) - ‘nginx_signing.key’ saved [1561/1561]
使用rpm命令將金鑰匯入rpm:
$ sudo rpm --import nginx_signing.key
4.1.6 SUSE 上安裝NGINX
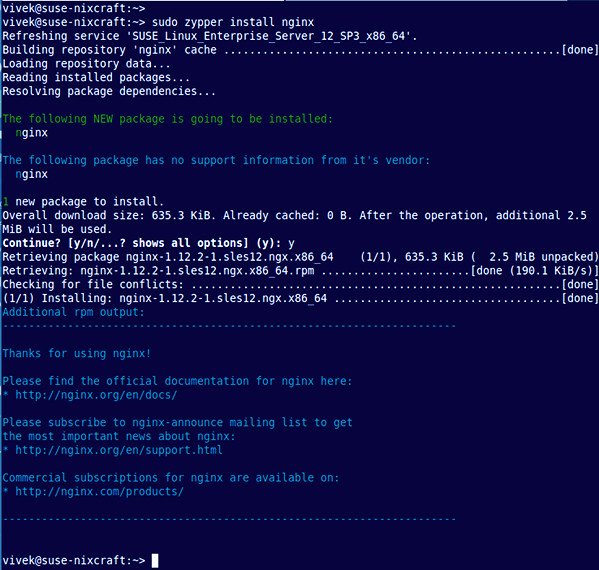
鍵入以下 zypper 命令:
$ sudo zypper install nginx=1.16.1
4.1.7 可選: 設定防火牆
❕ 注意:
如果機房流量入口有其他專用防火牆, 則可以關閉 nginx 伺服器上的防火牆, 且不需要執行此步驟.
首先建立Nginx特定服務的組態檔,使用vi命令等文字編輯器開啟埠80:
$ sudo vi /etc/sysconfig/SuSEfirewall2.d/services/nginx
新增以下設定:
## Name: Nginx web server
## Description: Open ports for Nginx Server

# space separated list of allowed TCP ports
TCP="http"
(如果不需要 HTTPS 支援,則只需要允許 TCP 埠號 80 上的通訊。)儲存並退出 VI/VIM 文字編輯器。現在,只需執行以下命令開啟埠80:
$ sudo yast firewall
必須使用 TAB 和箭頭鍵在 YaST 中跳轉。在 YaST 中,跳轉到允許的服務,然後按 Enter 鍵:
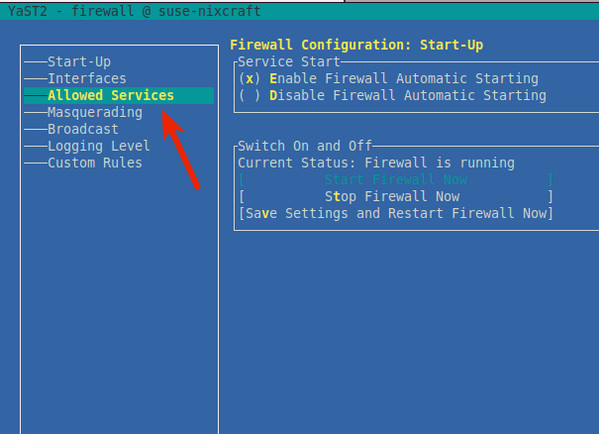
使用 TAB 跳轉到「Allowed Services」,然後按向下箭頭鍵選擇 Nginx web server,然後按確認鍵。必須按 Alt-A 來將Nginx伺服器新增到防火牆:
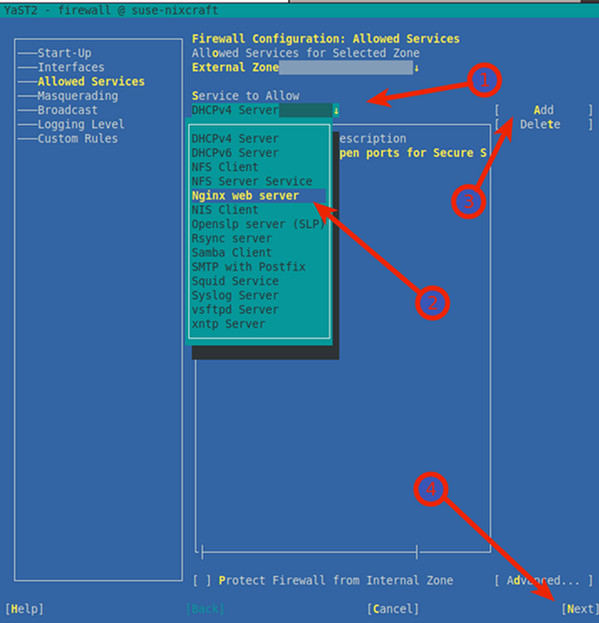
按 Alt-N 和 Alt-F 儲存並完成 SLES 上的防火牆設定。返回 shell 提示符後,列出 sle 上的所有 iptables 規則:
$ sudo iptables -S
範例輸出:
-A input_ext -p tcp -m limit --limit 3/min -m tcp --dport 80 --tcp-flags FIN,SYN,RST,ACK SYN -j LOG --log-prefix "SFW2-INext-ACC-TCP " --log-tcp-options --log-ip-options
-A input_ext -p tcp -m tcp --dport 80 -j ACCEPT
使用 sudo 命令和 grep 命令的組合來確定埠 80 是否開啟:
sudo sh -c 'iptables -L -n -v | grep :80'
4.1.8 啟動 NGINX Server
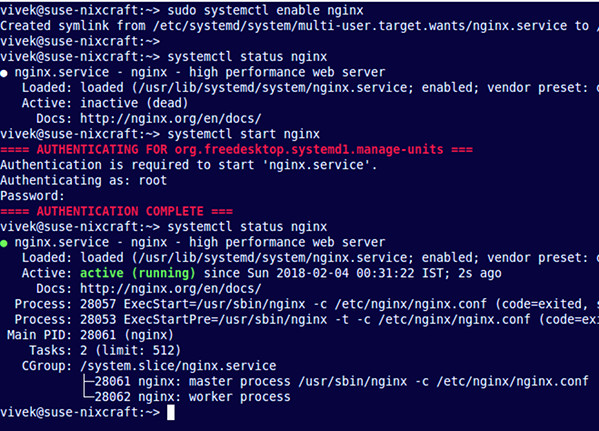
鍵入以下 systemctl 命令以在系統啟動時啟用 Nginx: (開機自啟)
$ sudo systemctl enable nginx
啟動 Nginx web 伺服器:
$ sudo systemctl start nginx
驗證:
$ systemctl status nginx
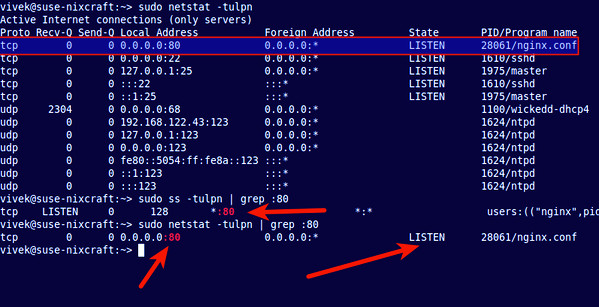
要判斷 80 埠是否監聽, 執行以下 netstat 命令或 ss 命令:
$ sudo netstat -tulpn | grep :80
$ sudo ss -tulpn | grep :80
4.1.9 NGINX 基礎操作
停止:
$ sudo systemctl stop nginx
啟動:
$ sudo systemctl start nginx
重新啟動服務:
$ sudo systemctl restart nginx
更改設定後重新載入 Ngnix:
$ sudo systemctl reload nginx
ℹ️ 建議:
設定更新後使用
reload來重新載入nginx.
存取 nginx 頁面:
假設 NGINX IP為: 192.168.0.1. 使用瀏覽器或 curl 存取:
http://serve_IP
http://your-domain
http://192.168.0.1

$ curl -I 192.168.122.43
範例輸出:
HTTP/1.1 200 OK
Server: nginx/1.16.1
Date: Sat, 03 Feb 2020 19:18:53 GMT
Content-Type: text/html
Content-Length: 612
Last-Modified: Tue, 17 Oct 2019 13:30:50 GMT
Connection: keep-alive
ETag: "59e6060a-264"
Accept-Ranges: bytes
4.1.10 查詢有關 SLES 上 Nginx 組態檔的資訊
現在 Nginx 已經啟動並執行了。接下來可以客製化設定。
SLES 的伺服器組態檔:
/etc/nginx/: nginx 預設設定目錄/etc/nginx/nginx.conf: nginx 主組態檔/etc/nginx/conf.d/default.conf: 預設 virtual host 的設定
修改主設定:
$ sudo vi /etc/nginx/nginx.conf
4.1.11 NGINX 紀錄檔
/var/log/nginx/access.log: 存取紀錄檔/var/log/nginx/error.log: 錯誤紀錄檔
4.1.12 nginx.conf
主組態檔詳細說明如下:
#### 全域性塊 開始 #####
# 設定允許執行Nginx伺服器的使用者和使用者組
#user  nginx nginx;
# 設定允許Nginx程序生成的worker process數
worker_processes  4;
#worker_cpu_affinity 0001 0010 0100 1000;

# 設定Nginx伺服器執行時的錯誤紀錄檔檔案存放路徑和名稱
#error_log  logs/error.log;
error_log  logs/error.log  info;

# 設定Nginx伺服器執行時的pid檔案存放路徑和名稱
pid        logs/nginx.pid;
#### 全域性塊 結束 #####


#### events塊 開始 ####
events {
    # 設定事件驅動模型
    use epoll;
    accept_mutex off;
    multi_accept off;
    worker_connections  65535;
}
#### events塊 結束 ####


#### http塊 開始 ####
http {
    # 定義MIME-Type
    include       mime.types;
    default_type  application/octet-stream;

    # 設定請求處理紀錄檔的格式
    log_format  main  '$remote_addr - $remote_user [$time_local] "$request" '
                      '$status $body_bytes_sent $request_time $upstream_response_time "$http_referer" '
                      '"$http_user_agent" "$http_x_forwarded_for" "$host"';

    access_log  logs/access.log  main;

    # 設定允許使用sendfile方式傳輸
    sendfile        on;
    #tcp_nopush     on;

    # 設定連線超時時間
    #keepalive_timeout  0;
    keepalive_timeout  65;

    # nginx允許的使用者端請求頭部的緩衝區大小
    client_header_buffer_size 4k;

    # gzip conf
    gzip  on;
    gzip_min_length 1024;
    gzip_buffers 32 4k;
    gzip_http_version 1.1;
    gzip_comp_level 6;
    gzip_types text/plain application/xml image/x-icon image/svg+xml image/png text/css image/jpeg image/gif application/x-javascript application/javascript application/json;
    gzip_vary on;
    gzip_disable "MSIE [1-6]\.";

    # security
    port_in_redirect off;
    server_tokens off;

    # proxy buffer
    proxy_buffers 8 4k;
    proxy_buffer_size 4k;
    proxy_temp_file_write_size 4k;
    proxy_temp_path proxy_temp;

    # proxy cache
    # proxy_cache_path cache/ keys_zone=cache_all:10m;


    #### server塊 開始 ####
    ## 設定虛擬主機localhost
    server {
        listen       80 reuseport;
        server_name  localhost;

        #charset koi8-r;

        access_log  logs/host.access.log  main;

        location / {
           root   html;
            index  index.html index.htm;
        }

        error_page  404              /404.html;

        # redirect server error pages to the static page /50x.html
        #
        error_page   500 502 503 504  /50x.html;
        location = /50x.html {
            root   html;
        }

    }
	#### server 塊 結束 ####


    # HTTPS server
    #
    #server {
    #    listen       443 ssl;
    #    server_name  localhost;

    #    ssl_certificate      cert.pem;
    #    ssl_certificate_key  cert.key;

    #    ssl_session_cache    shared:SSL:1m;
    #    ssl_session_timeout  5m;

    #    ssl_ciphers  HIGH:!aNULL:!MD5;
    #    ssl_prefer_server_ciphers  on;

    #    location / {
    #        root   html;
    #        index  index.html index.htm;
    #    }
    #}

    # virtual hosts
    include conf.d/default.conf;

}
#### http塊 結束 ####
✔️ 建議:
為了保證主組態檔的乾淨. 建議通過
include conf.d/default.conf;類似這樣的方式來引入其他virtual hosts設定.
4.1.13 紀錄檔轉儲
-
sudo vi /etc/logrotate.d/nginx -
編輯內容:
/var/log/nginx/*.log { daily rotate 90 # 保留90天, 按需調整 create dateext #compress # 是否啟用壓縮, 按需調整 #minsize 1M #create 0644 nginx nginx # nginx紀錄檔所屬使用者和組, 按需調整 # copytruncate 用於還在開啟中的紀錄檔檔案,把當前紀錄檔備份並截斷;是先拷貝再清空的方式,拷貝和清空之間有一個時間差,可能會丟失部分紀錄檔資料。 # delaycompress 和compress 一起使用時,轉儲的紀錄檔檔案到下一次轉儲時才壓縮 missingok ifempty # default nomail #noolddir # default sharedscripts # 執行postrotate指令碼,作用是在所有紀錄檔都輪轉後統一執行一次指令碼。如果沒有設定這個,那麼每個紀錄檔輪轉後都會執行一次指令碼 postrotate # 在logrotate轉儲之後需要執行的指令,例如重新啟動 (kill -HUP) 某個服務!必須獨立成行 if [ -f /var/log/nginx/nginx.pid ]; then kill -USR1 `cat /var/log/nginx/nginx.pid` fi endscript } -
強制執行一次來測試:
logrotate -f -v /etc/logrotate.d/nginx(對應目錄只能 user 有w許可權, 否則會報錯) -
設定好即可, logrotate 會自動讀取
/etc/logrotate.d的設定並自動執行.