pyqt5製作俄羅斯方塊小遊戲-----原始碼解析
一、前言
最近學習pyqt5中文教學時,最後一個例子製作了一個俄羅斯方塊小遊戲,由於解釋的不是很清楚,所以原始碼有點看不懂,查詢網上資料後,大概弄懂了原始碼的原理。
二、繪製主視窗
將主視窗居中,且設定了一個狀態列來顯示三種資訊:消除的行數,遊戲暫停狀態或者遊戲結束狀態。
class Tetris(QMainWindow):

    def __init__(self):
        super().__init__()

        self.initUI()


    def initUI(self):
        '''initiates application UI'''
        # 建立了一個Board類的範例,並設定為應用的中心元件
        self.tboard = Board(self)
        self.setCentralWidget(self.tboard)
        # 建立一個statusbar來顯示三種資訊:消除的行數,遊戲暫停狀態或者遊戲結束狀態
        # msg2Statusbar是一個自定義的訊號,用在(和)Board類(互動),showMessage()方法是一個內建的,用來在statusbar上顯示資訊的方法。
        self.statusbar = self.statusBar()
        self.tboard.msg2Statusbar[str].connect(self.statusbar.showMessage)

        self.tboard.start() # 初始化遊戲

        self.resize(213, 426)   #  設定視窗大小
        # self.setGeometry(300, 300, 500, 300)
        self.center()   # 視窗居中
        self.setWindowTitle('Tetris')   # 標題
        self.show() # 展示視窗


    def center(self):
        '''centers the window on the screen'''
        # screenGeometry()函數提供有關可用螢幕幾何的資訊
        screen = QDesktopWidget().screenGeometry()
        # 獲取視窗座標系
        size = self.geometry()
        # 將視窗放到中間
        self.move((screen.width()-size.width())/2,
            (screen.height()-size.height())/2)
其中Board類是我們後面要建立的類,主要定義了遊戲的執行邏輯。
通過QDesktopWidget().screenGeometry(),獲取了電腦螢幕的大小,
然後通過self.geometry()獲取了主視窗的大小,將主視窗放到螢幕中央。
三、繪製俄羅斯方塊的形狀
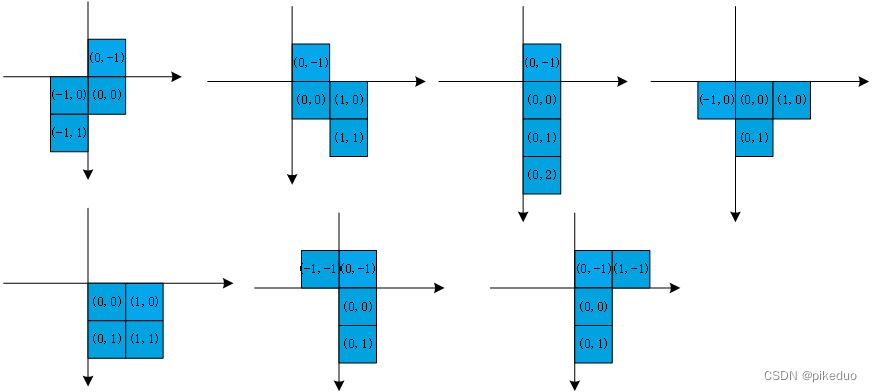
以某行某列為原點,繪製俄羅斯方塊的形狀。
俄羅斯方塊有7種基本形狀,如圖

每個方塊形狀都有四個小方塊,圖中的座標顯示的是小方塊左上角的座標。
定義一個Tetrominoe類,儲存所有方塊的形狀(其實相當於後面coordsTable陣列裡的index)。
# Tetrominoe類儲存了所有方塊的形狀。我們還定義了一個NoShape的空形狀。
class Tetrominoe(object):
    # 和Shape類裡的coordsTable陣列一一對應
    NoShape = 0
    ZShape = 1
    SShape = 2
    LineShape = 3
    TShape = 4
    SquareShape = 5
    LShape = 6
    MirroredLShape = 7
定義Shape類,儲存類方塊內部的資訊。
# Shape類儲存類方塊內部的資訊。
class Shape(object):
    # coordsTable元組儲存了所有的方塊形狀的組成。是一個構成方塊的座標模版。
    coordsTable = (
        ((0, 0),     (0, 0),     (0, 0),     (0, 0)),   # 空方塊
        ((0, -1),    (0, 0),     (-1, 0),    (-1, 1)),
        ((0, -1),    (0, 0),     (1, 0),     (1, 1)),
        ((0, -1),    (0, 0),     (0, 1),     (0, 2)),
        ((-1, 0),    (0, 0),     (1, 0),     (0, 1)),
        ((0, 0),     (1, 0),     (0, 1),     (1, 1)),
        ((-1, -1),   (0, -1),    (0, 0),     (0, 1)),
        ((1, -1),    (0, -1),    (0, 0),     (0, 1))
    )

    def __init__(self):
        # 下面建立了一個新的空座標陣列,這個陣列將用來儲存方塊的座標。
        self.coords = [[0,0] for i in range(4)]     # 4x4的二維陣列,每個元素代表方塊的左上角座標
        self.pieceShape = Tetrominoe.NoShape    # 方塊形狀,初始形狀為空白

        self.setShape(Tetrominoe.NoShape)

    # 返回當前方塊形狀
    def shape(self):
        '''returns shape'''

        return self.pieceShape

    # 設定方塊形狀
    def setShape(self, shape):  # 初始shape為0
        '''sets a shape'''

        table = Shape.coordsTable[shape]    # 從形狀列表裡取出其中一個方塊的形狀,為一個4x2的陣列

        for i in range(4):
            for j in range(2):
                self.coords[i][j] = table[i][j] # 賦給要使用的方塊元素

        self.pieceShape = shape # 再次獲取形狀(index)

    # 設定一個隨機的方塊形狀
    def setRandomShape(self):
        '''chooses a random shape'''

        self.setShape(random.randint(1, 7))

    # 小方塊的x座標,index代表第幾個方塊
    def x(self, index):
        '''returns x coordinate'''

        return self.coords[index][0]

    # 小方塊的y座標
    def y(self, index):
        '''returns y coordinate'''

        return self.coords[index][1]

    # 設定小方塊的x座標
    def setX(self, index, x):
        '''sets x coordinate'''

        self.coords[index][0] = x

    # 設定小方塊的y座標
    def setY(self, index, y):
        '''sets y coordinate'''

        self.coords[index][1] = y

    # 找出方塊形狀中位於最左邊的方塊的x座標
    def minX(self):
        '''returns min x value'''

        m = self.coords[0][0]
        for i in range(4):
            m = min(m, self.coords[i][0])

        return m

    # 找出方塊形狀中位於最右邊的方塊的x座標
    def maxX(self):
        '''returns max x value'''

        m = self.coords[0][0]
        for i in range(4):
            m = max(m, self.coords[i][0])

        return m

    # 找出方塊形狀中位於最左邊的方塊的y座標
    def minY(self):
        '''returns min y value'''

        m = self.coords[0][1]
        for i in range(4):
            m = min(m, self.coords[i][1])

        return m

    # 找出方塊形狀中位於最右邊的方塊的y座標
    def maxY(self):
        '''returns max y value'''

        m = self.coords[0][1]
        for i in range(4):
            m = max(m, self.coords[i][1])

        return m
注意,不同人對方塊座標的定義不同,但基本原理一致。
四、旋轉方塊
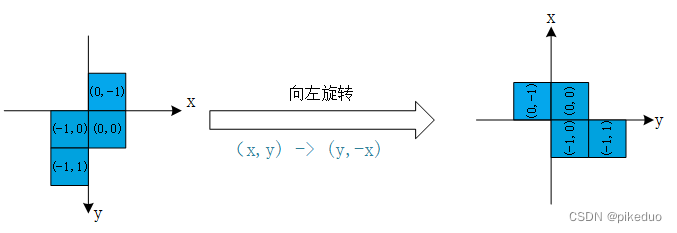
旋轉方塊,其實相當於將座標軸旋轉,以一個方塊形狀為例,向左旋轉如圖

座標軸變化(x,y) -> (y,-x)。
    # rotateLeft()方法向右旋轉一個方塊。正方形的方塊就沒必要旋轉,就直接返回了。
    # 其他的是返回一個新的,能表示這個形狀旋轉了的座標。
    def rotateLeft(self):
        '''rotates shape to the left'''
        # 正方形沒有必要旋轉
        if self.pieceShape == Tetrominoe.SquareShape:
            return self
        # 獲取當前的方塊形狀
        result = Shape()
        result.pieceShape = self.pieceShape
        # 向左旋轉,相當將座標軸向左旋轉了,和原來的座標軸想比 (x,y) -> (y,-x)
        for i in range(4):  # i代表第幾個小方塊
            result.setX(i, self.y(i))   # 設定第i個方塊的x座標,
            result.setY(i, -self.x(i))  # 設定第i個方塊的x座標

        return result
這段程式碼放在Shape類裡。
同理,向右旋轉,座標軸變化(x,y) -> (-y,x)。

    # 向右旋轉,同理,(x,y) -> (-y,x)
    def rotateRight(self):
        '''rotates shape to the right'''

        if self.pieceShape == Tetrominoe.SquareShape:
            return self

        result = Shape()
        result.pieceShape = self.pieceShape

        for i in range(4):
            result.setX(i, -self.y(i))
            result.setY(i, self.x(i))

        return result
程式碼同樣放在Shape類裡。
五、遊戲執行邏輯
這塊是最難理解也是最重要的一塊。
(1)初始化變數
定義一個Board類來描述遊戲的執行邏輯。
class Board(QFrame):
    # 建立了一個自定義訊號msg2Statusbar,當我們想往statusbar裡顯示資訊的時候,發出這個訊號就行了。
    msg2Statusbar = pyqtSignal(str)
    # 這些是Board類的變數。BoardWidth和BoardHeight分別是board的寬度和高度。Speed是遊戲的速度,每300ms出現一個新的方塊
    BoardWidth = 10 # 指介面寬度可以容納10個小方塊
    BoardHeight = 22    # 指介面高度可以容納22個小方塊
    Speed = 300

    def __init__(self, parent):
        super().__init__(parent)

        self.initBoard()


    def initBoard(self):
        '''initiates board'''

        self.timer = QBasicTimer()  # 定義了一個定時器
        self.isWaitingAfterLine = False # self.isWaitingAfterLine表示是否在等待消除行

        self.curX = 0   # 目前x座標
        self.curY = 0   # 目前y座標
        self.numLinesRemoved = 0    # 表示消除的行數,也就是分數
        self.board = [] # 儲存每個方塊位置的形狀,預設應該為0,下標代表方塊座標x*y

        self.setFocusPolicy(Qt.StrongFocus) # 設定焦點,使用tab鍵和滑鼠左鍵都可以獲取焦點
        self.isStarted = False  # 表示遊戲是否在執行狀態
        self.isPaused = False   # 表示遊戲是否在暫停狀態
        self.clearBoard()   # 清空介面的全部方塊
msg2Statusbar = pyqtSignal(str)
這段程式碼自定義了一個訊號。
self.timer = QBasicTimer()
這段程式碼定義了一個定時器。
self.setFocusPolicy(Qt.StrongFocus)
這段程式碼設定了焦點,TabFocus 只能使用Tab鍵才能獲取焦點,ClickFocus 只能使用滑鼠點選才能獲取焦點,StrongFocus 上面兩種都行,NoFocus 上面兩種都不行。
所謂焦點,其實就是你得滑鼠遊標移動到了該點。
(2)清空介面
初始化變數時,呼叫 self.clearBoard()清空了介面。
    # clearBoard()方法通過Tetrominoe.NoShape清空broad
    def clearBoard(self):
        '''clears shapes from the board'''
        # 將介面每個小方塊都設定為空,儲存到self.board中,下標表示第幾個方塊,(x*y)
        for i in range(Board.BoardHeight * Board.BoardWidth):
            self.board.append(Tetrominoe.NoShape)
Board.BoardHeight和Board.BoardWidth代表介面寬度和高度能夠容納多少個小方塊,Board.BoardHeight * Board.BoardWidth表示方塊的順序,相當於self.board的下標。
(3)啟動遊戲
接下來是開始遊戲的方法。
# 開始遊戲
    def start(self):
        '''starts game'''
        # 如果遊戲處於暫停狀態,直接返回
        if self.isPaused:
            return

        self.isStarted = True   # 將開始狀態設定為True
        self.isWaitingAfterLine = False
        self.numLinesRemoved = 0    # 將分數設定為0
        self.clearBoard()   # 清空介面全部的方塊
        # 狀態列顯示當前有多少分
        self.msg2Statusbar.emit(str(self.numLinesRemoved))

        self.newPiece() # 建立一個新的方塊
        self.timer.start(Board.Speed, self) # 開始計時,每過300ms重新整理一次當前的介面
(4)新建方塊
這裡呼叫了一個函數self.newPiece(),新建了一個方塊。
  # newPiece()方法是用來建立形狀隨機的方塊。如果隨機的方塊不能正確的出現在預設的位置,遊戲結束。
    def newPiece(self):
        '''creates a new shape'''

        self.curPiece = Shape() # 建立了一個Shape物件
        self.curPiece.setRandomShape()  # 設定了一個隨機的形狀
        self.curX = Board.BoardWidth // 2 + 1   # 以介面中心為起點
        self.curY = Board.BoardHeight - 1 + self.curPiece.minY() # 從這裡看應該是預留了一行的高度,但不知道作用是什麼
        # 判斷是否還有空位,如果沒有
        if not self.tryMove(self.curPiece, self.curX, self.curY):
            # 將當前形狀設定為空
            self.curPiece.setShape(Tetrominoe.NoShape)
            self.timer.stop()   # 停止計時
            self.isStarted = False  # 將開始狀態設定為False
            self.msg2Statusbar.emit("Game over") # 狀態列顯示遊戲結束
呼叫了tryMove()函數。
    # tryMove()是嘗試移動方塊的方法。
    # 如果方塊已經到達board的邊緣或者遇到了其他方塊,就返回False。否則就把方塊下落到想要的位置
    def tryMove(self, newPiece, newX, newY):
        '''tries to move a shape'''

        for i in range(4):
            # newPiece是一個Shape物件,newX,newY相當於座標原點(相對於方塊而言)
            x = newX + newPiece.x(i)    # 得到每個小方塊在介面上的座標
            y = newY - newPiece.y(i)
            # 超出邊界則返回False
            if x < 0 or x >= Board.BoardWidth or y < 0 or y >= Board.BoardHeight:
                return False
            # 如果方塊位置不為0,說明已經用過了,不允許使用,返回False
            if self.shapeAt(x, y) != Tetrominoe.NoShape:
                return False

        self.curPiece = newPiece    # 更新當前的方塊形狀
        self.curX = newX    # 更新當前的座標
        self.curY = newY
        self.update()   # 更新視窗,同時呼叫paintEvent()函數

        return True
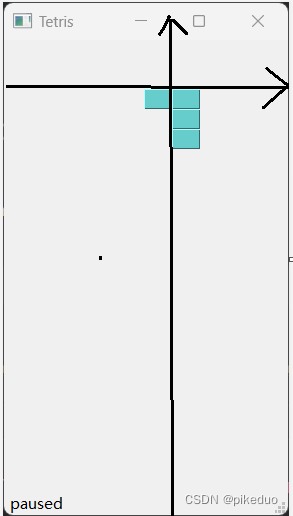
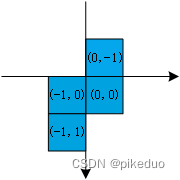
注意,y座標要減去小方塊的y座標,y = newY - newPiece.y(i),因為在介面上的座標軸是這樣的
而小方塊的座標是這樣的
其實座標軸的基本單位是一個小方塊,當做方塊來處理就可以了
這裡呼叫了shapeAt()方法,傳入了當前小方塊的座標。
    # shapeAt()決定了board裡方塊的的種類。
    def shapeAt(self, x, y):
        '''determines shape at the board position'''
        # 返回的是(x,y)座標方塊在self.board中的值
        return self.board[(y * Board.BoardWidth) + x]
(y * Board.BoardWidth) + x計算出了方塊的位置,至於怎麼計算的這裡就不說了,參照二維陣列。
self.update()函數更新了當前的視窗,且會呼叫paintEvent()函數。
(5)繪製方塊
   # 渲染是在paintEvent()方法裡發生的QPainter負責PyQt5裡所有低階繪畫操作。
    def paintEvent(self, event):
        '''paints all shapes of the game'''

        painter = QPainter(self)    # 新建了一個QPainter物件
        rect = self.contentsRect()  # 獲取內容區域
        # self.squareHeight()獲取的是小方塊的高度,不是很理解,猜測是方塊出現後去獲取方塊的高度
        boardTop = rect.bottom() - Board.BoardHeight * self.squareHeight()  # 獲取board中除去方塊後多出來的空間
        # 渲染遊戲分為兩步。第一步是先畫出所有已經落在最下面的的圖,這些儲存在self.board裡。
        # 可以使用shapeAt()檢視這個這個變數。
        for i in range(Board.BoardHeight):
            for j in range(Board.BoardWidth):
                # 返回儲存在self.board裡面的形狀
                shape = self.shapeAt(j, Board.BoardHeight - i - 1)
                # 如果形狀不是空,繪製方塊
                if shape != Tetrominoe.NoShape:
                    # 繪製方塊,rect.left()表示Board的左邊距
                    self.drawSquare(painter,
                        rect.left() + j * self.squareWidth(),
                        boardTop + i * self.squareHeight(), shape)
        # 第二步是畫出正在下落的方塊
        # 獲取目前方塊的形狀,不能為空
        if self.curPiece.shape() != Tetrominoe.NoShape:

            for i in range(4):
                # 計算在Board上的座標,作為方塊座標原點(單位是小方塊)
                x = self.curX + self.curPiece.x(i)
                y = self.curY - self.curPiece.y(i)
                # 繪製方塊
                self.drawSquare(painter, rect.left() + x * self.squareWidth(),
                    boardTop + (Board.BoardHeight - y - 1) * self.squareHeight(),
                    self.curPiece.shape())
分兩步畫圖,第一步畫已經存在底部的方塊,第二步畫正在下落的方塊。
呼叫了self.drawSquare()來繪製小方塊。
    def drawSquare(self, painter, x, y, shape):
        '''draws a square of a shape'''

        colorTable = [0x000000, 0xCC6666, 0x66CC66, 0x6666CC,
                      0xCCCC66, 0xCC66CC, 0x66CCCC, 0xDAAA00]
        # 為每種形狀的方塊設定不同的顏色
        color = QColor(colorTable[shape])
        # 引數分別為x,y,w,h,color,填充了顏色
        painter.fillRect(x + 1, y + 1, self.squareWidth() - 2,
            self.squareHeight() - 2, color)

        painter.setPen(color.lighter())
        # 畫線,從起始座標到終點座標,-1是為了留一點空格,看起來更有立體感
        painter.drawLine(x, y + self.squareHeight() - 1, x, y) # 左邊那條線
        painter.drawLine(x, y, x + self.squareWidth() - 1, y)   # 上邊那條線
        # 換了畫筆的樣式,同樣是為了讓圖案看起來更有立體感
        painter.setPen(color.darker())
        painter.drawLine(x + 1, y + self.squareHeight() - 1,
            x + self.squareWidth() - 1, y + self.squareHeight() - 1)    # 下邊那條線
        painter.drawLine(x + self.squareWidth() - 1,
            y + self.squareHeight() - 1, x + self.squareWidth() - 1, y + 1) # 右邊那條線
呼叫squareWidth()和squareHeight()方法返回小方塊的寬度和高度。
    # board的大小可以動態的改變。所以方格的大小也應該隨之變化。squareWidth()計算並返回每個塊應該佔用多少畫素--也即Board.BoardWidth。
    def squareWidth(self):
        '''returns the width of one square'''

        return self.contentsRect().width() // Board.BoardWidth


    def squareHeight(self):
        return self.contentsRect().height() // Board.BoardHeight
(6)方塊移動和消除
a. 消除方塊
    def pieceDropped(self):
        '''after dropping shape, remove full lines and create new shape'''
        # 將方塊的形狀新增到self.board中,非0代表該處有方塊
        for i in range(4):
            # 獲取每個小方塊的座標
            x = self.curX + self.curPiece.x(i)
            y = self.curY - self.curPiece.y(i)
            self.setShapeAt(x, y, self.curPiece.shape())
        # 移除滿行的方塊
        self.removeFullLines()
        # self.isWaitingAfterLine表示是否在等待消除行,如果不在等待就新建一個方塊
        if not self.isWaitingAfterLine:
            self.newPiece()
呼叫self.setShapeAt()函數將當前落到底部的方塊新增到self.board陣列中去。只要非0都代表該處有方塊。
    def setShapeAt(self, x, y, shape):
        '''sets a shape at the board'''
        # 設定方塊的形狀,放入self.board中
        self.board[(y * Board.BoardWidth) + x] = shape
呼叫self.removeFullLines()函數來消除方塊。
    # 如果方塊碰到了底部,就呼叫removeFullLines()方法,找到所有能消除的行消除它們。
    # 消除的具體動作就是把符合條件的行消除掉之後,再把它上面的行下降一行。
    # 注意移除滿行的動作是倒著來的,因為我們是按照重力來表現遊戲的,如果不這樣就有可能出現有些方塊浮在空中的現象
    def removeFullLines(self):
        '''removes all full lines from the board'''

        numFullLines = 0    # 記錄消除的行數
        rowsToRemove = []   # 要消除的行列表

        for i in range(Board.BoardHeight):  # 遍歷每一行

            n = 0
            for j in range(Board.BoardWidth): # 遍歷整行的方塊
                # 如果self.board裡面的值不為空,計數
                if not self.shapeAt(j, i) == Tetrominoe.NoShape:
                    n = n + 1
            # 如果整行都有方塊,將要消除的行新增進陣列中
            if n == Board.BoardWidth:   # 原文是 n == 10,但我覺得該成n == Board.BoardWidth會更嚴謹一點
                rowsToRemove.append(i)
        # 因為是從上往下遍歷,所以要倒過來消除,否則會出現方塊懸空的情況
        # 當然,也可以在遍歷的時候這樣遍歷:for m in rowsToRemove[-1:0]
        rowsToRemove.reverse()

        for m in rowsToRemove:
            # self.shapeAt(l, k + 1)獲取要消除的行的上一行的方塊形狀,然後替換當前方塊的形狀
            for k in range(m, Board.BoardHeight):
                for l in range(Board.BoardWidth):
                        self.setShapeAt(l, k, self.shapeAt(l, k + 1))

        # 更新已經消除的行數
        # numFullLines = numFullLines + len(rowsToRemove)
        # 還可以改成這樣,如果連續消除,則分數翻倍。
        numFullLines = numFullLines + int(math.pow(2, len(rowsToRemove))) - 1

        if numFullLines > 0:
            # 更新分數
            self.numLinesRemoved = self.numLinesRemoved + numFullLines
            self.msg2Statusbar.emit(str(self.numLinesRemoved))  # 改變狀態列分數的值
            # 在消除後還要將當前方塊形狀設定為空,然後重新整理介面
            self.isWaitingAfterLine = True
            self.curPiece.setShape(Tetrominoe.NoShape)
            self.update()
這裡我發現消除一行只加1分太單調了,所以改了一下規則,如果連續消除,則分數加倍。
numFullLines = numFullLines + int(math.pow(2, len(rowsToRemove))) - 1
b.方塊下落
定時器每次重新整理一次,方塊下落一行。
# 在計時器事件裡,要麼是等一個方塊下落完之後建立一個新的方塊,要麼是讓一個方塊直接落到底
    def timerEvent(self, event):
        '''handles timer event'''

        if event.timerId() == self.timer.timerId():
            # 如果在消除方塊,說明方塊已經下落到底部了,建立新的方塊,否則下落一行
            if self.isWaitingAfterLine:
                self.isWaitingAfterLine = False
                self.newPiece()
            else:
                self.oneLineDown()

        else:
            super(Board, self).timerEvent(event)
oneLineDown()函數執行方塊下落一行的操作。每下落一行,都會檢測是否有可以消除的行。
    def oneLineDown(self):
        '''goes one line down with a shape'''
        # 呼叫self.tryMove()函數時,就已經表示方塊下落一行了,每次下落到底部後,檢查一下是否有能夠消除的方塊
        if not self.tryMove(self.curPiece, self.curX, self.curY - 1):
            self.pieceDropped()
c.方塊直接落到底部
    def dropDown(self):
        '''drops down a shape'''
        # 獲取當前行
        newY = self.curY
        # 當方塊還沒落到最底部時,嘗試向下移動一行,同時當前行-1
        while newY > 0:

            if not self.tryMove(self.curPiece, self.curX, newY - 1):
                break

            newY -= 1
        # 移到底部時,檢查是否能夠消除方塊
        self.pieceDropped()
方塊落到底部,其實還一步一步下降到底部的過程,只不過這個過程是在一個定時器的時間內實現,所以在直觀上來看就是直接落到了底部。
(7)暫停遊戲
    # pause()方法用來暫停遊戲,停止計時並在statusbar上顯示一條資訊
    def pause(self):
        '''pauses game'''
        # 如果有處於執行狀態,則直接返回
        if not self.isStarted:
            return
        # 更改遊戲的狀態
        self.isPaused = not self.isPaused

        if self.isPaused:
            self.timer.stop()   # 停止計時
            self.msg2Statusbar.emit("paused")   # 傳送暫停訊號
        # 否則繼續執行,顯示分數
        else:
            self.timer.start(Board.Speed, self)
            self.msg2Statusbar.emit(str(self.numLinesRemoved))
        # 更新介面
        self.update()
暫停遊戲的邏輯和啟動遊戲的邏輯差不多。
(8)遊戲按鍵
   def keyPressEvent(self, event):
        '''processes key press events'''
        # 如果遊戲不是開始狀態或者方塊形狀為空,直接返回
        if not self.isStarted or self.curPiece.shape() == Tetrominoe.NoShape:
            super(Board, self).keyPressEvent(event)
            return

        key = event.key()
        # P代表暫停
        if key == Qt.Key_P:
            self.pause()
            return
        # 如果遊戲處於暫停狀態,則不觸發按鍵(只對按鍵P生效)
        if self.isPaused:
            return
        # 方向鍵左鍵代表左移一個位置,x座標-1
        elif key == Qt.Key_Left:
            self.tryMove(self.curPiece, self.curX - 1, self.curY)
        # 在keyPressEvent()方法獲得使用者按下的按鍵。如果按下的是右方向鍵,就嘗試把方塊向右移動,說嘗試是因為有可能到邊界不能移動了。
        # 方向鍵右鍵代表右移一個位置,x座標+1
        elif key == Qt.Key_Right:
            self.tryMove(self.curPiece, self.curX + 1, self.curY)
        # 下方向鍵代表向右旋轉
        elif key == Qt.Key_Down:
            self.tryMove(self.curPiece.rotateRight(), self.curX, self.curY)
        # 上方向鍵是把方塊向左旋轉一下
        elif key == Qt.Key_Up:
            self.tryMove(self.curPiece.rotateLeft(), self.curX, self.curY)
        # 空格鍵會直接把方塊放到底部
        elif key == Qt.Key_Space:
            self.dropDown()
        # D鍵是加速一次下落速度
        elif key == Qt.Key_D:
            self.oneLineDown()

        else:
            super(Board, self).keyPressEvent(event)
設定了各個按鍵對應的操作,可更改。
六、一些小小的優化
新增了一個重啟遊戲的按鍵R。
# R代表重啟遊戲
        if key == Qt.Key_R:
            self.initBoard()
            self.start()
按R重啟遊戲,初始化Board且啟動遊戲。
在遊戲暫停和結束後顯示遊戲當前的分數。
self.msg2Statusbar.emit(f"paused, current socre is {self.numLinesRemoved}") # 傳送暫停訊號,同時顯示當前分數
self.msg2Statusbar.emit(f"Game over, your socre is {self.numLinesRemoved}") # 狀態列顯示遊戲結束
本來還想要再新增一個啟動遊戲的按鈕,因為每次開啟遊戲就直接啟動了,有點沒反應過來,但是總是報錯,就沒加了。
七、最終實現程式碼
'''
俄羅斯方塊
'''
import math

from PyQt5.QtWidgets import QMainWindow, QFrame, QDesktopWidget, QApplication, QPushButton, QVBoxLayout
from PyQt5.QtCore import Qt, QBasicTimer, pyqtSignal
from PyQt5.QtGui import QPainter, QColor
import sys, random

class Tetris(QMainWindow):

    def __init__(self):
        super().__init__()

        self.initUI()


    def initUI(self):
        '''initiates application UI'''
        # 建立了一個Board類的範例,並設定為應用的中心元件
        self.tboard = Board(self)
        self.setCentralWidget(self.tboard)
        # 建立一個statusbar來顯示三種資訊:消除的行數,遊戲暫停狀態或者遊戲結束狀態
        # msg2Statusbar是一個自定義的訊號,用在(和)Board類(互動),showMessage()方法是一個內建的,用來在statusbar上顯示資訊的方法。
        self.statusbar = self.statusBar()
        self.tboard.msg2Statusbar[str].connect(self.statusbar.showMessage)

        self.tboard.start() # 初始化遊戲

        # self.btn = QPushButton("開始遊戲", self)
        # self.btn.clicked[bool].connect(self.start)
        #
        # vbox = QVBoxLayout(self)
        # vbox.addWidget(self.btn)
        # vbox.addWidget(self.tboard)
        #
        # self.setLayout(vbox)

        self.resize(213, 426)   #  設定視窗大小
        # self.setGeometry(300, 300, 500, 300)
        self.center()   # 視窗居中
        self.setWindowTitle('Tetris')   # 標題
        self.show() # 展示視窗


    def center(self):
        '''centers the window on the screen'''
        # screenGeometry()函數提供有關可用螢幕幾何的資訊
        screen = QDesktopWidget().screenGeometry()
        # 獲取視窗座標系
        size = self.geometry()
        # 將視窗放到中間
        self.move((screen.width()-size.width())//2,
            (screen.height()-size.height())//2)

class Board(QFrame):
    # 建立了一個自定義訊號msg2Statusbar,當我們想往statusbar裡顯示資訊的時候,發出這個訊號就行了。
    msg2Statusbar = pyqtSignal(str)
    # 這些是Board類的變數。BoardWidth和BoardHeight分別是board的寬度和高度。Speed是遊戲的速度,每300ms出現一個新的方塊
    BoardWidth = 10 # 指介面寬度可以容納10個小方塊
    BoardHeight = 22    # 指介面高度可以容納22個小方塊
    Speed = 300

    def __init__(self, parent):
        super().__init__(parent)

        self.initBoard()


    def initBoard(self):
        '''initiates board'''

        self.timer = QBasicTimer()  # 定義了一個定時器
        self.isWaitingAfterLine = False # self.isWaitingAfterLine表示是否在等待消除行

        self.curX = 0   # 目前x座標
        self.curY = 0   # 目前y座標
        self.numLinesRemoved = 0    # 表示消除的行數,也就是分數
        self.board = [] # 儲存每個方塊位置的形狀,預設應該為0,下標代表方塊座標x*y

        self.setFocusPolicy(Qt.StrongFocus) # 設定焦點,使用tab鍵和滑鼠左鍵都可以獲取焦點
        self.isStarted = False  # 表示遊戲是否在執行狀態
        self.isPaused = False   # 表示遊戲是否在暫停狀態
        self.clearBoard()   # 清空介面的全部方塊

    # shapeAt()決定了board裡方塊的的種類。
    def shapeAt(self, x, y):
        '''determines shape at the board position'''
        # 返回的是(x,y)座標方塊在self.board中的值
        return self.board[(y * Board.BoardWidth) + x]


    def setShapeAt(self, x, y, shape):
        '''sets a shape at the board'''
        # 設定方塊的形狀,放入self.board中
        self.board[(y * Board.BoardWidth) + x] = shape

    # board的大小可以動態的改變。所以方格的大小也應該隨之變化。squareWidth()計算並返回每個塊應該佔用多少畫素--也即Board.BoardWidth。
    def squareWidth(self):
        '''returns the width of one square'''

        return self.contentsRect().width() // Board.BoardWidth


    def squareHeight(self):
        return self.contentsRect().height() // Board.BoardHeight

    # 開始遊戲
    def start(self):
        '''starts game'''
        # 如果遊戲處於暫停狀態,直接返回
        if self.isPaused:
            return

        self.isStarted = True   # 將開始狀態設定為True
        self.isWaitingAfterLine = False
        self.numLinesRemoved = 0    # 將分數設定為0
        self.clearBoard()   # 清空介面全部的方塊
        # 狀態列顯示當前有多少分
        self.msg2Statusbar.emit(str(self.numLinesRemoved))

        self.newPiece() # 建立一個新的方塊
        self.timer.start(Board.Speed, self) # 開始計時,每過300ms重新整理一次當前的介面

    # pause()方法用來暫停遊戲,停止計時並在statusbar上顯示一條資訊
    def pause(self):
        '''pauses game'''
        # 如果有處於執行狀態,則直接返回
        if not self.isStarted:
            return
        # 更改遊戲的狀態
        self.isPaused = not self.isPaused

        if self.isPaused:
            self.timer.stop()   # 停止計時
            self.msg2Statusbar.emit(f"paused, current socre is {self.numLinesRemoved}")   # 傳送暫停訊號,同時顯示當前分數
        # 否則繼續執行,顯示分數
        else:
            self.timer.start(Board.Speed, self)
            self.msg2Statusbar.emit(str(self.numLinesRemoved))
        # 更新介面
        self.update()

    # 渲染是在paintEvent()方法裡發生的QPainter負責PyQt5裡所有低階繪畫操作。
    def paintEvent(self, event):
        '''paints all shapes of the game'''

        painter = QPainter(self)    # 新建了一個QPainter物件
        rect = self.contentsRect()  # 獲取內容區域
        # self.squareHeight()獲取的是小方塊的高度,不是很理解,猜測是方塊出現後去獲取方塊的高度
        boardTop = rect.bottom() - Board.BoardHeight * self.squareHeight()  # 獲取board中除去方塊後多出來的空間
        # 渲染遊戲分為兩步。第一步是先畫出所有已經落在最下面的的圖,這些儲存在self.board裡。
        # 可以使用shapeAt()檢視這個這個變數。
        for i in range(Board.BoardHeight):
            for j in range(Board.BoardWidth):
                # 返回儲存在self.board裡面的形狀
                shape = self.shapeAt(j, Board.BoardHeight - i - 1)
                # 如果形狀不是空,繪製方塊
                if shape != Tetrominoe.NoShape:
                    # 繪製方塊,rect.left()表示Board的左邊距
                    self.drawSquare(painter,
                        rect.left() + j * self.squareWidth(),
                        boardTop + i * self.squareHeight(), shape)
        # 第二步是畫出正在下落的方塊
        # 獲取目前方塊的形狀,不能為空
        if self.curPiece.shape() != Tetrominoe.NoShape:

            for i in range(4):
                # 計算在Board上的座標,作為方塊座標原點(單位是小方塊)
                x = self.curX + self.curPiece.x(i)
                y = self.curY - self.curPiece.y(i)
                # 繪製方塊
                self.drawSquare(painter, rect.left() + x * self.squareWidth(),
                    boardTop + (Board.BoardHeight - y - 1) * self.squareHeight(),
                    self.curPiece.shape())


    def keyPressEvent(self, event):
        '''processes key press events'''

        key = event.key()

        # R代表重啟遊戲
        if key == Qt.Key_R:
            self.initBoard()
            self.start()

        # 如果遊戲不是開始狀態或者方塊形狀為空,直接返回
        if not self.isStarted or self.curPiece.shape() == Tetrominoe.NoShape:
            super(Board, self).keyPressEvent(event)
            return

        # P代表暫停
        if key == Qt.Key_P:
            self.pause()
            return
        # 如果遊戲處於暫停狀態,則不觸發按鍵(只對按鍵P生效)
        if self.isPaused:
            return
        # 方向鍵左鍵代表左移一個位置,x座標-1
        elif key == Qt.Key_Left:
            self.tryMove(self.curPiece, self.curX - 1, self.curY)
        # 在keyPressEvent()方法獲得使用者按下的按鍵。如果按下的是右方向鍵,就嘗試把方塊向右移動,說嘗試是因為有可能到邊界不能移動了。
        # 方向鍵右鍵代表右移一個位置,x座標+1
        elif key == Qt.Key_Right:
            self.tryMove(self.curPiece, self.curX + 1, self.curY)
        # 下方向鍵代表向右旋轉
        elif key == Qt.Key_Down:
            self.tryMove(self.curPiece.rotateRight(), self.curX, self.curY)
        # 上方向鍵是把方塊向左旋轉一下
        elif key == Qt.Key_Up:
            self.tryMove(self.curPiece.rotateLeft(), self.curX, self.curY)
        # 空格鍵會直接把方塊放到底部
        elif key == Qt.Key_Space:
            self.dropDown()
        # D鍵是加速一次下落速度
        elif key == Qt.Key_D:
            self.oneLineDown()

        else:
            super(Board, self).keyPressEvent(event)

    # 在計時器事件裡,要麼是等一個方塊下落完之後建立一個新的方塊,要麼是讓一個方塊直接落到底
    def timerEvent(self, event):
        '''handles timer event'''

        if event.timerId() == self.timer.timerId():
            # 如果在消除方塊,說明方塊已經下落到底部了,建立新的方塊,否則下落一行
            if self.isWaitingAfterLine:
                self.isWaitingAfterLine = False
                self.newPiece()
            else:
                self.oneLineDown()

        else:
            super(Board, self).timerEvent(event)

    # clearBoard()方法通過Tetrominoe.NoShape清空broad
    def clearBoard(self):
        '''clears shapes from the board'''
        # 將介面每個小方塊都設定為空,儲存到self.board中,下標表示第幾個方塊,(x*y)
        for i in range(Board.BoardHeight * Board.BoardWidth):
            self.board.append(Tetrominoe.NoShape)


    def dropDown(self):
        '''drops down a shape'''
        # 獲取當前行
        newY = self.curY
        # 當方塊還沒落到最底部時,嘗試向下移動一行,同時當前行-1
        while newY > 0:

            if not self.tryMove(self.curPiece, self.curX, newY - 1):
                break

            newY -= 1
        # 移到底部時,檢查是否能夠消除方塊
        self.pieceDropped()


    def oneLineDown(self):
        '''goes one line down with a shape'''
        # 呼叫self.tryMove()函數時,就已經表示方塊下落一行了,每次下落到底部後,檢查一下是否有能夠消除的方塊
        if not self.tryMove(self.curPiece, self.curX, self.curY - 1):
            self.pieceDropped()


    def pieceDropped(self):
        '''after dropping shape, remove full lines and create new shape'''
        # 將方塊的形狀新增到self.board中,非0代表該處有方塊
        for i in range(4):
            # 獲取每個小方塊的座標
            x = self.curX + self.curPiece.x(i)
            y = self.curY - self.curPiece.y(i)
            self.setShapeAt(x, y, self.curPiece.shape())
        # 移除滿行的方塊
        self.removeFullLines()
        # self.isWaitingAfterLine表示是否在等待消除行,如果不在等待就新建一個方塊
        if not self.isWaitingAfterLine:
            self.newPiece()

    # 如果方塊碰到了底部,就呼叫removeFullLines()方法,找到所有能消除的行消除它們。
    # 消除的具體動作就是把符合條件的行消除掉之後,再把它上面的行下降一行。
    # 注意移除滿行的動作是倒著來的,因為我們是按照重力來表現遊戲的,如果不這樣就有可能出現有些方塊浮在空中的現象
    def removeFullLines(self):
        '''removes all full lines from the board'''

        numFullLines = 0    # 記錄消除的行數
        rowsToRemove = []   # 要消除的行列表

        for i in range(Board.BoardHeight):  # 遍歷每一行

            n = 0
            for j in range(Board.BoardWidth): # 遍歷整行的方塊
                # 如果self.board裡面的值不為空,計數
                if not self.shapeAt(j, i) == Tetrominoe.NoShape:
                    n = n + 1
            # 如果整行都有方塊,將要消除的行新增進陣列中
            if n == Board.BoardWidth:   # 原文是 n == 10,但我覺得該成n == Board.BoardWidth會更嚴謹一點
                rowsToRemove.append(i)
        # 因為是從上往下遍歷,所以要倒過來消除,否則會出現方塊懸空的情況
        # 當然,也可以在遍歷的時候這樣遍歷:for m in rowsToRemove[-1:0]
        rowsToRemove.reverse()

        for m in rowsToRemove:
            # self.shapeAt(l, k + 1)獲取要消除的行的上一行的方塊形狀,然後替換當前方塊的形狀
            for k in range(m, Board.BoardHeight):
                for l in range(Board.BoardWidth):
                        self.setShapeAt(l, k, self.shapeAt(l, k + 1))

        # 更新已經消除的行數
        # numFullLines = numFullLines + len(rowsToRemove)
        # 還可以改成這樣,如果連續消除,則分數翻倍。
        numFullLines = numFullLines + int(math.pow(2, len(rowsToRemove))) - 1

        if numFullLines > 0:
            # 更新分數
            self.numLinesRemoved = self.numLinesRemoved + numFullLines
            self.msg2Statusbar.emit(str(self.numLinesRemoved))  # 改變狀態列分數的值
            # 在消除後還要將當前方塊形狀設定為空,然後重新整理介面
            self.isWaitingAfterLine = True
            self.curPiece.setShape(Tetrominoe.NoShape)
            self.update()

    # newPiece()方法是用來建立形狀隨機的方塊。如果隨機的方塊不能正確的出現在預設的位置,遊戲結束。
    def newPiece(self):
        '''creates a new shape'''

        self.curPiece = Shape() # 建立了一個Shape物件
        self.curPiece.setRandomShape()  # 設定了一個隨機的形狀
        self.curX = Board.BoardWidth // 2 + 1   # 以介面中心為起點
        self.curY = Board.BoardHeight - 1 + self.curPiece.minY() # 從這裡看應該是預留了一行的高度,但不知道作用是什麼
        # 判斷是否還有空位,如果沒有
        if not self.tryMove(self.curPiece, self.curX, self.curY):
            # 將當前形狀設定為空
            self.curPiece.setShape(Tetrominoe.NoShape)
            self.timer.stop()   # 停止計時
            self.isStarted = False  # 將開始狀態設定為False
            self.msg2Statusbar.emit(f"Game over, your socre is {self.numLinesRemoved}") # 狀態列顯示遊戲結束


    # tryMove()是嘗試移動方塊的方法。
    # 如果方塊已經到達board的邊緣或者遇到了其他方塊,就返回False。否則就把方塊下落到想要的位置
    def tryMove(self, newPiece, newX, newY):
        '''tries to move a shape'''

        for i in range(4):
            # newPiece是一個Shape物件,newX,newY相當於座標原點(相對於方塊而言)
            x = newX + newPiece.x(i)    # 得到每個小方塊在介面上的座標
            y = newY - newPiece.y(i)
            # 超出邊界則返回False
            if x < 0 or x >= Board.BoardWidth or y < 0 or y >= Board.BoardHeight:
                return False
            # 如果方塊位置不為0,說明已經用過了,不允許使用,返回False
            if self.shapeAt(x, y) != Tetrominoe.NoShape:
                return False

        self.curPiece = newPiece    # 更新當前的方塊形狀
        self.curX = newX    # 更新當前的座標
        self.curY = newY
        self.update()   # 更新視窗,同時呼叫paintEvent()函數

        return True


    def drawSquare(self, painter, x, y, shape):
        '''draws a square of a shape'''

        colorTable = [0x000000, 0xCC6666, 0x66CC66, 0x6666CC,
                      0xCCCC66, 0xCC66CC, 0x66CCCC, 0xDAAA00]
        # 為每種形狀的方塊設定不同的顏色
        color = QColor(colorTable[shape])
        # 引數分別為x,y,w,h,color,填充了顏色
        painter.fillRect(x + 1, y + 1, self.squareWidth() - 2,
            self.squareHeight() - 2, color)

        painter.setPen(color.lighter())
        # 畫線,從起始座標到終點座標,-1是為了留一點空格,看起來更有立體感
        painter.drawLine(x, y + self.squareHeight() - 1, x, y) # 左邊那條線
        painter.drawLine(x, y, x + self.squareWidth() - 1, y)   # 上邊那條線
        # 換了畫筆的樣式,同樣是為了讓圖案看起來更有立體感
        painter.setPen(color.darker())
        painter.drawLine(x + 1, y + self.squareHeight() - 1,
            x + self.squareWidth() - 1, y + self.squareHeight() - 1)    # 下邊那條線
        painter.drawLine(x + self.squareWidth() - 1,
            y + self.squareHeight() - 1, x + self.squareWidth() - 1, y + 1) # 右邊那條線

# Tetrominoe類儲存了所有方塊的形狀。我們還定義了一個NoShape的空形狀。
class Tetrominoe(object):
    # 和Shape類裡的coordsTable陣列一一對應
    NoShape = 0
    ZShape = 1
    SShape = 2
    LineShape = 3
    TShape = 4
    SquareShape = 5
    LShape = 6
    MirroredLShape = 7

# Shape類儲存類方塊內部的資訊。
class Shape(object):
    # coordsTable元組儲存了所有的方塊形狀的組成。是一個構成方塊的座標模版。
    coordsTable = (
        ((0, 0),     (0, 0),     (0, 0),     (0, 0)),   # 空方塊
        ((0, -1),    (0, 0),     (-1, 0),    (-1, 1)),
        ((0, -1),    (0, 0),     (1, 0),     (1, 1)),
        ((0, -1),    (0, 0),     (0, 1),     (0, 2)),
        ((-1, 0),    (0, 0),     (1, 0),     (0, 1)),
        ((0, 0),     (1, 0),     (0, 1),     (1, 1)),
        ((-1, -1),   (0, -1),    (0, 0),     (0, 1)),
        ((1, -1),    (0, -1),    (0, 0),     (0, 1))
    )

    def __init__(self):
        # 下面建立了一個新的空座標陣列,這個陣列將用來儲存方塊的座標。
        self.coords = [[0,0] for i in range(4)]     # 4x4的二維陣列,每個元素代表方塊的左上角座標
        self.pieceShape = Tetrominoe.NoShape    # 方塊形狀,初始形狀為空白

        self.setShape(Tetrominoe.NoShape)

    # 返回當前方塊形狀
    def shape(self):
        '''returns shape'''

        return self.pieceShape

    # 設定方塊形狀
    def setShape(self, shape):  # 初始shape為0
        '''sets a shape'''

        table = Shape.coordsTable[shape]    # 從形狀列表裡取出其中一個方塊的形狀,為一個4x2的陣列

        for i in range(4):
            for j in range(2):
                self.coords[i][j] = table[i][j] # 賦給要使用的方塊元素

        self.pieceShape = shape # 再次獲取形狀(index)

    # 設定一個隨機的方塊形狀
    def setRandomShape(self):
        '''chooses a random shape'''

        self.setShape(random.randint(1, 7))

    # 小方塊的x座標,index代表第幾個方塊
    def x(self, index):
        '''returns x coordinate'''

        return self.coords[index][0]

    # 小方塊的y座標
    def y(self, index):
        '''returns y coordinate'''

        return self.coords[index][1]

    # 設定小方塊的x座標
    def setX(self, index, x):
        '''sets x coordinate'''

        self.coords[index][0] = x

    # 設定小方塊的y座標
    def setY(self, index, y):
        '''sets y coordinate'''

        self.coords[index][1] = y

    # 找出方塊形狀中位於最左邊的方塊的x座標
    def minX(self):
        '''returns min x value'''

        m = self.coords[0][0]
        for i in range(4):
            m = min(m, self.coords[i][0])

        return m

    # 找出方塊形狀中位於最右邊的方塊的x座標
    def maxX(self):
        '''returns max x value'''

        m = self.coords[0][0]
        for i in range(4):
            m = max(m, self.coords[i][0])

        return m

    # 找出方塊形狀中位於最左邊的方塊的y座標
    def minY(self):
        '''returns min y value'''

        m = self.coords[0][1]
        for i in range(4):
            m = min(m, self.coords[i][1])

        return m

    # 找出方塊形狀中位於最右邊的方塊的y座標
    def maxY(self):
        '''returns max y value'''

        m = self.coords[0][1]
        for i in range(4):
            m = max(m, self.coords[i][1])

        return m

    # rotateLeft()方法向右旋轉一個方塊。正方形的方塊就沒必要旋轉,就直接返回了。
    # 其他的是返回一個新的,能表示這個形狀旋轉了的座標。
    def rotateLeft(self):
        '''rotates shape to the left'''
        # 正方形沒有必要旋轉
        if self.pieceShape == Tetrominoe.SquareShape:
            return self
        # 獲取當前的方塊形狀
        result = Shape()
        result.pieceShape = self.pieceShape
        # 向左旋轉,相當將座標軸向左旋轉了,和原來的座標軸想比 (x,y) -> (y,-x)
        for i in range(4):  # i代表第幾個小方塊
            result.setX(i, self.y(i))   # 設定第i個方塊的x座標,
            result.setY(i, -self.x(i))  # 設定第i個方塊的x座標

        return result

    # 向右旋轉,同理,(x,y) -> (-y,x)
    def rotateRight(self):
        '''rotates shape to the right'''

        if self.pieceShape == Tetrominoe.SquareShape:
            return self

        result = Shape()
        result.pieceShape = self.pieceShape

        for i in range(4):
            result.setX(i, -self.y(i))
            result.setY(i, self.x(i))

        return result


if __name__ == '__main__':

    app = QApplication([])
    tetris = Tetris()
    sys.exit(app.exec_())
八、總結
俄羅斯方塊雖然是一個比較簡單的遊戲,但是從這一個簡單的遊戲中就能看出很多程式設計的思想。包括數學建模,將介面看成一個二維的座標軸,座標軸單位其實是一個小方塊,這樣看起來會更直觀一點,且也能固定方塊的大小,而不會因為視窗大小的改變而留下一大片空白,在具體的介面展示時再計算實際的座標。
將每個形狀的方塊都抽象為一個個座標,存放到陣列中,同時用一個陣列來儲存已經到達底部的方塊,每次重新整理後根據這個陣列重新繪製介面。