東拼西湊學java
前言
隨著大環境的影響,網際網路寒冬降臨,程式設計師的日子越來越難,搞不好哪天就被噶了,多學點東西也沒啥壞處,國內市場java如日中天,出門在外不會寫兩行java程式碼,都不好意思說自己是程式設計師,偽裝成一個萌新運維,混跡於各大java群,偷師學藝,略有所獲,水一篇部落格以記之
本部落格僅僅代表作者個人看法,以.Net視角來對比,不存在語言好壞之分,不足之處,歡迎拍磚,以免誤人子弟,java大佬有興趣可以帶我一jio,探討學習,懂的都懂
特殊用語 --> 懂的都懂 形容一些心照不宣的事情,可自行百度谷歌....
環境準備
JDK 1.8
IDEA
Maven 需設定阿里的源
工程結構
.net裡工程結構大致如下:
|---解決方案
    |---專案A
    |---專案B
    |---專案C

java裡工程結構
|---專案
    |---模組A
    |---模組B
    |---模組C
- 我們先建立一個空模板專案 檔案->新建專案-->Empty Project 指定專案名稱以及專案路徑即可
- 在該專案路徑下,建立對應的模組,比較常用的是Spring,Spring Initializr Maven,這個跟.net類似
starter 中介軟體
starter 是springboot裡提出的一個概念,場景啟動器,把一些常用的依賴聚合打包,方便使用者直接在專案中使用,簡化了開發,在.net裡就是中介軟體了,一個意思
官方解釋
Starters are a set of convenient dependency descriptors that you can include in your application.
You get a one-stop shop for all the Spring and related technologies that you need without having to hunt through sample code and copy-paste loads of dependency descriptors.
For example, if you want to get started using Spring and JPA for database access, include the spring-boot-starter-data-jpa dependency in your project.
spring生態是毋庸置疑的,開發常用的中介軟體,spring都整理好了,可以去官網直接查閱,懂的都懂
建立一個自定義的starter
-
新建一個模組,選擇Maven模組,給模組取個名字 hello-spring-boot-starter, 取名字要遵循starter的規範,望文知意
-
再建立一個模組,選擇Spring Initializr模組,給模組取個名字 hello-spring-boot-starter-autoconfigure,用於給starter編寫裝配資訊,這樣spring就能根據約定,自動裝配,hello-spring-boot-starter 依賴於 hello-spring-boot-starter-autoconfigure,當然瞭如果嫌麻煩,直接在 hello-spring-boot-starter 裡寫裝配資訊也可以,這個跟.net裡類似,懂的都懂
-
java專案起手式,在src/main/java,建立包路徑,通常為公司域名,com.xxx.xxx,我這裡定義為com.liang.hello
1.在com.liang.hello下,定義三個包
    autoConfig  用於編寫裝配資訊,生成物件,spring將這些物件新增到IOC容器
    bean        用於對映組態檔,將application.yaml裡的設定對映為實體類(javabean)
    service     用於編寫中介軟體的業務程式碼,需要使用到設定資訊的實體類
2.在bean包下,建立HelloProperties 檔案,我定義了兩個屬性,和一個Student物件
    package com.liang.hello.bean;

    import org.springframework.boot.context.properties.ConfigurationProperties;

    /**
    * @ConfigurationProperties("hello")是springboot提供讀取組態檔的一個註解
    *  1)讓當前類的屬性和組態檔中以 hello開頭的設定進行繫結
    *  2)以 hello為字首在組態檔中讀取/修改當前類中的屬性值
    */
    @ConfigurationProperties("hello")
    public class HelloProperties {

        private String prefix;
        private String suffix;
        private Student student;

        public String getPrefix() {
            return prefix;
        }

        public void setPrefix(String prefix) {
            this.prefix = prefix;
        }

        public String getSuffix() {
            return suffix;
        }

        public void setSuffix(String suffix) {
            this.suffix = suffix;
        }

        public Student getStudent() {
            return student;
        }

        public void setStudent(Student student) {
            this.student = student;
        }
    }
    package com.liang.hello.bean;

    public class Student {
        private String name;
        private String age;

        public String getName() {
            return name;
        }

        public void setName(String name) {
            this.name = name;
        }

        public String getAge() {
            return age;
        }

        public void setAge(String age) {
            this.age = age;
        }
    }
3.在service包下,定義一個介面,跟一個實現類,簡單的輸出組態檔的資訊
    package com.liang.hello.service;
    public interface BaseService {
        String sayMsg(String msg);
    }
    package com.liang.hello.service;

    import com.liang.hello.bean.HelloProperties;
    import org.springframework.beans.factory.annotation.Autowired;

    public class HelloService implements BaseService{

        @Autowired
        private HelloProperties helloProperties;


        public String sayMsg(String msg)
        {
            return helloProperties.getPrefix()+": "+msg+">> "+helloProperties.getSuffix() + helloProperties.getStudent().getName() + helloProperties.getStudent().getAge();
        }
    }
4.在autoConfig包下,產生一個bean物件,丟給spring ioc,要標記這個類為一個設定類
    package com.liang.hello.autoConfig;

    import com.liang.hello.bean.HelloProperties;
    import com.liang.hello.service.BaseService;
    import com.liang.hello.service.HelloService;
    import org.springframework.boot.autoconfigure.condition.ConditionalOnMissingBean;
    import org.springframework.boot.context.properties.EnableConfigurationProperties;
    import org.springframework.context.annotation.Bean;
    import org.springframework.context.annotation.Configuration;

    @Configuration //標識設定類
    @EnableConfigurationProperties(HelloProperties.class)//開啟屬性繫結功能+預設將HelloProperties放在容器中
    public class HelloAutoConfiguration {

        /**
        * @Bean註解用於告訴方法,產生一個Bean物件,然後這個Bean物件交給Spring管理。
        * 產生這個Bean物件的方法Spring只會呼叫一次,隨後這個Spring將會將這個Bean物件放在自己的IOC容器中;
        *
        * @ConditionalOnMissingBean(HelloService.class)
        * 條件裝配:容器中沒有HelloService這個類時標註的方法才生效 / 建立一個HelloService類
        */
        @Bean
        @ConditionalOnMissingBean(HelloService.class)
        public BaseService helloService()
        {
            BaseService helloService = new HelloService();
            return helloService;
        }
    }
- 前面都非常簡單,就是自己生成了一個物件,然後交給spring ioc管理,接下來就是告訴spring 如何尋找到HelloAutoConfiguration
5.在resources/META-INF 下,建立spring.factories 檔案,告訴你設定類的位置,srping會掃描包裡這個檔案,然後執行裝配
    # Auto Configure
    org.springframework.boot.autoconfigure.EnableAutoConfiguration=com.liang.hello.autoConfig.HelloAutoConfiguration
這樣一個簡單的starter就寫好了,使用maven構建一下,並推播到本地倉庫,maven類似於nuget,懂的都懂,現在去建立一個測試專案,來測試一下
6.新建模組,選擇Spring Initializr模組,給模組取個名字 hello-spring-boot-starter-test,在pom.xml裡新增依賴
        <dependency>
            <groupId>org.springframework.boot</groupId>
            <artifactId>spring-boot-starter-web</artifactId>
        </dependency>
        <dependency>
            <groupId>org.springframework.boot</groupId>
            <artifactId>spring-boot-starter-test</artifactId>
            <scope>test</scope>
        </dependency>
        <dependency>
            <groupId>com.liang</groupId>
            <artifactId>hello-spring-boot-starter</artifactId>
            <version>1.0-SNAPSHOT</version>
        </dependency>
7.java專案起手式,在src/main/java,建立包路徑,定義為com.liang.hello
在resources下,定義application.yaml組態檔
    hello:
      prefix: 你好!
      suffix: 666 and 888
      student:
        name: 雪佬
        age: 18

    server:
      port: 8080
      servlet:
        context-path: /
8.在com.liang.hello下,定義controller包,用於webapi的控制器
定義一個HelloController類,編寫一個簡單的webapi,來測試自定義的starter,DataResponse是我自定義的一個統一返回類
        @Autowired
        BaseService helloService;

        @ResponseBody
        @GetMapping("/hello") //處理get請求方式的/hello請求路徑
        public DataResponse sayHello()   //處理方法
        {
            String s = helloService.sayMsg("test666777888");
            return  DataResponse.Success(s,"");
        }
- java語法懂的都懂,由於函數沒有可選引數,所以需要寫很多過載方法
    package com.liang.hello.common;

    import lombok.Builder;
    import lombok.ToString;

    @Builder
    @ToString
    public class DataResponse {
        /**
        * 響應碼
        */
        public String Code;
        /**
        * 返回的資料
        */
        public Object Data;

        /**
        * 訊息
        */
        public String Message;


        public DataResponse(String code,Object data,String message){
            Code = code;
            Data = data;
            Message = message;
        }


        public static DataResponse Error() {
            return DataResponse.builder().Code("-1").build();
        }
        public static DataResponse Error(Object data) {
            return DataResponse.builder().Code("-1").Data(data).build();
        }
        public static DataResponse Error(String message) {
            return DataResponse.builder().Code("-1").Message(message).build();
        }
        public static DataResponse Error(Object data,String message) {
            return DataResponse.builder().Code("-1").Data(data).Message(message).build();
        }


        public static DataResponse Success() {
            return DataResponse.builder().Code("0").build();
        }
        public static DataResponse Success(Object data) {
            return DataResponse.builder().Code("0").Data(data).build();
        }
        public static DataResponse Success(String message) {
            return DataResponse.builder().Code("0").Message(message).build();
        }
        public static DataResponse Success(Object data,String message) {
            return DataResponse.builder().Code("0").Data(data).Message(message).build();
        }

    }
弄到這裡starter就結束了嘛,顯然事情沒有這麼簡單,既然用到了spring的自動裝配,那我們不妨往深處再挖一挖,沒準有意外收穫哦
前面我們已經建立了HelloService,那再建立一個TestService,同樣繼承BaseService,然後HelloAutoConfiguration類下,在寫一個testService的bean,測試一下一個介面多個實現,如何獲取指定的範例
非常神奇,spring會自動匹配,根據變數名稱,自動匹配bean,點選左側spring的綠色小圖示(類似於斷點圖示),還能自動跳轉到bean的實現,不要問,問就是牛逼,懂的都懂
現在我們已經在starter裡建立了2個bean,如果有N個bean,每個bean都要去HelloAutoConfiguration類下寫裝配,真是太麻煩了,這個時候,就可以使用到spring的自動裝配註解,只用在testService類上,加一個@Service的註解,就搞定了,簡單方便,連spring.factories都不用寫,在.net裡的DI框架目前還沒有統一,有內建的,用的比較多的是autofac,還有自研的DI框架,都大同小異
專案結構

springboot
springboot現在已經是java web開發的主流了,通常我們用.net core來之對標,他們誕生的初衷完全不一樣,springboot是整合自身的生態,化繁為簡,starter就是非常具有代表性的特性之一,.net core是一套跨平臺方案,誕生之初就是為了跨平臺,本身就非常簡潔,易用性也非常高,開發者往裡面新增所需的中介軟體即可,它的關注點始終圍繞框架的簡潔與效能

選擇springboot腳手架專案,會自動建立一個啟動檔案HelloSpringBootStarterTestApplication 裡面有一個@SpringBootApplication的組合註解,想了解的可以去翻閱java八股文,這裡我加了一個@EntityScan("com.liang.hello")註解,用於自動掃描該包下的bean,並完成裝配

控制器類上,要加@RestController 註解,這也是一個組合註解,然後在方法上加@ResponseBody註解,用於返回json型別,指定方法對映的路由,就可以了,如果想做mvc專案,還需要下載模板引擎的依賴,修改返回型別,指向一個檢視,略微麻煩些

aop
- 建立完springboot webapi模組,我們需要新增一個切面,用於記錄請求的資訊
java裡分為過濾器與攔截器,過濾器依賴與servlet容器,攔截器是Spring容器的功能,本質上都是aop思想的實現
.net core裡內建了各種過濾器,方便我們直接使用,攔截器則使用的比較少
1.老步驟,新增maven依賴
        <dependency>
            <groupId>org.aspectj</groupId>
            <artifactId>aspectjweaver</artifactId>
            <version>1.9.9.1</version>
        </dependency>
- 定義一個SpringBootAspect的類,用於AOP攔截,先定義一個切入點,再定義切面處理邏輯,這裡主要定義一個控制器全域性例外處理
        @Aspect
        @Component
        public class SpringBootAspect {

            /**
            * 定義一個切入點
            */
            @Pointcut(value="execution(* com.liang.hello.controller.*.*(..))")
            public void aop(){}

            @Around("aop()")
            public Object around(ProceedingJoinPoint invocation) throws Throwable{
                Object res = null;
                System.out.println("SpringBootAspect..環繞通知 Before");
                try {

                    res = invocation.proceed();
                }catch (Throwable throwable){
                    //修改內容
                    System.out.println("頁面執行錯誤,懂的都懂");
                    res = new DataResponse("500",null,"頁面執行錯誤");
                }
                System.out.println("SpringBootAspect..環繞通知 After");
                return res;
            }

        }
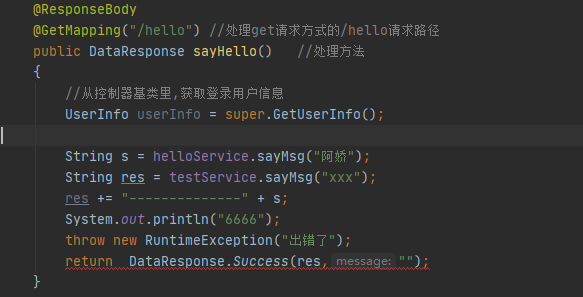
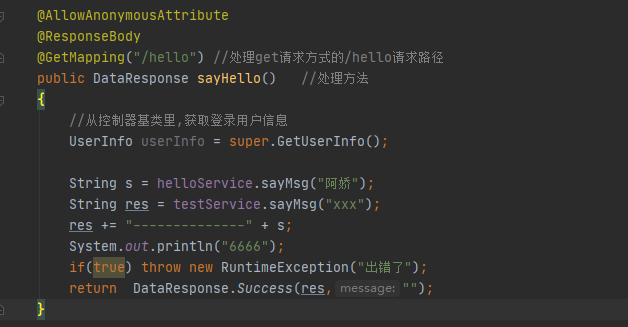
ide提示異常,java規定,結束語句後面,不允許有程式碼,他們認為編譯器不執行的程式碼是垃圾程式碼,呔,java語法懂的都懂,略施小計,成功的騙過了ide
- 執行結果

定時任務
- 定時任務是工作中使用非常頻繁的部分,也有很多框架,但是一些簡單的內建任務,使用框架就有點殺雞用牛刀了,.net裡我們通常用HostedService來實現,springboot內建了定時任務
1.建立一個ScheduledTasks類,使用註解開啟非同步,HelloSpringBootStarterTestApplication類也要開啟哦,程式碼如下
    @EnableAsync
    @Component
    public class ScheduledTasks {
        private static final SimpleDateFormat dateFormat = new SimpleDateFormat("HH:mm:ss");

        /**
        * 任務排程,每隔1秒執行一次
        */
        @Async
        @Scheduled(fixedRate = 1000)
        public void reportCurrentTime() {

            runThreadTest(1);

        }

        public void runThreadTest(int i) {
            try {
                Thread.sleep(3000);
            } catch (InterruptedException e) {
                e.printStackTrace();
            }
            System.out.println("執行緒"+Thread.currentThread().getName()+"執行非同步任務"+i + "現在時間:" + dateFormat.format(new Date()));

        }
    }

- runThreadTest方法,堵塞3秒,模擬業務執行耗時,發現定開啟了非同步,但是它依舊是同步執行,需要等上一個任務執行完畢,才會再執行下一個任務,網上翻了下答案,需要設定執行緒池,程式碼如下
    package com.liang.hello.config;


    import org.springframework.context.annotation.Bean;
    import org.springframework.context.annotation.Configuration;
    import org.springframework.scheduling.annotation.AsyncConfigurer;
    import org.springframework.scheduling.concurrent.ThreadPoolTaskExecutor;

    import java.util.concurrent.Executor;

    @Configuration
    public class ExecutorConfig implements AsyncConfigurer {

        // ThredPoolTaskExcutor的處理流程
        // 當池子大小小於corePoolSize,就新建執行緒,並處理請求
        // 當池子大小等於corePoolSize,把請求放入workQueue中,池子裡的空閒執行緒就去workQueue中取任務並處理
        // 當workQueue放不下任務時,就新建執行緒入池,並處理請求,
        // 如果池子大小撐到了maximumPoolSize,就用RejectedExecutionHandler來做拒絕處理
        // 當池子的執行緒數大於corePoolSize時,多餘的執行緒會等待keepAliveTime長時間,如果無請求可處理就自行銷燬
        //getAsyncExecutor:自定義執行緒池,若不重寫會使用預設的執行緒池。
        @Override
        @Bean
        public Executor getAsyncExecutor() {
            ThreadPoolTaskExecutor threadPool = new ThreadPoolTaskExecutor();
            //設定核心執行緒數
            threadPool.setCorePoolSize(10);
            //設定最大執行緒數
            threadPool.setMaxPoolSize(20);
            //執行緒池所使用的緩衝佇列
            threadPool.setQueueCapacity(10);
            //等待任務在關機時完成--表明等待所有執行緒執行完
            threadPool.setWaitForTasksToCompleteOnShutdown(true);
            // 等待時間 (預設為0,此時立即停止),並沒等待xx秒後強制停止
            threadPool.setAwaitTerminationSeconds(60);
            // 執行緒名稱字首
            threadPool.setThreadNamePrefix("ThreadPoolTaskExecutor-");

            // 初始化執行緒
            threadPool.initialize();
            return threadPool;
        }
    }
執行結果

mybatis plus
- 目前java主流的ORM框架,應該是mybatis了,我是不怎麼喜歡在xml裡組織sql的,麻煩的一批,但是也避免了萌新為圖方便,sql寫的到處都是,維護起來懂的都懂,網上隨便翻個答案,直接往專案裡整合
1.老樣子先新增依賴
        <!--mybatis-plus的springboot支援-->
        <dependency>
            <groupId>com.baomidou</groupId>
            <artifactId>mybatis-plus-boot-starter</artifactId>
            <version>3.4.3.1</version>
        </dependency>
        <!--mysql驅動-->
        <dependency>
            <groupId>mysql</groupId>
            <artifactId>mysql-connector-java</artifactId>
            <scope>runtime</scope>
        </dependency>
        <dependency>
            <groupId>com.baomidou</groupId>
            <artifactId>mybatis-plus-core</artifactId>
            <version>3.4.3.1</version>
        </dependency>
2.然後在yaml檔案裡新增mysql與mybatis plus的設定
    spring:
        datasource:
            driver-class-name: com.mysql.cj.jdbc.Driver
            url: jdbc:mysql://************:3306/test_mybatis?serverTimezone=Asia/Shanghai&useUnicode=true&characterEncoding=utf-8&zeroDateTimeBehavior=convertToNull&useSSL=false&allowPublicKeyRetrieval=true
            username: root
            password: ******
        jackson:
            date-format: yyyy-MM-dd HH:mm:ss
            time-zone: GMT+8
            serialization:
            write-dates-as-timestamps: false

        mybatis-plus:
        configuration:
            map-underscore-to-camel-case: false
            auto-mapping-behavior: full
            log-impl: org.apache.ibatis.logging.stdout.StdOutImpl
        mapper-locations: classpath:mapper/*.xml
        global-config:
            # 邏輯刪除設定
            db-config:
            # 刪除前
            logic-not-delete-value: 1
            # 刪除後
            logic-delete-value: 0
3.再整一個mybatis plus的設定類,新增mybatis plus的攔截器,反正也是網上抄的,我猜測大致是這個意思
    package com.liang.hello.config;

    import com.baomidou.mybatisplus.annotation.DbType;
    import com.baomidou.mybatisplus.extension.plugins.MybatisPlusInterceptor;
    import com.baomidou.mybatisplus.extension.plugins.inner.PaginationInnerInterceptor;
    import org.springframework.context.annotation.Bean;
    import org.springframework.context.annotation.Configuration;

    @Configuration
    public class MybatisPlusConfig {
        @Bean
        public MybatisPlusInterceptor mybatisPlusInterceptor() {
            MybatisPlusInterceptor interceptor = new MybatisPlusInterceptor();
            interceptor.addInnerInterceptor(new PaginationInnerInterceptor(DbType.MYSQL));
            return interceptor;
        }
    }
現在開始新增建立mybatis的相關目錄,網上都有,直接跟著抄就可以了,也非常好理解
4.定義一個mapper的包,在包下編寫mybatis的介面,我這裡用的是mybatis plus,已經預設實現了CRUD,我們簡單的寫幾個介面,用來測試
    package com.liang.hello.mapper;

    import com.baomidou.mybatisplus.core.conditions.Wrapper;
    import com.baomidou.mybatisplus.core.mapper.BaseMapper;
    import com.baomidou.mybatisplus.core.toolkit.Constants;
    import com.liang.hello.dto.OrderInfoResponse;
    import com.liang.hello.entity.UserInfo;
    import org.apache.ibatis.annotations.Mapper;
    import org.apache.ibatis.annotations.Param;
    import org.apache.ibatis.annotations.Select;
    import org.springframework.stereotype.Repository;
    import java.util.List;

    @Repository
    @Mapper
    //表明這是一個Mapper,也可以在啟動類上加上包掃描
    //Mapper 繼承該介面後,無需編寫 mapper.xml 檔案,即可獲得CRUD功能
    public interface UserInfoMapper extends BaseMapper<UserInfo> {

        @Select("select u.*,o.id as orderId,o.price from user_info u left join order_info o on u.id = o.userId ${ew.customSqlSegment}")
        List<OrderInfoResponse> getAll(@Param(Constants.WRAPPER) Wrapper wrapper);

        List<UserInfo> selectByName(@Param("UserName") String userName);

        void updateUserInfo(@Param("UserName") String userName,@Param("Age") int age);
    }
-
簡單的sql,mybatis plus也支援直接使用註解的方式來執行,簡單方便,引數是通過queryWrapper條件構造器來完成的,喜歡的同學可以重點了解一下,.net裡有linq,用過的同學懂的都懂
另外一個方式,就是通過制定mapper.xml來編寫sql,xml檔案路徑在組態檔裡制定,我們按照約定即可,在resources/mapper下,建立UserInfo.xml,名稱空間指向介面路徑,id對應介面的名稱,返回型別指向對應的實體
    <?xml version="1.0" encoding="UTF-8"?>
    <!DOCTYPE mapper PUBLIC "-//mybatis.org//DTD Mapper 3.0//EN" "<http://mybatis.org/dtd/mybatis-3-mapper.dtd>">
    <mapper namespace="com.com.liang.hello.mapper.UserInfoMapper">

        <select id="selectByName" resultType="com.liang.hello.entity.UserInfo">
            select * from user_info
            <where>
                <if test="UserName != null and UserName != ''">
                    UserName like CONCAT('%',#{UserName},'%');
                </if>
            </where>
        </select>

        <select id="updateUserInfo" resultType="com.liang.hello.entity.UserInfo">
            update user_info set Age=#{Age}
            <where>
                <if test="UserName != null and UserName != ''">
                    UserName = #{UserName};
                </if>
            </where>
        </select>
    </mapper>
mybatis xml語法可以去學習下,也不困難,簡單的看一遍就差不多了,複雜的部分用到的時候再去翻閱
5.定義一個service的包,在包下建立UserInfoServiceImpl,很熟悉的味道,經典的三層架構,在service層編寫業務邏輯,呼叫mapper介面的增刪改查方法,這裡重點說下事務
spring提供了事務的註解@Transactional,使用起來也非常方便,原理應該是藉助AOP來實現,使用這個註解前需要事先了解事務失效的場景,老八股文了,懂的都懂,在.net裡使用手動提交事務比較多,特意去了解搜了下手動提交事務,感覺差不多
    //修改年齡
    @Transactional
    public void update(UserInfo entity){
    //        TransactionStatus txStatus = transactionManager.getTransaction(new DefaultTransactionDefinition());
    //
    //        try {
    //            userInfoMapper.updateUserInfo(entity.getUserName(),entity.getAge());
    //            if(true) {
    //                throw new Exception("xx");
    //            }
    //            userInfoMapper.updateUserInfo(entity.getUserName(),entity.getAge()+1);
    //
    //        } catch (Exception e) {
    //            transactionManager.rollback(txStatus);
    //            e.printStackTrace();
    //        }finally {
    //            transactionManager.commit(txStatus);
    //        }


        //執行第一條sql
        userInfoMapper.updateUserInfo(entity.getUserName(),entity.getAge());
        if(true) throw new RuntimeException();
        //執行第二條sql
        userInfoMapper.updateUserInfo(entity.getUserName(),entity.getAge()+1);
    }
jwt
- 現在前後端分離已經成為主流,jwt是首選方案,話不多說,直接往裡面懟
1.老規矩,先新增jwt的依賴
        <dependency>
            <groupId>com.auth0</groupId>
            <artifactId>java-jwt</artifactId>
            <version>3.4.0</version>
        </dependency>
2.先定義一個工具類JwtUtils,用於jwt的一些常規操作,當看到verifyToken這個方法的時候,我就發現事情沒有那麼簡單
    package com.liang.hello.common;

    import com.auth0.jwt.JWT;
    import com.auth0.jwt.JWTVerifier;
    import com.auth0.jwt.algorithms.Algorithm;
    import com.auth0.jwt.exceptions.JWTDecodeException;
    import com.auth0.jwt.exceptions.TokenExpiredException;
    import com.auth0.jwt.interfaces.Claim;
    import com.auth0.jwt.interfaces.DecodedJWT;
    import org.springframework.util.StringUtils;

    import javax.servlet.http.HttpServletRequest;
    import java.io.UnsupportedEncodingException;
    import java.util.Date;
    import java.util.Enumeration;
    import java.util.HashMap;
    import java.util.Map;


    public class JwtUtils {
        // 過期時間 24 小時  60 * 24 * 60 * 1000
        private static final long EXPIRE_TIME = 60 * 60 * 1000;//60分鐘
        // 金鑰
        private static final String SECRET = "uxzc5ADbRigUDaY6pZFfWus2jZWLPH1";
        private static  String json="";

        /**
        * 生成 token
        */
        public static String createToken(String userId) {
            try {
                // 設定過期時間
                Date date = new Date(System.currentTimeMillis() + EXPIRE_TIME);
                // 私鑰和加密演演算法
                Algorithm algorithm = Algorithm.HMAC256(SECRET);
                // 設定頭部資訊
                Map<String, Object> header = new HashMap<>(2);
                header.put("Type", "Jwt");
                header.put("alg", "HS256");

                // 返回token字串 附帶userId資訊
                return JWT.create()
                        .withHeader(header)
                        .withClaim("userId", userId)
                        //到期時間
                        .withExpiresAt(date)
                        //建立一個新的JWT,並使用給定的演演算法進行標記
                        .sign(algorithm);

            } catch (Exception e) {
                return null;
            }
        }

        /**
        * 校驗 token 是否正確
        */
        public static Map<String, Claim> verifyToken(String token){
            token = token.replace("Bearer ","");
            DecodedJWT jwt = null;
            try {
                JWTVerifier verifier = JWT.require(Algorithm.HMAC256(SECRET)).build();
                jwt = verifier.verify(token);

            } catch (TokenExpiredException e) {
                //效驗失敗
                //這裡丟擲的異常是我自定義的一個異常,你也可以寫成別的
                throw new TokenExpiredException("token校驗失敗");
            }
            return jwt.getClaims();
        }

        /**
        * 獲得token中的資訊
        */
        public static String getUserId(String token) {
            Map<String, Claim> claims = verifyToken(token);
            Claim user_id_claim = claims.get("userId");
            if (null == user_id_claim || StringUtils.isEmpty(user_id_claim.asString())) {
                return null;
            }
            return  user_id_claim.asString();
        }

    }
- 校驗token正確,從token中獲取資訊,在.net裡框架幫忙做了,使用起來非常簡單,emmmmm.....我覺得spring提供一個spring-boot-starter-jwt 很有必要
.net裡實現如下
            //認證引數
            services.AddAuthentication("Bearer")
                .AddJwtBearer(o =>
                {
                    o.TokenValidationParameters = new TokenValidationParameters
                    {
                        ValidateIssuerSigningKey = true,//是否驗證簽名,不驗證的話可以篡改資料,不安全
                        IssuerSigningKey = signingKey,//解密的金鑰
                        ValidateIssuer = true,//是否驗證發行人,就是驗證載荷中的Iss是否對應ValidIssuer引數
                        ValidIssuer = jwtOptions.Iss,//發行人
                        ValidateAudience = true,//是否驗證訂閱人,就是驗證載荷中的Aud是否對應ValidAudience引數
                        ValidAudience = jwtOptions.Aud,//訂閱人
                        ValidateLifetime = true,//是否驗證過期時間,過期了就拒絕存取
                        ClockSkew = TimeSpan.Zero,//這個是緩衝過期時間,也就是說,即使我們設定了過期時間,這裡也要考慮進去,過期時間+緩衝,預設好像是7分鐘,你可以直接設定為0
                        RequireExpirationTime = true,
                    };
                    o.Events = new JwtBearerEvents
                    {
                        //許可權驗證失敗後執行
                        OnChallenge = context =>
                        {
                            //終止預設的返回結果(必須有)
                            context.HandleResponse();
                            var result = JsonConvert.SerializeObject(new { code = "401", message = "驗證失敗" });
                            context.Response.ContentType = "application/json";
                            //驗證失敗返回401
                            context.Response.StatusCode = StatusCodes.Status200OK;
                            context.Response.WriteAsync(result);
                            return Task.FromResult(0);
                        }
                    };
                });
- 思路應該比較簡單,弄個攔截器,校驗一波jwt,完成認證,再通過jwt裡的userId校驗使用者是否擁有存取許可權,開幹
3.先整一個自定義的註解AllowAnonymousAttribute,允許匿名存取,標識這個註解可以作用於類和方法上
    package com.liang.hello.attribute;

    import java.lang.annotation.ElementType;
    import java.lang.annotation.Retention;
    import java.lang.annotation.RetentionPolicy;
    import java.lang.annotation.Target;

    @Target({ElementType.METHOD, ElementType.TYPE})
    @Retention(RetentionPolicy.RUNTIME)
    public @interface AllowAnonymousAttribute {
        boolean required() default true;
    }
- 編寫自定義攔截器,用於jwt的校驗,校驗通過,獲取使用者資訊並授權,這裡主要是獲取類跟方法有沒有使用自定義註解,HandlerInterceptorAdapter也提示已過期,不知道有沒有替代方案
    package com.liang.hello.filters;

    import com.auth0.jwt.interfaces.Claim;
    import com.liang.hello.attribute.AllowAnonymousAttribute;
    import com.liang.hello.common.JwtUtils;
    import com.liang.hello.entity.UserInfo;
    import com.liang.hello.service.UserInfoServiceImpl;
    import org.springframework.beans.factory.annotation.Autowired;
    import org.springframework.stereotype.Component;
    import org.springframework.web.method.HandlerMethod;
    import org.springframework.web.servlet.HandlerInterceptor;
    import org.springframework.web.servlet.ModelAndView;
    import org.springframework.web.servlet.handler.HandlerInterceptorAdapter;

    import javax.servlet.http.HttpServletRequest;
    import javax.servlet.http.HttpServletResponse;
    import java.lang.annotation.Annotation;
    import java.lang.reflect.Method;
    import java.security.SignatureException;
    import java.util.Map;

    @Component
    public class JwtFilter extends HandlerInterceptorAdapter {
        @Autowired
        UserInfoServiceImpl userInfoService;

        @Override
        public boolean preHandle(HttpServletRequest httpServletRequest, HttpServletResponse httpServletResponse, Object object) throws SignatureException {
            // 如果不是對映到方法直接通過
            if (!(object instanceof HandlerMethod)) {
                return true;
            }
            HandlerMethod handlerMethod = (HandlerMethod) object;
            AllowAnonymousAttribute actionAttribute= handlerMethod.getMethod().getDeclaredAnnotation(AllowAnonymousAttribute.class);
            AllowAnonymousAttribute controllerAttribute = handlerMethod.getBeanType().getDeclaredAnnotation(AllowAnonymousAttribute.class);

            if (actionAttribute!=null || controllerAttribute!=null) return true;
            //預設全部檢查
            System.out.println("被jwt攔截需要驗證");
            // 從請求頭中取出 token  這裡需要和前端約定好把jwt放到請求頭一個叫Authorization的地方,**<font color=red size=3>懂的都懂</font>**
            String token = httpServletRequest.getHeader("Authorization");
            // 執行認證
            if (token == null) {
                //這裡其實是登入失效,沒token了   這個錯誤也是我自定義的,讀者需要自己修改
                throw new SignatureException("自定義錯誤");
            }
            // 獲取 token 中的 user Id
            String userId = JwtUtils.getUserId(token);

            //找找看是否有這個user   因為我們需要檢查使用者是否存在,讀者可以自行修改邏輯
            UserInfo user = userInfoService.getUserInfoById(userId);

            if (user == null) {
                //這個錯誤也是我自定義的
                throw new SignatureException("自定義錯誤");
            }
            //放入attribute以便後面呼叫
            httpServletRequest.setAttribute("userName", user.getUserName());
            httpServletRequest.setAttribute("id", user.getId());
            httpServletRequest.setAttribute("age", user.getAge());
            return true;
        }

    }
4.註冊自定義攔截器,讓spring呼叫這個攔截器
    package com.liang.hello.config;

    import com.liang.hello.filters.JwtFilter;
    import org.springframework.context.annotation.Configuration;
    import org.springframework.web.servlet.config.annotation.InterceptorRegistry;
    import org.springframework.web.servlet.config.annotation.WebMvcConfigurer;

    import javax.annotation.Resource;

    @Configuration
    public class WebConfig implements WebMvcConfigurer {
        @Resource
        private JwtFilter jwtFilter ;
        @Override
        public void addInterceptors(InterceptorRegistry registry) {
            registry.addInterceptor(jwtFilter).addPathPatterns("/**");
        }
    }
例外處理
前面我們有使用過框架自定義的一些異常,TokenExpiredException,SignatureException,我們可以在SpringBootAspect裡處理這些異常,並給出友好提示
    @ExceptionHandler(value = {TokenExpiredException.class})
    public DataResponse tokenExpiredException(TokenExpiredException e){
        return new DataResponse("401",null,"許可權不足token失效");
    }

    @ExceptionHandler(value = {SignatureException.class})
    public DataResponse authorizationException(SignatureException e){
        return new DataResponse("401",null,"許可權不足");
    }
    //全域性異常,兜底方案
    @ExceptionHandler(value = {Exception.class})
    public DataResponse exception(Exception e){
        return new DataResponse("500",null,"系統錯誤");
    }
-
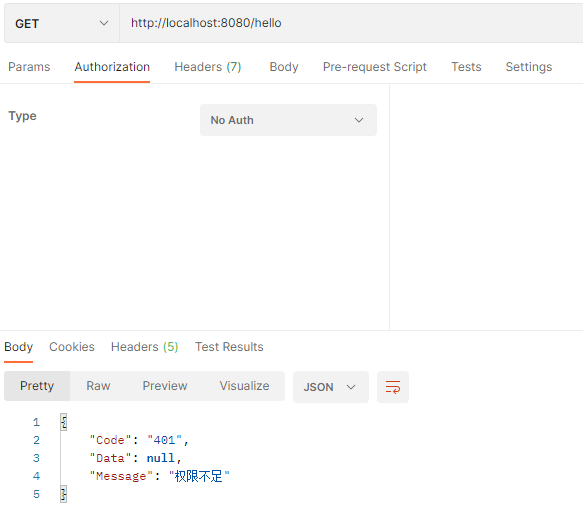
未登入存取需要授權介面
-
登入,使用錯誤的使用者名稱
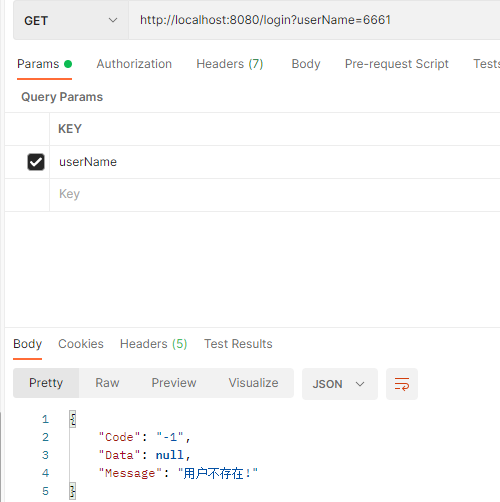
-
登入,使用正確的使用者名稱
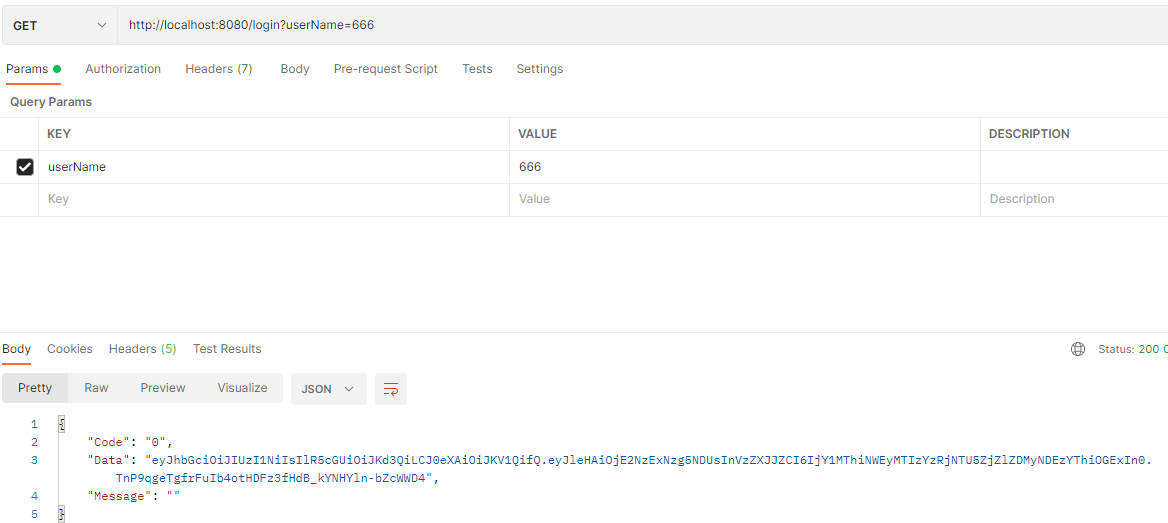
-
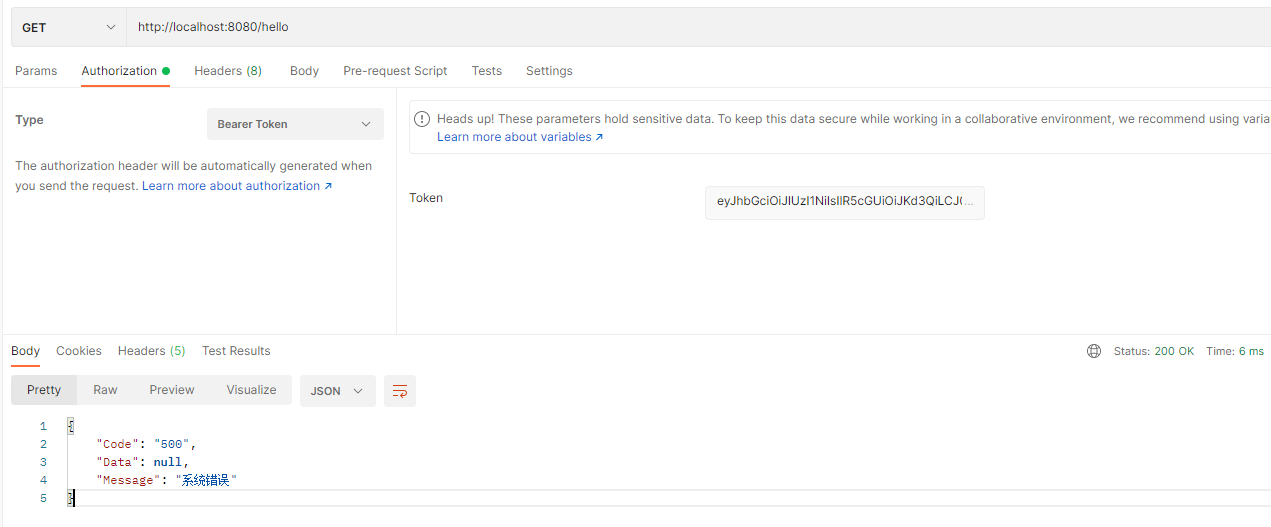
使用token,存取需要授權介面
主動丟擲異常
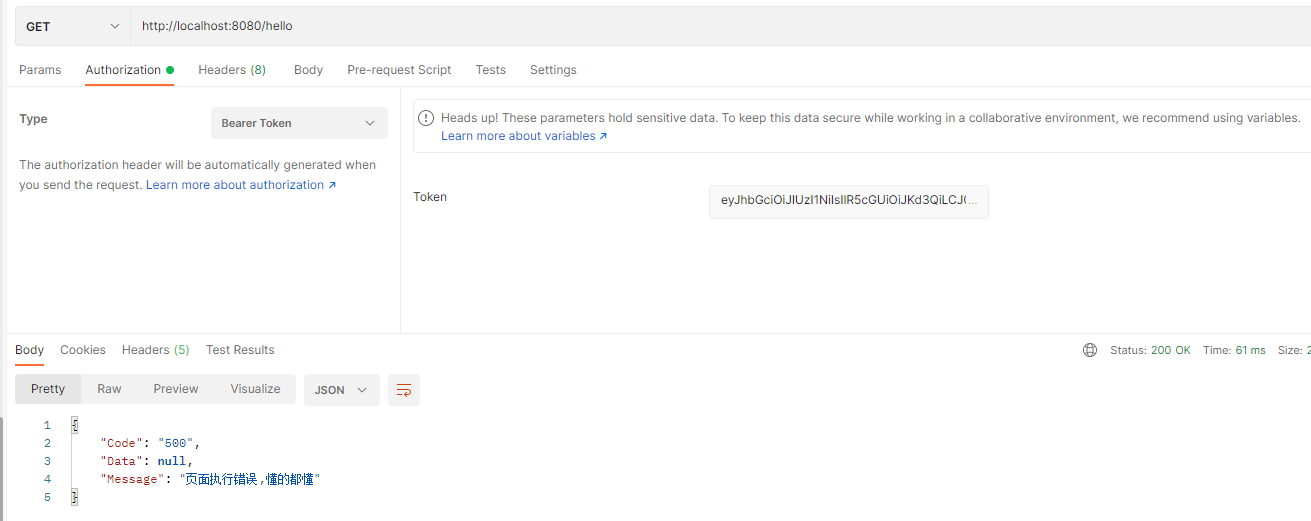
正常執行
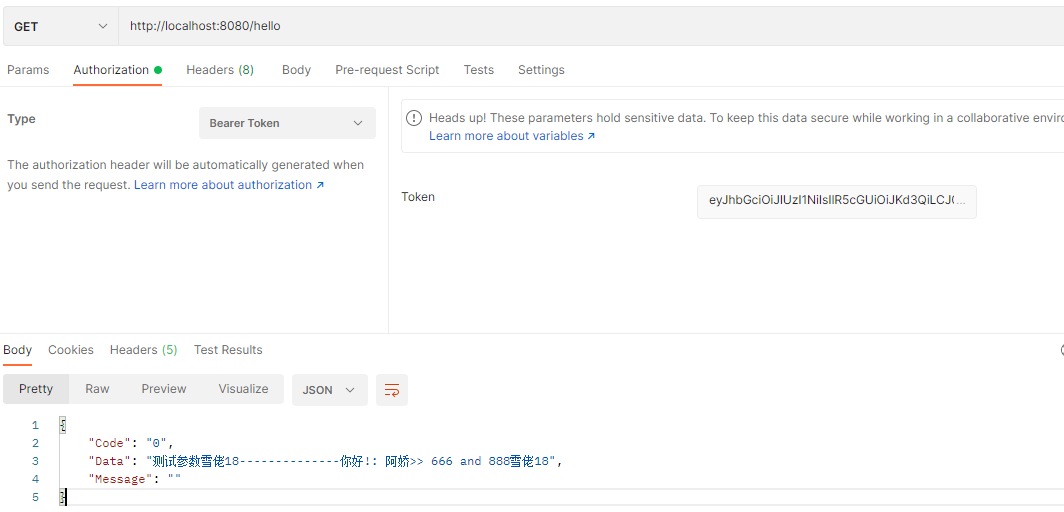
-
token過期,存取需要授權介面
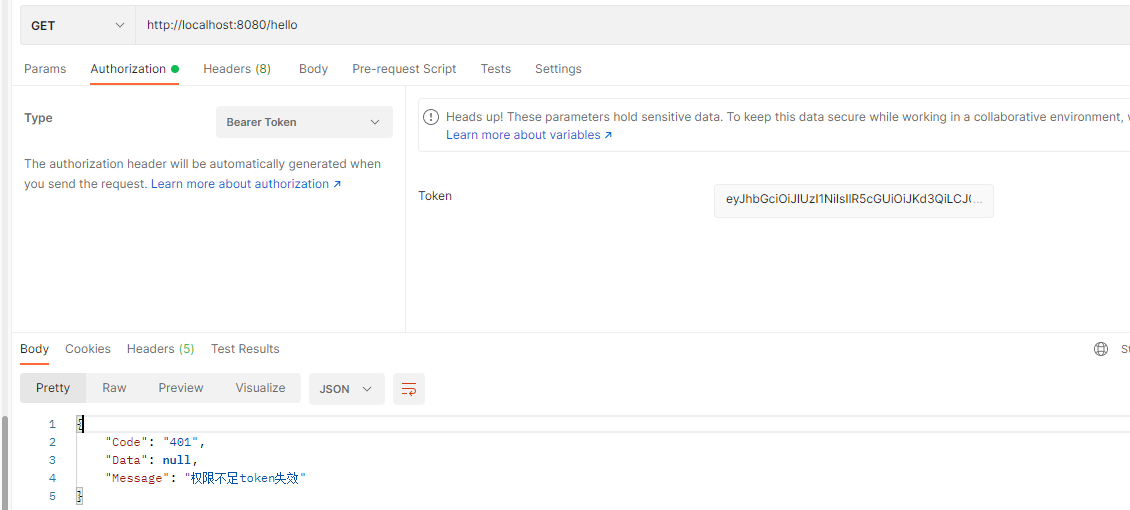
-
使用錯誤token,存取需要授權介面,因為沒有主動捕獲該異常,被全域性異常統一處理
