Flutter和Rust如何優雅的互動
前言
文章的圖片連結都是在github上,可能需要...你懂得;本文含有大量關鍵步驟設定圖片,強烈建議在合適環境下閱讀
Flutter直接呼叫C層還是蠻有魅力,想想你練習C++,然後直接能用flutter在上層展示出效果,是不是就有大量練手的機會了,邏輯反手就用C++,Rust去寫,給後面的接盤俠留下一座壯麗的克蘇魯神山,供其瞻仰
上面只是開個玩笑,目前flutter fif的互動,主要是為了和底層互動的統一,還能直接使用到大量寶藏一樣的底層庫
目前ffi的同步呼叫還是比較可以,非同步互動有辦法去解決,但是使用起來比較麻煩
- 有興趣的可以檢視下面
非同步訊息通訊模組中貼的issue
Flutter和Rust的互動
- flutter_rust_bridge庫給了一個很不錯的解決方案
- 主要是他能很輕鬆的實現非同步互動!
本文是循序漸進式,比較全面的介紹了flutter的ffi使用,ffigen使用,最後才是rust互動介紹;如果對ffi和ffigen不太關心,也可直接閱讀rust互動內容
FFI互動方式
設定
Android
- 需要先設定ndk
# mac
ndk.dir=/Users/***/Develop/SDK/android_sdk/ndk/21.3.6528147
# windows
ndk.dir=F:\\SDK\\AndroidSDK\\ndk\\21.3.6528147
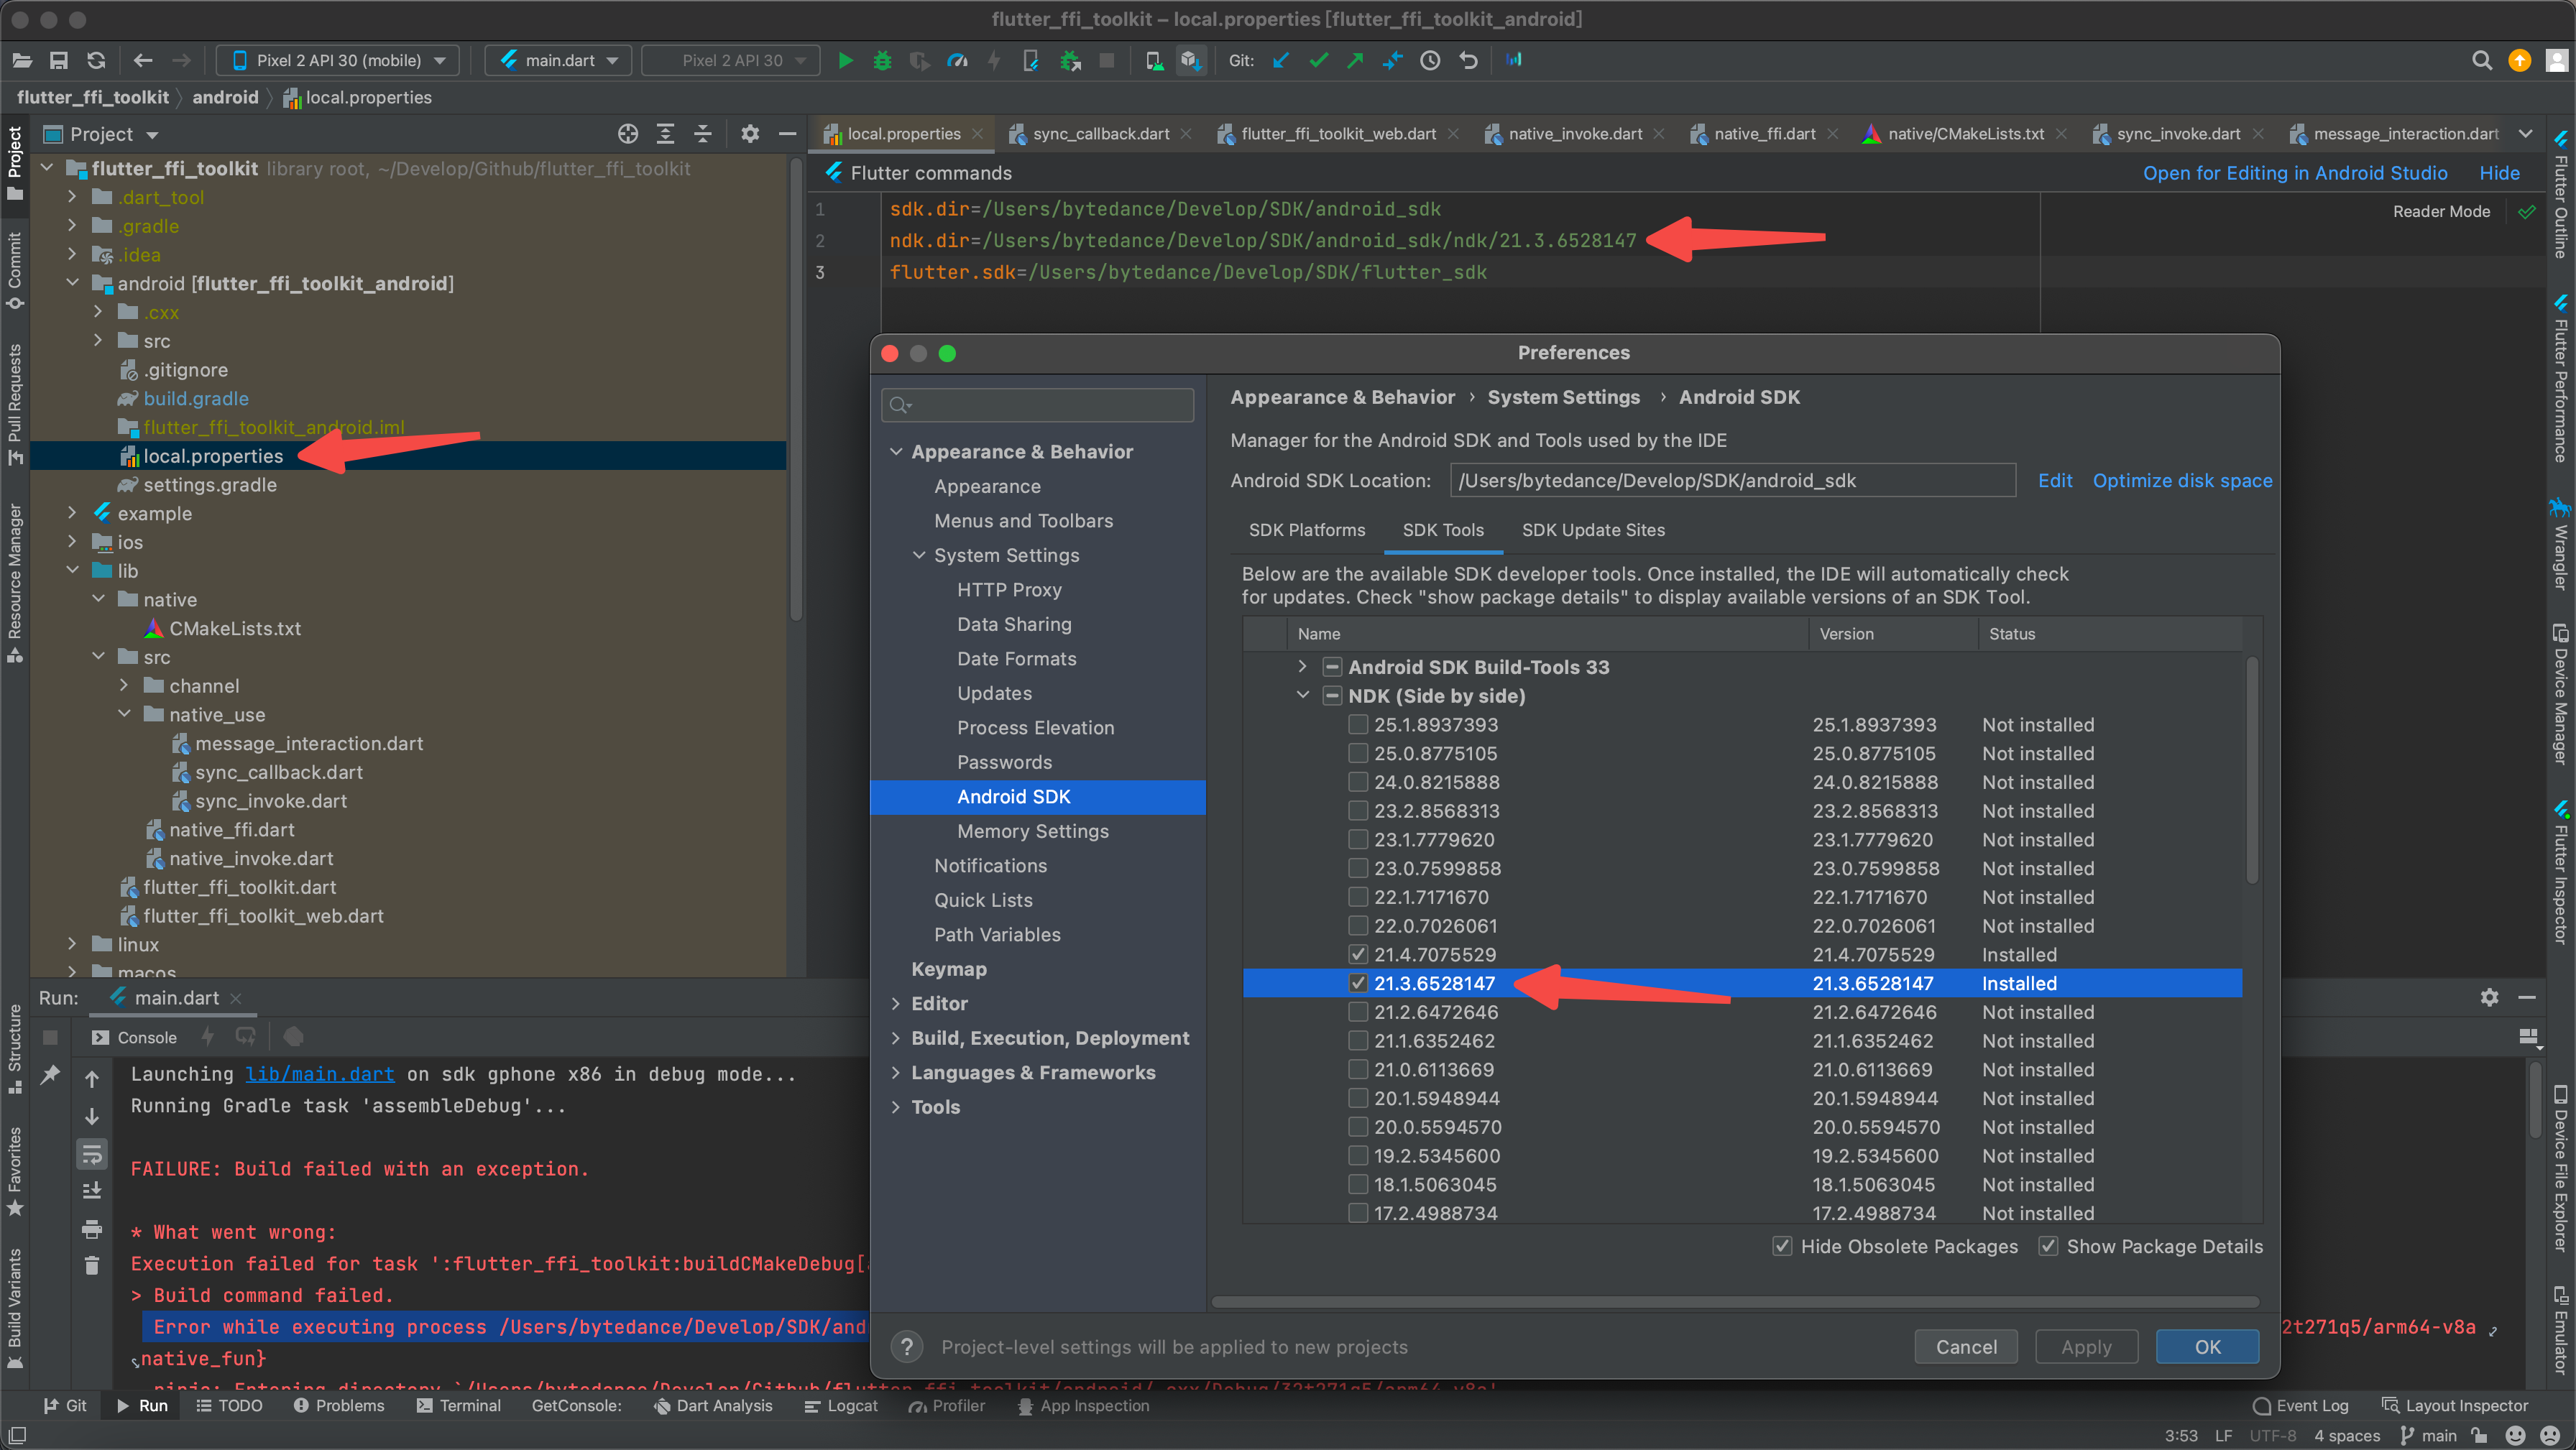
- 安裝下CMake
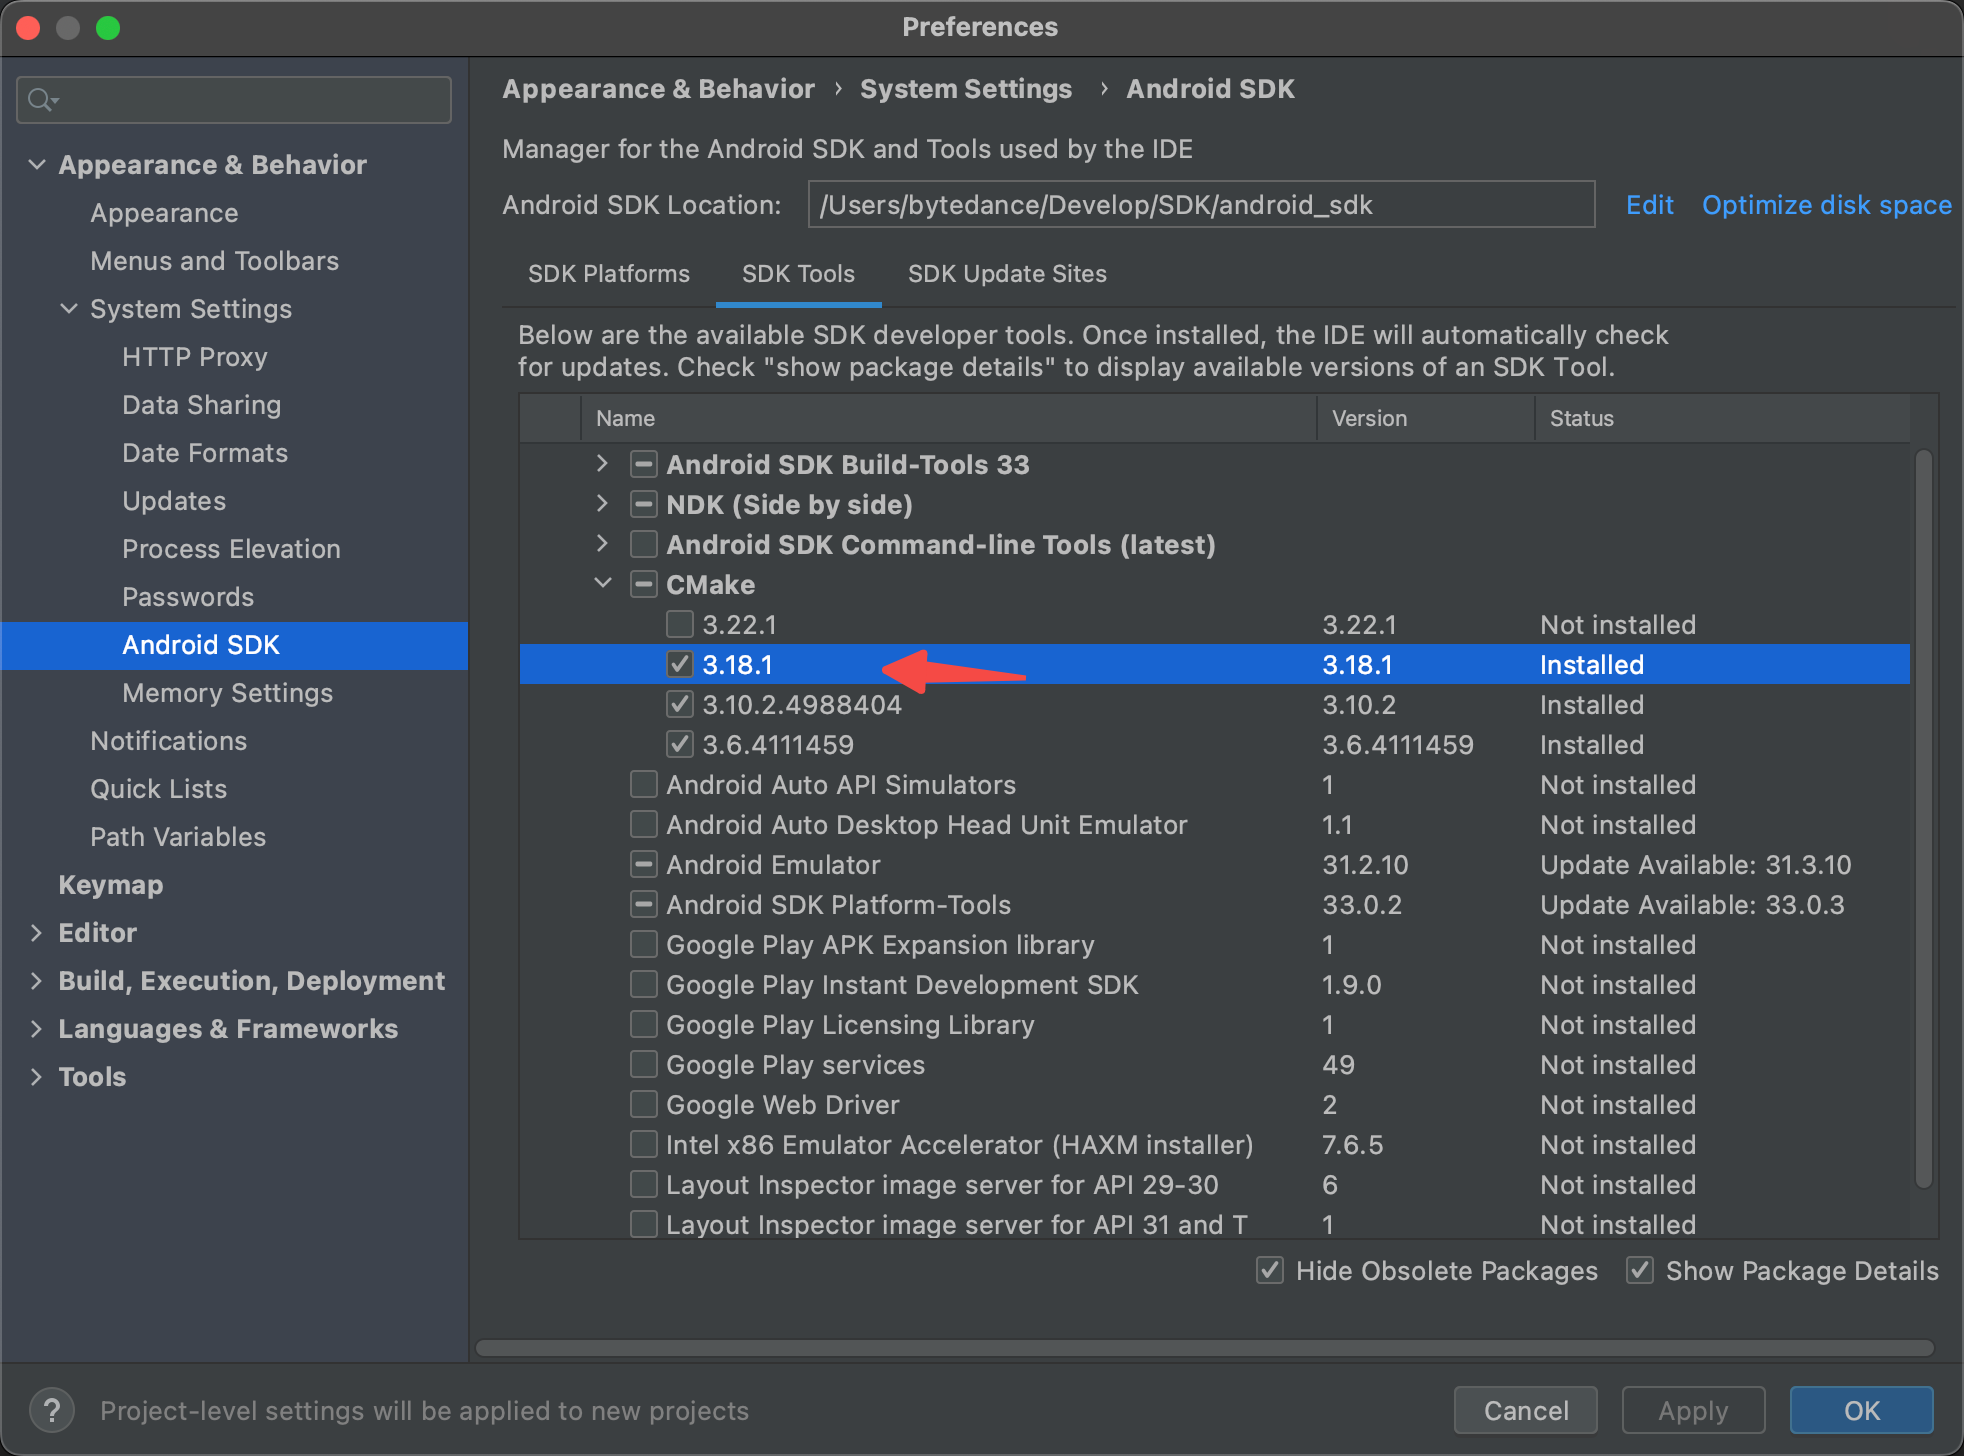
- 需要在Android的build.gradle裡設定下cmake路徑
android {
    ...

    //設定CMakeList路徑
    externalNativeBuild {
        cmake {
            path "../lib/native/CMakeLists.txt"
        }
    }
}

- 因為Windows和Linux都需要用到
CMakeLists.txt,先來看下Android的設定- Android的比較簡單,設定下需要編譯的c檔案就行了
- 一個個新增檔案的方式太麻煩了,這邊直接用
native_batch批次新增檔案 - android會指定給定義的專案名上加上
lib,set(PROJECT_NAME "native_fun")生成的名稱應該為libnative_fun.so
# cmake_minimum_required 表示支援的 cmake 最小版本
cmake_minimum_required(VERSION 3.4.1)

# 專案名稱
set(PROJECT_NAME "native_fun")

# 批次新增c檔案
# add_library 關鍵字表示構建連結庫,引數1是連結包名稱; 引數2'SHARED'表示構建動態連結庫; 引數2是原始檔列表
file(GLOB_RECURSE native_batch ../../ios/Classes/native/*)
add_library(${PROJECT_NAME} SHARED ${native_batch})
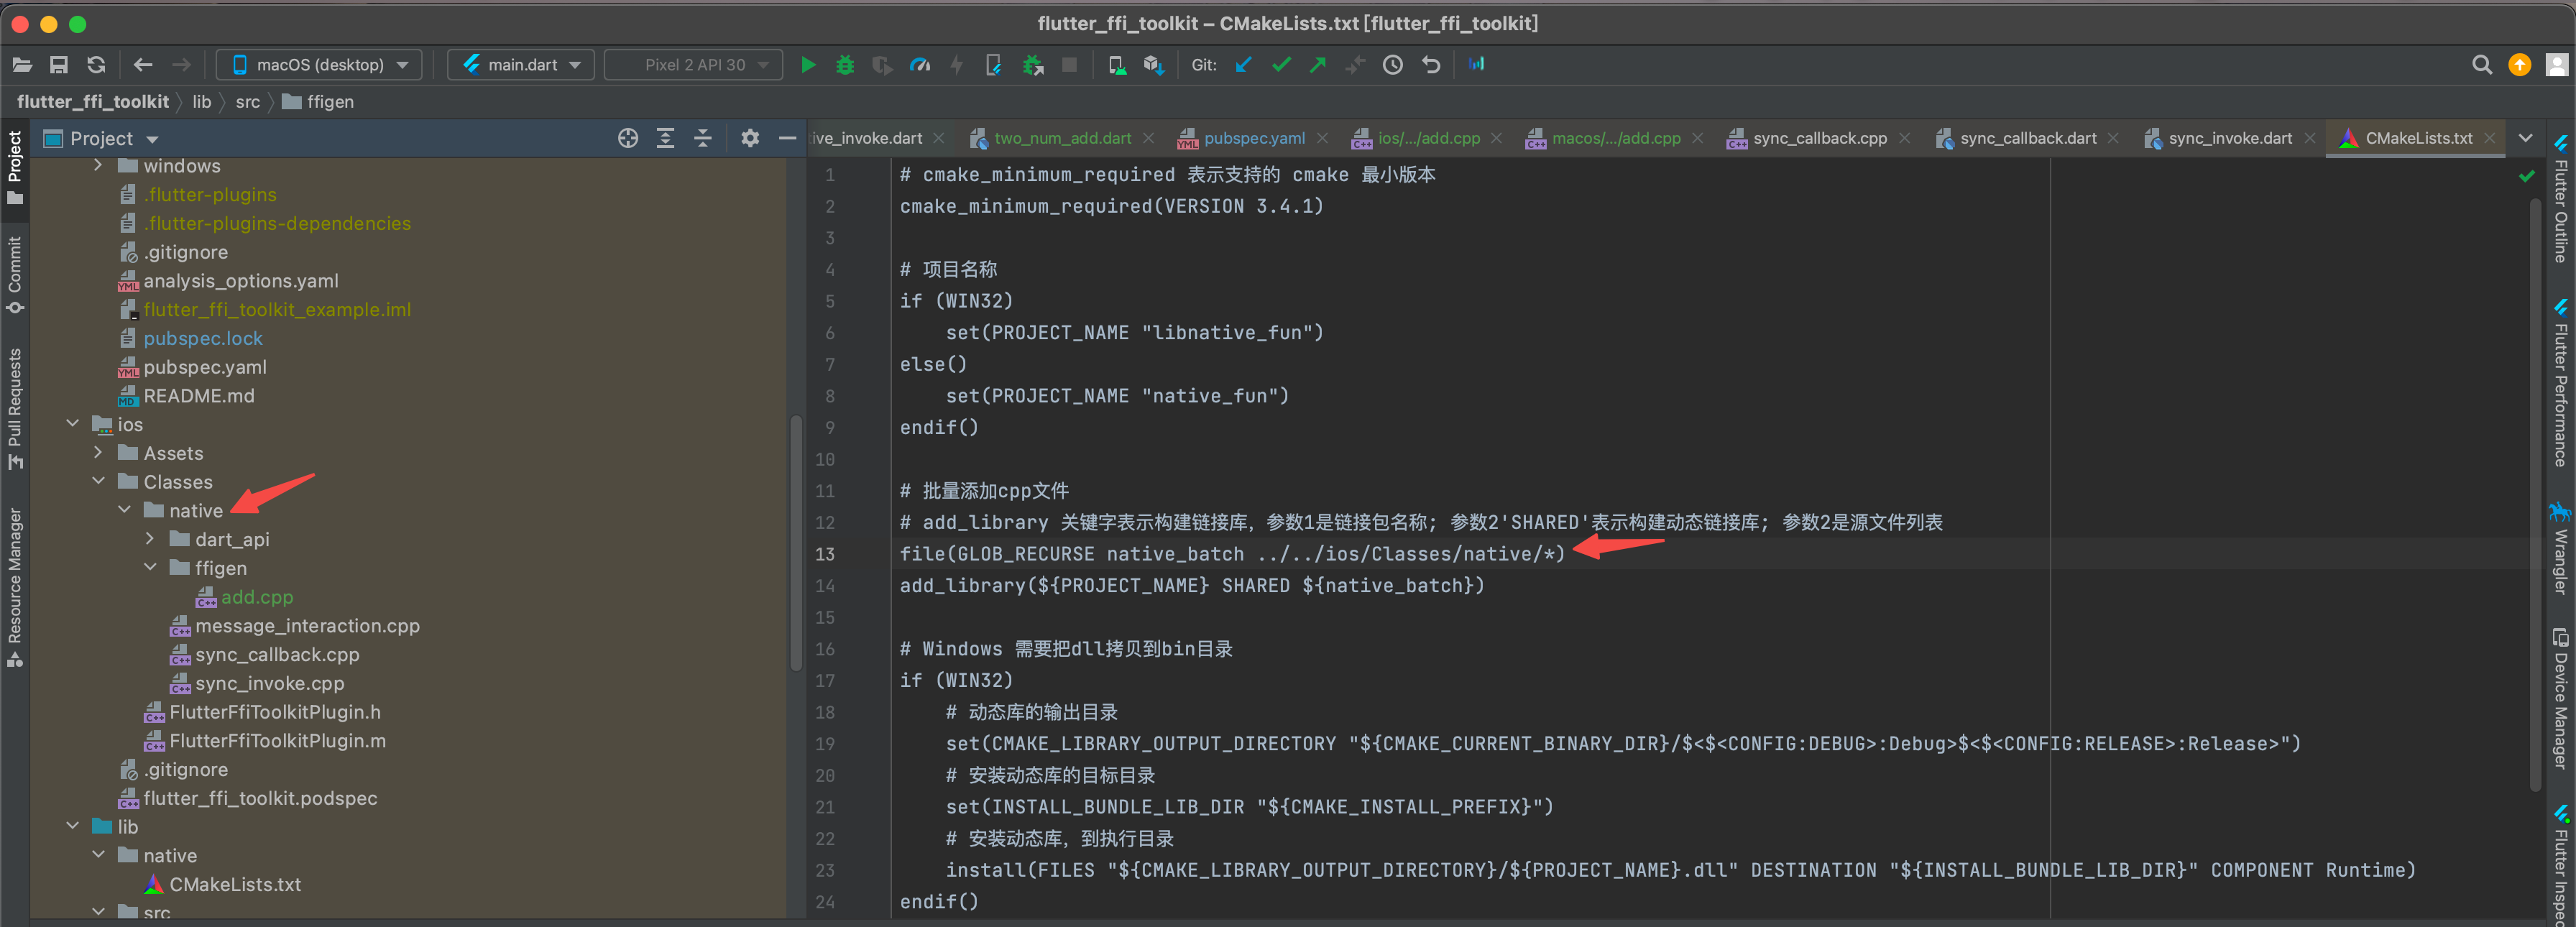
可以發現file(GLOB_RECURSE native_batch ../../ios/Classes/native/*)這邊路徑設定在iOS的Classes檔案下,這邊是為了方便統一編譯native資料夾下的所有c檔案,macOS和iOS需要放在Classes下,可以直接編譯
但是macOS和iOS沒法指定編譯超過父節點位置,必須放在Classes子資料夾下,超過這個節點就沒法編譯
所以這邊iOS和macOS必須要維護倆份相同c檔案(建個資料夾吧,方便直接拷貝過去);Android,Windows,Linux可以指定到這倆箇中的其中之一(建議指定iOS的Classes,避免一些靈異Bug)
- 效果
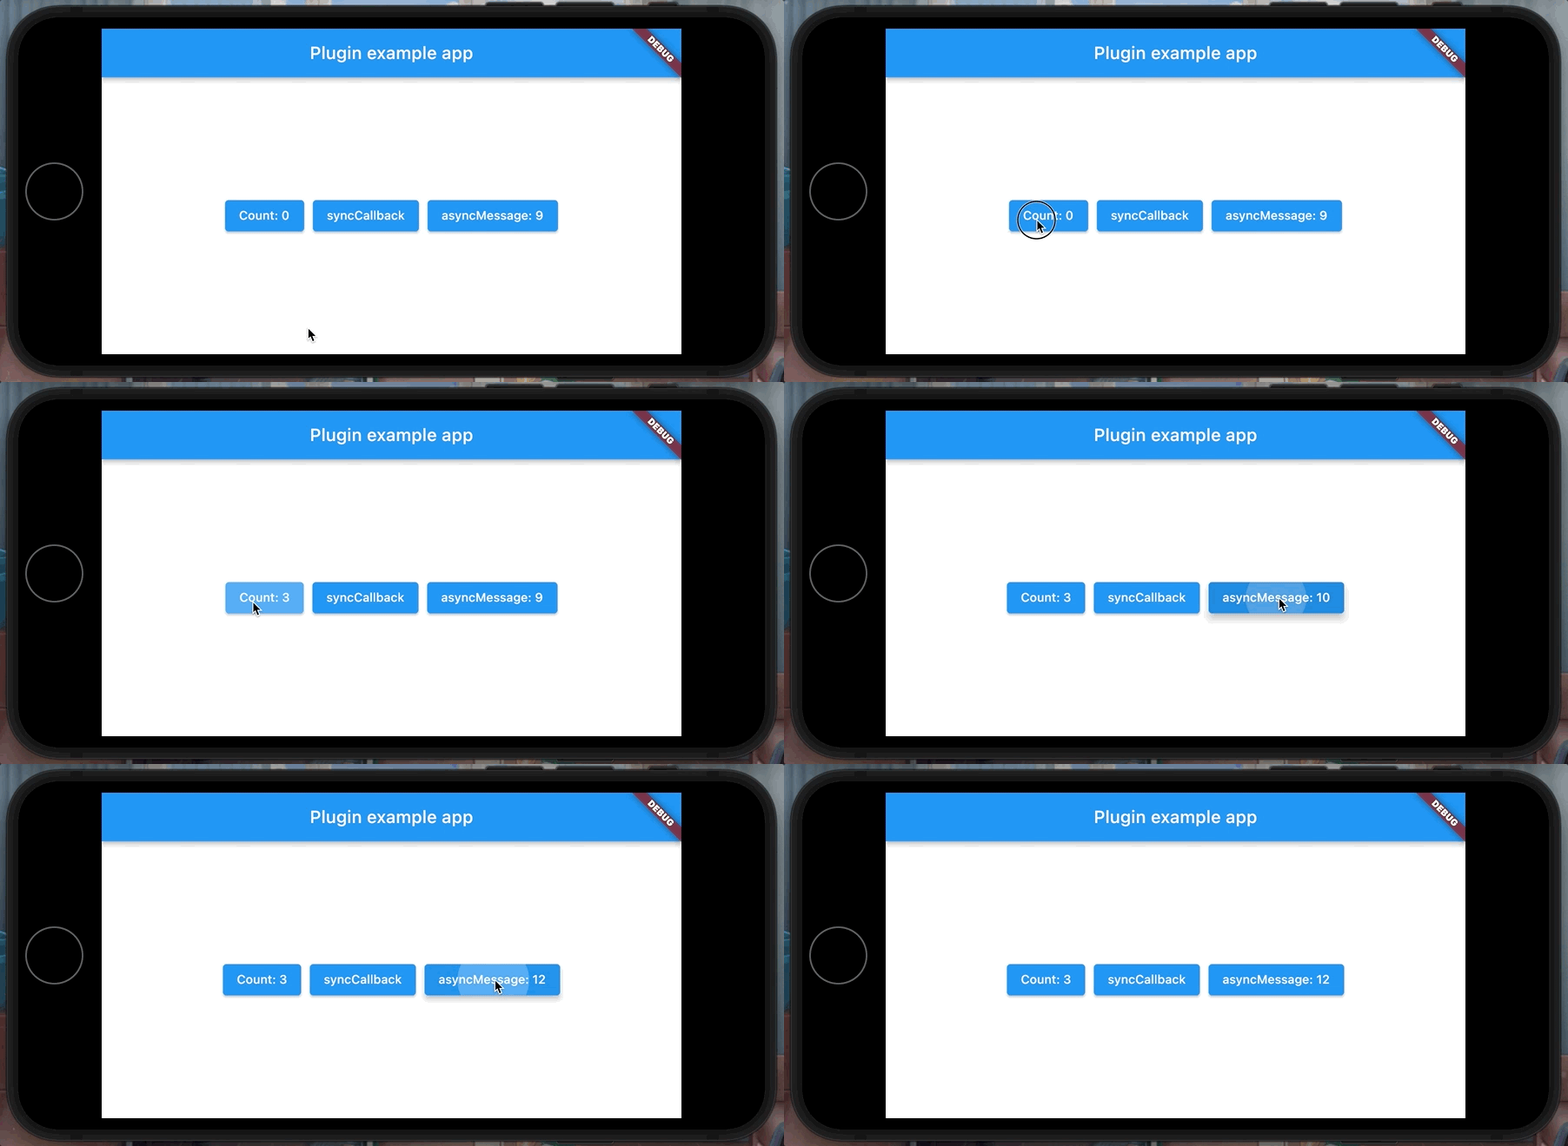
iOS
- iOS可以直接編譯C檔案,需要放在Classes資料夾下
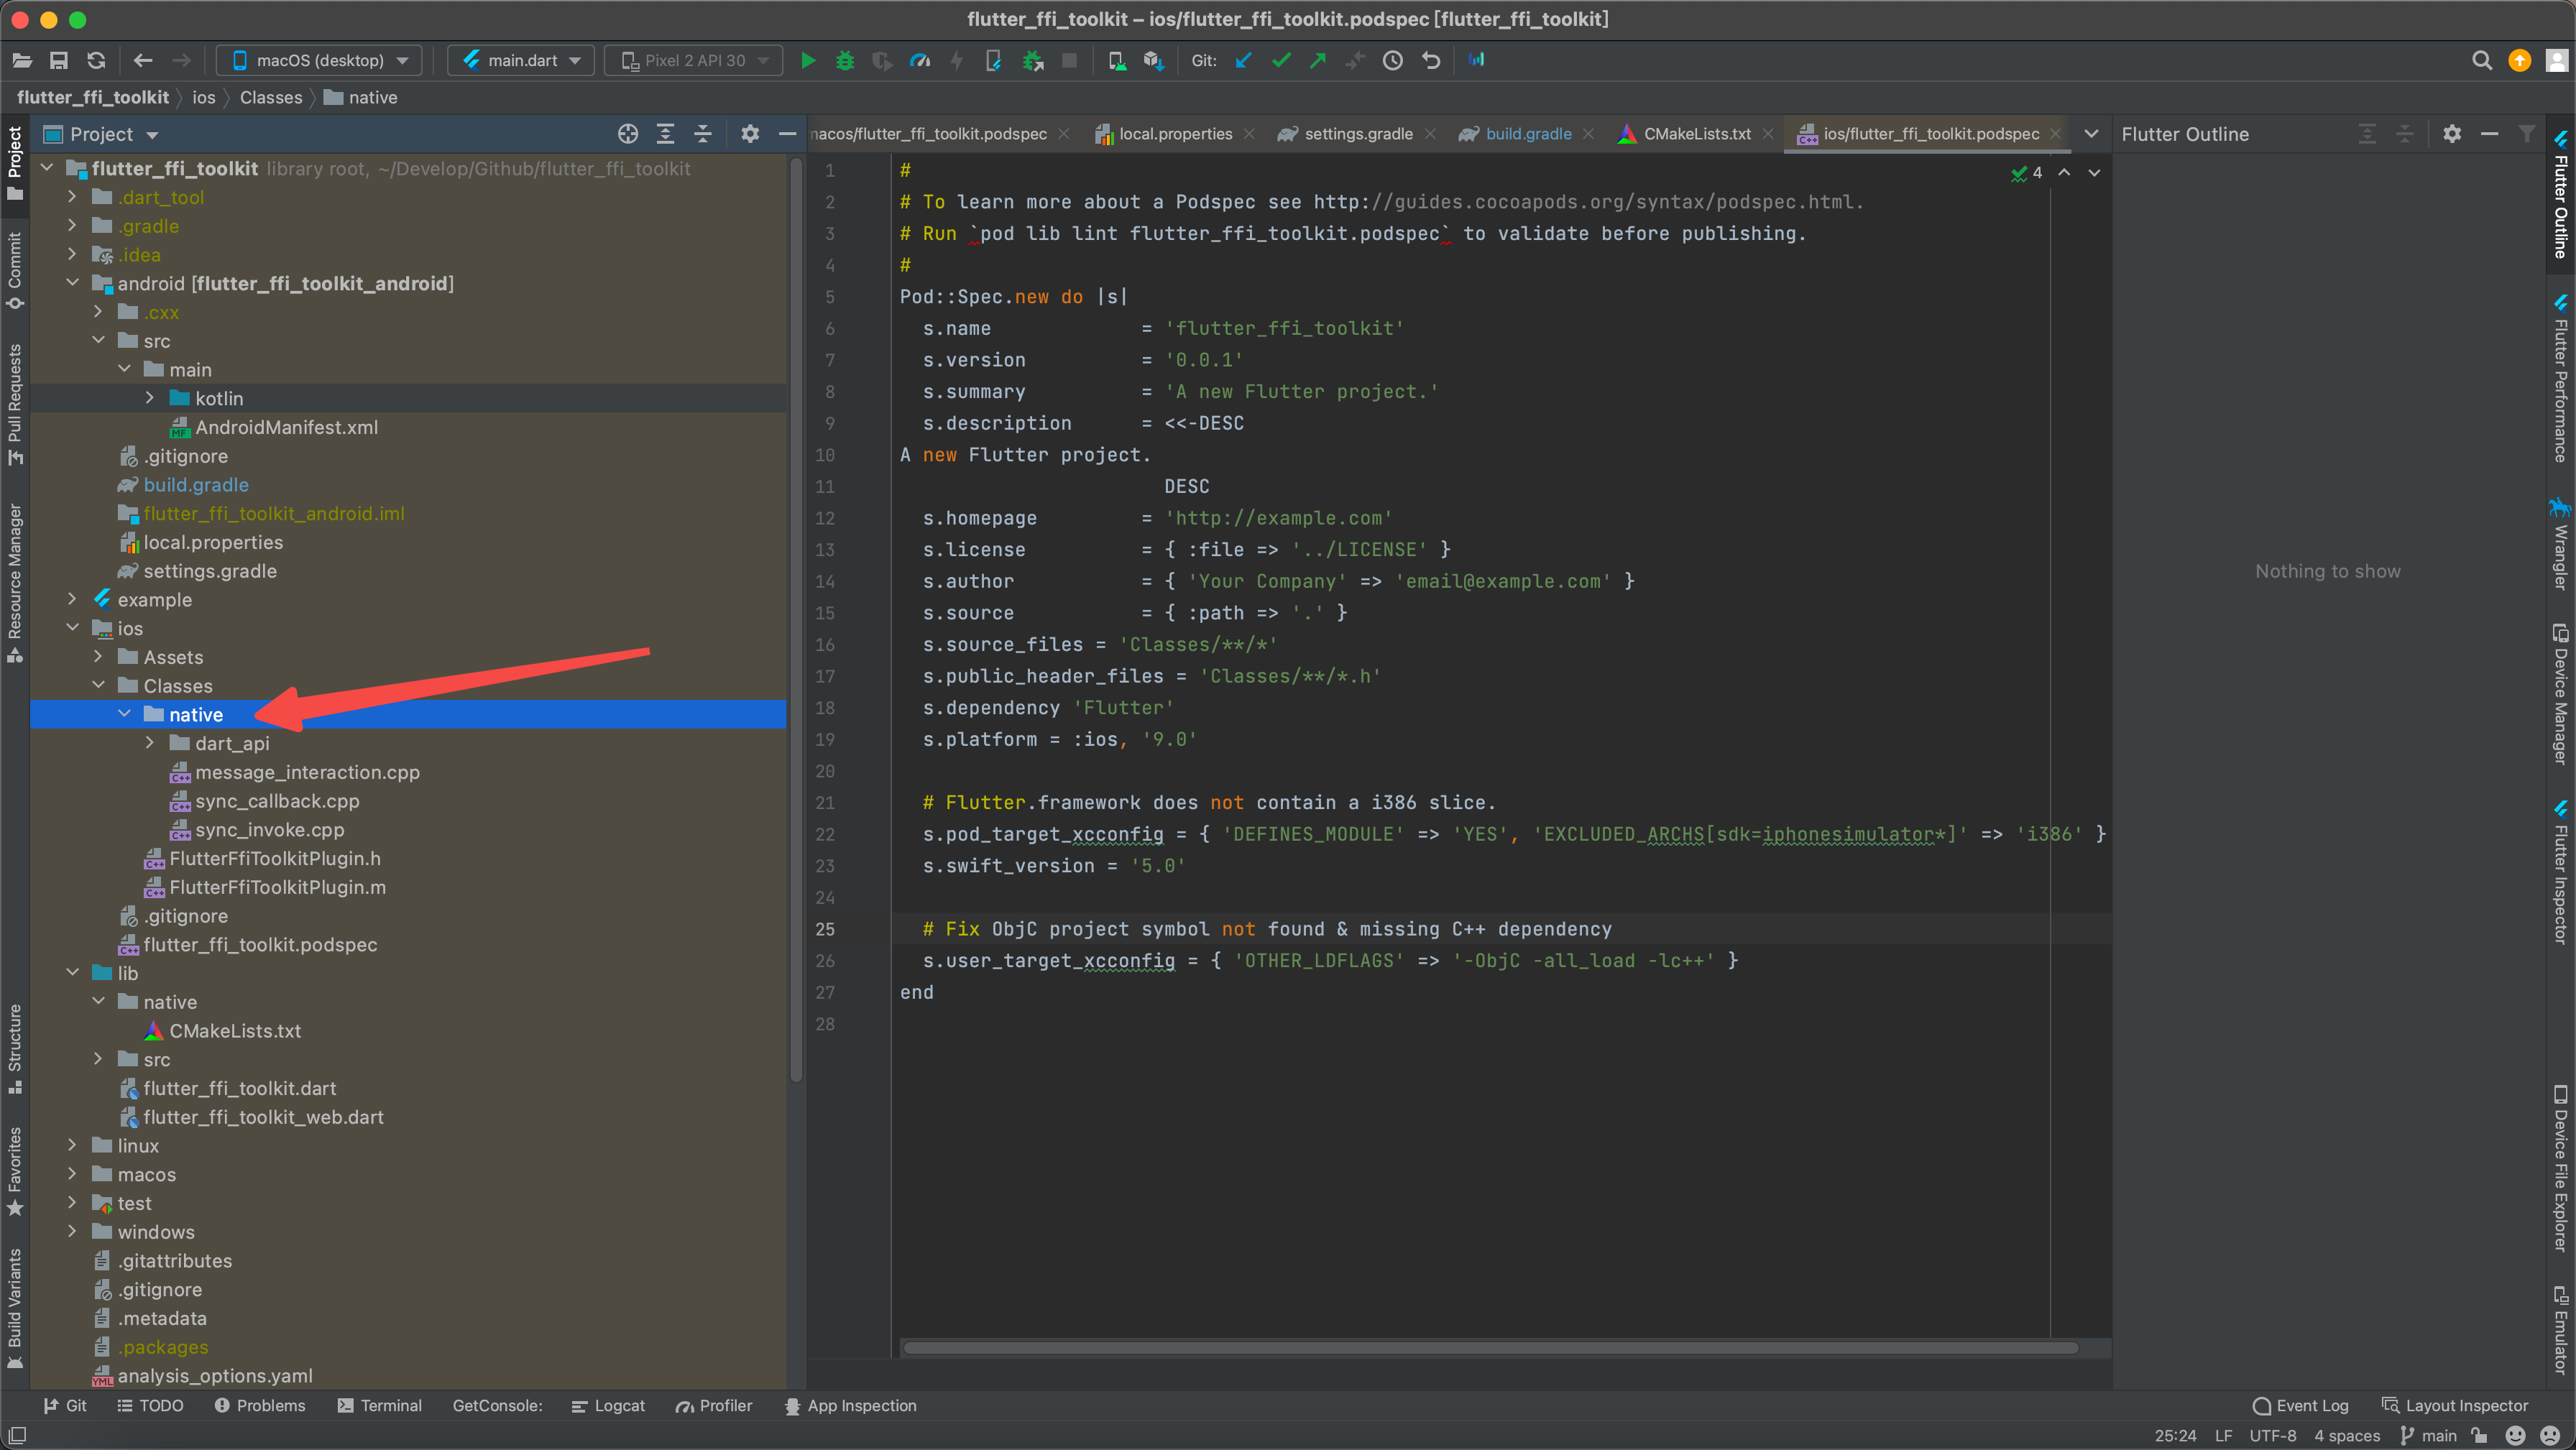
- 效果

macOS
- macOS也可以直接編譯C檔案,需要放在Classes資料夾下

- 效果
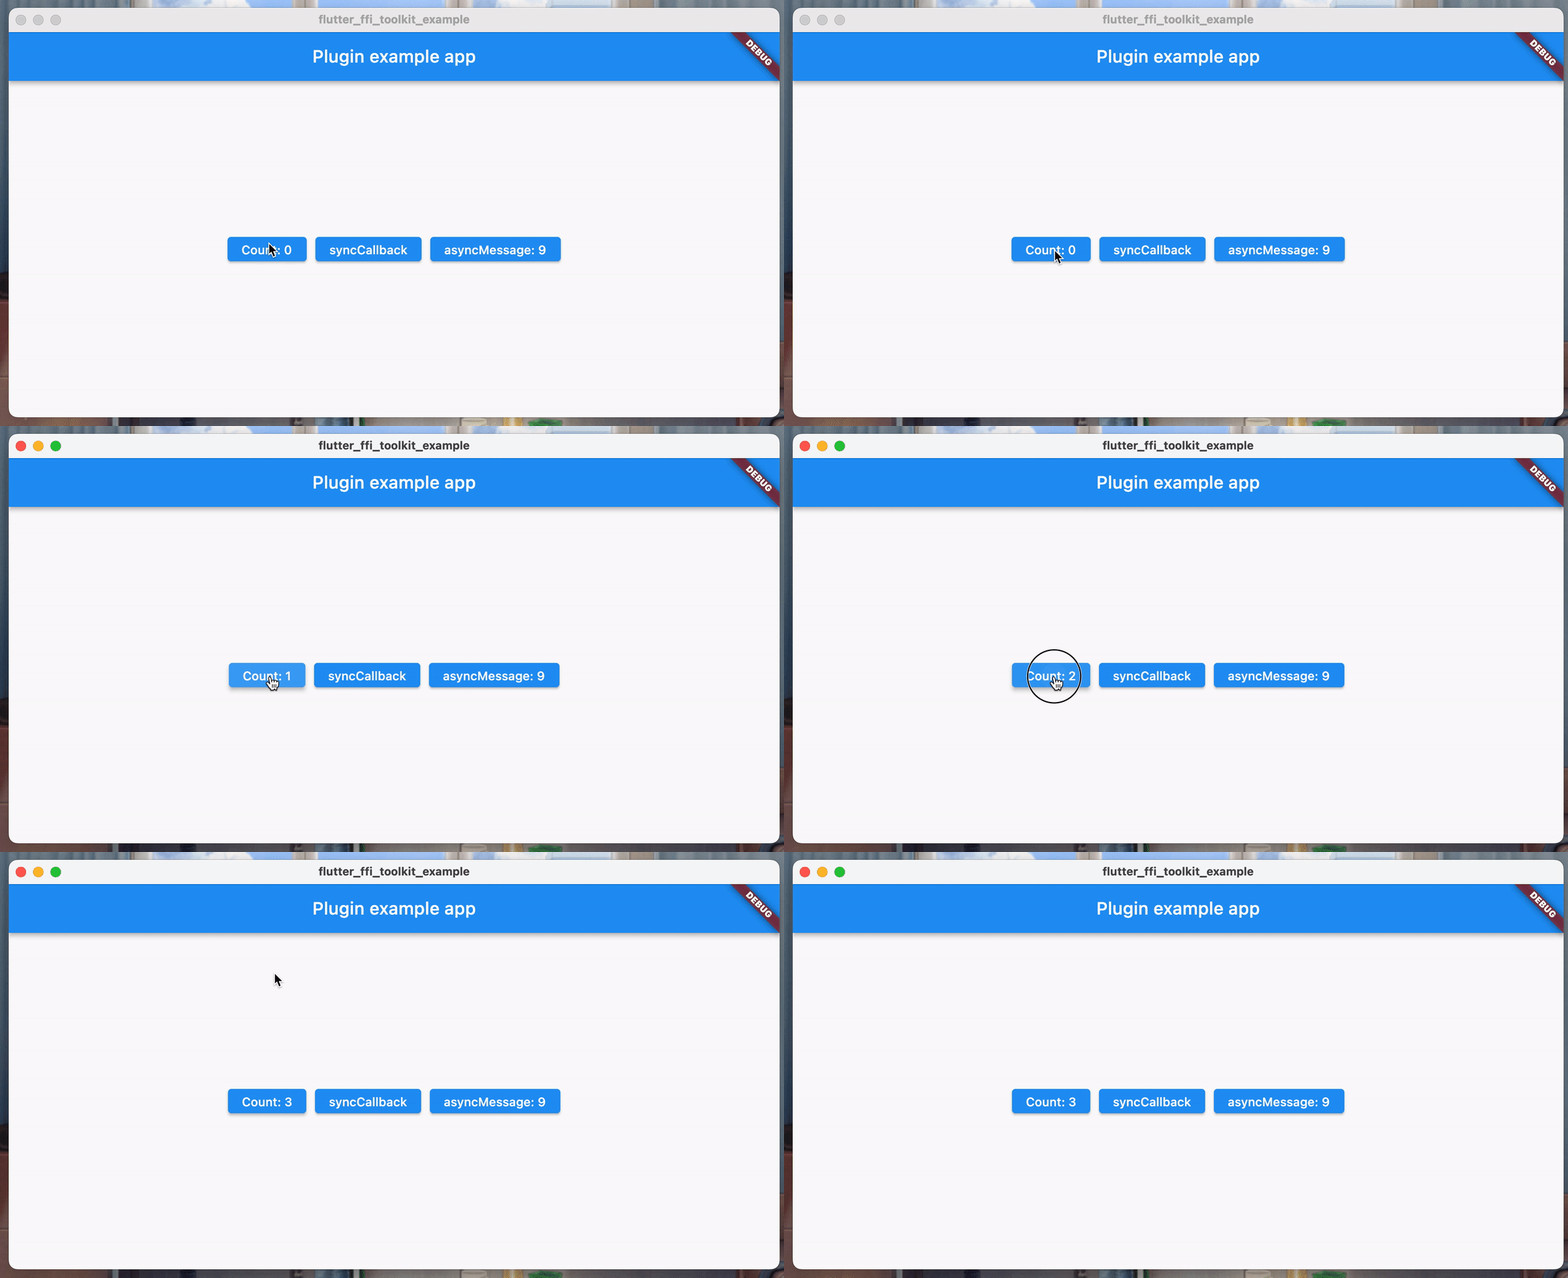
Windows
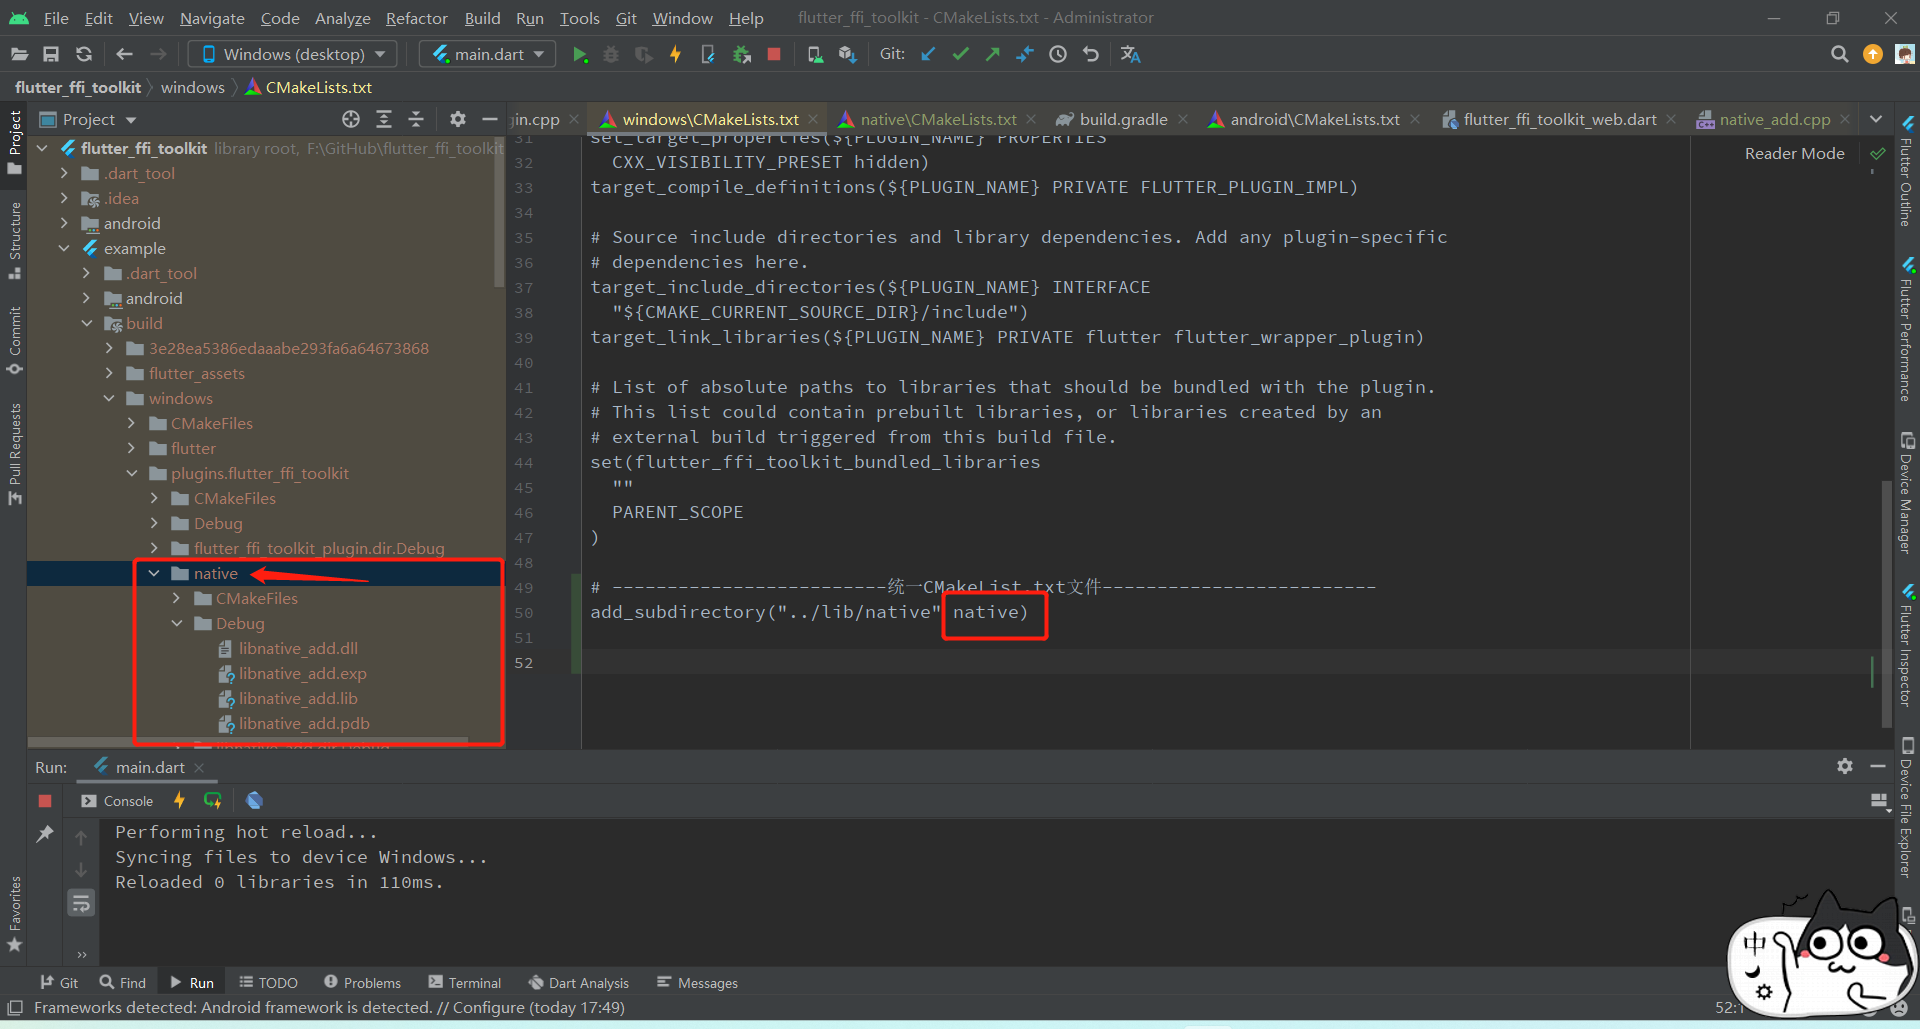
- windows下的CMakeLists.txt裡面指定了lib/native下面的統一CMakeLists.txt設定
# cmake_minimum_required 表示支援的 cmake 最小版本
cmake_minimum_required(VERSION 3.4.1)

# 專案名稱
set(PROJECT_NAME "libnative_fun")

# 批次新增cpp檔案
# add_library 關鍵字表示構建連結庫,引數1是連結包名稱; 引數2'SHARED'表示構建動態連結庫; 引數2是原始檔列表
file(GLOB_RECURSE native_batch ../../ios/Classes/native/*)
add_library(${PROJECT_NAME} SHARED ${native_batch})

# Windows 需要把dll拷貝到bin目錄
# 動態庫的輸出目錄
set(CMAKE_LIBRARY_OUTPUT_DIRECTORY "${CMAKE_CURRENT_BINARY_DIR}/$<$<CONFIG:DEBUG>:Debug>$<$<CONFIG:RELEASE>:Release>")
# 安裝動態庫的目標目錄
set(INSTALL_BUNDLE_LIB_DIR "${CMAKE_INSTALL_PREFIX}")
# 安裝動態庫,到執行目錄
install(FILES "${CMAKE_LIBRARY_OUTPUT_DIRECTORY}/${PROJECT_NAME}.dll" DESTINATION "${INSTALL_BUNDLE_LIB_DIR}" COMPONENT Runtime)

- 這邊可以將Android和Windows的設定統一下,加下判斷即可
# cmake_minimum_required 表示支援的 cmake 最小版本
cmake_minimum_required(VERSION 3.4.1)

# 專案名稱
if (WIN32)
    set(PROJECT_NAME "libnative_fun")
else()
    set(PROJECT_NAME "native_fun")
endif()

# 批次新增c檔案
# add_library 關鍵字表示構建連結庫,引數1是連結包名稱; 引數2'SHARED'表示構建動態連結庫; 引數2是原始檔列表
file(GLOB_RECURSE native_batch ../../ios/Classes/native/*)
add_library(${PROJECT_NAME} SHARED ${native_batch})

# Windows 需要把dll拷貝到bin目錄
if (WIN32)
    # 動態庫的輸出目錄
    set(CMAKE_LIBRARY_OUTPUT_DIRECTORY "${CMAKE_CURRENT_BINARY_DIR}/$<$<CONFIG:DEBUG>:Debug>$<$<CONFIG:RELEASE>:Release>")
    # 安裝動態庫的目標目錄
    set(INSTALL_BUNDLE_LIB_DIR "${CMAKE_INSTALL_PREFIX}")
    # 安裝動態庫,到執行目錄
    install(FILES "${CMAKE_LIBRARY_OUTPUT_DIRECTORY}/${PROJECT_NAME}.dll" DESTINATION "${INSTALL_BUNDLE_LIB_DIR}" COMPONENT Runtime)
endif()
- 說明下,Windows這邊必須將生成的dll拷貝到bin目錄下,才能呼叫
- 所以cmake裡面,最後那段Windows的特有程式碼是必須要寫的
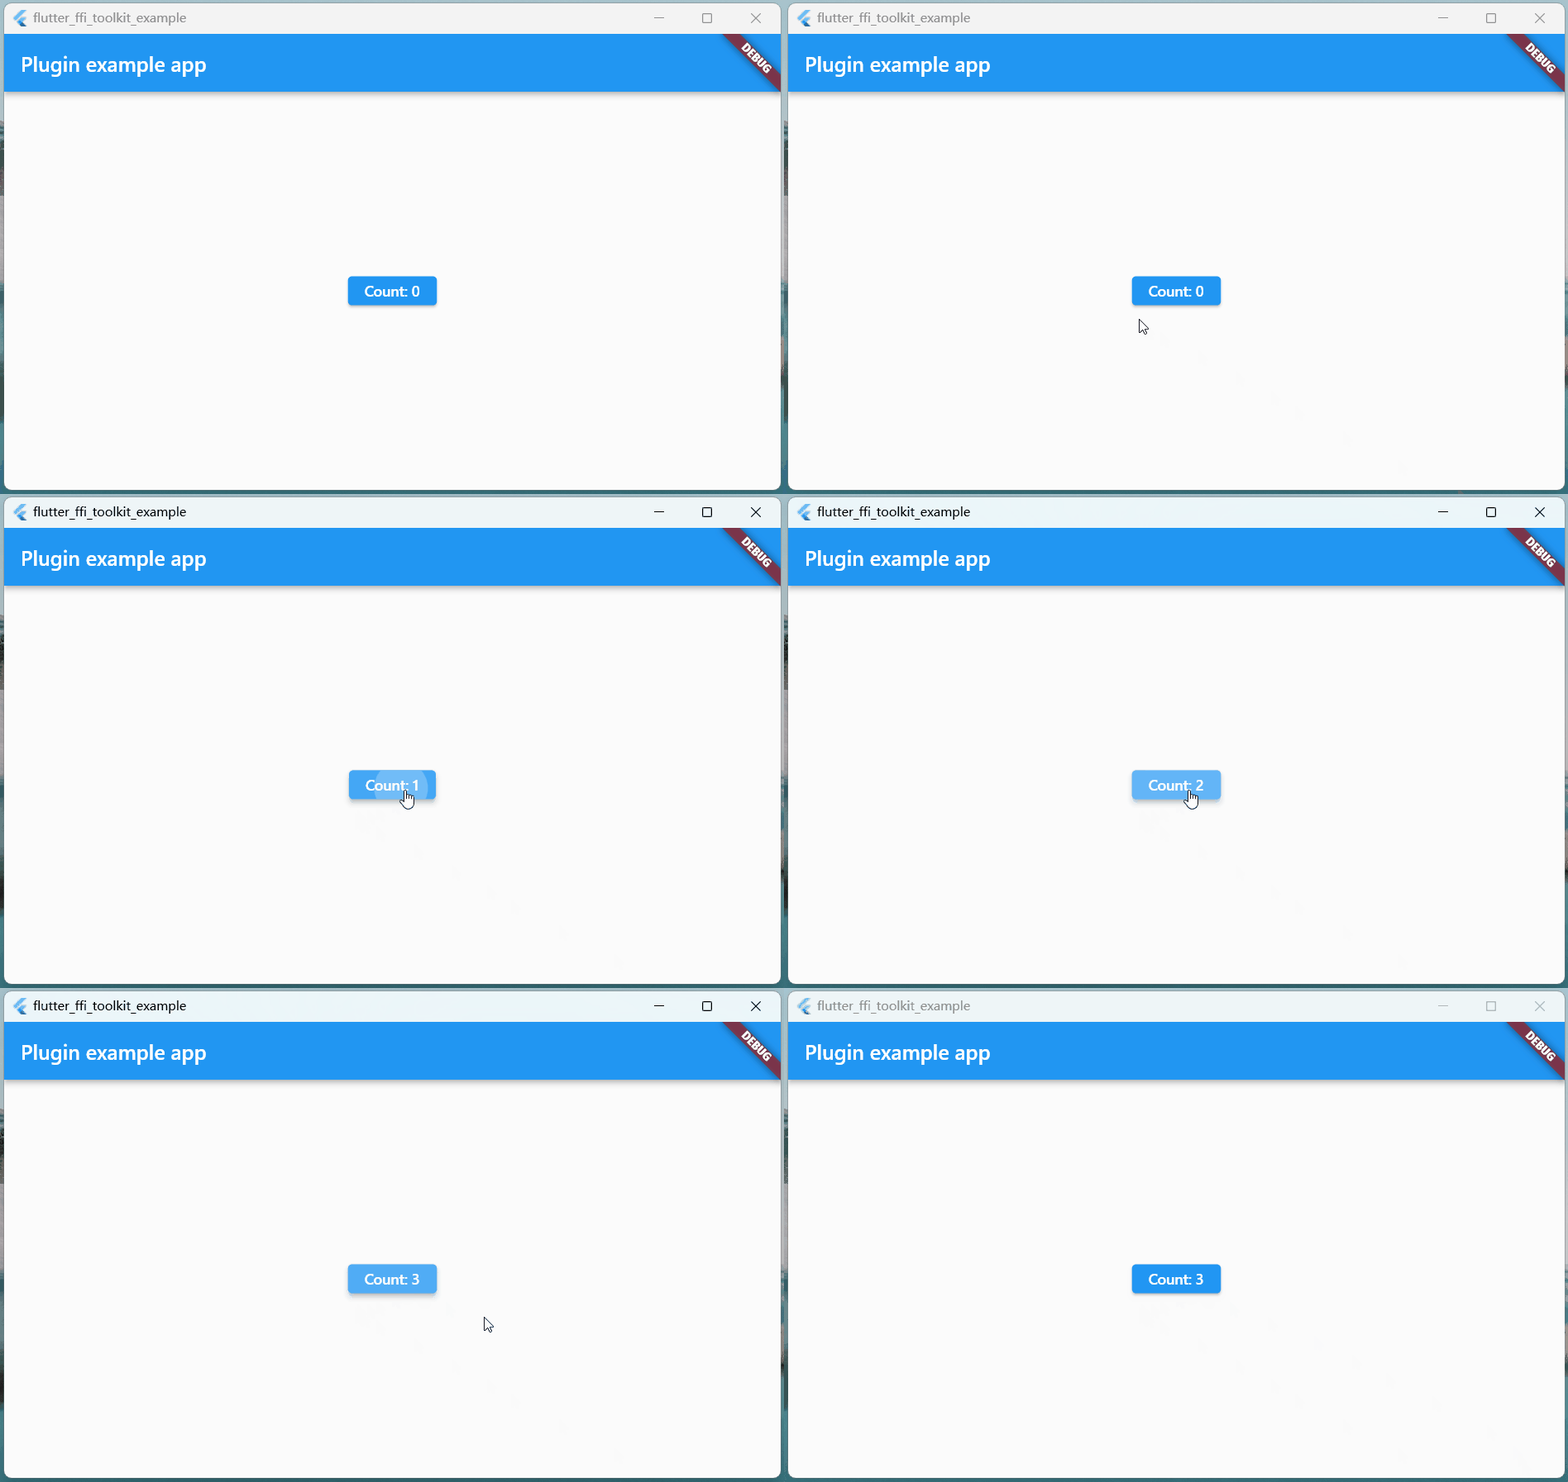
- 效果
互動
- 通用載入:NativeFFI.dynamicLibrary
class NativeFFI {
  NativeFFI._();

  static DynamicLibrary? _dyLib;

  static DynamicLibrary get dynamicLibrary {
    if (_dyLib != null) return _dyLib!;

    if (Platform.isMacOS || Platform.isIOS) {
      _dyLib = DynamicLibrary.process();
    } else if (Platform.isAndroid) {
      _dyLib = DynamicLibrary.open('libnative_fun.so');
    } else if (Platform.isWindows) {
      _dyLib = DynamicLibrary.open('libnative_fun.dll');
    } else {
      throw Exception('DynamicLibrary初始化失敗');
    }

    return _dyLib!;
  }
}
Flutter同步呼叫Native
- dart
/// 倆數相加
int ffiAddSyncInvoke(int a, int b) {
  final int Function(int x, int y) nativeAdd = NativeFFI.dynamicLibrary
      .lookup<NativeFunction<Int32 Function(Int32, Int32)>>("twoNumAdd")
      .asFunction();

  return nativeAdd(a, b);
}
- native
#include <stdint.h>

#ifdef WIN32
#define DART_API extern "C" __declspec(dllexport)
#else
#define DART_API extern "C" __attribute__((visibility("default"))) __attribute__((used))
#endif

DART_API int32_t twoNumAdd(int32_t x, int32_t y){
    return x + y;
}
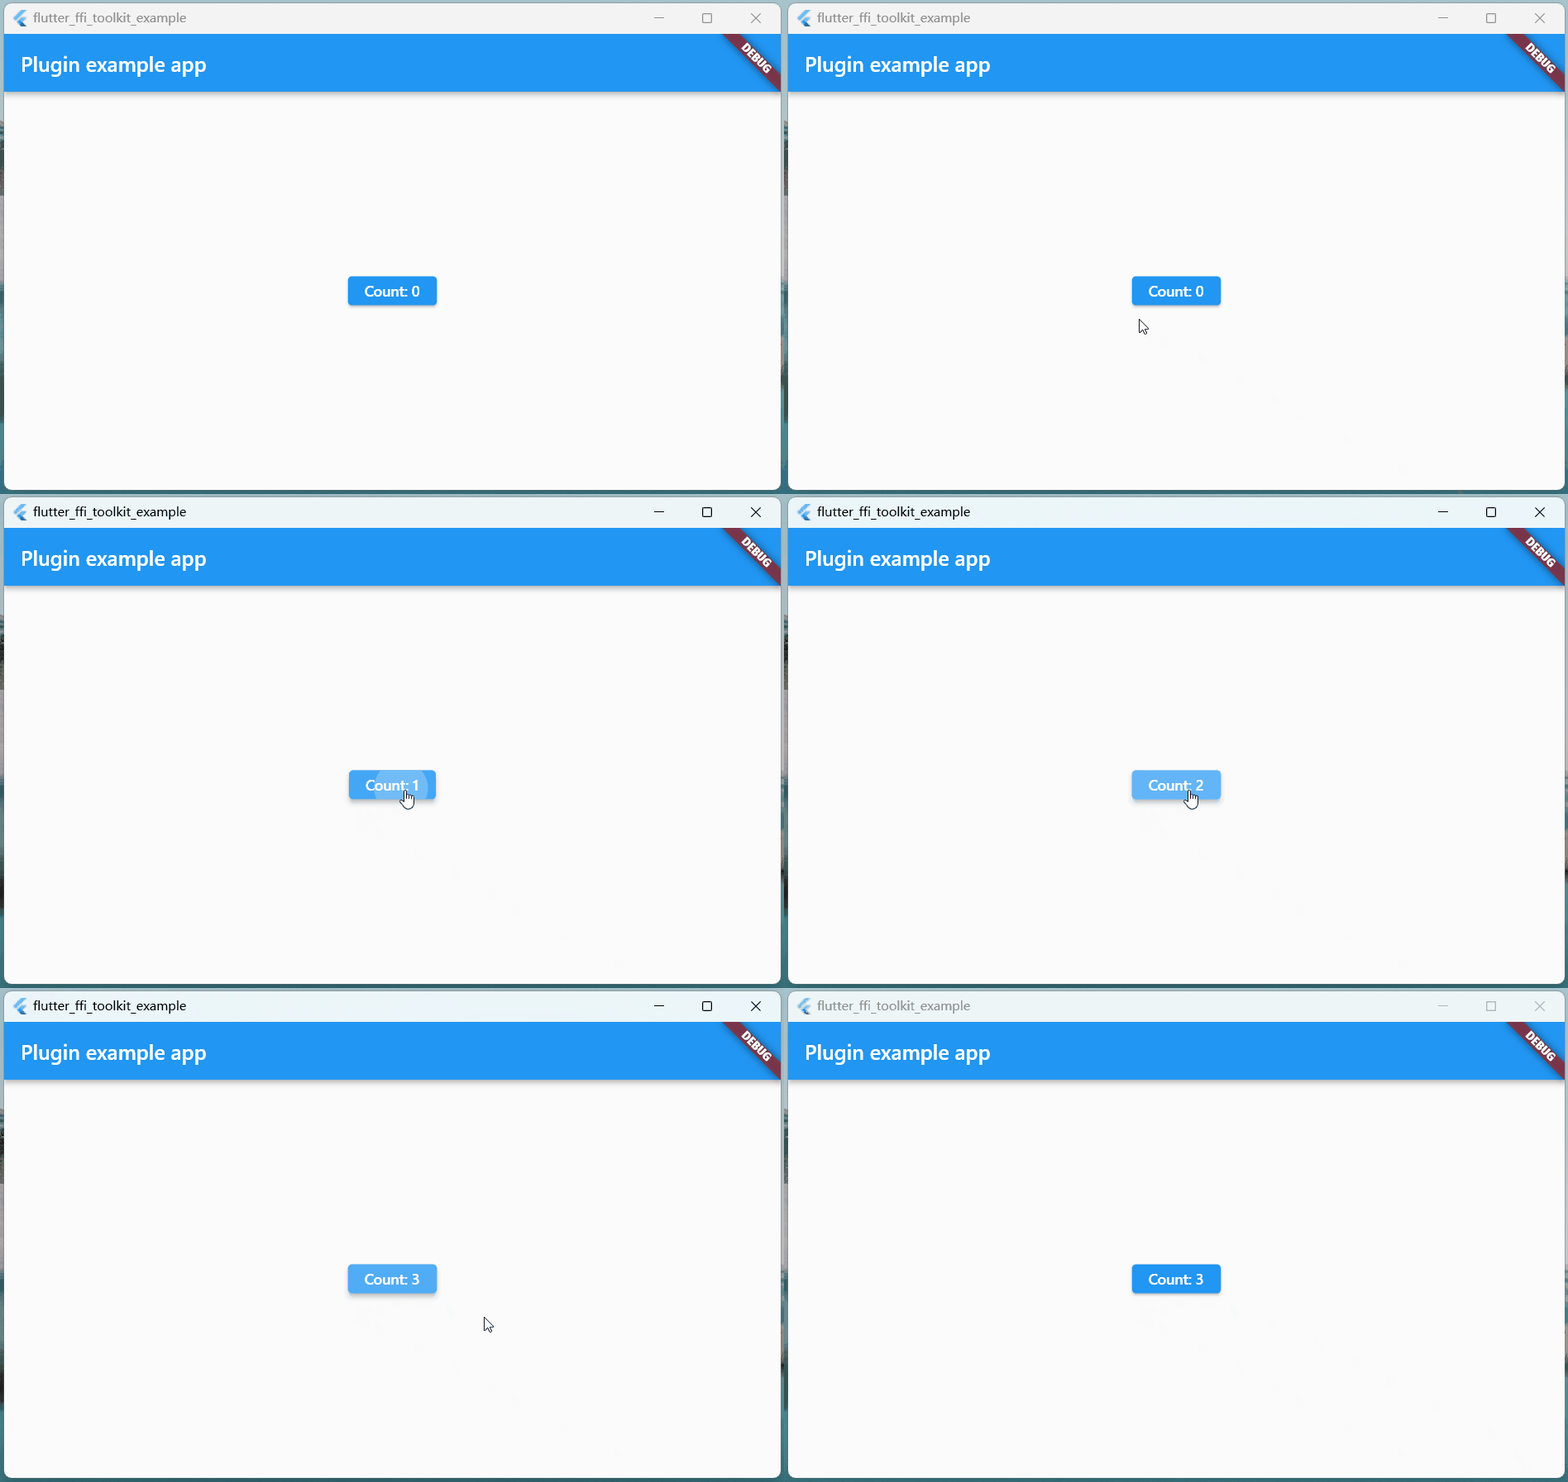
- 效果
Native同步觸發Flutter回撥
- dart
/// 傳遞的回撥
typedef _NativeCallback = Int32 Function(Int32 num);

/// Native方法
typedef _NativeSyncCallback = Void Function(
  Pointer<NativeFunction<_NativeCallback>> callback,
);

/// Dart結束回撥: Void和void不同,所以要區分開
typedef _DartSyncCallback = void Function(
  Pointer<NativeFunction<_NativeCallback>> callback,
);

/// 必須使用頂層方法或者靜態方法
/// macos端可以列印出native層紀錄檔, 行動端只能列印dart紀錄檔
int _syncCallback(int num) {
  print('--------');
  return num;
}

/// 在native層列印回撥傳入的值
void ffiPrintSyncCallback() {
  final _DartSyncCallback dartSyncCallback = NativeFFI.dynamicLibrary
      .lookup<NativeFunction<_NativeSyncCallback>>("nativeSyncCallback")
      .asFunction();

  // 包裝傳遞的回撥
  var syncFun = Pointer.fromFunction<_NativeCallback>(_syncCallback, 0);
  dartSyncCallback(syncFun);
}
- native
#include <stdint.h>
#include <iostream>

#ifdef WIN32
#define DART_API extern "C" __declspec(dllexport)
#else
#define DART_API extern "C" __attribute__((visibility("default"))) __attribute__((used))
#endif

using namespace std;

// 定義傳遞的回撥型別
typedef int32_t (*NativeCallback)(int32_t n);

DART_API void nativeSyncCallback(NativeCallback callback) {
    // 列印
    std::cout << "native log callback(666) = " << callback(666) << std::endl;
}
- 效果
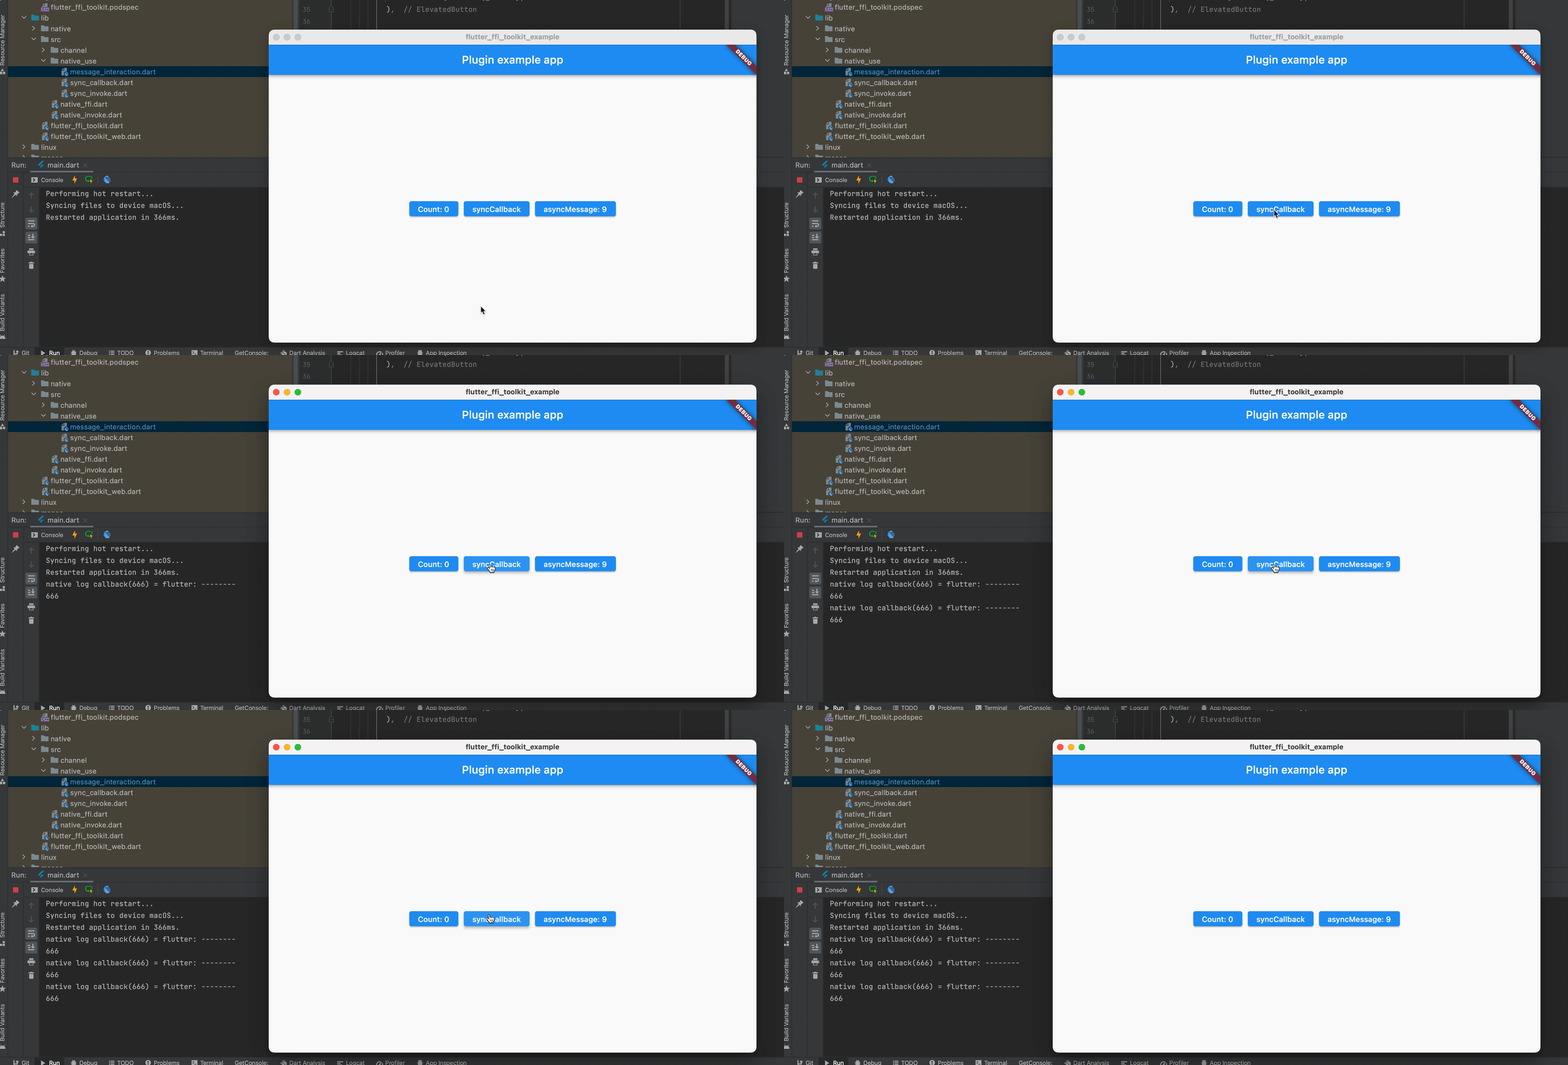
非同步訊息通訊
說明
非同步互動的寫法有點複雜,可以檢視下面的討論
- https://github.com/dart-lang/sdk/issues/37022
- https://stackoverflow.com/questions/63311092/flutter-dart-how-to-use-async-callback-with-dart-ffi
非同步通訊需要匯入額外c檔案用作通訊支援,但是如果你的iOS專案是swift專案,無法編譯這些額外c檔案
- 這些c檔案我是封裝在外掛裡,沒想到辦法怎麼建立橋接
- 如果是OC專案,就可以直接編譯
目前來看
- Android和iOS可以編譯額外的訊息通訊的c檔案
- windows和macos試了,都沒法編譯,麻了
使用
- dart
import 'dart:async';
import 'dart:ffi';
import 'dart:isolate';

import 'package:flutter/material.dart';
import 'package:flutter_ffi_toolkit/src/native_ffi.dart';

ReceivePort? _receivePort;
StreamSubscription? _subscription;

void _ensureNativeInitialized() {
  if (_receivePort == null) {
    WidgetsFlutterBinding.ensureInitialized();
    final initializeApi = NativeFFI.dynamicLibrary.lookupFunction<
        IntPtr Function(Pointer<Void>),
        int Function(Pointer<Void>)>("InitDartApiDL");
    if (initializeApi(NativeApi.initializeApiDLData) != 0) {
      throw "Failed to initialize Dart API";
    }

    _receivePort = ReceivePort();
    _subscription = _receivePort!.listen(_handleNativeMessage);
    final registerSendPort = NativeFFI.dynamicLibrary.lookupFunction<
        Void Function(Int64 sendPort),
        void Function(int sendPort)>('RegisterSendPort');
    registerSendPort(_receivePort!.sendPort.nativePort);
  }
}

void _handleNativeMessage(dynamic address) {
  print('---------native端通訊,地址: $address');
  Pointer<Int32> point = Pointer<Int32>.fromAddress(address);
  print('---------native端通訊,指標: $point');
  dynamic data = point.cast();
  print('---------native端通訊,cast: $data');
}

void ffiAsyncMessage(int a) {
  _ensureNativeInitialized();
  final void Function(int x) asyncMessage = NativeFFI.dynamicLibrary
      .lookup<NativeFunction<Void Function(Int32)>>("NativeAsyncMessage")
      .asFunction();

  asyncMessage(a);
}

void dispose() {
  // TODO _unregisterReceivePort(_receivePort.sendPort.nativePort);
  _subscription?.cancel();
  _receivePort?.close();
}
- native
// C
#include <stdio.h>

// Unix
#include <unistd.h>
#include <pthread.h>

#include "dart_api/dart_api.h"
#include "dart_api/dart_native_api.h"

#include "dart_api/dart_api_dl.h"

// Initialize `dart_api_dl.h`
DART_EXPORT intptr_t InitDartApiDL(void* data) {
  return Dart_InitializeApiDL(data);
}

Dart_Port send_port_;

DART_EXPORT void RegisterSendPort(Dart_Port send_port) {
  send_port_ = send_port;
}

void *thread_func(void *args) {
    printf("thread_func Running on (%p)\n", pthread_self());
    sleep(2 /* seconds */); // doing something

    Dart_CObject dart_object;
    dart_object.type = Dart_CObject_kInt64;
    dart_object.value.as_int64 = reinterpret_cast<intptr_t>(args);
    Dart_PostCObject_DL(send_port_, &dart_object);

    pthread_exit(args);
}

DART_EXPORT void NativeAsyncMessage(int32_t x) {
    printf("NativeAsyncCallback Running on (%p)\n", pthread_self());

    pthread_t message_thread;
    pthread_create(&message_thread, NULL, thread_func, (void *)&x);
}
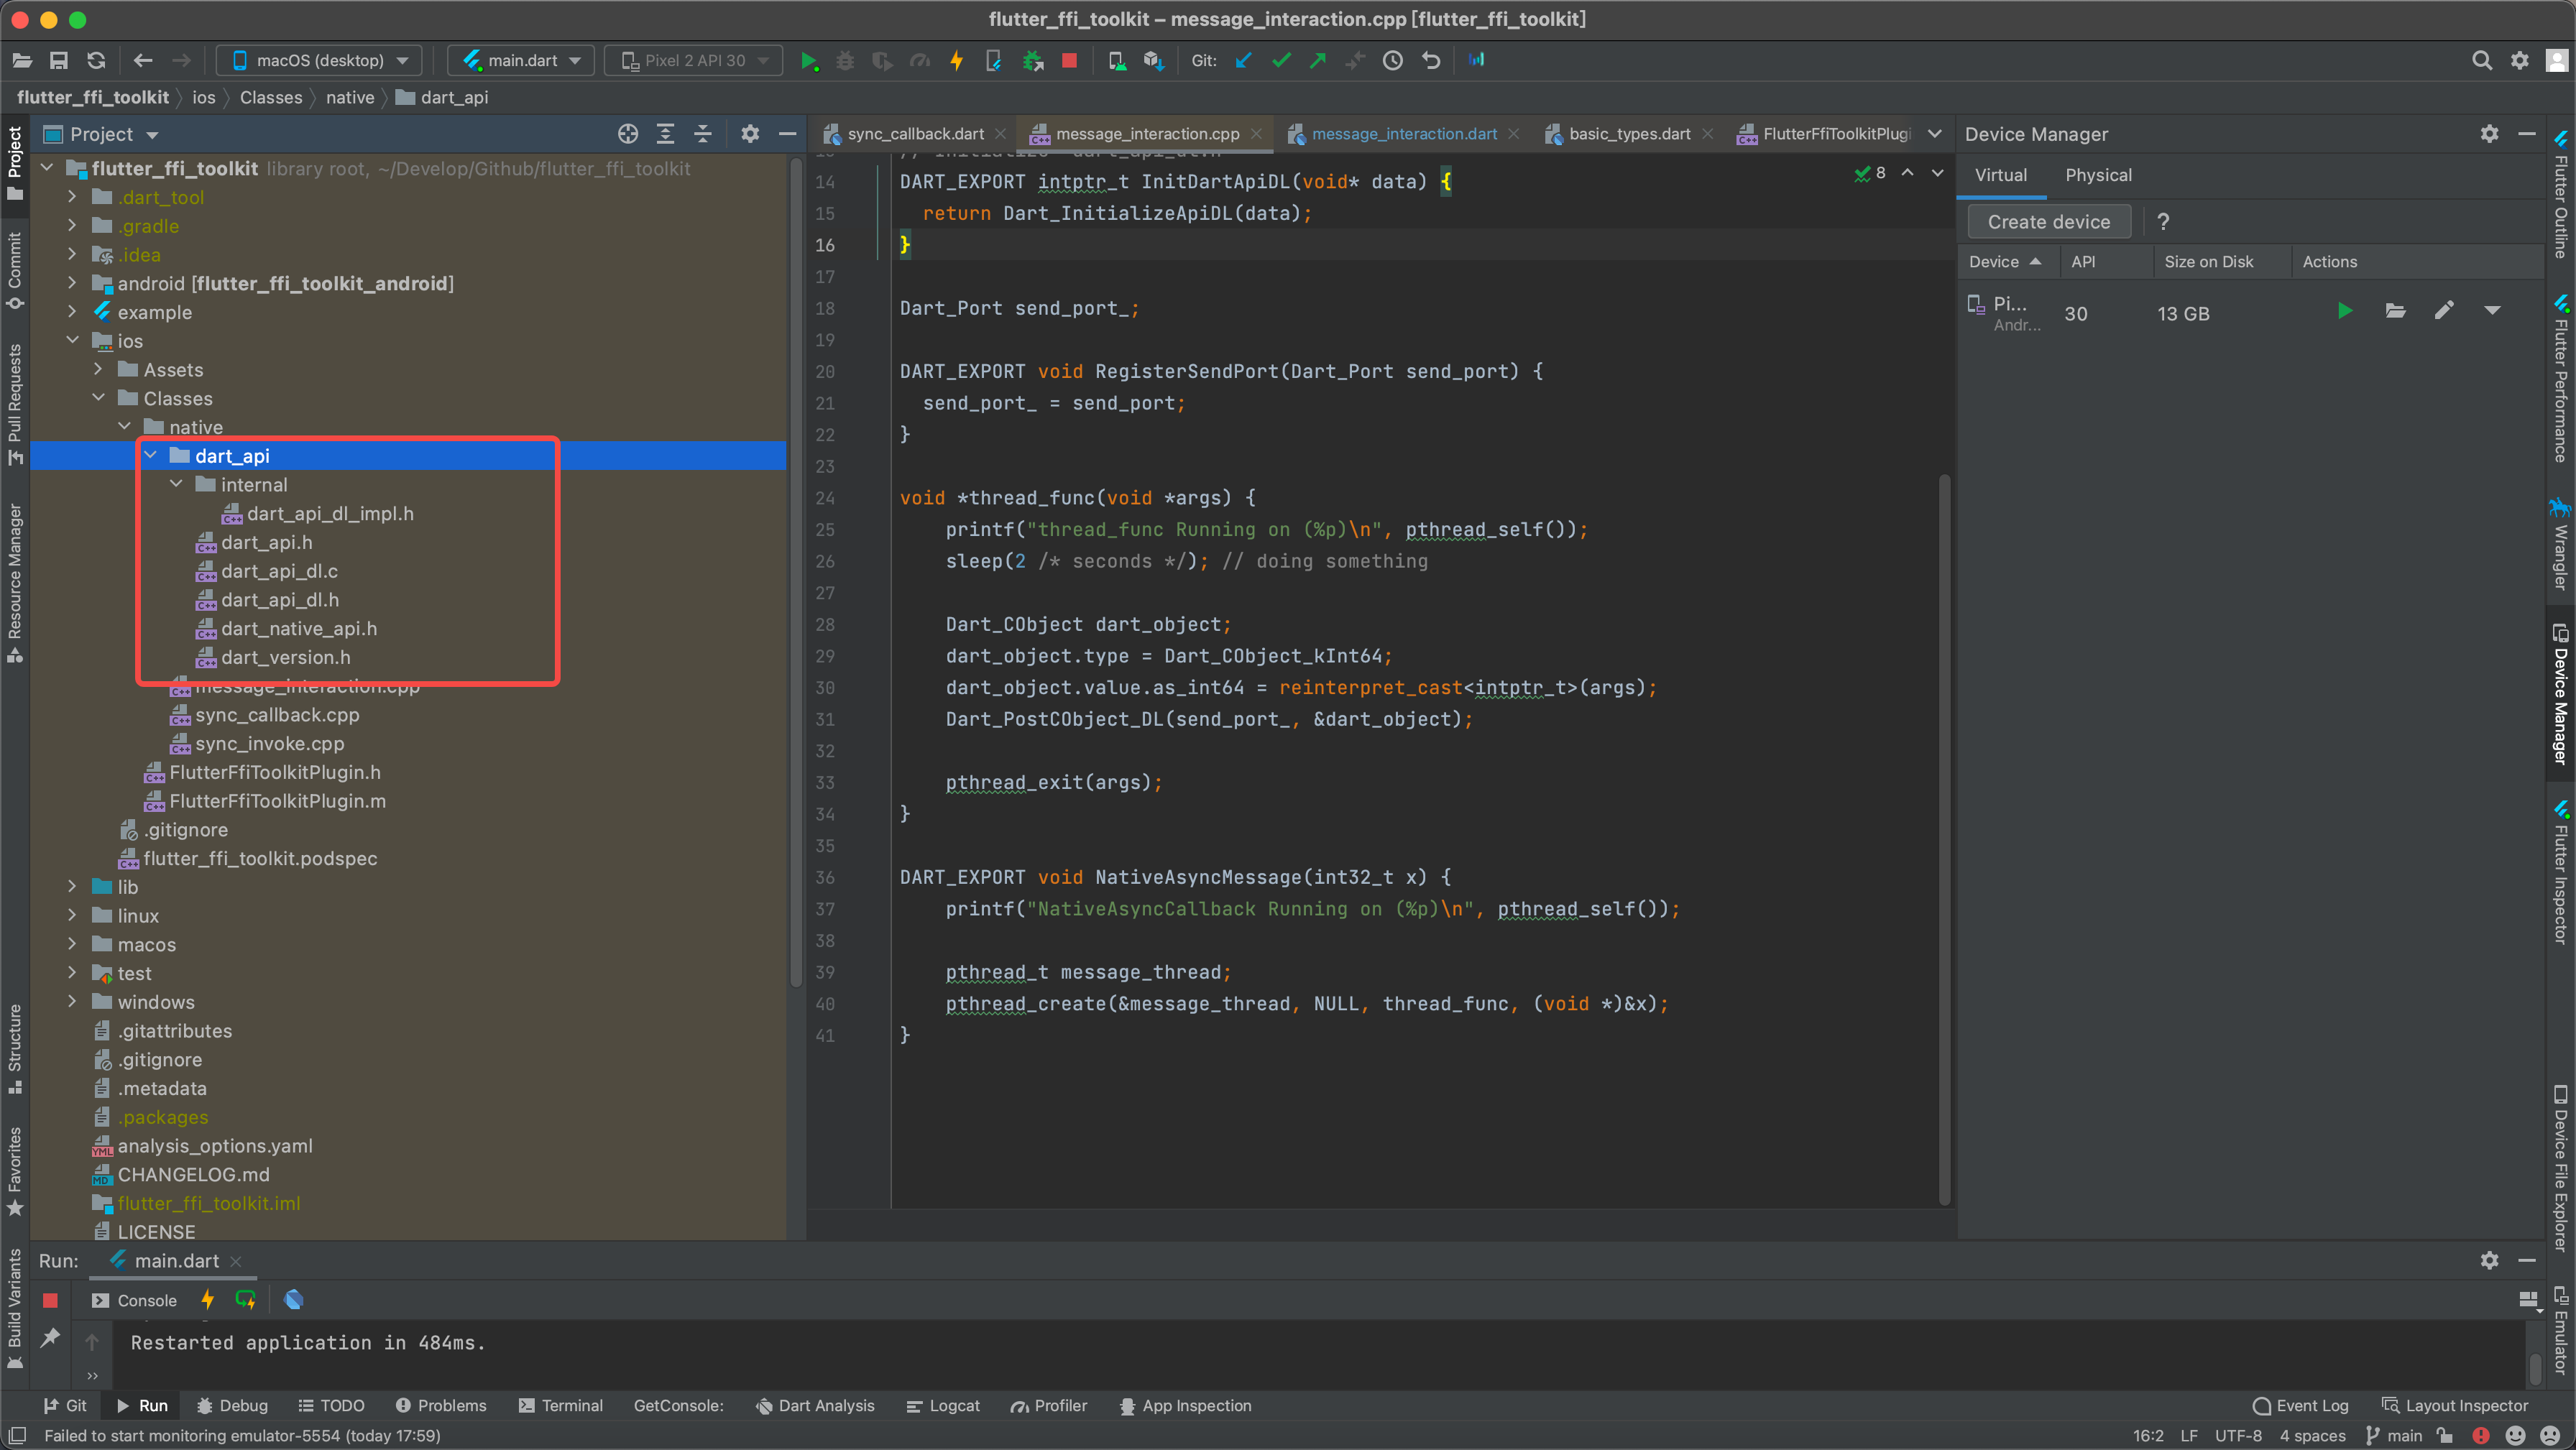
- 效果

ffigen使用
手寫這些ffi互動程式碼,也是件比較麻煩的事,而且每個方法都要寫對應的型別轉換和相應的寫死方法名,如果c的某個方法改變引數和方法名,再回去改對應的dart程式碼,無疑是一件蛋痛的事
flutter提供了一個自動生成ffi互動的程式碼,通俗的說:自動將c程式碼生成為對應dart的程式碼
設定
-
ubuntu/linux
- 安裝 libclangdev:
sudo apt-get install libclang-dev
- 安裝 libclangdev:
-
Windows
- 安裝 Visual Studio with C++ development support
- 安裝 LLVM:
winget install -e --id LLVM.LLVM
-
MacOS
-
安裝 Xcode
-
安裝 LLVM:
brew install llvm
-
-
引入ffigen
dependencies:
  ffigen: ^7.2.0

ffigen:
  # 輸出生成的檔案路徑
  output: 'lib/src/ffigen/two_num_add.dart'
  # 輸出的類名
  name: NativeLibrary
  headers:
    # 設定需要生成的檔案
    entry-points:
      - 'ios/Classes/native/ffigen/add.cpp'
    # 保證只轉換two_num_add.cpp檔案,不轉換其包含的庫檔案,建議加上
    include-directives:
      - 'ios/Classes/native/ffigen/add.cpp'
生成檔案
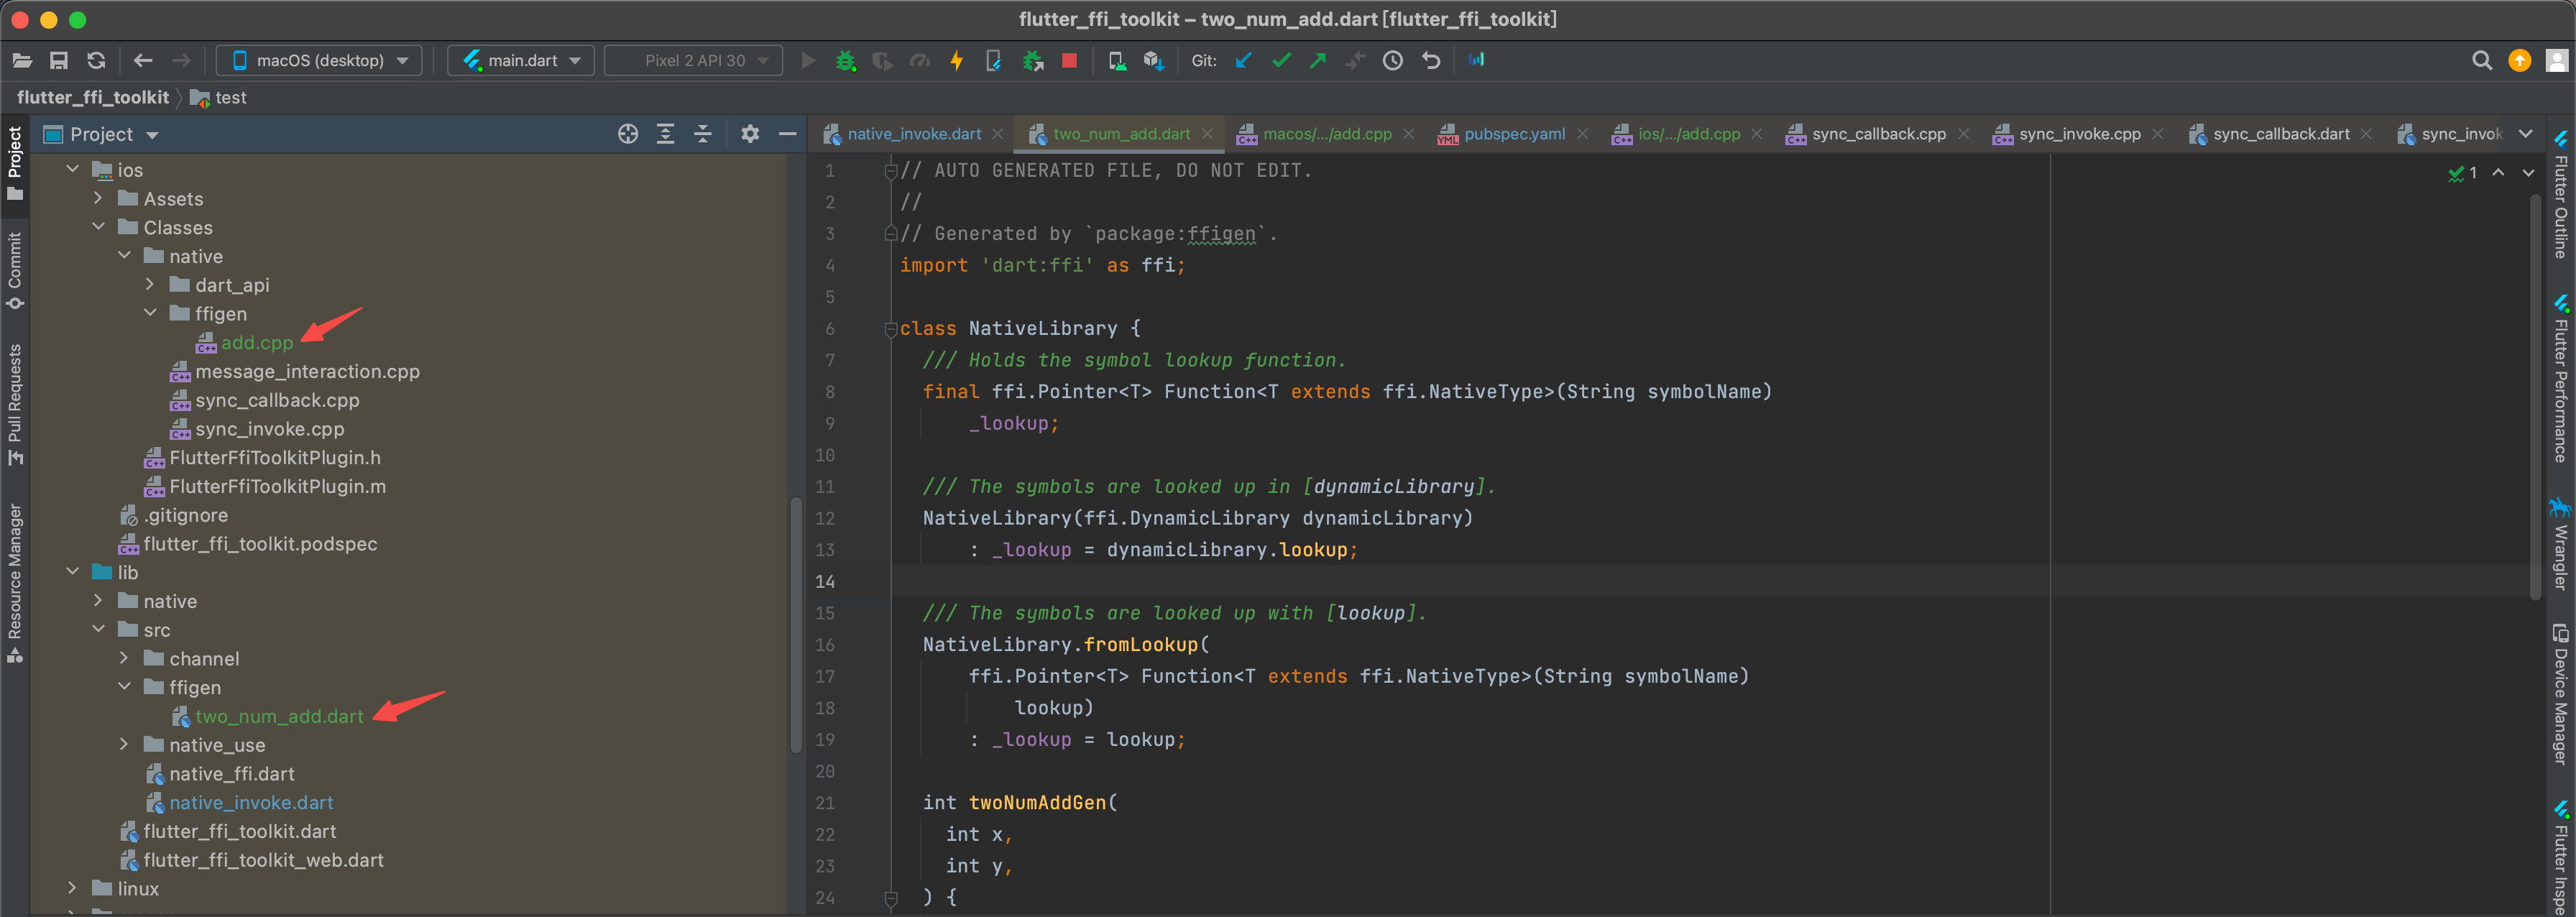
- 需要注意:生成的檔案位置,需要和指定檔案的編譯位置保持一致,這樣才能編譯這些c檔案
- ffigen生成命令
dart run ffigen
- add.cpp
- 使用命令生成對應dart檔案的時候,方法名前不能加我們定義的
DART_API,不然無法生成對應dart檔案 - 編譯的時候必須要加上
DART_API,不然無法編譯該方法 - 有點無語,有知道能統一處理cpp檔案方法的,還請在評論區告知呀
- 使用命令生成對應dart檔案的時候,方法名前不能加我們定義的
#include <stdint.h>

#ifdef WIN32
#define DART_API extern "C" __declspec(dllexport)
#else
#define DART_API extern "C" __attribute__((visibility("default"))) __attribute__((used))
#endif

// DART_API int32_t twoNumAddGen(int32_t x, int32_t y){
//     return x + y;
// }

int32_t twoNumAddGen(int32_t x, int32_t y){
    return x + y;
}
- 生成的dart檔案
// AUTO GENERATED FILE, DO NOT EDIT.
//
// Generated by `package:ffigen`.
import 'dart:ffi' as ffi;

class NativeLibrary {
  /// Holds the symbol lookup function.
  final ffi.Pointer<T> Function<T extends ffi.NativeType>(String symbolName)
      _lookup;

  /// The symbols are looked up in [dynamicLibrary].
  NativeLibrary(ffi.DynamicLibrary dynamicLibrary)
      : _lookup = dynamicLibrary.lookup;

  /// The symbols are looked up with [lookup].
  NativeLibrary.fromLookup(
      ffi.Pointer<T> Function<T extends ffi.NativeType>(String symbolName)
          lookup)
      : _lookup = lookup;

  int twoNumAddGen(
    int x,
    int y,
  ) {
    return _twoNumAddGen(
      x,
      y,
    );
  }

  late final _twoNumAddGenPtr =
      _lookup<ffi.NativeFunction<ffi.Int32 Function(ffi.Int32, ffi.Int32)>>(
          'twoNumAddGen');
  late final _twoNumAddGen =
      _twoNumAddGenPtr.asFunction<int Function(int, int)>();
}
使用
- 通用載入:NativeFFI.dynamicLibrary
class NativeFFI {
  NativeFFI._();

  static DynamicLibrary? _dyLib;

  static DynamicLibrary get dynamicLibrary {
    if (_dyLib != null) return _dyLib!;

    if (Platform.isMacOS || Platform.isIOS) {
      _dyLib = DynamicLibrary.process();
    } else if (Platform.isAndroid) {
      _dyLib = DynamicLibrary.open('libnative_fun.so');
    } else if (Platform.isWindows) {
      _dyLib = DynamicLibrary.open('libnative_fun.dll');
    } else {
      throw Exception('DynamicLibrary初始化失敗');
    }

    return _dyLib!;
  }
}
- 使用
NativeLibrary(NativeFFI.dynamicLibrary).twoNumAddGen(a, b);
- 效果
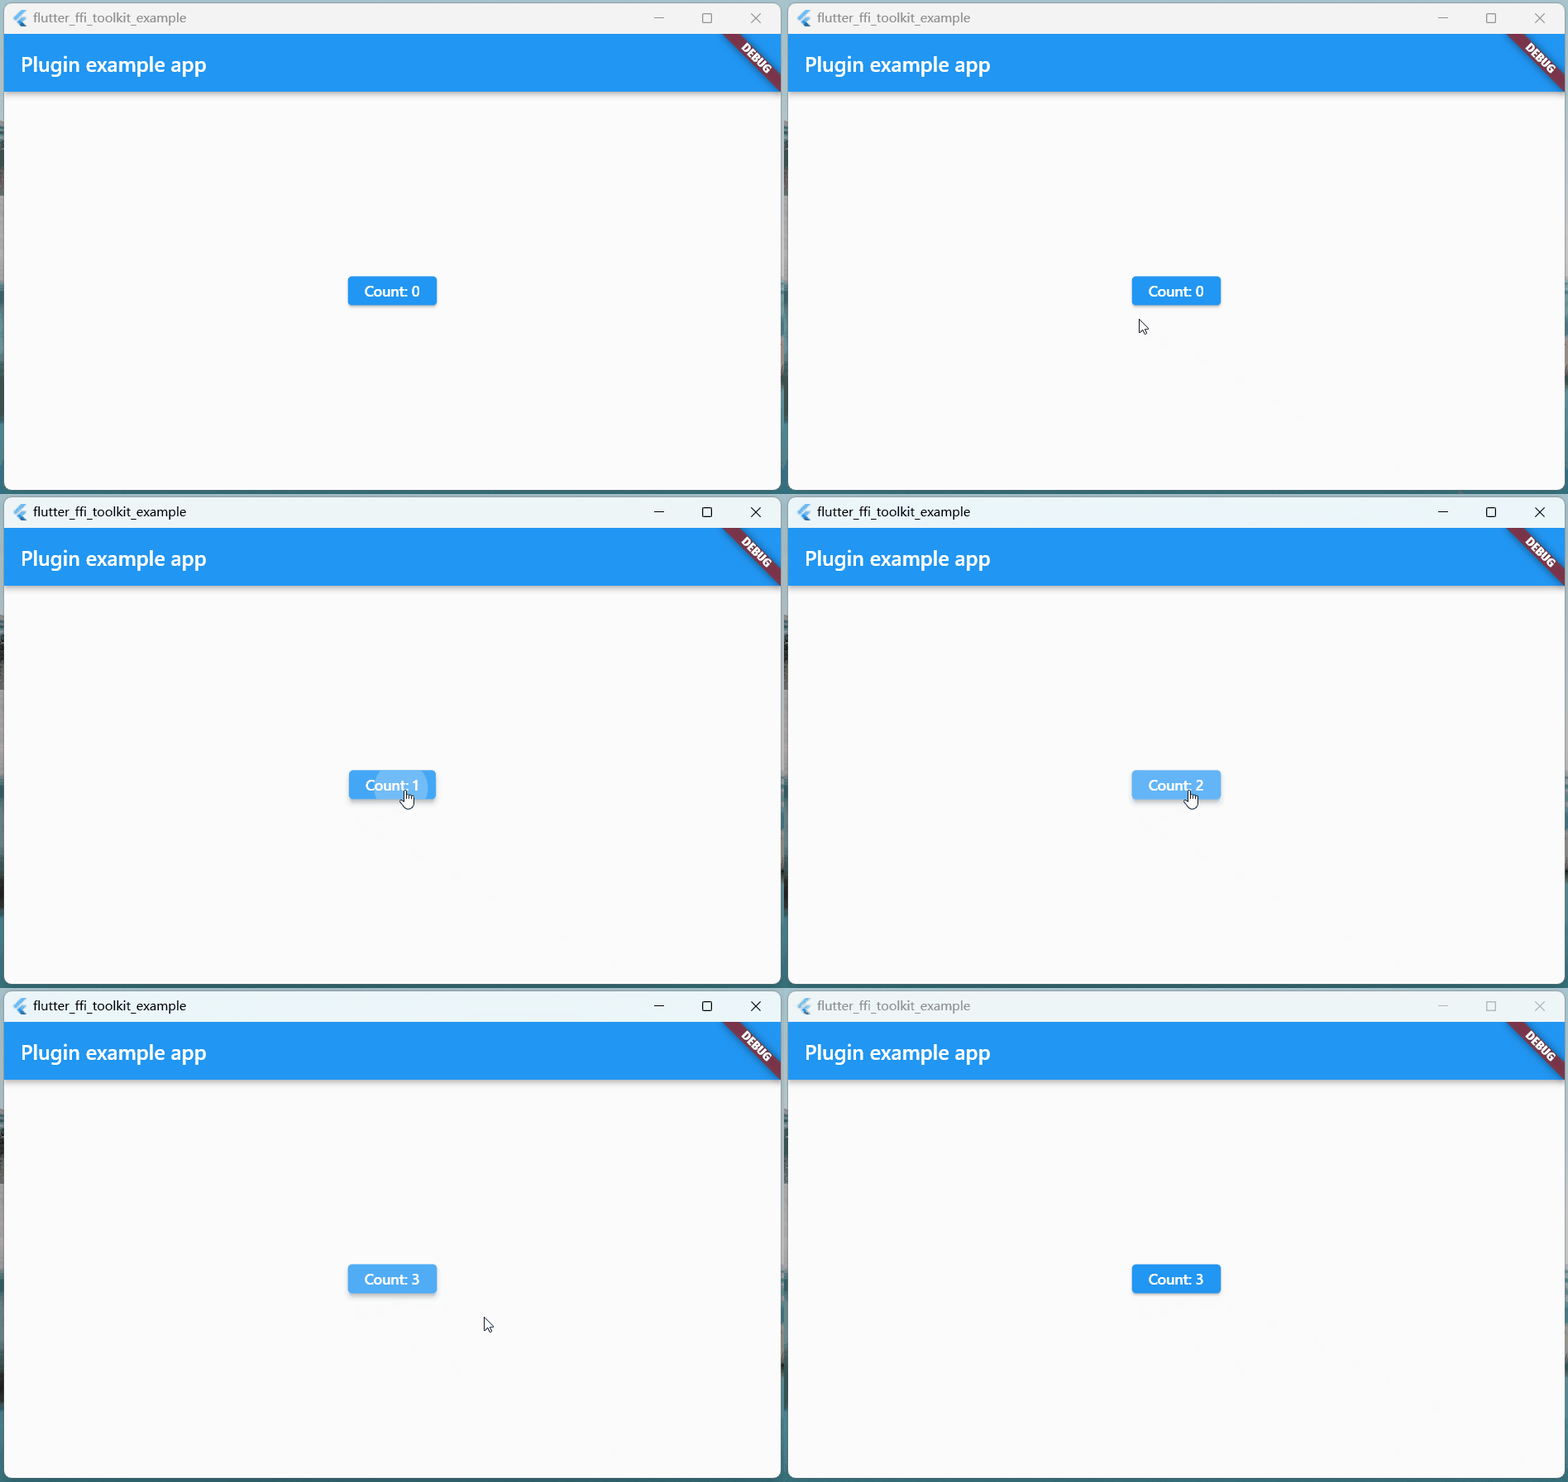
rust 互動
使用flutter_rust_bridge:flutter_rust_bridge
下面全平臺的設定,我成功編譯執行後寫的一份詳細指南(踩了一堆坑),大家務必認真按照步驟設定~
大家也可以參考官方檔案,不過我覺得寫的更加人性化,hhhhhh...
- 原版:https://cjycode.com/flutter_rust_bridge/
- 中文版:https://trdthg.github.io/flutter_rust_bindgen_book_zh
準備
建立Rust專案
- Rust安裝:https://rustup.rs/
- 建立專案,請選擇library

- Cargo.toml 需要引入三個庫:[package]和[lib]中的
name引數,請保持一致,此處範例是name = "rust_ffi"- [lib]:crate-type =["lib", "staticlib", "cdylib"]
- [build-dependencies]:flutter_rust_bridge_codegen
- [dependencies]:flutter_rust_bridge
- 最新版本檢視:https://crates.io/
[package]
name = "rust_ffi"
version = "0.1.0"
edition = "2021"

[lib]
name = "rust_ffi"
crate-type = ["staticlib", "cdylib"]

[build-dependencies]
flutter_rust_bridge_codegen = "=1.51.0"

[dependencies]
flutter_rust_bridge = "=1.51.0"
flutter_rust_bridge_macros = "=1.51.0"
- 寫rust程式碼需要注意下,不要在lib.rs中寫程式碼,不然生成檔案無法獲取導包

Flutter專案
- flutter專案正常建立就行了
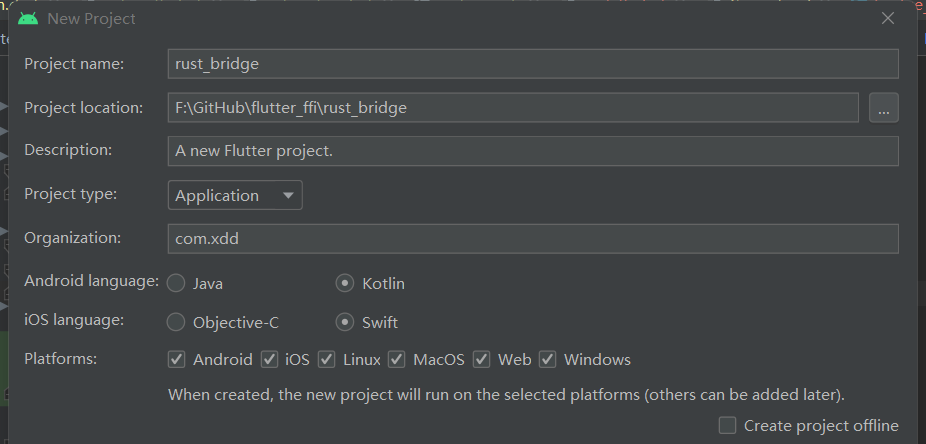
- flutter的pubspec.yaml中需要新增這些庫
dependencies:
  # https://pub.dev/packages/flutter_rust_bridge
  flutter_rust_bridge: 1.51.0
  ffi: ^2.0.1

dev_dependencies:
  ffigen: ^7.0.0
命令
- 需要先安裝下程式碼生成工具
# 必須
cargo install flutter_rust_bridge_codegen
# iOS和macOS 必須需要
cargo install cargo-xcode
-
安裝LLVM
-
ubuntu/linux
- 安裝 libclangdev:
sudo apt-get install libclang-dev
- 安裝 libclangdev:
-
Windows
- 安裝 Visual Studio with C++ development support
- 安裝 LLVM:
winget install -e --id LLVM.LLVM
-
MacOS
-
安裝 Xcode
-
安裝 LLVM:
brew install llvm
-
-
-
生成命令
flutter_rust_bridge_codegen -r rust/src/api.rs -d lib/ffi/rust_ffi/rust_ffi.dart
- 如果需要iOS和macOS,用下面的命令,說明請參照:設定 ---> iOS / macOS
flutter_rust_bridge_codegen -r rust/src/api.rs -d lib/ffi/rust_ffi/rust_ffi.dart -c ios/Runner/bridge_generated.h -c macos/Runner/bridge_generated.h
- 請注意
- 如果你在flutter側升級了
flutter_rust_bridge版本 - rust的Cargo.toml也應該對
flutter_rust_bridge_codegen和flutter_rust_bridge升級對應版本 - 升級完版本後需要重新跑下該命令
- 如果你在flutter側升級了
# 自動安裝最新版本
cargo install flutter_rust_bridge_codegen
# 指定版本
cargo install flutter_rust_bridge_codegen --version 1.51.0 --force
設定
Android
- 必須要安裝
cargo-ndk:它能夠將程式碼編譯到適合的 JNI 而不需要額外的設定
cargo install cargo-ndk
- 新增cargo的android編譯工具,在命令列執行下下述命令
rustup target add aarch64-linux-android
rustup target add armv7-linux-androideabi
rustup target add x86_64-linux-android
rustup target add i686-linux-android
- NDK:請使用NDK 22或更早的版本,NDK下載請參考下圖
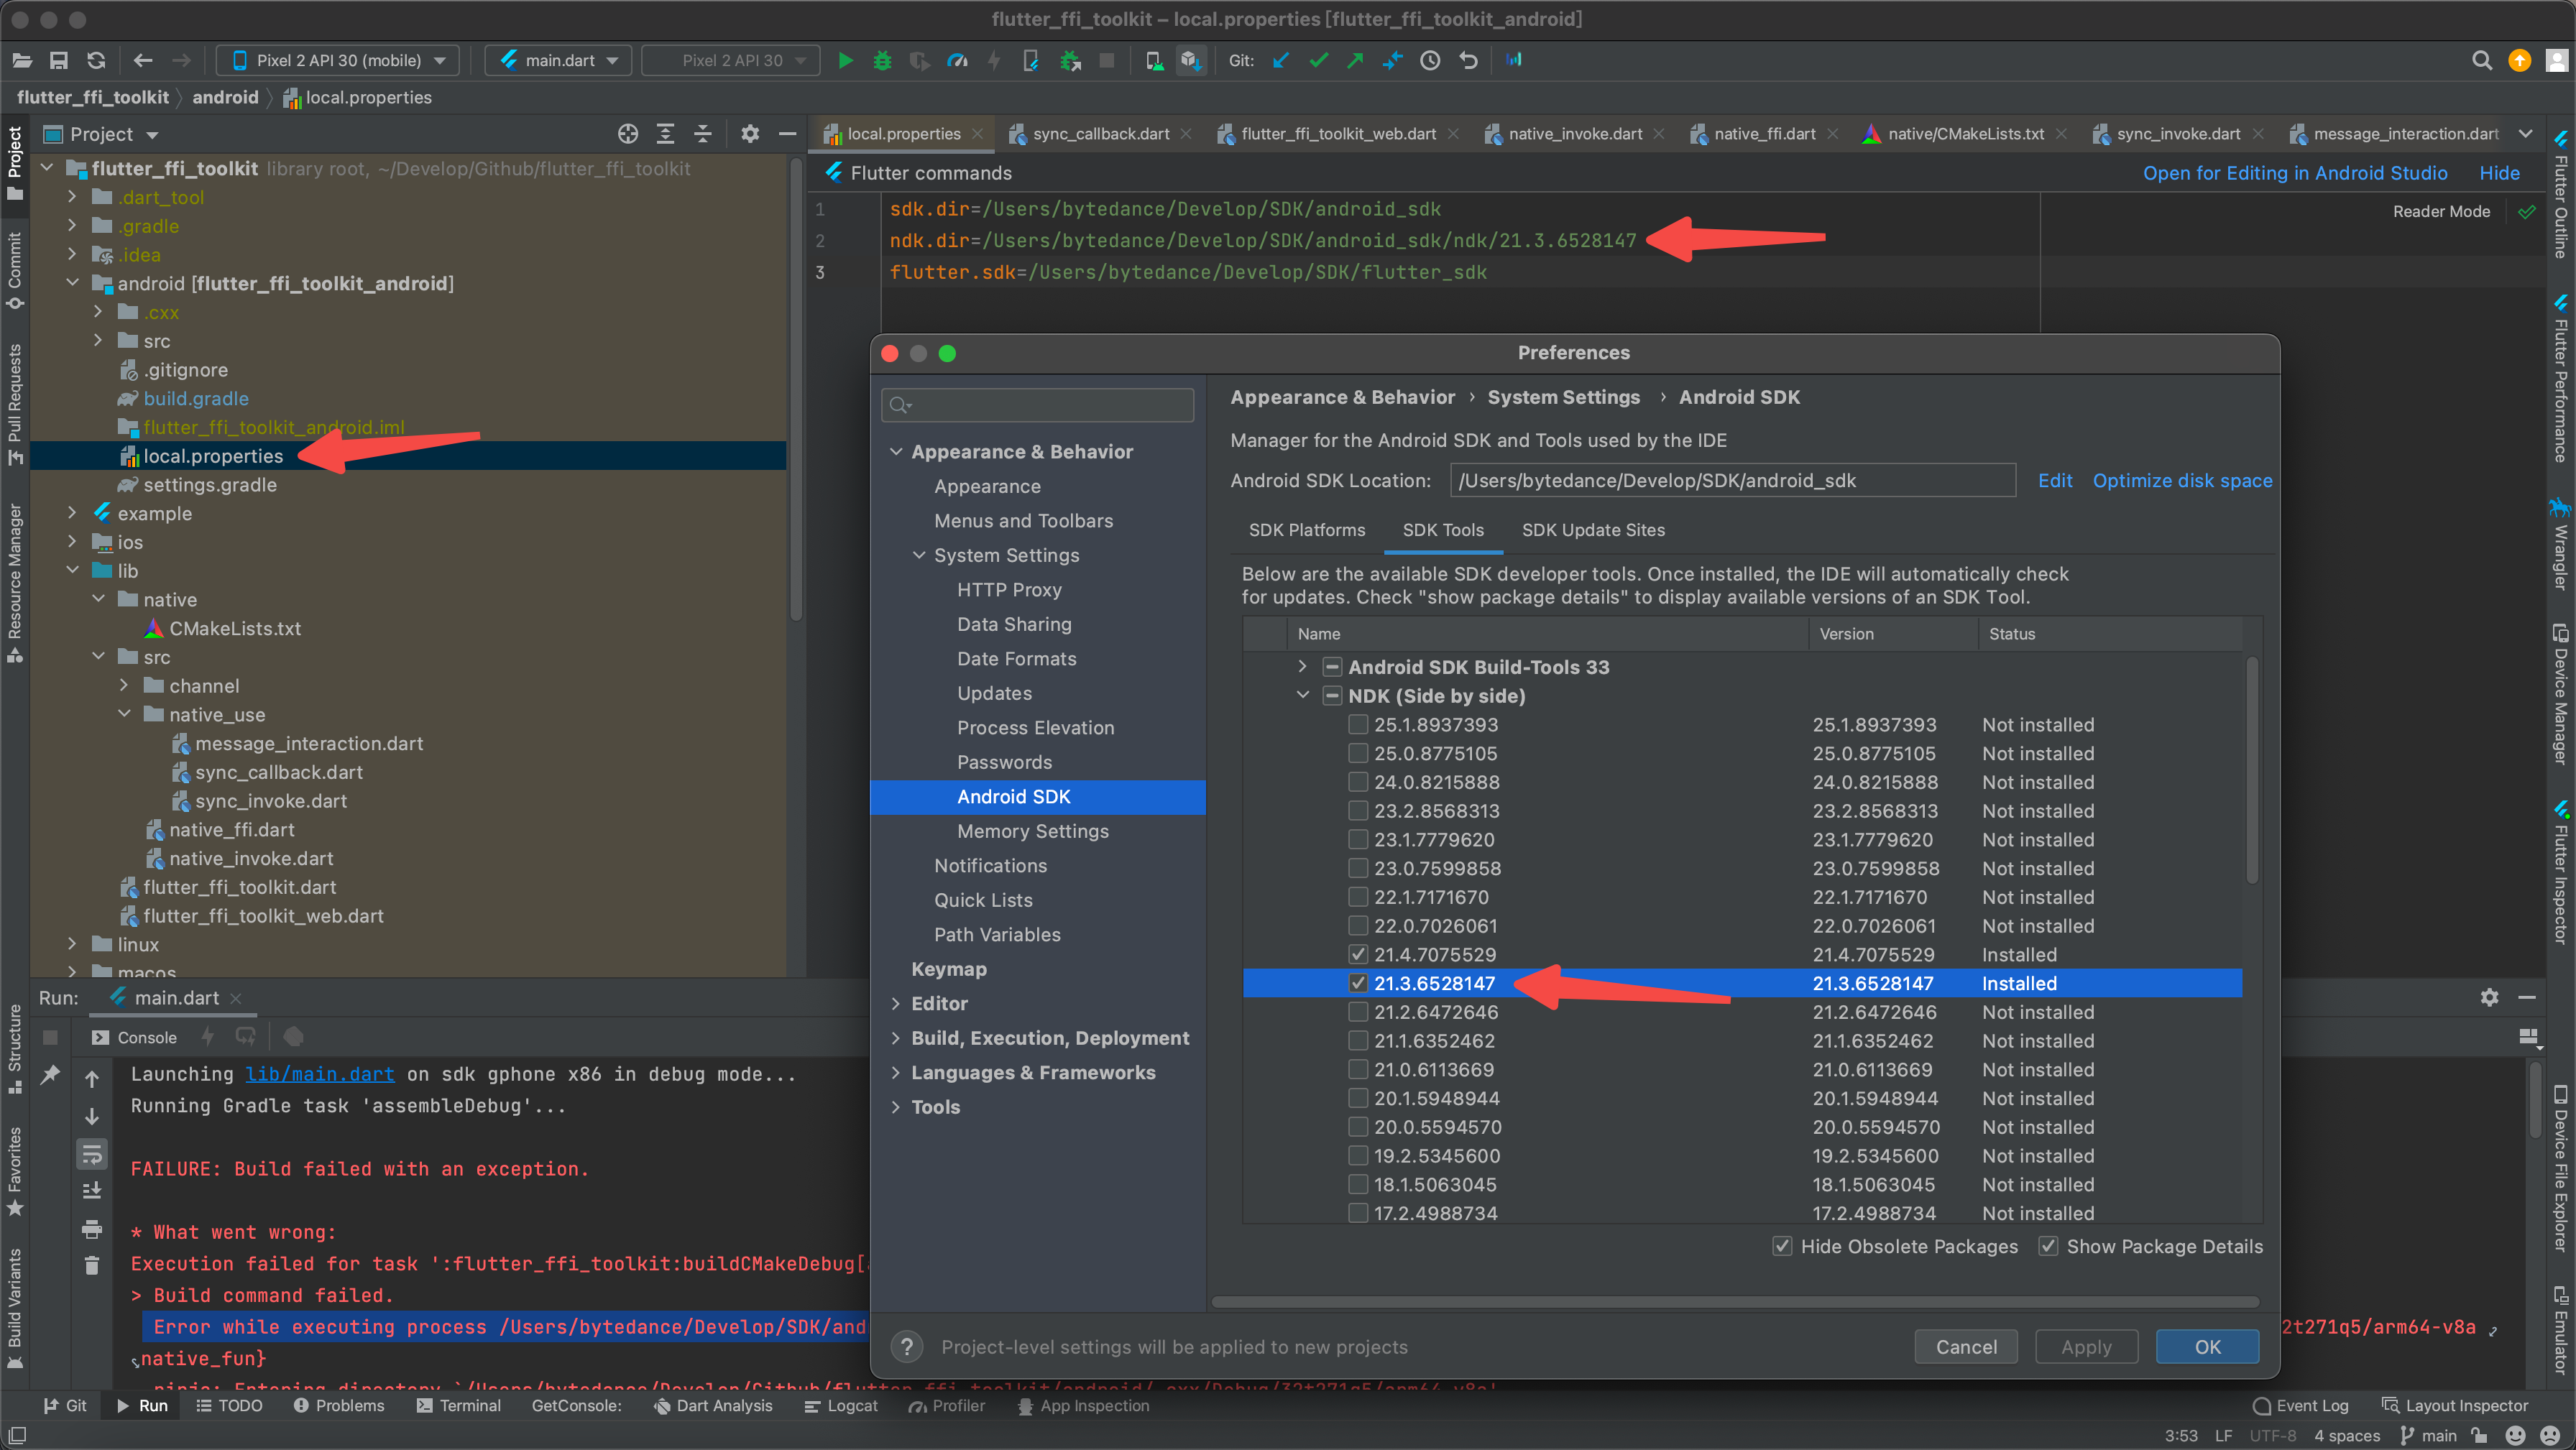
- 需要在gradle.properties設定下
# mac
ANDROID_NDK=/Users/***/Develop/SDK/android_sdk/ndk/21.3.6528147
# windows
ANDROID_NDK=F:\\SDK\\AndroidSDK\\ndk\\21.3.6528147

- 在
android/app/build.gradle的最後新增下面幾行- ANDROID_NDK 就是在上面設定的變數
- "../../rust":此處請設定自己rust專案資料夾命名
[
    new Tuple2('Debug', ''),
    new Tuple2('Profile', '--release'),
    new Tuple2('Release', '--release')
].each {
    def taskPostfix = it.first
    def profileMode = it.second
    tasks.whenTaskAdded { task ->
        if (task.name == "javaPreCompile$taskPostfix") {
            task.dependsOn "cargoBuild$taskPostfix"
        }
    }
    tasks.register("cargoBuild$taskPostfix", Exec) {
        // Until https://github.com/bbqsrc/cargo-ndk/pull/13 is merged,
        // this workaround is necessary.

        def ndk_command = """cargo ndk \
            -t armeabi-v7a -t arm64-v8a -t x86_64 -t x86 \
            -o ../android/app/src/main/jniLibs build $profileMode"""

        workingDir "../../rust"
        environment "ANDROID_NDK_HOME", "$ANDROID_NDK"
        if (org.gradle.nativeplatform.platform.internal.DefaultNativePlatform.currentOperatingSystem.isWindows()) {
            commandLine 'cmd', '/C', ndk_command
        } else {
            commandLine 'sh', '-c', ndk_command
        }
    }
}
iOS
- iOS 需要一些額外的交叉編譯目標:
# 64 bit targets (真機 & 模擬器):
rustup target add aarch64-apple-ios x86_64-apple-ios
# New simulator target for Xcode 12 and later
rustup target add aarch64-apple-ios-sim
- 需要先生成子專案
# 在rust專案下執行該命令
cargo xcode
新增一些繫結檔案
- 在 Xcode 中開啟
ios/Runner.xcodeproj, 接著把$crate/$crate.xcodeproj新增為子專案:File ---> Add Files to "Runner"
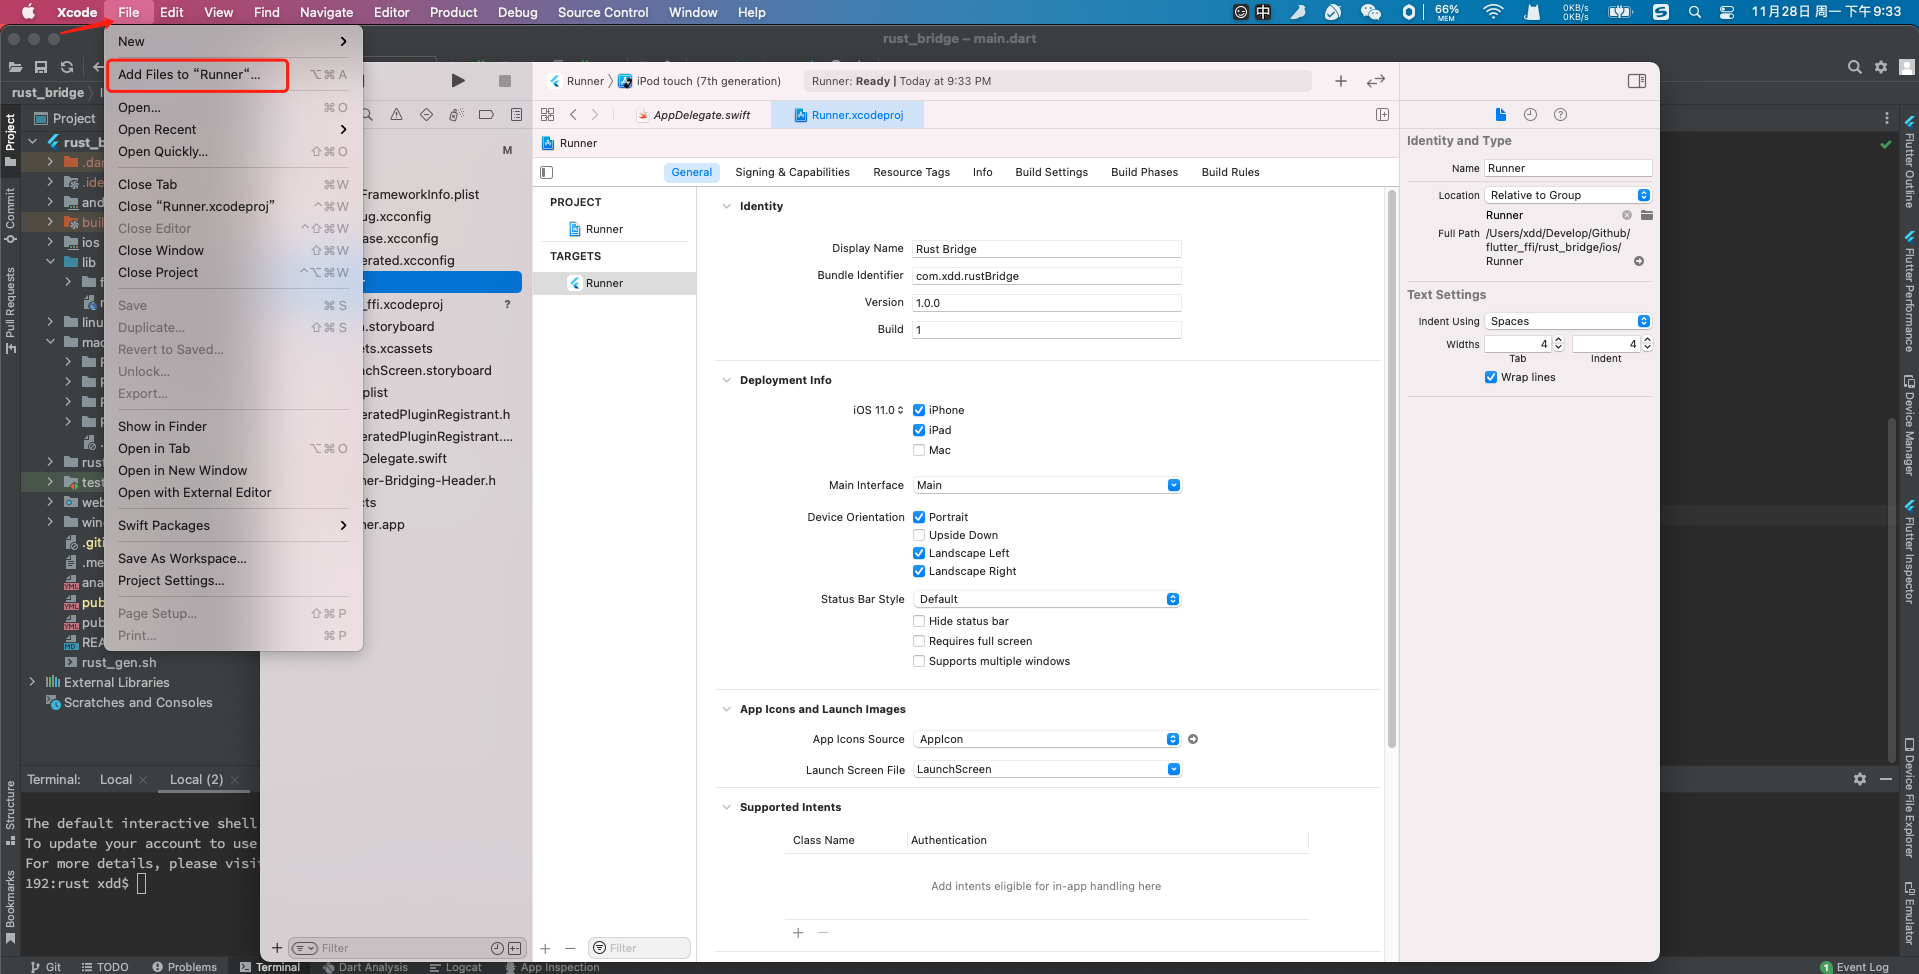
- 選擇生成子專案,然後點選
add
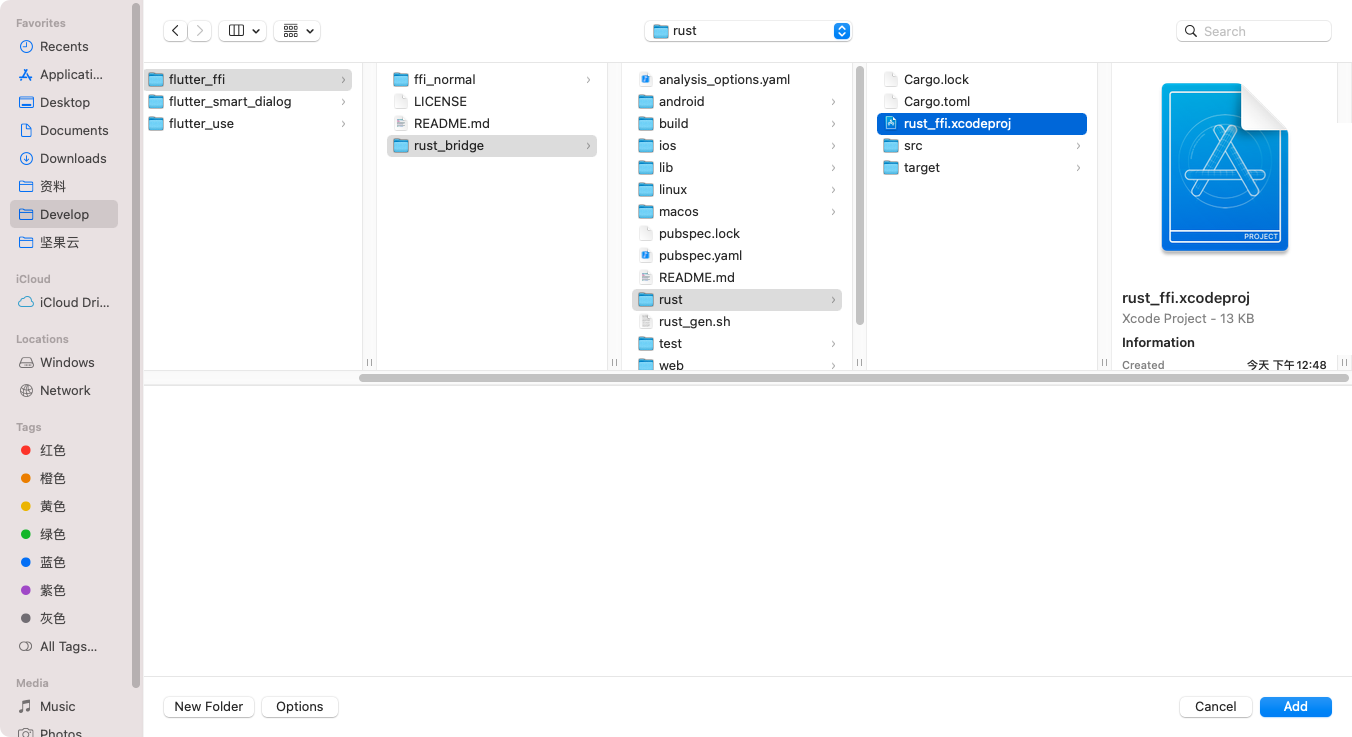
- 選中那個資料夾,就會生成在哪個檔案下
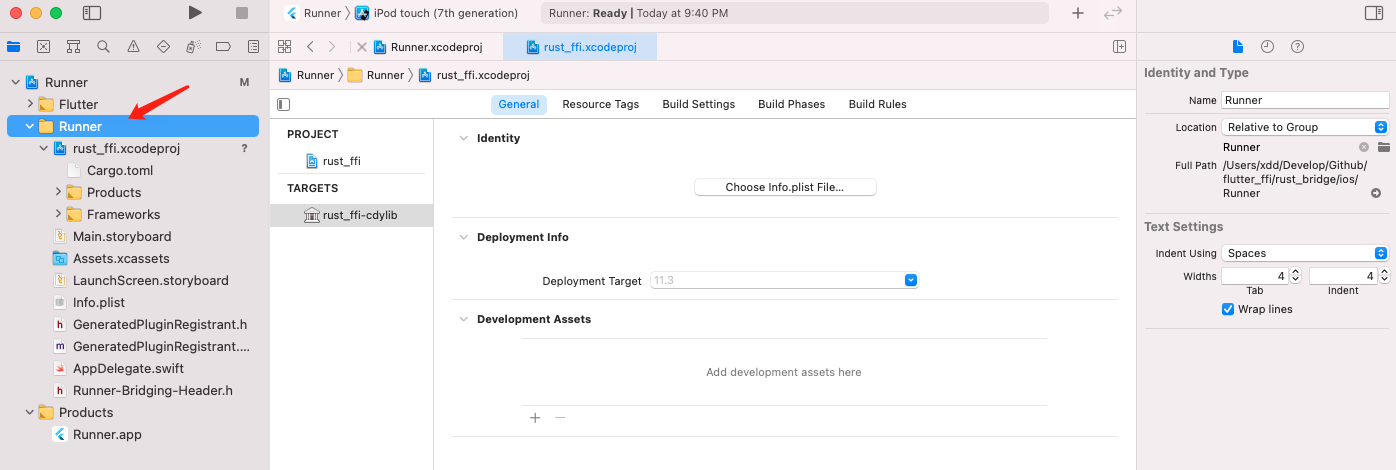
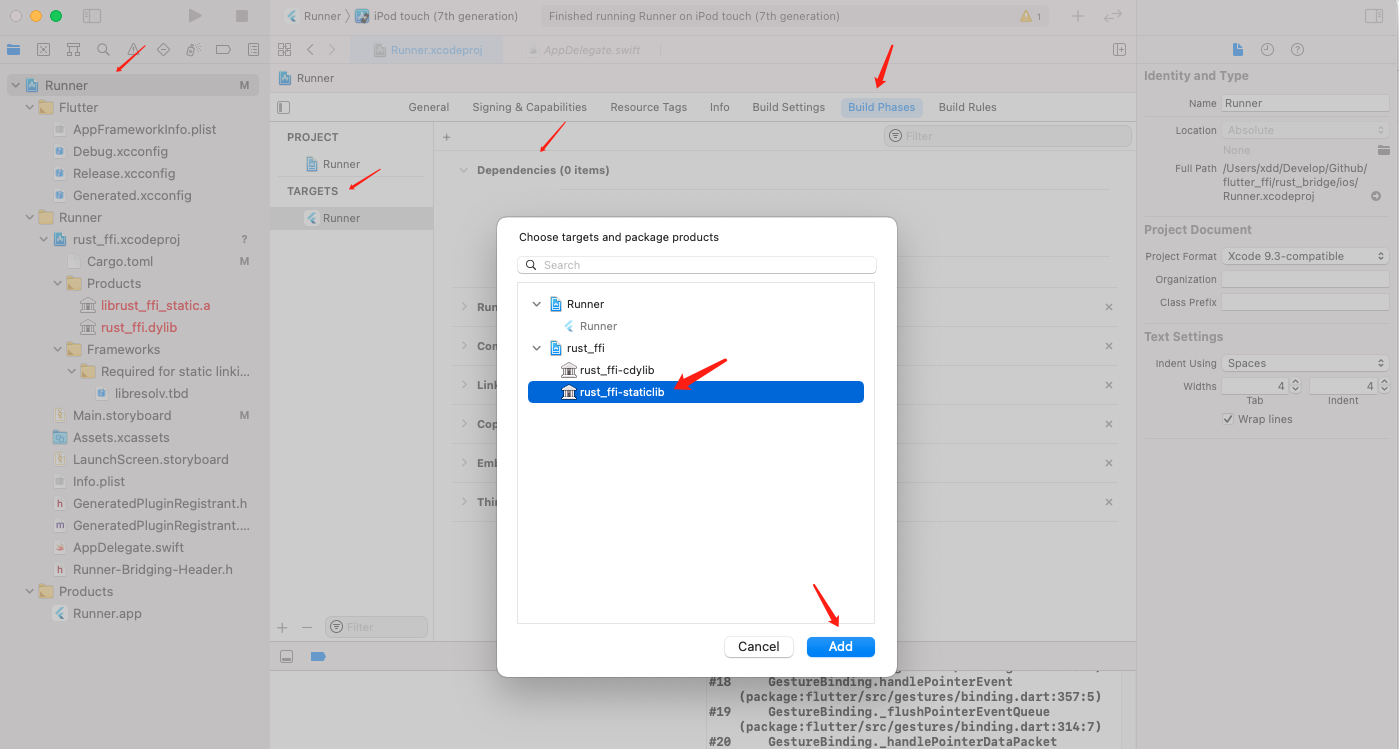
- 點選
Runner根專案,TARGETS ---> Build Phases ---> Target Dependencies :請新增$crate-staticlib
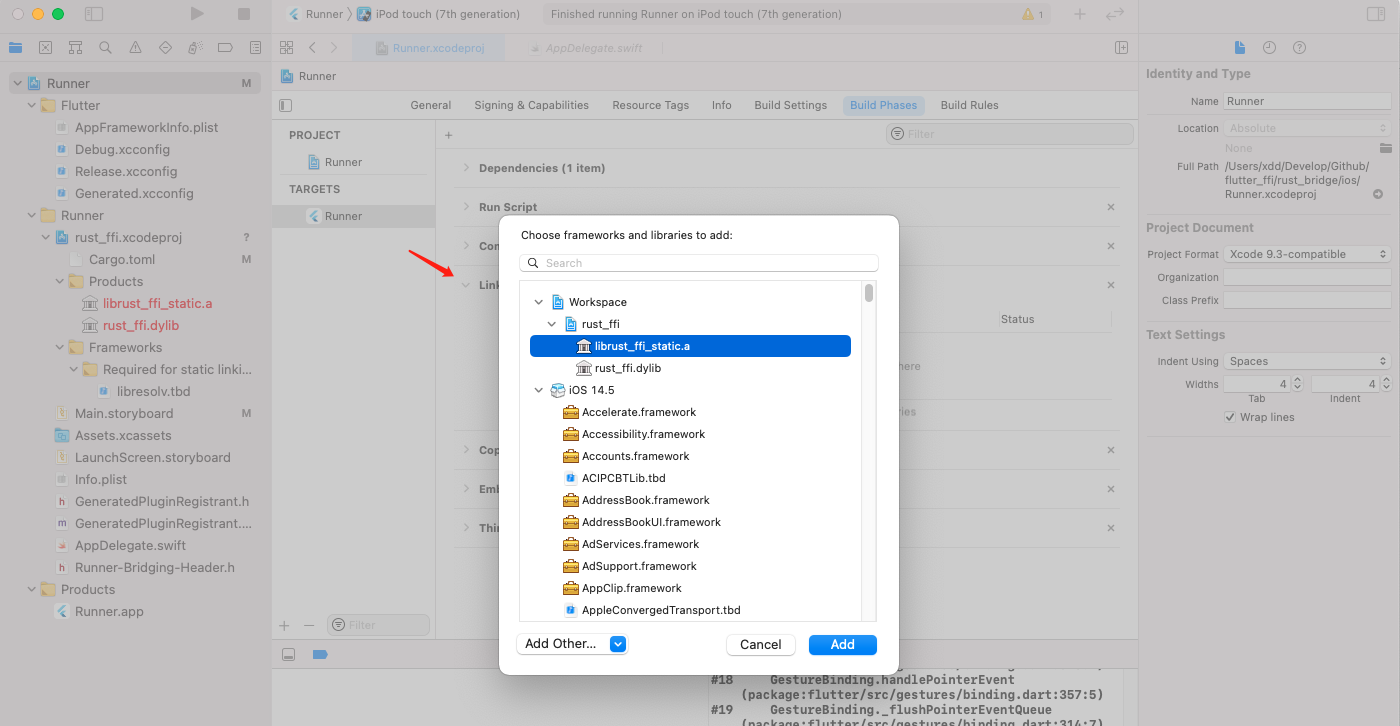
- 展開 Link Binary With Libraries:新增
lib$crate_static.a
- 新增完畢後
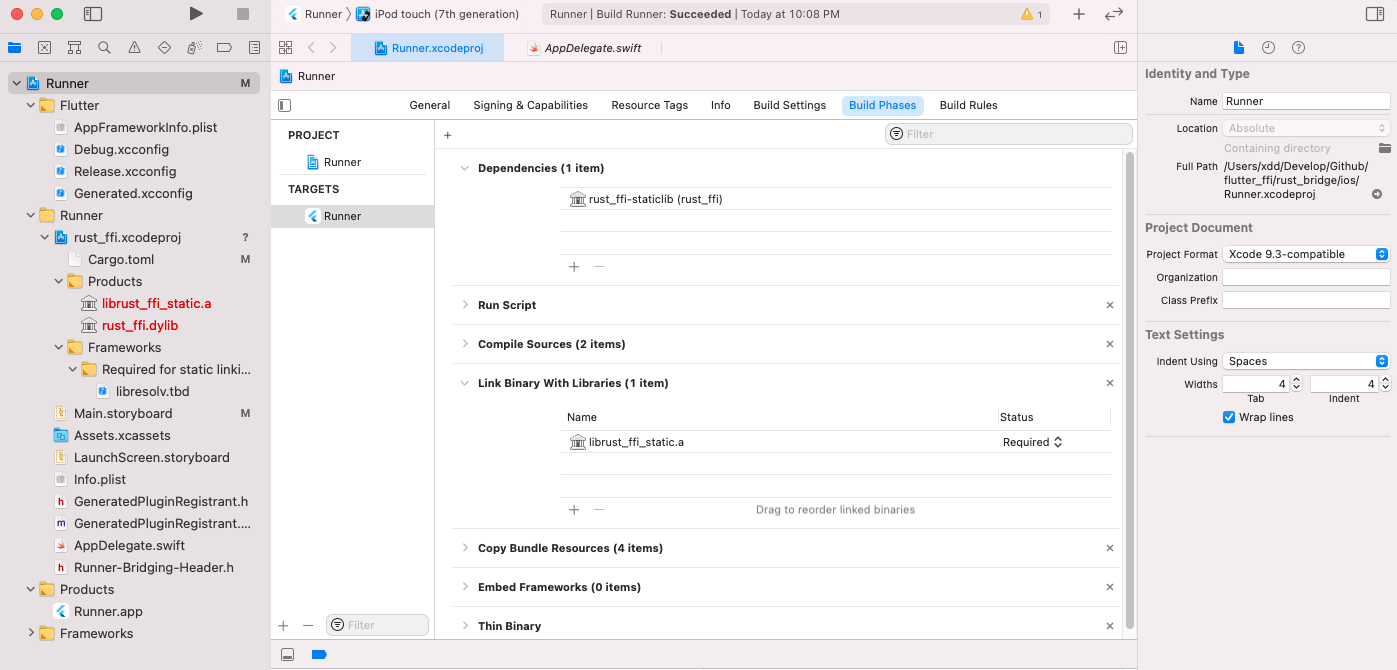
繫結標頭檔案
flutter_rust_bridge_codegen 會建立一個 C 標頭檔案,裡面列出了 Rust 庫匯出的所有符號,需要使用它,確保 Xcode 不會將符號去除。
在專案中需要新增 ios/Runner/bridge_generated.h (或者 macos/Runner/bridge_generated.h)
- 執行下述生成命令,會生成對應標頭檔案,自動放到ios和macos目錄下;可以封裝成指令碼,每次跑指令碼就行了
flutter_rust_bridge_codegen -r rust/src/api.rs -d lib/ffi/rust_ffi/rust_ffi.dart -c ios/Runner/bridge_generated.h -c macos/Runner/bridge_generated.h
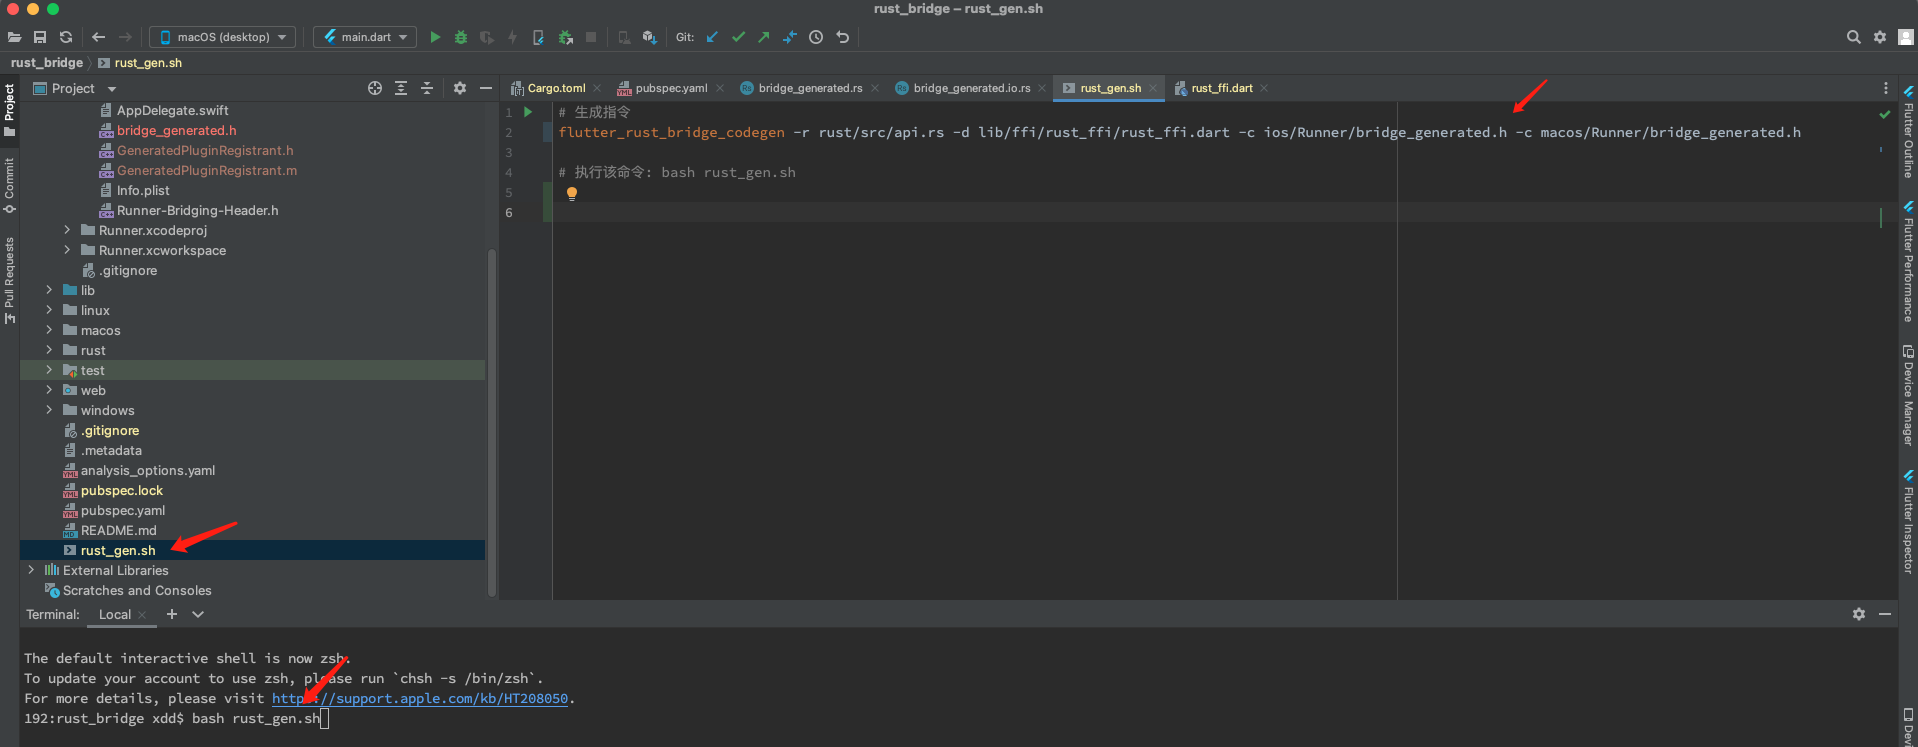
-
在
ios/Runner/Runner-Bridging-Header.h中新增#import "GeneratedPluginRegistrant.h" +#import "bridge_generated.h" -
ios/Runner/AppDelegate.swift中新增override func application( _ application: UIApplication, didFinishLaunchingWithOptions launchOptions: [UIApplication.LaunchOptionsKey: Any]? ) -> Bool { + let dummy = dummy_method_to_enforce_bundling() + print(dummy) GeneratedPluginRegistrant.register(with: self) return super.application(application, didFinishLaunchingWithOptions: launchOptions) }
macOS
說明
macos上面指向有個很奇怪的情況,官方檔案說明的是需要連結$crate-cdylib,$crate.dylib ;但是連結這個庫,用xcode編譯可以執行,但是使用android studio直接編譯執行的時候會報錯
與iOS保持一致,連結 $crate-staticlib ,lib$crate_static.a ,可以順利執行
下面設定,大家按需設定,我這邊使用靜態庫能成功,連結動態庫會失敗
開始設定
- 需要先生成子專案,如果在設定iOS的時候已經執行了該命令,就不需要再次執行了(當然,再次執行也沒問題)
# 在rust專案下執行該命令
cargo xcode
- 在 Xcode 中開啟
macos/Runner.xcodeproj, 接著把$crate/$crate.xcodeproj新增為子專案:File ---> Add Files to "Runner"
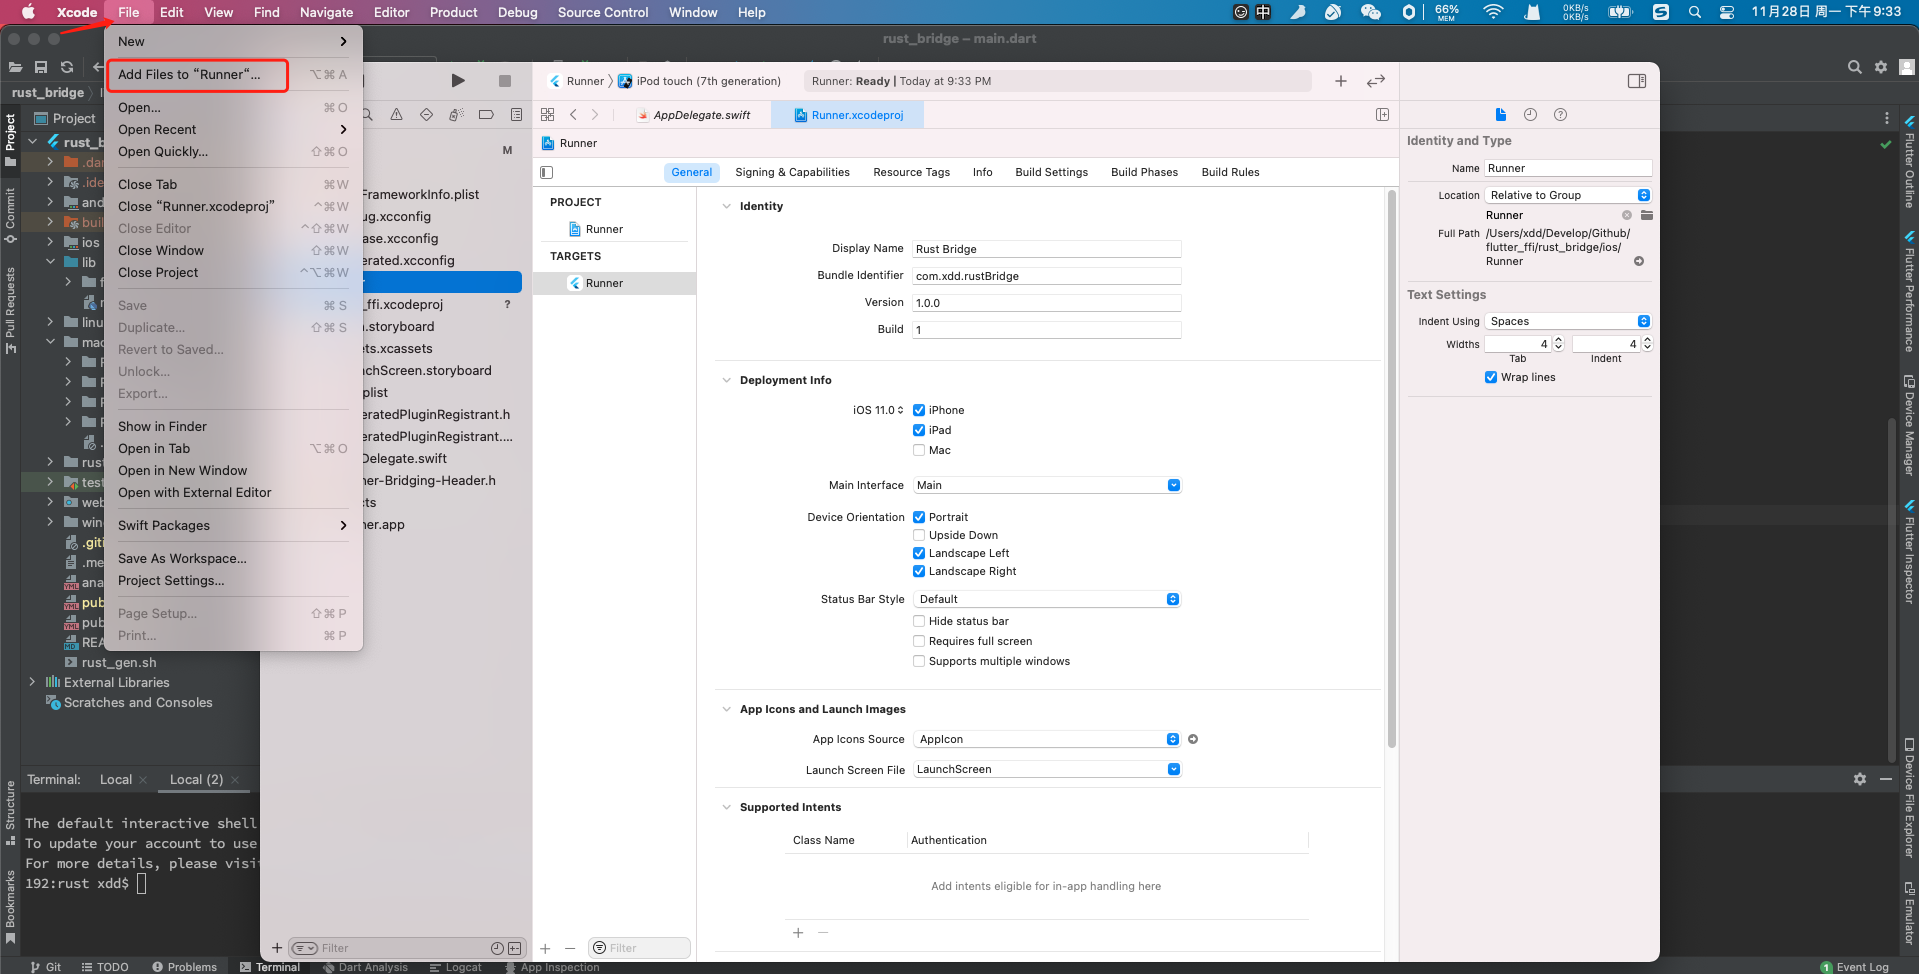
- 點選
Runner根專案,TARGETS ---> Build Phases ---> Target Dependencies :請新增$crate-staticlib(或者 $crate-staticlib )
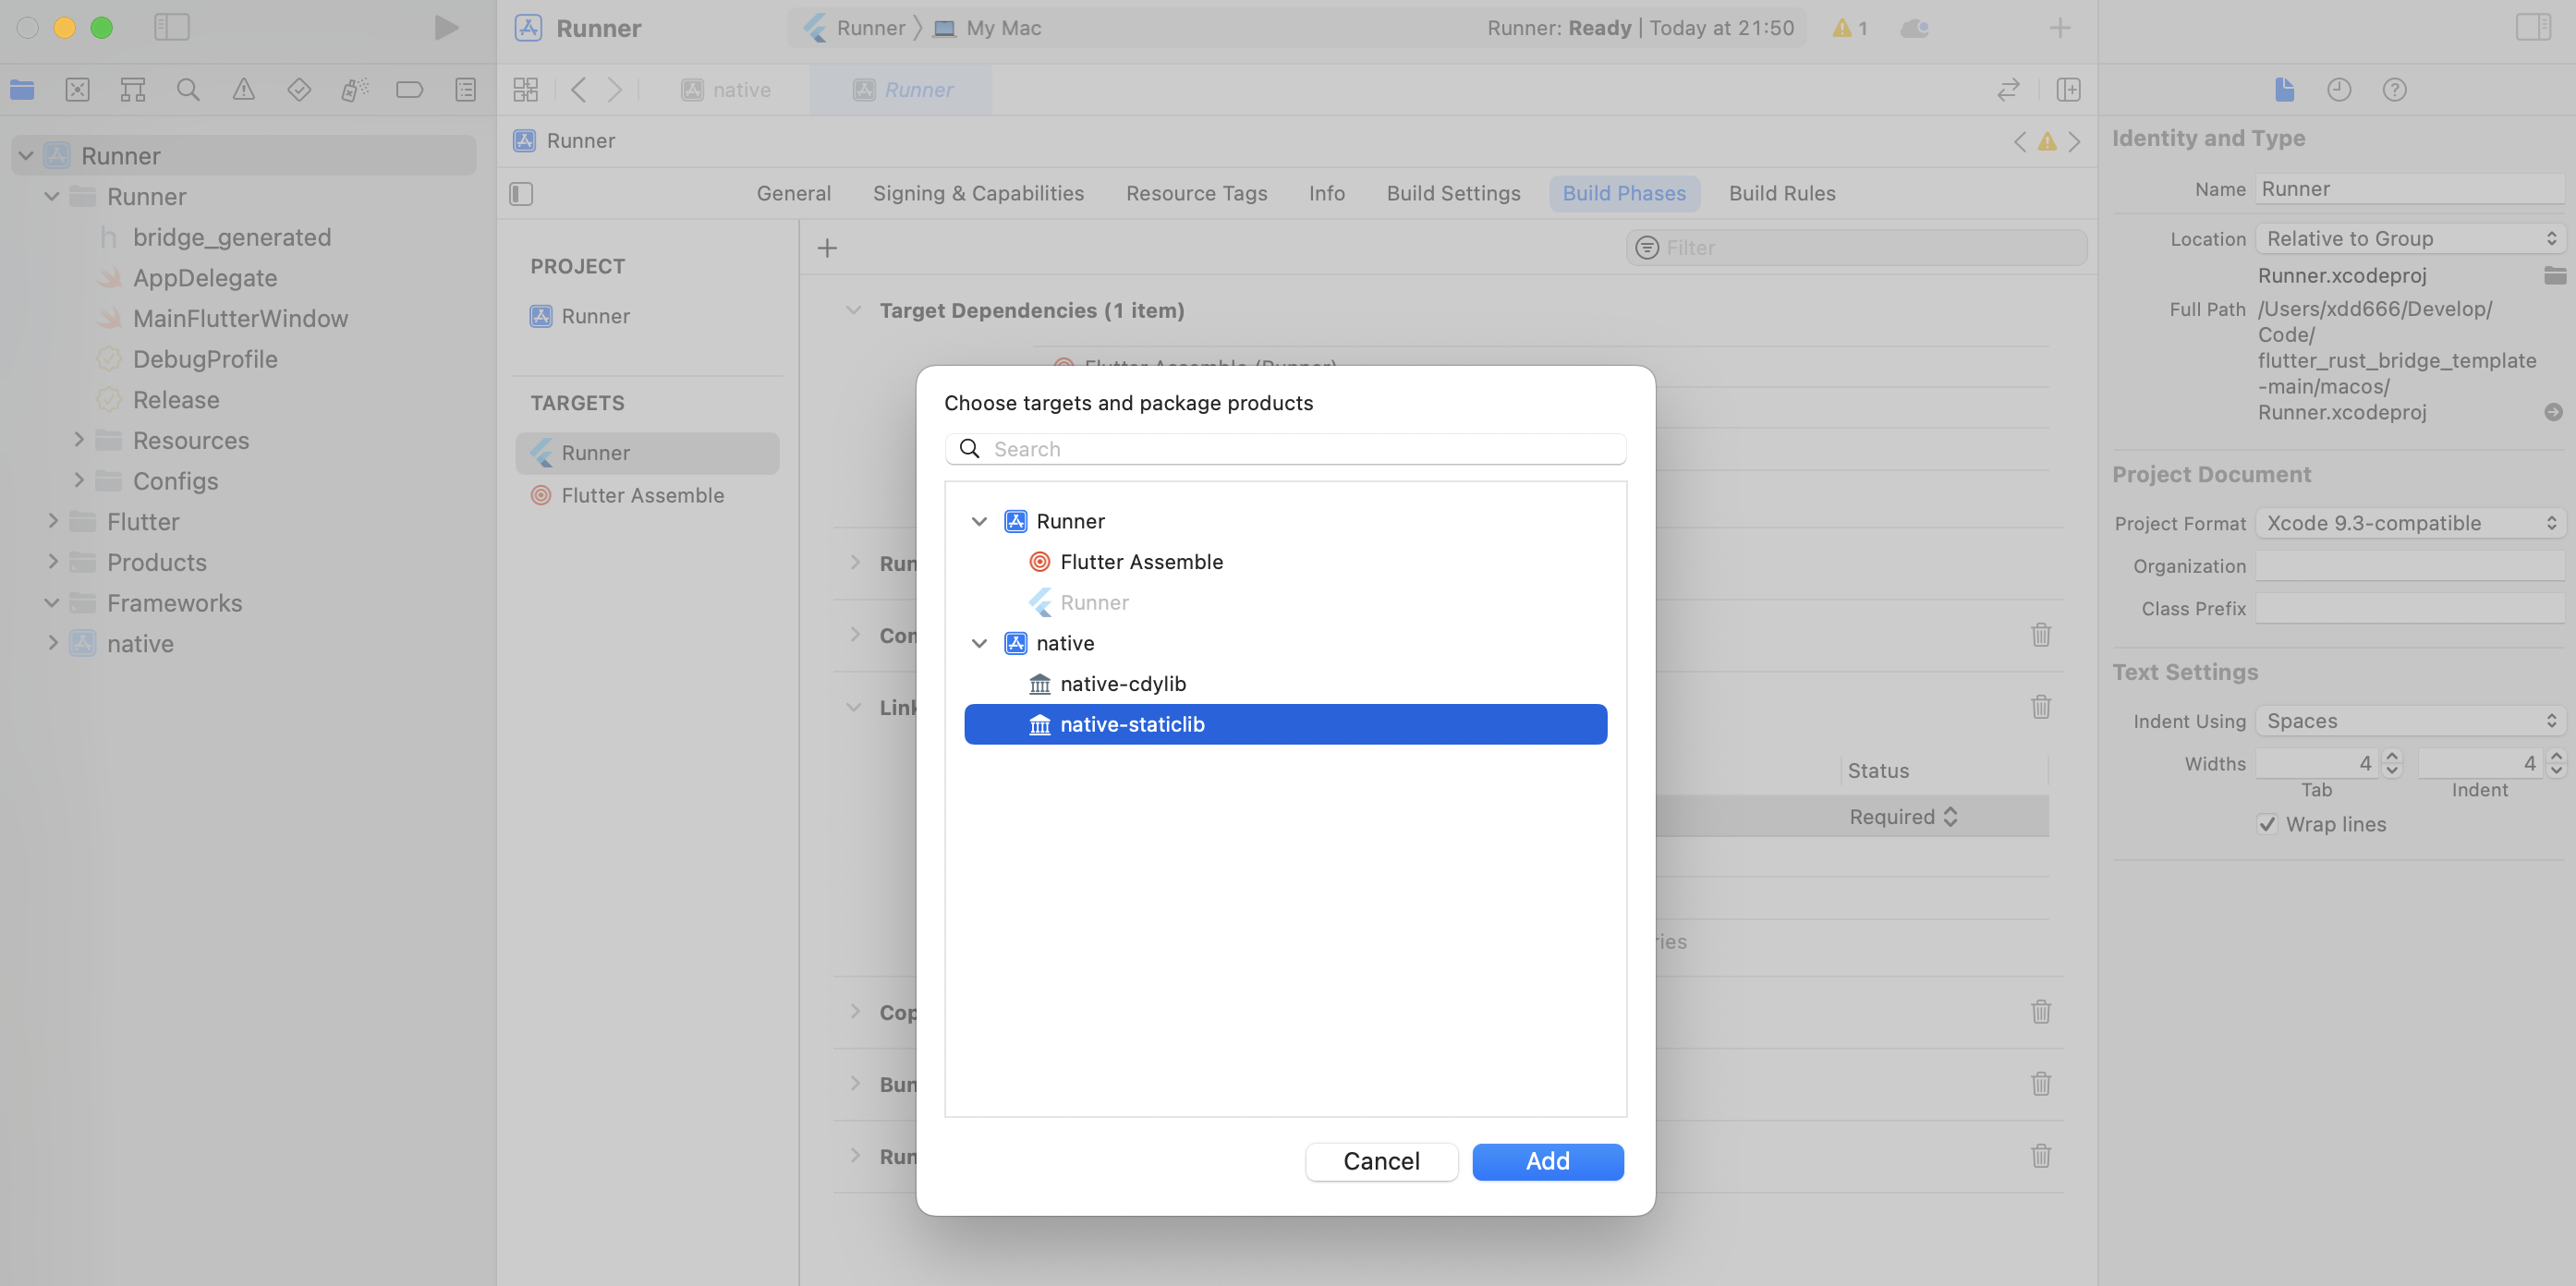
- 展開 Link Binary With Libraries: 新增
lib$crate_static.a(或者$crate.dylib)

- 需要注意的是,如果使用了動態庫,編譯報找不到
$crate.dylib的時候- 可以在
Link Binary With Libraries的時候,macOS新增的**.dylib要選擇Optional - 這個問題可能並不是必現
- 可以在
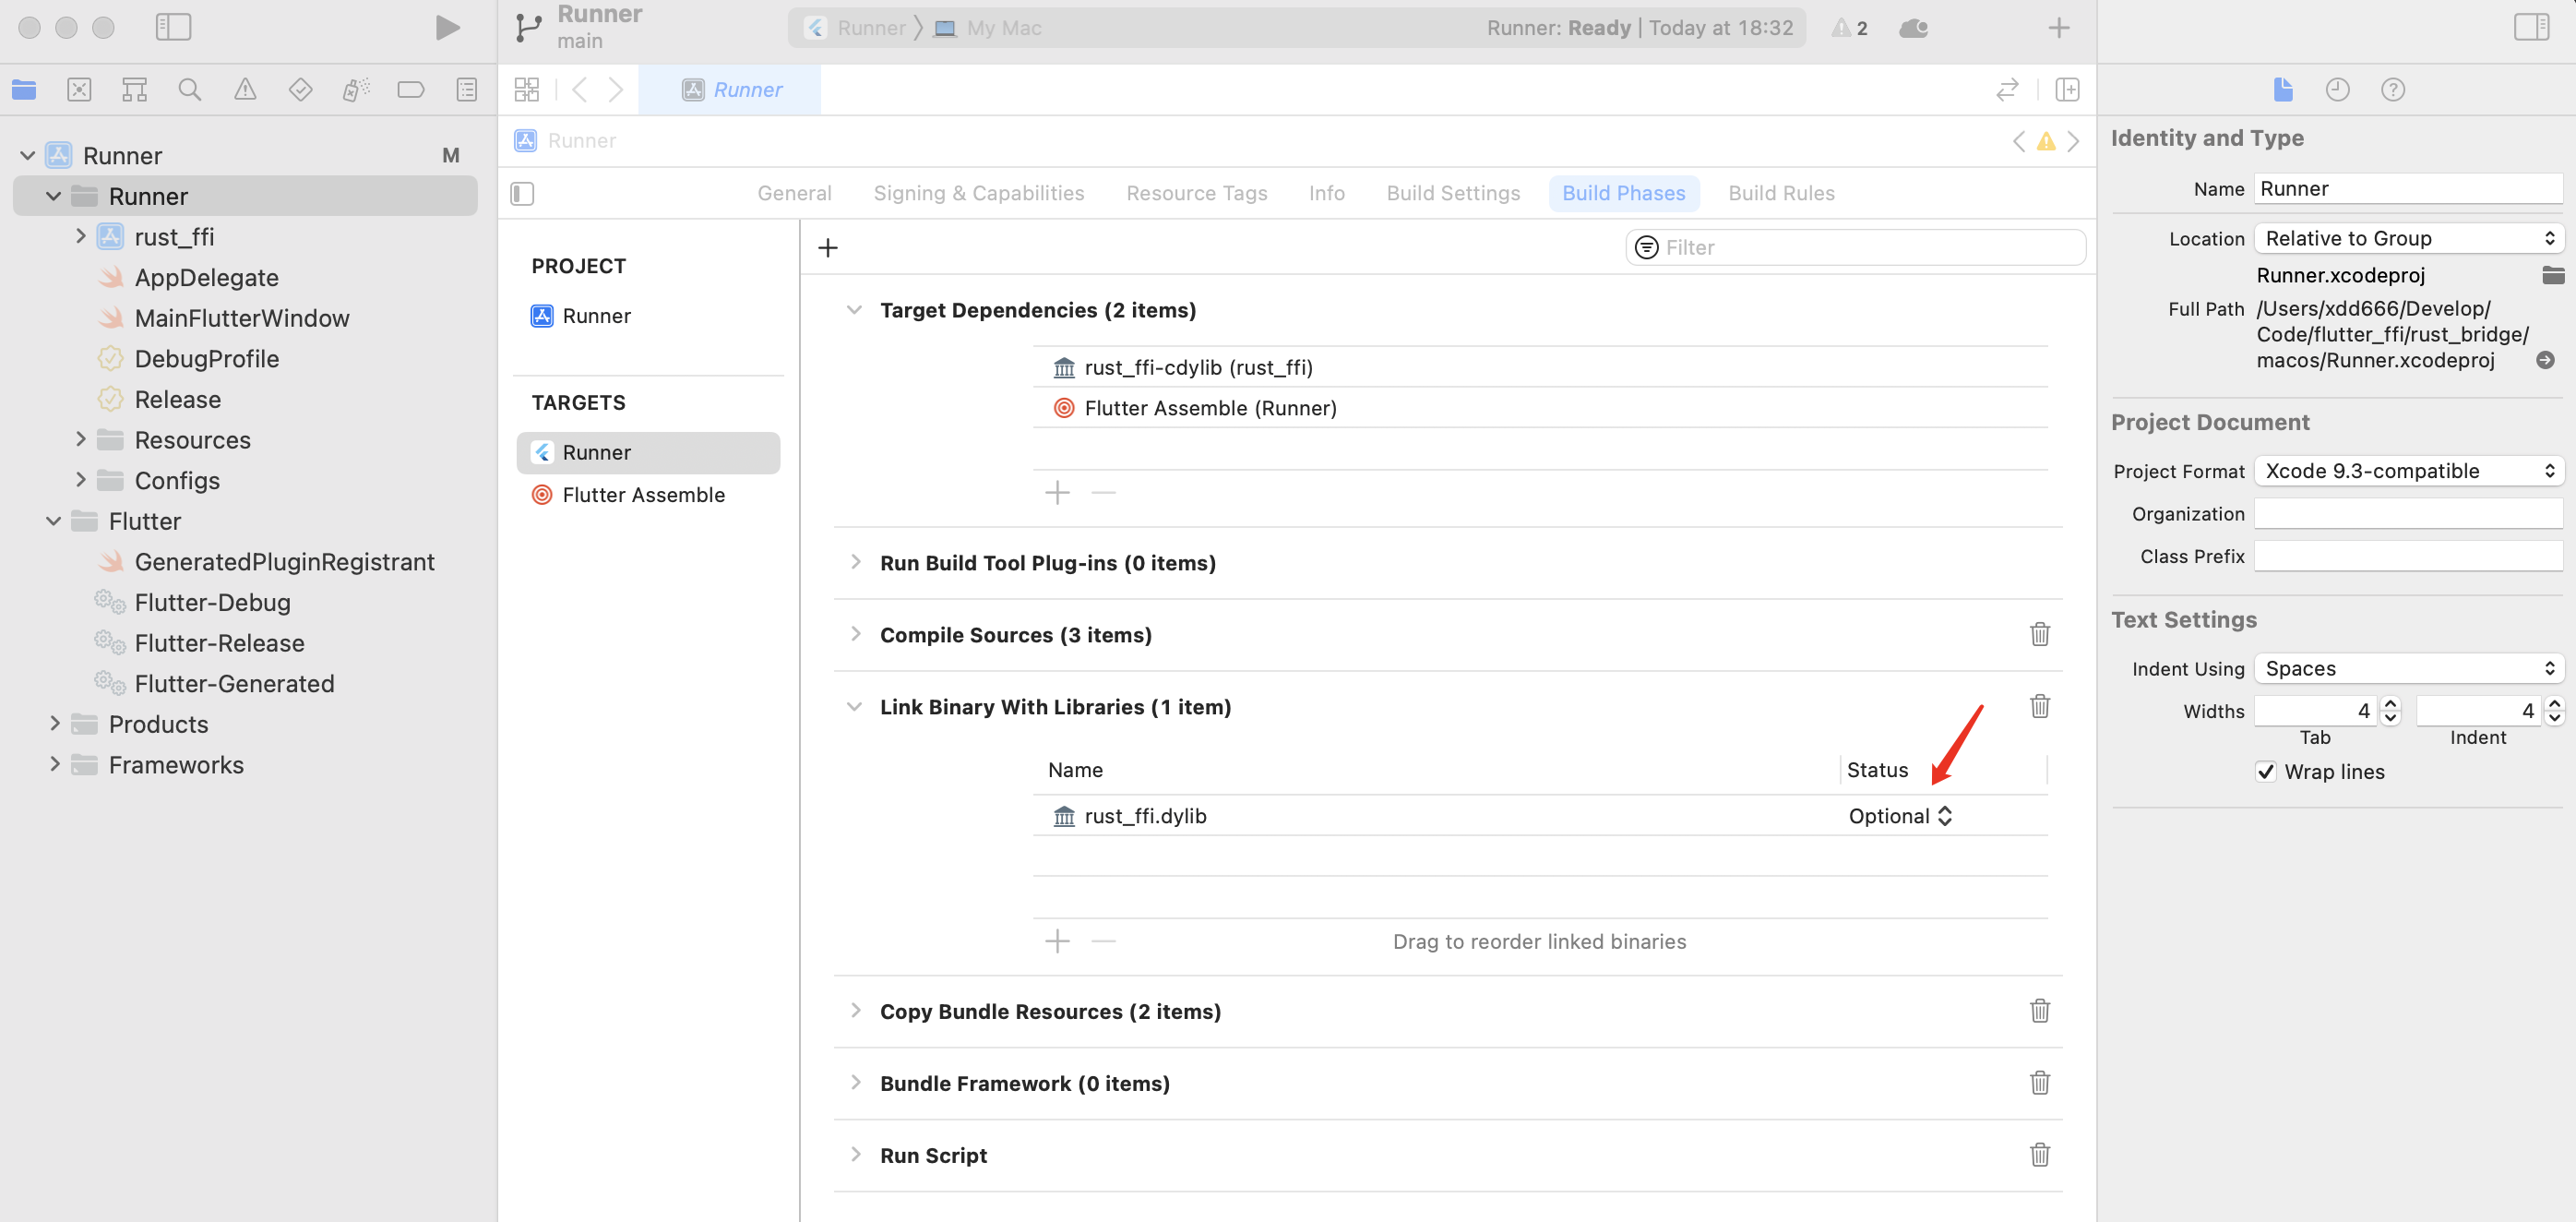
-
Flutter 在 MacOS 上預設不使用符號,我們需要新增我們自己的
-
在 Build Settings 分頁中
-
把 Objective-C Bridging Header 設定為:
Runner/bridge_generated.h
-
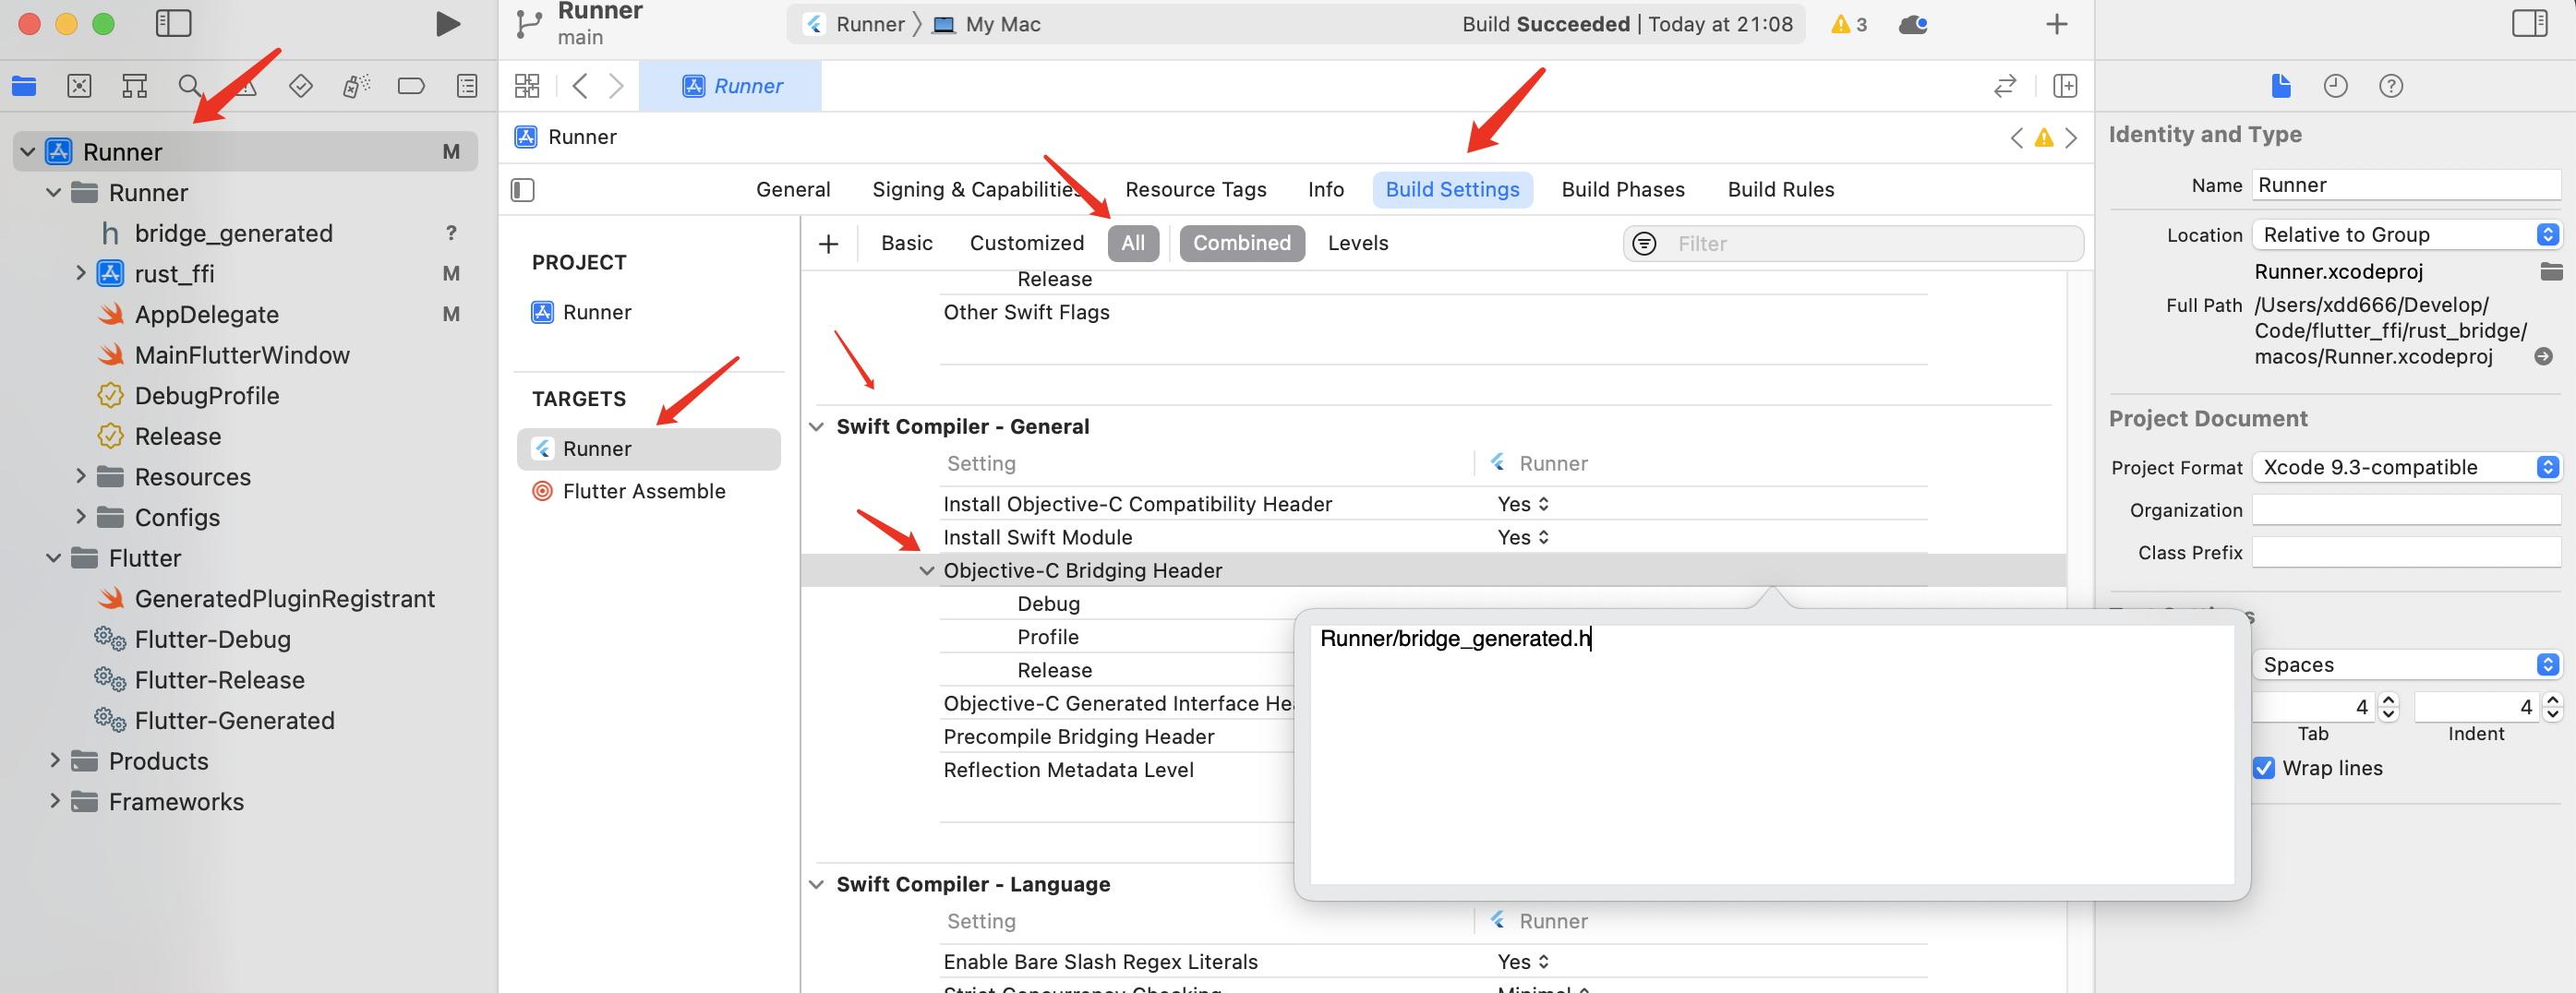
- 還需要把
bridge_generated.h檔案加入macos專案

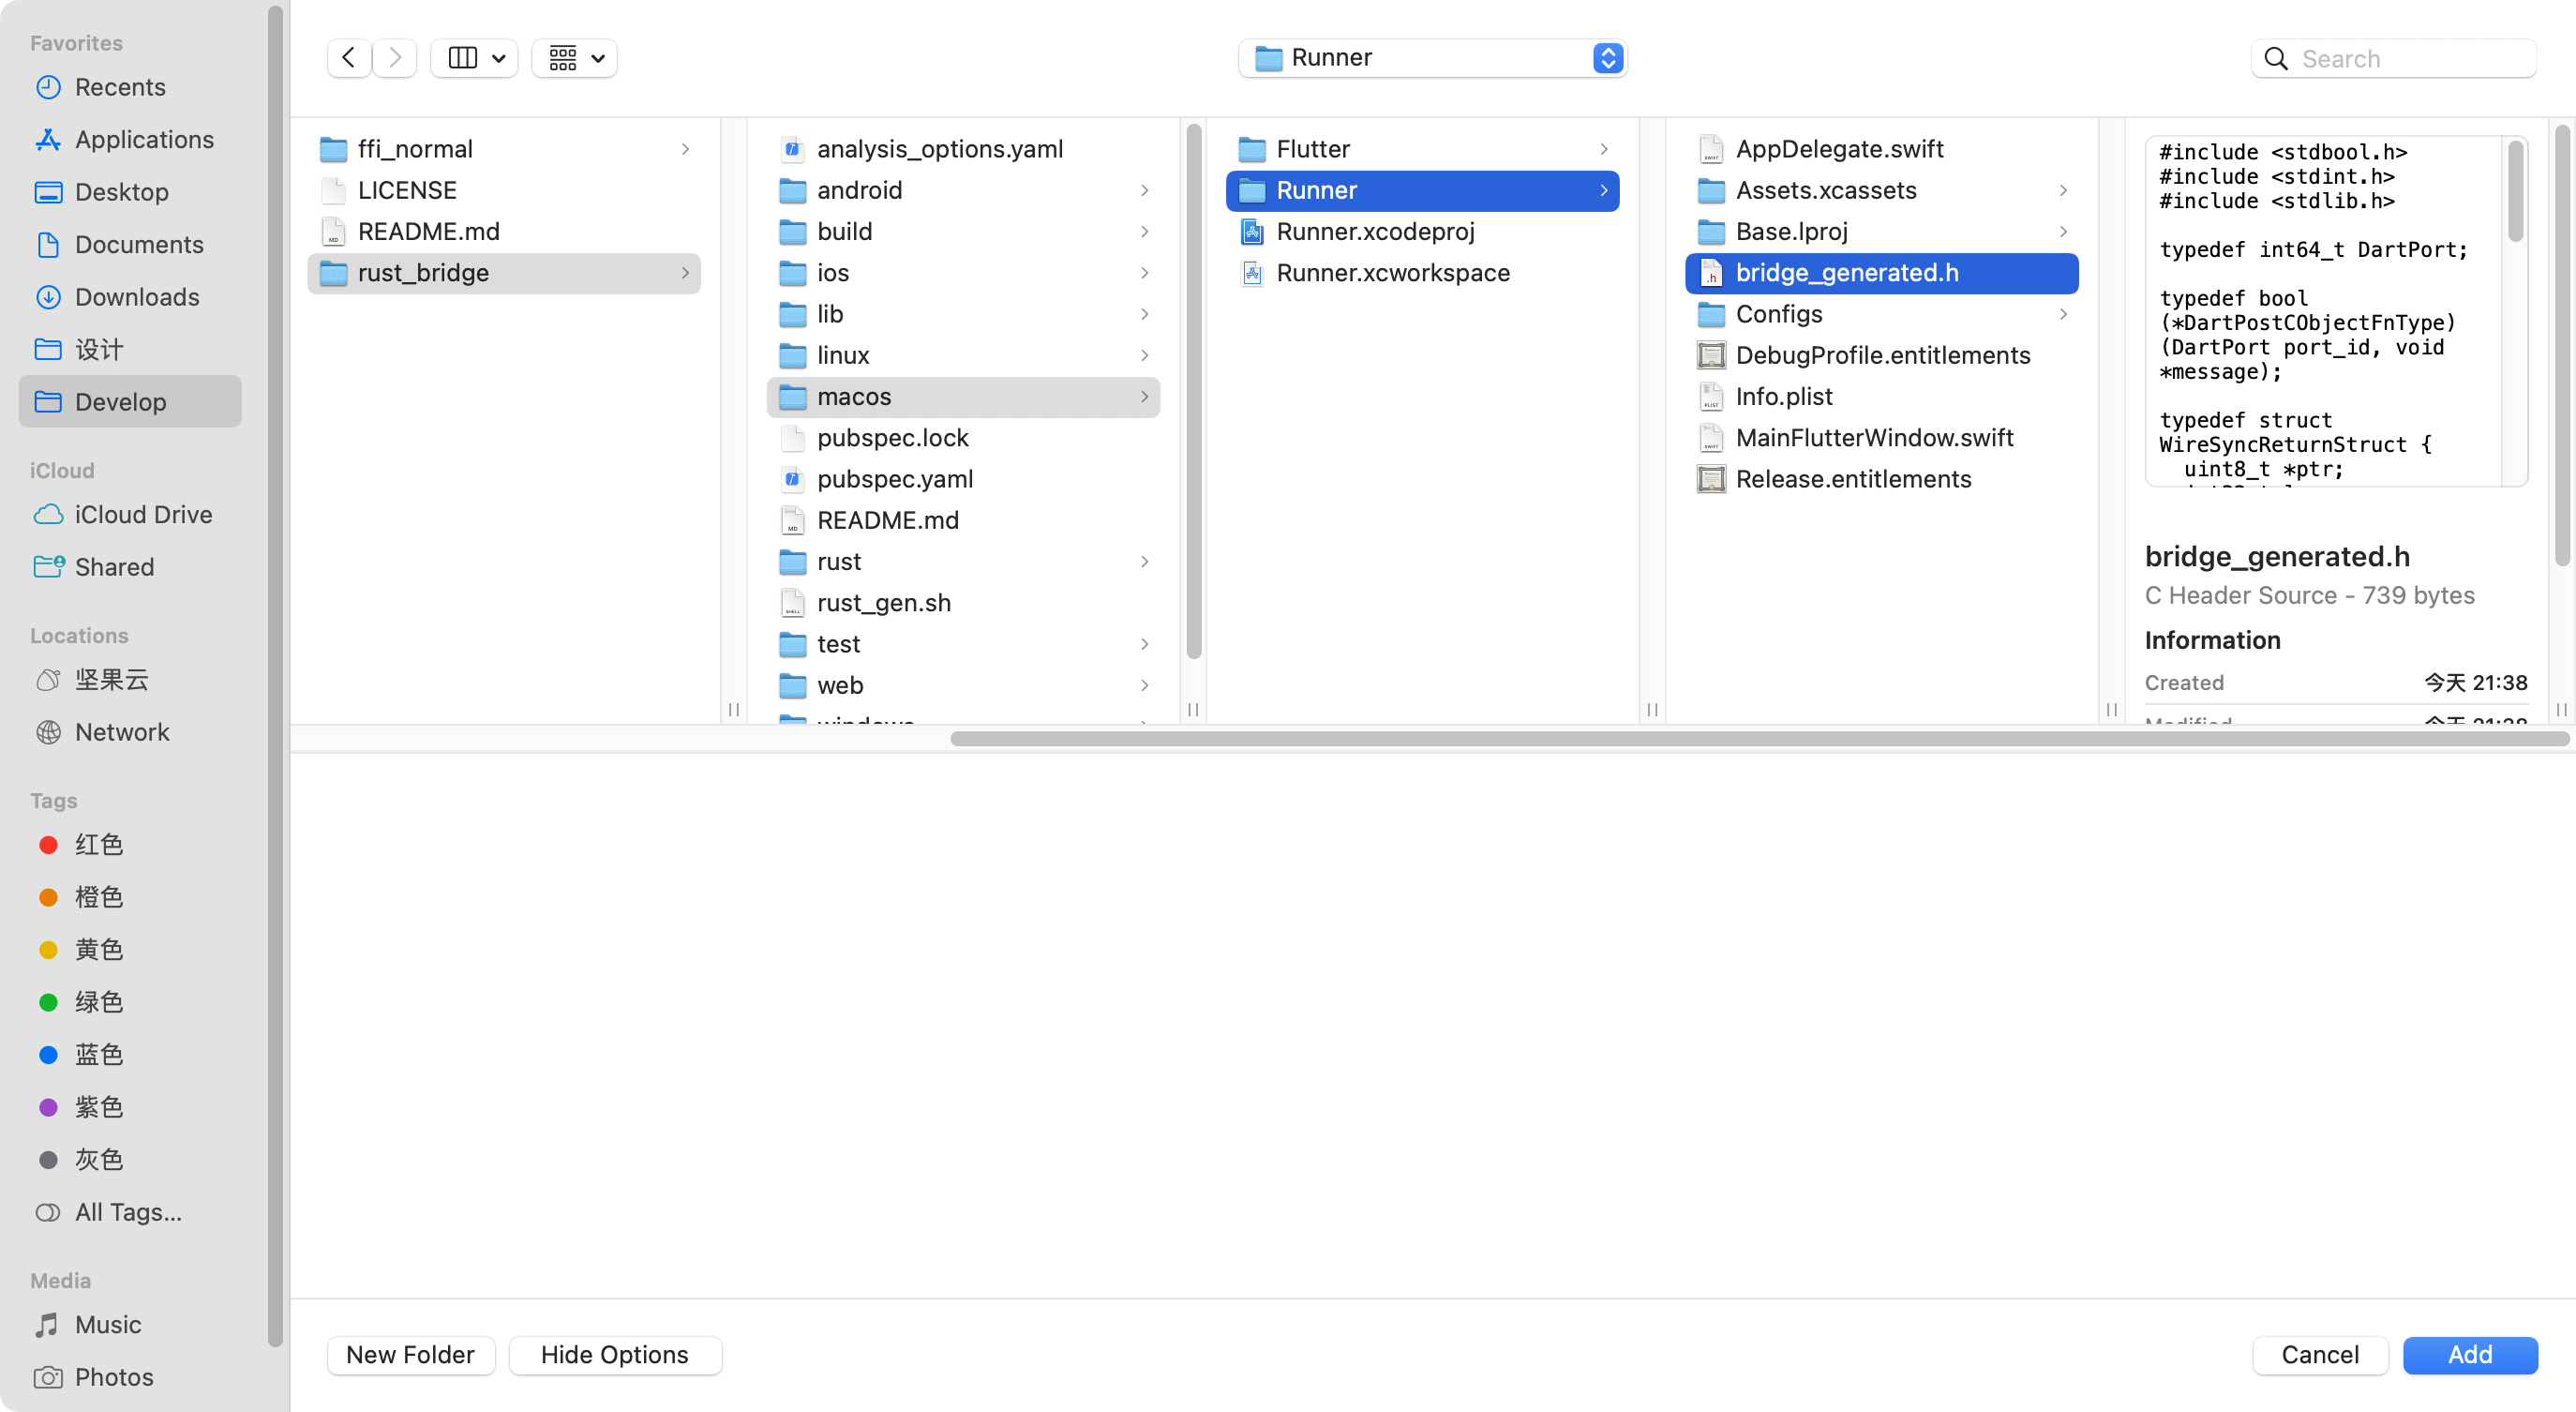

-
macos/Runner/AppDelegate.swift中新增import Cocoa import FlutterMacOS @NSApplicationMain class AppDelegate: FlutterAppDelegate { override func applicationShouldTerminateAfterLastWindowClosed(_ sender: NSApplication) -> Bool { + dummy_method_to_enforce_bundling() return true } }
Windows / Linux
說明
目前使用flutter_rust_bridge等庫保持在1.51.0版本
- 親測在windows,android,ios,macos可以編譯執行,linux(暫時沒精力折騰)
將flutter_rust_bridge更新到1.54.0版本
- 該版本有個比較大的改動,生成程式碼改動也比較大,需要安裝最新版
flutter_rust_bridge_codegen去生成程式碼 - 該版本在android,ios,macos可以編譯執行,在windows上會報錯
failed to run custom build command for `dart-sys v2.0.1`
Microsoft.CppCommon.targets(247,5): error MSB8066
猜測是作者新版本dart-sys v2.0.1這個庫有問題,導致編譯產物路徑出了問題,報錯了上面的錯
目前本demo的版本號限制死在1.51.0版本;後面作者可能會解決該問題,需要使用新版本可自行嘗試
- 在windows上安裝編譯生成庫,需要安裝指定版本
# 指定版本
cargo install flutter_rust_bridge_codegen --version 1.51.0 --force
重要說明
因為windows上編譯需要下載Corrosion,需要開啟全域性xx上網,不然可能在編譯的時候,會存在無法下載Corrosion的報錯
推薦工具使用sstap 1.0.9.7版本,這個版本內建全域性規則(可戴笠軟體,不僅限瀏覽器),後面的版本該規則被刪了
rust.make
- 需要先安裝Corrosion ,可參考:https://github.com/corrosion-rs/corrosion#installation
- 需要安裝cmake(選擇安裝到環境變數的方式):https://cmake.org/download/
- 然後執行下述命令
git clone https://github.com/corrosion-rs/corrosion.git
# Optionally, specify -DCMAKE_INSTALL_PREFIX=<target-install-path>. You can install Corrosion anyway
cmake -Scorrosion -Bbuild -DCMAKE_BUILD_TYPE=Release
cmake --build build --config Release
# This next step may require sudo or admin privileges if you're installing to a system location,
# which is the default.
cmake --install build --config Release
windows和linux需要新增個rust.make檔案:
- rust.make裡面標註的內容需要和Cargo.toml裡name保持一致
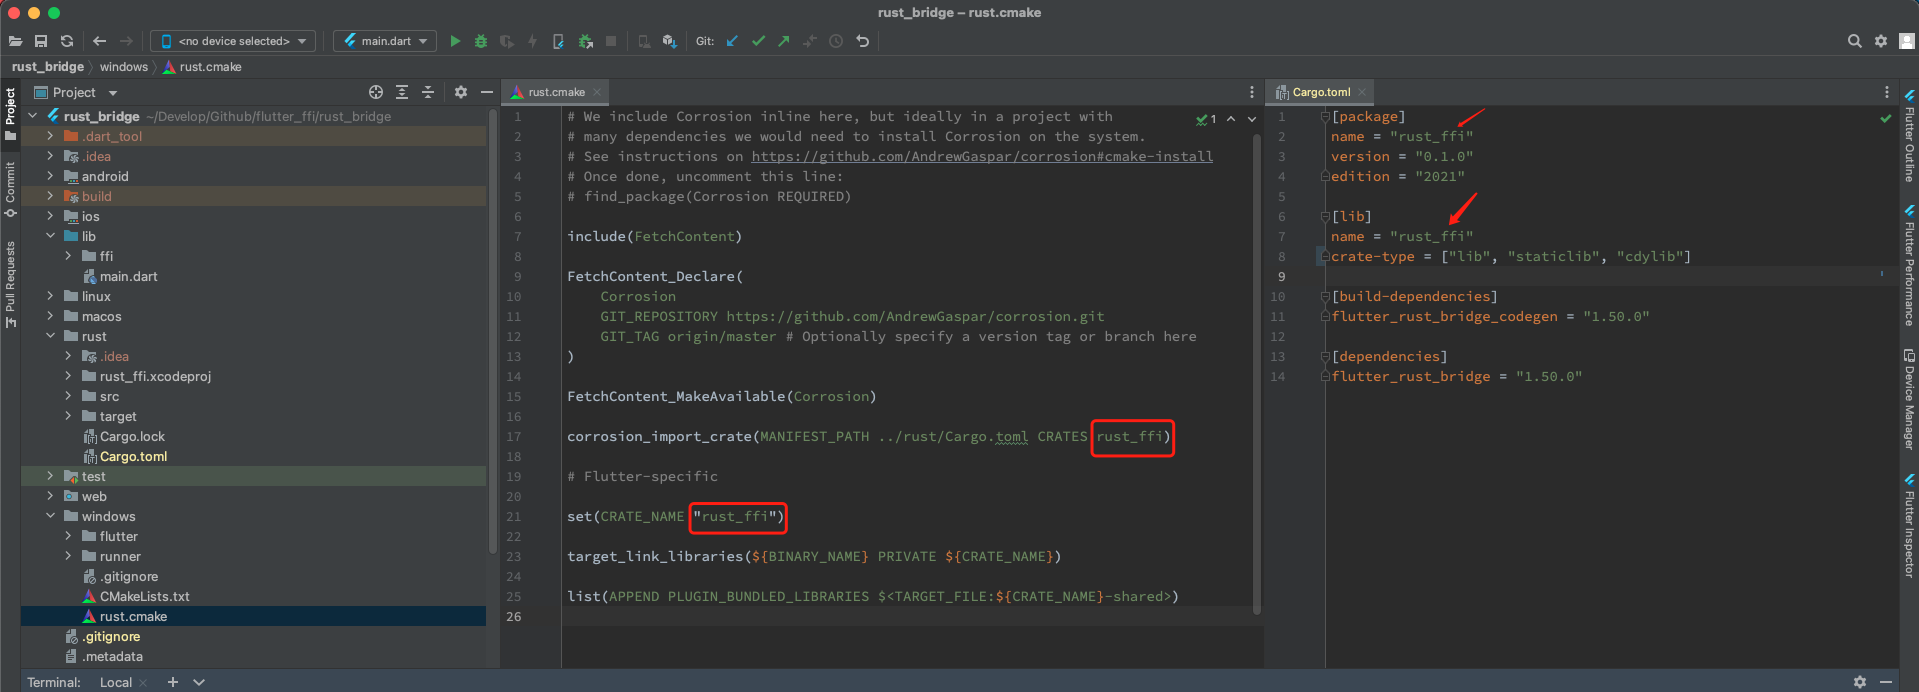
- rust.make
# We include Corrosion inline here, but ideally in a project with
# many dependencies we would need to install Corrosion on the system.
# See instructions on https://github.com/AndrewGaspar/corrosion#cmake-install
# Once done, uncomment this line:
# find_package(Corrosion REQUIRED)

include(FetchContent)

FetchContent_Declare(
    Corrosion
    GIT_REPOSITORY https://github.com/AndrewGaspar/corrosion.git
    GIT_TAG origin/master # Optionally specify a version tag or branch here
)

FetchContent_MakeAvailable(Corrosion)

corrosion_import_crate(MANIFEST_PATH ../rust/Cargo.toml CRATES rust_ffi)

# Flutter-specific

set(CRATE_NAME "rust_ffi")

target_link_libraries(${BINARY_NAME} PRIVATE ${CRATE_NAME})

list(APPEND PLUGIN_BUNDLED_LIBRARIES $<TARGET_FILE:${CRATE_NAME}-shared>)
調整
- Windows:在
windows/CMakeLists.txt新增rust.cmake檔案
 # Generated plugin build rules, which manage building the plugins and adding
 # them to the application.
 include(flutter/generated_plugins.cmake)

+include(./rust.cmake)

 # === Installation ===
 # Support files are copied into place next to the executable, so that it can
- Linux:在 Linux 上,你需要將 CMake 的最低版本升到 3.12,這是 Corrosion 的要求,
rust.cmake依賴 Corrosion。需求修改linux/CMakeLists.txt的這一行
-cmake_minimum_required(VERSION 3.10)
+cmake_minimum_required(VERSION 3.12)

...

# Generated plugin build rules, which manage building the plugins and adding
# them to the application.
include(flutter/generated_plugins.cmake)

+include(./rust.cmake)

# === Installation ===
# By default, "installing" just makes a relocatable bundle in the build
使用
- 呼叫
class NativeFFI {
  NativeFFI._();

  static DynamicLibrary? _dyLib;

  static DynamicLibrary get dyLib {
    if (_dyLib != null) return _dyLib!;

    const base = 'rust_ffi';
    if (Platform.isIOS) {
      _dyLib = DynamicLibrary.process();
    } else if (Platform.isMacOS) {
      _dyLib = DynamicLibrary.executable();
    } else if (Platform.isAndroid) {
      _dyLib = DynamicLibrary.open('lib$base.so');
    } else if (Platform.isWindows) {
      _dyLib = DynamicLibrary.open('$base.dll');
    } else {
      throw Exception('DynamicLibrary初始化失敗');
    }

    return _dyLib!;
  }
}

class NativeFun {
  static final _ffi = RustFfiImpl(NativeFFI.dyLib);

  static Future<int> add(int left, int right) async {
    int sum = await _ffi.add(left: left, right: right);
    return sum;
  }
}
- 自動生成的類就不寫了,就是上面使用的RustFfiImpl

- 使用
void main() {
  runApp(const MyApp());
}

class MyApp extends StatelessWidget {
  const MyApp({super.key});

  @override
  Widget build(BuildContext context) {
    return const MaterialApp(title: 'Flutter Demo', home: MyHomePage());
  }
}

class MyHomePage extends StatefulWidget {
  const MyHomePage({super.key});

  @override
  State<MyHomePage> createState() => _MyHomePageState();
}

class _MyHomePageState extends State<MyHomePage> {
  int _counter = 0;

  void _incrementCounter() async {
    _counter = await NativeFun.add(_counter, 2);
    setState(() {});
  }

  @override
  Widget build(BuildContext context) {
    return Scaffold(
      appBar: AppBar(title: const Text('Rust_Bridge Demo')),
      body: Center(
        child: Text(
          'Count:  $_counter',
          style: Theme.of(context).textTheme.headline4,
        ),
      ),
      floatingActionButton: FloatingActionButton(
        onPressed: _incrementCounter,
        tooltip: 'Increment',
        child: const Icon(Icons.add),
      ),
    );
  }
}
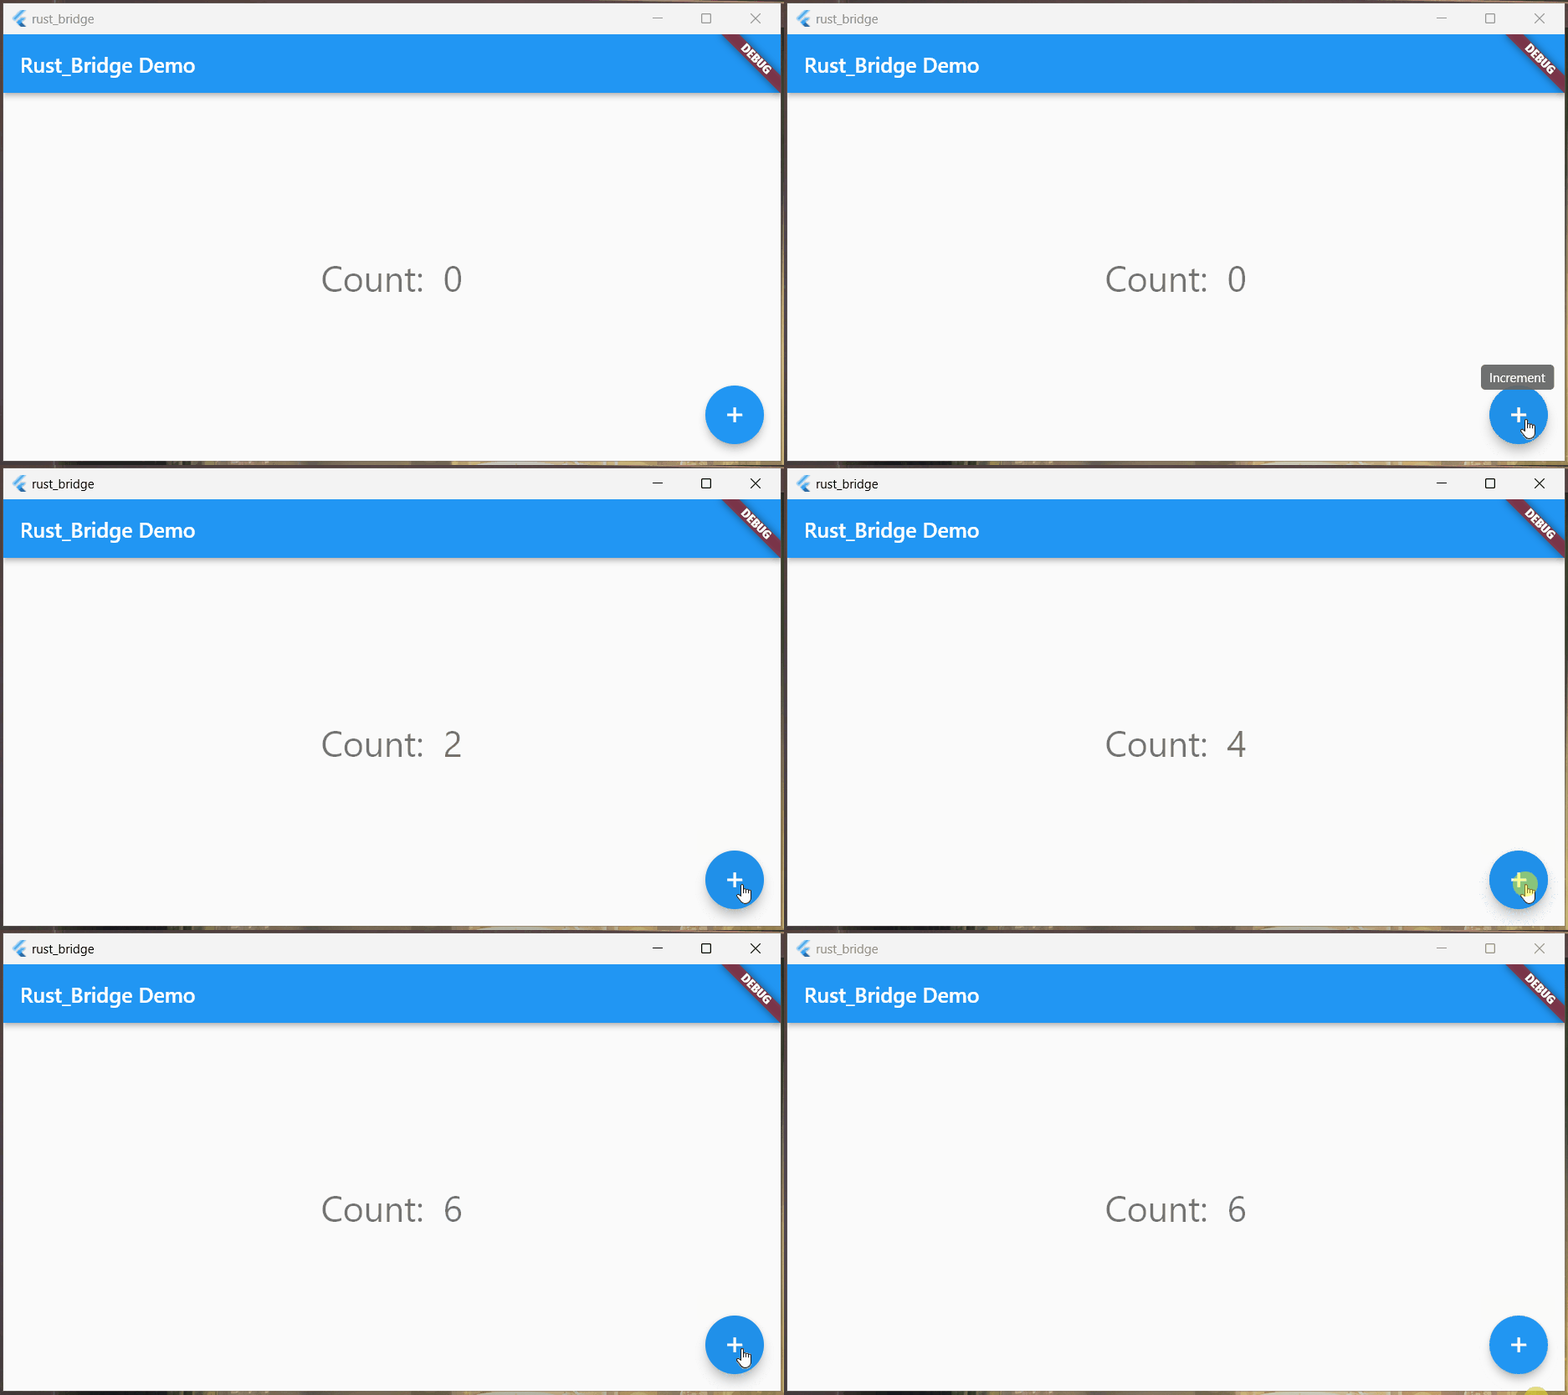
- 效果
結語
對於rust這塊,這些設定確實有點麻煩,但是設定完,後面就不用管了
痛苦一次就行了.