OpenVINO計算機視覺模型加速
OpenVINO計算機視覺模型加速
OpenVINO介紹
- 計算機視覺部署框架,支援多種邊緣硬體平臺
- Intel開發並開源使用的計算機視覺庫
- 支援多個場景視覺任務場景的快速演示
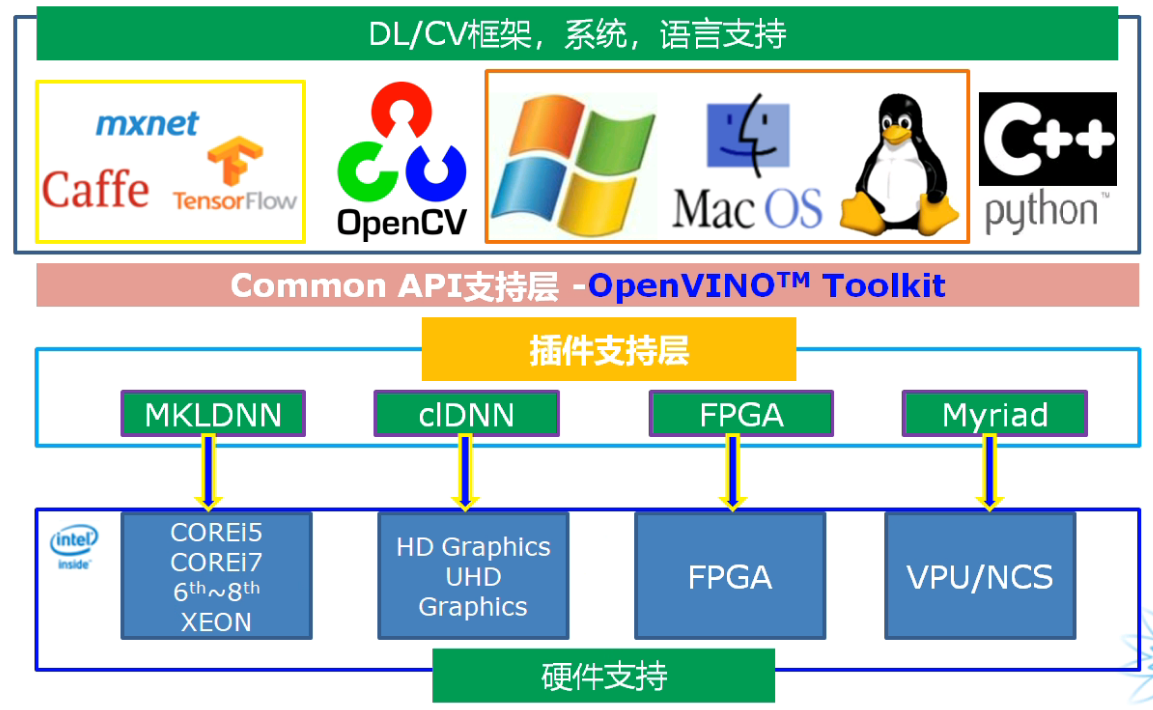
四個主要模組:

1、開發環境搭建
安裝cmake、Miniconda3、Notepad++、PyCharm、VisualStudio 2019
注意:安裝Miniconda3一定要設定其自動新增環境變數,需要新增5個環境變數,手動新增很可能會漏掉,排錯困難
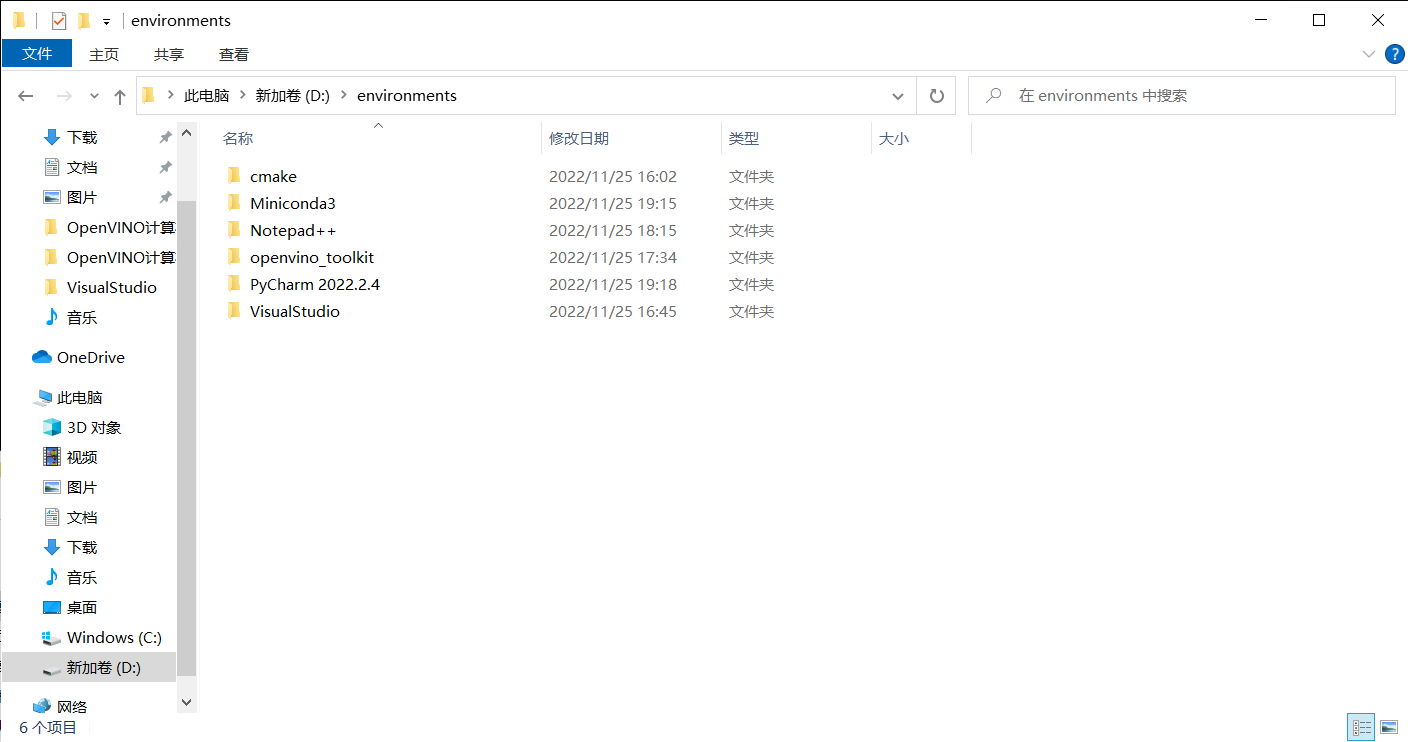
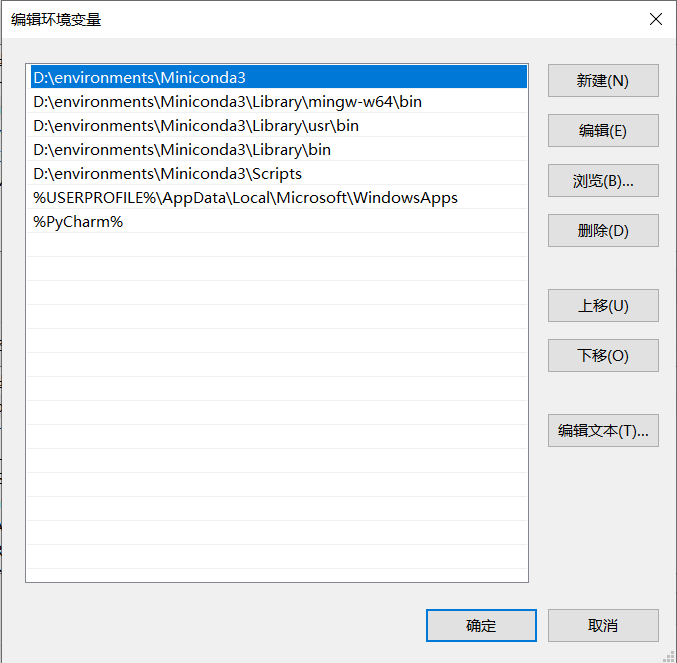
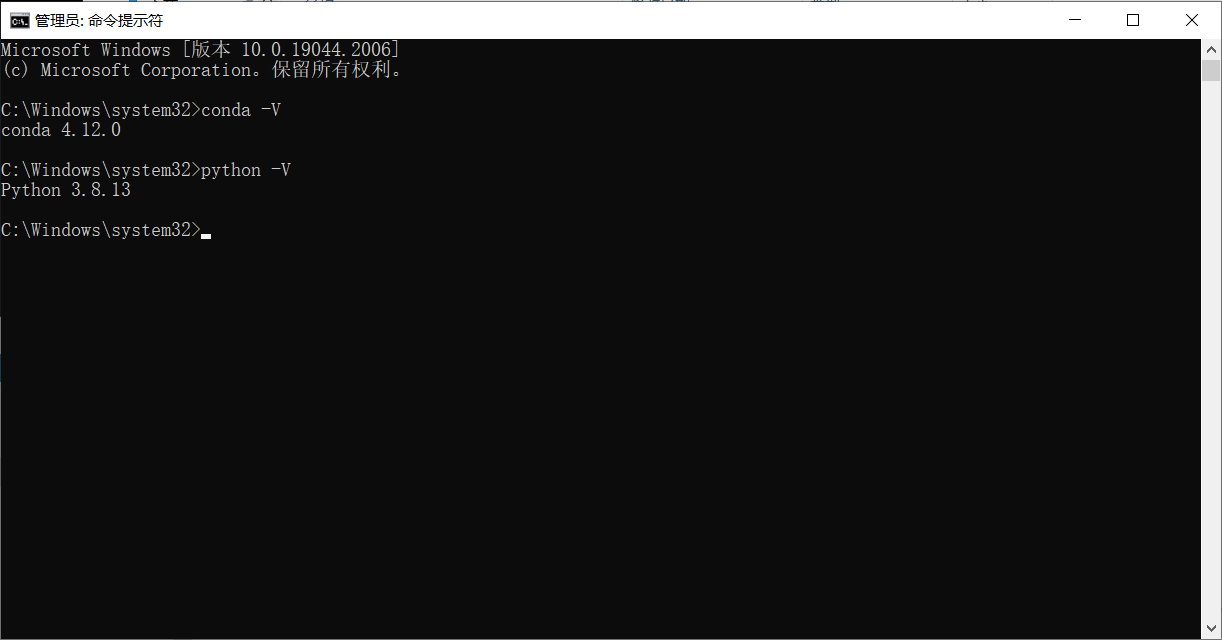
下載OpenVINO並安裝:[Download Intel® Distribution of OpenVINO™ Toolkit](https://www.intel.com/content/www/us/en/developer/tools/openvino-toolkit/download-previous-versions.html?operatingsystem=window&distributions=webdownload&version=2021 4.2 LTS&options=offline)
安裝完畢後執行測試程式
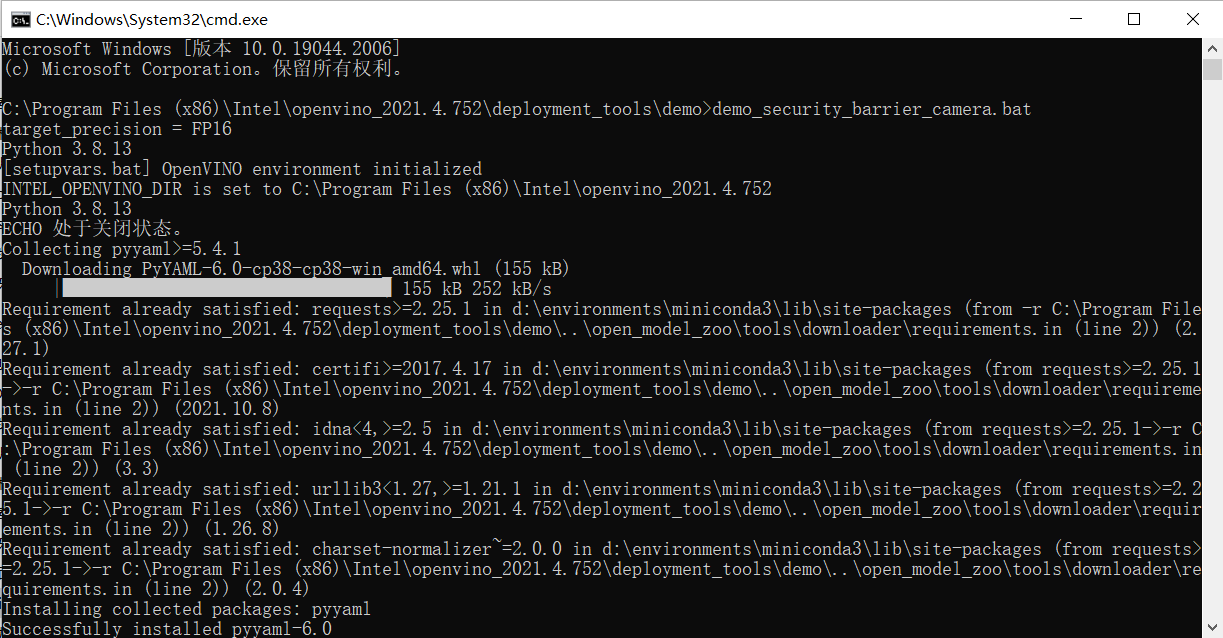
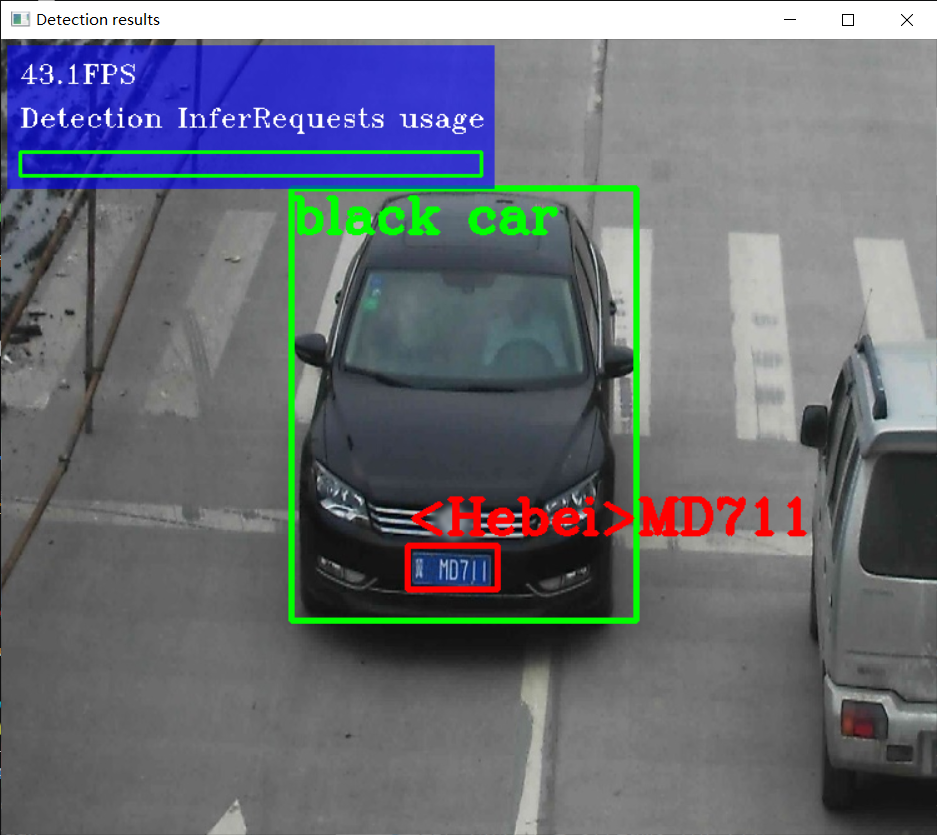
出現下面執行結果代表安裝設定成功
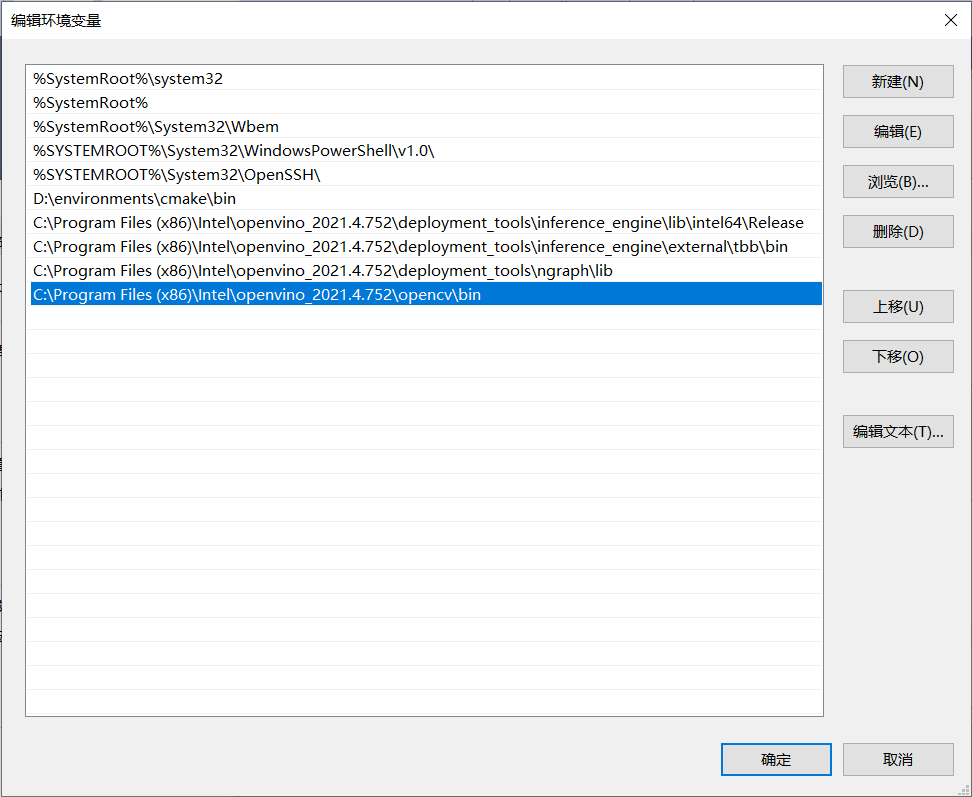
新增OpenVINO環境變數
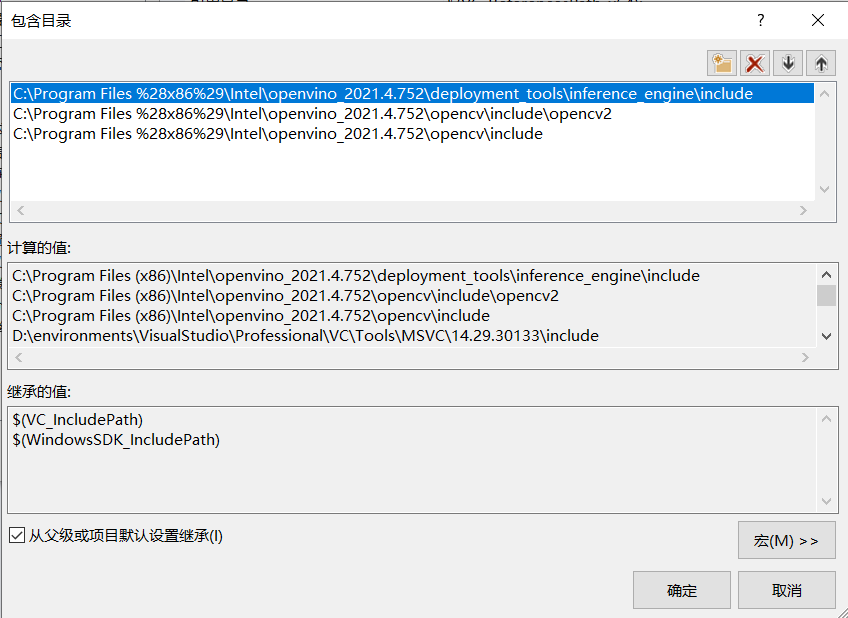
設定VisualStudio包含目錄、庫目錄及附加依賴項
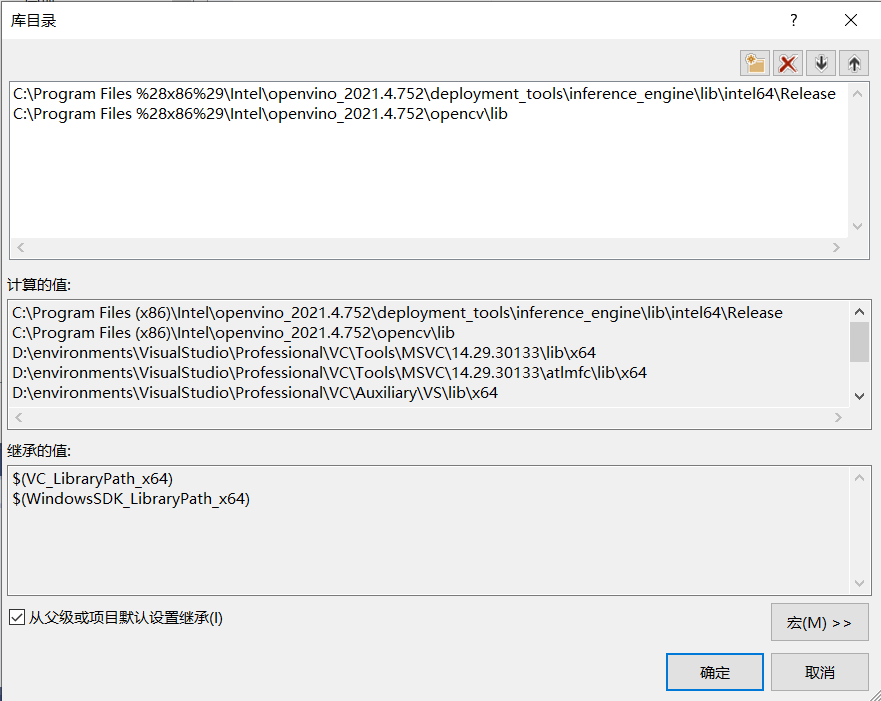
執行以下指令碼自動獲取附加依賴項

新增附加依賴項
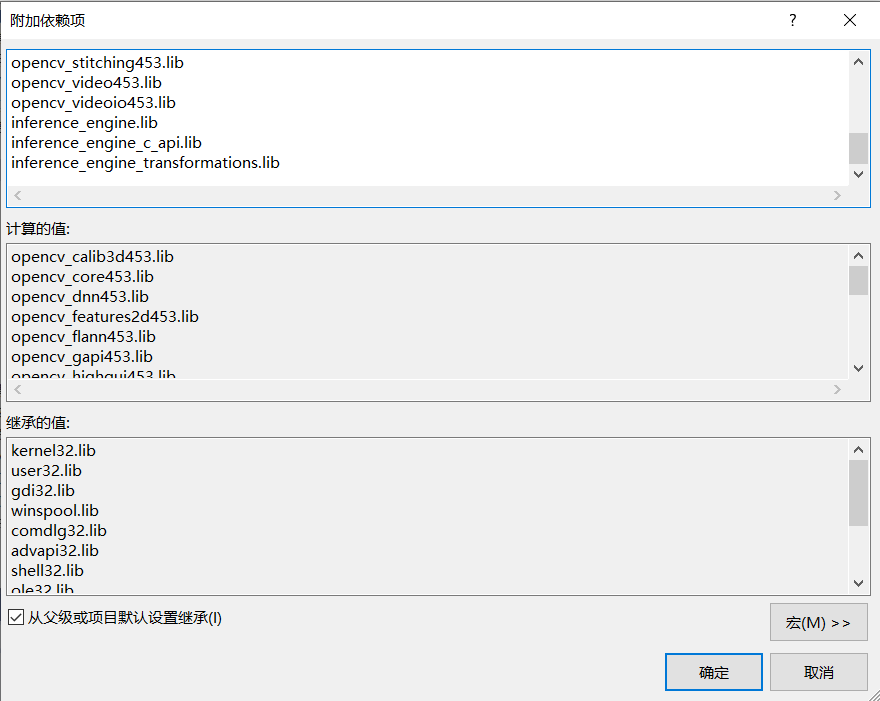
至此,開發環境搭建完畢!
2、SDK介紹與開發流程
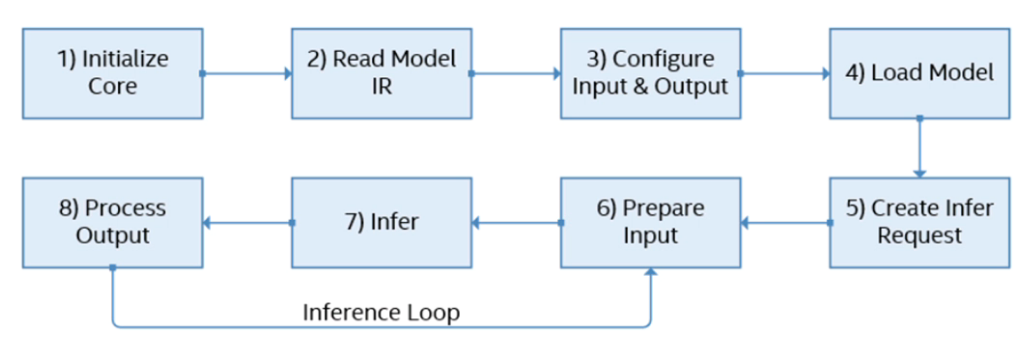
inference_engine.dll 推理引擎
依賴支援:inference_engine_transformations.dll, tbb.dll, tbbmalloc.dll, ngraph.dll
一定要把這些dll檔案都新增到 C:/Windows/System32 中才可以正常執行OpenVINO程式
InferenceEngine相關API函數支援
- InferenceEngine::Core
- InferenceEngine::Blob, InferenceEngine::TBlob, InferenceEngine::NV12Blob
- InferenceEngine::BlobMap
- InferenceEngine::InputsDataMap, InferenceEngine::InputInfo
- InferenceEngine::OutputsDataMap
- InferenceEngine核心庫的包裝類
- InferenceEngine::CNNNetwork
- InferenceEngine::ExecutableNetwork
- InferenceEngine::InferRequest
程式碼實現
#include <inference_engine.hpp>
#include <iostream>

using namespace InferenceEngine;

int main(int argc, char** argv) {

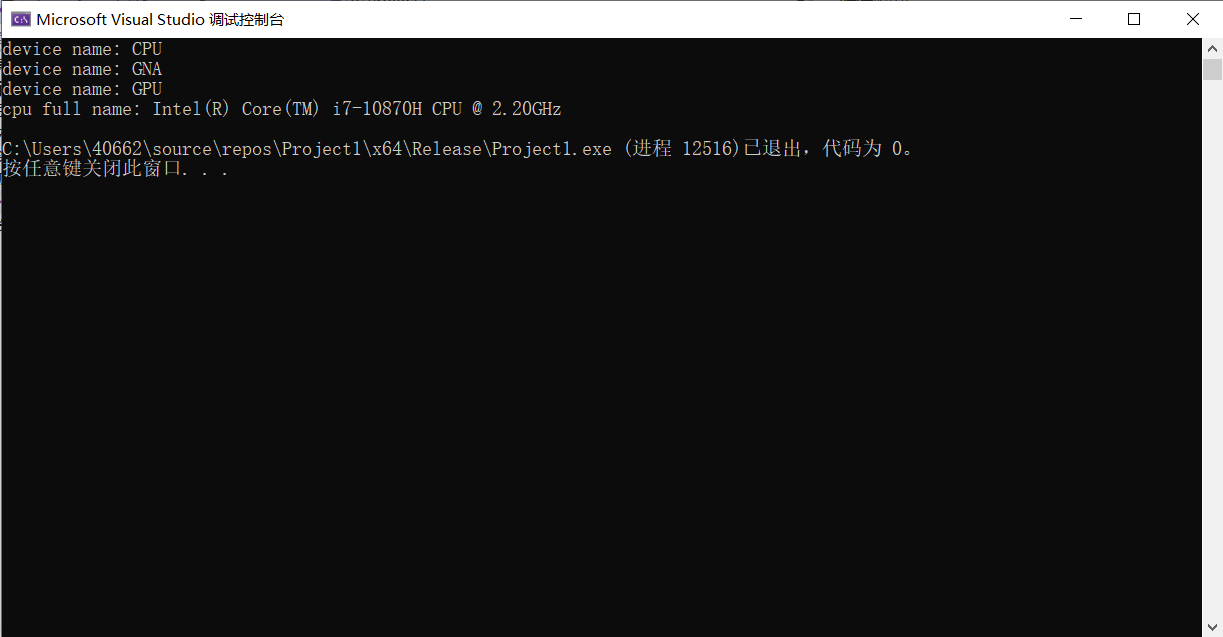
	InferenceEngine::Core ie;  //使用推理引擎獲取可用的裝置及cpu全稱
	std::vector<std::string> devices = ie.GetAvailableDevices();
	for (std::string name : devices) {
		std::cout << "device name: " << name << std::endl;
	}
	std::string cpuName = ie.GetMetric("CPU", METRIC_KEY(FULL_DEVICE_NAME)).as<std::string>();
	std::cout << "cpu full name: " << cpuName << std::endl;

	return 0;
}
效果:
3、ResNet18實現影象分類
預訓練模型介紹 - ResNet18
- 預處理影象
- mean = [0.485, 0.456, 0.406], std = [0.229, 0.224, 0.225],影象歸一化後再減去均值,除以方差
- 輸入:NCHW = 1 * 3 * 224 * 224 (num,channels,height,width)
- 輸出格式:1 * 1000
程式碼實現整體步驟
- 初始化Core ie
- ie.ReadNetwork
- 獲取輸入與輸出格式並設定精度
- 獲取可執行網路並連結硬體
- auto executable_network = ie.LoadNetwork(network, "CPU");
- 建立推理請求
- auto infer_request = executable_network.CreateInferRequest();
- 設定輸入資料 - 影象資料預處理
- 推理並解析輸出
程式碼實現
#include <inference_engine.hpp>
#include <opencv2/opencv.hpp>
#include <fstream>  //fstream檔案讀寫操作,iostream為控制檯操作

using namespace InferenceEngine;
std::string labels_txt_file = "D:/projects/models/resnet18_ir/imagenet_classes.txt";
std::vector<std::string> readClassNames();

int main(int argc, char** argv) {

	InferenceEngine::Core ie;
	std::vector<std::string> devices = ie.GetAvailableDevices();
	for (std::string name : devices) {
		std::cout << "device name: " << name << std::endl;
	}
	std::string cpuName = ie.GetMetric("CPU", METRIC_KEY(FULL_DEVICE_NAME)).as<std::string>();
	std::cout << "cpu name: " << cpuName << std::endl;

	std::string xml = "D:/projects/models/resnet18_ir/resnet18.xml";
	std::string bin = "D:/projects/models/resnet18_ir/resnet18.bin";
	std::vector<std::string> labels = readClassNames();  //讀取標籤
	cv::Mat src = cv::imread("D:/images/messi.jpg");  //讀取影象
	InferenceEngine::CNNNetwork network = ie.ReadNetwork(xml, bin);  //讀取resnet18網路

	InferenceEngine::InputsDataMap inputs = network.getInputsInfo();  //DataMap是一個Mat陣列
	InferenceEngine::OutputsDataMap outputs = network.getOutputsInfo();  //DataMap是一個Mat陣列
	std::string input_name = "";
	for (auto item : inputs) {  //auto可以自動推斷變數型別
		input_name = item.first;  //第一個引數是name,第二個引數是結構,第二個引數設定精度與結構
		auto input_data = item.second;
		input_data->setPrecision(Precision::FP32);
		input_data->setLayout(Layout::NCHW);
		input_data->getPreProcess().setColorFormat(ColorFormat::RGB);
		std::cout << "input name: " << input_name << std::endl;
	}
	std::string output_name = "";
	for (auto item : outputs) {  //auto可以自動推斷變數型別
		output_name = item.first;  //第一個引數是name,第二個引數是結構,第二個引數設定精度與結構
		auto output_data = item.second;
		output_data->setPrecision(Precision::FP32);
		//注意:output_data不要設定結構
		std::cout << "output name: " << output_name << std::endl;
	}

	auto executable_network = ie.LoadNetwork(network, "CPU");  //設定執行的裝置
	auto infer_request = executable_network.CreateInferRequest();  //設定推理請求

	//影象預處理
	auto input = infer_request.GetBlob(input_name);  //獲取網路輸入影象資訊
	size_t num_channels = input->getTensorDesc().getDims()[1];  //size_t 型別表示C中任何物件所能達到的最大長度,它是無符號整數
	size_t h = input->getTensorDesc().getDims()[2];
	size_t w = input->getTensorDesc().getDims()[3];
	size_t image_size = h * w;
	cv::Mat blob_image;
	cv::resize(src, blob_image, cv::Size(w, h));  //將輸入圖片大小轉換為與網路輸入大小一致
	blob_image.convertTo(blob_image, CV_32F);  //將輸入影象轉換為浮點數
	blob_image = blob_image / 255.0;
	cv::subtract(blob_image, cv::Scalar(0.485, 0.456, 0.406), blob_image);
	cv::divide(blob_image, cv::Scalar(0.229, 0.224, 0.225), blob_image);
	// HWC =》NCHW  將輸入影象從HWC格式轉換為NCHW格式
	float* data = static_cast<float*>(input->buffer());  //將影象放到buffer中,放入input中
	for (size_t row = 0; row < h; row++) {
		for (size_t col = 0; col < w; col++) {
			for (size_t ch = 0; ch < num_channels; ch++) {
				//將每個通道變成一張圖,按照通道順序
				data[image_size * ch + row * w + col] = blob_image.at<cv::Vec3f>(row, col)[ch];
			}
		}
	}

	infer_request.Infer();
	auto output = infer_request.GetBlob(output_name);
	//轉換輸出資料
	const float* probs = static_cast<PrecisionTrait<Precision::FP32>::value_type*>(output->buffer());
	const SizeVector outputDims = output->getTensorDesc().getDims();  //獲取輸出維度資訊 1*1000
	std::cout << outputDims[0] << "x" << outputDims[1] << std::endl;
	float max = probs[0];
	int max_index = 0;
	for (int i = 1; i < outputDims[1]; i++) {
		if (max < probs[i]) {  //找到結果probs中的最大值,獲取其下標
			max = probs[i];
			max_index = i;
		}
	}
	std::cout << "class index: " << max_index << std::endl;
	std::cout << "class name: " << labels[max_index] << std::endl;
	cv::putText(src, labels[max_index], cv::Point(50, 50), cv::FONT_HERSHEY_SIMPLEX, 1.0, cv::Scalar(0, 0, 255), 2, 8);
	cv::namedWindow("out", cv::WINDOW_FREERATIO);
	cv::imshow("out", src);
	cv::waitKey(0);
	return 0;
}

std::vector<std::string> readClassNames() {  //讀取檔案

	std::vector<std::string> classNames;
	std::ifstream fp(labels_txt_file);
	if (!fp.is_open()) {
		printf("could not open file...\n");
		exit(-1);
	}
	std::string name;
	while (!fp.eof()) {  //eof()函數判斷是否讀到檔案末尾
		std::getline(fp, name);  //逐行讀取檔案並儲存在變數中
		if (name.length()) {
			classNames.push_back(name);
		}
	}
	fp.close();
	return classNames;
}
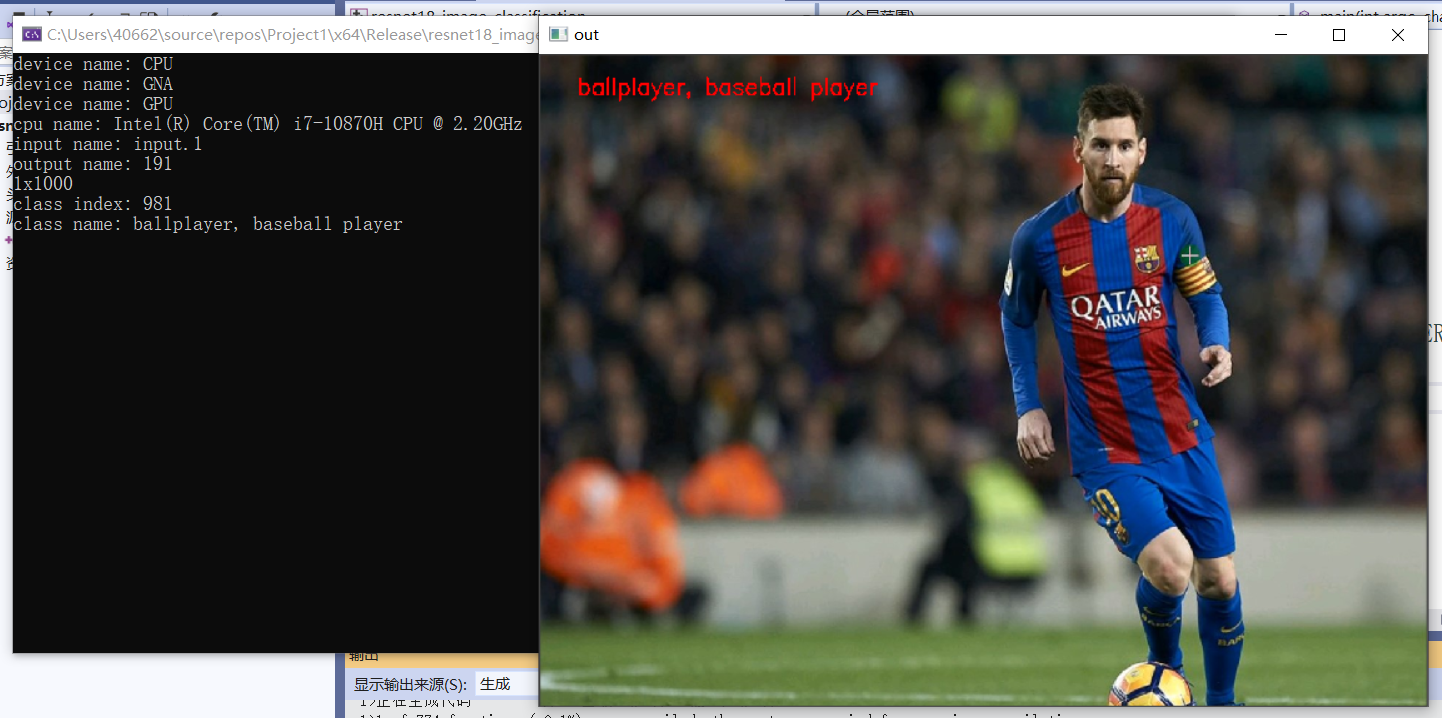
效果:
4、車輛檢測與車牌識別
模型介紹
- vehicle - license - plate - detection - varrier - 0106
- 基於BIT-Vehicle資料集
- 輸入 1 * 3 * 300 * 300 = NCHW
- 輸出格式:[1, 1, N, 7]
- 七個值:[image_id, label, conf, x_min, y_min, x_max, y_max]
呼叫流程
- 載入模型
- 設定輸入輸出
- 構建輸入
- 執行推斷
- 解析輸出
- 顯示結果
車輛及車牌檢測模型下載
cd C:\Program Files (x86)\Intel\openvino_2021.2.185\deployment_tools\open_model_zoo\tools\downloader  #以管理員身份執行cmd,切換到downloader資料夾下

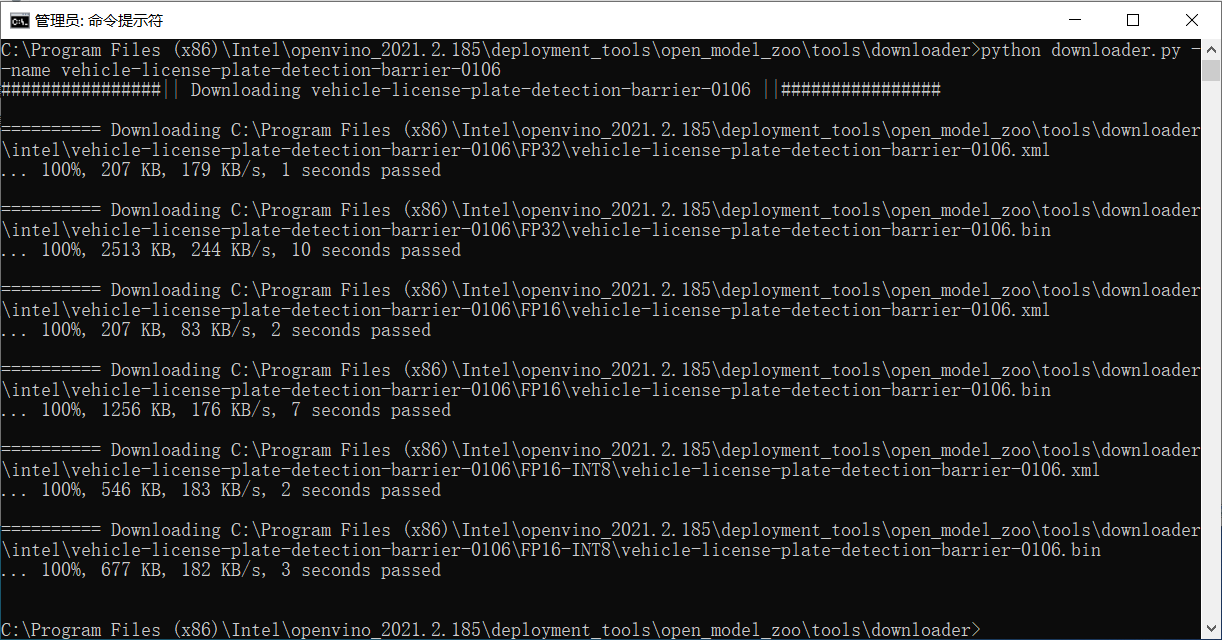
python downloader.py --name vehicle-license-plate-detection-barrier-0106  #在該資料夾下執行該指令碼,下載模型
出現下圖代表下載成功:
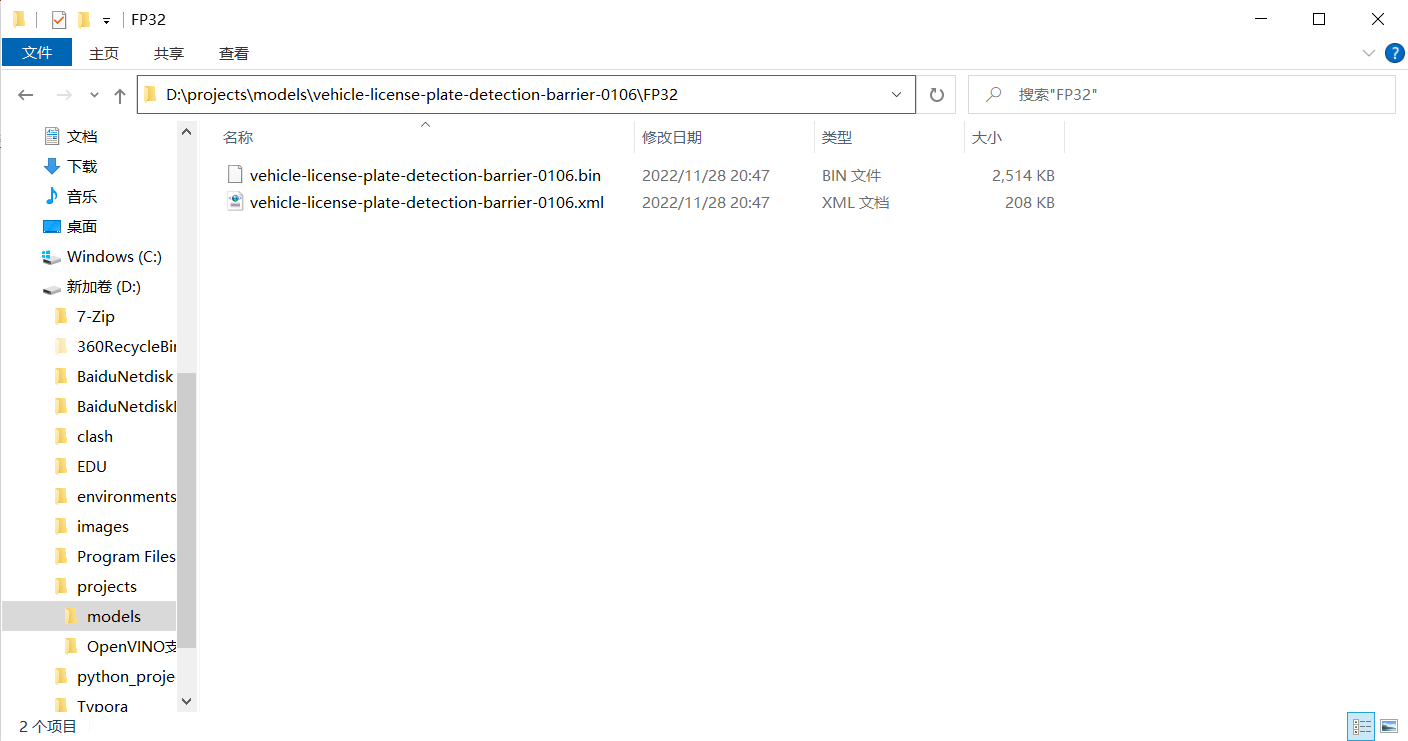
將下載的模型檔案移動到模型資料夾中:
車輛及車牌檢測程式碼實現
#include <inference_engine.hpp>
#include <opencv2/opencv.hpp>
#include <fstream>  //fstream檔案讀寫操作,iostream為控制檯操作

using namespace InferenceEngine;

int main(int argc, char** argv) {

	InferenceEngine::Core ie;
	std::vector<std::string> devices = ie.GetAvailableDevices();
	for (std::string name : devices) {
		std::cout << "device name: " << name << std::endl;
	}
	std::string cpuName = ie.GetMetric("CPU", METRIC_KEY(FULL_DEVICE_NAME)).as<std::string>();
	std::cout << "cpu name: " << cpuName << std::endl;

	std::string xml = "D:/projects/models/vehicle-license-plate-detection-barrier-0106/FP32/vehicle-license-plate-detection-barrier-0106.xml";
	std::string bin = "D:/projects/models/vehicle-license-plate-detection-barrier-0106/FP32/vehicle-license-plate-detection-barrier-0106.bin";
	cv::Mat src = cv::imread("D:/images/car_1.bmp");  //讀取影象
	int im_h = src.rows;
	int im_w = src.cols;
	InferenceEngine::CNNNetwork network = ie.ReadNetwork(xml, bin);  //讀取resnet18網路

	InferenceEngine::InputsDataMap inputs = network.getInputsInfo();  //DataMap是一個Mat陣列
	InferenceEngine::OutputsDataMap outputs = network.getOutputsInfo();  //DataMap是一個Mat陣列
	std::string input_name = "";
	for (auto item : inputs) {  //auto可以自動推斷變數型別
		input_name = item.first;  //第一個引數是name,第二個引數是結構,第二個引數設定精度與結構
		auto input_data = item.second;
		input_data->setPrecision(Precision::U8);  //預設為unsigned char對應U8
		input_data->setLayout(Layout::NCHW);
		//input_data->getPreProcess().setColorFormat(ColorFormat::BGR);  預設就是BGR
		std::cout << "input name: " << input_name << std::endl;
	}
	std::string output_name = "";
	for (auto item : outputs) {  //auto可以自動推斷變數型別
		output_name = item.first;  //第一個引數是name,第二個引數是結構,第二個引數設定精度與結構
		auto output_data = item.second;
		output_data->setPrecision(Precision::FP32);  //輸出還是浮點數
		//注意:output_data不要設定結構
		std::cout << "output name: " << output_name << std::endl;
	}

	auto executable_network = ie.LoadNetwork(network, "CPU");  //設定執行的裝置
	auto infer_request = executable_network.CreateInferRequest();  //設定推理請求

	//影象預處理
	auto input = infer_request.GetBlob(input_name);  //獲取網路輸入影象資訊
	size_t num_channels = input->getTensorDesc().getDims()[1];  //size_t 型別表示C中任何物件所能達到的最大長度,它是無符號整數
	size_t h = input->getTensorDesc().getDims()[2];
	size_t w = input->getTensorDesc().getDims()[3];
	size_t image_size = h * w;
	cv::Mat blob_image;
	cv::resize(src, blob_image, cv::Size(w, h));  //將輸入圖片大小轉換為與網路輸入大小一致
	//cv::cvtColor(blob_image, blob_image, cv::COLOR_BGR2RGB);  //色彩空間轉換

	// HWC =》NCHW  將輸入影象從HWC格式轉換為NCHW格式
	unsigned char* data = static_cast<unsigned char*>(input->buffer());  //將影象放到buffer中,放入input中
	for (size_t row = 0; row < h; row++) {
		for (size_t col = 0; col < w; col++) {
			for (size_t ch = 0; ch < num_channels; ch++) {
				//將每個通道變成一張圖,按照通道順序
				data[image_size * ch + row * w + col] = blob_image.at<cv::Vec3b>(row, col)[ch];
			}
		}
	}

	infer_request.Infer();
	auto output = infer_request.GetBlob(output_name);
	//轉換輸出資料
	const float* detection_out = static_cast<PrecisionTrait<Precision::FP32>::value_type*>(output->buffer());
	//output:[1, 1, N, 7]
	//七個引數為:[image_id, label, conf, x_min, y_min, x_max, y_max]
	const SizeVector outputDims = output->getTensorDesc().getDims();  //獲取輸出維度資訊 1*1000
	std::cout << outputDims[2] << "x" << outputDims[3] << std::endl;
	const int max_count = outputDims[2];  //識別出的物件個數
	const int object_size = outputDims[3];  //獲取物件資訊的個數,此處為7個
	for (int n = 0; n < max_count; n++) {
		float label = detection_out[n * object_size + 1];
		float confidence = detection_out[n * object_size + 2];
		float xmin = detection_out[n * object_size + 3] * im_w;
		float ymin = detection_out[n * object_size + 4] * im_h;
		float xmax = detection_out[n * object_size + 5] * im_w;
		float ymax = detection_out[n * object_size + 6] * im_h;
		if (confidence > 0.5) {
			printf("label id: %d \n", static_cast<int>(label));
			cv::Rect box;
			box.x = static_cast<int>(xmin);
			box.y = static_cast<int>(ymin);
			box.width = static_cast<int>(xmax - xmin);
			box.height = static_cast<int>(ymax - ymin);
			cv::rectangle(src, box, cv::Scalar(0, 0, 255), 2, 8);
			//box.tl()返回矩形左上角座標
			cv::putText(src, cv::format("%.2f", confidence), box.tl(), cv::FONT_HERSHEY_SIMPLEX, 1.0, cv::Scalar(0, 0, 255), 2, 8);
		}
	}

	//cv::putText(src, labels[max_index], cv::Point(50, 50), cv::FONT_HERSHEY_SIMPLEX, 1.0, cv::Scalar(0, 0, 255), 2, 8);
	cv::namedWindow("out", cv::WINDOW_FREERATIO);
	cv::imshow("out", src);
	cv::waitKey(0);
	return 0;
}
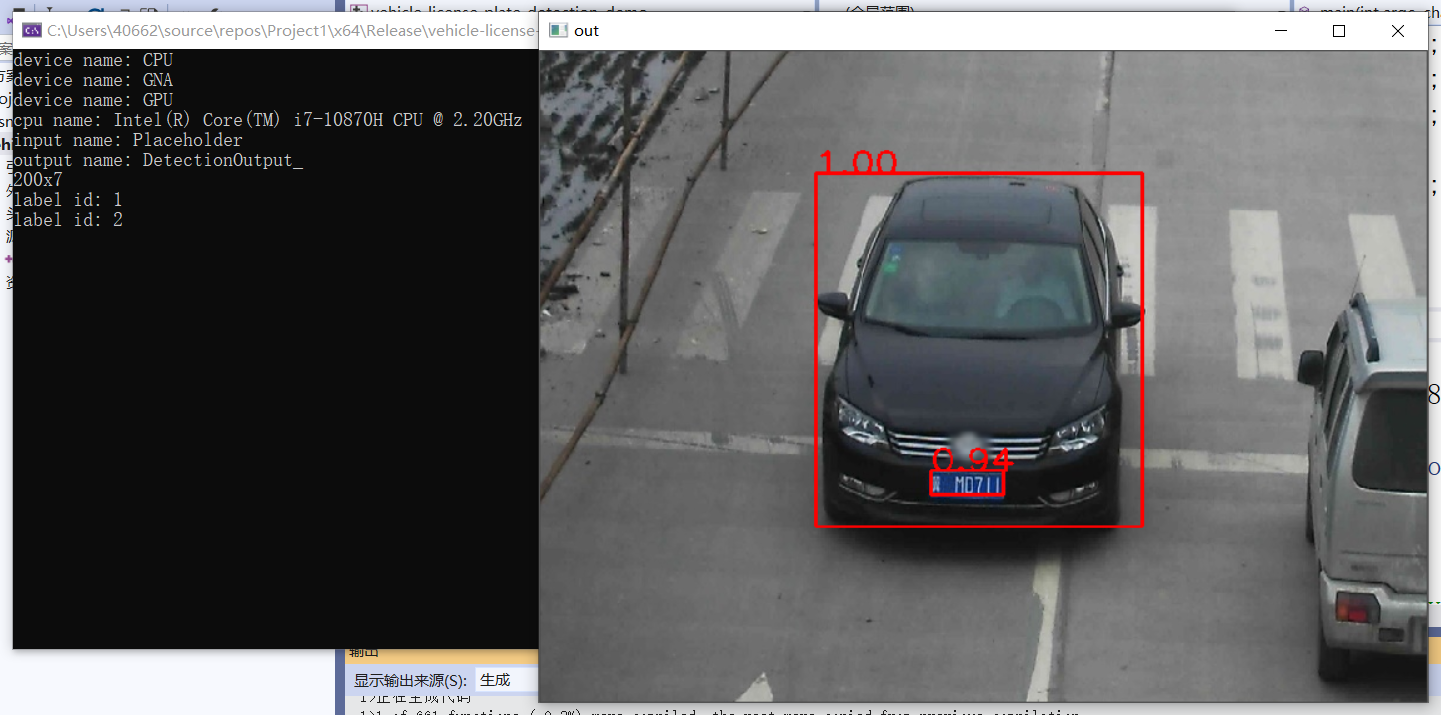
效果:
車牌識別
- 模型名稱:license-plate-recognition-barrier-0001
- 輸入格式:BGR
- 1 * 3 * 24 * 94,88 * 1 = [0, 1, 1, 1, 1, ...... , 1]
- 輸出格式:1 * 88 * 1 * 1
下載模型(license-plate-recognition-barrier-0001),下載方法同上,實現思路:1初始化車牌識別網路,提升輸入輸出值的應用範圍;2呼叫車輛及車牌檢測模型進行車牌檢測;3將車牌檢測的資料輸入車牌識別函數,使用車牌識別網路初始化的輸入輸出值在該函數中進行識別,輸出識別到的車牌資訊。
車牌識別程式碼實現
#include <opencv2/opencv.hpp>
#include <inference_engine.hpp>
#include <fstream>

using namespace InferenceEngine;
static std::vector<std::string> items = {
	"0","1","2","3","4","5","6","7","8","9",
	"< Anhui >","< Beijing >","< Chongqing >","< Fujian >",
	"< Gansu >","< Guangdong >","< Guangxi >","< Guizhou >",
	"< Hainan >","< Hebei >","< Heilongjiang >","< Henan >",
	"< HongKong >","< Hubei >","< Hunan >","< InnerMongolia >",
	"< Jiangsu >","< Jiangxi >","< Jilin >","< Liaoning >",
	"< Macau >","< Ningxia >","< Qinghai >","< Shaanxi >",
	"< Shandong >","< Shanghai >","< Shanxi >","< Sichuan >",
	"< Tianjin >","< Tibet >","< Xinjiang >","< Yunnan >",
	"< Zhejiang >","< police >",
	"A","B","C","D","E","F","G","H","I","J",
	"K","L","M","N","O","P","Q","R","S","T",
	"U","V","W","X","Y","Z"
};

InferenceEngine::InferRequest plate_request;
std::string plate_input_name1;
std::string plate_input_name2;
std::string plate_output_name;

void load_plate_recog_model();
void fetch_plate_text(cv::Mat &image, cv::Mat &plateROI);

int main(int argc, char** argv) {

	InferenceEngine::Core ie;
	load_plate_recog_model();  //呼叫車牌識別模型,模型資訊儲存到plate_input_name1/name2/output_name中

	std::string xml = "D:/projects/models/vehicle-license-plate-detection-barrier-0106/FP32/vehicle-license-plate-detection-barrier-0106.xml";
	std::string bin = "D:/projects/models/vehicle-license-plate-detection-barrier-0106/FP32/vehicle-license-plate-detection-barrier-0106.bin";
	cv::Mat src = cv::imread("D:/images/car_1.bmp");  //讀取影象
	int im_h = src.rows;
	int im_w = src.cols;
	InferenceEngine::CNNNetwork network = ie.ReadNetwork(xml, bin);  //讀取resnet18網路

	InferenceEngine::InputsDataMap inputs = network.getInputsInfo();  //DataMap是一個Mat陣列
	InferenceEngine::OutputsDataMap outputs = network.getOutputsInfo();  //DataMap是一個Mat陣列
	std::string input_name = "";
	for (auto item : inputs) {  //auto可以自動推斷變數型別
		input_name = item.first;  //第一個引數是name,第二個引數是結構,第二個引數設定精度與結構
		auto input_data = item.second;
		input_data->setPrecision(Precision::U8);  //預設為unsigned char對應U8
		input_data->setLayout(Layout::NCHW);
		//input_data->getPreProcess().setColorFormat(ColorFormat::BGR);  預設就是BGR
		std::cout << "input name: " << input_name << std::endl;
	}
	std::string output_name = "";
	for (auto item : outputs) {  //auto可以自動推斷變數型別
		output_name = item.first;  //第一個引數是name,第二個引數是結構,第二個引數設定精度與結構
		auto output_data = item.second;
		output_data->setPrecision(Precision::FP32);  //輸出還是浮點數
		//注意:output_data不要設定結構
		std::cout << "output name: " << output_name << std::endl;
	}

	auto executable_network = ie.LoadNetwork(network, "CPU");  //設定執行的裝置
	auto infer_request = executable_network.CreateInferRequest();  //設定推理請求

	//影象預處理
	auto input = infer_request.GetBlob(input_name);  //獲取網路輸入影象資訊
	size_t num_channels = input->getTensorDesc().getDims()[1];  //size_t 型別表示C中任何物件所能達到的最大長度,它是無符號整數
	size_t h = input->getTensorDesc().getDims()[2];
	size_t w = input->getTensorDesc().getDims()[3];
	size_t image_size = h * w;
	cv::Mat blob_image;
	cv::resize(src, blob_image, cv::Size(w, h));  //將輸入圖片大小轉換為與網路輸入大小一致
	//cv::cvtColor(blob_image, blob_image, cv::COLOR_BGR2RGB);  //色彩空間轉換

	// HWC =》NCHW  將輸入影象從HWC格式轉換為NCHW格式
	unsigned char* data = static_cast<unsigned char*>(input->buffer());  //將影象放到buffer中,放入input中
	for (size_t row = 0; row < h; row++) {
		for (size_t col = 0; col < w; col++) {
			for (size_t ch = 0; ch < num_channels; ch++) {
				//將每個通道變成一張圖,按照通道順序
				data[image_size * ch + row * w + col] = blob_image.at<cv::Vec3b>(row, col)[ch];
			}
		}
	}

	infer_request.Infer();
	auto output = infer_request.GetBlob(output_name);
	//轉換輸出資料
	const float* detection_out = static_cast<PrecisionTrait<Precision::FP32>::value_type*>(output->buffer());
	//output:[1, 1, N, 7]
	//七個引數為:[image_id, label, conf, x_min, y_min, x_max, y_max]
	const SizeVector outputDims = output->getTensorDesc().getDims();  //獲取輸出維度資訊 1*1000
	std::cout << outputDims[2] << "x" << outputDims[3] << std::endl;
	const int max_count = outputDims[2];  //識別出的物件個數
	const int object_size = outputDims[3];  //獲取物件資訊的個數,此處為7個
	for (int n = 0; n < max_count; n++) {
		float label = detection_out[n * object_size + 1];
		float confidence = detection_out[n * object_size + 2];
		float xmin = detection_out[n * object_size + 3] * im_w;
		float ymin = detection_out[n * object_size + 4] * im_h;
		float xmax = detection_out[n * object_size + 5] * im_w;
		float ymax = detection_out[n * object_size + 6] * im_h;
		if (confidence > 0.5) {
			printf("label id: %d \n", static_cast<int>(label));
			cv::Rect box;
			box.x = static_cast<int>(xmin);
			box.y = static_cast<int>(ymin);
			box.width = static_cast<int>(xmax - xmin);
			box.height = static_cast<int>(ymax - ymin);

			if (label == 2) {  //將車牌用綠色表示
				cv::rectangle(src, box, cv::Scalar(0, 255, 0), 2, 8);
				//recognize plate
				cv::Rect plate_roi;
				plate_roi.x = box.x - 5;
				plate_roi.y = box.y - 5;
				plate_roi.width = box.width + 10;
				plate_roi.height = box.height + 10;
				cv::Mat roi = src(plate_roi);  //需要先初始化Mat&,才能使用
				//呼叫車牌識別方法
				fetch_plate_text(src, roi);
			}
			else {
				cv::rectangle(src, box, cv::Scalar(0, 0, 255), 2, 8);
			}

			//box.tl()返回矩形左上角座標
			cv::putText(src, cv::format("%.2f", confidence), box.tl(), cv::FONT_HERSHEY_SIMPLEX, 1.0, cv::Scalar(0, 0, 255), 2, 8);
		}
	}

	//cv::putText(src, labels[max_index], cv::Point(50, 50), cv::FONT_HERSHEY_SIMPLEX, 1.0, cv::Scalar(0, 0, 255), 2, 8);
	cv::namedWindow("out", cv::WINDOW_FREERATIO);
	cv::imshow("out", src);
	cv::waitKey(0);
	return 0;
}

void load_plate_recog_model() {
	InferenceEngine::Core ie;

	std::string xml = "D:/projects/models/license-plate-recognition-barrier-0001/FP32/license-plate-recognition-barrier-0001.xml";
	std::string bin = "D:/projects/models/license-plate-recognition-barrier-0001/FP32/license-plate-recognition-barrier-0001.bin";

	InferenceEngine::CNNNetwork network = ie.ReadNetwork(xml, bin);  //讀取網路
	InferenceEngine::InputsDataMap inputs = network.getInputsInfo();  //DataMap是一個Mat陣列
	InferenceEngine::OutputsDataMap outputs = network.getOutputsInfo();  //DataMap是一個Mat陣列

	int cnt = 0;
	for (auto item : inputs) {  //auto可以自動推斷變數型別
		if (cnt == 0) {
			plate_input_name1 = item.first;  //第一個引數是name,第二個引數是結構,第二個引數設定精度與結構
			auto input_data = item.second;
			input_data->setPrecision(Precision::U8);  //預設為unsigned char對應U8
			input_data->setLayout(Layout::NCHW);
		}
		else if (cnt == 1) {
			plate_input_name2 = item.first;  //第一個引數是name,第二個引數是結構,第二個引數設定精度與結構
			auto input_data = item.second;
			input_data->setPrecision(Precision::FP32);  //預設為unsigned char對應U8
		}
		//input_data->getPreProcess().setColorFormat(ColorFormat::BGR);  預設就是BGR
		std::cout << "input name: " << (cnt + 1) << ":" << item.first << std::endl;
		cnt++;
	}
	std::string output_name = "";
	for (auto item : outputs) {  //auto可以自動推斷變數型別
		plate_output_name = item.first;  //第一個引數是name,第二個引數是結構,第二個引數設定精度與結構
		auto output_data = item.second;
		output_data->setPrecision(Precision::FP32);  //輸出還是浮點數
		//注意:output_data不要設定結構
		std::cout << "output name: " << plate_output_name << std::endl;
	}

	auto executable_network = ie.LoadNetwork(network, "CPU");  //設定執行的裝置
	plate_request = executable_network.CreateInferRequest();  //設定推理請求
}

void fetch_plate_text(cv::Mat &image, cv::Mat &plateROI) {
	//影象預處理,使用車牌識別的方法中獲取的輸入輸出資訊,用於文字獲取
	auto input1 = plate_request.GetBlob(plate_input_name1);  //獲取網路輸入影象資訊
	size_t num_channels = input1->getTensorDesc().getDims()[1];  //size_t 型別表示C中任何物件所能達到的最大長度,它是無符號整數
	size_t h = input1->getTensorDesc().getDims()[2];
	size_t w = input1->getTensorDesc().getDims()[3];
	size_t image_size = h * w;
	cv::Mat blob_image;
	cv::resize(plateROI, blob_image, cv::Size(94, 24));  //將輸入圖片大小轉換為與網路輸入大小一致
	//cv::cvtColor(blob_image, blob_image, cv::COLOR_BGR2RGB);  //色彩空間轉換

	// HWC =》NCHW  將輸入影象從HWC格式轉換為NCHW格式
	unsigned char* data = static_cast<unsigned char*>(input1->buffer());  //將影象放到buffer中,放入input中
	for (size_t row = 0; row < h; row++) {
		for (size_t col = 0; col < w; col++) {
			for (size_t ch = 0; ch < num_channels; ch++) {
				//將每個通道變成一張圖,按照通道順序
				data[image_size * ch + row * w + col] = blob_image.at<cv::Vec3b>(row, col)[ch];
			}
		}
	}

	//使用車牌識別的方法中獲取的輸入輸出資訊,用於文字獲取
	auto input2 = plate_request.GetBlob(plate_input_name2);
	int max_sequence = input2->getTensorDesc().getDims()[0];  //輸出字元長度
	float* blob2 = input2->buffer().as<float*>();
	blob2[0] = 0.0;
	std::fill(blob2 + 1, blob2 + max_sequence, 1.0f);  //填充起止範圍與填充值

	plate_request.Infer();  //執行推理
	auto output = plate_request.GetBlob(plate_output_name);  //獲取推理結果
	const float* plate_data = static_cast<PrecisionTrait<Precision::FP32>::value_type*>(output->buffer());  //獲取浮點型別輸出值plate_data
	std::string result;
	for (int i = 0; i < max_sequence; i++) {
		if (plate_data[i] == -1) {  //end
			break;
		}
		result += items[std::size_t(plate_data[i])];  //型別轉換,字串拼接
	}
	std::cout << result << std::endl;
	cv::putText(image, result.c_str(), cv::Point(50, 50), cv::FONT_HERSHEY_SIMPLEX, 1.0, cv::Scalar(0, 0, 255), 2, 8);
}
效果:
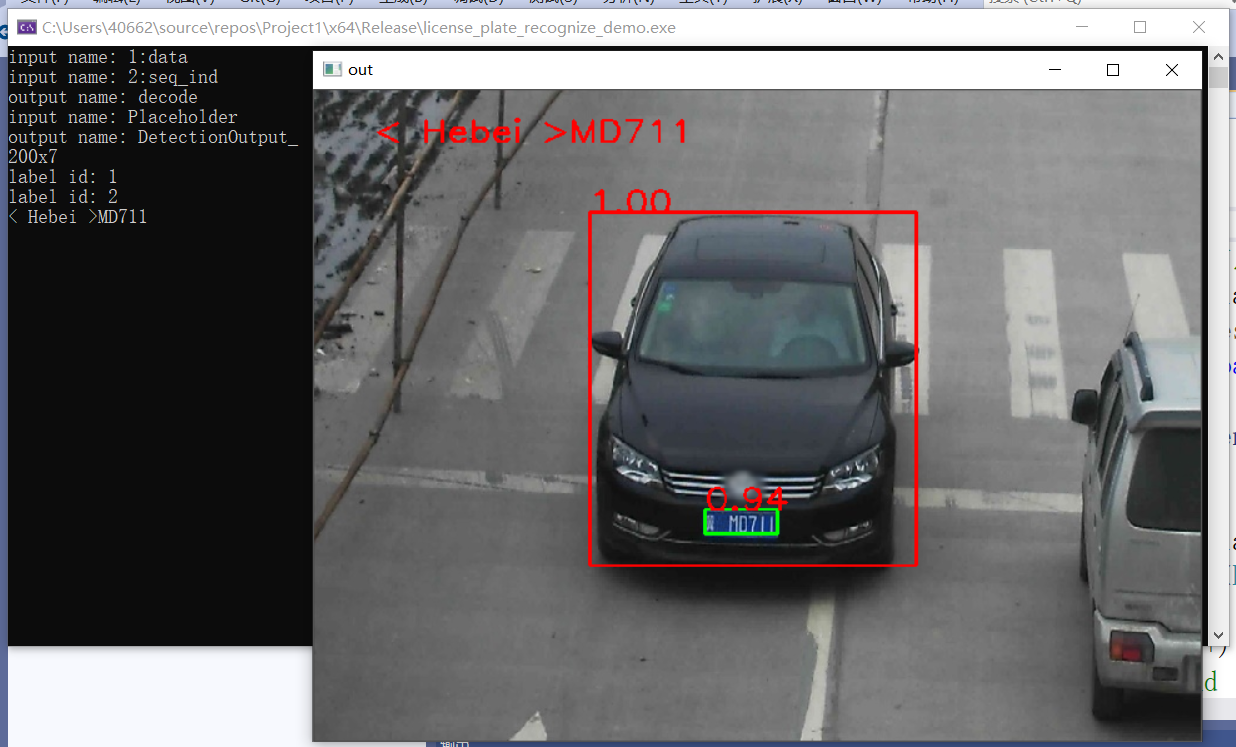
5、行人檢測、人臉檢測及表情識別
視訊行人檢測
模型介紹
- pedestrian-detection-adas-0002
- SSD MobileNetv1
- 輸入格式:[1 * 3 * 384 * 672]
- 輸出格式:[1, 1, N, 7]
程式碼實現
#include <inference_engine.hpp>
#include <opencv2/opencv.hpp>
#include <fstream>  //fstream檔案讀寫操作,iostream為控制檯操作

using namespace InferenceEngine;
void infer_process(cv::Mat &frame, InferenceEngine::InferRequest &request, std::string &input_name, std::string &output_name);
int main(int argc, char** argv) {

	InferenceEngine::Core ie;

	std::string xml = "D:/projects/models/pedestrian-detection-adas-0002/FP32/pedestrian-detection-adas-0002.xml";
	std::string bin = "D:/projects/models/pedestrian-detection-adas-0002/FP32/pedestrian-detection-adas-0002.bin";
	cv::Mat src = cv::imread("D:/images/pedestrians_test.jpg");  //讀取影象
	int im_h = src.rows;
	int im_w = src.cols;
	InferenceEngine::CNNNetwork network = ie.ReadNetwork(xml, bin);  //讀取車輛檢測網路

	//獲取網路輸入輸出資訊
	InferenceEngine::InputsDataMap inputs = network.getInputsInfo();  //DataMap是一個Mat陣列
	InferenceEngine::OutputsDataMap outputs = network.getOutputsInfo();  //DataMap是一個Mat陣列
	std::string input_name = "";
	for (auto item : inputs) {  //auto可以自動推斷變數型別
		input_name = item.first;  //第一個引數是name,第二個引數是結構,第二個引數設定精度與結構
		auto input_data = item.second;
		// A->B 表示提取A中的成員B
		input_data->setPrecision(Precision::U8);  //預設為unsigned char對應U8
		input_data->setLayout(Layout::NCHW);
		//input_data->getPreProcess().setColorFormat(ColorFormat::BGR);  預設就是BGR
		std::cout << "input name: " << input_name << std::endl;
	}
	std::string output_name = "";
	for (auto item : outputs) {  //auto可以自動推斷變數型別
		output_name = item.first;  //第一個引數是name,第二個引數是結構,第二個引數設定精度與結構
		auto output_data = item.second;
		output_data->setPrecision(Precision::FP32);  //輸出還是浮點數
		//注意:output_data不要設定結構
		std::cout << "output name: " << output_name << std::endl;
	}

	auto executable_network = ie.LoadNetwork(network, "CPU");  //設定執行的裝置
	auto infer_request = executable_network.CreateInferRequest();  //設定推理請求

	//建立視訊流/載入視訊檔
	cv::VideoCapture capture("D:/images/video/pedestrians_test.mp4");
	cv::Mat frame;
	while (true) {
		bool ret = capture.read(frame);
		if (!ret) {  //視訊幀為空就跳出迴圈
			break;
		}
		infer_process(frame, infer_request, input_name, output_name);
		cv::imshow("frame", frame);
		char c = cv::waitKey(1);
		if (c == 27) {  //ESC
			break;
		}
	}

	//cv::putText(src, labels[max_index], cv::Point(50, 50), cv::FONT_HERSHEY_SIMPLEX, 1.0, cv::Scalar(0, 0, 255), 2, 8);
	cv::namedWindow("out", cv::WINDOW_FREERATIO);
	cv::imshow("out", src);
	cv::waitKey(0);  //最後的視訊畫面靜止
	return 0;
}

void infer_process(cv::Mat& frame, InferenceEngine::InferRequest& request, std::string& input_name, std::string& output_name) {
	//影象預處理
	auto input = request.GetBlob(input_name);  //獲取網路輸入影象資訊
	int im_w = frame.cols;
	int im_h = frame.rows;
	size_t num_channels = input->getTensorDesc().getDims()[1];  //size_t 型別表示C中任何物件所能達到的最大長度,它是無符號整數
	size_t h = input->getTensorDesc().getDims()[2];
	size_t w = input->getTensorDesc().getDims()[3];
	size_t image_size = h * w;
	cv::Mat blob_image;
	cv::resize(frame, blob_image, cv::Size(w, h));  //將輸入圖片大小轉換為與網路輸入大小一致
	//cv::cvtColor(blob_image, blob_image, cv::COLOR_BGR2RGB);  //色彩空間轉換

	// HWC =》NCHW  將輸入影象從HWC格式轉換為NCHW格式
	unsigned char* data = static_cast<unsigned char*>(input->buffer());  //將影象放到buffer中,放入input中
	for (size_t row = 0; row < h; row++) {
		for (size_t col = 0; col < w; col++) {
			for (size_t ch = 0; ch < num_channels; ch++) {
				//將每個通道變成一張圖,按照通道順序
				data[image_size * ch + row * w + col] = blob_image.at<cv::Vec3b>(row, col)[ch];
			}
		}
	}

	request.Infer();
	auto output = request.GetBlob(output_name);
	//轉換輸出資料
	const float* detection_out = static_cast<PrecisionTrait<Precision::FP32>::value_type*>(output->buffer());
	//output:[1, 1, N, 7]
	//七個引數為:[image_id, label, conf, x_min, y_min, x_max, y_max]
	const SizeVector outputDims = output->getTensorDesc().getDims();  //獲取輸出維度資訊 1*1000
	std::cout << outputDims[2] << "x" << outputDims[3] << std::endl;
	const int max_count = outputDims[2];  //識別出的物件個數
	const int object_size = outputDims[3];  //獲取物件資訊的個數,此處為7個
	for (int n = 0; n < max_count; n++) {
		float label = detection_out[n * object_size + 1];
		float confidence = detection_out[n * object_size + 2];
		float xmin = detection_out[n * object_size + 3] * im_w;
		float ymin = detection_out[n * object_size + 4] * im_h;
		float xmax = detection_out[n * object_size + 5] * im_w;
		float ymax = detection_out[n * object_size + 6] * im_h;
		if (confidence > 0.9) {
			printf("label id: %d \n", static_cast<int>(label));
			cv::Rect box;
			box.x = static_cast<int>(xmin);
			box.y = static_cast<int>(ymin);
			box.width = static_cast<int>(xmax - xmin);
			box.height = static_cast<int>(ymax - ymin);

			if (label == 2) {  //將車牌與車輛用不同顏色表示
				cv::rectangle(frame, box, cv::Scalar(0, 255, 0), 2, 8);
			}
			else {
				cv::rectangle(frame, box, cv::Scalar(0, 0, 255), 2, 8);
			}

			//cv::rectangle(src, box, cv::Scalar(0, 0, 255), 2, 8);
			//box.tl()返回矩形左上角座標
			cv::putText(frame, cv::format("%.2f", confidence), box.tl(), cv::FONT_HERSHEY_SIMPLEX, 1.0, cv::Scalar(0, 0, 255), 2, 8);
		}
	}
}
效果:
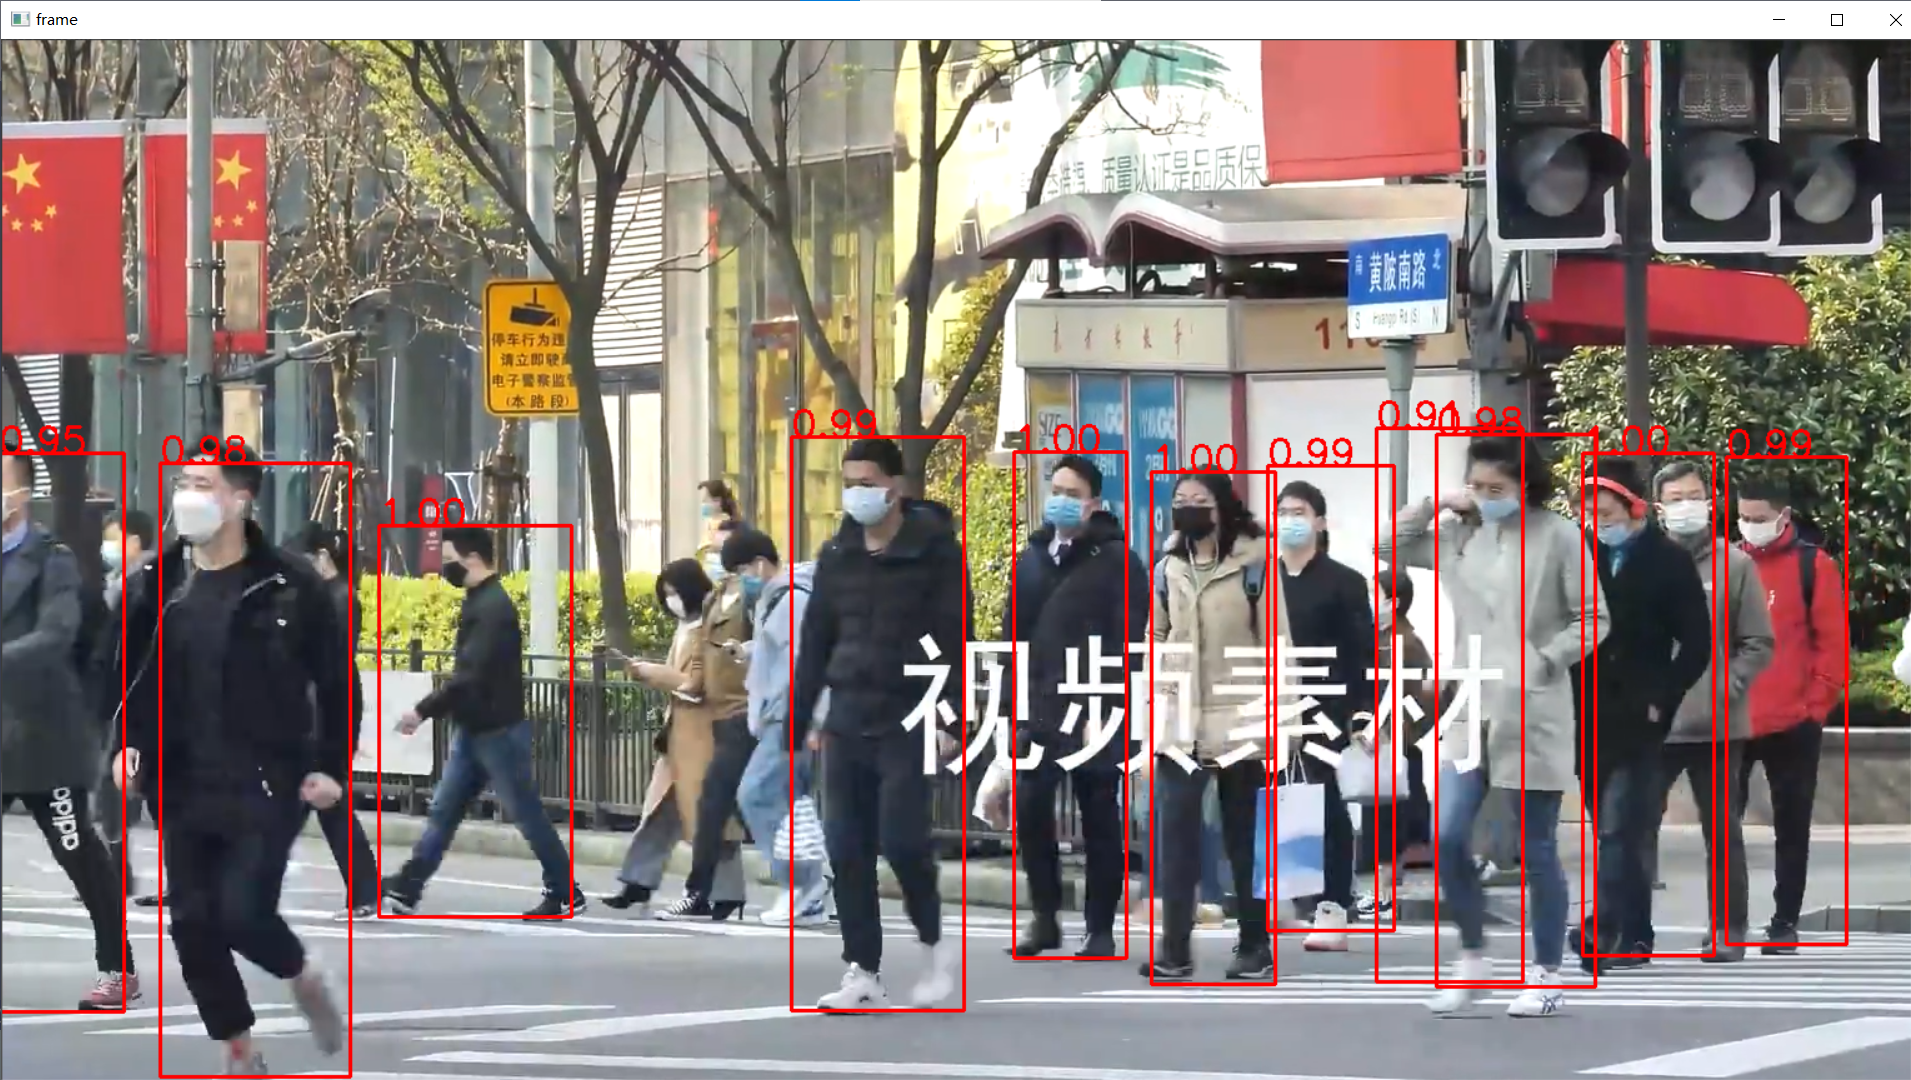
實時人臉檢測之非同步推理
模型介紹
- 人臉檢測:face-detection-0202,SSD-MobileNetv2
- 輸入格式:1 * 3 * 384 * 384
- 輸出格式:[1, 1, N, 7]
- OpenVINO中人臉檢測模型0202~0206
同步與非同步執行

程式碼實現
#include <inference_engine.hpp>
#include <opencv2/opencv.hpp>
#include <fstream>  //fstream檔案讀寫操作,iostream為控制檯操作

using namespace InferenceEngine;

//影象預處理常式
template <typename T>
void matU8ToBlob(const cv::Mat& orig_image, InferenceEngine::Blob::Ptr& blob, int batchIndex = 0) {
	InferenceEngine::SizeVector blobSize = blob->getTensorDesc().getDims();
	const size_t width = blobSize[3];
	const size_t height = blobSize[2];
	const size_t channels = blobSize[1];
	InferenceEngine::MemoryBlob::Ptr mblob = InferenceEngine::as<InferenceEngine::MemoryBlob>(blob);
	if (!mblob) {
		THROW_IE_EXCEPTION << "We expect blob to be inherited from MemoryBlob in matU8ToBlob, "
			<< "but by fact we were not able to cast inputBlob to MemoryBlob";
	}
	// locked memory holder should be alive all time while access to its buffer happens
	auto mblobHolder = mblob->wmap();

	T* blob_data = mblobHolder.as<T*>();

	cv::Mat resized_image(orig_image);
	if (static_cast<int>(width) != orig_image.size().width ||
		static_cast<int>(height) != orig_image.size().height) {
		cv::resize(orig_image, resized_image, cv::Size(width, height));
	}

	int batchOffset = batchIndex * width * height * channels;

	for (size_t c = 0; c < channels; c++) {
		for (size_t h = 0; h < height; h++) {
			for (size_t w = 0; w < width; w++) {
				blob_data[batchOffset + c * width * height + h * width + w] =
					resized_image.at<cv::Vec3b>(h, w)[c];
			}
		}
	}
}

void frameToBlob(std::shared_ptr<InferenceEngine::InferRequest>& request, cv::Mat& frame, std::string& input_name) {
	//影象預處理,輸入資料 ->指標獲取成員方法
	InferenceEngine::Blob::Ptr input = request->GetBlob(input_name);  //獲取網路輸入影象資訊
	//該函數template模板型別,需要指定具體型別
	matU8ToBlob<uchar>(frame, input);  //使用該函數處理輸入資料
}

int main(int argc, char** argv) {

	InferenceEngine::Core ie;
	std::vector<std::string> devices = ie.GetAvailableDevices();
	for (std::string name : devices) {
		std::cout << "device name: " << name << std::endl;
	}
	std::string cpuName = ie.GetMetric("CPU", METRIC_KEY(FULL_DEVICE_NAME)).as<std::string>();
	std::cout << "cpu name: " << cpuName << std::endl;

	std::string xml = "D:/projects/models/face-detection-0202/FP32/face-detection-0202.xml";
	std::string bin = "D:/projects/models/face-detection-0202/FP32/face-detection-0202.bin";

	//cv::Mat src = cv::imread("D:/images/mmc2.jpg");  //讀取影象
	//int im_h = src.rows;
	//int im_w = src.cols;

	InferenceEngine::CNNNetwork network = ie.ReadNetwork(xml, bin);  //讀取車輛檢測網路

	//獲取網路輸入輸出資訊並設定
	InferenceEngine::InputsDataMap inputs = network.getInputsInfo();  //DataMap是一個Mat陣列
	InferenceEngine::OutputsDataMap outputs = network.getOutputsInfo();  //DataMap是一個Mat陣列
	std::string input_name = "";
	for (auto item : inputs) {  //auto可以自動推斷變數型別
		input_name = item.first;  //第一個引數是name,第二個引數是結構,第二個引數設定精度與結構
		auto input_data = item.second;
		// A->B 表示提取A中的成員B
		input_data->setPrecision(Precision::U8);  //預設為unsigned char對應U8
		input_data->setLayout(Layout::NCHW);
		//input_data->getPreProcess().setColorFormat(ColorFormat::BGR);  預設就是BGR
		std::cout << "input name: " << input_name << std::endl;
	}
	std::string output_name = "";
	for (auto item : outputs) {  //auto可以自動推斷變數型別
		output_name = item.first;  //第一個引數是name,第二個引數是結構,第二個引數設定精度與結構
		auto output_data = item.second;
		output_data->setPrecision(Precision::FP32);  //輸出還是浮點數
		//注意:output_data不要設定結構
		std::cout << "output name: " << output_name << std::endl;
	}

	auto executable_network = ie.LoadNetwork(network, "CPU");  //設定執行的裝置
	//建立指標型別便於後續操作
	auto curr_infer_request = executable_network.CreateInferRequestPtr();  //設定推理請求
	auto next_infer_request = executable_network.CreateInferRequestPtr();  //設定推理請求

	cv::VideoCapture capture("D:/images/video/pedestrians_test.mp4");
	cv::Mat curr_frame;
	cv::Mat next_frame;
	capture.read(curr_frame);  //先讀取一幀作為當前幀
	int im_h = curr_frame.rows;
	int im_w = curr_frame.cols;
	frameToBlob(curr_infer_request, curr_frame, input_name);
	bool first_frame = true;  //設定兩個bool變數控制執行緒開啟
	bool last_frame = false;
	//開啟兩個執行緒,curr轉換顯示結果,next預處理影象,預處理後交換給curr
	while (true) {
		int64 start = cv::getTickCount();  //計時
		bool ret = capture.read(next_frame);  //讀取一幀作為下一幀
		if (!ret) {
			last_frame = true;  //如果下一幀為空,則last_frame為true
		}
		if (!last_frame) {  //如果last_frame為false則預處理下一幀影象
			frameToBlob(next_infer_request, next_frame, input_name);
		}
		if (first_frame) {  //如果first_frame為true則開啟兩個執行緒,同時修改first_frame為false,避免多次開啟執行緒
			curr_infer_request->StartAsync();  //開啟執行緒
			next_infer_request->StartAsync();
			first_frame = false;
		}
		else {  //如果first_frame與last_frame同為false表示只有下一幀不為空,則開啟一個next執行緒
			if (!last_frame) {
				next_infer_request->StartAsync();
			}
		}
		//判斷當前請求是否預處理完畢
		if (InferenceEngine::OK == curr_infer_request->Wait(InferenceEngine::IInferRequest::WaitMode::RESULT_READY)) {
			auto output = curr_infer_request->GetBlob(output_name);
			//轉換輸出資料
			const float* detection_out = static_cast<PrecisionTrait<Precision::FP32>::value_type*>(output->buffer());
			//output:[1, 1, N, 7]
			//七個引數為:[image_id, label, conf, x_min, y_min, x_max, y_max]
			const SizeVector outputDims = output->getTensorDesc().getDims();  //獲取輸出維度資訊 1*1000
			std::cout << outputDims[2] << "x" << outputDims[3] << std::endl;
			const int max_count = outputDims[2];  //識別出的物件個數
			const int object_size = outputDims[3];  //獲取物件資訊的個數,此處為7個
			for (int n = 0; n < max_count; n++) {
				float label = detection_out[n * object_size + 1];
				float confidence = detection_out[n * object_size + 2];
				float xmin = detection_out[n * object_size + 3] * im_w;
				float ymin = detection_out[n * object_size + 4] * im_h;
				float xmax = detection_out[n * object_size + 5] * im_w;
				float ymax = detection_out[n * object_size + 6] * im_h;
				if (confidence > 0.5) {
					printf("label id: %d \n", static_cast<int>(label));
					cv::Rect box;
					box.x = static_cast<int>(xmin);
					box.y = static_cast<int>(ymin);
					box.width = static_cast<int>(xmax - xmin);
					box.height = static_cast<int>(ymax - ymin);

					cv::rectangle(curr_frame, box, cv::Scalar(0, 0, 255), 2, 8);
					//getTickCount()相減得到cpu走過的時鐘週期數,getTickFrequency()得到cpu一秒走過的始終週期數
					float t = (cv::getTickCount() - start) / static_cast<float>(cv::getTickFrequency());
					std::cout << 1.0 / t << std::endl;
					//box.tl()返回矩形左上角座標
					cv::putText(curr_frame, cv::format("%.2f", confidence), box.tl(), cv::FONT_HERSHEY_SIMPLEX, 1.0, cv::Scalar(0, 0, 255), 2, 8);
				}
			}
		}
		//顯示結果
		cv::imshow("人臉檢測非同步顯示", curr_frame);
		char c = cv::waitKey(1);
		if (c == 27) {  //ESC
			break;
		}
		if (last_frame) {  //如果last_frame為true表示下一幀為空,則跳出迴圈
			break;
		}

		//非同步交換,下一幀複製到當前幀,當前幀請求與下一幀請求交換
		next_frame.copyTo(curr_frame);
		curr_infer_request.swap(next_infer_request);  //指標可以使用swap方法,否則不行
	}

	cv::waitKey(0);
	return 0;
}
效果:
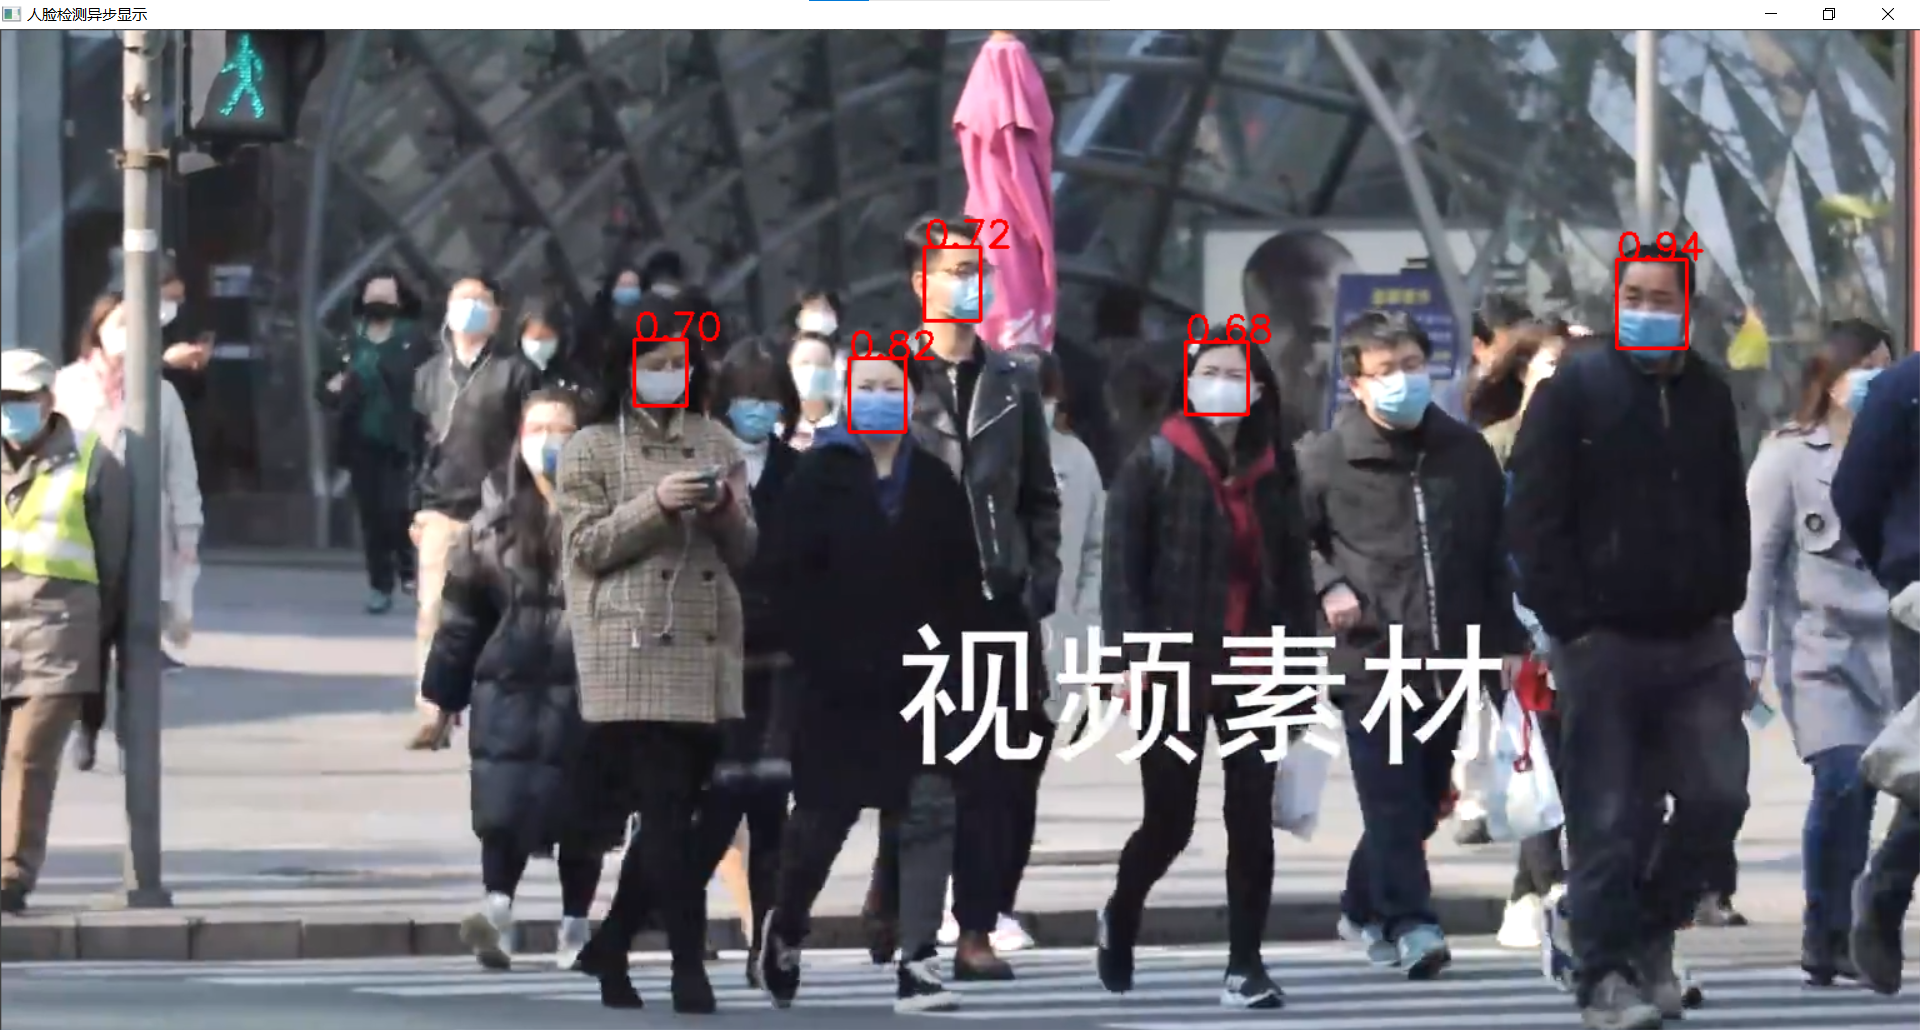
實時人臉表情識別
模型介紹
- 人臉檢測:face-detection-0202,SSD-MobileNetv2
- 輸入格式:1 * 3 * 384 * 384
- 輸出格式:[1, 1, N, 7]
- 表情識別:emotions-recognition-retail-0003
- 1 * 3 * 64 * 64
- [1, 5, 1, 1] - ('neutral', 'happy', 'sad', 'suprise', 'anger')
- 下載模型 emotions-recognition-retail-0003 同前
同步與非同步執行
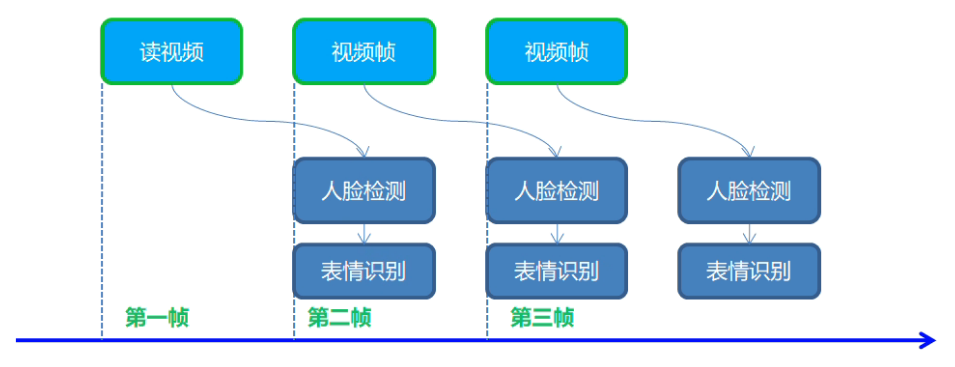
程式碼實現
#include <inference_engine.hpp>
#include <opencv2/opencv.hpp>
#include <fstream>  //fstream檔案讀寫操作,iostream為控制檯操作

using namespace InferenceEngine;

static const char *const items[] = {
	"neutral","happy","sad","surprise","anger"
};

//影象預處理常式
template <typename T>
void matU8ToBlob(const cv::Mat& orig_image, InferenceEngine::Blob::Ptr& blob, int batchIndex = 0) {
	InferenceEngine::SizeVector blobSize = blob->getTensorDesc().getDims();
	const size_t width = blobSize[3];
	const size_t height = blobSize[2];
	const size_t channels = blobSize[1];
	InferenceEngine::MemoryBlob::Ptr mblob = InferenceEngine::as<InferenceEngine::MemoryBlob>(blob);
	if (!mblob) {
		THROW_IE_EXCEPTION << "We expect blob to be inherited from MemoryBlob in matU8ToBlob, "
			<< "but by fact we were not able to cast inputBlob to MemoryBlob";
	}
	// locked memory holder should be alive all time while access to its buffer happens
	auto mblobHolder = mblob->wmap();

	T* blob_data = mblobHolder.as<T*>();

	cv::Mat resized_image(orig_image);
	if (static_cast<int>(width) != orig_image.size().width ||
		static_cast<int>(height) != orig_image.size().height) {
		cv::resize(orig_image, resized_image, cv::Size(width, height));
	}

	int batchOffset = batchIndex * width * height * channels;

	for (size_t c = 0; c < channels; c++) {
		for (size_t h = 0; h < height; h++) {
			for (size_t w = 0; w < width; w++) {
				blob_data[batchOffset + c * width * height + h * width + w] =
					resized_image.at<cv::Vec3b>(h, w)[c];
			}
		}
	}
}

void fetch_emotion(cv::Mat& image, InferenceEngine::InferRequest& request, cv::Rect& face_roi, std::string& e_input, std::string& e_output);
void frameToBlob(std::shared_ptr<InferenceEngine::InferRequest>& request, cv::Mat& frame, std::string& input_name) {
	//影象預處理,輸入資料 ->指標獲取成員方法
	InferenceEngine::Blob::Ptr input = request->GetBlob(input_name);  //獲取網路輸入影象資訊
	//該函數template模板型別,需要指定具體型別
	matU8ToBlob<uchar>(frame, input);  //使用該函數處理輸入資料
}

int main(int argc, char** argv) {

	InferenceEngine::Core ie;

	//load face model
	std::string xml = "D:/projects/models/face-detection-0202/FP32/face-detection-0202.xml";
	std::string bin = "D:/projects/models/face-detection-0202/FP32/face-detection-0202.bin";
	InferenceEngine::CNNNetwork network = ie.ReadNetwork(xml, bin);  //讀取車輛檢測網路
	//獲取網路輸入輸出資訊並設定
	InferenceEngine::InputsDataMap inputs = network.getInputsInfo();  //DataMap是一個Mat陣列
	InferenceEngine::OutputsDataMap outputs = network.getOutputsInfo();  //DataMap是一個Mat陣列

	std::string input_name = "";
	for (auto item : inputs) {  //auto可以自動推斷變數型別
		input_name = item.first;  //第一個引數是name,第二個引數是結構,第二個引數設定精度與結構
		auto input_data = item.second;
		// A->B 表示提取A中的成員B
		input_data->setPrecision(Precision::U8);  //預設為unsigned char對應U8
		input_data->setLayout(Layout::NCHW);
		//input_data->getPreProcess().setColorFormat(ColorFormat::BGR);  預設就是BGR
		std::cout << "input name: " << input_name << std::endl;
	}
	std::string output_name = "";
	for (auto item : outputs) {  //auto可以自動推斷變數型別
		output_name = item.first;  //第一個引數是name,第二個引數是結構,第二個引數設定精度與結構
		auto output_data = item.second;
		output_data->setPrecision(Precision::FP32);  //輸出還是浮點數
		//注意:output_data不要設定結構
		std::cout << "output name: " << output_name << std::endl;
	}

	auto executable_network = ie.LoadNetwork(network, "CPU");  //設定執行的裝置
	//建立指標型別便於後續操作
	auto curr_infer_request = executable_network.CreateInferRequestPtr();  //設定推理請求
	auto next_infer_request = executable_network.CreateInferRequestPtr();  //設定推理請求


	//load emotion model
	std::string em_xml = "D:/projects/models/emotions-recognition-retail-0003/FP32/emotions-recognition-retail-0003.xml";
	std::string em_bin = "D:/projects/models/emotions-recognition-retail-0003/FP32/emotions-recognition-retail-0003.bin";
	InferenceEngine::CNNNetwork em_network = ie.ReadNetwork(em_xml, em_bin);  //讀取車輛檢測網路
	//獲取網路輸入輸出資訊並設定
	InferenceEngine::InputsDataMap em_inputs = em_network.getInputsInfo();  //DataMap是一個Mat陣列
	InferenceEngine::OutputsDataMap em_outputs = em_network.getOutputsInfo();  //DataMap是一個Mat陣列

	std::string em_input_name = "";
	for (auto item : em_inputs) {
		em_input_name = item.first;
		//迴圈作用域內的變數可以不重新命名,為檢視更明確這裡重新命名
		auto em_input_data = item.second;
		em_input_data->setPrecision(Precision::U8);
		em_input_data->setLayout(Layout::NCHW);
	}
	std::string em_output_name = "";
	for (auto item : em_outputs) {  //auto可以自動推斷變數型別
		em_output_name = item.first;  //第一個引數是name,第二個引數是結構,第二個引數設定精度與結構
		auto em_output_data = item.second;
		em_output_data->setPrecision(Precision::FP32);  //輸出還是浮點數
	}
	auto executable_em_network = ie.LoadNetwork(em_network, "CPU");  //設定執行的裝置
	//建立指標型別便於後續操作
	auto em_request = executable_em_network.CreateInferRequest();  //設定推理請求


	cv::VideoCapture capture("D:/images/video/face_detect.mp4");
	cv::Mat curr_frame;
	cv::Mat next_frame;
	capture.read(curr_frame);  //先讀取一幀作為當前幀
	int im_h = curr_frame.rows;
	int im_w = curr_frame.cols;
	frameToBlob(curr_infer_request, curr_frame, input_name);
	bool first_frame = true;  //設定兩個bool變數控制執行緒開啟
	bool last_frame = false;
	//開啟兩個執行緒,curr轉換顯示結果,next預處理影象,預處理後交換給curr
	while (true) {
		int64 start = cv::getTickCount();  //計時
		bool ret = capture.read(next_frame);  //讀取一幀作為下一幀
		if (!ret) {
			last_frame = true;  //如果下一幀為空,則last_frame為true
		}
		if (!last_frame) {  //如果last_frame為false則預處理下一幀影象
			frameToBlob(next_infer_request, next_frame, input_name);
		}
		if (first_frame) {  //如果first_frame為true則開啟兩個執行緒,同時修改first_frame為false,避免多次開啟執行緒
			curr_infer_request->StartAsync();  //開啟執行緒
			next_infer_request->StartAsync();
			first_frame = false;
		}
		else {  //如果first_frame與last_frame同為false表示只有下一幀不為空,則開啟一個next執行緒
			if (!last_frame) {
				next_infer_request->StartAsync();
			}
		}
		//判斷當前請求是否預處理完畢
		if (InferenceEngine::OK == curr_infer_request->Wait(InferenceEngine::IInferRequest::WaitMode::RESULT_READY)) {
			auto output = curr_infer_request->GetBlob(output_name);
			//轉換輸出資料
			const float* detection_out = static_cast<PrecisionTrait<Precision::FP32>::value_type*>(output->buffer());
			//output:[1, 1, N, 7]
			//七個引數為:[image_id, label, conf, x_min, y_min, x_max, y_max]
			const SizeVector outputDims = output->getTensorDesc().getDims();  //獲取輸出維度資訊 1*1000
			std::cout << outputDims[2] << "x" << outputDims[3] << std::endl;
			const int max_count = outputDims[2];  //識別出的物件個數
			const int object_size = outputDims[3];  //獲取物件資訊的個數,此處為7個
			for (int n = 0; n < max_count; n++) {
				float label = detection_out[n * object_size + 1];
				float confidence = detection_out[n * object_size + 2];
				float xmin = detection_out[n * object_size + 3] * im_w;
				float ymin = detection_out[n * object_size + 4] * im_h;
				float xmax = detection_out[n * object_size + 5] * im_w;
				float ymax = detection_out[n * object_size + 6] * im_h;
				if (confidence > 0.5) {
					printf("label id: %d \n", static_cast<int>(label));
					cv::Rect box;
					box.x = static_cast<int>(xmin);
					box.y = static_cast<int>(ymin);
					xmax = xmax > im_w ? im_w : xmax;  //通過判斷避免越界
					ymax = ymax > im_h ? im_h : ymax;
					box.width = static_cast<int>(xmax - xmin);
					box.height = static_cast<int>(ymax - ymin);

					box.x = box.x < 0 ? 0 : box.x;  //通過判斷避免越界
					box.y = box.y < 0 ? 0 : box.y;
					box.width = box.x < 0 ? 0 : box.width;
					box.height = box.x < 0 ? 0 : box.height;

					cv::rectangle(curr_frame, box, cv::Scalar(0, 0, 255), 2, 8);

					fetch_emotion(curr_frame, em_request, box, em_input_name, em_output_name);  //獲取表情

					//getTickCount()相減得到cpu走過的時鐘週期數,getTickFrequency()得到cpu一秒走過的始終週期數
					float fps = static_cast<float>(cv::getTickFrequency()) / (cv::getTickCount() - start);

					cv::putText(curr_frame, cv::format("FPS:%.2f", fps), cv::Point(50, 50), cv::FONT_HERSHEY_SIMPLEX, 1.0, cv::Scalar(0, 0, 255), 2, 8);
				}
			}
		}
		//顯示結果
		cv::imshow("人臉檢測非同步顯示", curr_frame);
		char c = cv::waitKey(1);
		if (c == 27) {  //ESC
			break;
		}
		if (last_frame) {  //如果last_frame為true表示下一幀為空,則跳出迴圈
			break;
		}

		//非同步交換,下一幀複製到當前幀,當前幀請求與下一幀請求交換
		next_frame.copyTo(curr_frame);
		curr_infer_request.swap(next_infer_request);  //指標可以使用swap方法,否則不行
	}

	cv::waitKey(0);
	return 0;
}

//獲取表情
void fetch_emotion(cv::Mat& image, InferenceEngine::InferRequest& request, cv::Rect& face_roi, std::string& e_input, std::string& e_output) {

	cv::Mat faceROI = image(face_roi);  //獲取面部區域
	//影象預處理,使用車牌識別的方法中獲取的輸入輸出資訊,用於文字獲取
	auto blob = request.GetBlob(e_input);  //獲取網路輸入影象資訊
	matU8ToBlob<uchar>(faceROI, blob);

	request.Infer();  //執行推理

	auto output = request.GetBlob(e_output);
	//轉換輸出資料
	const float* probs = static_cast<PrecisionTrait<Precision::FP32>::value_type*>(output->buffer());
	const SizeVector outputDims = output->getTensorDesc().getDims();  //獲取輸出維度資訊 1*1000
	std::cout << outputDims[0] << "x" << outputDims[1] << std::endl;
	float max = probs[0];
	int max_index = 0;
	for (int i = 1; i < outputDims[1]; i++) {
		if (max < probs[i]) {  //找到結果probs中的最大值,獲取其下標
			max = probs[i];
			max_index = i;
		}
	}
	std::cout << items[max_index] << std::endl;
	cv::putText(image, items[max_index], face_roi.tl(), cv::FONT_HERSHEY_SIMPLEX, 1.0, cv::Scalar(0, 0, 255), 2, 8);
}
效果:

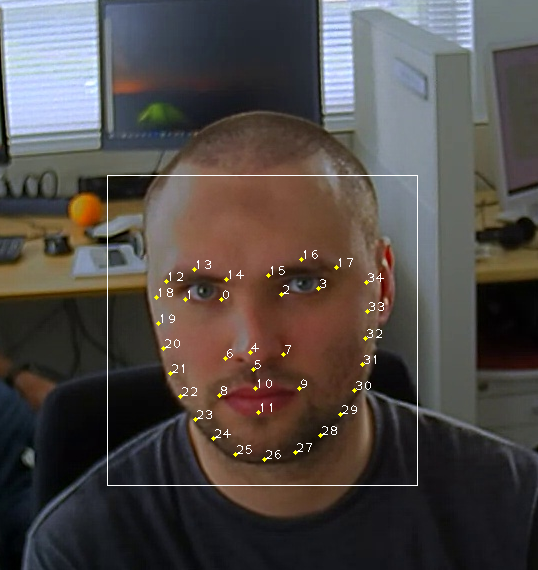
人臉關鍵點landmark檢測
模型介紹
- face-detection-0202 - 人臉檢測
- facial-landmarks-35-adas-0002 - landmark提取
- 輸入格式:[1 * 3 * 60 * 60]
- 輸出格式:[1, 70]
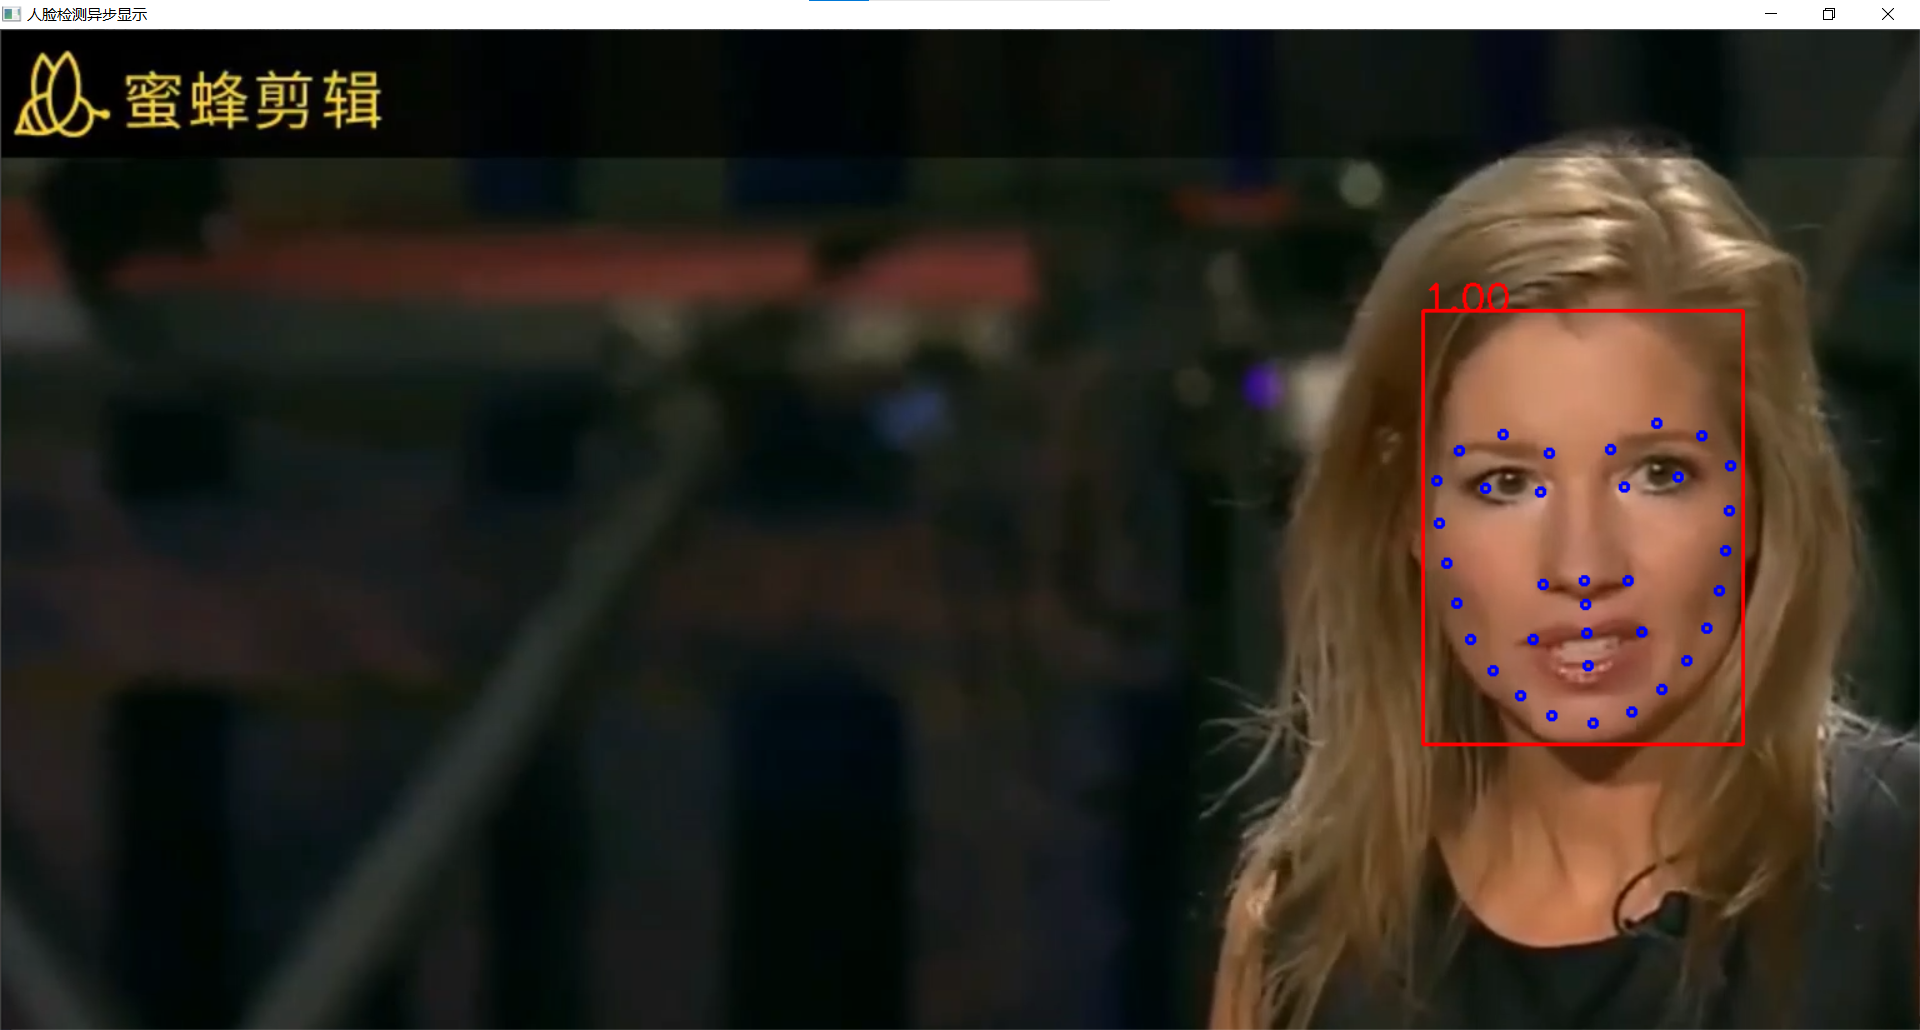
- 輸出人臉35個特徵點,浮點數座標
程式流程

程式碼實現
#include <inference_engine.hpp>
#include <opencv2/opencv.hpp>
#include <fstream>  //fstream檔案讀寫操作,iostream為控制檯操作

using namespace InferenceEngine;

//影象預處理常式
template <typename T>
void matU8ToBlob(const cv::Mat& orig_image, InferenceEngine::Blob::Ptr& blob, int batchIndex = 0) {
	InferenceEngine::SizeVector blobSize = blob->getTensorDesc().getDims();
	const size_t width = blobSize[3];
	const size_t height = blobSize[2];
	const size_t channels = blobSize[1];
	InferenceEngine::MemoryBlob::Ptr mblob = InferenceEngine::as<InferenceEngine::MemoryBlob>(blob);
	if (!mblob) {
		THROW_IE_EXCEPTION << "We expect blob to be inherited from MemoryBlob in matU8ToBlob, "
			<< "but by fact we were not able to cast inputBlob to MemoryBlob";
	}
	// locked memory holder should be alive all time while access to its buffer happens
	auto mblobHolder = mblob->wmap();

	T* blob_data = mblobHolder.as<T*>();

	cv::Mat resized_image(orig_image);
	if (static_cast<int>(width) != orig_image.size().width ||
		static_cast<int>(height) != orig_image.size().height) {
		cv::resize(orig_image, resized_image, cv::Size(width, height));
	}

	int batchOffset = batchIndex * width * height * channels;

	for (size_t c = 0; c < channels; c++) {
		for (size_t h = 0; h < height; h++) {
			for (size_t w = 0; w < width; w++) {
				blob_data[batchOffset + c * width * height + h * width + w] =
					resized_image.at<cv::Vec3b>(h, w)[c];
			}
		}
	}
}

void frameToBlob(std::shared_ptr<InferenceEngine::InferRequest>& request, cv::Mat& frame, std::string& input_name) {
	//影象預處理,輸入資料 ->指標獲取成員方法
	InferenceEngine::Blob::Ptr input = request->GetBlob(input_name);  //獲取網路輸入影象資訊
	//該函數template模板型別,需要指定具體型別
	matU8ToBlob<uchar>(frame, input);  //使用該函數處理輸入資料
}

InferenceEngine::InferRequest landmark_request;  //提高推理請求作用域
void loadLandmarksRequest(Core& ie, std::string& land_input_name, std::string& land_output_name);
int main(int argc, char** argv) {

	InferenceEngine::Core ie;
	std::vector<std::string> devices = ie.GetAvailableDevices();
	for (std::string name : devices) {
		std::cout << "device name: " << name << std::endl;
	}
	std::string cpuName = ie.GetMetric("CPU", METRIC_KEY(FULL_DEVICE_NAME)).as<std::string>();
	std::cout << "cpu name: " << cpuName << std::endl;

	std::string xml = "D:/projects/models/face-detection-0202/FP32/face-detection-0202.xml";
	std::string bin = "D:/projects/models/face-detection-0202/FP32/face-detection-0202.bin";

	//cv::Mat src = cv::imread("D:/images/mmc2.jpg");  //讀取影象
	//int im_h = src.rows;
	//int im_w = src.cols;

	InferenceEngine::CNNNetwork network = ie.ReadNetwork(xml, bin);  //讀取車輛檢測網路

	//獲取網路輸入輸出資訊並設定
	InferenceEngine::InputsDataMap inputs = network.getInputsInfo();  //DataMap是一個Mat陣列
	InferenceEngine::OutputsDataMap outputs = network.getOutputsInfo();  //DataMap是一個Mat陣列
	std::string input_name = "";
	for (auto item : inputs) {  //auto可以自動推斷變數型別
		input_name = item.first;  //第一個引數是name,第二個引數是結構,第二個引數設定精度與結構
		auto input_data = item.second;
		// A->B 表示提取A中的成員B
		input_data->setPrecision(Precision::U8);  //預設為unsigned char對應U8
		input_data->setLayout(Layout::NCHW);
		//input_data->getPreProcess().setColorFormat(ColorFormat::BGR);  預設就是BGR
		std::cout << "input name: " << input_name << std::endl;
	}
	std::string output_name = "";
	for (auto item : outputs) {  //auto可以自動推斷變數型別
		output_name = item.first;  //第一個引數是name,第二個引數是結構,第二個引數設定精度與結構
		auto output_data = item.second;
		output_data->setPrecision(Precision::FP32);  //輸出還是浮點數
		//注意:output_data不要設定結構
		std::cout << "output name: " << output_name << std::endl;
	}

	auto executable_network = ie.LoadNetwork(network, "CPU");  //設定執行的裝置
	//建立指標型別便於後續操作
	auto curr_infer_request = executable_network.CreateInferRequestPtr();  //設定推理請求
	auto next_infer_request = executable_network.CreateInferRequestPtr();  //設定推理請求

	//載入landmark模型
	std::string land_input_name = "";
	std::string land_output_name = "";
	loadLandmarksRequest(ie, land_input_name, land_output_name);

	cv::VideoCapture capture("D:/images/video/emotion_detect.mp4");
	cv::Mat curr_frame;
	cv::Mat next_frame;
	capture.read(curr_frame);  //先讀取一幀作為當前幀
	int im_h = curr_frame.rows;
	int im_w = curr_frame.cols;
	frameToBlob(curr_infer_request, curr_frame, input_name);
	bool first_frame = true;  //設定兩個bool變數控制執行緒開啟
	bool last_frame = false;
	//開啟兩個執行緒,curr轉換顯示結果,next預處理影象,預處理後交換給curr
	while (true) {
		int64 start = cv::getTickCount();  //計時
		bool ret = capture.read(next_frame);  //讀取一幀作為下一幀
		if (!ret) {
			last_frame = true;  //如果下一幀為空,則last_frame為true
		}
		if (!last_frame) {  //如果last_frame為false則預處理下一幀影象
			frameToBlob(next_infer_request, next_frame, input_name);
		}
		if (first_frame) {  //如果first_frame為true則開啟兩個執行緒,同時修改first_frame為false,避免多次開啟執行緒
			curr_infer_request->StartAsync();  //開啟執行緒
			next_infer_request->StartAsync();
			first_frame = false;
		}
		else {  //如果first_frame與last_frame同為false表示只有下一幀不為空,則開啟一個next執行緒
			if (!last_frame) {
				next_infer_request->StartAsync();
			}
		}
		//判斷當前請求是否預處理完畢
		if (InferenceEngine::OK == curr_infer_request->Wait(InferenceEngine::IInferRequest::WaitMode::RESULT_READY)) {
			auto output = curr_infer_request->GetBlob(output_name);
			//轉換輸出資料
			const float* detection_out = static_cast<PrecisionTrait<Precision::FP32>::value_type*>(output->buffer());
			//output:[1, 1, N, 7]
			//七個引數為:[image_id, label, conf, x_min, y_min, x_max, y_max]
			const SizeVector outputDims = output->getTensorDesc().getDims();  //獲取輸出維度資訊 1*1000
			std::cout << outputDims[2] << "x" << outputDims[3] << std::endl;
			const int max_count = outputDims[2];  //識別出的物件個數
			const int object_size = outputDims[3];  //獲取物件資訊的個數,此處為7個
			for (int n = 0; n < max_count; n++) {
				float label = detection_out[n * object_size + 1];
				float confidence = detection_out[n * object_size + 2];
				float xmin = detection_out[n * object_size + 3] * im_w;
				float ymin = detection_out[n * object_size + 4] * im_h;
				float xmax = detection_out[n * object_size + 5] * im_w;
				float ymax = detection_out[n * object_size + 6] * im_h;
				if (confidence > 0.5) {
					printf("label id: %d \n", static_cast<int>(label));
					cv::Rect box;

					float x1 = std::min(std::max(0.0f, xmin), static_cast<float>(im_w));  //防止目標區域越界
					float y1 = std::min(std::max(0.0f, ymin), static_cast<float>(im_h));
					float x2 = std::min(std::max(0.0f, xmax), static_cast<float>(im_w));
					float y2 = std::min(std::max(0.0f, ymax), static_cast<float>(im_h));

					box.x = static_cast<int>(x1);
					box.y = static_cast<int>(y1);
					box.width = static_cast<int>(x2 - x1);
					box.height = static_cast<int>(y2 - y1);

					cv::Mat face_roi = curr_frame(box);
					auto face_input_blob = landmark_request.GetBlob(land_input_name);
					matU8ToBlob<uchar>(face_roi, face_input_blob);
					landmark_request.Infer();  //執行推理獲取目標區域面部特徵點

					auto land_output = landmark_request.GetBlob(land_output_name);
					const float* blob_out = static_cast<PrecisionTrait<Precision::FP32>::value_type*>(land_output->buffer());
					const SizeVector land_dims = land_output->getTensorDesc().getDims();
					const int b = land_dims[0];
					const int cc = land_dims[1];

					//共70個特徵引數(x0, y0, x1, y1, ..., x34, y34),所以每次要 +2
					for (int i = 0; i < cc; i += 2) {
						float x = blob_out[i] * box.width + box.x;
						float y = blob_out[i + 1] * box.height + box.y;
						cv::circle(curr_frame, cv::Point(x, y), 3, cv::Scalar(255, 0, 0), 2, 8, 0);
					}

					cv::rectangle(curr_frame, box, cv::Scalar(0, 0, 255), 2, 8);
					//getTickCount()相減得到cpu走過的時鐘週期數,getTickFrequency()得到cpu一秒走過的始終週期數
					float t = (cv::getTickCount() - start) / static_cast<float>(cv::getTickFrequency());
					std::cout << 1.0 / t << std::endl;
					//box.tl()返回矩形左上角座標
					cv::putText(curr_frame, cv::format("%.2f", confidence), box.tl(), cv::FONT_HERSHEY_SIMPLEX, 1.0, cv::Scalar(0, 0, 255), 2, 8);
				}
			}
		}
		//顯示結果
		cv::imshow("人臉檢測非同步顯示", curr_frame);
		char c = cv::waitKey(1);
		if (c == 27) {  //ESC
			break;
		}
		if (last_frame) {  //如果last_frame為true表示下一幀為空,則跳出迴圈
			break;
		}

		//非同步交換,下一幀複製到當前幀,當前幀請求與下一幀請求交換
		next_frame.copyTo(curr_frame);
		curr_infer_request.swap(next_infer_request);  //指標可以使用swap方法,否則不行
	}

	cv::waitKey(0);
	return 0;
}

void loadLandmarksRequest (Core& ie, std::string& land_input_name, std::string& land_output_name) {
    //下載模型同前
	std::string xml = "D:/projects/models/facial-landmarks-35-adas-0002/FP32/facial-landmarks-35-adas-0002.xml";
	std::string bin = "D:/projects/models/facial-landmarks-35-adas-0002/FP32/facial-landmarks-35-adas-0002.bin";

	InferenceEngine::CNNNetwork network = ie.ReadNetwork(xml, bin);  //讀取網路
	InferenceEngine::InputsDataMap inputs = network.getInputsInfo();  //DataMap是一個Mat陣列
	InferenceEngine::OutputsDataMap outputs = network.getOutputsInfo();  //DataMap是一個Mat陣列

	int cnt = 0;
	for (auto item : inputs) {  //auto可以自動推斷變數型別
		land_input_name = item.first;  //第一個引數是name,第二個引數是結構,第二個引數設定精度與結構
		auto input_data = item.second;
		input_data->setPrecision(Precision::U8);  //預設為unsigned char對應U8
		input_data->setLayout(Layout::NCHW);
	}
	for (auto item : outputs) {  //auto可以自動推斷變數型別
		land_output_name = item.first;  //第一個引數是name,第二個引數是結構,第二個引數設定精度與結構
		auto output_data = item.second;
		output_data->setPrecision(Precision::FP32);  //輸出還是浮點數
	}

	auto executable_network = ie.LoadNetwork(network, "CPU");  //設定執行的裝置
	landmark_request = executable_network.CreateInferRequest();  //設定推理請求
}
效果:
6、影象語意分割與範例分割
實時道路語意分割
- 識別道路、背景、路邊、標誌線四個類別
道路分割模型介紹
- 模型:road-segmentation-adas-0001
- 輸入格式:[B, C=3, H=512, W=896], BGR
- 輸出格式:[B, C=4, H=512, W=896]
- 四個類別:BG, road, curb, mark
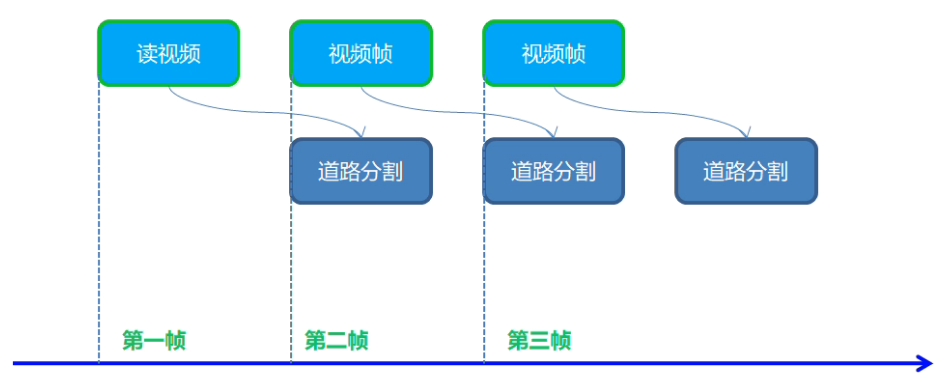
程式流程
程式碼實現
#include <inference_engine.hpp>
#include <opencv2/opencv.hpp>
#include <fstream>  //fstream檔案讀寫操作,iostream為控制檯操作

using namespace InferenceEngine;

//影象預處理常式
template <typename T>
void matU8ToBlob(const cv::Mat& orig_image, InferenceEngine::Blob::Ptr& blob, int batchIndex = 0) {
	InferenceEngine::SizeVector blobSize = blob->getTensorDesc().getDims();
	const size_t width = blobSize[3];
	const size_t height = blobSize[2];
	const size_t channels = blobSize[1];
	InferenceEngine::MemoryBlob::Ptr mblob = InferenceEngine::as<InferenceEngine::MemoryBlob>(blob);
	if (!mblob) {
		THROW_IE_EXCEPTION << "We expect blob to be inherited from MemoryBlob in matU8ToBlob, "
			<< "but by fact we were not able to cast inputBlob to MemoryBlob";
	}
	// locked memory holder should be alive all time while access to its buffer happens
	auto mblobHolder = mblob->wmap();

	T* blob_data = mblobHolder.as<T*>();

	cv::Mat resized_image(orig_image);
	if (static_cast<int>(width) != orig_image.size().width ||
		static_cast<int>(height) != orig_image.size().height) {
		cv::resize(orig_image, resized_image, cv::Size(width, height));
	}

	int batchOffset = batchIndex * width * height * channels;

	for (size_t c = 0; c < channels; c++) {
		for (size_t h = 0; h < height; h++) {
			for (size_t w = 0; w < width; w++) {
				blob_data[batchOffset + c * width * height + h * width + w] =
					resized_image.at<cv::Vec3b>(h, w)[c];
			}
		}
	}
}

void frameToBlob(std::shared_ptr<InferenceEngine::InferRequest>& request, cv::Mat& frame, std::string& input_name) {
	//影象預處理,輸入資料 ->指標獲取成員方法
	InferenceEngine::Blob::Ptr input = request->GetBlob(input_name);  //獲取網路輸入影象資訊
	//該函數template模板型別,需要指定具體型別
	matU8ToBlob<uchar>(frame, input);  //使用該函數處理輸入資料
}

int main(int argc, char** argv) {

	InferenceEngine::Core ie;

	std::string xml = "D:/projects/models/road-segmentation-adas-0001/FP32/road-segmentation-adas-0001.xml";
	std::string bin = "D:/projects/models/road-segmentation-adas-0001/FP32/road-segmentation-adas-0001.bin";

	InferenceEngine::CNNNetwork network = ie.ReadNetwork(xml, bin);  //讀取車輛檢測網路

	//獲取網路輸入輸出資訊並設定
	InferenceEngine::InputsDataMap inputs = network.getInputsInfo();  //DataMap是一個Mat陣列
	InferenceEngine::OutputsDataMap outputs = network.getOutputsInfo();  //DataMap是一個Mat陣列
	std::string input_name = "";
	for (auto item : inputs) {  //auto可以自動推斷變數型別
		input_name = item.first;  //第一個引數是name,第二個引數是結構,第二個引數設定精度與結構
		auto input_data = item.second;
		// A->B 表示提取A中的成員B
		input_data->setPrecision(Precision::U8);  //預設為unsigned char對應U8
		input_data->setLayout(Layout::NCHW);
		//input_data->getPreProcess().setColorFormat(ColorFormat::BGR);  預設就是BGR
		std::cout << "input name: " << input_name << std::endl;
	}
	std::string output_name = "";
	for (auto item : outputs) {  //auto可以自動推斷變數型別
		output_name = item.first;  //第一個引數是name,第二個引數是結構,第二個引數設定精度與結構
		auto output_data = item.second;
		output_data->setPrecision(Precision::FP32);  //輸出還是浮點數
		//注意:output_data不要設定結構
		std::cout << "output name: " << output_name << std::endl;
	}

	auto executable_network = ie.LoadNetwork(network, "CPU");  //設定執行的裝置
	//建立指標型別便於後續操作
	auto curr_infer_request = executable_network.CreateInferRequestPtr();  //設定推理請求
	auto next_infer_request = executable_network.CreateInferRequestPtr();  //設定推理請求

	cv::VideoCapture capture("D:/images/video/road_segmentation.mp4");
	cv::Mat curr_frame;
	cv::Mat next_frame;
	capture.read(curr_frame);  //先讀取一幀作為當前幀
	int im_h = curr_frame.rows;
	int im_w = curr_frame.cols;
	frameToBlob(curr_infer_request, curr_frame, input_name);
	bool first_frame = true;  //設定兩個bool變數控制執行緒開啟
	bool last_frame = false;

	std::vector<cv::Vec3b> color_tab;  //設定分割輸出影象中的不同顏色代表不同分類
	color_tab.push_back(cv::Vec3b(0, 0, 0));  //背景
	color_tab.push_back(cv::Vec3b(255, 0, 0));  //道路
	color_tab.push_back(cv::Vec3b(0, 0, 255));  //路邊
	color_tab.push_back(cv::Vec3b(0, 255, 255));  //路標

	//開啟兩個執行緒,curr轉換顯示結果,next預處理影象,預處理後交換給curr
	while (true) {
		int64 start = cv::getTickCount();  //計時
		bool ret = capture.read(next_frame);  //讀取一幀作為下一幀
		if (!ret) {
			last_frame = true;  //如果下一幀為空,則last_frame為true
		}
		if (!last_frame) {  //如果last_frame為false則預處理下一幀影象
			frameToBlob(next_infer_request, next_frame, input_name);
		}
		if (first_frame) {  //如果first_frame為true則開啟兩個執行緒,同時修改first_frame為false,避免多次開啟執行緒
			curr_infer_request->StartAsync();  //開啟執行緒
			next_infer_request->StartAsync();
			first_frame = false;
		}
		else {  //如果first_frame與last_frame同為false表示只有下一幀不為空,則開啟一個next執行緒
			if (!last_frame) {
				next_infer_request->StartAsync();
			}
		}
		//判斷當前請求是否預處理完畢
		if (InferenceEngine::OK == curr_infer_request->Wait(InferenceEngine::IInferRequest::WaitMode::RESULT_READY)) {
			auto output = curr_infer_request->GetBlob(output_name);
			//轉換輸出資料
			const float* detection_out = static_cast<PrecisionTrait<Precision::FP32>::value_type*>(output->buffer());

			//output:[B, C, H, W]
			const SizeVector outputDims = output->getTensorDesc().getDims();  //獲取輸出維度資訊 1*1000

			//每個畫素針對每種分類分別有一個識別結果數值,數值最大的為該畫素的分類
			//結果矩陣格式為:每種分類各有一個輸出影象大小的矩陣,每個畫素位置對應其在該分類的可能性
			const int out_c = outputDims[1];  //分割識別的型別個數,此處為4
			const int out_h = outputDims[2];  //分割網路輸出影象的高
			const int out_w = outputDims[3];  //分割網路輸出影象的寬
			cv::Mat result = cv::Mat::zeros(cv::Size(out_w, out_h), CV_8UC3);
			int step = out_h * out_w;
			for (int row = 0; row < out_h; row++) {
				for (int col = 0; col < out_w; col++) {
					int max_index = 0;  //定義一個變數儲存最大分類結果數值的下標
					float max_prob = detection_out[row * out_w + col];
					for (int cn = 1; cn < out_c; cn++) {
						//比較每個畫素在四種不同分類矩陣中的可能性,找到最大可能性的分類
						float prob = detection_out[cn * step + row * out_w + col];
						if (prob > max_prob) {
							max_prob = prob;
							max_index = cn;
						}
					}
					//在結果矩陣中對應畫素位置儲存原圖中該畫素分類對應的顏色
					result.at<cv::Vec3b>(row, col) = color_tab[max_index];
				}
			}
			//先初始化一個網路輸出結果大小的矩陣儲存每個畫素點對應的顏色,再將結果矩陣恢復到原圖大小,以便最終結果顯示
			cv::resize(result, result, cv::Size(im_w, im_h));
			//在輸入影象中對應位置按比例增加結果矩陣中對應的顏色
			cv::addWeighted(curr_frame, 0.5, result, 0.5, 0, curr_frame);
		}
		//getTickCount()相減得到cpu走過的時鐘週期數,getTickFrequency()得到cpu一秒走過的始終週期數
		float t = (cv::getTickCount() - start) / static_cast<float>(cv::getTickFrequency());
		cv::putText(curr_frame, cv::format("FPS: %.2f", 1.0 / t), cv::Point(50, 50), cv::FONT_HERSHEY_SIMPLEX, 1.0, cv::Scalar(0, 0, 255), 2, 8);
		//顯示結果
		cv::imshow("道路分割非同步顯示", curr_frame);
		char c = cv::waitKey(1);
		if (c == 27) {  //ESC
			break;
		}
		if (last_frame) {  //如果last_frame為true表示下一幀為空,則跳出迴圈
			break;
		}

		//非同步交換,下一幀複製到當前幀,當前幀請求與下一幀請求交換
		next_frame.copyTo(curr_frame);
		curr_infer_request.swap(next_infer_request);  //指標可以使用swap方法,否則不行
	}

	cv::waitKey(0);
	return 0;
}
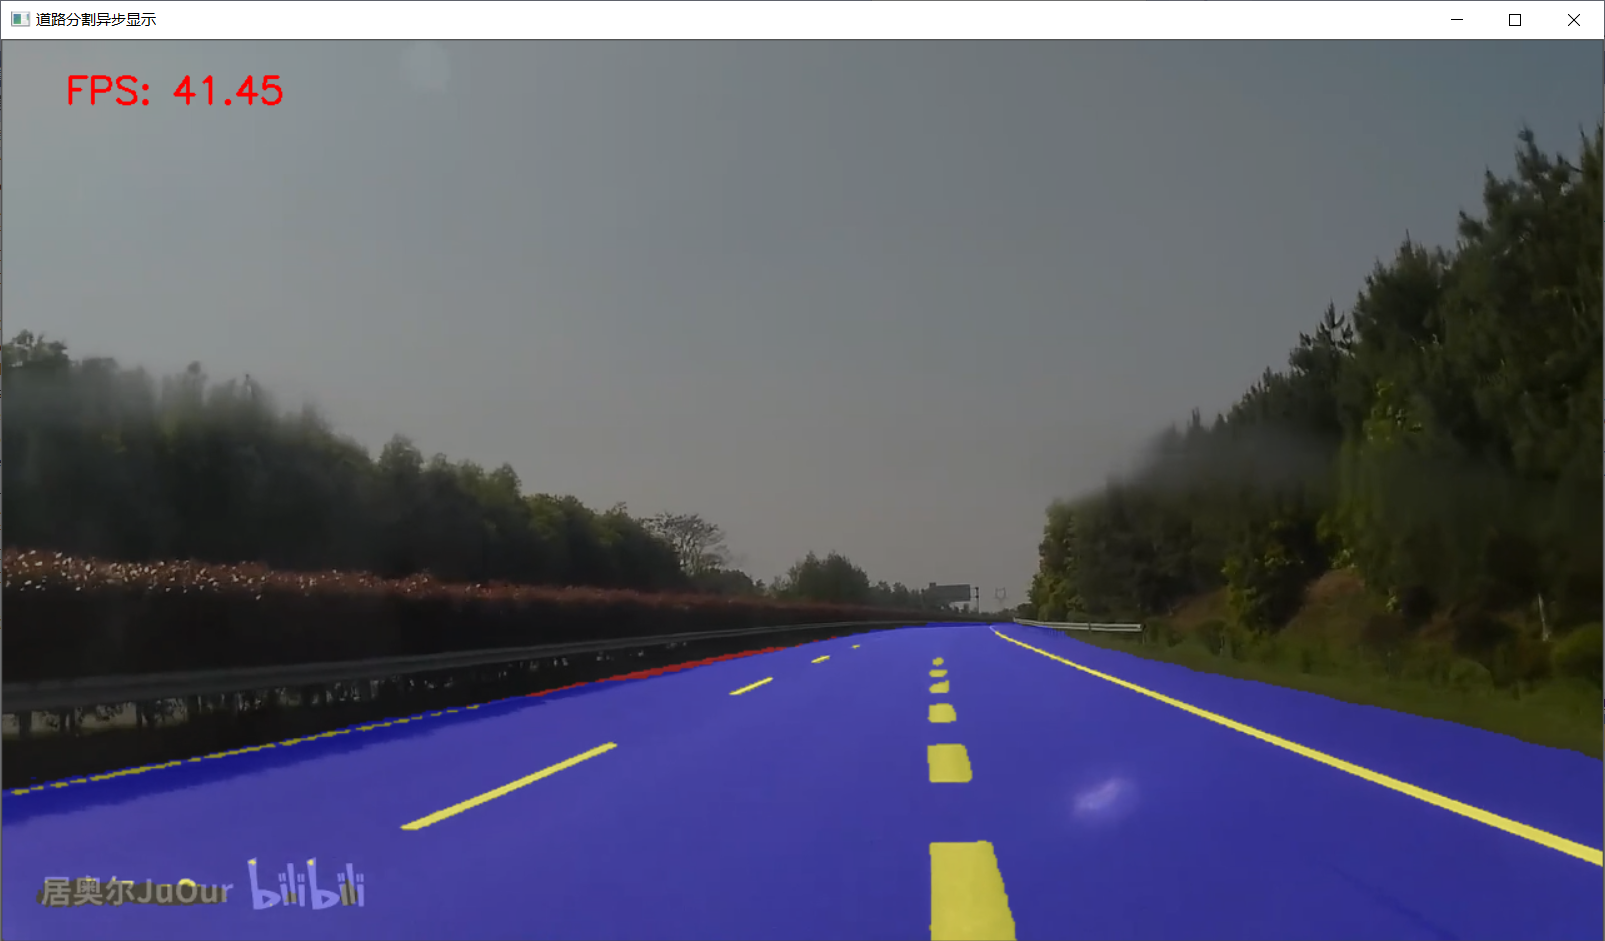
效果:
黃色為路面標誌,紅色為路邊,藍色為道路,其餘部分為背景
範例分割
範例分割模型介紹(Mask R-CNN)
- instance-segmentation-security-0050
- 有兩個輸入層:
- im_data: [1 * 3 * 480 * 480],影象資料 1 * C * H * C(num、channels、height、width)
- im_info: [1 * 3],影象資訊,寬、高和scale
- 輸出格式:
- classes: [100, ],最多100個範例,屬於不超過80個分類
- scores: [100, ],每個檢測到物件不是背景的概率
- Boxes: [100, 4],每個檢測到的物件的位置(左上角及右下角座標)
- raw_masks: [100, 81, 28, 28],實際是對每個範例都生成一個14*14的mask,對每個範例獲取81個類別(80個類別+背景)的概率值,輸出81個14 * 14大小的矩陣
- 實際記憶體中的結果矩陣是 14 * 14 * 81 * 100
程式碼實現
#include <inference_engine.hpp>
#include <opencv2/opencv.hpp>
#include <fstream>  //fstream檔案讀寫操作,iostream為控制檯操作

using namespace InferenceEngine;
/*
void read_coco_labels(std::vector<std::string>& labels) {
	std::string label_file = "D:/projects/models/coco_labels.txt";
	std::ifstream fp(label_file);
	if (!fp.is_open())
	{
		printf("could not open file...\n");
		exit(-1);
	}
	std::string name;
	while (!fp.eof())
	{
		std::getline(fp, name);
		if (name.length())
			labels.push_back(name);
	}
	fp.close();
}
*/

//影象預處理常式
template <typename T>
void matU8ToBlob(const cv::Mat& orig_image, InferenceEngine::Blob::Ptr& blob, int batchIndex = 0) {
	InferenceEngine::SizeVector blobSize = blob->getTensorDesc().getDims();
	const size_t width = blobSize[3];
	const size_t height = blobSize[2];
	const size_t channels = blobSize[1];
	InferenceEngine::MemoryBlob::Ptr mblob = InferenceEngine::as<InferenceEngine::MemoryBlob>(blob);
	if (!mblob) {
		THROW_IE_EXCEPTION << "We expect blob to be inherited from MemoryBlob in matU8ToBlob, "
			<< "but by fact we were not able to cast inputBlob to MemoryBlob";
	}
	// locked memory holder should be alive all time while access to its buffer happens
	auto mblobHolder = mblob->wmap();

	T* blob_data = mblobHolder.as<T*>();

	cv::Mat resized_image(orig_image);
	if (static_cast<int>(width) != orig_image.size().width ||
		static_cast<int>(height) != orig_image.size().height) {
		cv::resize(orig_image, resized_image, cv::Size(width, height));
	}

	int batchOffset = batchIndex * width * height * channels;

	for (size_t c = 0; c < channels; c++) {
		for (size_t h = 0; h < height; h++) {
			for (size_t w = 0; w < width; w++) {
				blob_data[batchOffset + c * width * height + h * width + w] =
					resized_image.at<cv::Vec3b>(h, w)[c];
			}
		}
	}
}

int main(int argc, char** argv) {

	InferenceEngine::Core ie;
	std::vector<std::string> coco_labels;
	//read_coco_labels(coco_labels);
	cv::RNG rng(12345);

	std::string xml = "D:/projects/models/instance-segmentation-security-0050/FP32/instance-segmentation-security-0050.xml";
	std::string bin = "D:/projects/models/instance-segmentation-security-0050/FP32/instance-segmentation-security-0050.bin";
	cv::Mat src = cv::imread("D:/images/instance_segmentation.jpg");  //讀取影象
	int im_h = src.rows;
	int im_w = src.cols;
	InferenceEngine::CNNNetwork network = ie.ReadNetwork(xml, bin);  //讀取車輛檢測網路

	//獲取網路輸入輸出資訊
	InferenceEngine::InputsDataMap inputs = network.getInputsInfo();  //DataMap是一個Mat陣列
	InferenceEngine::OutputsDataMap outputs = network.getOutputsInfo();  //DataMap是一個Mat陣列
	std::string image_input_name = "";
	std::string image_info_name = "";
	int in_index = 0;

	//設定兩個網路輸入資料的引數
	for (auto item : inputs) {  //auto可以自動推斷變數型別
		if (in_index == 0) {
			image_input_name = item.first;  //第一個引數是name,第二個引數是結構,第二個引數設定精度與結構
			auto input_data = item.second;
			// A->B 表示提取A中的成員B
			input_data->setPrecision(Precision::U8);  //預設為unsigned char對應U8,浮點型別則為FP32
			input_data->setLayout(Layout::NCHW);
		}
		else {
			image_info_name = item.first;  //第一個引數是name,第二個引數是結構,第二個引數設定精度與結構
			auto input_data = item.second;
			// A->B 表示提取A中的成員B
			input_data->setPrecision(Precision::FP32);  //預設為unsigned char對應U8,浮點型別則為FP32
		}
		in_index++;
	}

	for (auto item : outputs) {  //auto可以自動推斷變數型別
		std::string output_name = item.first;  //第一個引數是name,第二個引數是結構,第二個引數設定精度與結構
		auto output_data = item.second;
		output_data->setPrecision(Precision::FP32);  //輸出還是浮點數
		//注意:output_data不要設定結構
		std::cout << "output name: " << output_name << std::endl;
	}

	auto executable_network = ie.LoadNetwork(network, "CPU");  //設定執行的裝置
	auto infer_request = executable_network.CreateInferRequest();  //設定推理請求

	//影象預處理
	auto input = infer_request.GetBlob(image_input_name);  //獲取網路輸入影象資訊
	//將輸入影象轉換為網路的輸入格式
	matU8ToBlob<uchar>(src, input);

	//設定網路的第二個輸入
	auto input2 = infer_request.GetBlob(image_info_name);
	auto imInforDim = inputs.find(image_info_name)->second->getTensorDesc().getDims()[1];
	InferenceEngine::MemoryBlob::Ptr minput2 = InferenceEngine::as<InferenceEngine::MemoryBlob>(input2);
	auto minput2Holder = minput2->wmap();
	float* p = minput2Holder.as<InferenceEngine::PrecisionTrait<InferenceEngine::Precision::FP32>::value_type*>();
	p[0] = static_cast<float>(inputs[image_input_name]->getTensorDesc().getDims()[2]);  //輸入影象的高
	p[1] = static_cast<float>(inputs[image_input_name]->getTensorDesc().getDims()[3]);  //輸入影象的寬
	p[2] = 1.0f;  //scale,前面影象已經轉換為480*480,這裡保持為1.0就可以

	infer_request.Infer();

	float w_rate = static_cast<float>(im_w) / 480.0;  //用於通過網路輸出中的座標獲取原圖的座標
	float h_rate = static_cast<float>(im_h) / 480.0;

	auto scores = infer_request.GetBlob("scores");  //獲取網路輸出中的資訊
	auto boxes = infer_request.GetBlob("boxes");
	auto classes = infer_request.GetBlob("classes");
	auto raw_masks = infer_request.GetBlob("raw_masks");
	//轉換輸出資料
	const float* scores_data = static_cast<PrecisionTrait<Precision::FP32>::value_type*>(scores->buffer());  //強制轉換資料型別為浮點型
	const float* boxes_data = static_cast<PrecisionTrait<Precision::FP32>::value_type*>(boxes->buffer());
	const float* classes_data = static_cast<PrecisionTrait<Precision::FP32>::value_type*>(classes->buffer());
	const auto raw_masks_data = static_cast<PrecisionTrait<Precision::FP32>::value_type*>(raw_masks->buffer());
	const SizeVector scores_outputDims = scores->getTensorDesc().getDims();  //獲取輸出維度資訊 1*1000
	const SizeVector boxes_outputDims = boxes->getTensorDesc().getDims();  //獲取輸出維度資訊 1*1000
	const SizeVector raw_masks_outputDims = raw_masks->getTensorDesc().getDims();  //[100, 81, 28, 28]
	const int max_count = scores_outputDims[0];  //識別出的物件個數
	const int object_size = boxes_outputDims[1];  //獲取物件資訊的個數,此處為4個
	printf("mask NCHW=[%d, %d, %d, %d]\n", raw_masks_outputDims[0], raw_masks_outputDims[1], raw_masks_outputDims[2], raw_masks_outputDims[3]);
	int mask_h = raw_masks_outputDims[2];
	int mask_w = raw_masks_outputDims[3];
	size_t box_stride = mask_h * mask_w * raw_masks_outputDims[1];  //兩個mask之間的距離
	for (int n = 0; n < max_count; n++) {
		float confidence = scores_data[n];
		float xmin = boxes_data[n * object_size] * w_rate;  //轉換為原圖中的座標
		float ymin = boxes_data[n * object_size + 1] * h_rate;
		float xmax = boxes_data[n * object_size + 2] * w_rate;
		float ymax = boxes_data[n * object_size + 3] * h_rate;
		if (confidence > 0.5) {
			cv::Scalar color(rng.uniform(0, 255), rng.uniform(0, 255), rng.uniform(0, 255));
			cv::Rect box;
			float x1 = std::min(std::max(0.0f, xmin), static_cast<float>(im_w));  //避免越界
			float y1 = std::min(std::max(0.0f, ymin), static_cast<float>(im_h));
			float x2 = std::min(std::max(0.0f, xmax), static_cast<float>(im_w));
			float y2 = std::min(std::max(0.0f, ymax), static_cast<float>(im_h));
			box.x = static_cast<int>(x1);
			box.y = static_cast<int>(y1);
			box.width = static_cast<int>(x2 - x1);
			box.height = static_cast<int>(y2 - y1);
			int label = static_cast<int>(classes_data[n]);  //第幾個範例
			//std::cout << "confidence: " << confidence << "class name: " << coco_labels[label] << std::endl;
			//解析mask,raw_masks_data表示所有mask起始位置,box_stride*n表示跳過遍歷的範例
			float* mask_arr = raw_masks_data + box_stride * n + mask_h * mask_w * label;  //找到當前範例當前分類mask的起始指標
			cv::Mat mask_mat(mask_h, mask_w, CV_32FC1, mask_arr);  //從mask_arr指標開始取值構建Mat
			cv::Mat roi_img = src(box);  //建立src大小的Mat並保留box區域
			cv::Mat resized_mask_mat(box.height, box.width, CV_32FC1);
			cv::resize(mask_mat, resized_mask_mat, cv::Size(box.width, box.height));
			cv::Mat uchar_resized_mask(box.height, box.width, CV_8UC3, color);
			roi_img.copyTo(uchar_resized_mask, resized_mask_mat <= 0.5);  //resized_mask_mat中畫素值<=0.5的畫素都不會複製到uchar_resized_mask上
			cv::addWeighted(uchar_resized_mask, 0.7, roi_img, 0.3, 0.0f, roi_img);

			//cv::rectangle(src, box, cv::Scalar(0, 0, 255), 2, 8);
			//box.tl()返回矩形左上角座標
			cv::putText(src, cv::format("%.2f", confidence), box.tl(), cv::FONT_HERSHEY_SIMPLEX, 0.5, cv::Scalar(0, 0, 255), 1, 8);
		}
	}

	//cv::putText(src, labels[max_index], cv::Point(50, 50), cv::FONT_HERSHEY_SIMPLEX, 1.0, cv::Scalar(0, 0, 255), 2, 8);
	cv::namedWindow("out", cv::WINDOW_AUTOSIZE);
	cv::imshow("out", src);
	cv::waitKey(0);
	return 0;
}
效果:
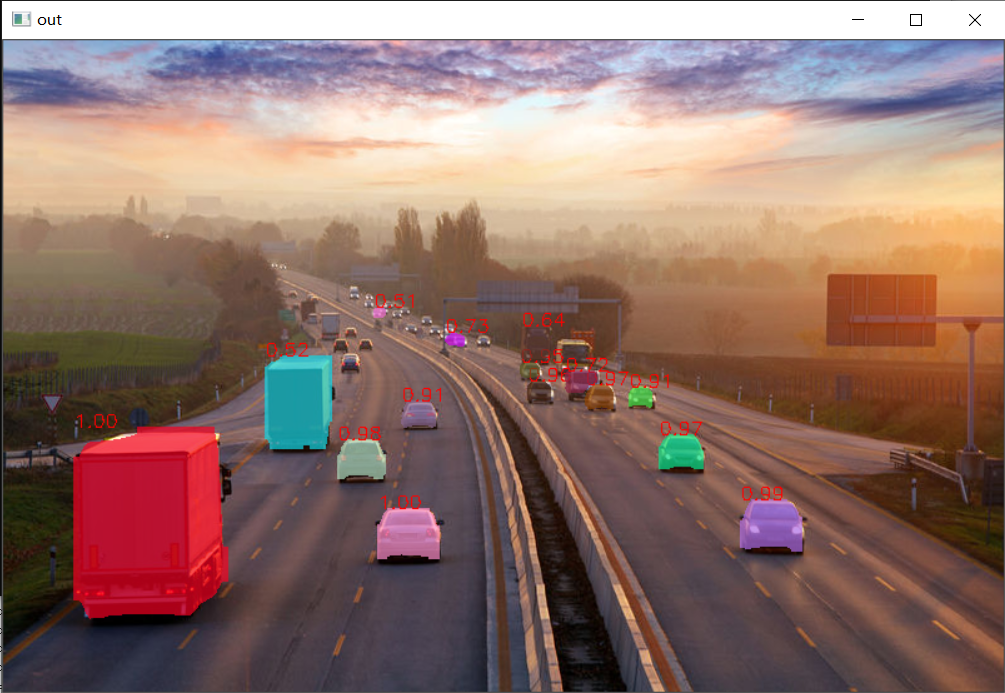
7、場景文字檢測與識別
場景文字檢測
模型介紹
- text-detection-0003
- PixelLink模型庫,BGR順序
- 1個輸入層:[B, C, H, W] [1 * 3 * 768 * 1280]
- 2個輸出層:
- model/link_logits_/add:[1x16x192x320] - 畫素與周圍畫素的聯絡
- model/segm_logits/add:[1x2x192x320] - 每個畫素所屬分類(文字/非文字),只要解析第二個輸出就可以獲取文字區域
程式碼實現
#include <inference_engine.hpp>
#include <opencv2/opencv.hpp>
#include <fstream>  //fstream檔案讀寫操作,iostream為控制檯操作

using namespace InferenceEngine;

//影象預處理常式
template <typename T>
void matU8ToBlob(const cv::Mat& orig_image, InferenceEngine::Blob::Ptr& blob, int batchIndex = 0) {
	InferenceEngine::SizeVector blobSize = blob->getTensorDesc().getDims();
	const size_t width = blobSize[3];
	const size_t height = blobSize[2];
	const size_t channels = blobSize[1];
	InferenceEngine::MemoryBlob::Ptr mblob = InferenceEngine::as<InferenceEngine::MemoryBlob>(blob);
	if (!mblob) {
		THROW_IE_EXCEPTION << "We expect blob to be inherited from MemoryBlob in matU8ToBlob, "
			<< "but by fact we were not able to cast inputBlob to MemoryBlob";
	}
	// locked memory holder should be alive all time while access to its buffer happens
	auto mblobHolder = mblob->wmap();

	T* blob_data = mblobHolder.as<T*>();

	cv::Mat resized_image(orig_image);
	if (static_cast<int>(width) != orig_image.size().width ||
		static_cast<int>(height) != orig_image.size().height) {
		cv::resize(orig_image, resized_image, cv::Size(width, height));
	}

	int batchOffset = batchIndex * width * height * channels;

	for (size_t c = 0; c < channels; c++) {
		for (size_t h = 0; h < height; h++) {
			for (size_t w = 0; w < width; w++) {
				blob_data[batchOffset + c * width * height + h * width + w] =
					resized_image.at<cv::Vec3b>(h, w)[c];
			}
		}
	}
}

int main(int argc, char** argv) {

	InferenceEngine::Core ie;

	std::string xml = "D:/projects/models/text-detection-0003/FP32/text-detection-0003.xml";
	std::string bin = "D:/projects/models/text-detection-0003/FP32/text-detection-0003.bin";
	cv::Mat src = cv::imread("D:/images/text_detection.png");  //讀取影象
	cv::imshow("input", src);
	int im_h = src.rows;
	int im_w = src.cols;
	InferenceEngine::CNNNetwork network = ie.ReadNetwork(xml, bin);  //讀取車輛檢測網路

	//獲取網路輸入輸出資訊
	InferenceEngine::InputsDataMap inputs = network.getInputsInfo();  //DataMap是一個Mat陣列
	InferenceEngine::OutputsDataMap outputs = network.getOutputsInfo();  //DataMap是一個Mat陣列
	std::string image_input_name = "";

	//設定兩個網路輸入資料的引數
	for (auto item : inputs) {  //auto可以自動推斷變數型別
		image_input_name = item.first;  //第一個引數是name,第二個引數是結構,第二個引數設定精度與結構
		auto input_data = item.second;
		// A->B 表示提取A中的成員B
		input_data->setPrecision(Precision::U8);  //預設為unsigned char對應U8,浮點型別則為FP32
		input_data->setLayout(Layout::NCHW);
	}
	std::string output_name1 = "";
	std::string output_name2 = "";
	int out_index = 0;
	for (auto item : outputs) {  //auto可以自動推斷變數型別
		if (out_index == 1) {
			output_name2 = item.first;
		}
		else {
			output_name1 = item.first;
		}
		auto output_data = item.second;
		output_data->setPrecision(Precision::FP32);  //輸出還是浮點數
		out_index++;
	}

	auto executable_network = ie.LoadNetwork(network, "CPU");  //設定執行的裝置
	auto infer_request = executable_network.CreateInferRequest();  //設定推理請求

	//影象預處理
	auto input = infer_request.GetBlob(image_input_name);  //獲取網路輸入影象資訊
	//將輸入影象轉換為網路的輸入格式
	matU8ToBlob<uchar>(src, input);

	infer_request.Infer();

	auto output = infer_request.GetBlob(output_name2);  //只解析第二個輸出即可
	//轉換輸出資料
	const float* detection_out = static_cast<PrecisionTrait<Precision::FP32>::value_type*>(output->buffer());

	//output:[B, C, H, W] [1, 2, 192, 320]
	const SizeVector outputDims = output->getTensorDesc().getDims();  //獲取輸出維度資訊 1*1000

	//每個畫素針對每種分類分別有一個識別結果數值,數值最大的為該畫素的分類
	//結果矩陣格式為:每種分類各有一個輸出影象大小的矩陣,每個畫素位置對應其在該分類的可能性
	const int out_c = outputDims[1];  //分割識別的型別個數,此處為2
	const int out_h = outputDims[2];  //分割網路輸出影象的高
	const int out_w = outputDims[3];  //分割網路輸出影象的寬
	cv::Mat mask = cv::Mat::zeros(cv::Size(out_w, out_h), CV_32F);
	int step = out_h * out_w;
	for (int row = 0; row < out_h; row++) {
		for (int col = 0; col < out_w; col++) {
			float p1 = detection_out[row * out_w + col];  //獲取每個畫素最大可能的分類類別
			float p2 = detection_out[step + row * out_w + col];
			if (p1 < p2) {
				mask.at<float>(row, col) = p2;
			}
		}
	}
	//先初始化一個網路輸出結果大小的矩陣儲存每個畫素點對應的顏色,再將結果矩陣恢復到原圖大小,以便最終結果顯示
	cv::resize(mask, mask, cv::Size(im_w, im_h));
	mask = mask * 255;
	mask.convertTo(mask, CV_8U);  //把mask從浮點數轉換為整數,並將範圍轉換為0-255
	cv::threshold(mask, mask, 100, 255, cv::THRESH_BINARY);  //將mask按指定範圍進行二值化分割
	std::vector<std::vector<cv::Point>> contours;
	cv::findContours(mask, contours, cv::RETR_EXTERNAL, cv::CHAIN_APPROX_SIMPLE);
	for (size_t t = 0; t < contours.size(); t++) {  //繪製每個前景區域外輪廓,遍歷這些外輪廓並繪製到輸入影象中
		cv::Rect box = cv::boundingRect(contours[t]);
		cv::rectangle(src, box, cv::Scalar(0, 0, 255), 2, 8, 0);
	}
	//cv::putText(src, labels[max_index], cv::Point(50, 50), cv::FONT_HERSHEY_SIMPLEX, 1.0, cv::Scalar(0, 0, 255), 2, 8);
	cv::namedWindow("mask", cv::WINDOW_AUTOSIZE);
	cv::imshow("mask", mask);
	cv::imshow("場景文字檢測", src);
	cv::waitKey(0);
	return 0;
}
效果:

場景文字識別
模型介紹
- 模型名稱:text-recognition-0012
- 輸入格式 - BCHW = [1 * 1 * 32 * 120],輸入的是單通道灰度圖
- 輸出層 - WBL = [30, 1, 37], W表示序列長度,每個字元佔一行,共30行,每個字元有37種可能,所以佔37列
- 其中L為:0123456789abcdefghijklmnopqrstuvwxyz#
-
表示CTC解析時候的空白字元,CTC的輸出連續兩個字元不能相同,相同字元間必有空格隔開,可參見以下部落格:超詳細講解CTC理論和實戰 - 簡書 (jianshu.com)
程式碼實現
#include <inference_engine.hpp>
#include <opencv2/opencv.hpp>
#include <fstream>  //fstream檔案讀寫操作,iostream為控制檯操作

using namespace InferenceEngine;

//影象預處理常式
template <typename T>
void matU8ToBlob(const cv::Mat& orig_image, InferenceEngine::Blob::Ptr& blob, int batchIndex = 0) {
	InferenceEngine::SizeVector blobSize = blob->getTensorDesc().getDims();
	const size_t width = blobSize[3];
	const size_t height = blobSize[2];
	const size_t channels = blobSize[1];
	InferenceEngine::MemoryBlob::Ptr mblob = InferenceEngine::as<InferenceEngine::MemoryBlob>(blob);
	if (!mblob) {
		THROW_IE_EXCEPTION << "We expect blob to be inherited from MemoryBlob in matU8ToBlob, "
			<< "but by fact we were not able to cast inputBlob to MemoryBlob";
	}
	// locked memory holder should be alive all time while access to its buffer happens
	auto mblobHolder = mblob->wmap();

	T* blob_data = mblobHolder.as<T*>();

	cv::Mat resized_image(orig_image);
	if (static_cast<int>(width) != orig_image.size().width ||
		static_cast<int>(height) != orig_image.size().height) {
		cv::resize(orig_image, resized_image, cv::Size(width, height));
	}

	int batchOffset = batchIndex * width * height * channels;

	for (size_t c = 0; c < channels; c++) {
		for (size_t h = 0; h < height; h++) {
			for (size_t w = 0; w < width; w++) {
				blob_data[batchOffset + c * width * height + h * width + w] =
					resized_image.at<cv::Vec3b>(h, w)[c];
			}
		}
	}
}

//文字識別預處理
void loadTextRecogRequest(Core& ie, std::string& reco_input_name, std::string& reco_output_name);
std::string alphabet = "0123456789abcdefghijklmnopqrstuvwxyz#";  //用於匹配的字元表
std::string ctc_decode(const float* blob_out, int seq_w, int seq_l);  //CTC字元匹配函數
InferenceEngine::InferRequest reco_request;
int main(int argc, char** argv) {

	InferenceEngine::Core ie;

	std::string xml = "D:/projects/models/text-detection-0003/FP32/text-detection-0003.xml";
	std::string bin = "D:/projects/models/text-detection-0003/FP32/text-detection-0003.bin";
	cv::Mat src = cv::imread("D:/images/text_detection02.png");  //讀取影象
	cv::imshow("input", src);
	int im_h = src.rows;
	int im_w = src.cols;
	InferenceEngine::CNNNetwork network = ie.ReadNetwork(xml, bin);  //讀取車輛檢測網路

	//獲取網路輸入輸出資訊
	InferenceEngine::InputsDataMap inputs = network.getInputsInfo();  //DataMap是一個Mat陣列
	InferenceEngine::OutputsDataMap outputs = network.getOutputsInfo();  //DataMap是一個Mat陣列
	std::string image_input_name = "";

	//設定兩個網路輸入資料的引數
	for (auto item : inputs) {  //auto可以自動推斷變數型別
		image_input_name = item.first;  //第一個引數是name,第二個引數是結構,第二個引數設定精度與結構
		auto input_data = item.second;
		// A->B 表示提取A中的成員B
		input_data->setPrecision(Precision::U8);  //預設為unsigned char對應U8,浮點型別則為FP32
		input_data->setLayout(Layout::NCHW);
	}
	std::string output_name1 = "";
	std::string output_name2 = "";
	int out_index = 0;
	for (auto item : outputs) {  //auto可以自動推斷變數型別
		if (out_index == 1) {
			output_name2 = item.first;
		}
		else {
			output_name1 = item.first;
		}
		auto output_data = item.second;
		output_data->setPrecision(Precision::FP32);  //輸出還是浮點數
		out_index++;
	}

	auto executable_network = ie.LoadNetwork(network, "CPU");  //設定執行的裝置
	auto infer_request = executable_network.CreateInferRequest();  //設定推理請求

	//影象預處理
	auto input = infer_request.GetBlob(image_input_name);  //獲取網路輸入影象資訊
	//將輸入影象轉換為網路的輸入格式
	matU8ToBlob<uchar>(src, input);

	infer_request.Infer();

	auto output = infer_request.GetBlob(output_name2);  //只解析第二個輸出即可
	//轉換輸出資料
	const float* detection_out = static_cast<PrecisionTrait<Precision::FP32>::value_type*>(output->buffer());

	//output:[B, C, H, W] [1, 2, 192, 320]
	const SizeVector outputDims = output->getTensorDesc().getDims();  //獲取輸出維度資訊 1*1000

	//每個畫素針對每種分類分別有一個識別結果數值,數值最大的為該畫素的分類
	//結果矩陣格式為:每種分類各有一個輸出影象大小的矩陣,每個畫素位置對應其在該分類的可能性
	const int out_c = outputDims[1];  //分割識別的型別個數,此處為2
	const int out_h = outputDims[2];  //分割網路輸出影象的高
	const int out_w = outputDims[3];  //分割網路輸出影象的寬
	cv::Mat mask = cv::Mat::zeros(cv::Size(out_w, out_h), CV_8U);
	int step = out_h * out_w;
	for (int row = 0; row < out_h; row++) {
		for (int col = 0; col < out_w; col++) {
			float p1 = detection_out[row * out_w + col];  //獲取每個畫素最大可能的分類類別
			float p2 = detection_out[step + row * out_w + col];
			if (p2 >= 1.0) {
				mask.at<uchar>(row, col) = 255;
			}
		}
	}
	//先初始化一個網路輸出結果大小的矩陣儲存每個畫素點對應的顏色,再將結果矩陣恢復到原圖大小,以便最終結果顯示
	cv::resize(mask, mask, cv::Size(im_w, im_h));

	std::vector<std::vector<cv::Point>> contours;  //初始化一個容器儲存輪廓點集
	cv::findContours(mask, contours, cv::RETR_EXTERNAL, cv::CHAIN_APPROX_SIMPLE);

	cv::Mat gray;
	cv::cvtColor(src, gray, cv::COLOR_BGR2GRAY);
	std::string reco_input_name = "";
	std::string reco_output_name = "";
	loadTextRecogRequest(ie, reco_input_name, reco_output_name);
	std::cout << "text input: " << reco_input_name << "text output: " << reco_output_name << std::endl;

	for (size_t t = 0; t < contours.size(); t++) {  //繪製每個前景區域外輪廓,遍歷這些外輪廓並繪製到輸入影象中
		cv::Rect box = cv::boundingRect(contours[t]);
		cv::rectangle(src, box, cv::Scalar(0, 0, 255), 2, 8, 0);
		box.x = box.x - 4;  //擴大文字檢測區域減少漏檢誤檢
		box.y = box.y - 4;
		box.width = box.width + 8;
		box.height = box.height + 8;

		cv::Mat roi = gray(box);

		auto reco_input_blob = reco_request.GetBlob(reco_input_name);
		size_t num_channels = reco_input_blob->getTensorDesc().getDims()[1];
		size_t h = reco_input_blob->getTensorDesc().getDims()[2];
		size_t w = reco_input_blob->getTensorDesc().getDims()[3];
		size_t image_size = h * w;
		cv::Mat blob_image;
		cv::resize(roi, blob_image, cv::Size(w, h));  //轉換影象為網路輸入大小

		//HWC =》NCHW
		unsigned char* data = static_cast<unsigned char*>(reco_input_blob->buffer());
		for (size_t row = 0; row < h; row++) {
			for (size_t col = 0; col < w; col++) {
				data[row * w + col] = blob_image.at<uchar>(row, col);  //uchar型別無符號 0-255
			}
		}
		reco_request.Infer();

		auto reco_output = reco_request.GetBlob(reco_output_name);
		//獲取輸出資料的指標
		const float* blob_out = static_cast<PrecisionTrait<Precision::FP32>::value_type*>(reco_output->buffer());
		const SizeVector reco_dims = reco_output->getTensorDesc().getDims();
		const int RW = reco_dims[0];  //30
		const int RB = reco_dims[1];  //1
		const int RL = reco_dims[2];  //37
		//通過CTC解碼來處理網路輸出的資料
		std::string ocr_txt = ctc_decode(blob_out, RW, RL);  //識別輸出的資料為字元
		std::cout << ocr_txt << std::endl;
		cv::putText(src, ocr_txt, box.tl(), cv::FONT_HERSHEY_PLAIN, 1.0, cv::Scalar(255, 0, 0), 1);
	}
	//cv::putText(src, labels[max_index], cv::Point(50, 50), cv::FONT_HERSHEY_SIMPLEX, 1.0, cv::Scalar(0, 0, 255), 2, 8);
	cv::namedWindow("mask", cv::WINDOW_AUTOSIZE);
	cv::imshow("mask", mask);
	cv::imshow("場景文字檢測", src);
	cv::waitKey(0);
	return 0;
}

void loadTextRecogRequest(Core& ie, std::string& reco_input_name, std::string& reco_output_name) {

	std::string xml = "D:/projects/models/text-recognition-0012/FP32/text-recognition-0012.xml";
	std::string bin = "D:/projects/models/text-recognition-0012/FP32/text-recognition-0012.bin";
	InferenceEngine::CNNNetwork network = ie.ReadNetwork(xml, bin);

	InferenceEngine::InputsDataMap inputs = network.getInputsInfo();
	InferenceEngine::OutputsDataMap outputs = network.getOutputsInfo();

	for (auto item : inputs) {
		reco_input_name = item.first;
		auto input_data = item.second;
		input_data->setPrecision(Precision::U8);
		input_data->setLayout(Layout::NCHW);
	}
	for (auto item : outputs) {
		reco_output_name = item.first;
		auto output_data = item.second;
		output_data->setPrecision(Precision::FP32);
	}

	auto exec_network = ie.LoadNetwork(network, "CPU");
	reco_request = exec_network.CreateInferRequest();
}

std::string ctc_decode(const float* blob_out, int seq_w, int seq_l) {
	printf("seq width:%d,seq length:%d\n", seq_w, seq_l);
	std::string res = "";
	bool prev_pad = false;
	const int num_classes = alphabet.length();
	int seq_len = seq_w * seq_l;
	for (int i = 0; i < seq_w; i++) {
		int argmax = 0;
		int max_prob = blob_out[i * seq_l];
		for (int j = 0; j < num_classes; j++) {
			if (blob_out[i * seq_l + j] > max_prob) {
				max_prob = blob_out[i * seq_l + j];
				argmax = j;
			}
		}
		auto symbol = alphabet[argmax];  //遍歷查詢每個字元的最大可能字元
		if (symbol == '#') {  //去除字串中的空字元
			//通過prev_pad來控制空字元之後的字元一定會新增到結果字串中,而兩個連續相同字元的第二個不會被新增到結果字串中
			prev_pad = true;
		}
		else {
			if (res.empty() || prev_pad || (!res.empty() && symbol != res.back())) {  //back()方法獲取字串最後一個字元;front()獲取第一個字元
				prev_pad = false;
				res += symbol;  //字串拼接
			}
		}
	}
	return res;
}
效果:
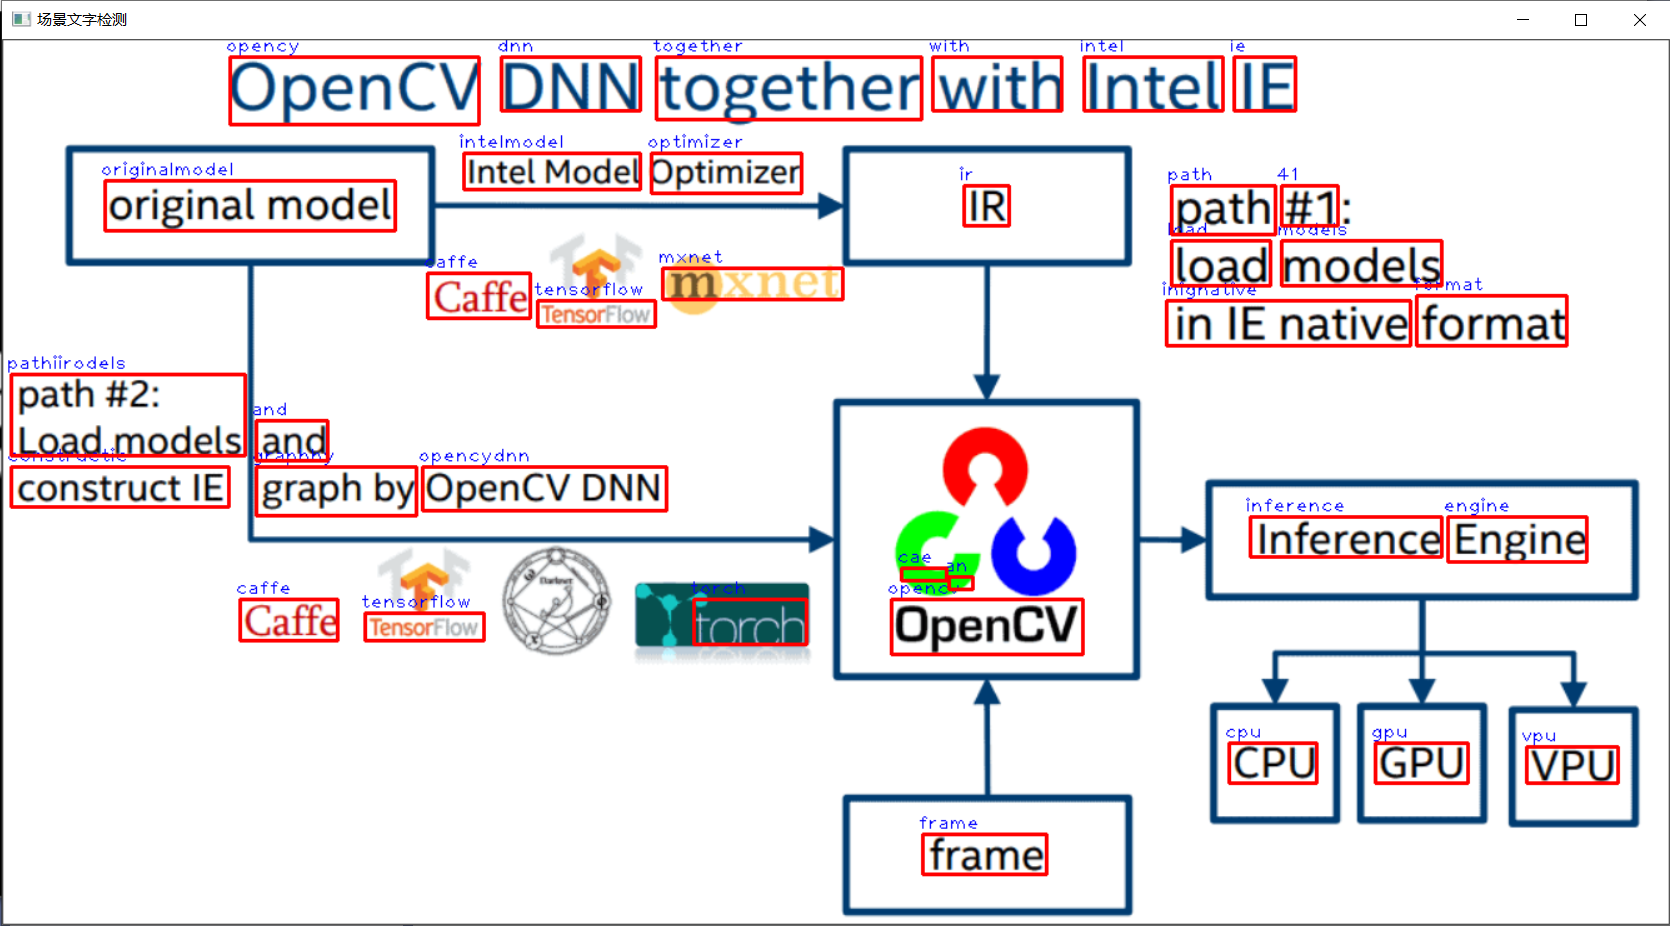
8、模型轉換與部署
pytorch模型轉換與部署
- ONNX轉換與支援
- 首先需要儲存pth檔案,然後轉化為內ONNX格式檔案
- OpenVINO支援直接讀取ONNX格式檔案解析
- ONNX轉換為IR檔案
pytorch模型轉換為onnx模型
從pytorch官網安裝:Start Locally | PyTorch
import torch
import torchvision

def main():
    model = torchvision.models.resnet18(pretrained=True).eval()  #模型的推理模式
    dummy_input = torch.randn((1,3,224,224))  #tensor張量,多維陣列,此處模型輸入為3通道,224*224大小的影象
    torch.onnx.export(model,dummy_input,"resnet18.onnx")

if __name__ == '__main__':
    main()
執行後獲取的onnx模型檔案:
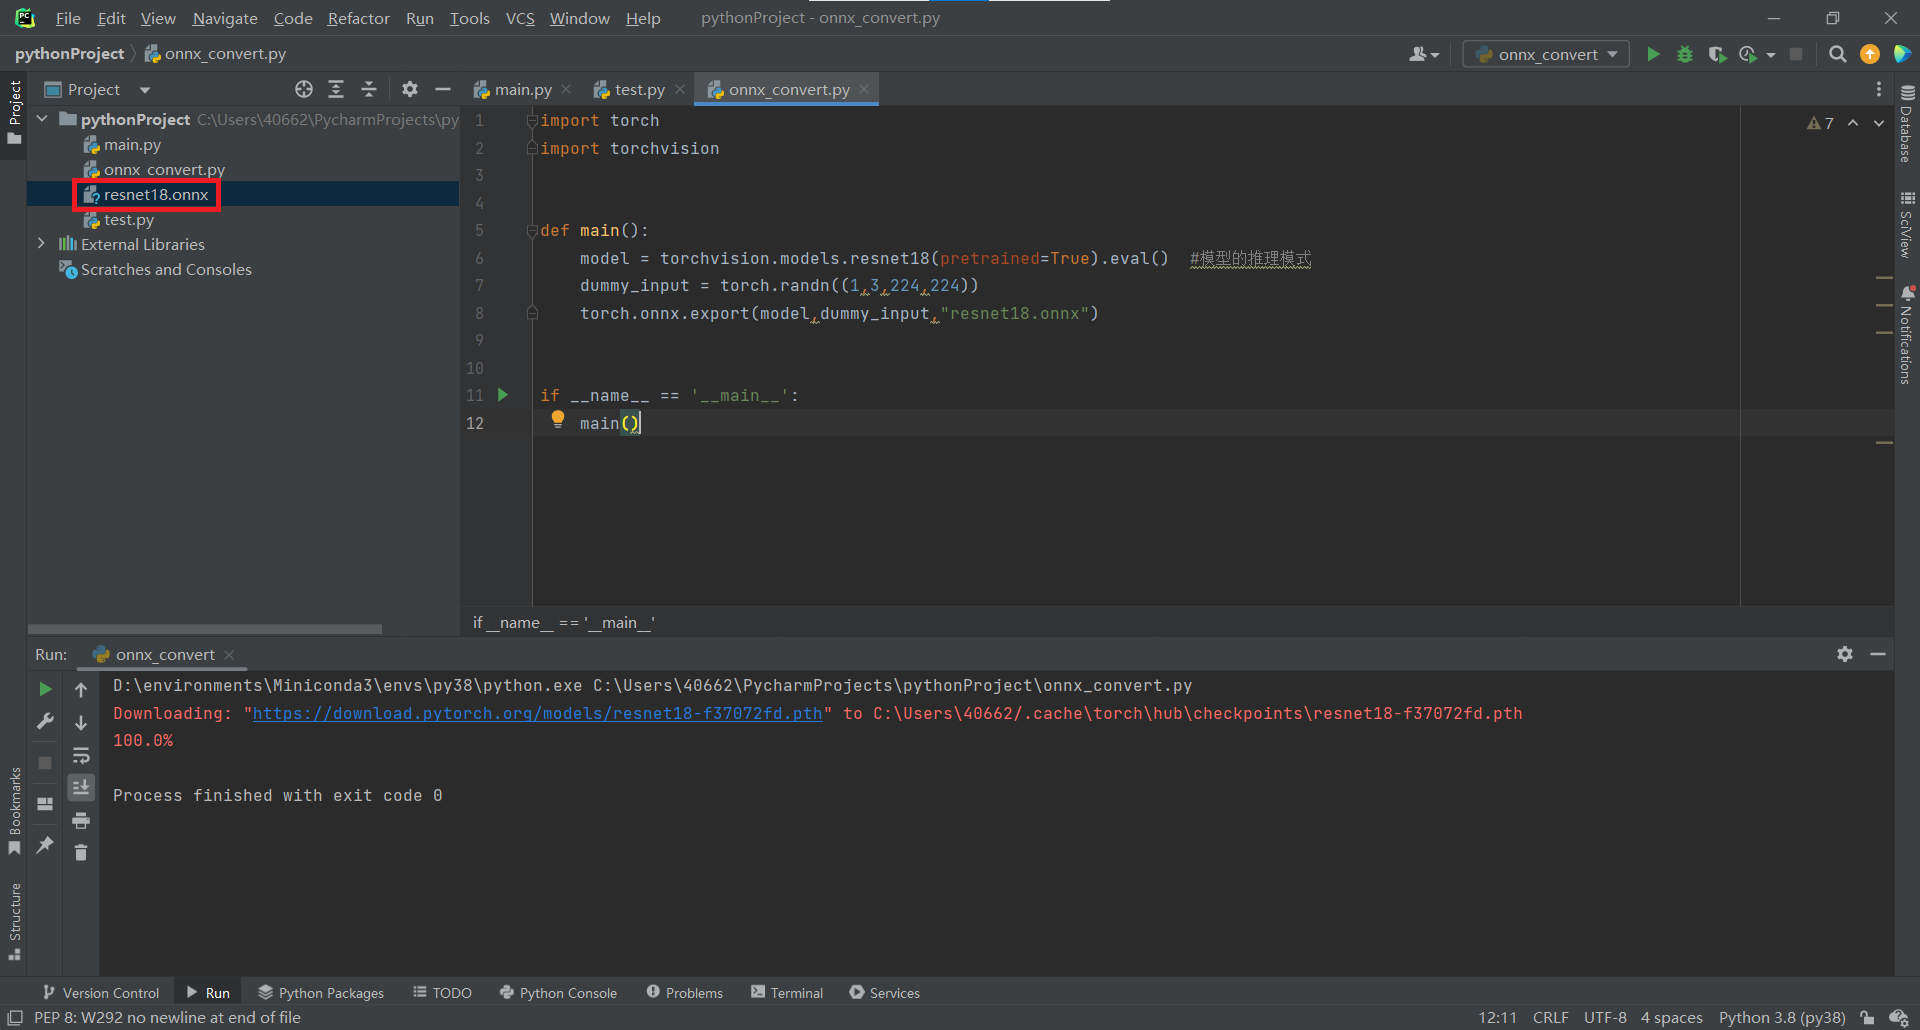
onnx模型轉換為IR模型
-
進入OpenVINO安裝路徑下的model_optimizer資料夾,路徑如下:C:\Program Files (x86)\Intel\openvino_2021.2.185\deployment_tools\model_optimizer
-
可以通過執行該資料夾中的install_prerequisites資料夾中的bat指令碼來安裝onnx及tensorflow環境,也可手動根據requirements_onnx.txt檔案中的環境要求安裝,安裝完環境後,以管理員身份執行cmd命令提示字元並進入到model_optimizer資料夾下
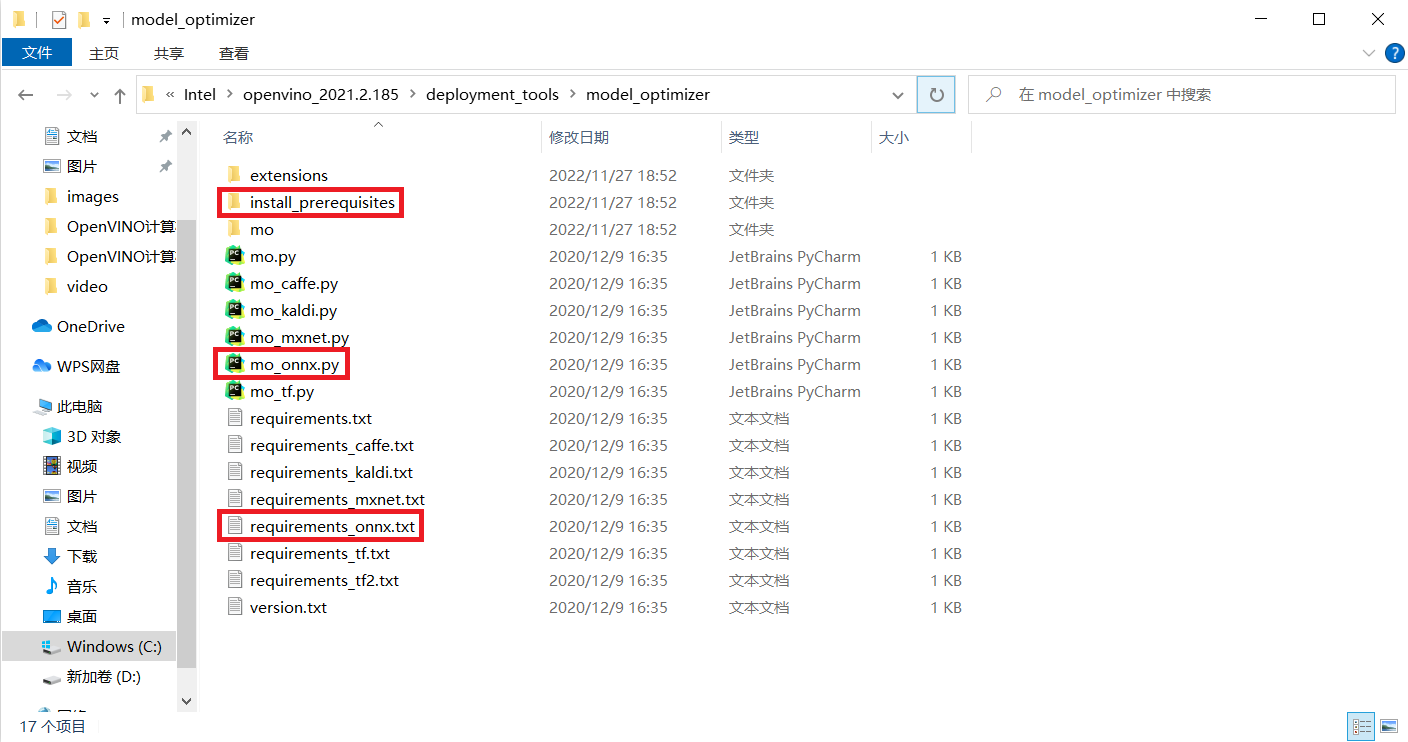
- 執行model_optimizer資料夾下mo_onnx.py指令碼將onnx模型轉換為IR模型,執行後該資料夾下會生成xml及bin兩個檔案
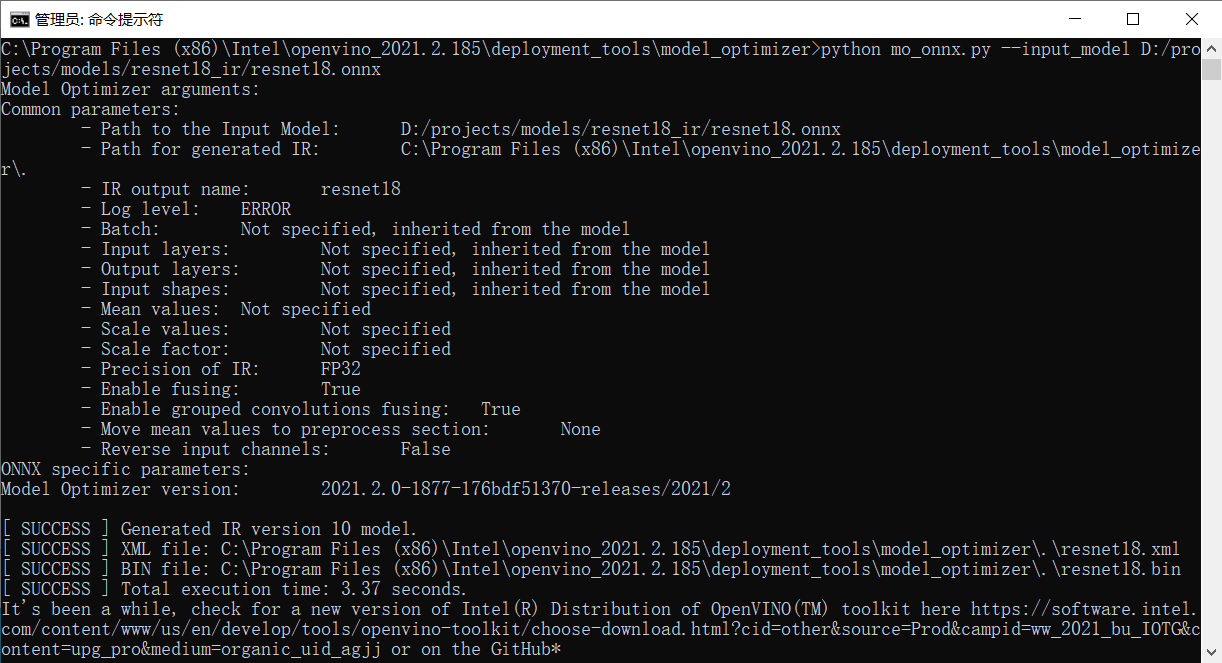
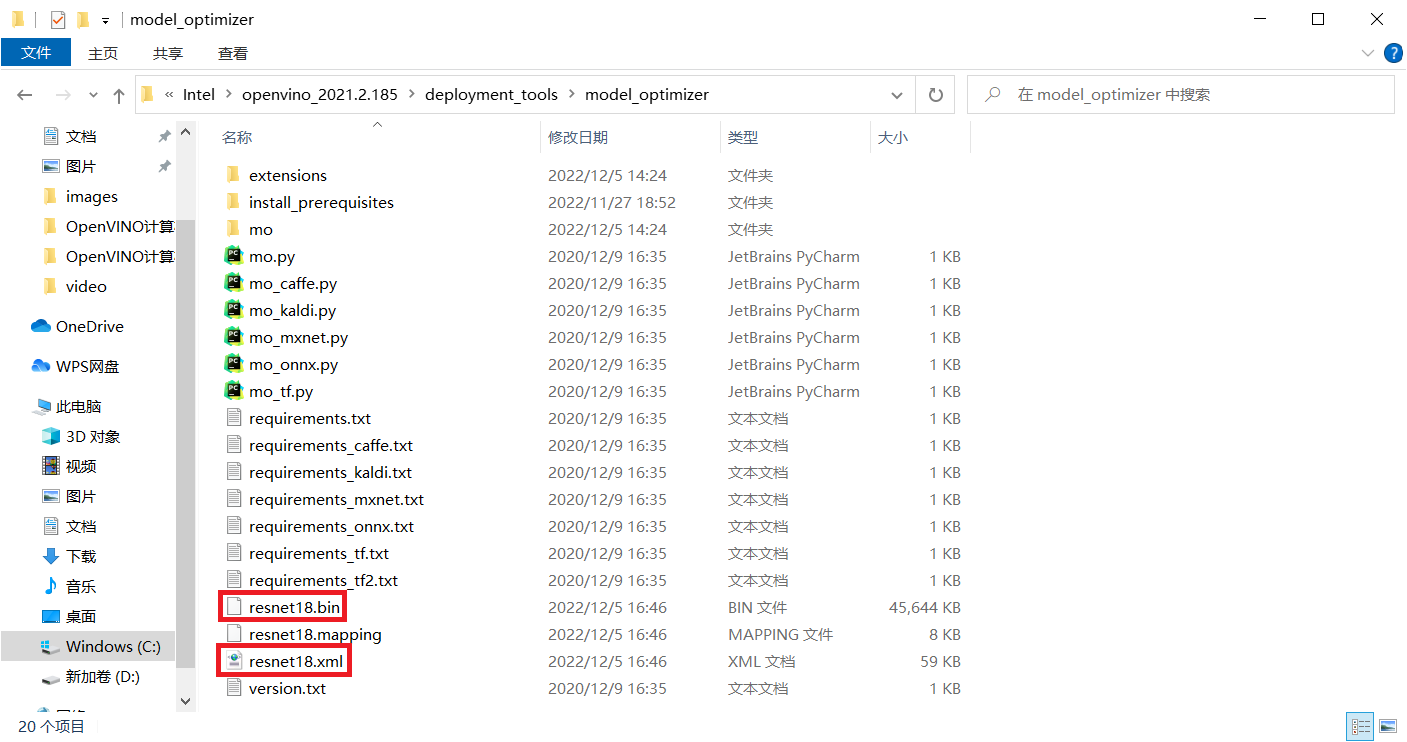
執行指令碼如下:
python mo_onnx.py --input_model D:/projects/models/resnet18_ir/resnet18.onnx
轉換獲得的onnx模型及IR模型測試程式碼
#include <inference_engine.hpp>
#include <opencv2/opencv.hpp>
#include <fstream>

using namespace InferenceEngine;
std::string labels_txt_file = "D:/projects/models/resnet18_ir/imagenet_classes.txt";
std::vector<std::string> readClassNames();
int main(int argc, char** argv) {
	InferenceEngine::Core ie;
	std::vector<std::string> devices = ie.GetAvailableDevices();
	for (std::string name : devices) {
		std::cout << "device name: " << name << std::endl;
	}
	std::string cpuName = ie.GetMetric("CPU", METRIC_KEY(FULL_DEVICE_NAME)).as<std::string>();
	std::cout << "cpu full name: " << cpuName << std::endl;
	//std::string xml = "D:/projects/models/resnet18_ir/resnet18.xml";  //IR模型
	//std::string bin = "D:/projects/models/resnet18_ir/resnet18.bin";
	std::string onnx = "D:/projects/models/resnet18_ir/resnet18.onnx";  //ONNX模型
	std::vector<std::string> labels = readClassNames();
	cv::Mat src = cv::imread("D:/images/messi02.jpg");

	//IR和ONNX格式的模型都可以被InferenceEngine讀取
	// InferenceEngine::CNNNetwork network = ie.ReadNetwork(xml, bin);
	InferenceEngine::CNNNetwork network = ie.ReadNetwork(onnx);
	InferenceEngine::InputsDataMap inputs = network.getInputsInfo();
	InferenceEngine::OutputsDataMap outputs = network.getOutputsInfo();

	std::string input_name = "";
	for (auto item : inputs) {
		input_name = item.first;
		auto input_data = item.second;
		input_data->setPrecision(Precision::FP32);
		input_data->setLayout(Layout::NCHW);
		input_data->getPreProcess().setColorFormat(ColorFormat::RGB);
		std::cout << "input name: " << input_name << std::endl;
	}

	std::string output_name = "";
	for (auto item : outputs) {
		output_name = item.first;
		auto output_data = item.second;
		output_data->setPrecision(Precision::FP32);
		std::cout << "output name: " << output_name << std::endl;
	}

	auto executable_network = ie.LoadNetwork(network, "CPU");
	auto infer_request = executable_network.CreateInferRequest();

	auto input = infer_request.GetBlob(input_name);
	size_t num_channels = input->getTensorDesc().getDims()[1];
	size_t h = input->getTensorDesc().getDims()[2];
	size_t w = input->getTensorDesc().getDims()[3];
	size_t image_size = h * w;
	cv::Mat blob_image;
	cv::resize(src, blob_image, cv::Size(w, h));
	cv::cvtColor(blob_image, blob_image, cv::COLOR_BGR2RGB);
	blob_image.convertTo(blob_image, CV_32F);
	blob_image = blob_image / 255.0;
	cv::subtract(blob_image, cv::Scalar(0.485, 0.456, 0.406), blob_image);
	cv::divide(blob_image, cv::Scalar(0.229, 0.224, 0.225), blob_image);

	// HWC =》NCHW
	float* data = static_cast<float*>(input->buffer());
	for (size_t row = 0; row < h; row++) {
		for (size_t col = 0; col < w; col++) {
			for (size_t ch = 0; ch < num_channels; ch++) {
				data[image_size * ch + row * w + col] = blob_image.at<cv::Vec3f>(row, col)[ch];
			}
		}
	}

	infer_request.Infer();

	auto output = infer_request.GetBlob(output_name);
	const float* probs = static_cast<PrecisionTrait<Precision::FP32>::value_type*>(output->buffer());
	const SizeVector outputDims = output->getTensorDesc().getDims();
	std::cout << outputDims[0] << "x" << outputDims[1] << std::endl;
	float max = probs[0];
	int max_index = 0;
	for (int i = 1; i < outputDims[1]; i++) {
		if (max < probs[i]) {
			max = probs[i];
			max_index = i;
		}
	}

	std::cout << "class index : " << max_index << std::endl;
	std::cout << "class name : " << labels[max_index] << std::endl;
	cv::putText(src, labels[max_index], cv::Point(50, 50), cv::FONT_HERSHEY_SIMPLEX, 1.0, cv::Scalar(0, 0, 255), 2, 8);
	cv::imshow("輸入影象", src);
	cv::waitKey(0);
	return 0;
}


std::vector<std::string> readClassNames()
{
	std::vector<std::string> classNames;

	std::ifstream fp(labels_txt_file);
	if (!fp.is_open())
	{
		printf("could not open file...\n");
		exit(-1);
	}
	std::string name;
	while (!fp.eof())
	{
		std::getline(fp, name);
		if (name.length())
			classNames.push_back(name);
	}
	fp.close();
	return classNames;
}
效果:
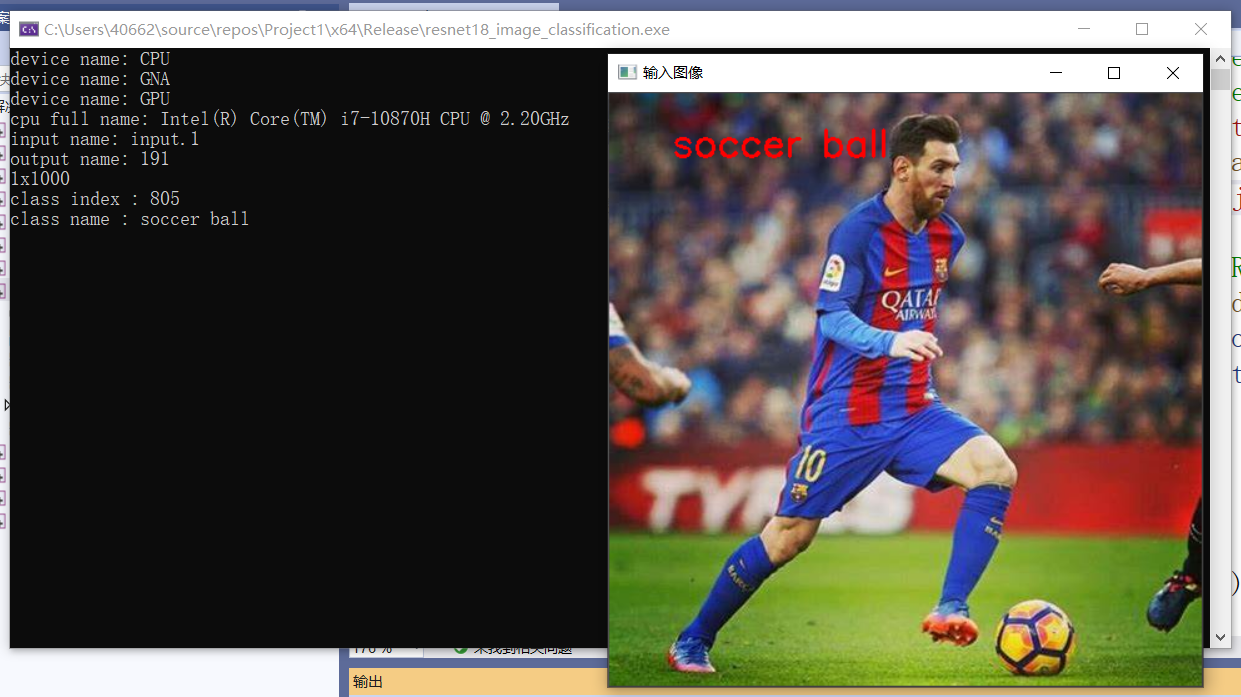
tensorflow模型轉換與部署
- 通用引數設定
- --input_model <path_to_frozen.pb>
- --transformations_config <path_to_subgraph_replacement_configuration_file.json>
- --tensorflow_object_detection_api_pipeline_config <path_topipeline.config>
- --input_shape
- --reverse_input_channels(將rgb通道反序轉換為bgr方便opencv後續操作)
- 版本資訊要求
- tensorflow:required:>=1.15.2
- numpy:required:<1.19.0
- pip install tensorflow-gpu==1.15.2 -i https://pypi.tuna.tsinghua.edu.cn/simple
- pip install tensorflow-gpu==1.15.2 -i https://pypi.doubanio.com/simple/
- networkx>=1.11
- numpy>=1.14.0,<1.19.0
- test-generator==0.1.1
- defusedxml>=0.5.0
獲取tensorflow預訓練模型及檢視OpenVINO模型轉換檔案
使用mobilenetv2版本pb轉換為IR並呼叫推理
COCO-trained models連結:models/tf1_detection_zoo.md at master · tensorflow/models · GitHub
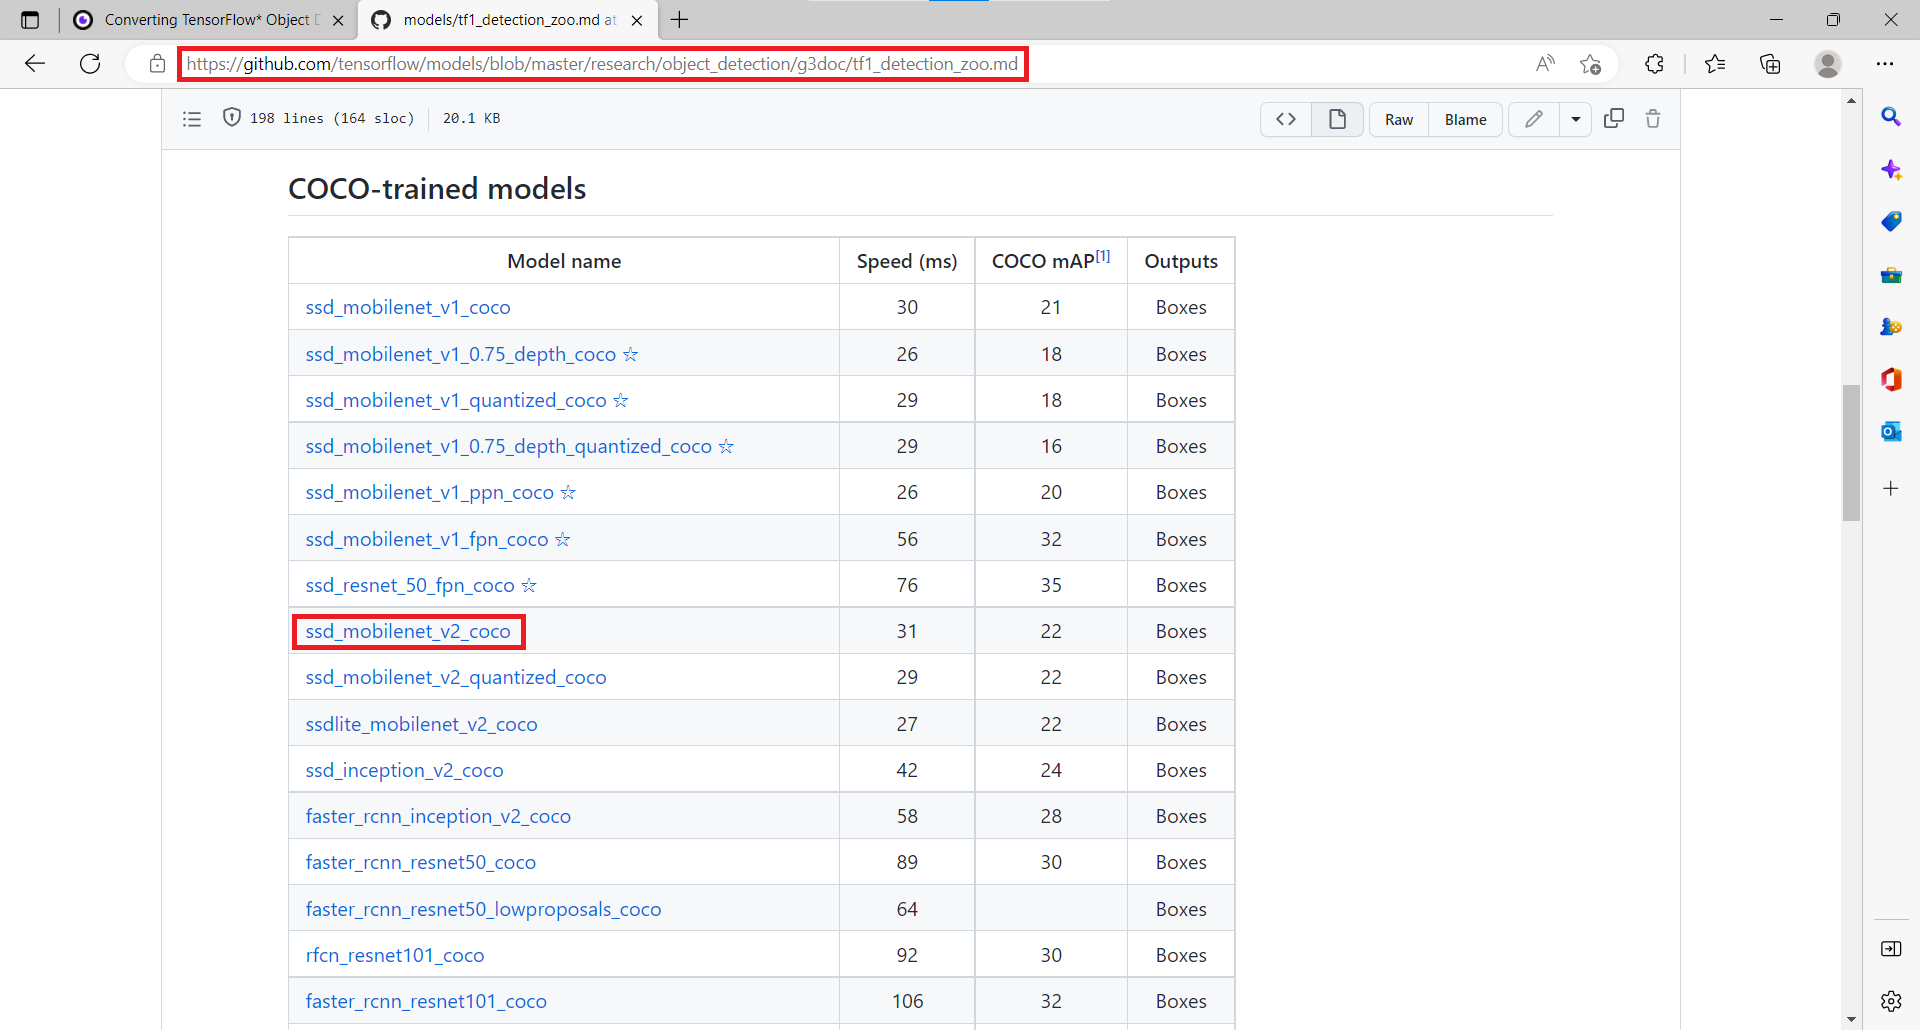
OpenVINO中的tesorflow模型轉換連結:https://docs.openvino.ai/2021.2/openvino_docs_MO_DG_prepare_model_convert_model_tf_specific_Convert_Object_Detection_API_Models.html
獲取的預訓練模型資料夾中的pipeline.config檔案可以對模型進行設定,比如引數image_resized可以保持原有固定輸入影象大小300 * 300,也可以設定為保持原影象比例並設定影象大小縮放在一個範圍內
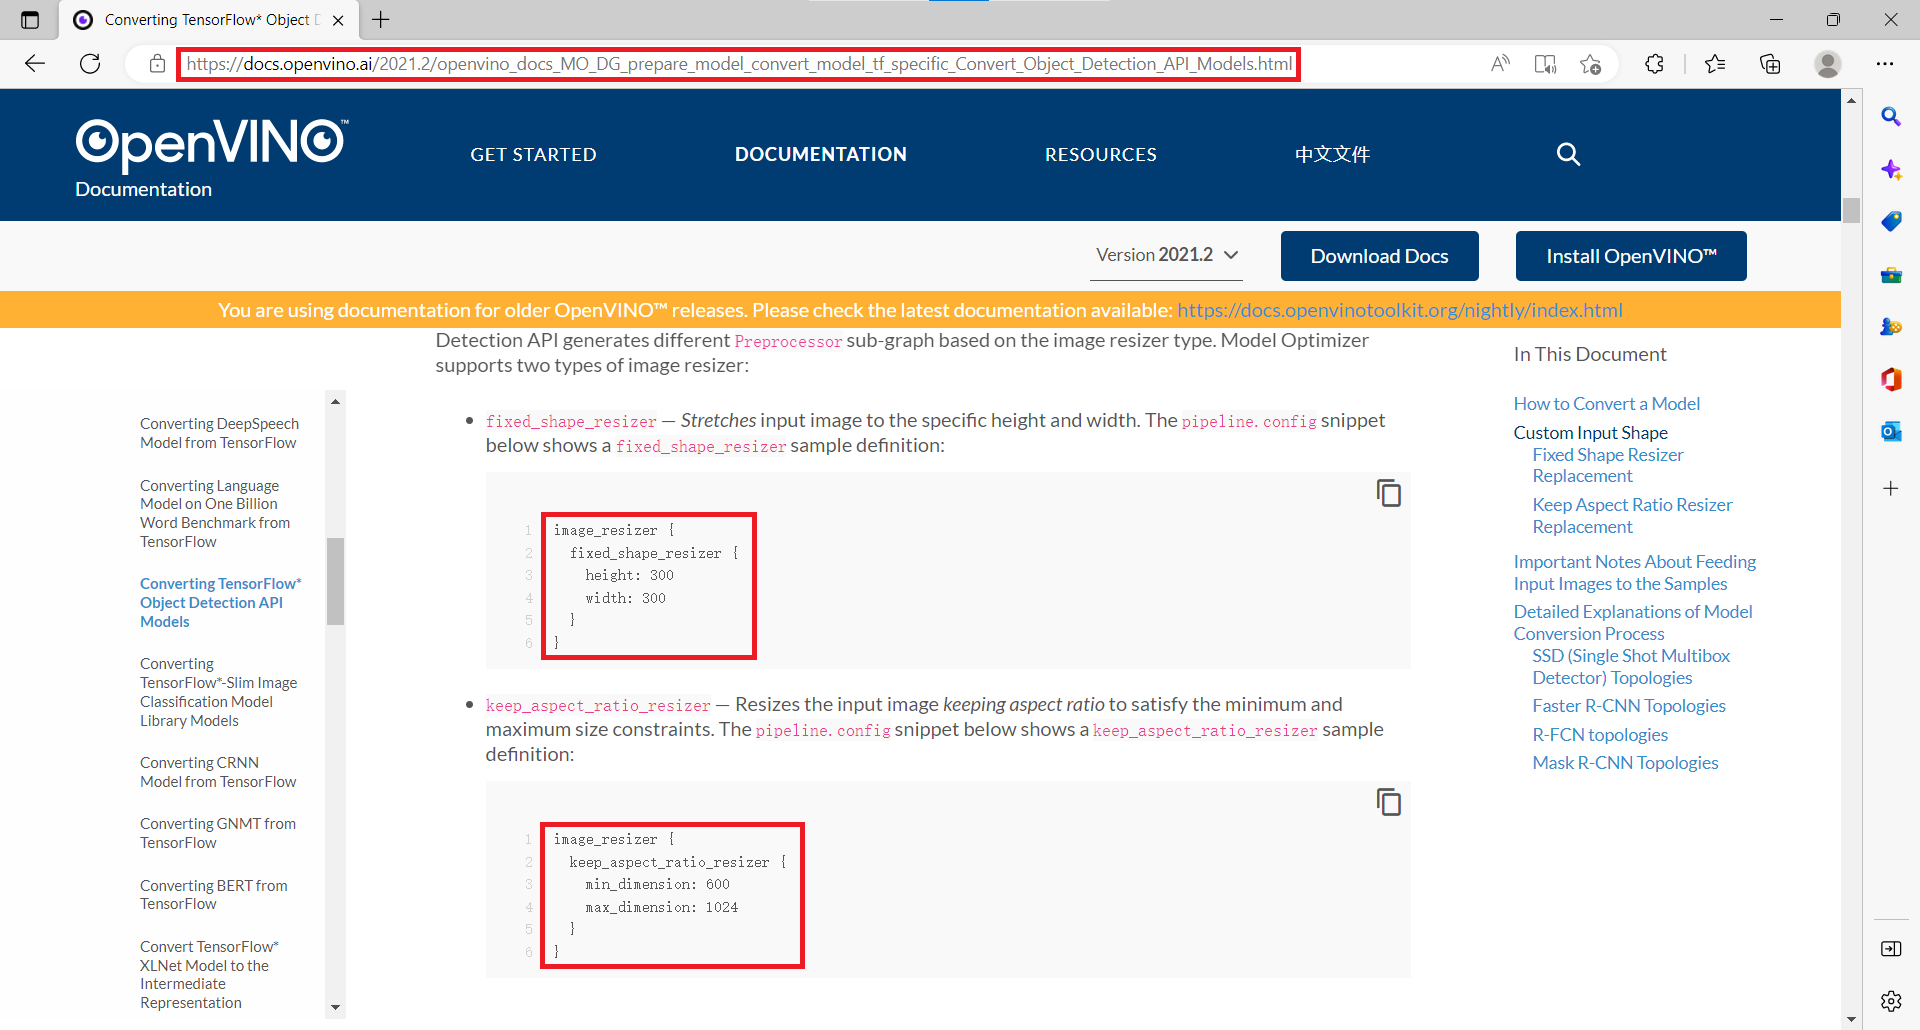
pb模型轉換為IR模型程式碼:
python mo_tf.py --input_model=D:/tensorflow/ssd_mobilenet_v2_coco_2018_03_29/frozen_inference_graph.pb --transformations_config extensions/front/tf/ssd_v2_support.json --tensorflow_object_detection_api_pipeline_config D:/tensorflow/ssd_mobilenet_v2_coco_2018_03_29/pipeline.config --reverse_input_channels --input_shape [1,300,300,3]
tensorflow模型轉換環境搭建及執行
python版本必須為3.8以下才能安裝tensorflow 1.15.2,同時1.0版的tensorflow分cpu版與gpu版兩種;
本機安裝的python版本是3.8,所以使用conda建立python版本為3.6的虛擬環境用於模型轉換:
conda create -n py36 python==3.6.5
conda activate py36
pip install tensorflow==1.15.2 -i https://pypi.doubanio.com/simple/
pip install tensorflow-gpu==1.15.2 -i https://pypi.doubanio.com/simple/
pip install networkx==1.11
pip install numpy==1.18.4
pip install test-generator==0.1.1
pip install defusedxml==0.5.0
cd C:\Program Files (x86)\Intel\openvino_2021.2.185\deployment_tools\model_optimizer
python mo_tf.py --input_model=D:/tensorflow/ssd_mobilenet_v2_coco_2018_03_29/frozen_inference_graph.pb --transformations_config extensions/front/tf/ssd_v2_support.json --tensorflow_object_detection_api_pipeline_config D:/tensorflow/ssd_mobilenet_v2_coco_2018_03_29/pipeline.config --reverse_input_channels --input_shape [1,300,300,3]
模型轉換成功及轉換得到的xml與bin檔案
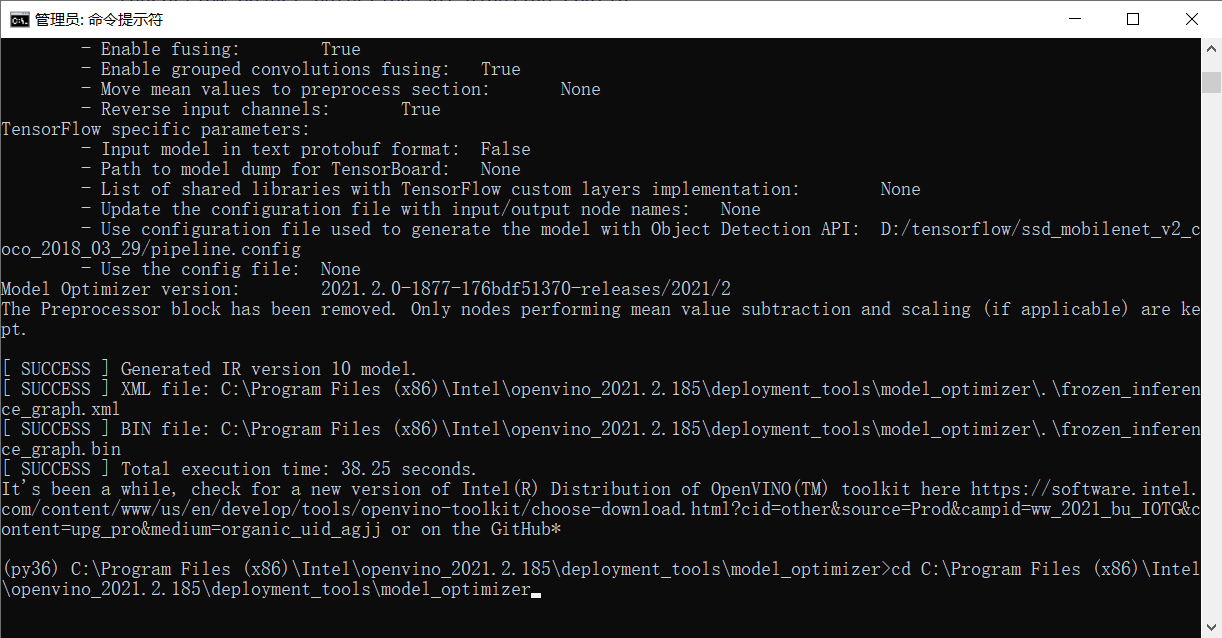
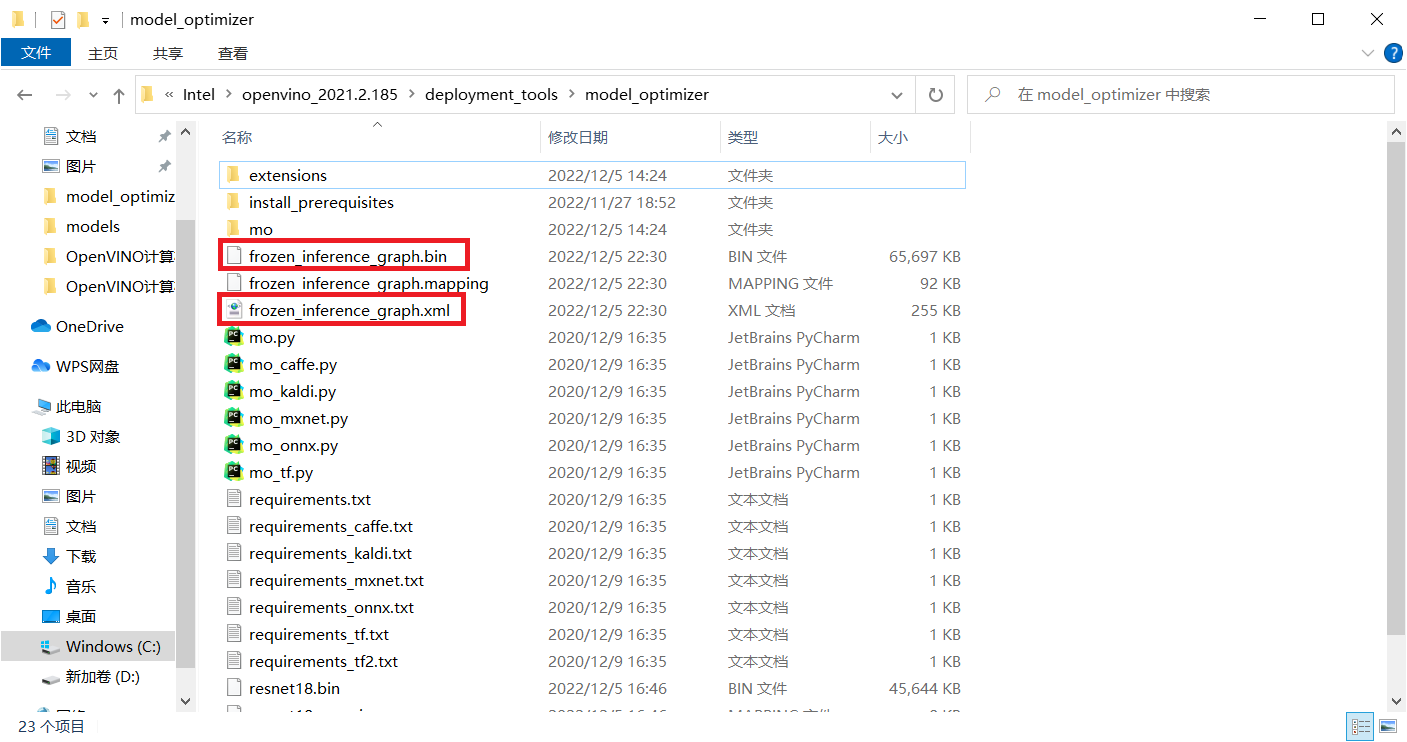
模型轉換後的IR模型測試程式碼
#include <inference_engine.hpp>
#include <opencv2/opencv.hpp>
#include <fstream>  //fstream檔案讀寫操作,iostream為控制檯操作

void read_coco_labels(std::vector<std::string>& labels) {
	std::string label_file = "D:/projects/models/object_detection_classes_coco.txt";
	std::ifstream fp(label_file);
	if (!fp.is_open())
	{
		printf("could not open file...\n");
		exit(-1);
	}
	std::string name;
	while (!fp.eof())
	{
		std::getline(fp, name);
		if (name.length())
			labels.push_back(name);
	}
	fp.close();
}

using namespace InferenceEngine;

int main(int argc, char** argv) {

	InferenceEngine::Core ie;

	std::string xml = "D:/projects/models/tf_ssdv2_ir/frozen_inference_graph.xml";
	std::string bin = "D:/projects/models/tf_ssdv2_ir/frozen_inference_graph.bin";

	std::vector<std::string> coco_labels;
	read_coco_labels(coco_labels);

	cv::Mat src = cv::imread("D:/images/dog_bike_car.jpg");  //讀取影象
	int im_h = src.rows;
	int im_w = src.cols;
	InferenceEngine::CNNNetwork network = ie.ReadNetwork(xml, bin);  //讀取車輛檢測網路

	//獲取網路輸入輸出資訊
	InferenceEngine::InputsDataMap inputs = network.getInputsInfo();  //DataMap是一個Mat陣列
	InferenceEngine::OutputsDataMap outputs = network.getOutputsInfo();  //DataMap是一個Mat陣列
	std::string input_name = "";
	for (auto item : inputs) {  //auto可以自動推斷變數型別
		input_name = item.first;  //第一個引數是name,第二個引數是結構,第二個引數設定精度與結構
		auto input_data = item.second;
		// A->B 表示提取A中的成員B
		input_data->setPrecision(Precision::U8);  //預設為unsigned char對應U8
		input_data->setLayout(Layout::NCHW);
		//input_data->getPreProcess().setColorFormat(ColorFormat::BGR);  預設就是BGR
		std::cout << "input name: " << input_name << std::endl;
	}
	std::string output_name = "";
	for (auto item : outputs) {  //auto可以自動推斷變數型別
		output_name = item.first;  //第一個引數是name,第二個引數是結構,第二個引數設定精度與結構
		auto output_data = item.second;
		output_data->setPrecision(Precision::FP32);  //輸出還是浮點數
		//注意:output_data不要設定結構
		std::cout << "output name: " << output_name << std::endl;
	}

	auto executable_network = ie.LoadNetwork(network, "CPU");  //設定執行的裝置
	auto infer_request = executable_network.CreateInferRequest();  //設定推理請求

	//影象預處理
	auto input = infer_request.GetBlob(input_name);  //獲取網路輸入影象資訊
	size_t num_channels = input->getTensorDesc().getDims()[1];  //size_t 型別表示C中任何物件所能達到的最大長度,它是無符號整數
	size_t h = input->getTensorDesc().getDims()[2];
	size_t w = input->getTensorDesc().getDims()[3];
	size_t image_size = h * w;
	cv::Mat blob_image;
	cv::resize(src, blob_image, cv::Size(w, h));  //將輸入圖片大小轉換為與網路輸入大小一致
	//cv::cvtColor(blob_image, blob_image, cv::COLOR_BGR2RGB);  //色彩空間轉換

	// HWC =》NCHW  將輸入影象從HWC格式轉換為NCHW格式
	unsigned char* data = static_cast<unsigned char*>(input->buffer());  //將影象放到buffer中,放入input中
	for (size_t row = 0; row < h; row++) {
		for (size_t col = 0; col < w; col++) {
			for (size_t ch = 0; ch < num_channels; ch++) {
				//將每個通道變成一張圖,按照通道順序
				data[image_size * ch + row * w + col] = blob_image.at<cv::Vec3b>(row, col)[ch];
			}
		}
	}

	infer_request.Infer();
	auto output = infer_request.GetBlob(output_name);
	//轉換輸出資料
	const float* detection_out = static_cast<PrecisionTrait<Precision::FP32>::value_type*>(output->buffer());
	//output:[1, 1, N, 7]
	//七個引數為:[image_id, label, conf, x_min, y_min, x_max, y_max]
	const SizeVector outputDims = output->getTensorDesc().getDims();  //獲取輸出維度資訊 1*1000
	std::cout << outputDims[2] << "x" << outputDims[3] << std::endl;
	const int max_count = outputDims[2];  //識別出的物件個數
	const int object_size = outputDims[3];  //獲取物件資訊的個數,此處為7個
	for (int n = 0; n < max_count; n++) {
		float label = detection_out[n * object_size + 1];
		float confidence = detection_out[n * object_size + 2];
		float xmin = detection_out[n * object_size + 3] * im_w;
		float ymin = detection_out[n * object_size + 4] * im_h;
		float xmax = detection_out[n * object_size + 5] * im_w;
		float ymax = detection_out[n * object_size + 6] * im_h;
		if (confidence > 0.7) {
			printf("label id: %d,label name: %s \n", static_cast<int>(label), coco_labels[static_cast<int>(label)]);
			cv::Rect box;
			box.x = static_cast<int>(xmin);
			box.y = static_cast<int>(ymin);
			box.width = static_cast<int>(xmax - xmin);
			box.height = static_cast<int>(ymax - ymin);

			cv::rectangle(src, box, cv::Scalar(0, 0, 255), 2, 8);
			//box.tl()返回矩形左上角座標
			cv::putText(src, coco_labels[static_cast<int>(label)], box.tl(), cv::FONT_HERSHEY_SIMPLEX, 1.0, cv::Scalar(0, 255, 0), 2, 8);
		}
	}

	//cv::putText(src, labels[max_index], cv::Point(50, 50), cv::FONT_HERSHEY_SIMPLEX, 1.0, cv::Scalar(0, 0, 255), 2, 8);
	cv::namedWindow("out", cv::WINDOW_FREERATIO);
	cv::imshow("out", src);
	cv::waitKey(0);
	return 0;
}
效果:
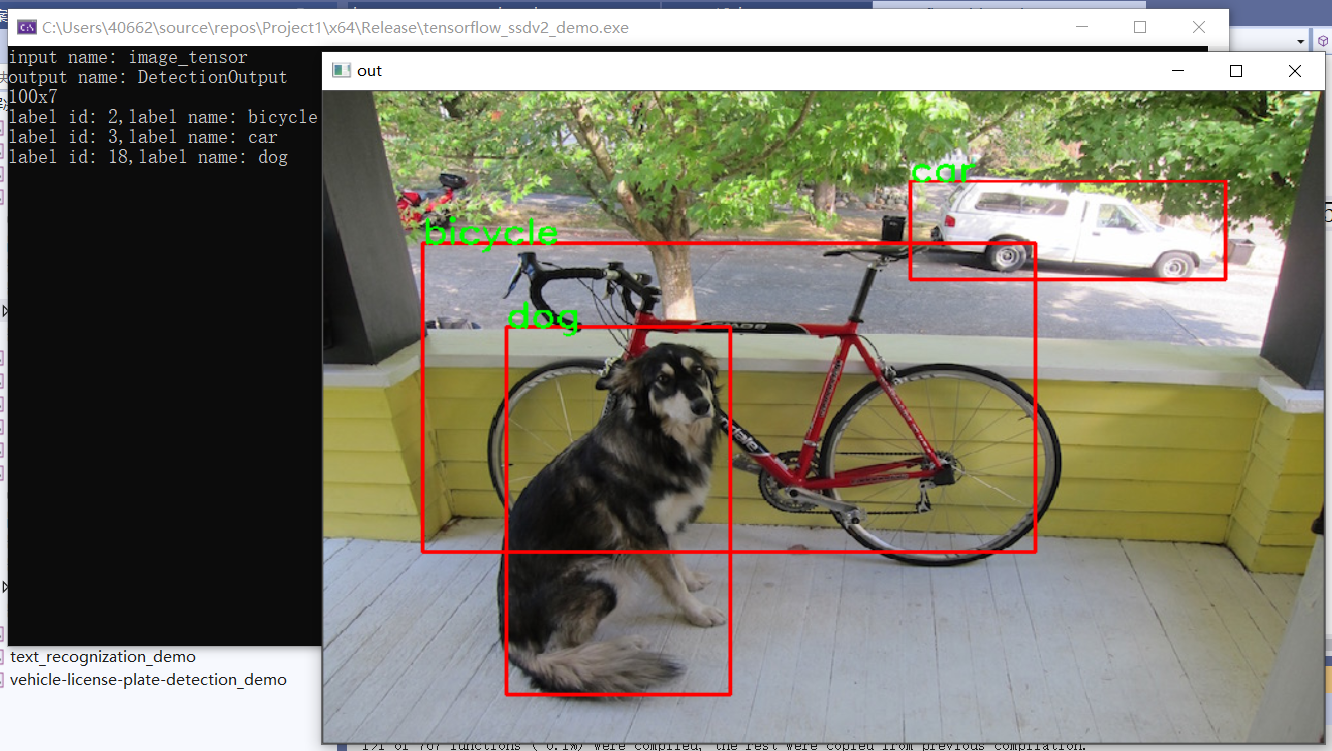
9、YOLOv5模型部署與推理
- Pytorch版本YOLOv5安裝與設定
- YOLOv5轉ONNX格式生成
- OpenVINO部署支援
YOLOv5安裝與設定
強烈建議使用pycharm中的terminal命令列進行相關環境安裝,速度快並且降低失敗概率
- pytorch三件套安裝(cuda版本11.6)
pip3 install torch torchvision torchaudio --extra-index-url https://download.pytorch.org/whl/cu116
下載YOLOv5專案地址:GitHub - ultralytics/yolov5: YOLOv5