vue怎麼判斷元素是否在可視區域
三種方法:1、利用offsetTop和scrollTop獲取元素的位置,判斷是否小於等於viewPortHeight(檢視埠距離)即可。2、利用getBoundingClientRect()判斷,語法「元素物件.getBoundingClientRect()」。3、利用IntersectionObserver判斷,只需要檢查指定元素和可視區域是否重疊即可。

前端(vue)入門到精通課程,老師線上輔導:聯絡老師
Apipost = Postman + Swagger + Mock + Jmeter 超好用的API偵錯工具:
本教學操作環境:windows7系統、vue3版,DELL G3電腦。
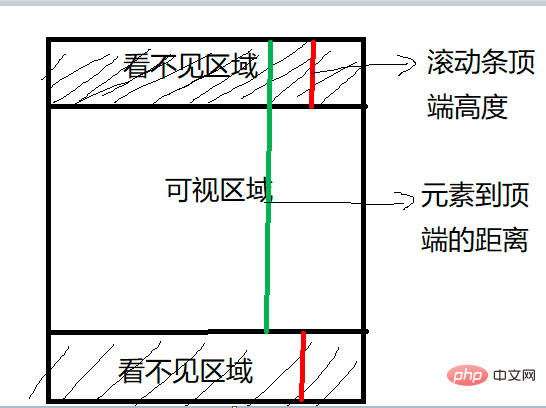
可視區域是什麼
可視區域即我們瀏覽網頁的裝置肉眼可見的區域,如下圖

在日常開發中,我們經常需要判斷目標元素是否在視窗之內或者和視窗的距離小於一個值(例如 100 px),從而實現一些常用的功能,例如:
- 圖片的懶載入
- 列表的無限捲動
- 計算廣告元素的曝光情況
- 可點選連結的預載入
判斷元素是否在可視區域的三種方式
判斷一個元素是否在可視區域,我們常用的有三種辦法:
offsetTop、scrollTop
getBoundingClientRect
Intersection Observer
方法1、offsetTop、scrollTop
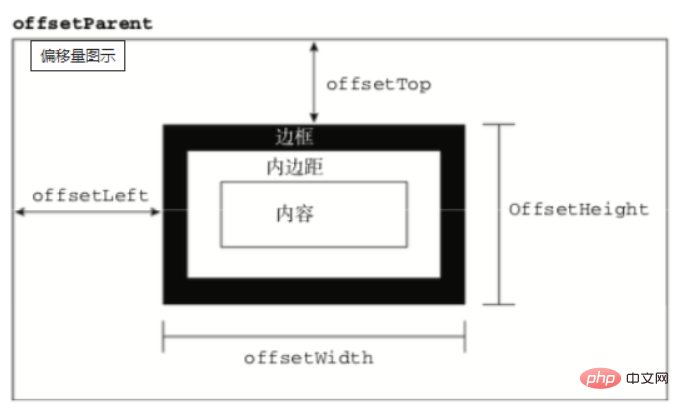
offsetTop,元素的上外邊框至包含元素的上內邊框之間的畫素距離,其他offset屬性如下圖所示:

下面再來了解下clientWidth、clientHeight:
clientWidth:元素內容區寬度加上左右內邊距寬度,即clientWidth = content + paddingclientHeight:元素內容區高度加上上下內邊距高度,即clientHeight = content + padding
這裡可以看到client元素都不包括外邊距
最後,關於scroll系列的屬性如下:
scrollWidth和scrollHeight主要用於確定元素內容的實際大小scrollLeft和scrollTop屬性既可以確定元素當前捲動的狀態,也可以設定元素的捲動位置- 垂直捲動
scrollTop > 0 - 水平捲動
scrollLeft > 0
- 垂直捲動
將元素的
scrollLeft和scrollTop設定為 0,可以重置元素的捲動位置
注意
- 上述屬性都是唯讀的,每次存取都要重新開始
下面再看看如何實現判斷:
公式如下:
el.offsetTop - document.documentElement.scrollTop <= viewPortHeight
登入後複製程式碼實現:
function isInViewPortOfOne (el) {
    // viewPortHeight 相容所有瀏覽器寫法
    const viewPortHeight = window.innerHeight || document.documentElement.clientHeight || document.body.clientHeight
    const offsetTop = el.offsetTop
    const scrollTop = document.documentElement.scrollTop
    const top = offsetTop - scrollTop
    return top <= viewPortHeight
}登入後複製
方法2:getBoundingClientRect
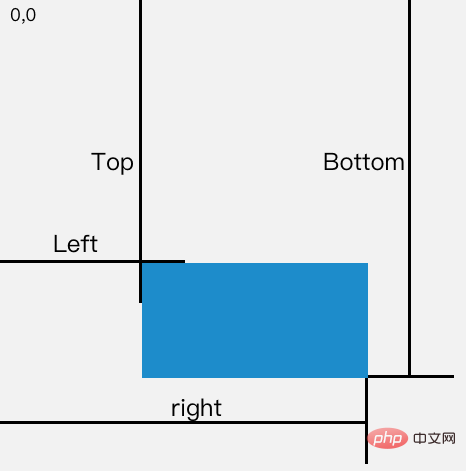
返回值是一個 DOMRect物件,擁有left, top, right, bottom, x, y, width, 和 height屬性。【學習視訊分享:、】
const target = document.querySelector('.target');
const clientRect = target.getBoundingClientRect();
console.log(clientRect);

// {
//   bottom: 556.21875,
//   height: 393.59375,
//   left: 333,
//   right: 1017,
//   top: 162.625,
//   width: 684
// }登入後複製
屬性對應的關係圖如下所示:

當頁面發生捲動的時候,top與left屬性值都會隨之改變
如果一個元素在視窗之內的話,那麼它一定滿足下面四個條件:
- top 大於等於 0
- left 大於等於 0
- bottom 小於等於視窗高度
- right 小於等於視窗寬度
實現程式碼如下:
function isInViewPort(element) {
  const viewWidth = window.innerWidth || document.documentElement.clientWidth;
  const viewHeight = window.innerHeight || document.documentElement.clientHeight;
  const {
    top,
    right,
    bottom,
    left,
  } = element.getBoundingClientRect();

  return (
    top >= 0 &&
    left >= 0 &&
    right <= viewWidth &&
    bottom <= viewHeight
  );
}登入後複製
方法3:Intersection Observer
Intersection Observer 即重疊觀察者,從這個命名就可以看出它用於判斷兩個元素是否重疊,因為不用進行事件的監聽,效能方面相比getBoundingClientRect會好很多
使用步驟主要分為兩步:建立觀察者和傳入被觀察者
建立觀察者
const options = {
  // 表示重疊面積佔被觀察者的比例,從 0 - 1 取值,
  // 1 表示完全被包含
  threshold: 1.0,
  root:document.querySelector('#scrollArea') // 必須是目標元素的父級元素
};

const callback = (entries, observer) => { ....}

const observer = new IntersectionObserver(callback, options);登入後複製通過new IntersectionObserver建立了觀察者 observer,傳入的引數 callback 在重疊比例超過 threshold 時會被執行`
關於callback回撥函數常用屬性如下:
// 上段程式碼中被省略的 callback
const callback = function(entries, observer) {
    entries.forEach(entry => {
        entry.time;               // 觸發的時間
        entry.rootBounds;         // 根元素的位置矩形,這種情況下為視窗位置
        entry.boundingClientRect; // 被觀察者的位置舉行
        entry.intersectionRect;   // 重疊區域的位置矩形
        entry.intersectionRatio;  // 重疊區域佔被觀察者面積的比例(被觀察者不是矩形時也按照矩形計算)
        entry.target;             // 被觀察者
    });
};登入後複製通過 observer.observe(target) 這一行程式碼即可簡單的註冊被觀察者
const target = document.querySelector('.target');
observer.observe(target);登入後複製
案例分析
實現:建立了一個十萬個節點的長列表,當節點滾入到視窗中時,背景就會從紅色變為黃色
Html結構如下:
<div class="container"></div>
登入後複製css樣式如下:
.container {
    display: flex;
    flex-wrap: wrap;
}
.target {
    margin: 5px;
    width: 20px;
    height: 20px;
    background: red;
}登入後複製往container插入1000個元素
const $container = $(".container");

// 插入 100000 個 <div class="target"></div>
function createTargets() {
  const htmlString = new Array(100000)
    .fill('<div class="target"></div>')
    .join("");
  $container.html(htmlString);
}登入後複製這裡,首先使用getBoundingClientRect方法進行判斷元素是否在可視區域
function isInViewPort(element) {
    const viewWidth = window.innerWidth || document.documentElement.clientWidth;
    const viewHeight =
          window.innerHeight || document.documentElement.clientHeight;
    const { top, right, bottom, left } = element.getBoundingClientRect();

    return top >= 0 && left >= 0 && right <= viewWidth && bottom <= viewHeight;
}登入後複製然後開始監聽scroll事件,判斷頁面上哪些元素在可視區域中,如果在可視區域中則將背景顏色設定為yellow
$(window).on("scroll", () => {
    console.log("scroll !");
    $targets.each((index, element) => {
        if (isInViewPort(element)) {
            $(element).css("background-color", "yellow");
        }
    });
});登入後複製通過上述方式,可以看到可視區域顏色會變成黃色了,但是可以明顯看到有卡頓的現象,原因在於我們繫結了scroll事件,scroll事件伴隨了大量的計算,會造成資源方面的浪費
下面通過Intersection Observer的形式同樣實現相同的功能
首先建立一個觀察者
const observer = new IntersectionObserver(getYellow, { threshold: 1.0 });登入後複製getYellow回撥函數實現對背景顏色改變,如下:
function getYellow(entries, observer) {
    entries.forEach(entry => {
        $(entry.target).css("background-color", "yellow");
    });
}登入後複製最後傳入觀察者,即.target元素
$targets.each((index, element) => {
    observer.observe(element);
});登入後複製以上就是vue怎麼判斷元素是否在可視區域的詳細內容,更多請關注TW511.COM其它相關文章!