手記系列之三 ----- 關於使用Nginx的一些使用方法和經驗
前言
本篇文章主要介紹的關於本人在使用Nginx的一些使用方法和經驗~
Nginx介紹
介紹
Nginx("engine x")是一款是由俄羅斯的程式設計師Igor Sysoev所開發高效能的 Web和 反向代理 伺服器,也是一個IMAP/POP3/SMTP 代理伺服器。 在高連線並行的情況下,Nginx是Apache伺服器不錯的替代品。
正向代理和反向代理
更詳細的理論知識可以看這篇文章: https://www.nginx.org.cn/article/detail/177
網上這塊的資料很多,個人理解核心,就是使用者去存取網際網路的服務就是正向代理,網際網路服務存取我們部署的服務就是反向代理。
負載均衡介紹
相關的使用教學可以看這篇文章:https://www.cnblogs.com/xuwujing/p/11953697.html
在介紹Nginx的負載均衡實現之前,先簡單的說下負載均衡的分類,主要分為硬體負載均衡和軟體負載均衡,硬體負載均衡是使用專門的軟體和硬體相結合的裝置,裝置商會提供完整成熟的解決方案,比如F5,在資料的穩定性以及安全性來說非常可靠,但是相比軟體而言造價會更加昂貴;軟體的負載均衡以Nginx這類軟體為主,實現的一種訊息佇列分發機制。
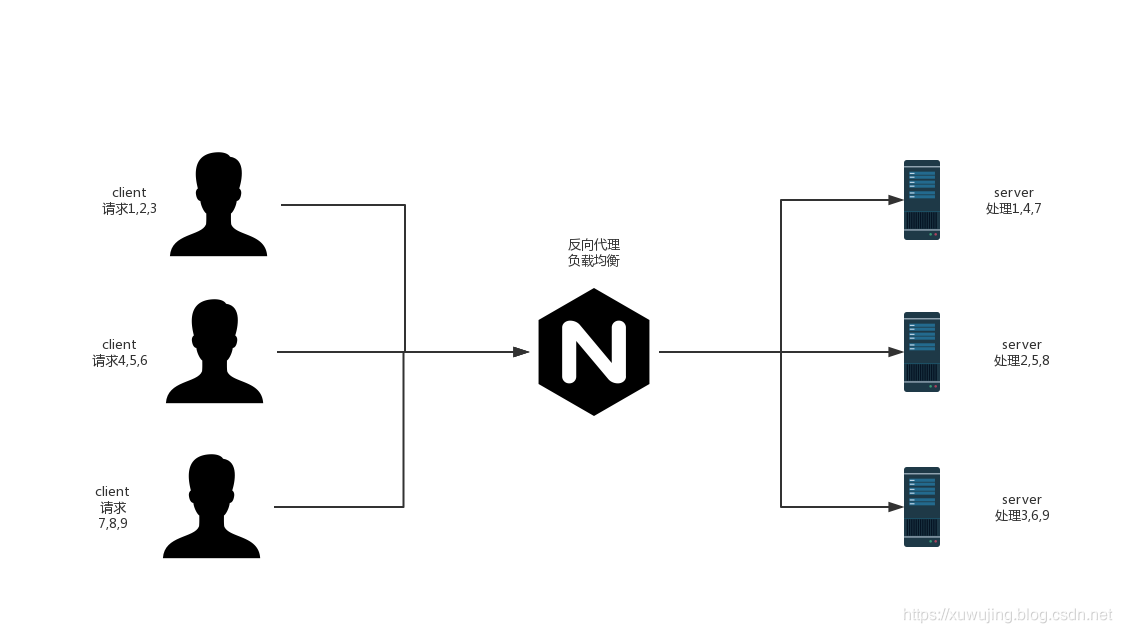
簡單來說所謂的負載均衡就是把很多請求進行分流,將他們分配到不同的伺服器去處理。比如我有3個伺服器,分別為A、B、C,然後使用Nginx進行負載均衡,使用輪詢策略,此時如果收到了9個請求,那麼會均勻的將這9個請求分發給A、B、Cf伺服器,每一個伺服器處理3個請求,這樣的話我們可以利用多臺機器叢集的特性減少單個伺服器的壓力。
Nginx實現負載均衡的範例圖:

Nginx相關使用
可以看這篇文章: https://www.cnblogs.com/xuwujing/p/11899890.html
使用Nginx+tomcat+redis做叢集
多個tomcat加上Nginx實現負載均衡,通過redis實現session共用。
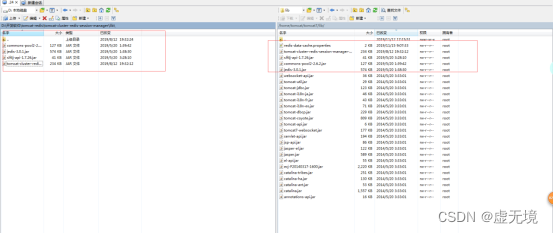
可以使用github上面的第三方的jar包來實現,少量的設定即可。
下載地址: https://github.com/ran-jit/tomcat-cluster-redis-session-manager


將下載lib包放到tomcat/lib 目錄下,組態檔修改的redis地址然後上傳到tomcat/conf目錄下即可。
Nginx設定:
#user  nobody;
worker_processes  10;

#error_log  logs/error.log;
#error_log  logs/error.log  notice;
#error_log  logs/error.log  info;

#pid        logs/nginx.pid;


events {
    worker_connections  1024;
}


error_log /var/log/nginx-error.log info;

http {
    include       mime.types;
    default_type  application/octet-stream;

    #log_format  main  '$remote_addr - $remote_user [$time_local] "$request" '
    #                  '$status $body_bytes_sent "$http_referer" '
    #                  '"$http_user_agent" "$http_x_forwarded_for"';

    #access_log  logs/access.log  main;

    sendfile        on;
    #tcp_nopush     on;

    #keepalive_timeout  0;
    keepalive_timeout  65;

    #gzip  on;

     upstream pancm{
       server 192.169.0.24:8085;
       server 192.169.0.24:8084;
    }

    server {
        listen      8083;
        server_name  192.169.0.24;

        #charset koi8-r;

        #access_log  logs/host.access.log  main;

        location / {
            root   html;
            proxy_pass http://pancm;
	     proxy_set_header Host  $host:8083;
              proxy_set_header X-Forwarded-Host $host:8083;
             proxy_set_header X-Forwarded-Server $host:8083;
             proxy_set_header X-Forwarded-For $proxy_add_x_forwarded_for;
            proxy_connect_timeout 3s;
            proxy_read_timeout 5s;
            proxy_send_timeout 3s;
	    index  index.html index.htm;
        }


	   #============對不同請求的處理=============
        location ~ \.(jsp|html|jspx|do|action)?$
        {
            #=============tomcat的資源位置============
      	   root   html;

           index index.jsp index.jspx index.do;
            #==========Nginx提供的代理============
            proxy_set_header Host  $host:8083;
            proxy_set_header X-Forwarded-Host $host:8083;
            proxy_set_header X-Forwarded-Server $host:8083;
            proxy_set_header X-Forwarded-For $proxy_add_x_forwarded_for;
            #=== 如果遇到.jsp .jspx .do .action 的請求就進入該伺服器(tomcat)===
            proxy_pass http://pancm;
        }

        #error_page  404              /404.html;

        # redirect server error pages to the static page /50x.html
        #
        error_page   500 502 503 504  /50x.html;
        location = /50x.html {
            root   html;
        }

        # proxy the PHP scripts to Apache listening on 127.0.0.1:80
        #
        #location ~ \.php$ {
        #    proxy_pass   http://127.0.0.1;
        #}

        # pass the PHP scripts to FastCGI server listening on 127.0.0.1:9000
        #
        #location ~ \.php$ {
        #    root           html;
        #    fastcgi_pass   127.0.0.1:9000;
        #    fastcgi_index  index.php;
        #    fastcgi_param  SCRIPT_FILENAME  /scripts$fastcgi_script_name;
        #    include        fastcgi_params;
        #}

        # deny access to .htaccess files, if Apache's document root
        # concurs with nginx's one
        #
        #location ~ /\.ht {
        #    deny  all;
        #}
    }


    # another virtual host using mix of IP-, name-, and port-based configuration
    #
    #server {
    #    listen       8000;
    #    listen       somename:8080;
    #    server_name  somename  alias  another.alias;

    #    location / {
    #        root   html;
    #        index  index.html index.htm;
    #    }
    #}


    # HTTPS server
    #
    #server {
    #    listen       443 ssl;
    #    server_name  localhost;

    #    ssl_certificate      cert.pem;
    #    ssl_certificate_key  cert.key;

    #    ssl_session_cache    shared:SSL:1m;
    #    ssl_session_timeout  5m;

    #    ssl_ciphers  HIGH:!aNULL:!MD5;
    #    ssl_prefer_server_ciphers  on;

    #    location / {
    #        root   html;
    #        index  index.html index.htm;
    #    }
    #}

}
啟動nginx的命令為:
/usr/local/nginx/sbin/nginx -t //測試nginx.conf的設定是否正確
/usr/local/nginx/sbin/nginx -c /usr/local/nginx/conf/nginx.conf //根據nginx.conf裡的設定,啟動nginx服務
熱載入
/usr/local/nginx/sbin/nginx -s reload

Nginx作為檔案伺服器
可以參考這篇文章:
https://www.cnblogs.com/xuwujing/p/12811365.html
Nginx獲取真實使用者IP設定
核心設定:
	set_real_ip_from 0.0.0.0/0;
    real_ip_header  X-Forwarded-For;
    real_ip_recursive on;
完整設定(僅做參考):
http {
    log_format  main  '$remote_addr - $remote_user [$time_local] "$request" '
                      '$status $body_bytes_sent "$http_referer" '
                      '"$http_user_agent" "$http_x_forwarded_for"';
    log_format weblog '$msec | $time_local | $host | $status | $bytes_sent | $remote_addr | $upstream_addr | $request | $request_time | $upstream_response_time | $request_length | $http_referer | $http_user_agent';

    # 注意,這裡我使用的紀錄檔格式為我自定義的weblog紀錄檔格式,其中會輸出$remote_addr 遠端使用者端地址。
    access_log  /var/log/nginx/access.log  weblog;

    # 下面三行為重點,新增後就可以獲取到使用者端真實IP
    set_real_ip_from 0.0.0.0/0;
    real_ip_header  X-Forwarded-For;
    real_ip_recursive on;

    # 下面三行為常見反向代理傳遞真實使用者端IP的設定,設定在http{}中,則全域性應用在下面的所有server中
    proxy_set_header Host      $host;
    proxy_set_header X-Real-IP $remote_addr;
    proxy_set_header X-Forwarded-For $proxy_add_x_forwarded_for;

    include             /etc/nginx/mime.types;
    default_type        application/octet-stream;

    # Load modular configuration files from the /etc/nginx/conf.d directory.
    # See http://nginx.org/en/docs/ngx_core_module.html#include
    # for more information.
    include /etc/nginx/conf.d/*.conf;

}
Nginx限速控制
限制連線數:
語法: limit_conn_zone key zone=name:size;
詳細說明:https://nginx.org/en/docs/http/ngx_http_limit_conn_module.html
例如:
http  {
    limit_conn_zone $binary_remote_addr zone=perip:10m;
    limit_conn_zone $server_name zone=perserver:10m;
    ...
    server  {
        ...
        # 限制每個IP能夠最多建立10個連線
        limit_conn perip 10;
        # 限制每個網站最多接受100個連線
        limit_conn perserver 100;
    }
}
限制請求速度:
語法:limit_req_zone key zone=name:size rate=rate [sync];
詳細說明: https://nginx.org/en/docs/http/ngx_http_limit_req_module.html
限制請求速度可用於防止DDoS攻擊,或防止上游伺服器同時被太多請求淹沒。
例如:
http  {
    limit_req_zone $binary_remote_addr zone=perip:10m rate=2r/s;
    limit_req_zone $binary_remote_addr zone=one:10m rate=1r/s;
    limit_req_zone $server_name zone=perserver:10m rate=10r/s;
    ...
    server {
        ...
        # 限制每個IP每秒不超過2個請求,突發不超過5個請求。
        limit_req zone=perip burst=5 nodelay;
        # 限制每個網站每秒不超過10個請求,突發不超過10個請求。
        limit_req zone=perserver burst=10;
        location /search/ {
            # 限制每個IP每秒不超過1個請求。
            limit_req zone=one;
        }
    }
}
限制頻寬:
語法:limit_rate rate;
單位為:byte/s
詳細說明: https://nginx.org/en/docs/http/ngx_http_core_module.html
該設定主要用於限制單個請求的下載速度,以為一個使用者端可以建立多個請求,所以一般需要結合限制連線數使用,防止因為個別使用者端而耗盡伺服器頻寬。
http {
    limit_conn_zone $binary_remote_address zone=perip:10m
    ...
    server {
        ...
        location /download/ {
            # 限制每個IP只能建立一個連線
            limit_conn perip 1;
            # 當請求的流量超500KB後進行限速
            limit_rate_after 500k;
            # 限速 50KB/s
            limit_rate 50k;
        }
    }
}
完整設定:
http  {
    # 限速IP白名單
    geo $limit {
        default 1;
        10.0.0.0/8 0;
        192.168.0.0/24 0;
        172.20.0.35 0;
    }

    # 白名單不限速,非白名單按照使用者端IP限速
    map $limit $limit_key {
        0 "";
        1 $binary_remote_addr;
    }

    limit_conn_zone $server_name zone=perserver:10m;
    limit_req_zone $server_name zone=perserverreq:10m rate=10r/s;
    limit_conn_zone $limit_key zone=perip:10m;
    limit_req_zone $limit_key zone=two:10m rate=2r/s;
    limit_req_zone $limit_key zone=one:10m rate=1r/s;
    ...
    server  {
        ...
        # 限制每個網站每秒不超過10個請求,突發不超過10個請求。
        limit_req zone=perserverreq burst=10;
        # 限制每個網站最多接受100個請求
        limit_conn perserver 100;
        # 限制每個IP能夠最多建立10個請求
        limit_conn perip 10;
        # 限制每個IP每秒不超過1個請求,突發不超過3個請求。
        limit_req zone=one burst=3 nodelay;

        location /search/ {
            # 限制每個IP每秒不超過1個請求。
            limit_req zone=one;
        }

        location /download/ {
            # 限制每個IP只能建立一個連線
            limit_conn perip 1;
            # 當請求的流量超500KB後進行限速
            limit_rate_after 500k;
            # 限速 50KB/s
            limit_rate 50k;
        }
    }
}
備註:
需要注意的是使用者端IP使用 $binary_remote_addr 變數,而不是 \(remote_addr。
\)remote_addr 是一個文字型變數,長度為7至15個位元組之間。
$binary_remote_addr 是二進位制的IP表達形式,對於IPv4地址,變數的大小始終為4個位元組,對於IPv6地址,變數的大小始終為16個位元組。
儲存狀態在32位元平臺上總是佔用32或64位元組,在64位元平臺上佔用64位元組。 1M的記憶體空間可以保留大約32000個32位元組狀態或16000個64位元位元組。例子中的10M的話換算下來可以保留16萬個IP地址資訊。當超出請求是伺服器將返回錯誤。
Nginx監聽多埠以及Https
多埠,就是兩端server
https則需要設定證書
  server {
   #     listen       8181;
      #  server_name  192.168.0.1

        #charset koi8-r;

        #access_log  logs/host.access.log  main;

     #   rewrite ^(.*)$ https://$host$1 permanent;
    }


    # HTTPS server
    #
    server {
        listen       8080 ssl;
        server_name   192.168.0.1 ;


        ssl_certificate      /usr/local/nginx/cert/xxx.crt;
        ssl_certificate_key  /usr/local/nginx/cert/xxx.key;

        ssl_session_cache    shared:SSL:1m;
        ssl_session_timeout  30m;

        #ssl_ciphers  HIGH:!aNULL:!MD5;
        ssl_ciphers ECDHE-RSA-AES128-GCM-SHA256:ECDHE:ECDH:AES:HIGH:!NULL:!aNULL:!MD5:!ADH:!RC4;
        ssl_protocols TLSv1 TLSv1.1 TLSv1.2;
        ssl_prefer_server_ciphers  on;

        location / {
            root   /home/release/dist;
            index  index.html index.htm;
        }

        location ^~ /api/ {
            proxy_pass http://127.0.0.1:9999;
            proxy_cookie_path / /;
            proxy_pass_header Set-Cookie;
            proxy_set_header Host zans;
        }


		 proxy_set_header Host $host;
		proxy_set_header X-Real-IP $remote_addr;
		proxy_set_header X-Forwarded-For $proxy_add_x_forwarded_for;

    }


	 # HTTPS server
    #
    server {
		listen       443 ssl;
		server_name  xxx.com ;
        ssl_certificate      /usr/local/nginx/cert/xxx.crt;
        ssl_certificate_key  /usr/local/nginx/cert/xxx.key;

        ssl_session_cache    shared:SSL:1m;
        ssl_session_timeout  30m;

        #ssl_ciphers  HIGH:!aNULL:!MD5;
        ssl_ciphers ECDHE-RSA-AES128-GCM-SHA256:ECDHE:ECDH:AES:HIGH:!NULL:!aNULL:!MD5:!ADH:!RC4;
        ssl_protocols TLSv1 TLSv1.1 TLSv1.2;
        ssl_prefer_server_ciphers  on;

		location / {
            root   /home/release/app;
            index  index.html index.htm;
        }

		 location ^~ /api {
            proxy_pass http://127.0.0.1:6666;
            proxy_cookie_path / /;
            proxy_pass_header Set-Cookie;
            proxy_set_header Host zans;
        }

		 proxy_set_header Host $host;
		proxy_set_header X-Real-IP $remote_addr;
		proxy_set_header X-Forwarded-For $proxy_add_x_forwarded_for;

    }
錯誤處理
1,Nginx: error while loading shared libraries: libpcre.so.1
則說明未安裝pcre或安裝了未設定軟鏈,安裝或者設定器軟鏈即可
ln -s /usr/local/lib/libpcre.so.1 /lib64/
2,實現負載均衡之後,頁面無法跳轉
原因: nginx 預設的埠是80,更改監聽的埠之後,也需要更改一下。
也會出現這種錯誤:net::ERR_NAME_NOT_RESOLVED
解決辦法:
在location 下添加proxy_set_header Host $host:port 這個設定,port 和listen 的埠保持一致, 不然是無法跳轉的。
3,使用檔案伺服器的一些問題
-
nginx需要設定傳輸的大小;
-
存取若出現了403許可權問題,一般情況下是上傳的圖片用root建立的,但nginx存取使用nginx使用者存取的,所以在linux系統出現了問題。
解決辦法一:nginx使用root使用者啟動,在nginx的設定改成 use root;
解決辦法二:全域性設定資料夾的許可權,並且使nginx擁有讀取的許可權; -
nginx限速問題,如果寬頻不高,可以對大圖片檔案進行限速。
其他
之前寫的nginx相關文章:
https://www.cnblogs.com/xuwujing/tag/nginx/
一首很帶感的動漫鋼琴曲~
原創不易,如果感覺不錯,希望給個推薦!您的支援是我寫作的最大動力!
版權宣告:
作者:虛無境
部落格園出處:http://www.cnblogs.com/xuwujing
CSDN出處:http://blog.csdn.net/qazwsxpcm
個人部落格出處:https://xuwujing.github.io/