淺析Nodejs中的http模組和匯出共用

node.js極速入門課程:進入學習
一、http 模組
http 模組是 Node.js 官方提供的、用來建立 web 伺服器的模組。【相關教學推薦:】
通過 http 模組提供的 http.createServer() 方法,就能方便的把一臺普通的電腦,變成一臺 web 伺服器,從而對外提供 web 資源服務。
1、建立 web 伺服器
- 匯入 http 模組
- 建立 web 伺服器範例
- 為伺服器範例繫結 request 事件,監聽使用者端的請求
- 啟動伺服器
範例:監聽 8080 服務
// 匯入 http 模組
const http = require('http')
// 建立 web 伺服器範例
const server = http.createServer()
// 為伺服器範例繫結 request 事件 監聽使用者端的請求
server.on('request', function (req, res) {
    console.log('請求中...')
})
// 啟動服務
server.listen(8080, function () {
    console.log('http://127.0.0.1:8080')
})登入後複製
2、req 請求物件
只要伺服器接收到了使用者端的請求,就會呼叫通過 server.on() 為伺服器繫結的 request 事件處理常式
範例:在事件處理常式中,存取與使用者端相關的資料或屬性
// 匯入 http 模組
const http = require('http')
// 建立 web 伺服器範例
const server = http.createServer()
// req 是請求物件 包含了與使用者端相關的資料和屬性
server.on('request', (req) => {
    // req.url 使用者端請求的 url 地址
    const url = req.url
    // req.method 是使用者端請求的 method 型別
    const method = req.method
    const str = `Your request url is ${url} and request method is ${method}`
    console.log(str)
})
// 啟動服務
server.listen(8080, function () {
    console.log('http://127.0.0.1:8080')
})登入後複製
3、res 響應物件
在伺服器的 request 事件處理常式中,如果想存取與伺服器相關的資料或屬性,需要使用 response
範例:請求響應
// 匯入 http 模組
const http = require('http')
// 建立 web 伺服器範例
const server = http.createServer()
// req 是請求物件 包含了與使用者端相關的資料和屬性
server.on('request', (req, res) => {
    // req.url 使用者端請求的 url 地址
    const url = req.url
    // req.method 是使用者端請求的 method 型別
    const method = req.method
    const str = `Your request url is ${url} and request method is ${method}`
    console.log(str)
    // 呼叫 res.end() 方法 向用戶端響應一些內容
    res.end(str)
})
// 啟動服務
server.listen(8080, function () {
    console.log('http://127.0.0.1:8080')
})登入後複製

4、解決中文亂碼問題
當呼叫 res.end() 方法,向用戶端傳送中文內容時,會出現亂碼問題,需要手動設定內容的編碼格式
範例:解決中文亂碼
// 匯入 http 模組
const http = require('http')
// 建立 web 伺服器範例
const server = http.createServer()
// req 是請求物件 包含了與使用者端相關的資料和屬性
server.on('request', (req, res) => {
    // req.url 使用者端請求的 url 地址
    const url = req.url
    // req.method 是使用者端請求的 method 型別
    const method = req.method
    const str = `請求地址是 ${url} 請求方法是 ${method}`
    console.log(str)
    // 設定 Content-Type 響應頭 解決中文亂碼問題
    res.setHeader('Content-Type', 'text/html; charset=utf-8')
    // 呼叫 res.end() 方法 向用戶端響應一些內容
    res.end(str)
})
// 啟動服務
server.listen(8080, function () {
    console.log('http://127.0.0.1:8080')
})登入後複製

5、根據不同的 url 響應不同的 html 內容
範例:步驟如下
- 獲取請求的 url 地址
- 設定預設的響應內容為 404 Not found
- 判斷使用者請求的是否為 / 或 /index.html 首頁
- 判斷使用者請求的是否為 /about.html 關於頁面
- 設定 Content-Type 響應頭,防止中文亂碼
- 使用 res.end() 把內容響應給使用者端
// 匯入 http 模組
const http = require('http')
// 建立 web 伺服器範例
const server = http.createServer()
// req 是請求物件 包含了與使用者端相關的資料和屬性
server.on('request', (req, res) => {
    // req.url 使用者端請求的 url 地址
    const url = req.url
    // 設定預設的內容為 404 Not Found
    let content = '<h1>404 Not Found!</h1>'
    // 使用者請求頁是首頁
    if(url === '/' || url === '/index.html') {
        content = '<h1>首頁</h1>'
    } else if (url === '/about.html') {
        content = '<h1>關於頁面</h1>'
    }
    // 設定 Content-Type 響應頭 防止中文亂碼
    res.setHeader('Content-Type', 'text/html; charset=utf-8')
    // 呼叫 res.end() 方法 向用戶端響應一些內容
    res.end(content)
})
// 啟動服務
server.listen(8080, function () {
    console.log('http://127.0.0.1:8080')
})登入後複製


二、Node.js 中的模組分類
1、三大模組分類
- 內建模組:由 node.js 官方提供的,如 fs、path、http 等
- 自定義模組:使用者建立的每個 .js 檔案,都是自定義模組
- 第三方模組:由第三方開發出來的模組,使用前要先下載
2、模組作用域
防止了全域性變數汙染的問題
範例:
index.js 檔案
const username = '張三'

function say() {
    console.log(username);
}登入後複製
test.js 檔案
const custom = require('./index')

console.log(custom)登入後複製
3、module.exports 物件
在自定義模組中,可以使用 module.exports 物件,將模組內的成員共用出去,供外界使用。
外界 require() 方法匯入自定義模組時,得到的就是 module.exports 所指向的物件
範例:
index.js 檔案
const blog = '前端雜貨鋪'

// 向 module.exports 物件上掛載屬性
module.exports.username = '李四'
// 向 module.exports 物件上掛載方法
module.exports.sayHello = function () {
    console.log('Hello!')
}
module.exports.blog = blog登入後複製
test.js 檔案
const m = require('./index')

console.log(m)登入後複製
4、共用成員時的注意點
使用 require() 方法匯入模組時,匯入的結果,永遠以 module.exports 指向的物件為準
範例:
index.js 檔案
module.exports.username = '李四'

module.exports.sayHello = function () {
    console.log('Hello!')
}

// 讓 module.exports 指向一個新物件
module.exports = {
    nickname: '張三',
    sayHi() {
        console.log('Hi!')
    }
}登入後複製
test.js 檔案
const m = require('./index')

console.log(m)登入後複製
5、exports 和 module.exports
預設情況下,exports 和 module.exports 指向同一個物件。
最終共用的結果,還是以 module.exports 指向的物件為準。
範例:
index1.js 檔案
exports.username = '雜貨鋪'

module.exports = {
    name: '前端雜貨鋪',
    age: 21
}登入後複製
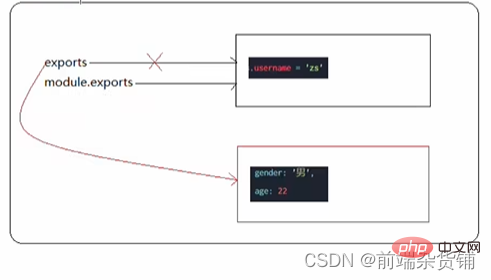
index2.js 檔案
module.exports.username = 'zs'

exports = {
    gender: '男',
    age: 22
}登入後複製
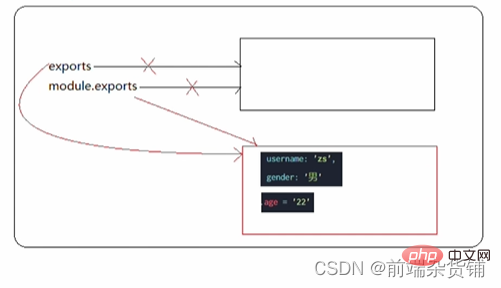
index3.js 檔案
exports.username = '雜貨鋪'
module.exports.age = 21
登入後複製
index4.js 檔案
exports = {
    gender: '男',
    age: 21
}

module.exports = exports

module.exports.username = 'zs'登入後複製
對 index2.js 檔案結果的解析如下:

對 index4.js 檔案結果的解析如下:
注意:為防止混亂,儘量不要在同一個模組中同時使用 exports 和 module.exports
更多node相關知識,請存取:!
以上就是淺析Nodejs中的http模組和匯出共用的詳細內容,更多請關注TW511.COM其它相關文章!
