Xmake v2.7.3 釋出,包元件和 C++ 模組增量構建支援
Xmake 是一個基於 Lua 的輕量級跨平臺構建工具。
它非常的輕量,沒有任何依賴,因為它內建了 Lua 執行時。
它使用 xmake.lua 維護專案構建,相比 makefile/CMakeLists.txt,設定語法更加簡潔直觀,對新手非常友好,短時間內就能快速入門,能夠讓使用者把更多的精力集中在實際的專案開發上。
我們能夠使用它像 Make/Ninja 那樣可以直接編譯專案,也可以像 CMake/Meson 那樣生成工程檔案,另外它還有內建的包管理系統來幫助使用者解決 C/C++ 依賴庫的整合使用問題。
目前,Xmake 主要用於 C/C++ 專案的構建,但是同時也支援其他 native 語言的構建,可以實現跟 C/C++ 進行混合編譯,同時編譯速度也是非常的快,可以跟 Ninja 持平。
Xmake = Build backend + Project Generator + Package Manager + [Remote|Distributed] Build + Cache
儘管不是很準確,但我們還是可以把 Xmake 按下面的方式來理解:
Xmake ~= Make/Ninja + CMake/Meson + Vcpkg/Conan + distcc + ccache/sccache

新特性介紹
包元件支援
背景簡介
這個新特性主要用於實現從一個 C/C++ 包中整合特定的子庫,一般用於一些比較大的包中的庫元件整合。
因為這種包裡面提供了很多的子庫,但不是每個子庫使用者都需要,全部連結反而有可能會出問題。
儘管,之前的版本也能夠支援子庫選擇的特性,例如:
add_requires("sfml~foo", {configs = {graphics = true, window = true}})
add_requires("sfml~bar", {configs = {network = true}})

target("foo")
    set_kind("binary")
    add_packages("sfml~foo")

target("bar")
    set_kind("binary")
    add_packages("sfml~bar")
這是通過每個包的自定義設定來實現的,但這種方式會存在一些問題:
sfml~foo和sfml~bar會作為兩個獨立的包,重複安裝,佔用雙倍的磁碟空間- 也會重複編譯一些共用程式碼,影響安裝效率
- 如果一個目標同時依賴了
sfml~foo和sfml~bar,會存在連結衝突
如果是對於 boost 這種超大包的整合,重複編譯和磁碟佔用的影響會非常大,如果在子庫組合非常多的情況下,甚至會導致超過 N 倍的磁碟佔用。
為了解決這個問題,Xmake 新增了包元件模式,它提供了以下一些好處:
- 僅僅一次編譯安裝,任意多個元件快速整合,極大提升安裝效率,減少磁碟佔用
- 元件抽象化,跨編譯器和平臺,使用者不需要關心如何設定每個子庫之間連結順序依賴
- 使用更加方便
更多背景詳情見:#2636
使用包元件
對於使用者,使用包元件是非常方便的,因為使用者是不需要維護包的,只要使用的包,它設定了相關的元件集,我們就可以快速整合和使用它,例如:
add_requires("sfml")

target("foo")
    set_kind("binary")
    add_packages("sfml", {components = "graphics"})

target("bar")
    set_kind("binary")
    add_packages("sfml", {components = "network"})
檢視包元件
那麼,如何知道指定的包提供了哪些元件呢?我們可以通過執行下面的命令檢視:
$ xrepo info sfml
The package info of project:
    require(sfml):
      -> description: Simple and Fast Multimedia Library
      -> version: 2.5.1
      ...
      -> components:
         -> system:
         -> graphics: system, window
         -> window: system
         -> audio: system
         -> network: system
包元件設定
如果你是包的維護者,想要將一個包增加元件支援,那麼需要通過下面兩個介面來完成包元件的設定:
- add_components: 新增包元件列表
- on_component: 設定每個包元件
包元件的連結設定
大多數情況下,包元件只需要設定它自己的一些子連結資訊,例如:
package("sfml")
    add_components("graphics")
    add_components("audio", "network", "window")
    add_components("system")

    on_component("graphics", function (package, component)
        local e = package:config("shared") and "" or "-s"
        component:add("links", "sfml-graphics" .. e)
        if package:is_plat("windows", "mingw") and not package:config("shared") then
            component:add("links", "freetype")
            component:add("syslinks", "opengl32", "gdi32", "user32", "advapi32")
        end
    end)

    on_component("window", function (package, component)
        local e = package:config("shared") and "" or "-s"
        component:add("links", "sfml-window" .. e)
        if package:is_plat("windows", "mingw") and not package:config("shared") then
            component:add("syslinks", "opengl32", "gdi32", "user32", "advapi32")
        end
    end)

    ...
上面是一個不完整的包設定,我僅僅摘取一部分跟包元件相關的設定。
一個關於包元件的設定和使用的完整例子見:components example
設定元件的編譯資訊
我們不僅可以設定每個元件的連結資訊,還有 includedirs, defines 等等編譯資訊,我們也可以對每個元件單獨設定。
package("sfml")
    on_component("graphics", function (package, component)
        package:add("defines", "TEST")
    end)
設定元件依賴
package("sfml")
    add_components("graphics")
    add_components("audio", "network", "window")
    add_components("system")

    on_component("graphics", function (package, component)
          component:add("deps", "window", "system")
    end)
上面的設定,告訴包,我們的 graphics 元件還會額外依賴 window 和 system 兩個元件。
因此,在使用者端,我們對 graphics 的元件使用,可以從
add_packages("sfml", {components = {"graphics", "window", "system"})
簡化為:
add_packages("sfml", {components = "graphics")
因為,只要我們開啟了 graphics 元件,它也會自動啟用依賴的 window 和 system 元件,並且自動保證連結順序正確。
另外,我們也可以通過 add_components("graphics", {deps = {"window", "system"}}) 來設定元件依賴關係。
從系統庫中查詢元件
我們知道,在包設定中,設定 add_extsources 可以改進包在系統中的查詢,比如從 apt/pacman 等系統包管理器中找庫。
當然,我們也可以讓每個元件也能通過 extsources 設定,去優先從系統庫中找到它們。
例如,sfml 包,它在 homebrew 中其實也是元件化的,我們完全可以讓包從系統庫中,找到對應的每個元件,而不需要每次原始碼安裝它們。
$ ls -l /usr/local/opt/sfml/lib/pkgconfig
-r--r--r--  1 ruki  admin  317 10 19 17:52 sfml-all.pc
-r--r--r--  1 ruki  admin  534 10 19 17:52 sfml-audio.pc
-r--r--r--  1 ruki  admin  609 10 19 17:52 sfml-graphics.pc
-r--r--r--  1 ruki  admin  327 10 19 17:52 sfml-network.pc
-r--r--r--  1 ruki  admin  302 10 19 17:52 sfml-system.pc
-r--r--r--  1 ruki  admin  562 10 19 17:52 sfml-window.pc
我們只需要,對每個元件設定它的 extsources:
    if is_plat("macosx") then
        add_extsources("brew::sfml/sfml-all")
    end

    on_component("graphics", function (package, component)
        -- ...
        component:add("extsources", "brew::sfml/sfml-graphics")
    end)
預設的全域性元件設定
除了通過指定元件名的方式,設定特定元件,如果我們沒有指定元件名,預設就是全域性設定所有元件。
package("sfml")
    on_component(function (package, component)
        -- configure all components
    end)
當然,我們也可以通過下面的方式,指定設定 graphics 元件,剩下的元件通過預設的全域性設定介面進行設定:
package("sfml")
    add_components("graphics")
    add_components("audio", "network", "window")
    add_components("system")

    on_component("graphics", function (package, component)
        -- configure graphics
    end)

    on_component(function (package, component)
        -- component audio, network, window, system
    end)
C++ 模組構建改進
增量構建支援
原本以為 Xmake 對 C++ 模組已經支援的比較完善了,後來才發現,它的增量編譯還無法正常工作。
因此,這個版本 Xmake 對 C++ 模組的增量編譯也做了很好的支援,儘管支援過程還是花了很多精力的。
我分析了下,各家的編譯器對生成帶模組的 include 依賴資訊格式(*.d),差異還是非常大的。
gcc 的格式最複雜,不過我還是將它支援上了。
build/.objs/dependence/linux/x86_64/release/src/foo.mpp.o: src/foo.mpp\
build/.objs/dependence/linux/x86_64/release/src/foo.mpp.o  gcm.cache/foo.gcm: bar.c++m cat.c++m\
foo.c++m: gcm.cache/foo.gcm\
.PHONY: foo.c++m\
gcm.cache/foo.gcm:|  build/.objs/dependence/linux/x86_64/release/src/foo.mpp.o\
CXX_IMPORTS += bar.c++m cat.c++m\
clang 的格式相容性最好,沒有做任何特殊改動就支援了。
build//hello.pcm: /usr/lib/llvm-15/lib/clang/15.0.2/include/module.modulemap src/hello.mpp\
msvc 的格式擴充套件性比較好,解析和支援起來比較方便:
{
    "Version": "1.2",
    "Data": {
        "Source": "c:\users\ruki\desktop\user_headerunit\src\main.cpp",
        "ProvidedModule": "",
        "Includes": [],
        "ImportedModules": [
            {
                "Name": "hello",
                "BMI": "c:\users\ruki\desktop\user_headerunit\src\hello.ifc"
            }
        ],
        "ImportedHeaderUnits": [
            {
                "Header": "c:\users\ruki\desktop\user_headerunit\src\header.hpp",
                "BMI": "c:\users\ruki\desktop\user_headerunit\src\header.hpp.ifc"
            }
        ]
    }
}
迴圈依賴檢測支援
由於模組之間是存在依賴關係的,因此如果有幾個模組之間存在迴圈依賴參照,那麼是無法編譯通過的。
但是之前的版本中,Xmake 無法檢測到這種情況,遇到迴圈依賴,編譯就會卡死,沒有任何提示資訊,這對使用者非常不友好。
而新版本中,我們對這種情況做了改進,增加了模組的迴圈依賴檢測,編譯時候會出現以下錯誤提示,方便使用者定位問題:
$ xmake
[  0%]: generating.cxx.module.deps Foo.mpp
[  0%]: generating.cxx.module.deps Foo2.mpp
[  0%]: generating.cxx.module.deps Foo3.mpp
[  0%]: generating.cxx.module.deps main.cpp
error: circular modules dependency(Foo2, Foo, Foo3, Foo2) detected!
  -> module(Foo2) in Foo2.mpp
  -> module(Foo) in Foo.mpp
  -> module(Foo3) in Foo3.mpp
  -> module(Foo2) in Foo2.mpp
更加 LSP 友好的語法格式
我們預設約定的域設定語法,儘管非常簡潔,但是對自動格式化縮排和 IDE 不是很友好,如果你格式化設定,縮排就完全錯位了。
target("foo")
    set_kind("binary")
    add_files("src/*.cpp")
另外,如果兩個 target 之間設定了一些全域性的設定,那麼它不能自動結束當前 target 作用域,使用者需要顯式呼叫 target_end()。
target("foo")
    set_kind("binary")
    add_files("src/*.cpp")
target_end()

add_defines("ROOT")

target("bar")
    set_kind("binary")
    add_files("src/*.cpp")
雖然,上面我們提到,可以使用 do end 模式來解決自動縮排問題,但是需要 target_end() 的問題還是存在。
target("foo") do
    set_kind("binary")
    add_files("src/*.cpp")
end
target_end()

add_defines("ROOT")

target("bar") do
    set_kind("binary")
    add_files("src/*.cpp")
end
因此,在新版本中,我們提供了一種更好的可選域設定語法,來解決自動縮排,target 域隔離問題,例如:
target("foo", function ()
    set_kind("binary")
    add_files("src/*.cpp")
end)

add_defines("ROOT")

target("bar", function ()
    set_kind("binary")
    add_files("src/*.cpp")
end)
foo 和 bar 兩個域是完全隔離的,我們即使在它們中間設定其他設定,也不會影響它們,另外,它還對 LSP 非常友好,即使一鍵格式化,也不會導致縮排混亂。
注:這僅僅只是一隻可選的擴充套件語法,現有的設定語法還是完全支援的,使用者可以根據自己的需求喜好,來選擇合適的設定語法。
為特定編譯器新增 flags
使用 add_cflags, add_cxxflags 等介面設定的值,通常都是跟編譯器相關的,儘管 Xmake 也提供了自動檢測和對映機制,
即使設定了當前編譯器不支援的 flags,Xmake 也能夠自動忽略它,但是還是會有警告提示。
新版本中,我們改進了所有 flags 新增介面,可以僅僅對特定編譯器指定 flags,來避免額外的警告,例如:
add_cxxflags("clang::-stdlib=libc++")
add_cxxflags("gcc::-stdlib=libc++")
或者:
add_cxxflags("-stdlib=libc++", {tools = "clang"})
add_cxxflags("-stdlib=libc++", {tools = "gcc"})
注:不僅僅是編譯flags,對 add_ldflags 等連結 flags,也是同樣生效的。
renderdoc 偵錯程式支援
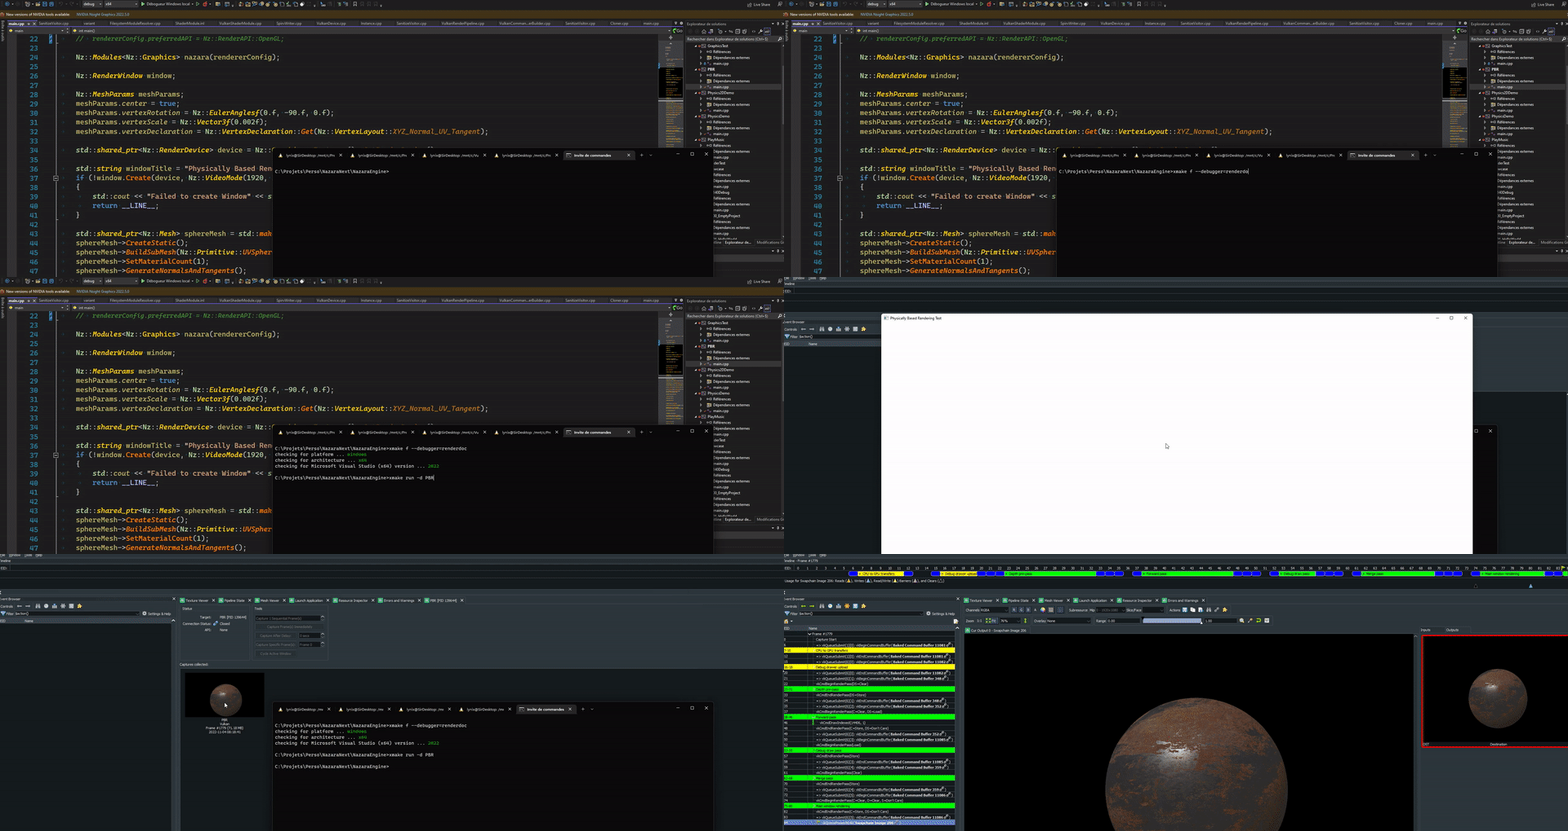
感謝 @SirLynix 貢獻了這個很棒的特性,它可以讓 Xmake 直接載入 renderdoc 去偵錯一些圖形渲染程式。
使用非常簡單,我們先確保安裝了 renderdoc,然後設定偵錯程式為 renderdoc,載入偵錯執行:
$ xmake f --debugger=renderdoc
$ xmake run -d
具體使用效果如下:

新增 C++ 異常介面設定
Xmake 新增了一個 set_exceptions 抽象化設定介面,我們可以通過這個設定,設定啟用和禁用 C++/Objc 的異常。
通常,如果我們通過 add_cxxflags 介面去設定它們,需要根據不同的平臺,編譯器分別處理它們,非常繁瑣。
例如:
on_config(function (target)
    if (target:has_tool("cxx", "cl")) then
        target:add("cxflags", "/EHsc", {force = true})
        target:add("defines", "_HAS_EXCEPTIONS=1", {force = true})
    elseif(target:has_tool("cxx", "clang") or target:has_tool("cxx", "clang-cl")) then
        target:add("cxflags", "-fexceptions", {force = true})
        target:add("cxflags", "-fcxx-exceptions", {force = true})
    end
end)
而通過這個介面,我們就可以抽象化成編譯器無關的方式去設定它們。
開啟 C++ 異常:
set_exceptions("cxx")
禁用 C++ 異常:
set_exceptions("no-cxx")
我們也可以同時設定開啟 objc 異常。
set_exceptions("cxx", "objc")
或者禁用它們。
set_exceptions("no-cxx", "no-objc")
Xmake 會在內部自動根據不同的編譯器,去適配對應的 flags。
支援 ispc 編譯規則
Xmake 新增了 ipsc 編譯器內建規則支援,非常感謝 @star-hengxing 的貢獻,具體使用方式如下:
target("test")
    set_kind("binary")
    add_rules("utils.ispc", {header_extension = "_ispc.h"})
    set_values("ispc.flags", "--target=host")
    add_files("src/*.ispc")
    add_files("src/*.cpp")
支援 msvc 的 armasm 編譯器
之前的版本,Xmake 增加了 Windows ARM 的初步支援,但是對 asm 編譯還沒有很好的支援,因此這個版本,我們繼續完善 Windows ARM 的支援。
對 msvc 的 armasm.exe 和 armasm64.exe 都支援上了。
另外,我們也改進了包對 Windows ARM 平臺的交叉編譯支援。
新增 gnu-rm 構建規則
Xmake 也新增了一個使用 gnu-rm 工具鏈去構建嵌入式專案的規則和例子工程,非常感謝 @JacobPeng 的貢獻。
add_rules("mode.debug", "mode.release")

add_requires("gnu-rm")
set_toolchains("@gnu-rm")
set_plat("cross")
set_arch("armv7")

target("foo")
    add_rules("gnu-rm.static")
    add_files("src/foo/*.c")

target("hello")
    add_deps("foo")
    add_rules("gnu-rm.binary")
    add_files("src/*.c", "src/*.S")
    add_files("src/*.ld")
    add_includedirs("src/lib/cmsis")
完整工程見:Embed GNU-RM Example
新增 OpenBSD 系統支援
之前的版本,Xmake 僅僅支援 FreeBSD 系統,而 OpenBSD 跟 FreeBSD 還是有不少差異的,導致 Xmake 無法在它上面正常編譯安裝。
而新版本已經完全支援在 OpenBSD 上執行 Xmake 了。
更新內容
新特性
- 一種新的可選域設定語法,對 LSP 友好,並且支援域隔離。
- #2944: 為嵌入式工程新增
gnu-rm.binary和gnu-rm.static規則和測試工程 - #2636: 支援包元件
- 支援 msvc 的 armasm/armasm64
- #3023: 改進 xmake run -d,新增 renderdoc 偵錯程式支援
- #3022: 為特定編譯器新增 flags
- #3025: 新增 C++ 異常介面設定
- #3017: 支援 ispc 編譯器規則
改進
- #2925: 改進 doxygen 外掛
- #2948: 支援 OpenBSD
- 新增
xmake g --insecure-ssl=y設定選項去禁用 ssl 證書檢測 - #2971: 使 vs/vsxmake 工程生成的結果每次保持一致
- #3000: 改進 C++ 模組構建支援,實現增量編譯支援
- #3016: 改進 clang/msvc 去更好地支援 std 模組
Bugs 修復
https://tboox.org/cn/2022/11/08/xmake-update-v2.7.3/