設計模式:責任鏈模式的應用場景及原始碼應用
一、概述
責任鏈模式(Chain of Responsibility Pattern)是將鏈中每一個節點看作是一個物件,每個節點處理的請求均不同,且內部自動維護一個下一節點物件。當一個請求從鏈式的首端發出時,會沿著鏈的路徑依次傳遞給每一個節點物件,直至有物件處理這個請求為止,屬於行為型模式。就像一場足球比賽,通過層層傳遞,最終射門。
責任鏈模式的應用場景
- 多個物件可以處理一個請求,但具體由哪個物件處理該請求在執行時自動確定。
- 可動態指定一組物件處理請求,或新增新的處理者。
- 需要在不明確指定請求處理者的情況下,向多個處理者中的一個提交請求。
設計模式只是幫助減少程式碼的複雜性,讓其滿足開閉原則,提高程式碼的擴充套件性。如果不使用同樣可以完成需求。
假設業務場景是這樣的,我們 系統處在一個下游服務,因為業務需求,系統中所使用的 基礎資料需要從上游中臺同步到系統資料庫
基礎資料包含了很多型別資料,雖然資料在中臺會有一定驗證,但是 資料只要是人為錄入就極可能存在問題,遵從對上游系統不信任原則,需要對資料接收時進行一系列校驗
最初是要進行一系列驗證原則才能入庫的,後來因為工期問題只放了一套非空驗證,趁著春節期間時間還算寬裕,把這套驗證規則骨架放進去
從我們系統的接入資料規則而言,個人覺得需要支援以下幾套規則
- 必填項校驗,如果資料無法滿足業務所必須欄位要求,資料一旦落入庫中就會產生一系列問題
- 非法字元校驗,因為資料如何錄入,上游系統的錄入規則是什麼樣的我們都不清楚,這一項規則也是必須的
- 長度校驗,理由同上,如果系統某欄位長度限制 50,但是接入來的資料 500長度,這也會造成問題
如果不使用責任鏈模式,上面說的真實同步場景面臨兩個問題
- 如果把上述說的程式碼邏輯校驗規則寫到一起,毫無疑問這個類或者說這個方法函數奇大無比。減少程式碼複雜性一貫方法是:將大塊程式碼邏輯拆分成函數,將大類拆分成小類,是應對程式碼複雜性的常用方法。如果此時說:可以把不同的校驗規則拆分成不同的函數,不同的類,這樣不也可以滿足減少程式碼複雜性的要求麼。這樣拆分是能解決程式碼複雜性,但是這樣就會面臨第二個問題
- 開閉原則:新增一個新的功能應該是,在已有程式碼基礎上擴充套件程式碼,而非修改已有程式碼。大家設想一下,假設你寫了三套校驗規則,執行過一段時間,這時候領導讓加第四套,是不是要在原有程式碼上改動
綜上所述,在合適的場景運用適合的設計模式,能夠讓程式碼設計複雜性降低,變得更為健壯。朝更遠的說也能讓自己的編碼設計能力有所提高。
優點
- 將請求與處理解耦。
- 請求處理者(節點物件)只需要關注自己感興趣的請求進行處理即可,對於不感興趣的請求,轉發給下一個節點。
- 具備鏈式傳遞處理請求功能,請求傳送者無需知曉鏈路結構,只需等待請求處理結果。
- 鏈路結構靈活,可以通過改變鏈路的結構動態的新增或刪減責任。
- 易於擴充套件新的請求處理類(節點),符合開閉原則。
缺點
- 責任鏈太長或者處理時間過長,會影響整體效能。
- 如果節點物件存在迴圈參照時,會造成死迴圈,導致系統崩潰。
二、入門案例
2.1 類圖

2.2 基礎類介紹
抽象介面RequestHandler
public interface RequestHandler {

    void doHandler(String req);
}
抽象類BaseRequestHandler
public abstract class BaseRequestHandler implements RequestHandler {

    protected RequestHandler next;

    public void next(RequestHandler next) {
        this.next = next;
    }
}
具體處理類AHandler
public class AHandler extends BaseRequestHandler {

    @Override
    public void doHandler(String req) {
        // 處理自己的業務邏輯
        System.out.println("A中處理自己的邏輯");
        // 傳遞給下個類(若鏈路中還有下個處理類)
        if (next != null) {
            next.doHandler(req);
        }
    }
}
當然還有具體的處理類B、C等等,這裡不展開贅述。
使用類Client
public class Client {
    public static void main(String[] args) {
        BaseRequestHandler a = new AHandler();
        BaseRequestHandler b = new BHandler();
        BaseRequestHandler c = new CHandler();
        a.next(b);
        b.next(c);
        a.doHandler("鏈路待處理的資料");
    }
}
2.3 處理流程圖

三、應用場景
3.1 場景舉例
場景一
金融業務其中就有一個業務場景:一筆訂單進來,會先在後臺通過初審人員進行審批,初審不通過,訂單流程結束。初審通過以後,會轉給終審人員進行審批,不通過,流程結束;通過,流轉到下個業務場景。
對於這塊業務程式碼,一套if-else幹到底。後來,技術老大CodeReview,點名要求改掉這塊。(當然,比較複雜的情況,還是可以用工作流來處理這個場景)。
場景二
有的公司業務會呼叫我們介面,將資料同步過來。同樣,我們需要將處理好的資料,傳給他們。由於雙方傳輸資料都是加密傳輸,所以在接受他們資料之前,需要對資料進行解密,驗籤,引數校驗等操作。同樣,我們給他們傳資料也需要進行加簽,加密操作。
具體案例
對於場景二,我們結合程式碼一起探討一下。
1、一切從註解開始,我這裡自定義了一個註解@Duty,這個註解有spring的@Component註解,也就是標記了這個自定義註解的類,都是交給spring的bean容器去管理。
註解中,有兩個屬性:1.type,定義相同的type型別的bean,會被放到一個責任鏈集合中。2.order,同一個責任鏈集合中,bean的排序,數值越小,會放到鏈路最先的位置,優先處理。
@Target({ElementType.TYPE})
@Retention(RetentionPolicy.RUNTIME)
@Documented
@Inherited
@Service
public @interface Duty {
    /**
     * 標記具體業務場景
     * @return
     */
    String type() default "";

    /**
     * 排序:數值越小,排序越前
     * @return
     */
    int order() default 0;
}2、定義一個頂層的抽象介面IHandler,傳入2個泛型引數,供後續自定義。
public interface IHandler<T, R> {
    /**
     * 抽象處理類
     * @param t
     * @return
     */
    R handle(T t);
}3、定義一個責任鏈bean的管理類HandleChainManager,用來存放不同業務下的責任鏈路集合。在該類中,有一個Map和兩個方法。
- handleMap:這個map會存放責任鏈路中,具體的執行類,key是註解
@Duty中定義的type值,value是標記了@Duty註解的bean集合,也就是具體的執行類集合。 - setHandleMap:傳入具體執行bean的集合,存放在map中。
- executeHandle:從map中找到具體的執行bean集合,並依次執行。
public class HandleChainManager {
    /**
     * 存放責任鏈路上的具體處理類
     * k-具體業務場景名稱
     * v-具體業務場景下的責任鏈路集合
     */
    private Map<String, List<IHandler>> handleMap;

    /**
     * 存放系統中責任鏈具體處理類
     * @param handlerList
     */
    public void setHandleMap(List<IHandler> handlerList) {
        handleMap = handlerList
                .stream()
                .sorted(Comparator.comparingInt(h -> AnnotationUtils.findAnnotation(h.getClass(), Duty.class).order()))
                .collect(Collectors.groupingBy(handler -> AnnotationUtils.findAnnotation(handler.getClass(), Duty.class).type()));
    }

    /**
     * 執行具體業務場景中的責任鏈集合
     * @param type 對應@Duty註解中的type,可以定義為具體業務場景
     * @param t 被執行的引數
     */
    public <T, R> R executeHandle(String type, T t) {
        List<IHandler> handlers = handleMap.get(type);
        R r = null;
        if (CollectionUtil.isNotEmpty(handlers)) {
            for (IHandler<T, R> handler : handlers) {
               r = handler.handle(t);
            }
        }
        return r;
    }
}4、定義一個設定類PatternConfiguration,用於裝配上面的責任鏈管理器HandleChainManager。
@Configuration
public class PatternConfiguration {

    @Bean
    public HandleChainManager handlerChainExecute(List<IHandler> handlers) {
        HandleChainManager handleChainManager = new HandleChainManager();
        handleChainManager.setHandleMap(handlers);
        return handleChainManager;
    }

}5、具體的處理類:SignChainHandler、EncryptionChainHandler、RequestChainHandler,這裡我以SignChainHandler為例。
在具體處理類上標記自定義註解@Duty,該類會被注入到bean容器中,實現IHandler介面,只需關心自己的handle方法,處理具體的業務邏輯。
@Duty(type = BusinessConstants.REQUEST, order = 1)
public class SignChainHandler implements IHandler<String, String> {
    /**
     * 處理加簽邏輯
     * @param s
     * @return
     */
    @Override
    public String handle(String s) {
        // 加簽邏輯
        System.out.println("甲方爸爸要求加簽");
        return "加簽";
    }
}
6、具體怎麼呼叫?這裡我寫了個測試controller直接呼叫,具體如下:
@RestController
@Slf4j
public class TestController {

    @Resource
    private HandleChainManager handleChainManager;

    @PostMapping("/send")
    public String duty(@RequestBody String requestBody) {
        String response = handleChainManager.executeHandle(BusinessConstants.REQUEST, requestBody);
        return response;
    }
}
7、執行結果,會按照註解中標記的order依次執行。

至此,完工。又可以開心的擼程式碼了,然後在具體的執行類中,又是一頓if-else。。。
四、原始碼中運用
4.1Mybatis原始碼中的運用
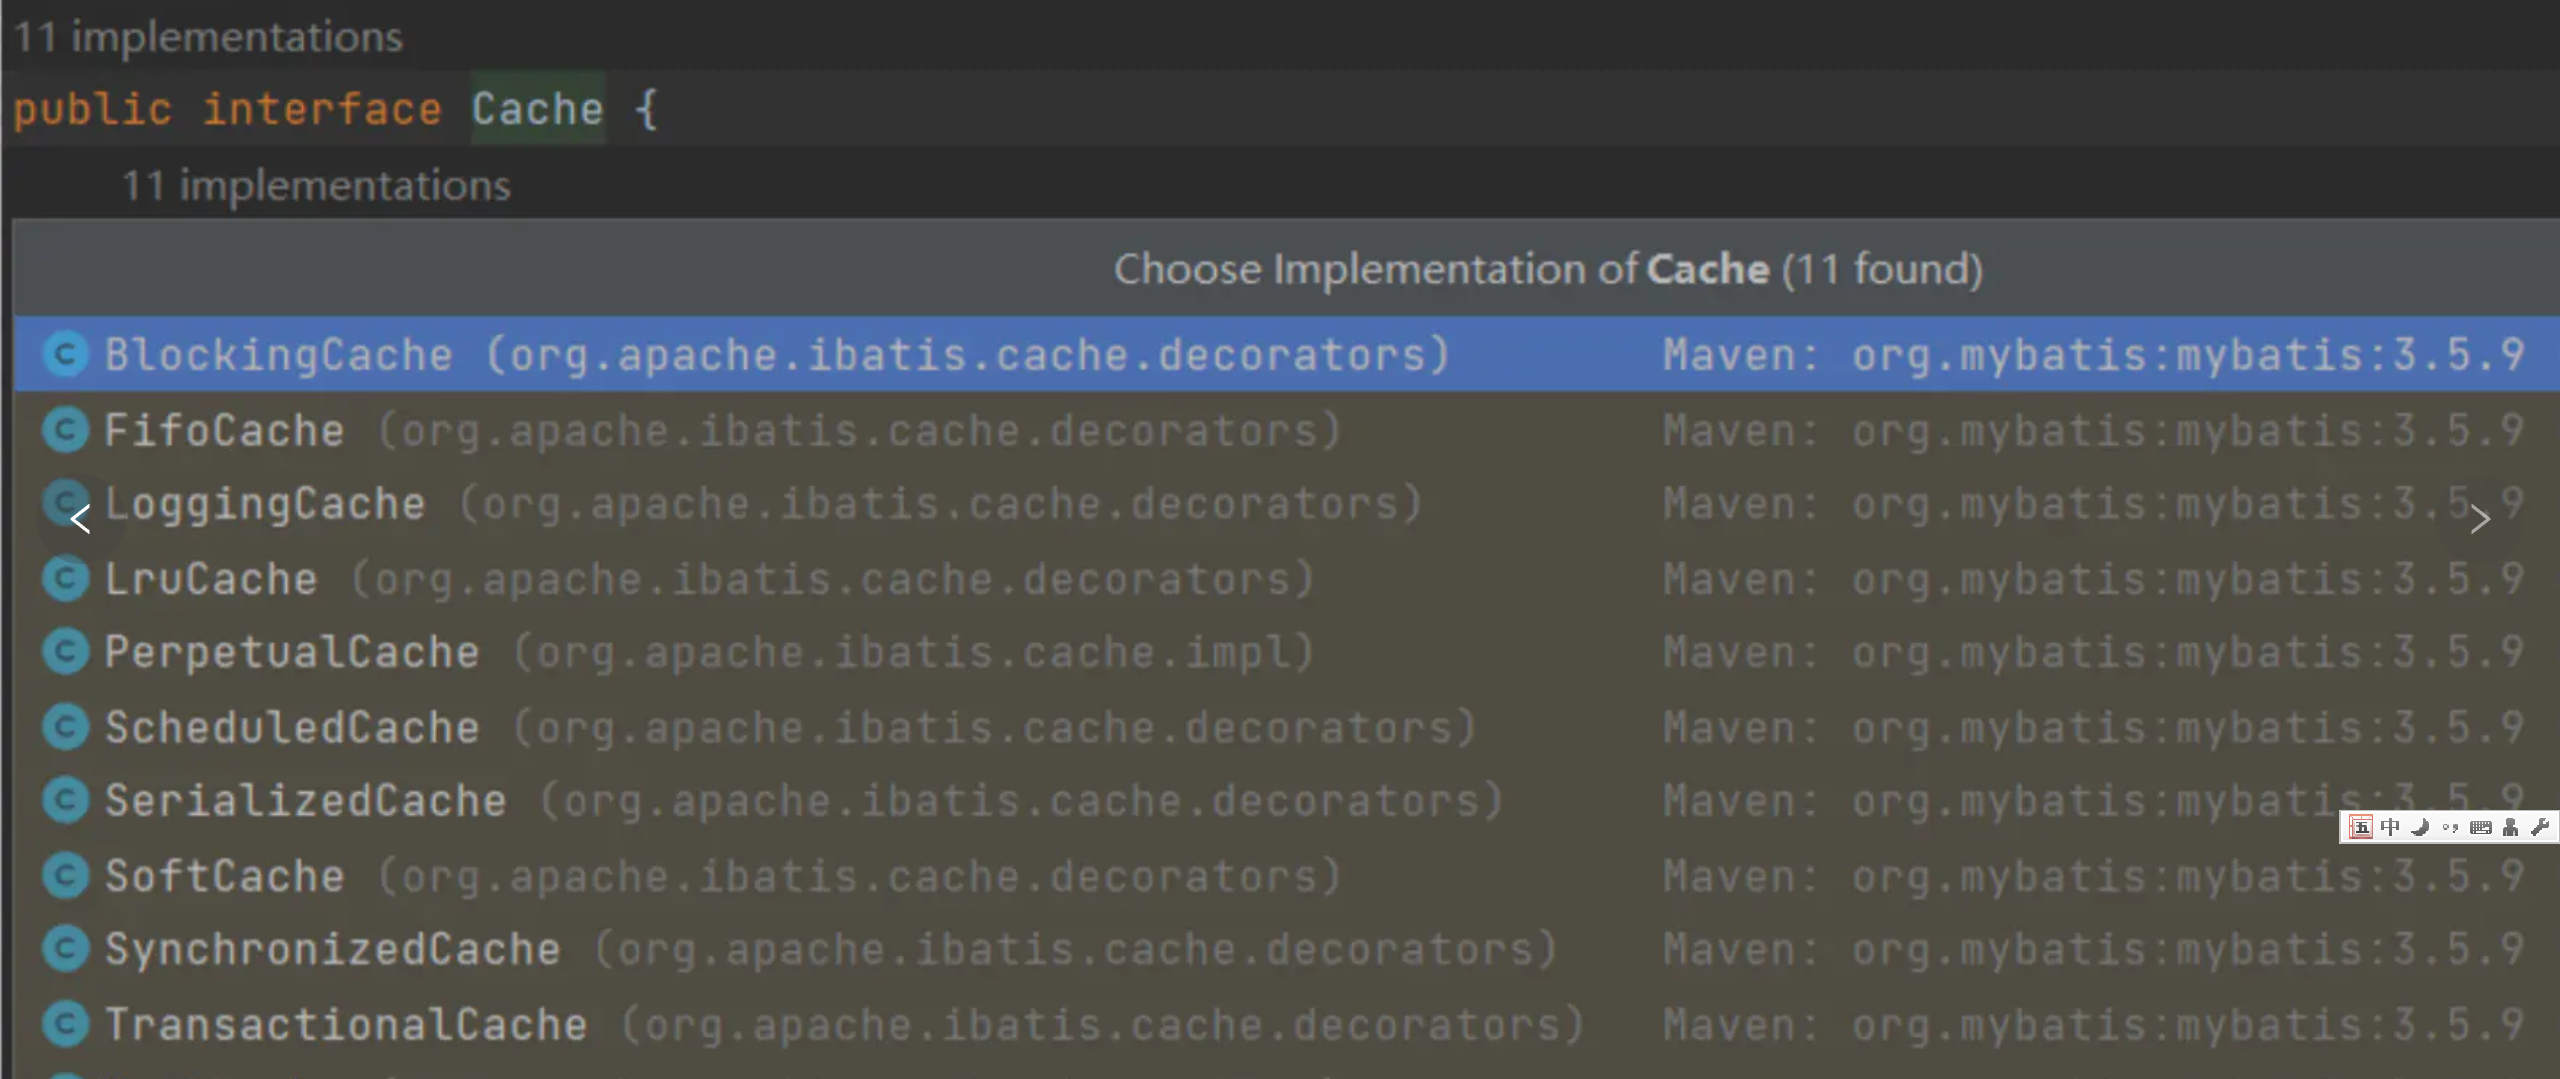
Mybatis中的快取介面Cache,cache作為一個快取介面,最主要的功能就是新增和獲取快取的功能,作為介面它有11個實現類,分別實現不同的功能,下面是介面原始碼和實現類。
package org.apache.ibatis.cache;

import java.util.concurrent.locks.ReadWriteLock;

public interface Cache {
    String getId();

    void putObject(Object var1, Object var2);

    Object getObject(Object var1);

    Object removeObject(Object var1);

    void clear();

    int getSize();

    default ReadWriteLock getReadWriteLock() {
        return null;
    }
}
下面,我們來看下其中一個子類LoggingCache的原始碼。主要看他的putObject方法和getObject方法,它在方法中直接傳給下一個實現去執行。這個實現類其實是為了在獲取快取的時候列印快取的命中率的。
public class LoggingCache implements Cache {
    private final Log log;
    private final Cache delegate;
    protected int requests = 0;
    protected int hits = 0;

    public LoggingCache(Cache delegate) {
        this.delegate = delegate;
        this.log = LogFactory.getLog(this.getId());
    }

    // ...
    public void putObject(Object key, Object object) {
        this.delegate.putObject(key, object);
    }

    public Object getObject(Object key) {
        ++this.requests;
        Object value = this.delegate.getObject(key);
        if (value != null) {
            ++this.hits;
        }

        if (this.log.isDebugEnabled()) {
            this.log.debug("Cache Hit Ratio [" + this.getId() + "]: " + this.getHitRatio());
        }

        return value;
    }
    // ...
}最後,經過Cache介面各種實現類的處理,最終會到達PerpetualCache這個實現類。與之前的處理類不同的是,這個類中有一個map,在map中做存取,也就是說,最終快取還是會儲存在map中的。
public class PerpetualCache implements Cache {
    private final String id;
    private final Map<Object, Object> cache = new HashMap();

    public PerpetualCache(String id) {
        this.id = id;
    }

    // ...

    public void putObject(Object key, Object value) {
        this.cache.put(key, value);
    }

    public Object getObject(Object key) {
        return this.cache.get(key);
    }
    // ...

}
4.2spring原始碼中的運用
4.2.1DispatcherServlet類
DispatcherServlet 核心方法 doDispatch。HandlerExecutionChain只是維護HandlerInterceptor的集合,可以向其中註冊相應的攔截器,本身不直接處理請求,將請求分配給責任鏈上註冊處理器執行,降低職責鏈本身與處理邏輯之間的耦合程度。
protected void doDispatch(HttpServletRequest request, HttpServletResponse response) throws Exception {
        HttpServletRequest processedRequest = request;
        HandlerExecutionChain mappedHandler = null;
        boolean multipartRequestParsed = false;
        WebAsyncManager asyncManager = WebAsyncUtils.getAsyncManager(request);
        try {
            ModelAndView mv = null;
            Exception dispatchException = null;
            try {
                processedRequest = checkMultipart(request);
                multipartRequestParsed = (processedRequest != request);
                // Determine handler for the current request.
                mappedHandler = getHandler(processedRequest);
                if (mappedHandler == null) {
                    noHandlerFound(processedRequest, response);
                    return;
                }
                // Determine handler adapter for the current request.
                HandlerAdapter ha = getHandlerAdapter(mappedHandler.getHandler());
                // Process last-modified header, if supported by the handler.
                String method = request.getMethod();
                boolean isGet = "GET".equals(method);
                if (isGet || "HEAD".equals(method)) {
                    long lastModified = ha.getLastModified(request, mappedHandler.getHandler());
                    if (new ServletWebRequest(request, response).checkNotModified(lastModified) && isGet) {
                        return;
                    }
                }
                if (!mappedHandler.applyPreHandle(processedRequest, response)) {
                    return;
                }
                // Actually invoke the handler.
                mv = ha.handle(processedRequest, response, mappedHandler.getHandler());
                if (asyncManager.isConcurrentHandlingStarted()) {
                    return;
                }
                applyDefaultViewName(processedRequest, mv);
                mappedHandler.applyPostHandle(processedRequest, response, mv);
            }
            catch (Exception ex) {
                dispatchException = ex;
            }
            catch (Throwable err) {
                // As of 4.3, we're processing Errors thrown from handler methods as well,
                // making them available for @ExceptionHandler methods and other scenarios.
                dispatchException = new NestedServletException("Handler dispatch failed", err);
            }
            processDispatchResult(processedRequest, response, mappedHandler, mv, dispatchException);
        }
        catch (Exception ex) {
            triggerAfterCompletion(processedRequest, response, mappedHandler, ex);
        }
        catch (Throwable err) {
            triggerAfterCompletion(processedRequest, response, mappedHandler,
                    new NestedServletException("Handler processing failed", err));
        }
        finally {
            if (asyncManager.isConcurrentHandlingStarted()) {
                // Instead of postHandle and afterCompletion
                if (mappedHandler != null) {
                    mappedHandler.applyAfterConcurrentHandlingStarted(processedRequest, response);
                }
            }
            else {
                // Clean up any resources used by a multipart request.
                if (multipartRequestParsed) {
                    cleanupMultipart(processedRequest);
                }
            }
        }
    }
4.2.2HandlerExecutionChain類
這裡分析的幾個方法,都是從DispatcherServlet類的doDispatch方法中請求的。
- 獲取攔截器,執行preHandle方法
boolean applyPreHandle(HttpServletRequest request,
                       HttpServletResponse response) throws Exception {
    HandlerInterceptor[] interceptors = this.getInterceptors();
    if (!ObjectUtils.isEmpty(interceptors)) {
        for(int i = 0; i < interceptors.length; this.interceptorIndex = i++) {
            HandlerInterceptor interceptor = interceptors[i];
            if (!interceptor.preHandle(request, response, this.handler)) {
                this.triggerAfterCompletion(request, response, (Exception)null);
                return false;
            }
        }
    }
    return true;
}- 在applyPreHandle方法中,執行triggerAfterCompletion方法
void triggerAfterCompletion(HttpServletRequest request,
                            HttpServletResponse response, Exception ex) throws Exception {
    HandlerInterceptor[] interceptors = this.getInterceptors();
    if (!ObjectUtils.isEmpty(interceptors)) {
        for(int i = this.interceptorIndex; i >= 0; --i) {
            HandlerInterceptor interceptor = interceptors[i];
            try {
                interceptor.afterCompletion(request, response, this.handler, ex);
            } catch (Throwable var8) {
                logger.error("HandlerInterceptor.afterCompletion threw exception", var8);
            }
        }
    }
}- 獲取攔截器,執行applyPostHandle方法
void applyPostHandle(HttpServletRequest request,
                     HttpServletResponse response, ModelAndView mv)
                     throws Exception {
    HandlerInterceptor[] interceptors = this.getInterceptors();
    if (!ObjectUtils.isEmpty(interceptors)) {
        for(int i = interceptors.length - 1; i >= 0; --i) {
            HandlerInterceptor interceptor = interceptors[i];
            interceptor.postHandle(request, response, this.handler, mv);
        }
    }
}
五、程式碼範例
員工在OA系統中提交請假申請,首先專案經理處理,他能審批3天以內的假期,如果大於3天,則由專案經理則轉交給總經理處理。接下來我們用責任鏈模式實現這個過程。
1、封裝請假資訊實體類
public class LeaveRequest {
    private String name;    // 請假人姓名
    private int numOfDays;  // 請假天數
    private int workingAge;  //員工工齡(在公司大於2年則總經理會審批)
   //省略get..set..
}
2、抽象處理者類 Handler,維護一個nextHandler屬性,該屬性為當前處理者的下一個處理者的參照;
宣告了抽象方法process,其實在這裡也用了方法模板模式:
public abstract class ApproveHandler {

    protected  ApproveHandler nextHandler;//下一個處理者(與類一致,這段程式碼很重要)

    public void setNextHandler(ApproveHandler approveHandler){
        this.nextHandler=approveHandler;
    }

    public abstract void process(LeaveRequest leaveRequest); // 處理請假(這裡用了模板方法模式)

}
3、專案經理處理者,能處理小於3天的假期,而請假資訊裡沒有名字時,審批不通過:
public class PMHandler extends ApproveHandler{

    @Override
    public void process(LeaveRequest leaveRequest) {
        //未填寫姓名的請假單不通過
        if(null != leaveRequest.getName()){
            if(leaveRequest.getNumOfDays() <= 3){
                System.out.println(leaveRequest.getName()+",你通過專案經理審批!");
            }else {
                System.out.println("專案經理轉交總經理");
                if(null != nextHandler){
                    nextHandler.process(leaveRequest);
                }
            }
        }else {
            System.out.println("請假單未填寫完整,未通過專案經理審批!");
            return;
        }
    }
}
4、總經理處理者,能處理大於3天的假期,且工齡超過2年才會審批通過:
public class GMHandler extends ApproveHandler{

    @Override
    public void process(LeaveRequest leaveRequest) {
        //員工在公司工齡超過2年,則審批通過
        if(leaveRequest.getWorkingAge() >=2 && leaveRequest.getNumOfDays() > 3){
            System.out.println(leaveRequest.getName()+",你通過總經理審批!");
            if(null != nextHandler){
                nextHandler.process(leaveRequest);
            }
        }else {
            System.out.println("在公司年限不夠,長假未通過總經理審批!");
            return;
        }
    }
}
範例程式碼完成,我們測試一下:
public class Test {
    public static void main(String[] args) {
        PMHandler pm = new PMHandler();
        GMHandler gm = new GMHandler();

        LeaveRequest leaveRequest = new LeaveRequest();
        leaveRequest.setName("張三");
        leaveRequest.setNumOfDays(4);//請假4天
        leaveRequest.setWorkingAge(3);//工齡3年

        pm.setNextHandler(gm);//設定傳遞順序
        pm.process(leaveRequest);
    }
}
執行結果:
專案經理轉交總經理
張三,你通過總經理審批!
六、原始碼中的典型應用
原始碼中的典型應用:
- Netty 中的 Pipeline和ChannelHandler通過責任鏈設計模式來組織程式碼邏輯。
- Spring Security 使用責任鏈模式,可以動態地新增或刪除責任(處理 request 請求)。
- Spring AOP 通過責任鏈模式來管理 Advisor。
- Dubbo Filter 過濾器鏈也是用了責任鏈模式(連結串列),可以對方法呼叫做一些過濾處理,譬如超時(TimeoutFilter),異常(ExceptionFilter),Token(TokenFilter)等。
- Mybatis 中的 Plugin 機制使用了責任鏈模式,設定各種官方或者自定義的 Plugin,與 Filter 類似,可以在執行 Sql 語句的時候做一些操作。
- Tomcat 呼叫 ApplicationFilterFactory過濾器鏈。
spring安全框架security使用責任鏈模式
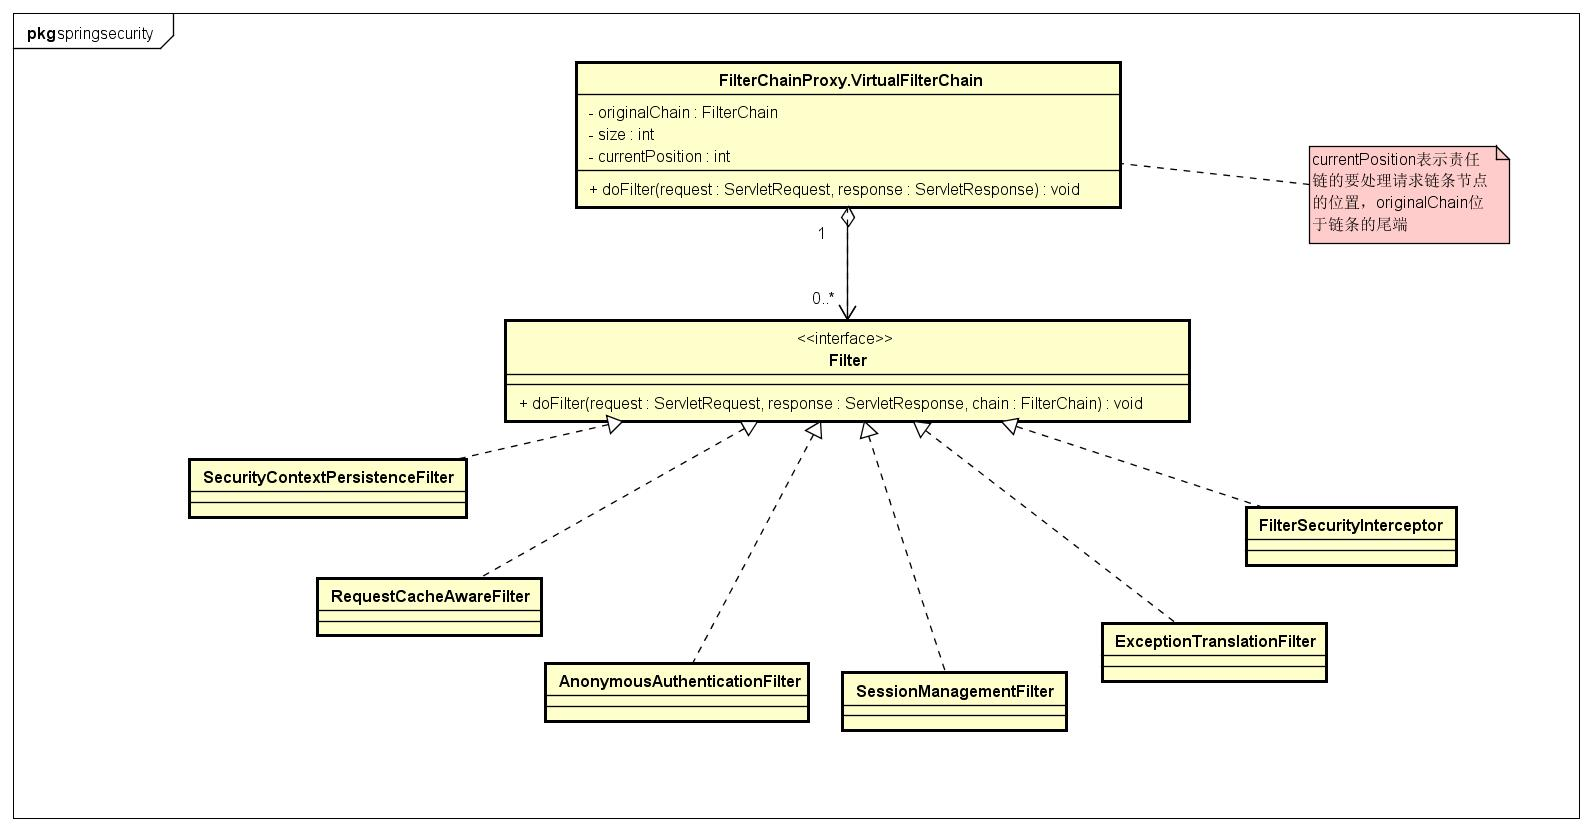
spring安全框架security使用責任鏈模式,框架使用者可以動態地新增刪除責任(處理request請求)。
UML 類圖
活動圖:
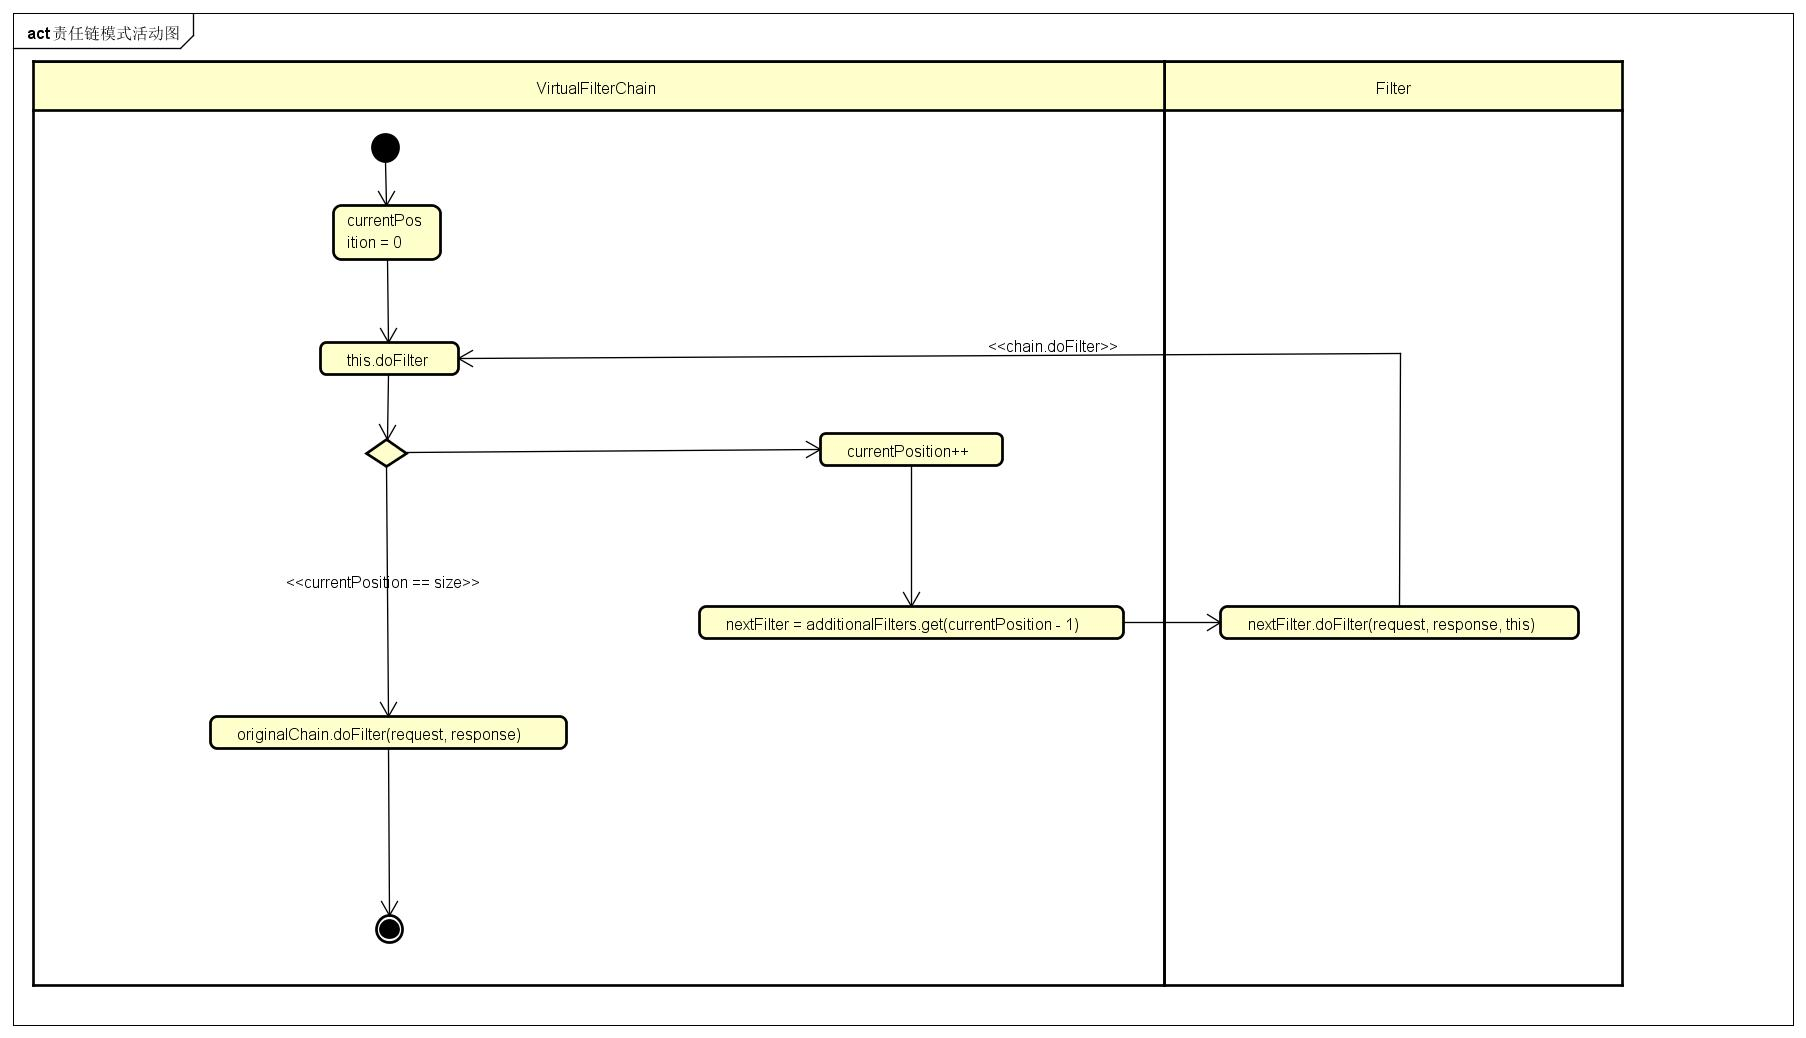
原始碼解析:currentPosition表示責任鏈的要處理請求鏈條節點的位置,使用additionalFilters來依次處理request請求。additionalFilters中的每個Filter成員都承擔某一項具體職責,並且每個Filter都會被執行到。 責任鏈條的成員執行完自己的職責後,會回撥鏈條的處理請求方法,責任鏈條會找到下一個鏈條成員來執行職責,直到鏈條尾端。
private static class VirtualFilterChain implements FilterChain {
		private final FilterChain originalChain;      //鏈條中的節點全部執行完後,處理request請求的物件
		private final List<Filter> additionalFilters; //請求實際執行者,
		private final FirewalledRequest firewalledRequest;
		private final int size;
		private int currentPosition = 0; //鏈條移動的位置,當currentPosition==size,到達鏈條的尾端。
		private VirtualFilterChain(FirewalledRequest firewalledRequest,
				FilterChain chain, List<Filter> additionalFilters) {
			this.originalChain = chain;
			this.additionalFilters = additionalFilters;
			this.size = additionalFilters.size();
			this.firewalledRequest = firewalledRequest;
		}

		public void doFilter(ServletRequest request, ServletResponse response)
				throws IOException, ServletException {
			if (currentPosition == size) { //到達鏈條尾端
				if (logger.isDebugEnabled()) {
					logger.debug(UrlUtils.buildRequestUrl(firewalledRequest)
							+ " reached end of additional filter chain; proceeding with original chain");
				}

				// Deactivate path stripping as we exit the security filter chain
				this.firewalledRequest.reset();

				originalChain.doFilter(request, response);
			}
			else {
				currentPosition++; //依次移動鏈條指標到具體節點

				Filter nextFilter = additionalFilters.get(currentPosition - 1);

				if (logger.isDebugEnabled()) {
					logger.debug(UrlUtils.buildRequestUrl(firewalledRequest)
							+ " at position " + currentPosition + " of " + size
							+ " in additional filter chain; firing Filter: '"
							+ nextFilter.getClass().getSimpleName() + "'");
				}

				nextFilter.doFilter(request, response, this);//將鏈條本身的物件傳遞給鏈條成員
			}
		}
	}
鏈條成員Filter會執行chain.doFilter(request, response )方法,而chain是鏈條本身的參照,這樣成員就將請求又重新交給了鏈條。看SecurityContextHolderAwareRequestFilter原始碼:
public void doFilter(ServletRequest req, ServletResponse res, FilterChain chain)
      throws IOException, ServletException {
   chain.doFilter(this.requestFactory.create((HttpServletRequest) req,
         (HttpServletResponse) res), res);
}
七:設計模式重語意
最後說一下需要達成的業務需求。將一個批次資料經過處理器鏈的處理,返回出符合要求的資料分類
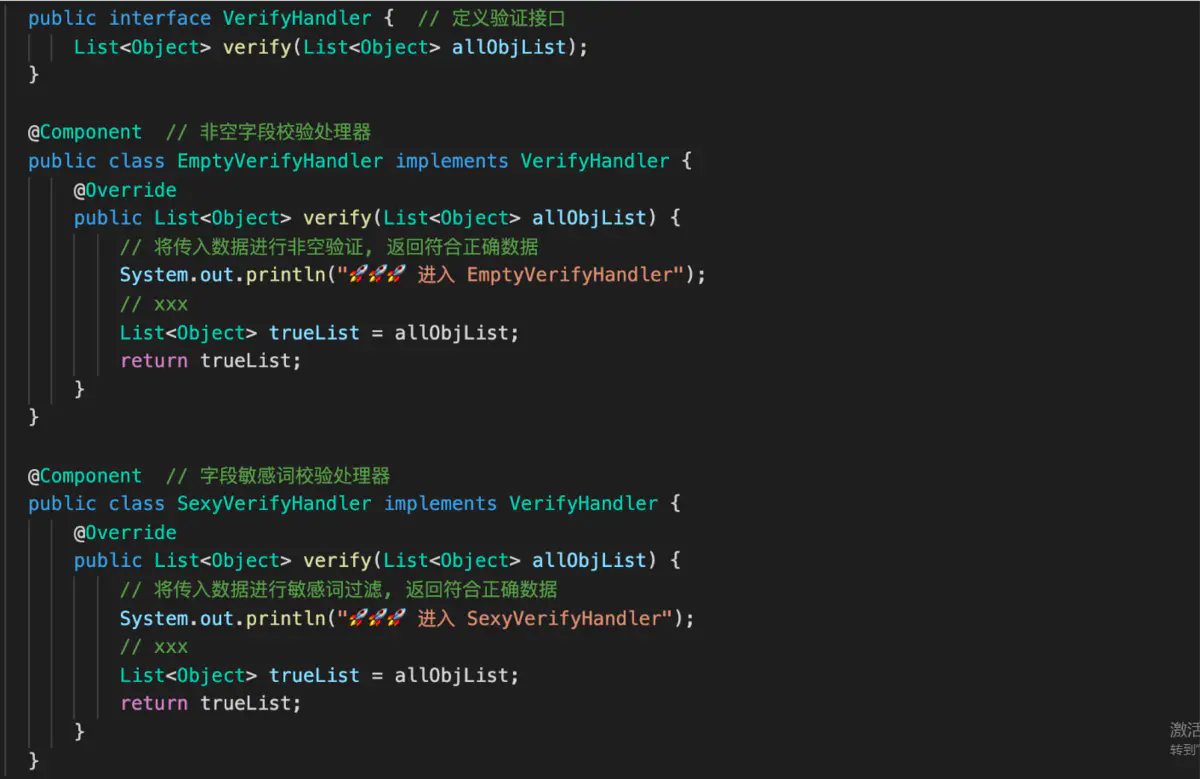
定義頂級驗證介面和一系列處理器實現類沒什麼難度,但是應該如何進行鏈式呼叫呢?
這一塊程式碼需要有一定 Spring 基礎才能理解,一起來看下 VerifyHandlerChain 如何將所有處理器串成一條鏈
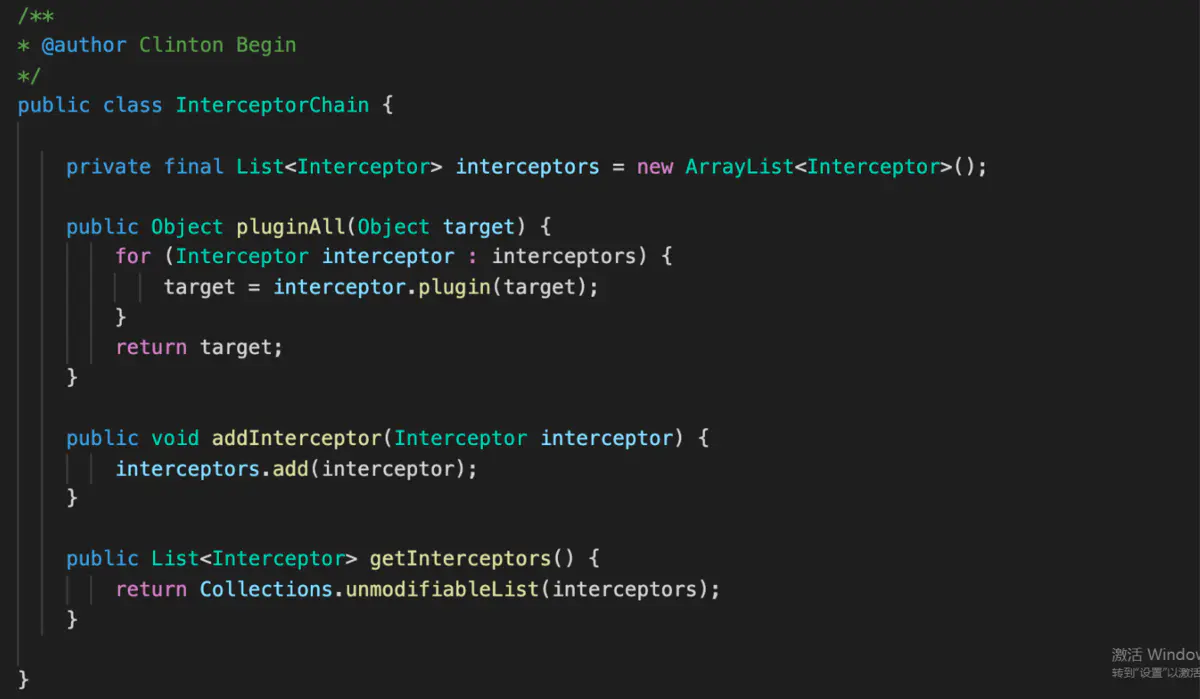
VerifyHandlerChain 處理流程如下:
- 實現自 InitializingBean 介面,在對應實現方法中獲取 IOC 容器中型別為 VerifyHandler 的 Bean,也就是 EmptyVerifyHandler、SexyVerifyHandler
- 將 VerifyHandler 型別的 Bean 新增到處理器鏈容器中
- 定義校驗方法 verify(),對入引資料展開處理器鏈的全部呼叫,如果過程中發現已無需要驗證的資料,直接返回
這裡使用 SpringBoot 專案中預設測試類,來測試一下如何呼叫
@SpringBootTest
class ChainApplicationTests {

    @Autowired
    private VerifyHandlerChain verifyHandlerChain;

    @Test
    void contextLoads() {
        List<Object> verify = verifyHandlerChain.verify(Lists.newArrayList("原始碼圈", "@一隻阿木木"));
        System.out.println(verify);
    }
}
這樣的話,如果客戶或者產品提校驗相關的需求時,我們只需要實現 VerifyHandler 介面新建個校驗規則實現類就 OK 了,這樣符合了設計模式的原則:滿足開閉原則,提高程式碼的擴充套件性
熟悉之前作者寫過設計模式的文章應該知道,強調設計模式重語意,而不是具體的實現過程。所以,你看這個咱們這個校驗程式碼,把責任鏈兩種模式結合了使用