【單元測試】Junit 4(二)--eclipse設定Junit+Junit基礎註解
1.0 前言
前面我們介紹了白盒測試方法,後面我們來介紹一下Junit 4,使用的是eclipse(用IDEA的小夥伴可以撤了)
1.1 設定Junit 4
1.1.1 安裝包
我們需要三個jar包:
- org.junit_4.13.2.v20211018-1956.jar
- org.hamcrest.core_1.3.0.v20180420-1519.jar
- org.hamcrest-library-1.3.jar
org.junit_4.13.2.v20211018-1956.jar和org.hamcrest.core_1.3.0.v20180420-1519.jar這兩個jar包是eclipse自帶的
然後我們需要下一個org.hamcrest-library-1.3.jar
1.1.2 建立Junit專案
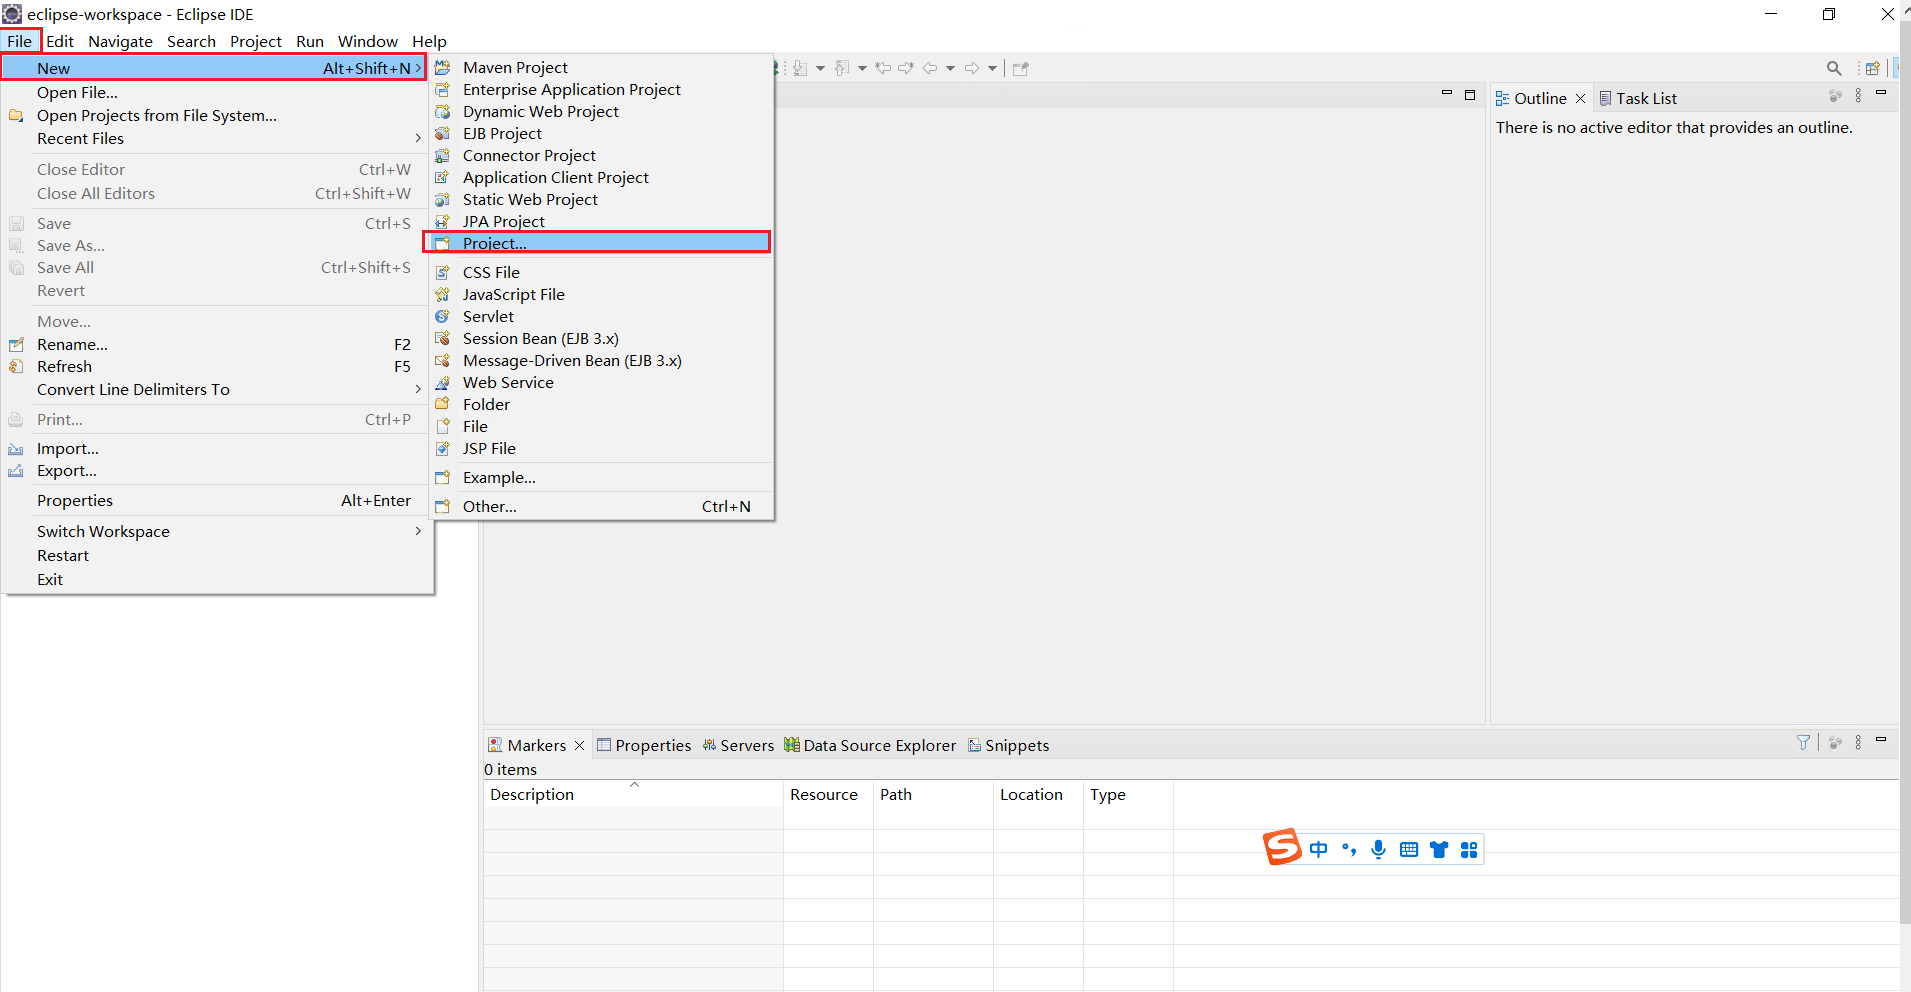
點選 new >> New >> Project
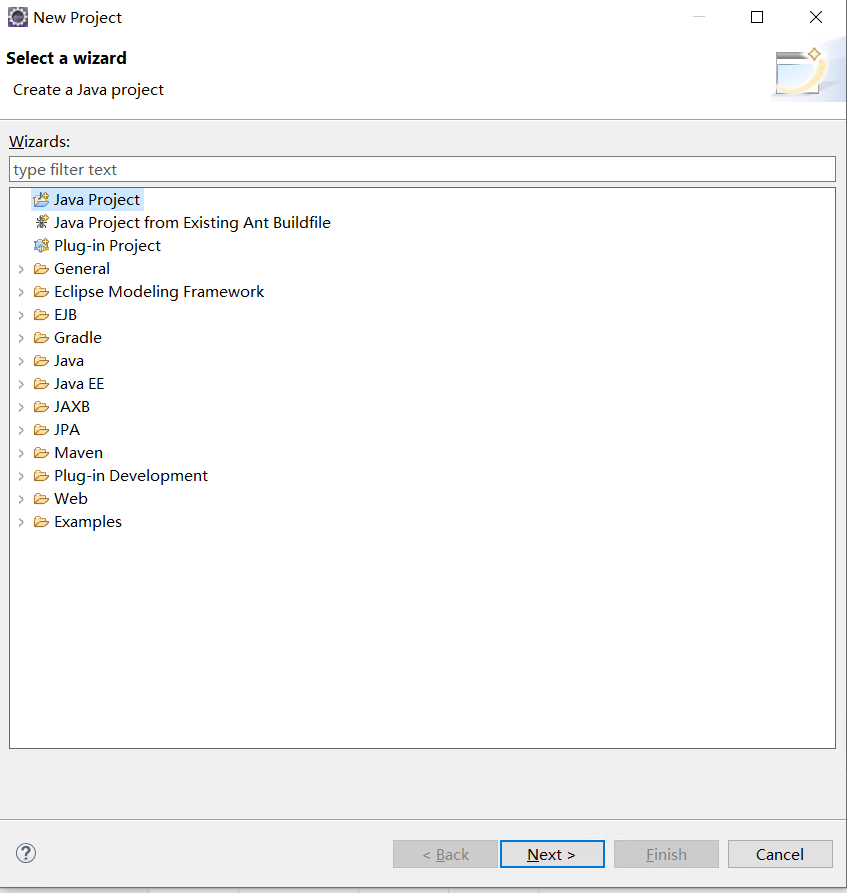
選擇Java Project 點選next
輸入專案名,選擇jre,點選next

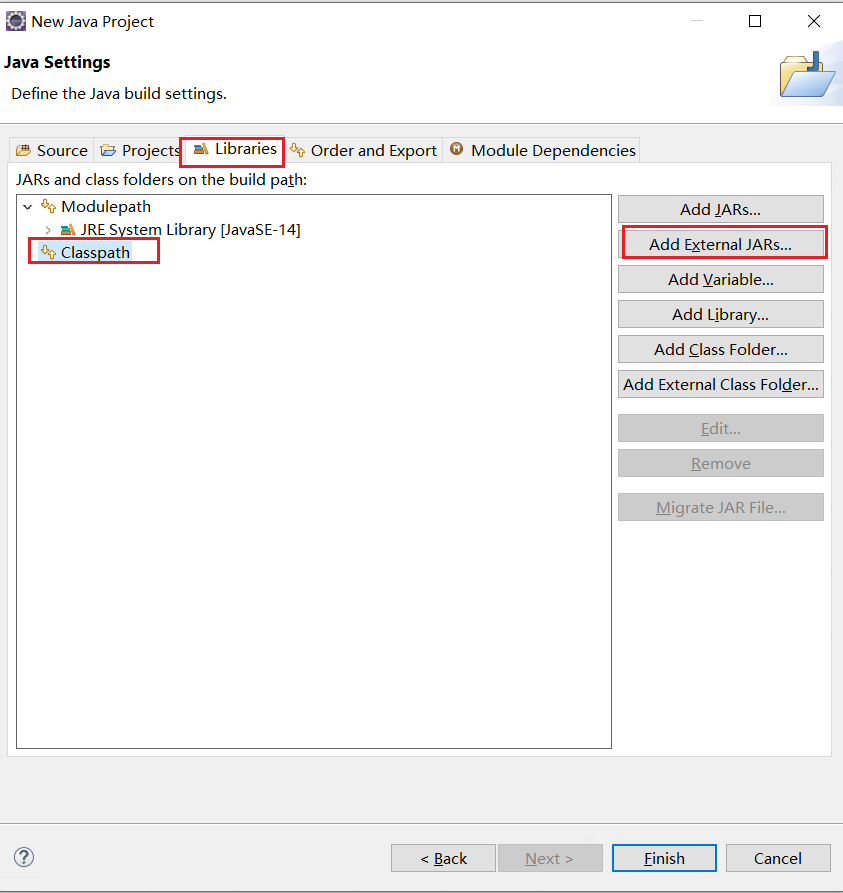
選擇 Libraries >> Classpath >> Add Extemal JARs
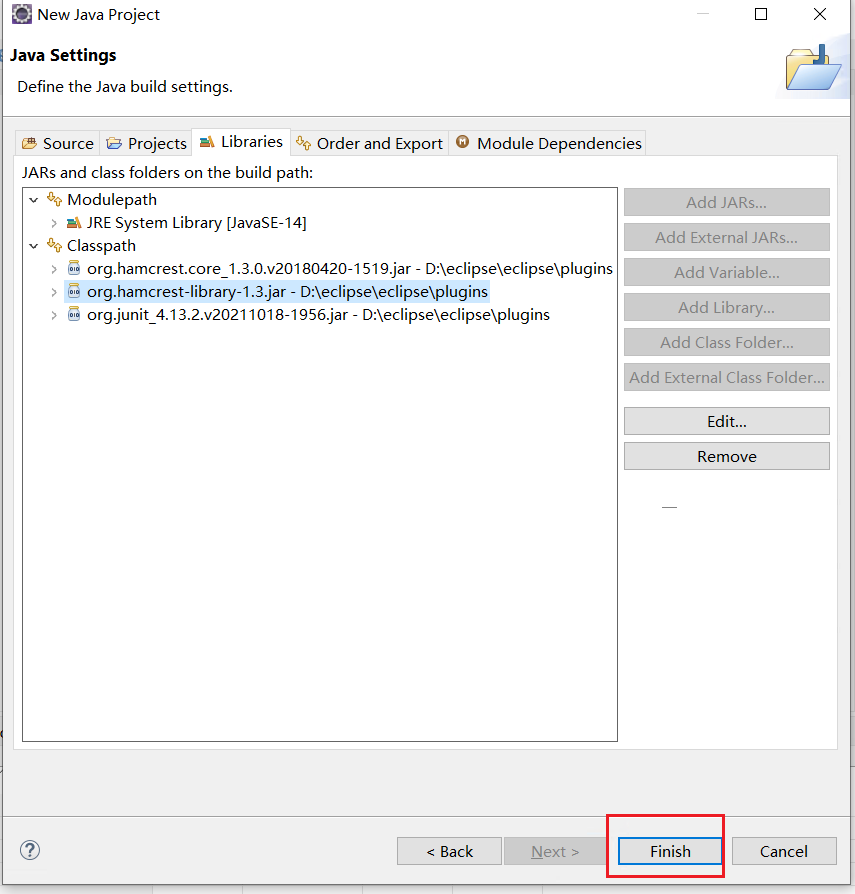
選擇之前我們的三個jar包,一般放在eclipsed的plugins目錄,org.hamcrest-library-1.3.jar則在自己下載的目錄(可以把下載下來的jar包也丟這裡),點選Finish
我們新建一個資料夾存放junit程式碼
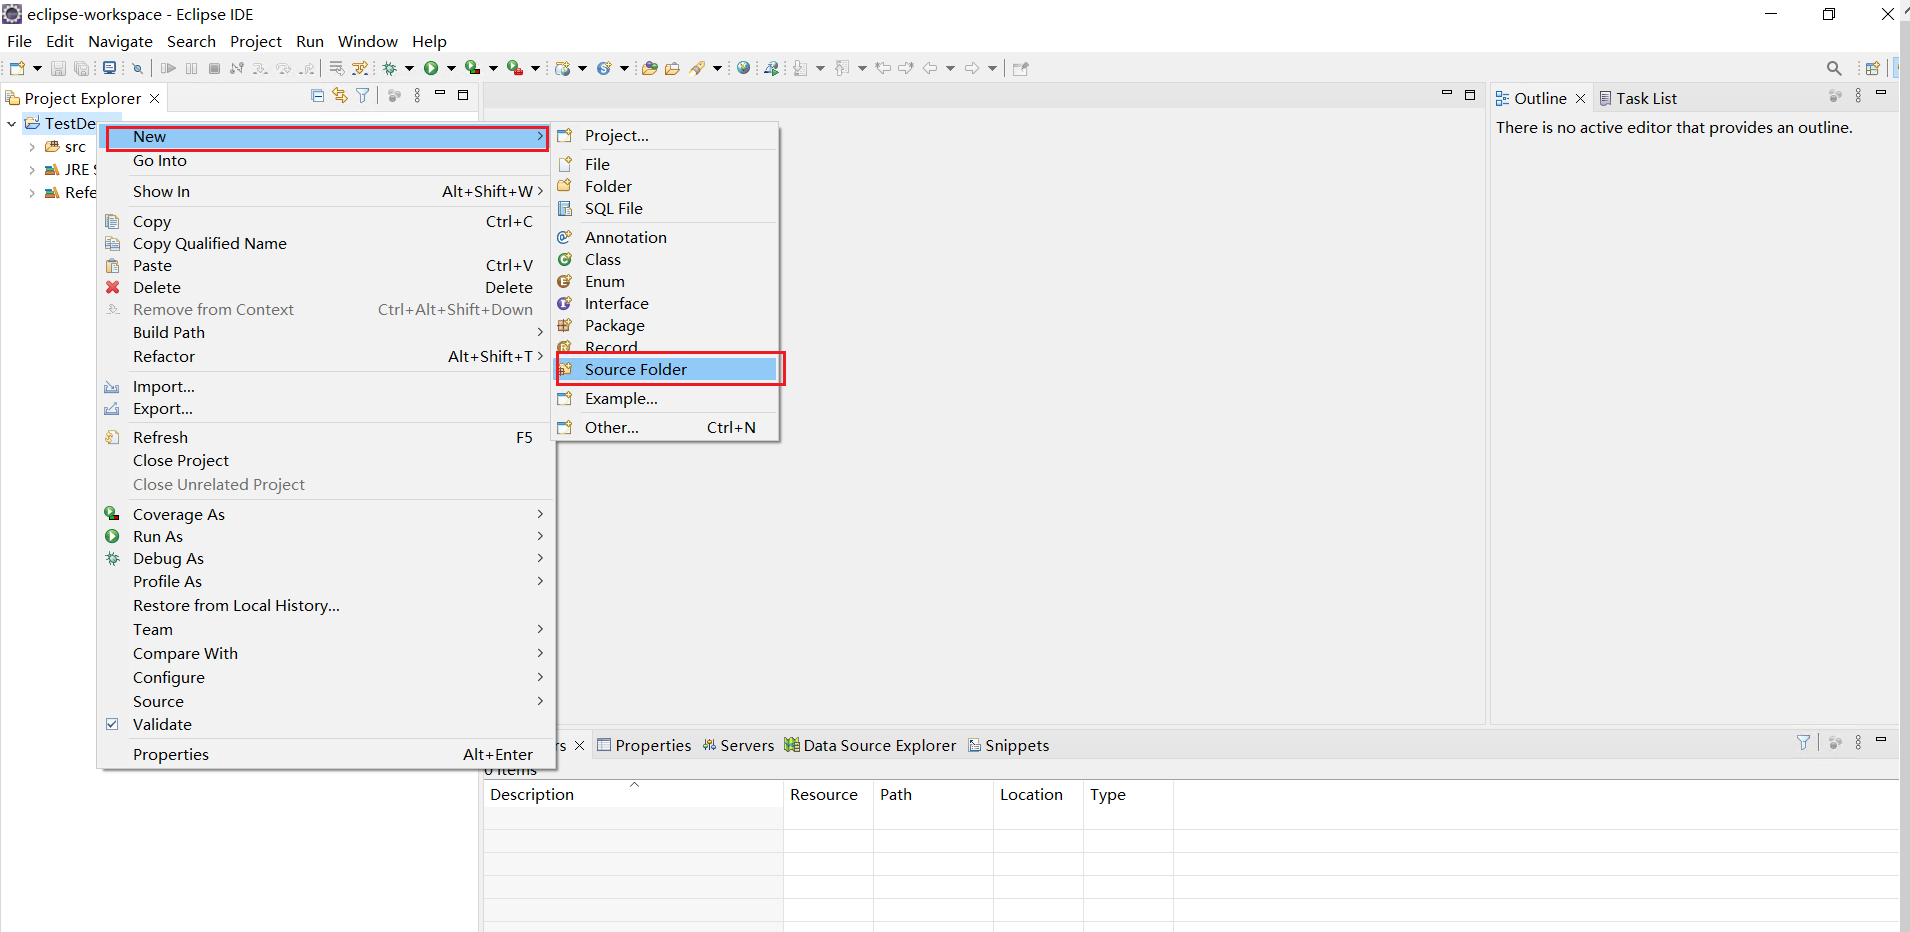
新建一個專案
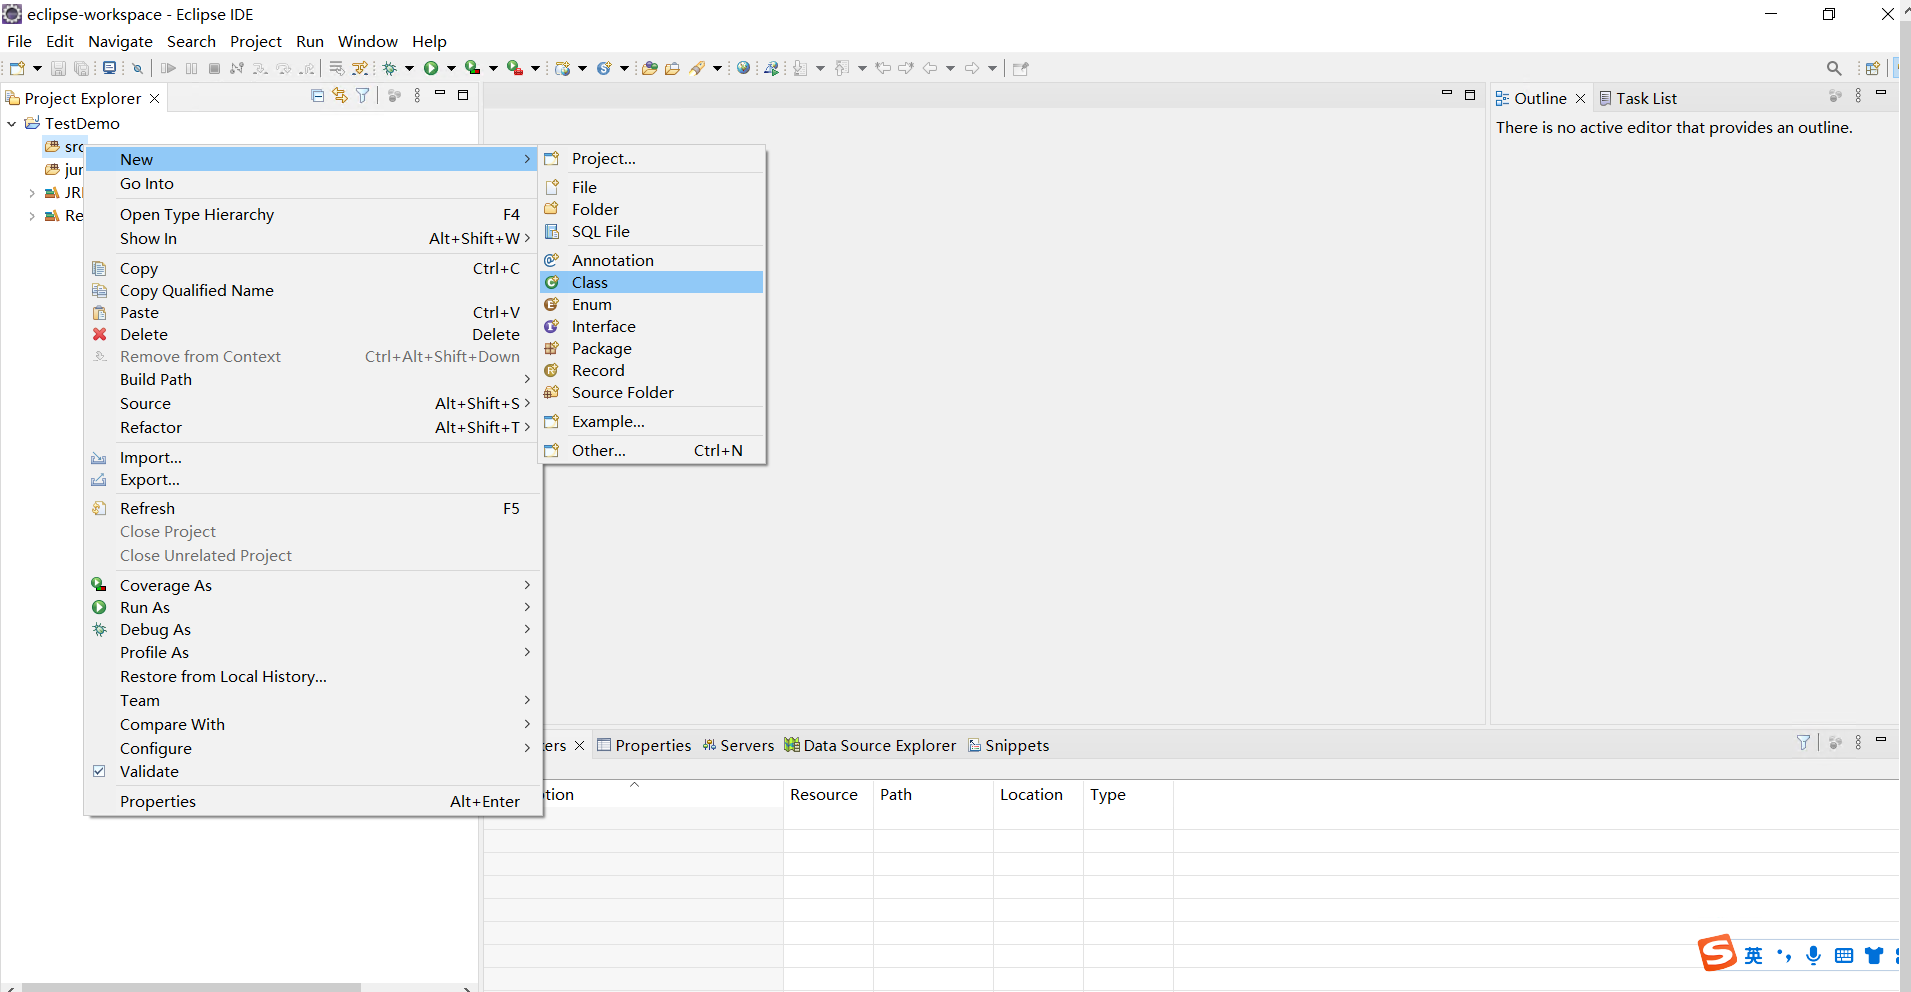
編寫Demo.java程式碼:
public class Demo {
	public int add (int a, int b) {
		return a + b;
	}
	public int div (int a, int b) {
		return a / b;
	}
}
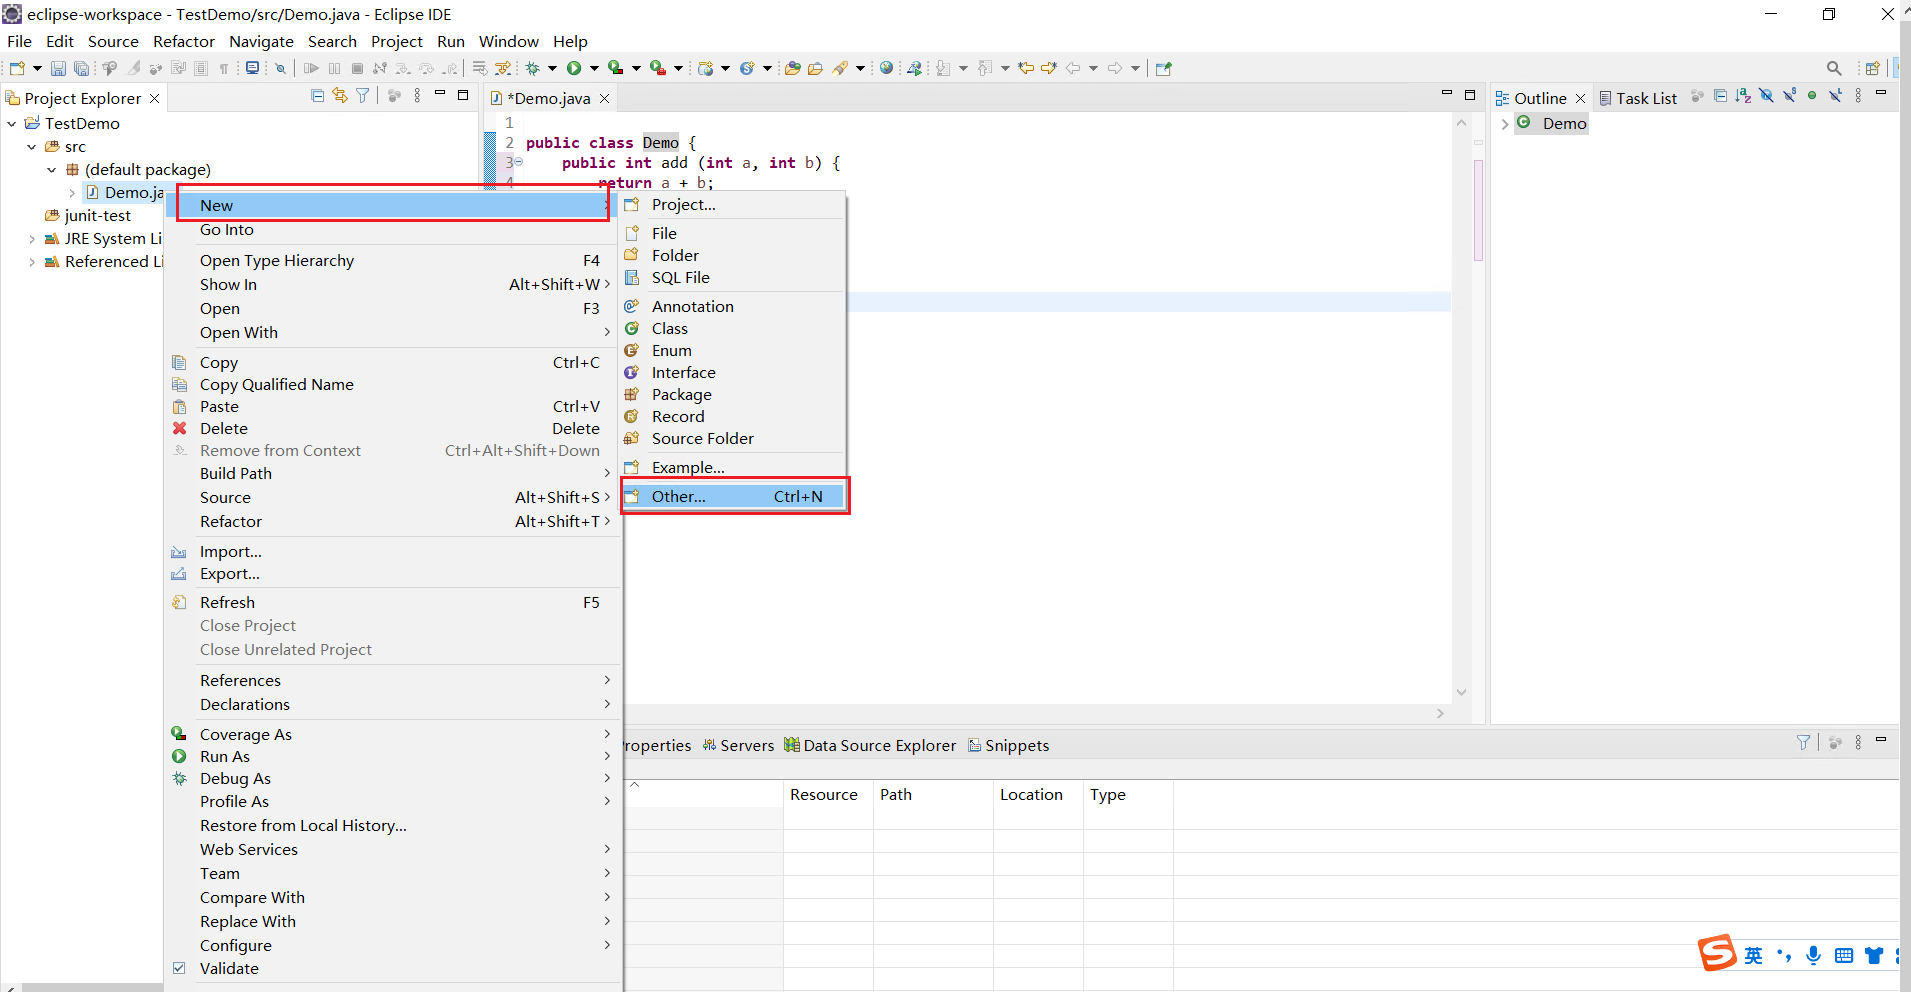
右鍵專案,new一個,這裡沒有junit,我們去其他裡面找
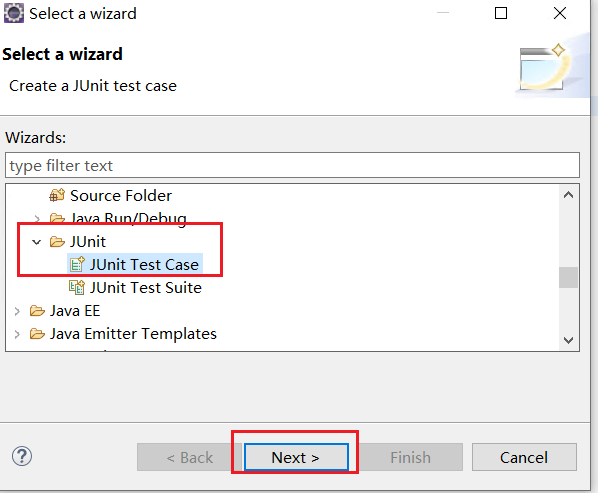
在java下的junit,選擇Test Case,點選next
選擇junit4,選擇目錄到我們剛剛建的junit資料夾,選擇Finish
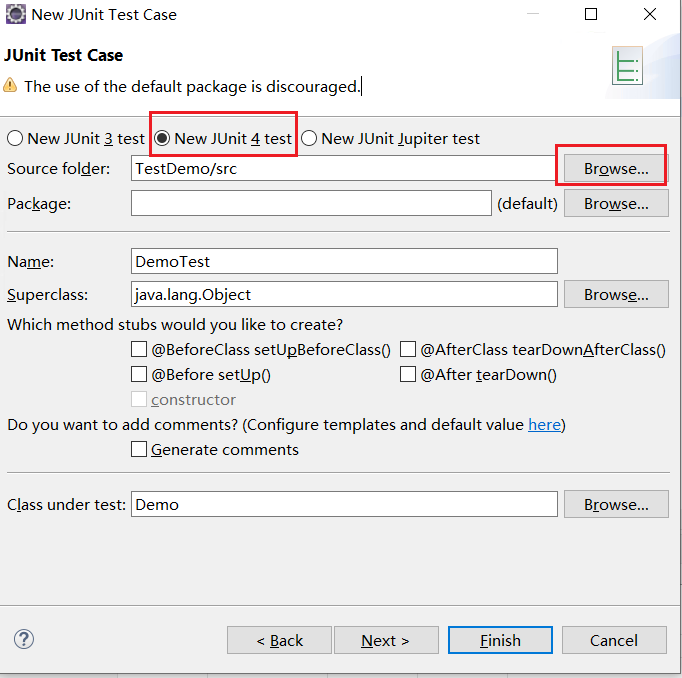
在DemoTest.java中輸入程式碼:
import static org.junit.Assert.*;

import org.junit.After;
import org.junit.Before;
import org.junit.Test;

public class DemoTest {

	Demo demo;

	@Before
	public void setUp() throws Exception {
		demo = new Demo();
	}

	@After
	public void tearDown() throws Exception {
		demo = null;
	}

	@Test
	public void testAdd() {
		// 範例化一個類
		Demo demo = new Demo();
		// 期望值
		int expetected = 2;
		// 真實值
		int trueValue = demo.add(1, 1);
		// 斷言方法
		assertEquals(expetected, trueValue);
	}

	@Test
	public void testDiv() {
		// 範例化一個類
		Demo demo = new Demo();
		// 期望值
		int expetected = 2;
		// 真實值
		int trueValue = demo.div(2, 1);
		// 斷言方法
		assertEquals(expetected, trueValue);
	}

}
執行
1.2 Junit 4 註解
1.2.1 測試用例相關的註解
1.2.1.1 @Before
public void setUp() throws Exception {
    // 初始化所需的資源
}
在每個測試方法之前執行,用以初始化需要初始化的資源
1.2.1.2 @After
@After
public void tearDown() throws Exception {
    // 關閉資源
}
在每個測試方法之後執行,用以關閉需要初始化的資源
1.2.1.3 @BeforeClass
@BeforeClass
public static void setup()  throws Exception {
    // 初始化資源
}
在所有方法執行之前執行,一般被用作執行計算代價很大的任務,如開啟資料庫連線。被@BeforeClass 註解的方法應該是靜態的(即 static型別的)。
1.2.1.4 @AfterClass
@AfterClass
public static void tearDown()  throws Exception {
    // 關閉資源
}
在所有方法執行之後執行,一般被用作執行類似關閉資料庫連線的任務。被@AfterClass 註解的方法應該是靜態的(即 static型別的)。
1.2.1.5 @Test
@Test
public void test01() {
	// 測試,斷言等
}
包含了真正的測試程式碼,並且會被Junit應用為要測試的方法。
@Test註解有兩個可選的引數:
- expected表示此測試方法執行後應該丟擲的異常,(值是異常名)
- timeout檢測測試方法的執行時間
1.2.1.6 @Ignore
註釋掉一個測試方法或者一個類,被註釋的方法或類,不會被執行。
注意:JUnite4的執行順序:@BeforeClass > @Before > @Test1 > @After > @Before > @Test2 > @After ...... > @AfterClass
1.2.1.7 範例
import static org.junit.Assert.*;

import org.junit.After;
import org.junit.Before;
import org.junit.Test;

public class DemoTest {

	@BeforeClass
	public static void setup()  throws Exception {
		// 這裡初始化資源(如連線資料庫)
	}

	@AfterClass
	public static void tearDown()  throws Exception {
		// 關閉資源()
	}

	@Before
	public void setUp() throws Exception {
		System.out.println("SetUp.....");
		// 這裡初始化我們所需要的資源
	}

	@After
	public void tearDown() throws Exception {
		System.out.println("Gone.....");
		// 這裡關閉我們的資源
	}

	@Test
	public void test01() {
		// 測試1
	}

	@Ignore
	@Test
	public void test02() {
		// 測試2
	}

}
1.2.2 打包測試Suite相關的註解
1.2.2.1 @RunWith(Suite.class)
需要一個特殊的Runner, 因此需要向@RunWith註解傳遞一個引數Suite.calss。
1.2.2.2 @Suite.SuiteClasses(...{xx.class, xx.class, ...})
用來表明這個類是一個打包測試類,把需要打包的類作為引數傳遞給該註解即可。
1.2.2.3 範例
有了這兩個註解之後,就已經完整的表達了所有的含義,因此下面的類無關緊要,隨便起個類名,內容為空
import org.junit.runner.RunWith;
import org.junit.runners.Suite;
import org.junit.runners.Suite.SuiteClasses;

public class DemoTest {

	@RunWith(Suite.class)
	@SuiteClasses({Demo01.class, Demo02.class, Demo03.class})
	public class AllTests {

	}
}
1.2.3 引數化測試相關的註解
1.2.3.1 @RunWith(Parameterized.class)
首先要為這種測試專門生成一個新的類,而不能與其他測試共用同一個類。
這裡不使用預設的Runner了,使用帶有引數化功能的Runner。
@RunWith(Parameterized.class)這條語句就是為這個類指定了ParameterizedRunner。
這個需要和我們後面的@Parameters組合使用
1.2.3.2 @Parameters
放在方法上。
定義一個待測試的類,並且定義兩個變數,一個用於存放引數,一個用於存放期待的結果。
定義測試資料的結合,就是下方的prepareData()方法,該方法可以任意命名,但是必須使用@Parameters標註進行修飾。
這裡需要注意:其中的資料是一個二維陣列,資料兩兩一組,每組中的這兩個資料,一個是引數,一個是預期的結果。比如第一組{2,4}中:2是引數,4是預期結果。這兩資料順序無所謂。
然後,是建構函式,其功能就是對先前定義的兩個引數進行初始化。這裡要注意引數的順序,要和上面的資料集合的順序保持一致。(比如都是先引數後結果)
那麼這裡我們還是看下面的例子吧
1.2.3.3 範例
import static org.junit.Assert.assertEquals;

import java.util.Arrays;

import org.junit.Test;
import org.junit.runner.RunWith;
import org.junit.runners.Parameterized;
import org.junit.runners.Parameterized.Parameters;

@RunWith(Parameterized.class)
public class FibonacciTest {

    @Parameters(name = "{index}: fib({0})={1}")
    public static Iterable<Object[]> data() {
        return Arrays.asList(new Object[][] {
                 { 0, 0 }, { 1, 1 }, { 2, 1 }, { 3, 2 }, { 4, 3 }, { 5, 5 }, { 6, 8 }
           });
    }

    private int input;
    private int expected;

    public FibonacciTest(int input, int expected) {
        this.input = input;
        this.expected = expected;
    }

    @Test
    public void test() {
        assertEquals(expected, Fibonacci.compute(input));
    }
}
1.2.4 控制用例執行順序相關的註解
1.2.4.1 @FixMethodOrder
控制測試方法的執行順序的。
該註解的引數是org.junit.runners.MethodSorters物件。
列舉類org.junit.runners.MethodSorters中定義三種順序型別:
MethodSorters.JVM:按照JVM得到的方法順序,即程式碼中定義的方法順序。
MethodSorters.DEFAULT:預設的順序,以確定但不可預期的順序執行。
MethodSorters.NAME_ASCENDING:按方法名字母順序執行。
1.2.5 自定義規則Rule相關的註解
1.2.5.1 @Rule和@ClassRule
-
什麼是Rule實現
Rule是一組實現了TestRule介面的共用類,提供了驗證,監視TestCase和外部資源管理等能力。
即,提供了測試用例執行過程中一些通用功能的共用能力,使不必重複編寫一些功能類似的程式碼。
-
JUnit4中包含兩個註解:@Rule和@ClassRule
用於修飾Field或返回Rule的Method。
兩者作用域不同:
- @Rule的作用域是測試方法。
- @ClassRule則是測試Class。
1.2.5.2 JUnit提供了以下幾個Rule實現,必要時也可以自己實現Rule
-
Verifier:驗證測試執行結果的正確性。
-
ErrorCollector:收集測試方法中出現的錯誤資訊,測試不會中斷,如果有錯誤發生,測試結束後會標記失敗。
-
ExpectedException:提供靈活的異常驗證功能。
-
Timeout:用於測試超時的Rule。
-
ExternalResource:外部資源管理。
-
TemporaryFolder:在JUnit的測試執行前後,建立和刪除新的臨時目錄。
-
TestWatcher:監視測試方法生命週期的各個階段。
-
TestName:在測試方法執行過程中提供獲取測試名字的能力。