[Android開發學iOS系列] Auto Layout
[Android開發學iOS系列] Auto Layout
內容:
- 介紹什麼是Auto Layout.
- 基本使用方法
- 在程式碼中寫約束的方法
- Auto Layout的原理
- 尺寸和優先順序
- Auto Layout的使用細則
- 重要的屬性
- StackView
- Layout Guide
- Performance
- Debugging
What is Auto Layout
Auto Layout會根據constraints(約束)動態計算出view hierarchy中所有View的位置和大小.
對於Android開發者來說, Auto Layout很容易上手, 它非常像ConstraintLayout和RelativeLayout: 給View規定它上下左右和誰對齊, 決定UI的位置和大小.
Auto Layout的約束更寬泛一些, 不僅僅是兩個View之間的關係, 還有寬高, 比率等設定, 並且可以有一些大於小於等的範圍設定.
Auto Layout不是一個View
開始學Auto Layout我還以為它是一個叫AutoLayout的View, 把其他子View包進去然後設定一些放置規則, 就類似於Android的ConstraintLayout或者RelativeLayout.
但是其實不是, AutoLayout不是一個具體的View, 它代表的是一種計算引擎. 因為在程式碼裡你從來不需要寫AutoLayout這個關鍵字, 寫的從來都是Constraints.
開發者為View設定足夠多的約束, 規定和這個View位置和大小相關的因素, 這個引擎就可以為我們計算出View的位置和大小.
AutoLayout為了解決什麼問題
不同螢幕適配; 可以合理應對變化的responsive UI.
改變佈局有內外兩種因素, 除了螢幕尺寸, 螢幕旋轉, 視窗大小改變等外部因素.
內部因素還包含了內容的動態變化, 國際化的支援, 字型的調整等.
和Auto Layout平行的解決方案是什麼
擺放UI有三種主要的方法:
- 在程式裡給每個View設定frame.
- 設定frame, 結合使用autoresizing masks來應對外部變化. (autoresizing mask定義了一個view的frame在它的superview frame變化時應該如何變化.)
- 使用Auto Layout.
可以看出第二種只是在基於frame的方式上做出了一點改進, 所能應對的也僅僅是外部變化, 有一定的侷限性. 所以可以把前兩種歸類為一種.
這也正是Auto Layout出現之前的解決方案, 即基於frame的佈局方式.
Auto Layout的思考點不再著眼於view frame, 而是view的relationship.
如何使用Auto Layout
寫iOS的UI有多種方式, Auto Layout屬於UIKit, 在寫的時候, 可以用storyboard, 也可以直接在程式碼中寫約束.
在storyboard裡面有一些好處, 比如所見即所得, 而且ide會給出一些warnings, 比如控制元件在storyboard上的位置與約束不一致, 會提示, 並且可以選擇方式修復.
在storyboard裡面寫約束確實是不容易出錯的一種方式, xcode的操作也很直觀, 這裡不做演示了.
之前我們也討論過, 用storyboard寫UI存在閱讀性差, 程式碼版本管理和團隊合作都有問題等.
所以具體使用需要看實際情況.
關於約束, location和size的約束不能混著用, 這個也是從邏輯上就可以理解的.
比如讓某個view的top和parent的top對齊(或者再offset個常數)是可以的, 但是讓top等於某個size就不能理解了.
在程式碼中建立約束
如果不用Interface Builder, 而是選擇在程式碼中建立約束, 那麼仍然有多種選擇:
- 使用layout anchor.
- 使用
NSLayoutConstraint類. - 使用Visual Format Language.
我們在改變約束的時候通常不會add/remove constraints, 而是active/deactivate.
使用Layout anchor
這個方法可能是最直觀的一種方法.
// Get the superview's layout
let margins = view.layoutMarginsGuide

// Pin the leading edge of myView to the margin's leading edge
myView.leadingAnchor.constraint(equalTo: margins.leadingAnchor).isActive = true

// Pin the trailing edge of myView to the margin's trailing edge
myView.trailingAnchor.constraint(equalTo: margins.trailingAnchor).isActive = true

// Give myView a 1:2 aspect ratio
myView.heightAnchor.constraint(equalTo: myView.widthAnchor, multiplier: 2.0).isActive = true
這裡我們把每一條約束設定了isActive = true.
也可以直接放在一個陣列裡一起activate, 會有效能優勢:
NSLayoutConstraint.activate([
    myView.leadingAnchor.constraint(equalTo: margins.leadingAnchor),
    myView.trailingAnchor.constraint(equalTo: margins.trailingAnchor),
    myView.heightAnchor.constraint(equalTo: myView.widthAnchor, multiplier: 2.0)
])
使用NSLayoutConstraint
使用NSLayoutConstraint寫起來比較囉嗦, 必須給每個引數都指定值:
NSLayoutConstraint(item: myView, attribute: .leading, relatedBy: .equal, toItem: view, attribute: .leadingMargin, multiplier: 1.0, constant: 0.0).isActive = true

NSLayoutConstraint(item: myView, attribute: .trailing, relatedBy: .equal, toItem: view, attribute: .trailingMargin, multiplier: 1.0, constant: 0.0).isActive = true

NSLayoutConstraint(item: myView, attribute: .height, relatedBy: .equal, toItem: myView, attribute:.width, multiplier: 2.0, constant:0.0).isActive = true
這個不但寫起來麻煩, 可讀性也很差.
Visual Format Language (VFL)
let views = ["myView" : myView]
let formatString = "|-[myView]-|"

let constraints = NSLayoutConstraint.constraints(withVisualFormat: formatString, options: .alignAllTop, metrics: nil, views: views)

NSLayoutConstraint.activate(constraints)
用一些鍵碟符號來表達這個佈局的. (like a way of drawing the layout you want with a series of keyboard symbols)
管道符號代表parent view的邊邊.
Auto Layout的工作原理

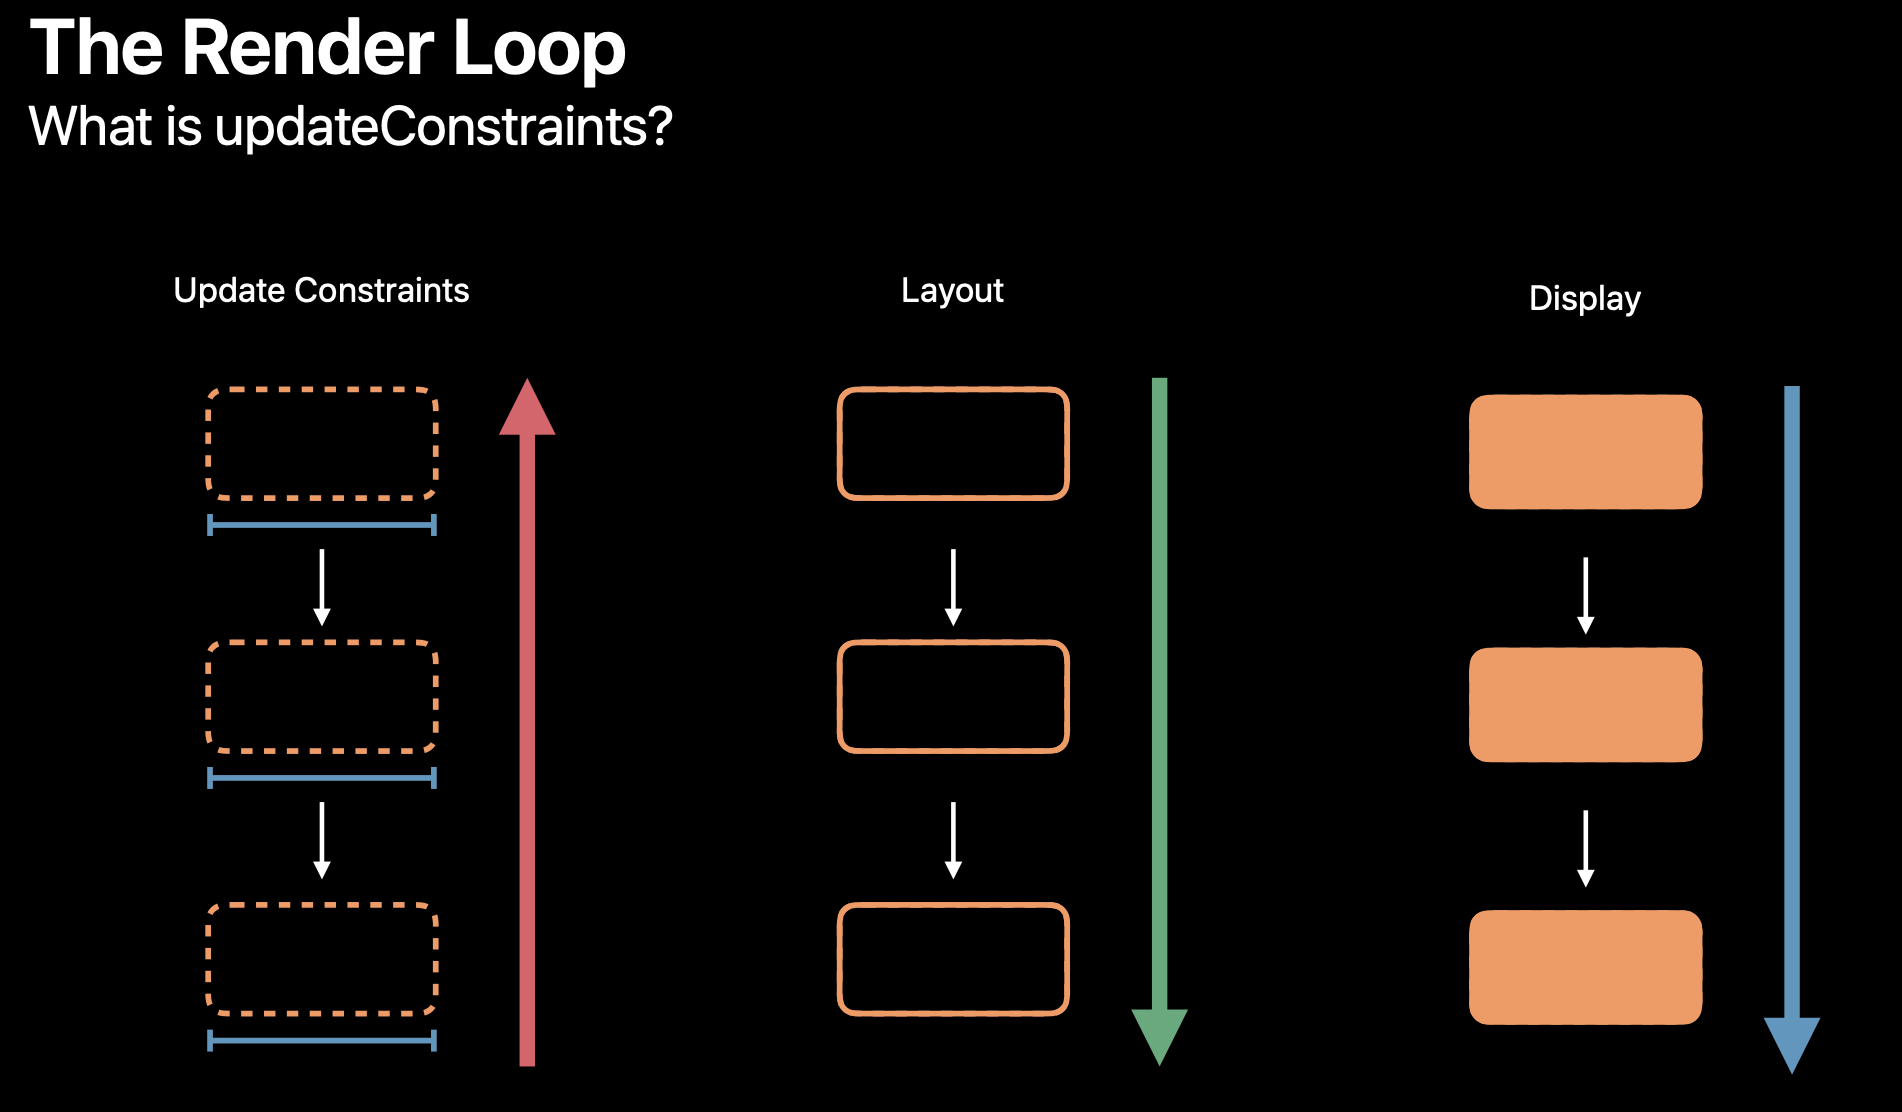
圖來自於: https://developer.apple.com/videos/play/wwdc2018/220
Render loop包含如上三個階段:
- update constraints從葉子節點向上.
- layout從parent節點向下執行.
- display即最後的繪製階段.
這三個階段對應的方法:

Update Constraints
它的工作是:
- 把每個公式(約束)加入計算引擎Engine裡.
- 計算引擎負責解出變數: 最後的frame.
- 通知View: Superview: setNeedsLayout().
engine這裡扮演一個layout cache和tracker. 收到變化時它會重新計算.
Layout
從engine得到資訊後, Subview setBounds(), subview setCenter().
尺寸和優先順序
瞭解了Auto Layout的原理之後, 看尺寸和優先順序的部分就很好理解.
Intrinsic content size
有一些View有固有內容尺寸, 對於AutoLayout來說, 會預設使用intrinsic content size, 這樣開發者就不用非得提供尺寸資訊.
預設使用: intrinsic content size. 固有內容尺寸.
- UIImageView: image size.
- UILabel: text size.
優先順序
優先順序的值可以從1到1000, 預設是1000.
- Required: 1000
- Default High: 750
- Default Low: 250
有優先順序是因為多個constraints之間可能會有衝突, 那麼約束的要求可能不能完全100%滿足, 計算引擎會在在不能滿足的情況下, 儘量地減少偏差.
約束的優先順序就用來表示哪條約束我們更加關心, 更想滿足, 優先考慮.
優先順序相關的變數
- content hugging priority: 尺寸比固有內容更大的可能性. 預設250. 值越小表示View更願意擴張來滿足約束了; 值越大表示View希望儘可能地接近固有尺寸.
- content compression resistance priority: 尺寸比固有內容尺寸更小的阻力程度. 預設750. 值越大表示這個View壓縮內容的可能性越小.
Auto Layout的使用細則
Properties & Functions
有個重要的屬性要提一下:
translatesAutoresizingMaskIntoConstraints
這個屬性是為了相容Auto Layout出現之前的基於frame佈局的legacy layout系統, 幫助View在Auto Layout的世界裡, 以legacy layout system的方式運作.
當這個屬性為true, 並且設定了frame時, 引擎會自動生成constraints來滿足這個frame.
這個View的屬性預設為true. 當我們要用constraints時需要設定為false.
- 當在storyboard中開始為View設定constraints時, 會自動設定為false.
- 當我們在程式碼中給view設定約束之前, 需要自己顯式地把這個屬性設定為false.
如果還是用frame佈局, 這個屬性不用設定成false. 比如在迴圈裡生成很多view的時候, 可能想有一些尺寸和位置用frame設定.
- sizeToFit(): 剛好包裹內容的大小.
Stack View
Stack View是在Auto Layout的基礎上的, 幫助我們做一些水平或者垂直的佈局, 不用寫內部元素間的constraints. (類似於Android中的LinearLayout.)
往Stack View里加需要疊放的元素用的是addArrangedSubview()這個方法.
與此同時, addSubview()方法可以用來加一些別的View.
幾個屬性:
- axis: 主軸方向.
- alignment: 對齊方式.
- distribution: 沿著主軸的分佈.
Stack View是比較輕量的, 所以官方會建議儘量多使用Stack View, 只在有必要的時候寫約束.
確實方便很多.
Layout Guide
很多時候為了佈局的需要我們可能要包裹View或者是新增一下輔助View, 每個View都有自己的layer, 所以為了改進效能, 我們可以使用Layout Guide.
View自帶一個layoutMarginsGuide.
還挺方便的. (看了這個視訊: https://www.youtube.com/watch?v=4qPcMGiSADA)
Performance & Building Efficient Layouts
iOS12對AutoLayout的效能做了很多改進, 這個WWDC的talk有講.
關於有效率的佈局, 簡而言之就是少做無用功.
Constraint Churn
constraint churning是個典型的效能問題.
churn: 攪動.
constraint churn是指更新了constraints, 但實際上view並不需要移動.
這樣是給engine傳送了額外的資訊, 達到一定數量之後, 就會影響效能.
需要注意的是:
- 不要remove all constraints然後又add all. 可以把它們分組, 哪些是固定不變的, 那麼addView的時候就加上, 然後activate; 對於需要動態變化的部分可以分兩組(比如一個根據內容動態決定是否需要顯示圖片的例子, 可以有兩個陣列: imageConstraints和noImageConstraints), 單獨activate/deactivate這兩組約束.
- 使用isHidden可以提高效率. 比起add/remove Subview來說.
也是WWDC2018/220裡提到的, 如何避免Constraint Churn:
- Avoid removing all constraints
- Add static constraints once
- Only change the constraints that need changing
- Hide views instead of removing them
Size
可以選擇性地override一些尺寸, 減少text measure計算的過程:
- Return size if known without text measurement
- Use
UIView.noIntrinsicMetricand constraints.
System Layout Size Fitting Size
intrinsic content size是view傳給engine的.
而這個system layout size fitting size, 是從engine取出來的.
但是它有想不到的效能消耗. (every time you call the method, an engine is created and discarded.)
Debugging
Auto Layout中由約束引起的錯誤可能會有:
- 約束自相矛盾(衝突), 不能滿足, 無解. (比如一個寬度即等於100又等於200, ???)
- 約束不足導致有很多可能的解. (Engine會給出一個解, 但可能不是你想要的.)
關於怎麼debug可以看: https://developer.apple.com/library/archive/documentation/UserExperience/Conceptual/AutolayoutPG/TypesofErrors.html
大體上是根據Log還有一些可能有幫助的view的屬性和方法(供debug用).
這個視訊(https://developer.apple.com/videos/play/wwdc2015/219/)的後半段有講debug.
這裡還有一個小工具網站: https://www.wtfautolayout.com/
Summary
Auto Layout是線性代數的應用範例.
有時候搬磚搬久了是不是應該慢下來欣賞一下數學的美.
References
- Understanding Auto Layout - Official Doc
- High Performance Auto Layout - WWDC2018
- Mysteries of Auto Layout, Part 1 - WWDC 2015
- Mysteries of Auto Layout, Part 2 - WWDC 2015
- Auto Layout Basics at codepath
- The Auto Layout cheat sheet
- Behind the Scenes with Auto Layout - iOS Conf SG 2019
- AutoLayout Log分析小工具
