低程式碼 系列 —— 視覺化編輯器2
其他章節請看:
視覺化編輯器2
在第一篇中我們搭建了視覺化編輯器的框架,完成了物料區和元件區的拖拽;本篇繼續完善編輯器的功能,例如:復原和重做、置頂和置底、刪除、右鍵選單、快捷鍵。
復原和重做
需求:給物料區和編輯區新增復原和重做功能
例如:
- 從物料區依次拖拽元件到編輯區,點選
復原能回回到上一步,點選重做又可以恢復 - 在編輯區中拖動元素,點選復原也能回到上一次位置
選單區增加復原和重做按鈕樣式
需求:選單區增加復原和重做按鈕樣式
效果如下圖所示:

抽離選單區到新模組 Menus.js。核心程式碼如下:
// 選單區
// spug\src\pages\lowcodeeditor\Menus.js
...

class Menus extends React.Component {
    render() {
        return (
            <div style={{ textAlign: 'center' }}>
                <Space>
                    <Button type="primary" icon={<UndoOutlined />} onClick={() => console.log('復原')}>復原</Button>
                    <Button type="primary" icon={<RedoOutlined />} onClick={() => console.log('重做')}>重做</Button>
                </Space>
            </div>
        )
    }
}
在 index.js 中引入 Menus 模組:
// spug\src\pages\lowcodeeditor\index.js
import Menus from './Menus'

...
<Header className={styles.editorMenuBox}>
    <Menus/>
</Header>
復原和重做的基本思路
復原和重做顧名思義,請看下圖(from 雲音樂技術團隊):

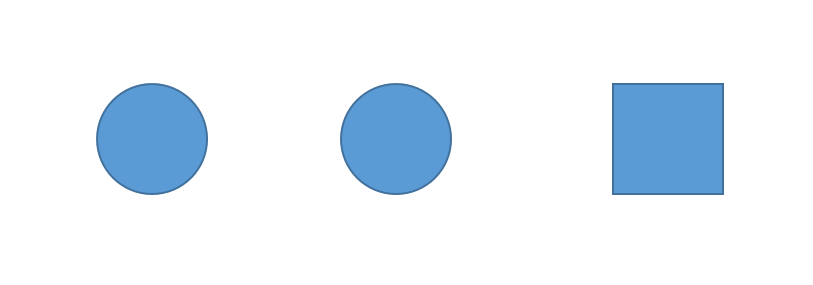
有一個點需要注意:筆者開啟 win7 下的 ppt,依次做如下操作:
- 拖一個圓形,再拖一個圓形,再拖入一個圓形,目前有三個圓
- 按一次
ctrl+z復原,目前只有兩個圓圈,在拖入一個矩形
此刻效果如下圖所示:
-
按一次復原,顯示兩個圓
-
在按一次復原,只有一個圓,而非 3 個圓(
注意)。
整個過程如下圖所示:從左到右有 5 種頁面狀態
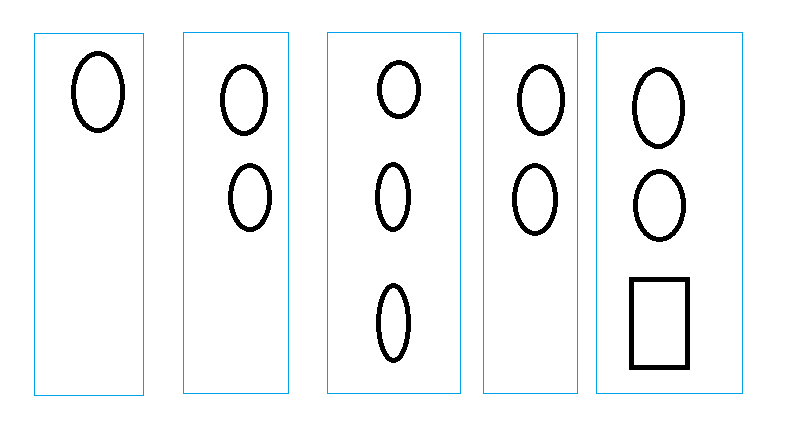
第3種頁面狀態為什麼在撤回中丟失?
或許設計就是這樣規定的:當頁面處在某個歷史狀態下,在進行某些操作,就會產生一個新的狀態分支,之前的歷史狀態則被丟棄。就像這樣(from 雲音樂技術團隊):

既然每個操作後對應一個新的頁面狀態,而我們使用的react也是資料驅動的,那麼就使用快照的思路,也就是把每個頁面的資料儲存一份,比如你好回到上一個狀態,直接從歷史資料中找到上一步資料,頁面則會自動便過去。
開始編碼前,我們先過一下資料結構和基本方法。
基本資料結構如下:
snapshotState = {
    current: -1, // 索引
    timeline: [], // 存放快照資料
    limit: 20, // 預設只能回退或復原最近20次。防止儲存的資料量過大
    commands: {}, // 命令和執行功能的對映 undo: () => {} redo: () => {}
}
commands 中存放的是命令(或操作)比如復原、拖拽。比如註冊復原一個命令:
// 復原
store.registerCommand({
    name: 'undo',
    keyboard: 'ctrl+z',
    execute() { // {1}
        return {
            // 從快照中取出當前頁面狀態,呼叫對應的 undo 方法即可完成復原
            execute() { // {1}
                console.log('復原')
                const {current, timeline} = store.snapshotState
                // 無路可退則返回
                if(current == -1){
                    return;
                }

                let item = timeline[current]
                if(item){
                    item.undo()
                    store.snapshotState.current--
                }
            }
        }
    }
})
當我們執行 commands 中執行該命令時,則會執行 execute()(行{1}),從快照歷史中取出當前快照,執行對應的 undo() 方法完成復原。 undo() 非常簡單,就像這樣:
store.registerCommand({
    name: 'drag',
    pushTimeline: 'true',
    execute() {
        let before = _.cloneDeep(store.snapshotState.before)
        let after = _.cloneDeep(store.json)
        return {
            redo() {
                store.json = after
            },
            // 復原
            undo() {
                store.json = before
            }
        }
    }
})
復原和重做基本實現
我們把狀態相關的資料集中存在 store.js 中:
// spug\src\pages\lowcodeeditor\store.js

import _ from 'lodash'

class Store {

  // 快照。用於復原、重做
  @observable snapshotState = {
    // 記錄之前的頁面狀態,用於復原
    before: null,
    current: -1, // 索引
    timeline: [], // 存放快照資料
    limit: 20, // 預設只能回退或復原最近20次。防止儲存的資料量過大
    commands: {}, // 命令和執行功能的對映 undo: () => {} redo: () => {}
    commandArray: [], // 存放所有命令
  }

  // 註冊命令。將命令存入 commandArray,並在建立命令名和對應的動作,比如 execute(執行), redo(重做), undo(復原)
  registerCommand = (command) => {

    const { commandArray, commands } = this.snapshotState
    // 記錄命令
    commandArray.push(command)

    // 用函數包裹有利於傳遞引數
    commands[command.name] = () => {
      // 每個操作可以有多個動作。比如拖拽有復原和重做
      // 每個命令有個預設
      const { execute, redo, undo } = command.execute()
      execute && execute()

      // 無需存入歷史。例如復原或重做,只需要移動 current 指標。如果是拖拽,由於改變了頁面狀態,則需存入歷史
      if (!command.pushTimeline) {
        return
      }
      let {snapshotState: state} = this
      let { timeline, current, limit } = state
      // 新分支
      state.timeline = timeline.slice(0, current + 1)
      state.timeline.push({ redo, undo })
      // 只保留最近 limit 次操作記錄
      state.timeline = state.timeline.slice(-limit);
      state.current = state.timeline.length - 1;
    }
  }

  // 儲存快照。例如拖拽之前、移動以前觸發
  snapshotStart = () => {
    this.snapshotState.before = _.cloneDeep(this.json)
  }

  // 儲存快照。例如拖拽結束、移動之後觸發
  snapshotEnd = () => {
    this.snapshotState.commands.drag()
  }
}

export default new Store()
在抽離的選單元件中初始化命令,即註冊復原、重做、拖拽三個命令。
// 選單區
// spug\src\pages\lowcodeeditor\Menus.js

import _ from 'lodash'

@observer
class Menus extends React.Component {
    componentDidMount() {
        // 初始化
        this.registerCommand()
    }
    // 註冊命令。有命令的名字、命令的快捷鍵、命令的多個功能
    registerCommand = () => {
        // 重做命令。
        // store.registerCommand - 將命令存入 commandArray,並在建立命令名和對應的動作,比如 execute(執行), redo(重做), undo(復原)
        store.registerCommand({
            // 命令的名字
            name: 'redo',
            // 命令的快捷鍵
            keyboard: 'ctrl+y',
            // 命令執行入口。多層封裝用於傳遞引數給裡面的方法
            execute() {
                return {
                    // 從快照中取出下一個頁面狀態,呼叫對應的 redo 方法即可完成重做
                    execute() {
                        console.log('重做')
                        const {current, timeline} = store.snapshotState
                        let item = timeline[current + 1]
                        // 可以撤回
                        if(item?.redo){
                            item.redo()
                            store.snapshotState.current++
                        }
                    }
                }
            }
        })

        // 復原
        store.registerCommand({
            name: 'undo',
            keyboard: 'ctrl+z',
            execute() {
                return {
                    // 從快照中取出當前頁面狀態,呼叫對應的 undo 方法即可完成復原
                    execute() {
                        console.log('復原')
                        const {current, timeline} = store.snapshotState
                        // 無路可退則返回
                        if(current == -1){
                            return;
                        }

                        let item = timeline[current]
                        if(item){
                            item.undo()
                            store.snapshotState.current--
                        }
                    }
                }
            }
        })

        store.registerCommand({
            name: 'drag',
            // 標記是否存入快照(timelime)中。例如拖拽動作改變了頁面狀態,需要往快照中插入
            pushTimeline: 'true',
            execute() {
                // 深拷貝頁面狀態資料
                let before = _.cloneDeep(store.snapshotState.before)
                let after = _.cloneDeep(store.json)
                // 重做和復原直接替換資料即可。
                return {
                    redo() {
                        store.json = after
                    },
                    // 復原
                    undo() {
                        store.json = before
                    }
                }
            }
        })
    }
    render() {
        return (
            <div style={{ textAlign: 'center' }}>
                <Space>
                    <Button type="primary" icon={<UndoOutlined />} onClick={() => store.snapshotState.commands.undo()}>復原</Button>
                    <Button type="primary" icon={<RedoOutlined />} onClick={() => store.snapshotState.commands.redo()}>重做</Button>
                </Space>
            </div>
        )
    }
}

export default Menus
在拖拽前觸發 snapshotStart() 記錄此刻頁面狀態,並在拖拽後觸發 snapshotEnd() 將現在頁面的資料存入歷史,用於復原和重做。請看程式碼:
// 物料區(即元件區)
// spug\src\pages\lowcodeeditor\Material.js
@observer
class Material extends React.Component {
    // 記錄拖動的元素
    dragstartHander = (e, target) => {
        ...
        // 打快照。用於記錄此刻頁面的資料,用於之後的復原
        store.snapshotStart()
    }
// spug\src\pages\lowcodeeditor\Container.js
@observer
class Container extends React.Component {
  dropHander = e => {
    // 打快照。將現在頁面的資料存入歷史,用於復原和重做。
    store.snapshotEnd()
  }
筆者測試如下:
- 依次從物料區拖拽三個元件到編輯區
- 點選
復原、復原、復原編輯區依次剩2個元件、1個元件、0個元件 - 在點選
重做、重做、重做,編輯區依次顯示1個元件、2個元件、3個元件
編輯區增加復原和重做
上面我們完成了物料區拖拽元件到編輯區的復原和重做,如果將元件從編輯區中移動,點選復原是不能回到上一次的位置。
需求:編輯區移動某元件到3個不同的地方,點選撤回能依次回到之前的位置,重做也類似。
思路:選中元素時打快照,mouseup時如果移動過則打快照
全部變動如下:
// spug\src\pages\lowcodeeditor\ComponentBlock.js
mouseDownHandler = (e, target, index) => {
    // 快照
    store.snapshotStart()
}
// spug\src\pages\lowcodeeditor\Container.js
mouseMoveHander = e => {
    // 選中元素後,再移動才有效
    if (!store.startCoordinate) {
        return
    }
    // 標記:選中編輯區的元件後並移動
    store.isMoved = true

}
// mouseup 後輔助線不在顯示
mouseUpHander = e => {
    if(store.isMoved){
        store.isMoved = false
        store.snapshotEnd()
    }
    store.startCoordinate = null
}
// spug\src\pages\lowcodeeditor\store.js
@observable snapshotState = {
    // 編輯區選中元件拖動後則置為 true
    isMoved: false,
}
復原和重做支援快捷鍵
需求:按 ctrl+z 復原,按 ctrl+y 重做。
每次操作都得存放一次資料,即打一次快照
實現如下:
// 選單區
// spug\src\pages\lowcodeeditor\Menus.js

@observer
class Menus extends React.Component {
    componentDidMount() {
        // 初始化
        this.registerCommand()

        // 所有按鍵均會觸發keydown事件
        window.addEventListener('keydown', this.onKeydown)
    }

    // 解除安裝事件
    componentWillUnmount() {
        window.removeEventListener('keydown', this.onKeydown)
    }

    // 取出快捷鍵對應的命令並執行命令
    onKeydown = (e) => {
        console.log('down')
        // KeyboardEvent.ctrlKey 唯讀屬性返回一個 Boolean 值,表示事件觸發時 control 鍵是 (true) 否 (false) 按下。
        // code 返回一個值,該值不會被鍵盤佈局或修飾鍵的狀態改變。當您想要根據輸入裝置上的物理位置處理鍵而不是與這些鍵相關聯的字元時,此屬性非常有用
        const {ctrlKey, code} = e
        const keyCodes ={
            KeyZ: 'z',
            KeyY: 'y',
        }
        // 未匹配則直接退出
        if(!keyCodes[code]){
            return
        }
        // 生成快捷鍵,例如 ctrl+z
        let keyStr = []
        if(ctrlKey){
            keyStr.push('ctrl')
        }
        keyStr.push(keyCodes[code])
        keyStr = keyStr.join('+')

        // 取出快捷鍵對應的命令
        let command = store.snapshotState.commandArray.find(item => item.keyboard === keyStr);
        // 執行該命令
        command = store.snapshotState.commands[command.name]
        command && command()
    }
    ...
}

export default Menus
json 匯入匯出
編輯器最終需要將生成的 json 組態檔匯出出去,對應的也應該支援匯入,因為做了一半下班了,得儲存下次接著用。
我們可以分析下 amis 的視覺化編輯器,它將匯出和匯入合併成一個模組(即程式碼)。就像這樣:
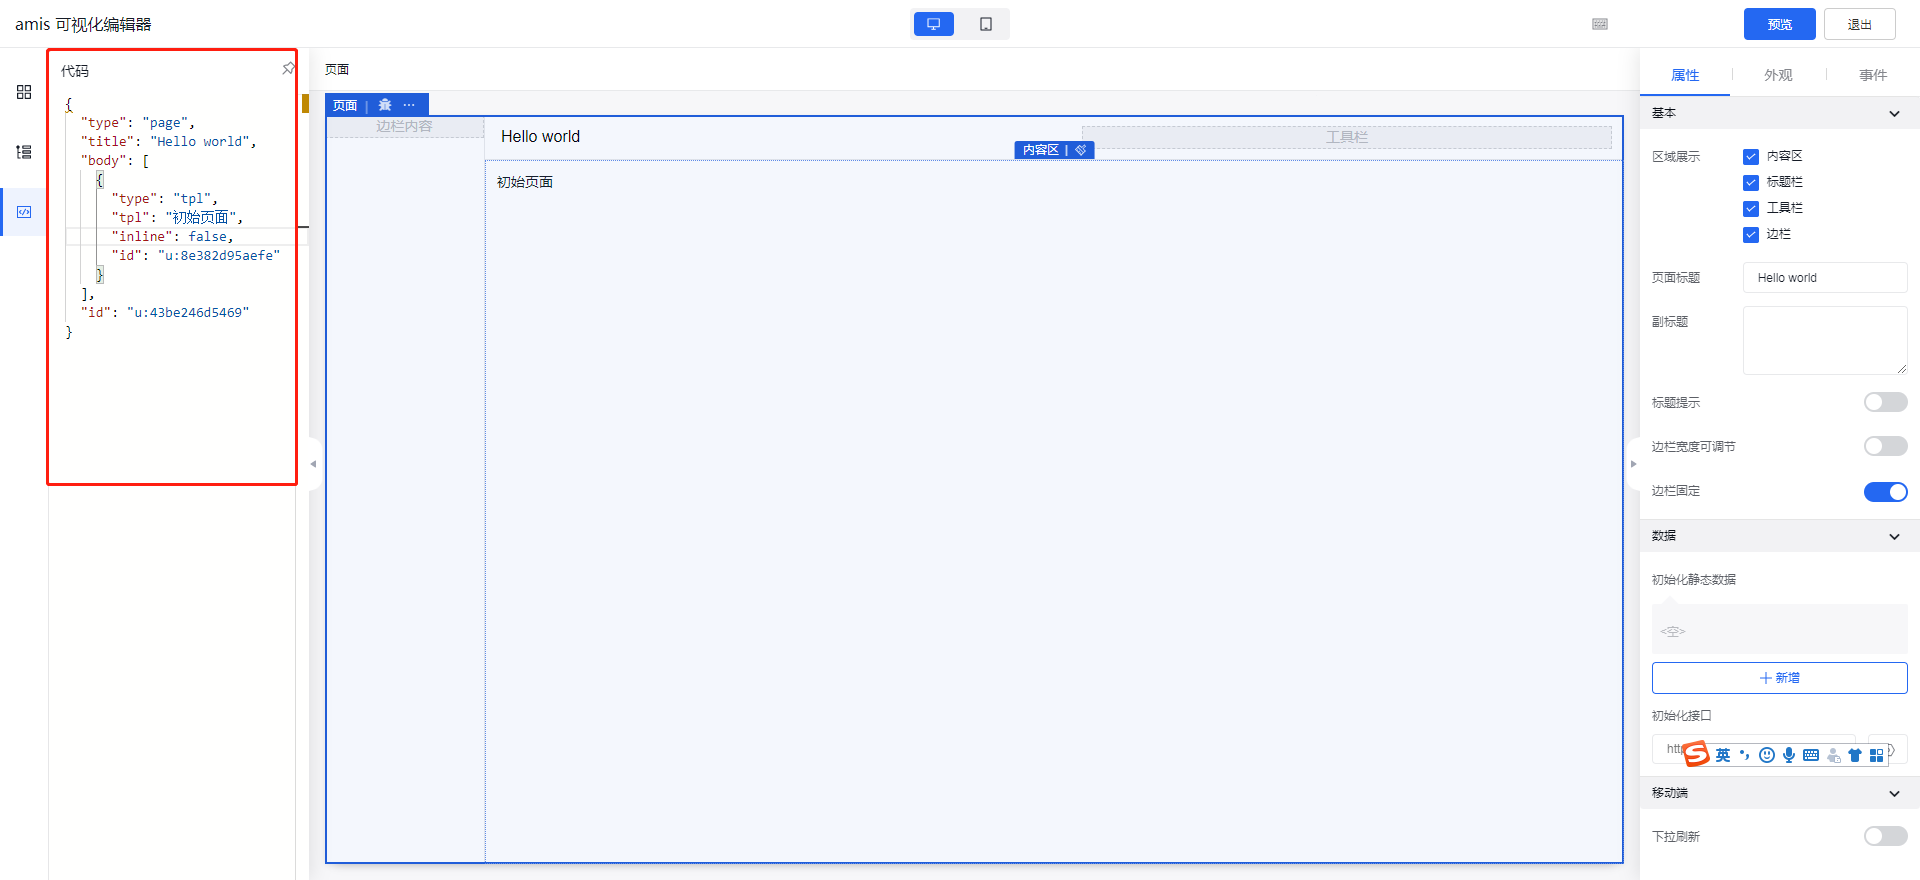
如果要匯出資料,直接複製即可。而且更改設定資料,編輯區的元件也會同步,而且支援撤回,匯入也隱形的包含了。
我們要做到上面這點也不難,就是將現在的設定資料 json 放入一個面板中,給面板增加鍵盤事件,最主要的是註冊 input 事件,當 textarea 的 value 被修改時觸發從而放入歷史快照中,匯入的貼上也得放入歷史快照,按 ctrl + z 時撤回。
難點是組態檔錯誤提示,比如某元件的設定屬性是 type,而使用者改成 type2,這個可以通過驗證每個元件支援的屬性解決,但如果 json 中缺少一個逗號,這時應該像 amise 編輯器一樣友好(給出錯誤提示):
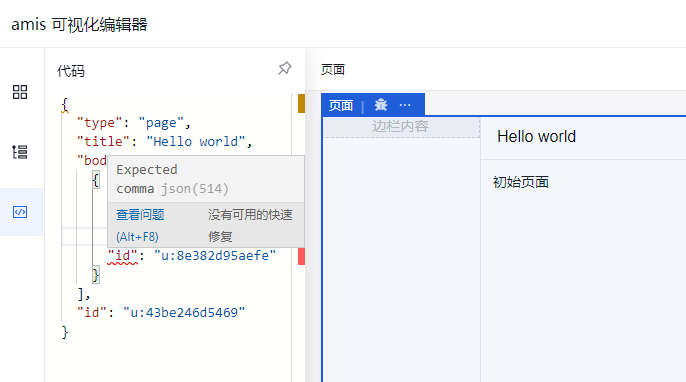
如果需求可以由自己決定,那麼可以做得簡單點:
- 匯出,直接彈框顯示組態檔(多餘的屬性,比如給程式內部用的剔除)給使用者看即可,無需撤回和保持編輯區元件的同步
- 匯入,通常是一開始就做這個動作。如果希望中途匯入,那麼就在儲存前後打快照,也很容易實現復原
置頂和置底
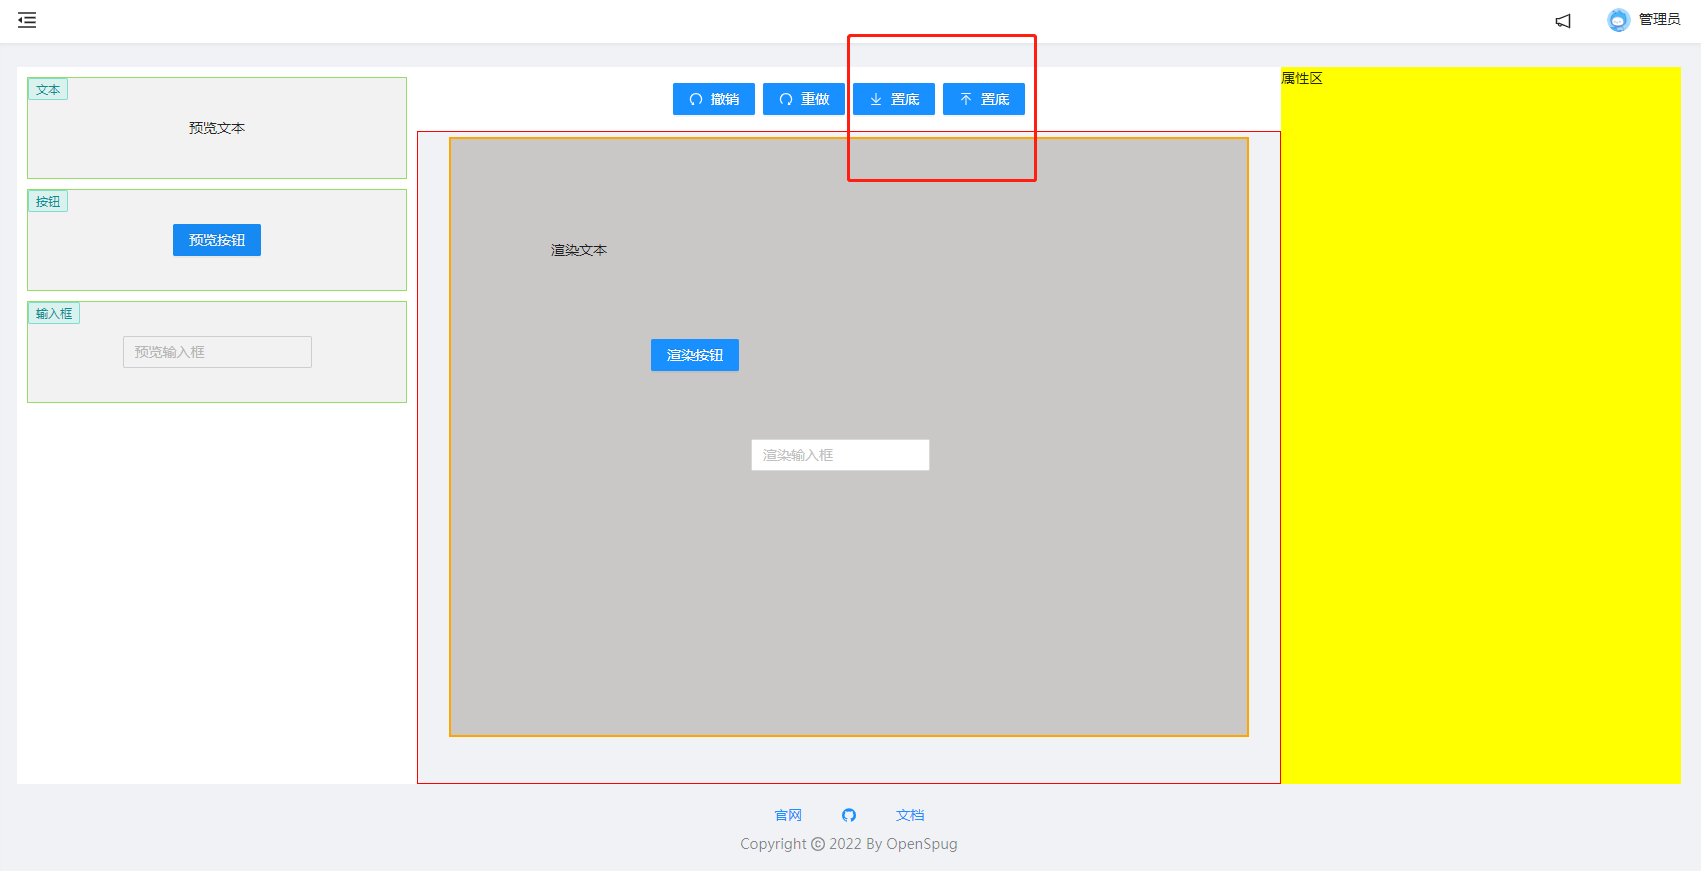
需求:將選中的元件置頂或置底,支援同時操作多個。
首先在選單區增加兩個按鈕。
效果如下圖所示:
// spug\src\pages\lowcodeeditor\Menus.js
...
import { ReactComponent as BottomSvg } from './images/set-bottom.svg'
import { ReactComponent as TopSvg } from './images/set-top.svg'

...
render() {
    return (
        <div style={{ textAlign: 'center' }}>
            <Space>
                <Button type="primary" icon={<UndoOutlined />} onClick={() => store.snapshotState.commands.undo()}>復原</Button>
                <Button type="primary" icon={<RedoOutlined />} onClick={() => store.snapshotState.commands.redo()}>重做</Button>
                <Button type="primary" onClick={() => console.log('置底')}><Icon component={BottomSvg} />置底</Button>
                <Button type="primary" onClick={() => console.log('置底')}><Icon component={TopSvg} />置底</Button>
            </Space>
        </div>
    )
}
注:按鈕引入自定義圖示,最初筆者放入 icon 屬性中 <Button type="primary" icon={<BottomSvg />} >置底</Button> 結果圖片非常大,樣式遭到破壞,根據 antd 官網,將其寫在 Icon 元件中即可。
接著增加置頂和置頂的命令。思路是:
- 點選置頂,去到所有元件中最大的 zindex,然後將當前選中元件的 zindex 設定為
maxZIndex + 1 - 點選置底,如果最小 zindex 小於1,則不能將當前選中元件的 zindex 設定為
minZIndex - 1,因為若為負數(比如 -1),元件會到編輯器下面去,直接看不見了。
實現如下:
// 選單區
// spug\src\pages\lowcodeeditor\Menus.js
@observer
class Menus extends React.Component {
    ...
    registerCommand = () => {
        // 置頂
        store.registerCommand({
            name: 'setTop',
            pushTimeline: 'true',
            execute() {
                // 深拷貝頁面狀態資料
                let before = _.cloneDeep(store.json)
                // 取得最大的zindex,然後將選中的元件的 zindex 設定為最大的 zindex + 1
                // 注:未處理 z-index 超出極限的場景
                let maxZIndex = Math.max(...store.json.components.map(item => item.zIndex))

                // 這種寫法也可以:
                // let maxZIndex = store.json.components.reduce((pre, elem) => Math.max(pre, elem.zIndex), -Infinity)

                store.focusComponents.forEach( item => item.zIndex = maxZIndex + 1)

                let after = _.cloneDeep(store.json)
                // 重做和復原直接替換資料即可。
                return {
                    redo() {
                        store.json = after
                    },
                    // 復原
                    undo() {
                        store.json = before
                    }
                }
            }
        })

        // 置底
        store.registerCommand({
            name: 'setBottom',
            pushTimeline: 'true',
            execute() {
                // 深拷貝頁面狀態資料
                let before = _.cloneDeep(store.json)
                let minZIndex = Math.min(...store.json.components.map(item => item.zIndex))

                // 如果最小值小於 1,最小值置為0,其他未選中的的元素都增加1
                // 注:不能簡單的拿到最最小值減1,因為若為負數(比如 -1),元件會到編輯器下面去,直接看不見了。
                if(minZIndex < 1){
                    store.focusComponents.forEach( item => item.zIndex = 0)
                    store.unFocusComponents.forEach( item => item.zIndex++ )
                }else {
                    store.focusComponents.forEach( item => item.zIndex = minZIndex - 1)
                }

                let after = _.cloneDeep(store.json)
                // 重做和復原直接替換資料即可。
                return {
                    redo() {
                        store.json = after
                    },
                    // 復原
                    undo() {
                        store.json = before
                    }
                }
            }
        })
    }
    render() {
        return (
            <div style={{ textAlign: 'center' }}>
                <Space>
                    ...
                    <Button type="primary" onClick={() => store.snapshotState.commands.setTop()}>...置頂</Button>
                    <Button type="primary" onClick={() => store.snapshotState.commands.setBottom()}>...置底</Button>
                </Space>
            </div>
        )
    }
}
export default Menus
Tip:給置頂和置底增加快捷鍵筆者就不實現了,和復原快捷鍵類似,非常簡單。
刪除
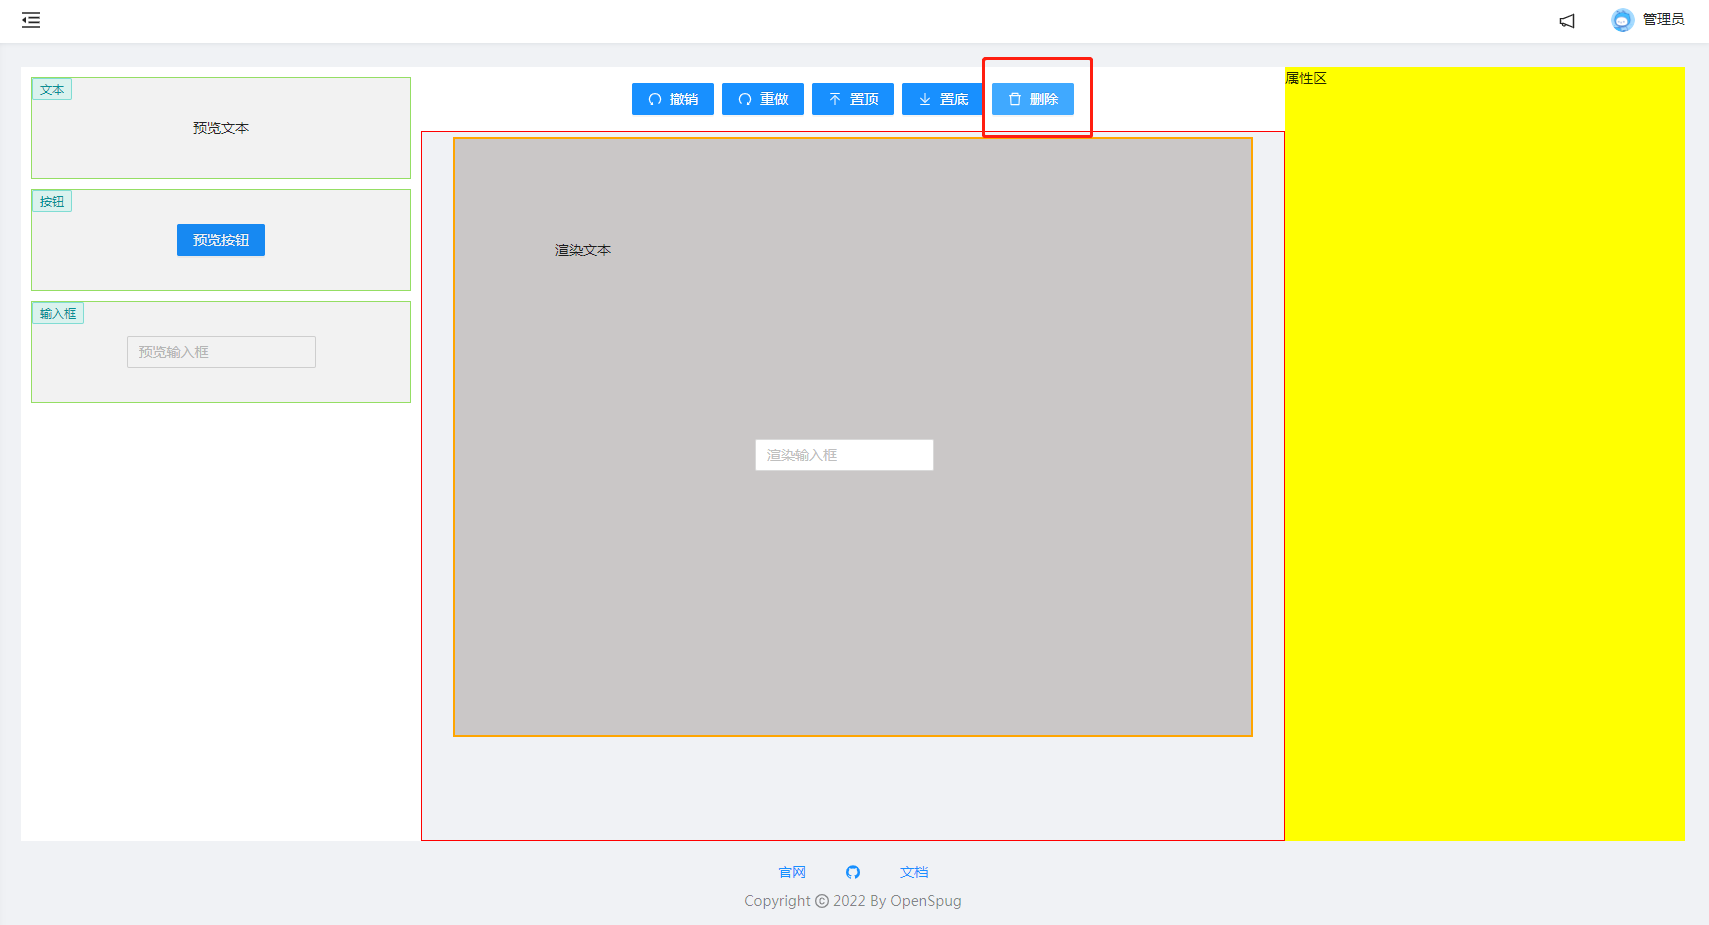
需求:刪除編輯區中選中的元素,例如刪除編輯區中的按鈕。
效果如下圖所示:
實現如下:
// 選單區
// spug\src\pages\lowcodeeditor\Menus.js

class Menus extends React.Component {
    registerCommand = () => {
        // 刪除
        store.registerCommand({
            name: 'delete',
            pushTimeline: 'true',
            execute() {
                // 深拷貝頁面狀態資料
                let before = _.cloneDeep(store.json)
                // 未選中的就是要保留的
                store.json.components = store.unFocusComponents

                let after = _.cloneDeep(store.json)
                // 重做和復原直接替換資料即可。
                return {
                    redo() {
                        store.json = after
                    },
                    // 復原
                    undo() {
                        store.json = before
                    }
                }
            }
        })
    }
    render() {
        return (
            <div style={{ textAlign: 'center' }}>
                <Space>
                    ...
                    <Button type="primary" icon={<DeleteOutlined />} onClick={() => store.snapshotState.commands.delete()}>刪除</Button>
                </Space>
            </div>
        )
    }
}
Tip:比如選中元素後,按 Delete 鍵刪除,筆者可自行新增快捷鍵即可。
預覽
簡單的預覽,可以在此基礎上不讓使用者拖動,而且元件(例如輸入框)可以輸入。
做得更好一些是生成使用者最終使用的樣式
再好一些是不僅生成使用者使用時一樣的樣式,而且在預覽頁可以正常使用該功能。
右鍵選單
需求:對編輯器中的元件右鍵出現選單,能更方便觸發置頂、置底、刪除等功能。
效果如下:

思路:最初打算用原生事件 contextmenu 實現,最後直接用 andt 的 Menu + Dropdown 實現。請看程式碼:
// spug\src\pages\lowcodeeditor\ComponentBlock.js
import { Dropdown, Menu } from 'antd';

// 右鍵選單
const ContextMenu = (
  <Menu>
    <Menu.Item onClick={() => store.snapshotState.commands.setTop()} >
      置頂
    </Menu.Item>
    <Menu.Divider />
    <Menu.Item onClick={() => store.snapshotState.commands.setBottom()}>
      置底
    </Menu.Item>
    <Menu.Divider />
    <Menu.Item onClick={() => store.snapshotState.commands.delete()}>
      刪除
    </Menu.Item>
  </Menu>
);

class ComponentBlock extends React.Component {
  render() {
    return (
      <div ref={this.box}
      - className={styles.containerBlockBox}
        ...
      >
        <Dropdown overlay={ContextMenu} trigger={['contextMenu']} style={{ background: '#000' }}>
          <div className={styles.containerBlockBox}>
            {store.componentMap[item.type]?.render()}
          </div>
        </Dropdown>
      </div>
    )
  }
}
給每個元件外用 Dropdown 封裝一下,點選選單時觸發響應命令即可。
支援同時對多個選中元素進行操作,比如同時刪除多個,撤回和重做當然也支援。
最後給選單新增圖示,就像這樣:
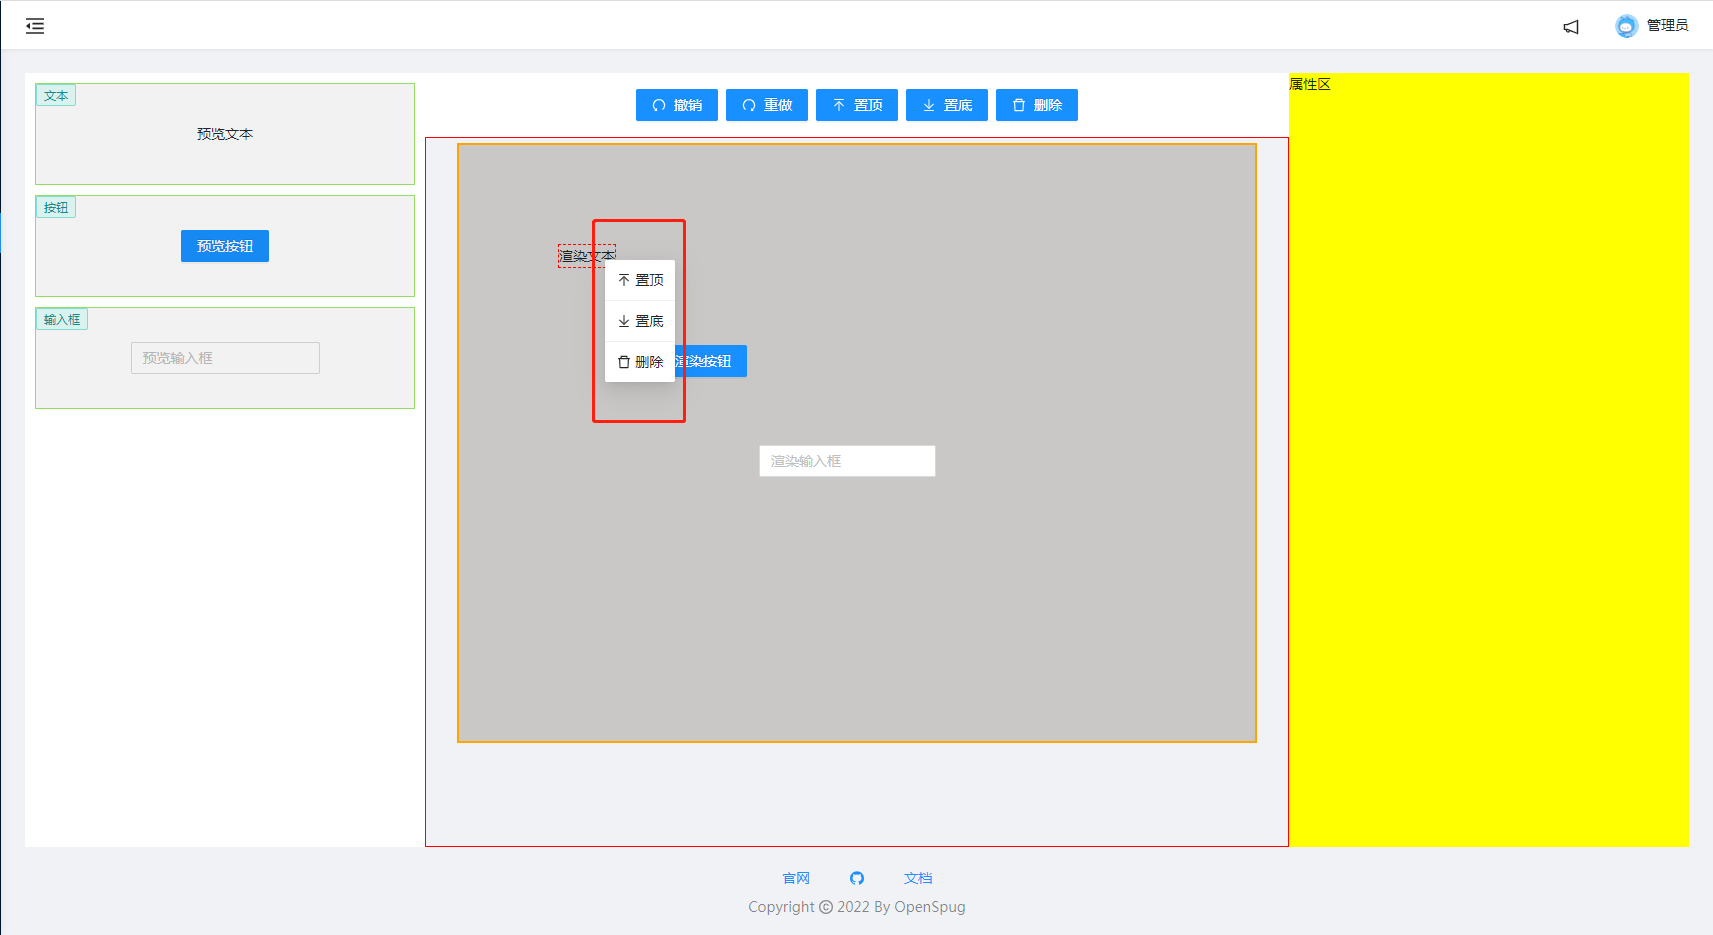
設定 Icon 的 fill 或 style 不起作用,圖示總是白色。最後刪除置頂和置底的 svg 中 fill='#ffffff' 就可以了。程式碼如下:
// spug\src\pages\lowcodeeditor\ComponentBlock.js
import Icon, { DeleteOutlined } from '@ant-design/icons';
import { ReactComponent as BottomSvg } from './images/set-bottom.svg'
import { ReactComponent as TopSvg } from './images/set-top.svg'

// 右鍵選單
const ContextMenu = (
  <Menu>
    <Menu.Item onClick={() => store.snapshotState.commands.setTop()} >
      <Icon component={TopSvg} /> 置頂
    </Menu.Item>
    <Menu.Divider />
    <Menu.Item onClick={() => store.snapshotState.commands.setBottom()}>
      <Icon component={BottomSvg} /> 置底
    </Menu.Item>
    <Menu.Divider />
    <Menu.Item onClick={() => store.snapshotState.commands.delete()}>
      <DeleteOutlined /> 刪除
    </Menu.Item>
  </Menu>
);
刪除 svg 中的 fill 屬性後,圖示的顏色隨文字顏色變化。
其他章節請看:
出處:https://www.cnblogs.com/pengjiali/p/16844280.html
本文版權歸作者和部落格園共有,歡迎轉載,但未經作者同意必須保留此段宣告,且在文章頁面明顯位置給出原文連線。