Istio(十三):Istio專案實際案例——Online Boutique
一.模組概覽
在本模組中,我們將部署名為 Online Boutique 的微服務應用程式,試用 Istio 的不同功能。
Online Boutique 是一個雲原生微服務演示應用程式。Online Boutique 是一個由 10 個微服務組成的應用。該應用是一個基於 Web 的電子商務應用,使用者可以瀏覽商品,將其新增到購物車,併購買商品。
二.系統環境
| 伺服器版本 | docker軟體版本 | Kubernetes(k8s)叢集版本 | Istio軟體版本 | CPU架構 |
|---|---|---|---|---|
| CentOS Linux release 7.4.1708 (Core) | Docker version 20.10.12 | v1.21.9 | Istio1.14 | x86_64 |
三.建立Kubernetes(k8s)叢集
3.1 建立Kubernetes(k8s)叢集
我們需要一套可以正常執行的Kubernetes叢集,關於Kubernetes(k8s)叢集的安裝部署,可以檢視部落格《Centos7 安裝部署Kubernetes(k8s)叢集》https://www.cnblogs.com/renshengdezheli/p/16686769.html
3.2 Kubernetes叢集環境
Kubernetes叢集架構:k8scloude1作為master節點,k8scloude2,k8scloude3作為worker節點
| 伺服器 | 作業系統版本 | CPU架構 | 程序 | 功能描述 |
|---|---|---|---|---|
| k8scloude1/192.168.110.130 | CentOS Linux release 7.4.1708 (Core) | x86_64 | docker,kube-apiserver,etcd,kube-scheduler,kube-controller-manager,kubelet,kube-proxy,coredns,calico | k8s master節點 |
| k8scloude2/192.168.110.129 | CentOS Linux release 7.4.1708 (Core) | x86_64 | docker,kubelet,kube-proxy,calico | k8s worker節點 |
| k8scloude3/192.168.110.128 | CentOS Linux release 7.4.1708 (Core) | x86_64 | docker,kubelet,kube-proxy,calico | k8s worker節點 |
四.安裝istio
4.1 安裝Istio
Istio最新版本為1.15,因為我們Kubernetes叢集版本為1.21.9,所以我們選擇安裝Istio 1.14版本。
[root@k8scloude1 ~]# kubectl get node
NAME         STATUS   ROLES                  AGE    VERSION
k8scloude1   Ready    control-plane,master   288d   v1.21.9
k8scloude2   Ready    <none>                 288d   v1.21.9
k8scloude3   Ready    <none>                 288d   v1.21.9
我們將安裝 Istio的demo 組態檔,因為它包含所有的核心元件,啟用了跟蹤和紀錄檔記錄,便於學習不同的 Istio 功能。
關於istio的詳細安裝部署,請檢視部落格《Istio(二):在Kubernetes(k8s)叢集上安裝部署istio1.14》https://www.cnblogs.com/renshengdezheli/p/16836404.html
也可以按照如下使用 GetMesh CLI 在Kubernetes叢集中安裝 Istio 。
下載 GetMesh CLI:
curl -sL https://istio.tetratelabs.io/getmesh/install.sh | bash
安裝 Istio:
getmesh istioctl install --set profile=demo
Istio安裝完成後,建立一個名稱空間online-boutique,新的專案就部署在online-boutique名稱空間下,給名稱空間online-boutique設定上 istio-injection=enabled 標籤,啟用sidecar 自動注入。
#建立名稱空間online-boutique
[root@k8scloude1 ~]# kubectl create ns online-boutique
namespace/online-boutique created

#切換名稱空間
[root@k8scloude1 ~]# kubens online-boutique
Context "kubernetes-admin@kubernetes" modified.
Active namespace is "online-boutique".

#讓名稱空間online-boutique啟用sidecar 自動注入
[root@k8scloude1 ~]# kubectl label ns online-boutique istio-injection=enabled
namespace/online-boutique labeled

[root@k8scloude1 ~]# kubectl get ns -l istio-injection --show-labels
NAME              STATUS   AGE   LABELS
online-boutique   Active   16m   istio-injection=enabled,kubernetes.io/metadata.name=online-boutique
五.部署online Boutique應用
5.1 部署 Online Boutique 應用
在叢集和 Istio 準備好後,我們可以克隆 Online Boutique 應用庫了。istio和k8s叢集版本如下:
[root@k8scloude1 ~]# istioctl version
client version: 1.14.3
control plane version: 1.14.3
data plane version: 1.14.3 (1 proxies)

[root@k8scloude1 ~]# kubectl get nodes
NAME         STATUS   ROLES                  AGE    VERSION
k8scloude1   Ready    control-plane,master   283d   v1.21.9
k8scloude2   Ready    <none>                 283d   v1.21.9
k8scloude3   Ready    <none>                 283d   v1.21.9
使用git克隆程式碼倉庫:
#安裝git
[root@k8scloude1 ~]# yum -y install git

#檢視git版本
[root@k8scloude1 ~]# git version
git version 1.8.3.1

#建立online-boutique目錄,專案放在該目錄下
[root@k8scloude1 ~]# mkdir online-boutique

[root@k8scloude1 ~]# cd online-boutique/

[root@k8scloude1 online-boutique]# pwd
/root/online-boutique

#git克隆程式碼
[root@k8scloude1 online-boutique]# git clone https://github.com/GoogleCloudPlatform/microservices-demo.git
正克隆到 'microservices-demo'...
remote: Enumerating objects: 8195, done.
remote: Counting objects: 100% (332/332), done.
remote: Compressing objects: 100% (167/167), done.
remote: Total 8195 (delta 226), reused 241 (delta 161), pack-reused 7863
接收物件中: 100% (8195/8195), 30.55 MiB | 154.00 KiB/s, done.
處理 delta 中: 100% (5823/5823), done.

[root@k8scloude1 online-boutique]# ls
microservices-demo
前往 microservices-demo 目錄,istio-manifests.yaml,kubernetes-manifests.yaml是主要的安裝檔案
[root@k8scloude1 online-boutique]# cd microservices-demo/

[root@k8scloude1 microservices-demo]# ls
cloudbuild.yaml     CODEOWNERS       docs  istio-manifests       kustomize  pb         release        SECURITY.md    src
CODE_OF_CONDUCT.md  CONTRIBUTING.md  hack  kubernetes-manifests  LICENSE    README.md  renovate.json  skaffold.yaml  terraform

[root@k8scloude1 microservices-demo]# cd release/

[root@k8scloude1 release]# ls
istio-manifests.yaml  kubernetes-manifests.yaml
檢視所需的映象,可以在k8s叢集的worker節點提前下載映象
關於gcr.io映象的下載方式可以檢視部落格《輕鬆下載k8s.gcr.io,gcr.io,quay.io映象 》https://www.cnblogs.com/renshengdezheli/p/16814395.html
[root@k8scloude1 release]# ls
istio-manifests.yaml  kubernetes-manifests.yaml

[root@k8scloude1 release]# vim kubernetes-manifests.yaml

#可以看到安裝此專案需要13個映象,gcr.io表示是Google的映象
[root@k8scloude1 release]# grep image kubernetes-manifests.yaml
        image: gcr.io/google-samples/microservices-demo/emailservice:v0.4.0
          image: gcr.io/google-samples/microservices-demo/checkoutservice:v0.4.0
        image: gcr.io/google-samples/microservices-demo/recommendationservice:v0.4.0
          image: gcr.io/google-samples/microservices-demo/frontend:v0.4.0
        image: gcr.io/google-samples/microservices-demo/paymentservice:v0.4.0
        image: gcr.io/google-samples/microservices-demo/productcatalogservice:v0.4.0
        image: gcr.io/google-samples/microservices-demo/cartservice:v0.4.0
        image: busybox:latest
        image: gcr.io/google-samples/microservices-demo/loadgenerator:v0.4.0
        image: gcr.io/google-samples/microservices-demo/currencyservice:v0.4.0
        image: gcr.io/google-samples/microservices-demo/shippingservice:v0.4.0
        image: redis:alpine
        image: gcr.io/google-samples/microservices-demo/adservice:v0.4.0

[root@k8scloude1 release]# grep image kubernetes-manifests.yaml | uniq | wc -l
13

#在k8s叢集的worker節點提前下載映象,以k8scloude2為例
#把gcr.io換為gcr.lank8s.cn,比如gcr.io/google-samples/microservices-demo/emailservice:v0.4.0換為gcr.lank8s.cn/google-samples/microservices-demo/emailservice:v0.4.0
[root@k8scloude2 ~]# docker pull gcr.lank8s.cn/google-samples/microservices-demo/emailservice:v0.4.0
。。。。。。
其他那些映象就按照此方法下載......
。。。。。。
[root@k8scloude2 ~]# docker pull gcr.lank8s.cn/google-samples/microservices-demo/adservice:v0.4.0

#映象下載之後,使用sed把kubernetes-manifests.yaml檔案中的gcr.io修改為gcr.lank8s.cn
[root@k8scloude1 release]# sed -i 's/gcr.io/gcr.lank8s.cn/' kubernetes-manifests.yaml

#此時kubernetes-manifests.yaml檔案中的映象就全被修改了
[root@k8scloude1 release]# grep image kubernetes-manifests.yaml
        image: gcr.lank8s.cn/google-samples/microservices-demo/emailservice:v0.4.0
          image: gcr.lank8s.cn/google-samples/microservices-demo/checkoutservice:v0.4.0
        image: gcr.lank8s.cn/google-samples/microservices-demo/recommendationservice:v0.4.0
          image: gcr.lank8s.cn/google-samples/microservices-demo/frontend:v0.4.0
        image: gcr.lank8s.cn/google-samples/microservices-demo/paymentservice:v0.4.0
        image: gcr.lank8s.cn/google-samples/microservices-demo/productcatalogservice:v0.4.0
        image: gcr.lank8s.cn/google-samples/microservices-demo/cartservice:v0.4.0
        image: busybox:latest
        image: gcr.lank8s.cn/google-samples/microservices-demo/loadgenerator:v0.4.0
        image: gcr.lank8s.cn/google-samples/microservices-demo/currencyservice:v0.4.0
        image: gcr.lank8s.cn/google-samples/microservices-demo/shippingservice:v0.4.0
        image: redis:alpine
        image: gcr.lank8s.cn/google-samples/microservices-demo/adservice:v0.4.0

#istio-manifests.yaml 檔案沒有映象
[root@k8scloude1 release]# vim istio-manifests.yaml
[root@k8scloude1 release]# grep image istio-manifests.yaml
建立 Kubernetes 資源:
[root@k8scloude1 release]# pwd
/root/online-boutique/microservices-demo/release

[root@k8scloude1 release]# ls
istio-manifests.yaml  kubernetes-manifests.yaml

#在online-boutique名稱空間建立k8s資源
[root@k8scloude1 release]# kubectl apply -f /root/online-boutique/microservices-demo/release/kubernetes-manifests.yaml -n online-boutique
檢查所有 Pod 都在執行:
[root@k8scloude1 release]# kubectl get pod -o wide
NAME                                     READY   STATUS    RESTARTS   AGE   IP               NODE         NOMINATED NODE   READINESS GATES
adservice-9c6d67f96-txrsb                2/2     Running   0          85s   10.244.112.151   k8scloude2   <none>           <none>
cartservice-6d7544dc98-86p9c             2/2     Running   0          86s   10.244.251.228   k8scloude3   <none>           <none>
checkoutservice-5ff49769d4-5p2cn         2/2     Running   0          86s   10.244.112.148   k8scloude2   <none>           <none>
currencyservice-5f56dd7456-lxjnz         2/2     Running   0          85s   10.244.251.241   k8scloude3   <none>           <none>
emailservice-677bbb77d8-8ndsp            2/2     Running   0          86s   10.244.112.156   k8scloude2   <none>           <none>
frontend-7d65884948-hnmh6                2/2     Running   0          86s   10.244.112.154   k8scloude2   <none>           <none>
loadgenerator-77ffcbd84d-hhh2w           2/2     Running   0          85s   10.244.112.147   k8scloude2   <none>           <none>
paymentservice-88f465d9d-nfxnc           2/2     Running   0          86s   10.244.112.149   k8scloude2   <none>           <none>
productcatalogservice-8496676498-6zpfk   2/2     Running   0          86s   10.244.112.143   k8scloude2   <none>           <none>
recommendationservice-555cdc5c84-j5w8f   2/2     Running   0          86s   10.244.251.227   k8scloude3   <none>           <none>
redis-cart-6f65887b5d-42b8m              2/2     Running   0          85s   10.244.251.236   k8scloude3   <none>           <none>
shippingservice-6ff94bd6-tm6d2           2/2     Running   0          85s   10.244.251.242   k8scloude3   <none>           <none>
建立 Istio 資源:
[root@k8scloude1 microservices-demo]# pwd
/root/online-boutique/microservices-demo

[root@k8scloude1 microservices-demo]# ls istio-manifests/
allow-egress-googleapis.yaml  frontend-gateway.yaml  frontend.yaml

[root@k8scloude1 microservices-demo]# kubectl apply -f ./istio-manifests
serviceentry.networking.istio.io/allow-egress-googleapis created
serviceentry.networking.istio.io/allow-egress-google-metadata created
gateway.networking.istio.io/frontend-gateway created
virtualservice.networking.istio.io/frontend-ingress created
virtualservice.networking.istio.io/frontend created
部署了一切後,我們就可以得到入口閘道器的 IP 地址並開啟前端服務:
[root@k8scloude1 microservices-demo]# INGRESS_HOST="$(kubectl -n istio-system get service istio-ingressgateway -o jsonpath='{.status.loadBalancer.ingress[0].ip}')"

[root@k8scloude1 microservices-demo]# echo "$INGRESS_HOST"
192.168.110.190

[root@k8scloude1 microservices-demo]# kubectl get service -n istio-system istio-ingressgateway -o wide
NAME                   TYPE           CLUSTER-IP      EXTERNAL-IP       PORT(S)                                                                      AGE   SELECTOR
istio-ingressgateway   LoadBalancer   10.107.131.65   192.168.110.190   15021:30093/TCP,80:32126/TCP,443:30293/TCP,31400:30628/TCP,15443:30966/TCP   27d   app=istio-ingressgateway,istio=ingressgateway
在瀏覽器中開啟 INGRESS_HOST,你會看到前端服務,瀏覽器存取http://192.168.110.190/,如下圖所示:

我們需要做的最後一件事是刪除 frontend-external 服務。frontend-external 服務是一個 LoadBalancer 服務,它暴露了前端。由於我們正在使用 Istio 的入口閘道器,我們不再需要這個 LoadBalancer 服務了。
刪除frontend-external服務,執行:
[root@k8scloude1 ~]# kubectl get svc | grep frontend-external
frontend-external       LoadBalancer   10.102.0.207     192.168.110.191   80:30173/TCP   4d15h

[root@k8scloude1 ~]# kubectl delete svc frontend-external
service "frontend-external" deleted

[root@k8scloude1 ~]# kubectl get svc | grep frontend-external
Online Boutique 應用清單還包括一個負載發生器,它正在生成對所有服務的請求——這是為了讓我們能夠模擬網站的流量。
六.部署可觀察性工具
6.1 部署可觀察性工具
接下來,我們將部署可觀察性、分散式追蹤、資料視覺化工具,下面兩種方法任選一種;
關於prometheus,grafana,kiali,zipkin更詳細的安裝方法可以檢視部落格《Istio(三):服務網格istio可觀察性:Prometheus,Grafana,Zipkin,Kiali》https://www.cnblogs.com/renshengdezheli/p/16836943.html
#方法一:
[root@k8scloude1 ~]# kubectl apply -f https://raw.githubusercontent.com/istio/istio/release-1.14/samples/addons/prometheus.yaml

[root@k8scloude1 ~]# kubectl apply -f https://raw.githubusercontent.com/istio/istio/release-1.14/samples/addons/grafana.yaml

[root@k8scloude1 ~]# kubectl apply -f https://raw.githubusercontent.com/istio/istio/release-1.14/samples/addons/kiali.yaml

[root@k8scloude1 ~]# kubectl apply -f https://raw.githubusercontent.com/istio/istio/release-1.14/samples/addons/extras/zipkin.yaml

#方法二:下載istio安裝包istio-1.14.3-linux-amd64.tar.gz安裝分析工具
[root@k8scloude1 ~]# ls istio* -d
istio-1.14.3  istio-1.14.3-linux-amd64.tar.gz

[root@k8scloude1 ~]# cd istio-1.14.3/

[root@k8scloude1 addons]# pwd
/root/istio-1.14.3/samples/addons

[root@k8scloude1 addons]# ls
extras  grafana.yaml  jaeger.yaml  kiali.yaml  prometheus.yaml  README.md

[root@k8scloude1 addons]# kubectl apply -f prometheus.yaml

[root@k8scloude1 addons]# kubectl apply -f grafana.yaml

[root@k8scloude1 addons]# kubectl apply -f kiali.yaml

[root@k8scloude1 addons]# ls extras/
prometheus-operator.yaml  prometheus_vm_tls.yaml  prometheus_vm.yaml  zipkin.yaml
[root@k8scloude1 addons]# kubectl apply -f extras/zipkin.yaml
如果你在安裝 Kiali 的時候發現以下錯誤
No matches for kind "MonitoringDashboard" in version "monitoring.kiali.io/v1alpha1"請重新執行以上命令。
prometheus,grafana,kiali,zipkin被安裝在istio-system名稱空間下,我們可以使用 getmesh istioctl dashboard kiali 開啟 Kiali介面。
我們使用另外一種方法開啟Kiali介面:
#可以看到prometheus,grafana,kiali,zipkin被安裝在istio-system名稱空間下
[root@k8scloude1 addons]# kubectl get pod -n istio-system
NAME                                    READY   STATUS    RESTARTS   AGE
grafana-6c5dc6df7c-cnc9w                1/1     Running   2          27h
istio-egressgateway-58949b7c84-k7v6f    1/1     Running   8          10d
istio-ingressgateway-75bc568988-69k8j   1/1     Running   6          3d21h
istiod-84d979766b-kz5sd                 1/1     Running   14         10d
kiali-5db6985fb5-8t77v                  1/1     Running   0          3m25s
prometheus-699b7cc575-dx6rp             2/2     Running   8          2d21h
zipkin-6cd5d58bcc-hxngj                 1/1     Running   1          17h

#可以看到kiali這個service的型別為ClusterIP,外部環境存取不了
[root@k8scloude1 addons]# kubectl get service -n istio-system
NAME                   TYPE           CLUSTER-IP       EXTERNAL-IP       PORT(S)                                                                      AGE
grafana                NodePort       10.100.151.232   <none>            3000:31092/TCP                                                               27h
istio-egressgateway    ClusterIP      10.102.56.241    <none>            80/TCP,443/TCP                                                               10d
istio-ingressgateway   LoadBalancer   10.107.131.65    192.168.110.190   15021:30093/TCP,80:32126/TCP,443:30293/TCP,31400:30628/TCP,15443:30966/TCP   10d
istiod                 ClusterIP      10.103.37.59     <none>            15010/TCP,15012/TCP,443/TCP,15014/TCP                                        10d
kiali                  ClusterIP      10.109.42.120    <none>            20001/TCP,9090/TCP                                                           7m42s
prometheus             NodePort       10.101.141.187   <none>            9090:31755/TCP                                                               2d21h
tracing                ClusterIP      10.101.30.10     <none>            80/TCP                                                                       17h
zipkin                 NodePort       10.104.85.78     <none>            9411:30350/TCP                                                               17h
#修改kiali這個service的型別為NodePort,這樣外部環境就可以存取kiali了
#把type: ClusterIP 修改為 type: NodePort即可
[root@k8scloude1 addons]# kubectl edit service kiali -n istio-system
service/kiali edited

#現在kiali這個service的型別為NodePort,瀏覽器輸入物理機ip:30754即可存取kiali網頁了
[root@k8scloude1 addons]# kubectl get service -n istio-system
NAME                   TYPE           CLUSTER-IP       EXTERNAL-IP       PORT(S)                                                                      AGE
grafana                NodePort       10.100.151.232   <none>            3000:31092/TCP                                                               27h
istio-egressgateway    ClusterIP      10.102.56.241    <none>            80/TCP,443/TCP                                                               10d
istio-ingressgateway   LoadBalancer   10.107.131.65    192.168.110.190   15021:30093/TCP,80:32126/TCP,443:30293/TCP,31400:30628/TCP,15443:30966/TCP   10d
istiod                 ClusterIP      10.103.37.59     <none>            15010/TCP,15012/TCP,443/TCP,15014/TCP                                        10d
kiali                  NodePort       10.109.42.120    <none>            20001:30754/TCP,9090:31573/TCP                                               8m42s
prometheus             NodePort       10.101.141.187   <none>            9090:31755/TCP                                                               2d21h
tracing                ClusterIP      10.101.30.10     <none>            80/TCP                                                                       17h
zipkin                 NodePort       10.104.85.78     <none>            9411:30350/TCP                                                               17h
k8scloude1機器的地址為192.168.110.130,我們可以在瀏覽器中開啟 http://192.168.110.130:30754,進入 kiali,kiali首頁如下:

在online-boutique名稱空間點選Graph,檢視服務的拓撲結構
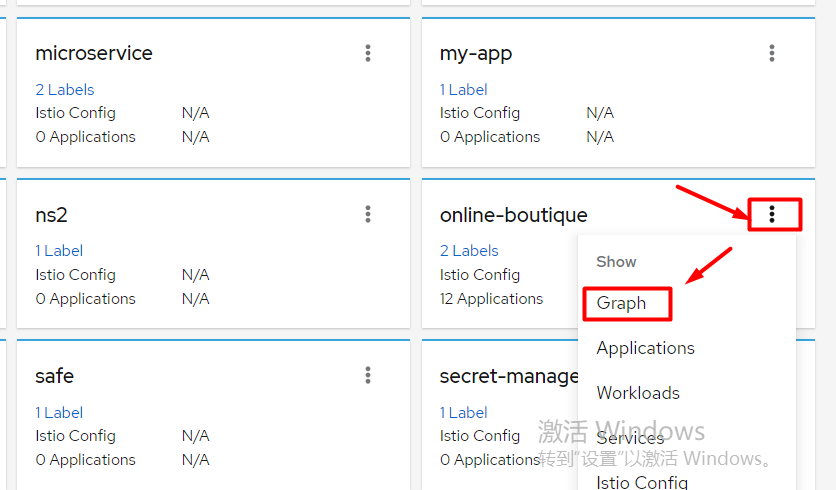
下面是 Boutique 圖表在 Kiali 中的樣子:
該圖向我們展示了服務的拓撲結構,並將服務的通訊方式視覺化。它還顯示了入站和出站的指標,以及通過連線 Jaeger 和 Grafana(如果安裝了)的追蹤。圖中的顏色代表服務網格的健康狀況。紅色或橙色的節點可能需要注意。元件之間的邊的顏色代表這些元件之間的請求的健康狀況。節點形狀表示元件的型別,如服務、工作負載或應用程式。

七.流量路由
7.1 流量路由
我們已經建立了一個新的 Docker 映象,它使用了與當前執行的前端服務不同的檔頭。讓我們看看如何部署所需的資源並將一定比例的流量路由到不同的前端服務版本。
在我們建立任何資源之前,讓我們刪除現有的前端部署(kubectl delete deploy frontend)
[root@k8scloude1 ~]# kubectl get deploy | grep frontend
frontend                1/1     1            1           4d21h

[root@k8scloude1 ~]# kubectl delete deploy frontend
deployment.apps "frontend" deleted

[root@k8scloude1 ~]# kubectl get deploy | grep frontend
重新建立一個前端deploy,名字還是frontend,但是指定了一個版本標籤設定為 original 。yaml檔案如下:
[root@k8scloude1 ~]# vim frontend-original.yaml

[root@k8scloude1 ~]# cat frontend-original.yaml
apiVersion: apps/v1
kind: Deployment
metadata:
  name: frontend
spec:
  selector:
    matchLabels:
      app: frontend
      version: original
  template:
    metadata:
      labels:
        app: frontend
        version: original
      annotations:
        sidecar.istio.io/rewriteAppHTTPProbers: "true"
    spec:
      containers:
        - name: server
          image: gcr.lank8s.cn/google-samples/microservices-demo/frontend:v0.2.1
          ports:
          - containerPort: 8080
          readinessProbe:
            initialDelaySeconds: 10
            httpGet:
              path: "/_healthz"
              port: 8080
              httpHeaders:
              - name: "Cookie"
                value: "shop_session-id=x-readiness-probe"
          livenessProbe:
            initialDelaySeconds: 10
            httpGet:
              path: "/_healthz"
              port: 8080
              httpHeaders:
              - name: "Cookie"
                value: "shop_session-id=x-liveness-probe"
          env:
          - name: PORT
            value: "8080"
          - name: PRODUCT_CATALOG_SERVICE_ADDR
            value: "productcatalogservice:3550"
          - name: CURRENCY_SERVICE_ADDR
            value: "currencyservice:7000"
          - name: CART_SERVICE_ADDR
            value: "cartservice:7070"
          - name: RECOMMENDATION_SERVICE_ADDR
            value: "recommendationservice:8080"
          - name: SHIPPING_SERVICE_ADDR
            value: "shippingservice:50051"
          - name: CHECKOUT_SERVICE_ADDR
            value: "checkoutservice:5050"
          - name: AD_SERVICE_ADDR
            value: "adservice:9555"
          - name: ENV_PLATFORM
            value: "gcp"
          resources:
            requests:
              cpu: 100m
              memory: 64Mi
            limits:
              cpu: 200m
              memory: 128Mi
建立deploy
[root@k8scloude1 ~]# kubectl apply -f frontend-original.yaml
deployment.apps/frontend created

#deploy建立成功
[root@k8scloude1 ~]# kubectl get deploy | grep frontend
frontend                1/1     1            1           43s

#pod也正常執行
[root@k8scloude1 ~]# kubectl get pod | grep frontend
frontend-ff47c5568-qnzpt                 2/2     Running   0          105s
現在我們準備建立一個 DestinationRule,定義兩個版本的前端——現有的(original)和新的(v1)。
[root@k8scloude1 ~]# vim frontend-dr.yaml

[root@k8scloude1 ~]# cat frontend-dr.yaml
apiVersion: networking.istio.io/v1alpha3
kind: DestinationRule
metadata:
  name: frontend
spec:
  host: frontend.online-boutique.svc.cluster.local
  subsets:
    - name: original
      labels:
        version: original
    - name: v1
      labels:
        version: 1.0.0
建立DestinationRule
[root@k8scloude1 ~]# kubectl apply -f frontend-dr.yaml
destinationrule.networking.istio.io/frontend created

[root@k8scloude1 ~]# kubectl get destinationrule
NAME       HOST                                         AGE
frontend   frontend.online-boutique.svc.cluster.local   12s
接下來,我們將更新 VirtualService,並指定將所有流量路由到子集。在這種情況下,我們將把所有流量路由到原始版本original的前端。
[root@k8scloude1 ~]# vim frontend-vs.yaml

[root@k8scloude1 ~]# cat frontend-vs.yaml
apiVersion: networking.istio.io/v1alpha3
kind: VirtualService
metadata:
  name: frontend-ingress
spec:
  hosts:
    - '*'
  gateways:
    - frontend-gateway
  http:
  - route:
    - destination:
        host: frontend.online-boutique.svc.cluster.local
        port:
          number: 80
        subset: original
更新 VirtualService 資源
[root@k8scloude1 ~]# kubectl apply -f frontend-vs.yaml
virtualservice.networking.istio.io/frontend-ingress created

[root@k8scloude1 ~]# kubectl get virtualservice
NAME               GATEWAYS               HOSTS                                    AGE
frontend                                  ["frontend.default.svc.cluster.local"]   5d14h
frontend-ingress   ["frontend-gateway"]   ["*"]                                    14s

#修改frontend這個virtualservice的hosts為frontend.online-boutique.svc.cluster.local
[root@k8scloude1 ~]# kubectl edit virtualservice frontend
virtualservice.networking.istio.io/frontend edited

[root@k8scloude1 ~]# kubectl get virtualservice
NAME               GATEWAYS               HOSTS                                            AGE
frontend                                  ["frontend.online-boutique.svc.cluster.local"]   5d14h
frontend-ingress   ["frontend-gateway"]   ["*"]                                            3m24s
現在我們將 VirtualService 設定為將所有進入的流量路由到 original 子集,我們可以安全地建立新的前端部署。
[root@k8scloude1 ~]# vim frontend-v1.yaml

[root@k8scloude1 ~]# cat frontend-v1.yaml
apiVersion: apps/v1
kind: Deployment
metadata:
  name: frontend-v1
spec:
  selector:
    matchLabels:
      app: frontend
      version: 1.0.0
  template:
    metadata:
      labels:
        app: frontend
        version: 1.0.0
      annotations:
        sidecar.istio.io/rewriteAppHTTPProbers: "true"
    spec:
      containers:
        - name: server
          image: gcr.lank8s.cn/tetratelabs/boutique-frontend:1.0.0
          ports:
          - containerPort: 8080
          readinessProbe:
            initialDelaySeconds: 10
            httpGet:
              path: "/_healthz"
              port: 8080
              httpHeaders:
              - name: "Cookie"
                value: "shop_session-id=x-readiness-probe"
          livenessProbe:
            initialDelaySeconds: 10
            httpGet:
              path: "/_healthz"
              port: 8080
              httpHeaders:
              - name: "Cookie"
                value: "shop_session-id=x-liveness-probe"
          env:
          - name: PORT
            value: "8080"
          - name: PRODUCT_CATALOG_SERVICE_ADDR
            value: "productcatalogservice:3550"
          - name: CURRENCY_SERVICE_ADDR
            value: "currencyservice:7000"
          - name: CART_SERVICE_ADDR
            value: "cartservice:7070"
          - name: RECOMMENDATION_SERVICE_ADDR
            value: "recommendationservice:8080"
          - name: SHIPPING_SERVICE_ADDR
            value: "shippingservice:50051"
          - name: CHECKOUT_SERVICE_ADDR
            value: "checkoutservice:5050"
          - name: AD_SERVICE_ADDR
            value: "adservice:9555"
          - name: ENV_PLATFORM
            value: "gcp"
          resources:
            requests:
              cpu: 100m
              memory: 64Mi
            limits:
              cpu: 200m
              memory: 128Mi
建立前端部署frontend-v1
[root@k8scloude1 ~]# kubectl apply -f frontend-v1.yaml
deployment.apps/frontend-v1 created

#deploy正常執行
[root@k8scloude1 ~]# kubectl get deploy | grep frontend-v1
frontend-v1             1/1     1            1           54s

#pod正常執行
[root@k8scloude1 ~]# kubectl get pod | grep frontend-v1
frontend-v1-6457cb648d-fgmkk             2/2     Running   0          70s
如果我們在瀏覽器中開啟 INGRESS_HOST,我們仍然會看到原始版本的前端。瀏覽器開啟http://192.168.110.190/,顯示的前端如下:

讓我們更新 VirtualService 中的權重,開始將 30% 的流量路由到 v1 的子集。
[root@k8scloude1 ~]# vim frontend-30.yaml

[root@k8scloude1 ~]# cat frontend-30.yaml
apiVersion: networking.istio.io/v1alpha3
kind: VirtualService
metadata:
  name: frontend-ingress
spec:
  hosts:
    - '*'
  gateways:
    - frontend-gateway
  http:
  - route:
    - destination:
        host: frontend.online-boutique.svc.cluster.local
        port:
          number: 80
        subset: original
      weight: 70
    - destination:
        host: frontend.online-boutique.svc.cluster.local
        port:
          number: 80
        subset: v1
      weight: 30
更新 VirtualService
[root@k8scloude1 ~]# kubectl apply -f frontend-30.yaml
virtualservice.networking.istio.io/frontend-ingress configured

[root@k8scloude1 ~]# kubectl get virtualservices
NAME               GATEWAYS               HOSTS                                            AGE
frontend                                  ["frontend.online-boutique.svc.cluster.local"]   5d14h
frontend-ingress   ["frontend-gateway"]   ["*"]                                            20m
瀏覽器存取http://192.168.110.190/,檢視前端介面,如果我們重新整理幾次網頁,我們會注意到來自前端 v1 的更新檔頭,一般顯示$75,如下所示:

多重新整理幾次頁面顯示$30,如下所示:

我們可以在瀏覽器中開啟 http://192.168.110.130:30754,進入 kiali介面檢視服務的拓撲結構,選擇online-boutique名稱空間,檢視Graph

服務的拓撲結構如下,我們會發現有兩個版本的前端在執行:

八.故障注入
8.1 故障注入
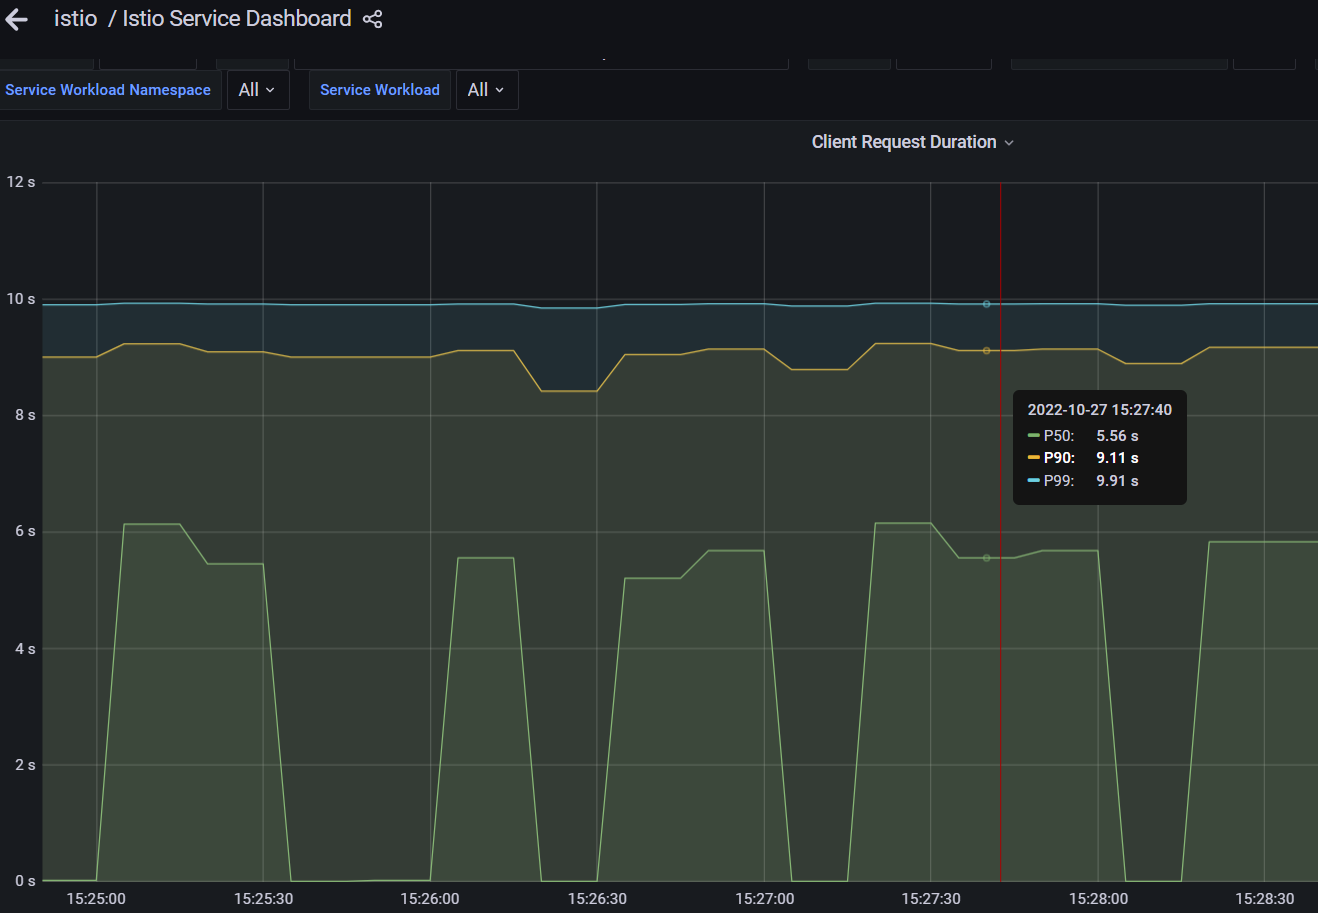
我們將為推薦服務引入 5 秒的延遲。Envoy 將為 50% 的請求注入延遲。
[root@k8scloude1 ~]# vim recommendation-delay.yaml

[root@k8scloude1 ~]# cat recommendation-delay.yaml
apiVersion: networking.istio.io/v1alpha3
kind: VirtualService
metadata:
  name: recommendationservice
spec:
  hosts:
  - recommendationservice.online-boutique.svc.cluster.local
  http:
  - route:
      - destination:
          host: recommendationservice.online-boutique.svc.cluster.local
    fault:
      delay:
        percentage:
          value: 50
        fixedDelay: 5s
將上述 YAML 儲存為 recommendation-delay.yaml,然後用 kubectl apply -f recommendation-delay.yaml 建立 VirtualService。
[root@k8scloude1 ~]# kubectl apply -f recommendation-delay.yaml
virtualservice.networking.istio.io/recommendationservice created

[root@k8scloude1 ~]# kubectl get virtualservice
NAME                    GATEWAYS               HOSTS                                                         AGE
frontend                                       ["frontend.online-boutique.svc.cluster.local"]                6d13h
frontend-ingress        ["frontend-gateway"]   ["*"]                                                         23h
recommendationservice                          ["recommendationservice.online-boutique.svc.cluster.local"]   7s
我們可以在瀏覽器中開啟 INGRESS_HOST http://192.168.110.190/,然後點選其中一個產品。推薦服務的結果顯示在螢幕底部的」Other Products You Might Light「部分。如果我們重新整理幾次頁面,我們會注意到,該頁面要麼立即載入,要麼有一個延遲載入頁面。這個延遲是由於我們注入了 5 秒的延遲。
我們可以開啟 Grafana(getmesh istioctl dash grafana)和 Istio 服務儀表板,或者使用如下方法開啟Grafana介面:
#檢視grafana的埠號
[root@k8scloude1 ~]# kubectl get svc -n istio-system | grep grafana
grafana                NodePort       10.100.151.232   <none>            3000:31092/TCP                                                               24d
http://192.168.110.130:31092/開啟grafana介面。點選istio-service-dashboard進入istio服務介面
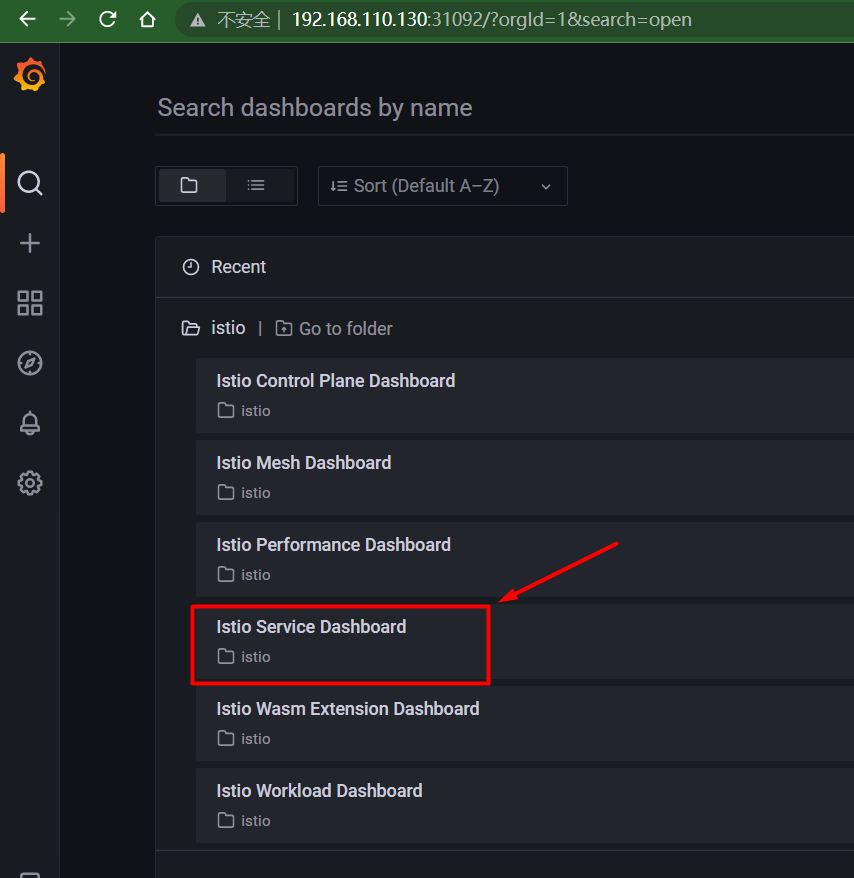
確保從服務列表中選擇recommendationsservice,在 Reporter 下拉式選單中選擇 source,並檢視顯示延遲的 Client Request Duration,如下圖所示:

點選View放大Client Request Duration圖表
同樣地,我們可以注入一箇中止。在下面的例子中,我們為傳送到產品目錄服務的 50% 的請求注入一個 HTTP 500。
[root@k8scloude1 ~]# vim productcatalogservice-abort.yaml

[root@k8scloude1 ~]# cat productcatalogservice-abort.yaml
apiVersion: networking.istio.io/v1alpha3
kind: VirtualService
metadata:
  name: productcatalogservice
spec:
  hosts:
  - productcatalogservice.online-boutique.svc.cluster.local
  http:
  - route:
      - destination:
          host: productcatalogservice.online-boutique.svc.cluster.local
    fault:
      abort:
        percentage:
          value: 50
        httpStatus: 500
建立VirtualService。
[root@k8scloude1 ~]# kubectl apply -f productcatalogservice-abort.yaml
virtualservice.networking.istio.io/productcatalogservice created

[root@k8scloude1 ~]# kubectl get virtualservice
NAME                    GATEWAYS               HOSTS                                                         AGE
frontend                                       ["frontend.online-boutique.svc.cluster.local"]                6d13h
frontend-ingress        ["frontend-gateway"]   ["*"]                                                         23h
productcatalogservice                          ["productcatalogservice.online-boutique.svc.cluster.local"]   8s
recommendationservice                          ["recommendationservice.online-boutique.svc.cluster.local"]   36m
如果我們重新整理幾次產品頁面,我們應該得到如下圖所示的錯誤資訊。

請注意,錯誤資訊說,失敗的原因是故障過濾器中止。如果我們開啟 Grafana(getmesh istioctl dash grafana),我們也會注意到圖中報告的錯誤。
刪除productcatalogservice這個VirtualService:
[root@k8scloude1 ~]# kubectl delete virtualservice productcatalogservice
virtualservice.networking.istio.io "productcatalogservice" deleted

[root@k8scloude1 ~]# kubectl get virtualservice
NAME                    GATEWAYS               HOSTS                                                         AGE
frontend                                       ["frontend.online-boutique.svc.cluster.local"]                6d14h
frontend-ingress        ["frontend-gateway"]   ["*"]                                                         23h
recommendationservice                          ["recommendationservice.online-boutique.svc.cluster.local"]   44m
九.彈性
9.1 彈性
為了演示彈性功能,我們將在產品目錄服務部署中新增一個名為 EXTRA_LATENCY 的環境變數。這個變數會在每次呼叫服務時注入一個額外的休眠。
通過執行 kubectl edit deploy productcatalogservice 來編輯產品目錄服務部署。
[root@k8scloude1 ~]# kubectl get deploy
NAME                    READY   UP-TO-DATE   AVAILABLE   AGE
adservice               1/1     1            1           6d14h
cartservice             1/1     1            1           6d14h
checkoutservice         1/1     1            1           6d14h
currencyservice         1/1     1            1           6d14h
emailservice            1/1     1            1           6d14h
frontend                1/1     1            1           24h
frontend-v1             1/1     1            1           28h
loadgenerator           1/1     1            1           6d14h
paymentservice          1/1     1            1           6d14h
productcatalogservice   1/1     1            1           6d14h
recommendationservice   1/1     1            1           6d14h
redis-cart              1/1     1            1           6d14h
shippingservice         1/1     1            1           6d14h

[root@k8scloude1 ~]# kubectl edit deploy productcatalogservice
deployment.apps/productcatalogservice edited
這將開啟一個編輯器。捲動到有環境變數的部分,新增 EXTRA_LATENCY 環境變數。
 ...
     spec:
       containers:
       - env:
         - name: EXTRA_LATENCY
           value: 6s
 ...
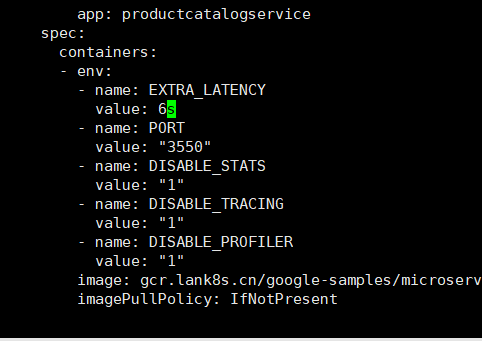
儲存並推出編輯器。
如果我們重新整理http://192.168.110.190/頁面,我們會發現頁面需要 6 秒的時間來載入(那是由於我們注入的延遲)。
讓我們給產品目錄服務新增一個 2 秒的超時。
[root@k8scloude1 ~]# vim productcatalogservice-timeout.yaml

[root@k8scloude1 ~]# cat productcatalogservice-timeout.yaml
apiVersion: networking.istio.io/v1alpha3
kind: VirtualService
metadata:
  name: productcatalogservice
spec:
  hosts:
  - productcatalogservice.online-boutique.svc.cluster.local
  http:
  - route:
    - destination:
        host: productcatalogservice.online-boutique.svc.cluster.local
    timeout: 2s
建立 VirtualService。
[root@k8scloude1 ~]# kubectl apply -f productcatalogservice-timeout.yaml
virtualservice.networking.istio.io/productcatalogservice created

[root@k8scloude1 ~]# kubectl get virtualservice
NAME                    GATEWAYS               HOSTS                                                         AGE
frontend                                       ["frontend.online-boutique.svc.cluster.local"]                6d14h
frontend-ingress        ["frontend-gateway"]   ["*"]                                                         24h
productcatalogservice                          ["productcatalogservice.online-boutique.svc.cluster.local"]   10s
recommendationservice                          ["recommendationservice.online-boutique.svc.cluster.local"]   76m
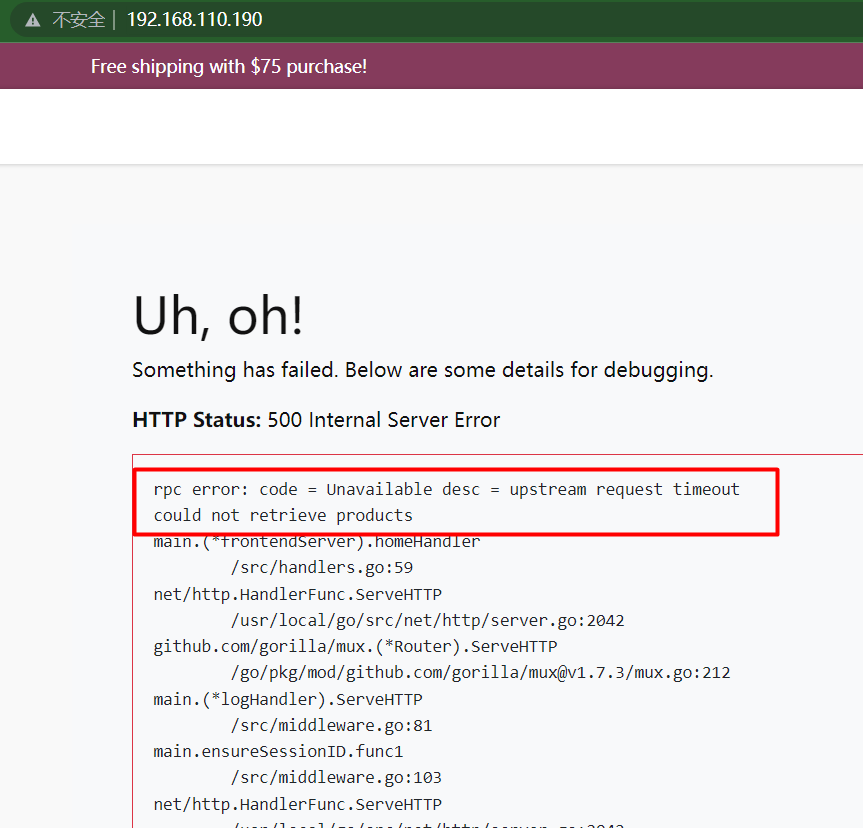
如果我們重新整理頁面http://192.168.110.190/,我們會注意到一個錯誤資訊的出現:

 rpc error: code = Unavailable desc = upstream request timeout
 could not retrieve products
該錯誤表明對產品目錄服務的請求超時了。原因為:我們修改了服務,增加了 6 秒的延遲,並將超時設定為 2 秒。
讓我們定義一個重試策略,有三次嘗試,每次嘗試的超時為 1 秒。
[root@k8scloude1 ~]# vim productcatalogservice-retry.yaml

[root@k8scloude1 ~]# cat productcatalogservice-retry.yaml
apiVersion: networking.istio.io/v1alpha3
kind: VirtualService
metadata:
  name: productcatalogservice
spec:
  hosts:
  - productcatalogservice.online-boutique.svc.cluster.local
  http:
  - route:
    - destination:
        host: productcatalogservice.online-boutique.svc.cluster.local
    retries:
      attempts: 3
      perTryTimeout: 1s

[root@k8scloude1 ~]# kubectl apply -f productcatalogservice-retry.yaml
virtualservice.networking.istio.io/productcatalogservice configured

[root@k8scloude1 ~]# kubectl get virtualservice
NAME                    GATEWAYS               HOSTS                                                         AGE
frontend                                       ["frontend.online-boutique.svc.cluster.local"]                6d14h
frontend-ingress        ["frontend-gateway"]   ["*"]                                                         24h
productcatalogservice                          ["productcatalogservice.online-boutique.svc.cluster.local"]   10m
recommendationservice                          ["recommendationservice.online-boutique.svc.cluster.local"]   86m
由於我們在產品目錄服務部署中留下了額外的延遲,我們仍然會看到錯誤。
讓我們開啟 Zipkin 中的追蹤,看看重試策略的作用。使用 getmesh istioctl dash zipkin 來開啟 Zipkin 儀表盤。或者使用如下方法開啟zipkin介面
#檢視zipkin埠為30350
[root@k8scloude1 ~]# kubectl get svc -n istio-system | grep zipkin
zipkin                 NodePort       10.104.85.78     <none>            9411:30350/TCP                                                               23d
瀏覽器輸入http://192.168.110.130:30350/開啟zipkin介面。
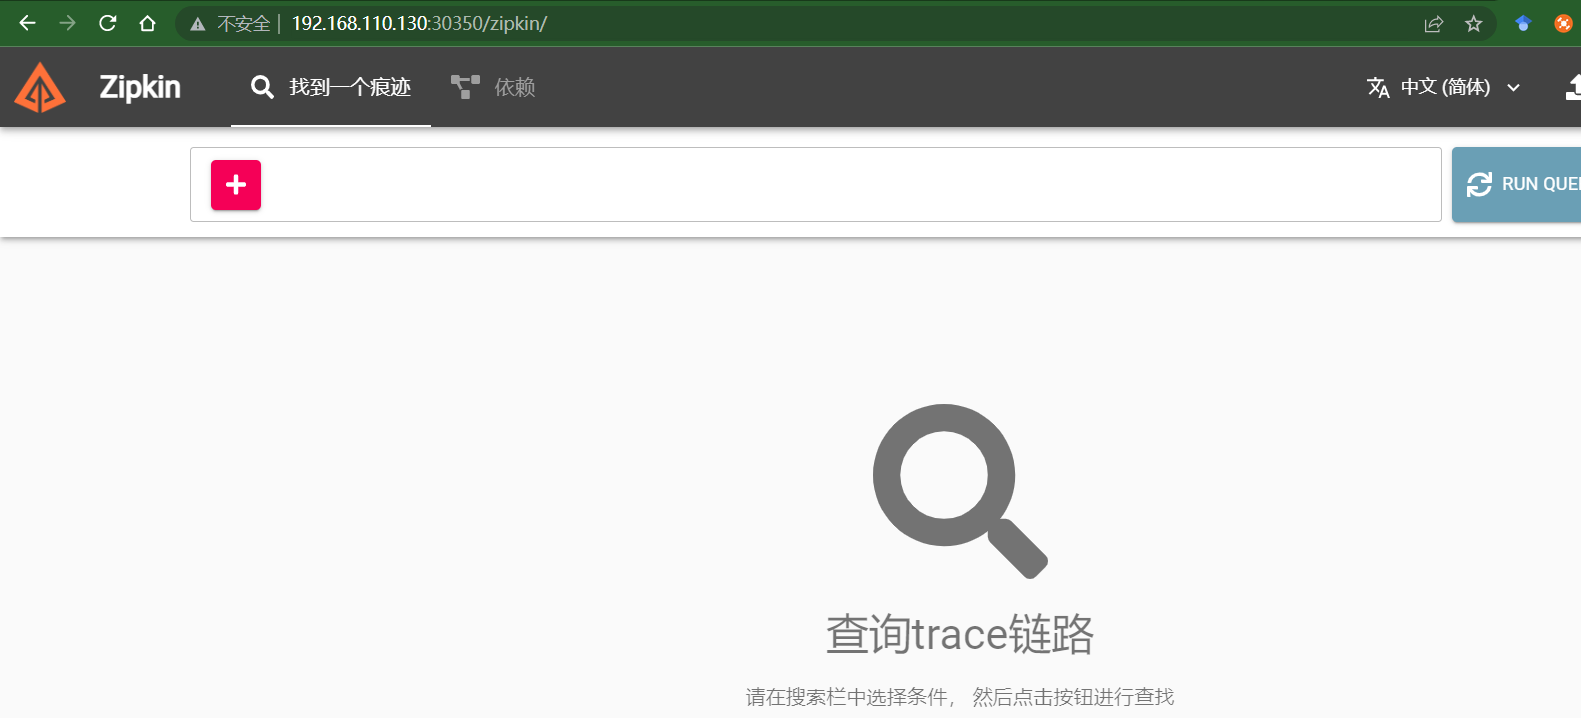
點選 + 按鈕,選擇 serviceName 和 frontend.online-boutique。為了只得到至少一秒鐘的響應(這就是我們的 perTryTimeout),選擇 minDuration,在文字方塊中輸入 1s。點選RUN QUERY搜尋按鈕,顯示所有追蹤。
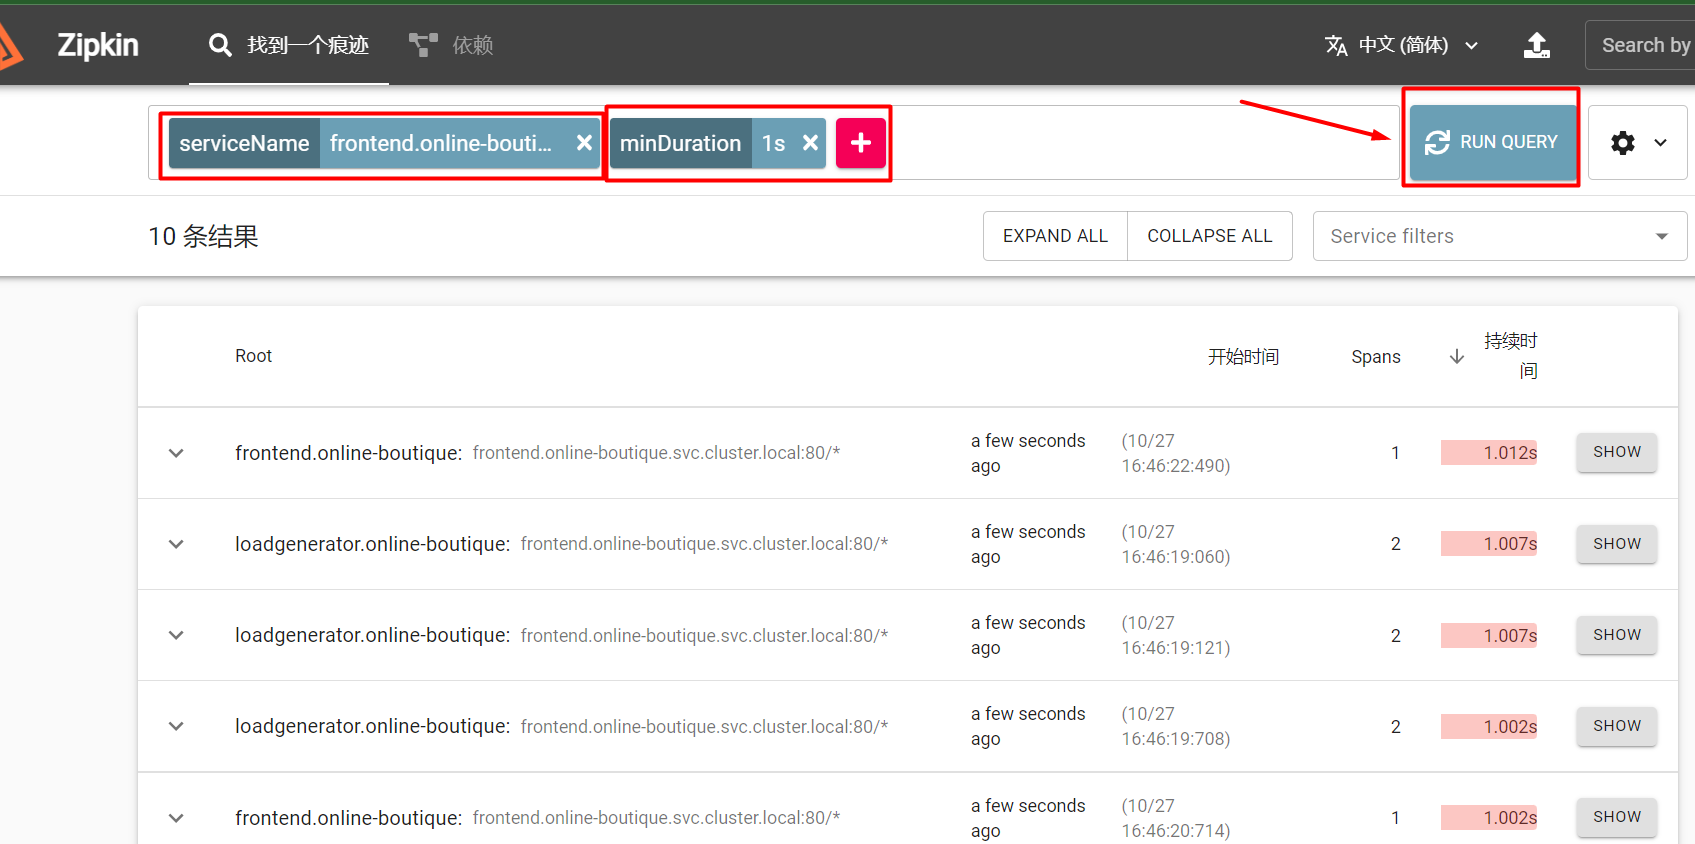
點選 Filter 按鈕,從下拉式選單中選擇 productCatalogService.online-boutique。你應該看到花了 1 秒鐘的 trace。這些 trace 對應於我們之前定義的 perTryTimeout。

點選SHOW

詳細資訊如下:

執行 kubectl delete vs productcatalogservice 刪除 VirtualService。
[root@k8scloude1 ~]# kubectl get virtualservice
NAME                    GATEWAYS               HOSTS                                                         AGE
frontend                                       ["frontend.online-boutique.svc.cluster.local"]                6d15h
frontend-ingress        ["frontend-gateway"]   ["*"]                                                         24h
productcatalogservice                          ["productcatalogservice.online-boutique.svc.cluster.local"]   37m
recommendationservice                          ["recommendationservice.online-boutique.svc.cluster.local"]   113m

[root@k8scloude1 ~]# kubectl delete virtualservice productcatalogservice
virtualservice.networking.istio.io "productcatalogservice" deleted

[root@k8scloude1 ~]# kubectl get virtualservice
NAME                    GATEWAYS               HOSTS                                                         AGE
frontend                                       ["frontend.online-boutique.svc.cluster.local"]                6d15h
frontend-ingress        ["frontend-gateway"]   ["*"]                                                         24h
recommendationservice                          ["recommendationservice.online-boutique.svc.cluster.local"]   114m