瑞吉外賣實戰專案全攻略——優化篇第一天
瑞吉外賣實戰專案全攻略——優化篇第一天
該系列將記錄一份完整的實戰專案的完成過程,該篇屬於優化篇第一天,主要負責完成快取優化問題
案例來自B站黑馬程式設計師Java專案實戰《瑞吉外賣》,請結合課程資料閱讀以下內容
該篇我們將完成以下內容:
- Git管理
- Redis環境搭建
- 快取簡訊驗證碼
- 快取菜品資料
- Spring Cache
- 快取套餐資料
- Git合併管理
Git管理
在之前的文章中我們已經詳細介紹Git的相關知識以及使用
下面我們將Git使用在我們的當前專案裡方便我們管理和回顧各個版本的流程:
- Gitee碼雲建立倉庫,並複製其SSH
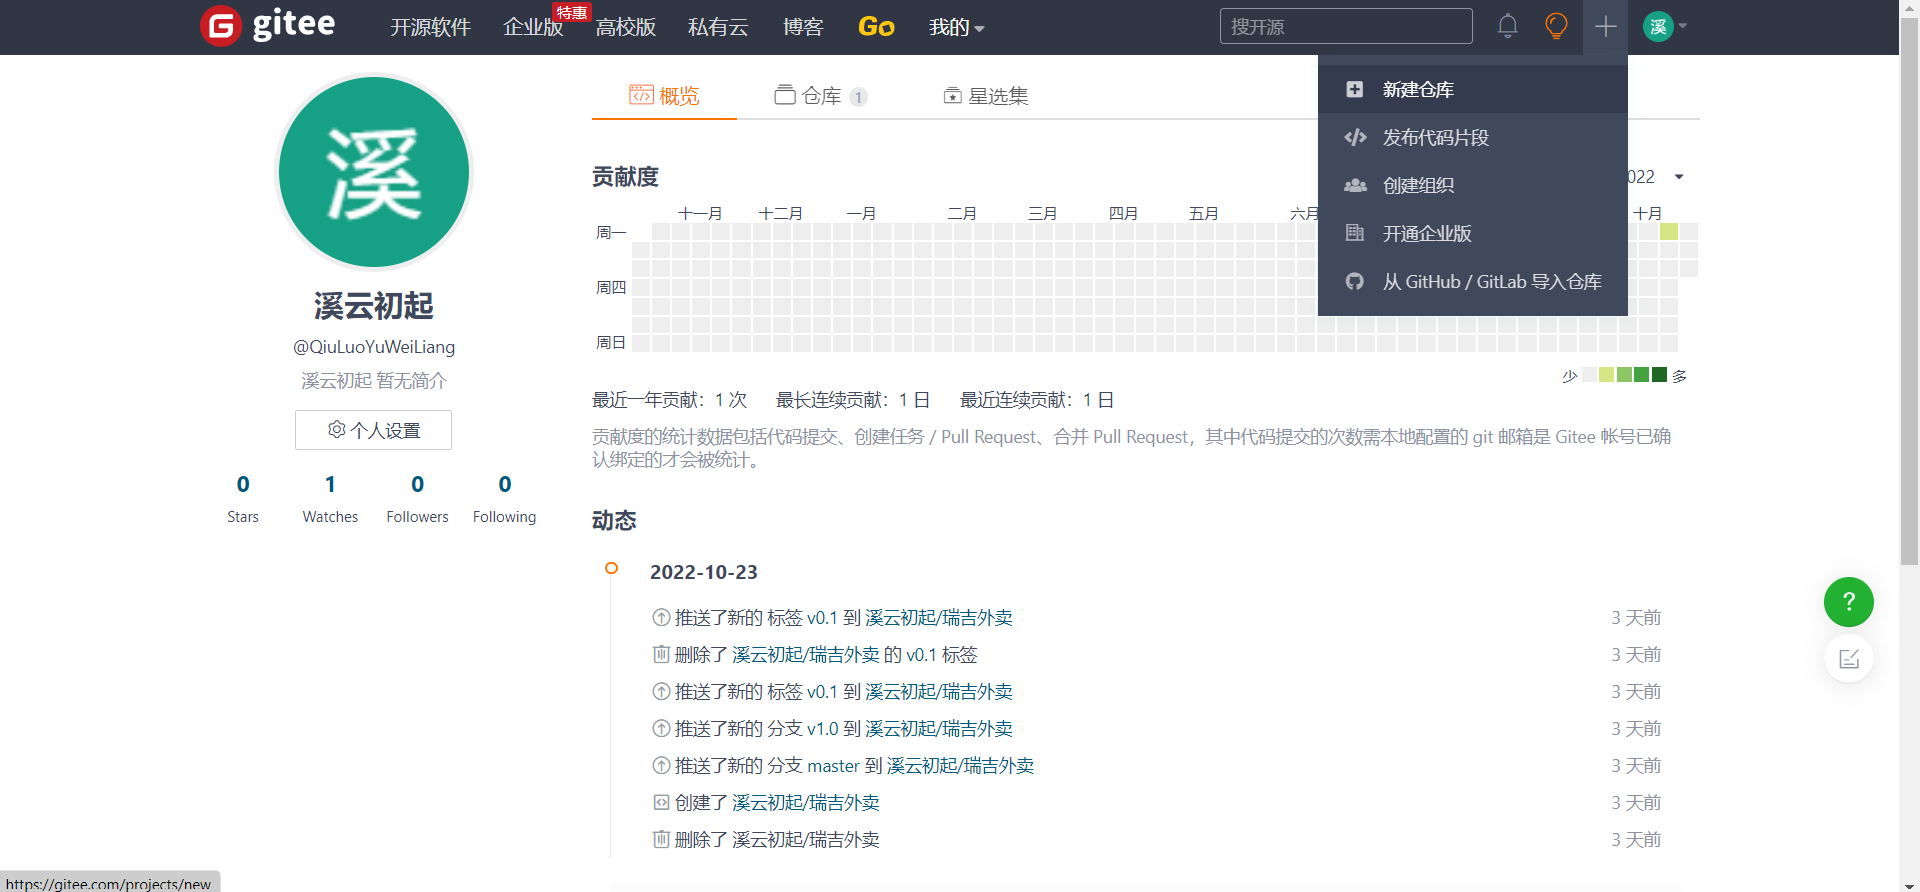
- IDEA專案中建立Git管理機制
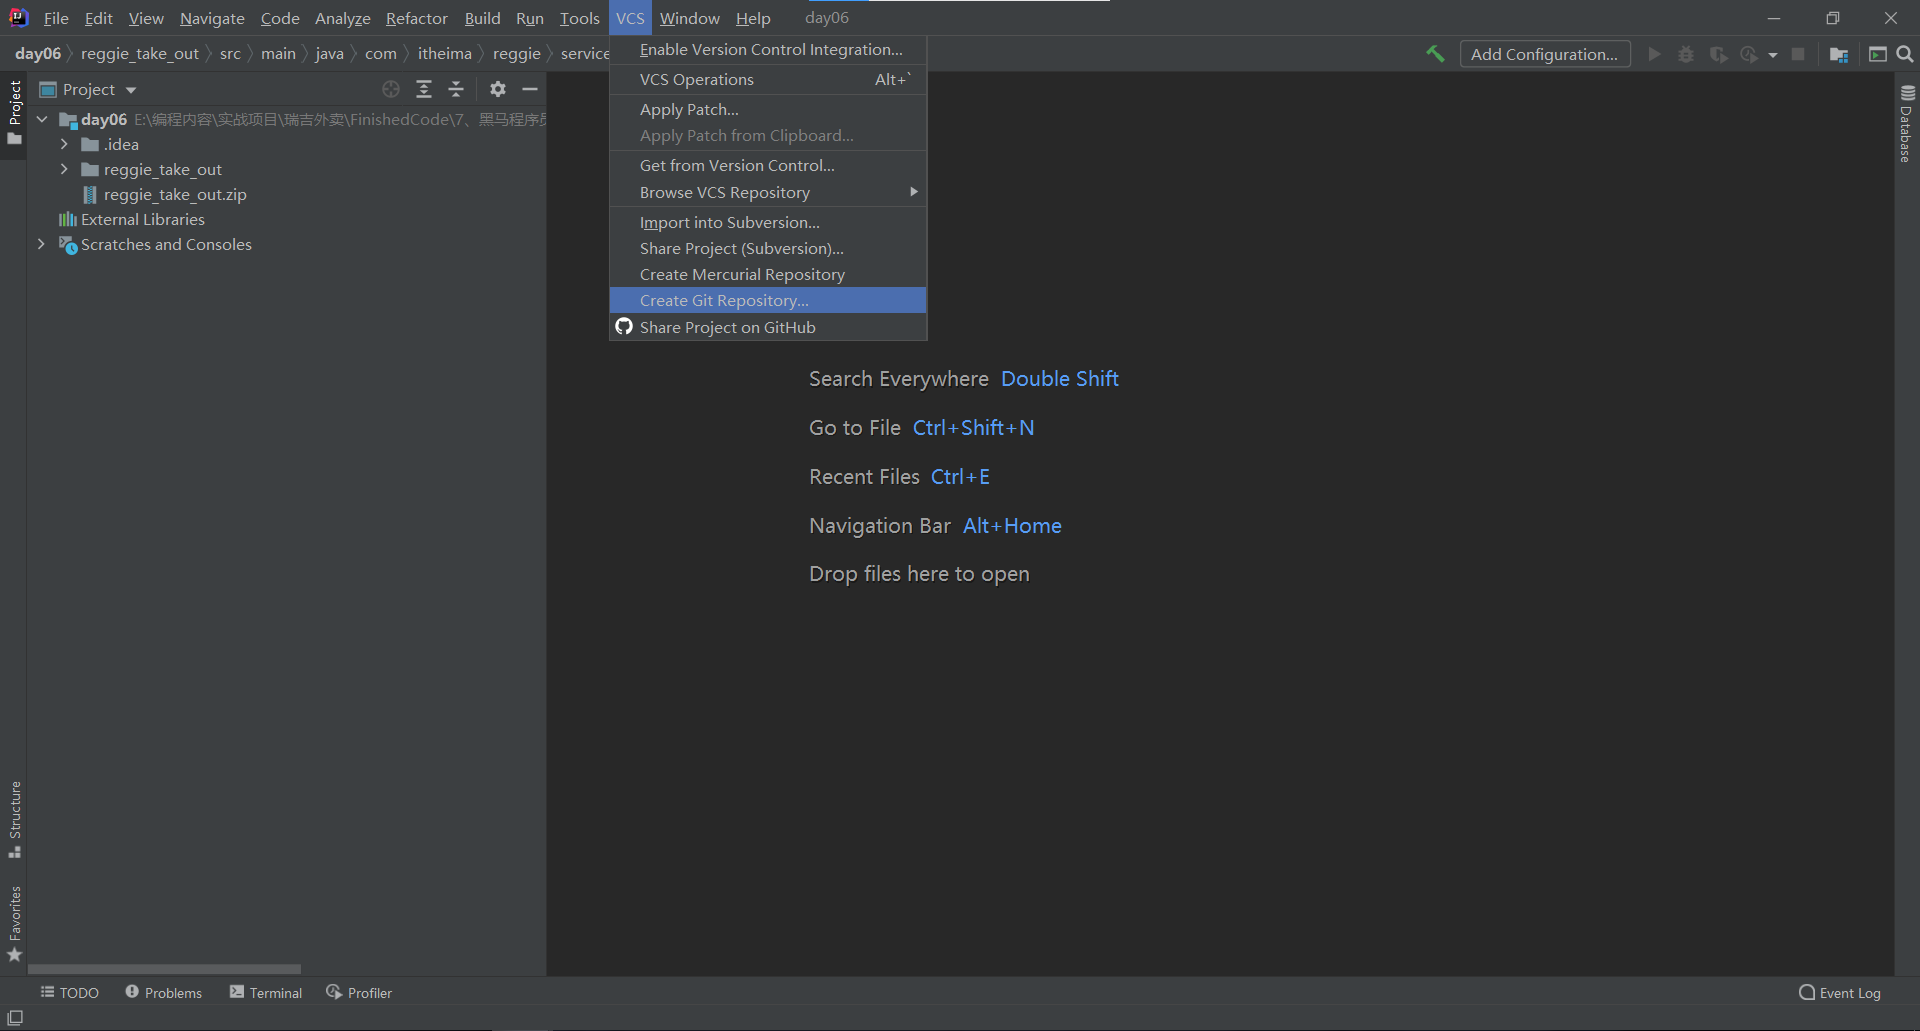
- 設定.gitignore檔案,控制上傳檔案的型別
.git
logs
rebel.xml
target/
!.mvn/wrapper/maven-wrapper.jar
log.path_IS_UNDEFINED
.DS_Store
offline_user.md

### STS ###
.apt_generated
.classpath
.factorypath
.project
.settings
.springBeans

### IntelliJ IDEA ###
.idea
*.iws
*.iml
*.ipr

### NetBeans ###
nbproject/private/
build/
nbbuild/
dist/
nbdist/
.nb-gradle/
generatorConfig.xml

### nacos ###
third-party/nacos/derby.log
third-party/nacos/data/
third-party/nacos/work/

file/
- 提交當前檔案至本地倉庫

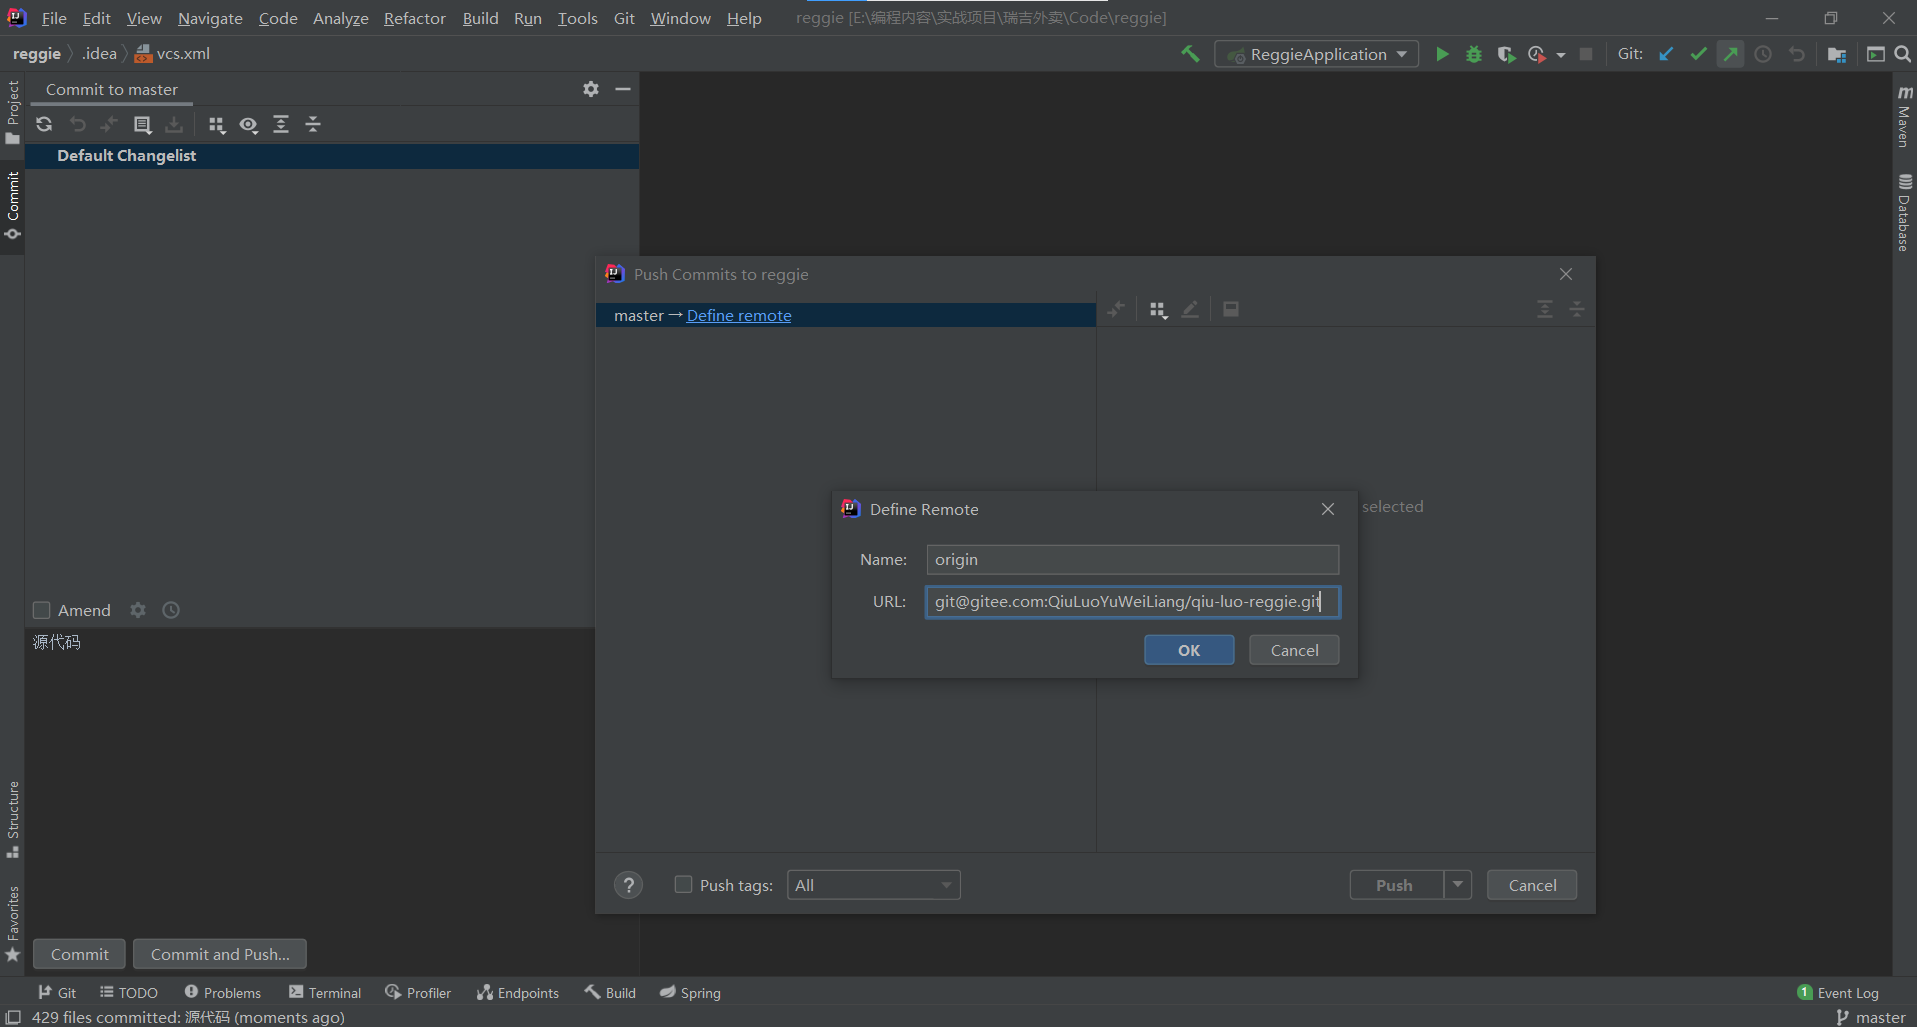
- 設定遠端倉庫SSH並提交檔案
- 建立一個分支V1.0來供我們開發使用,到後期將該開發分支與主分支合併即可
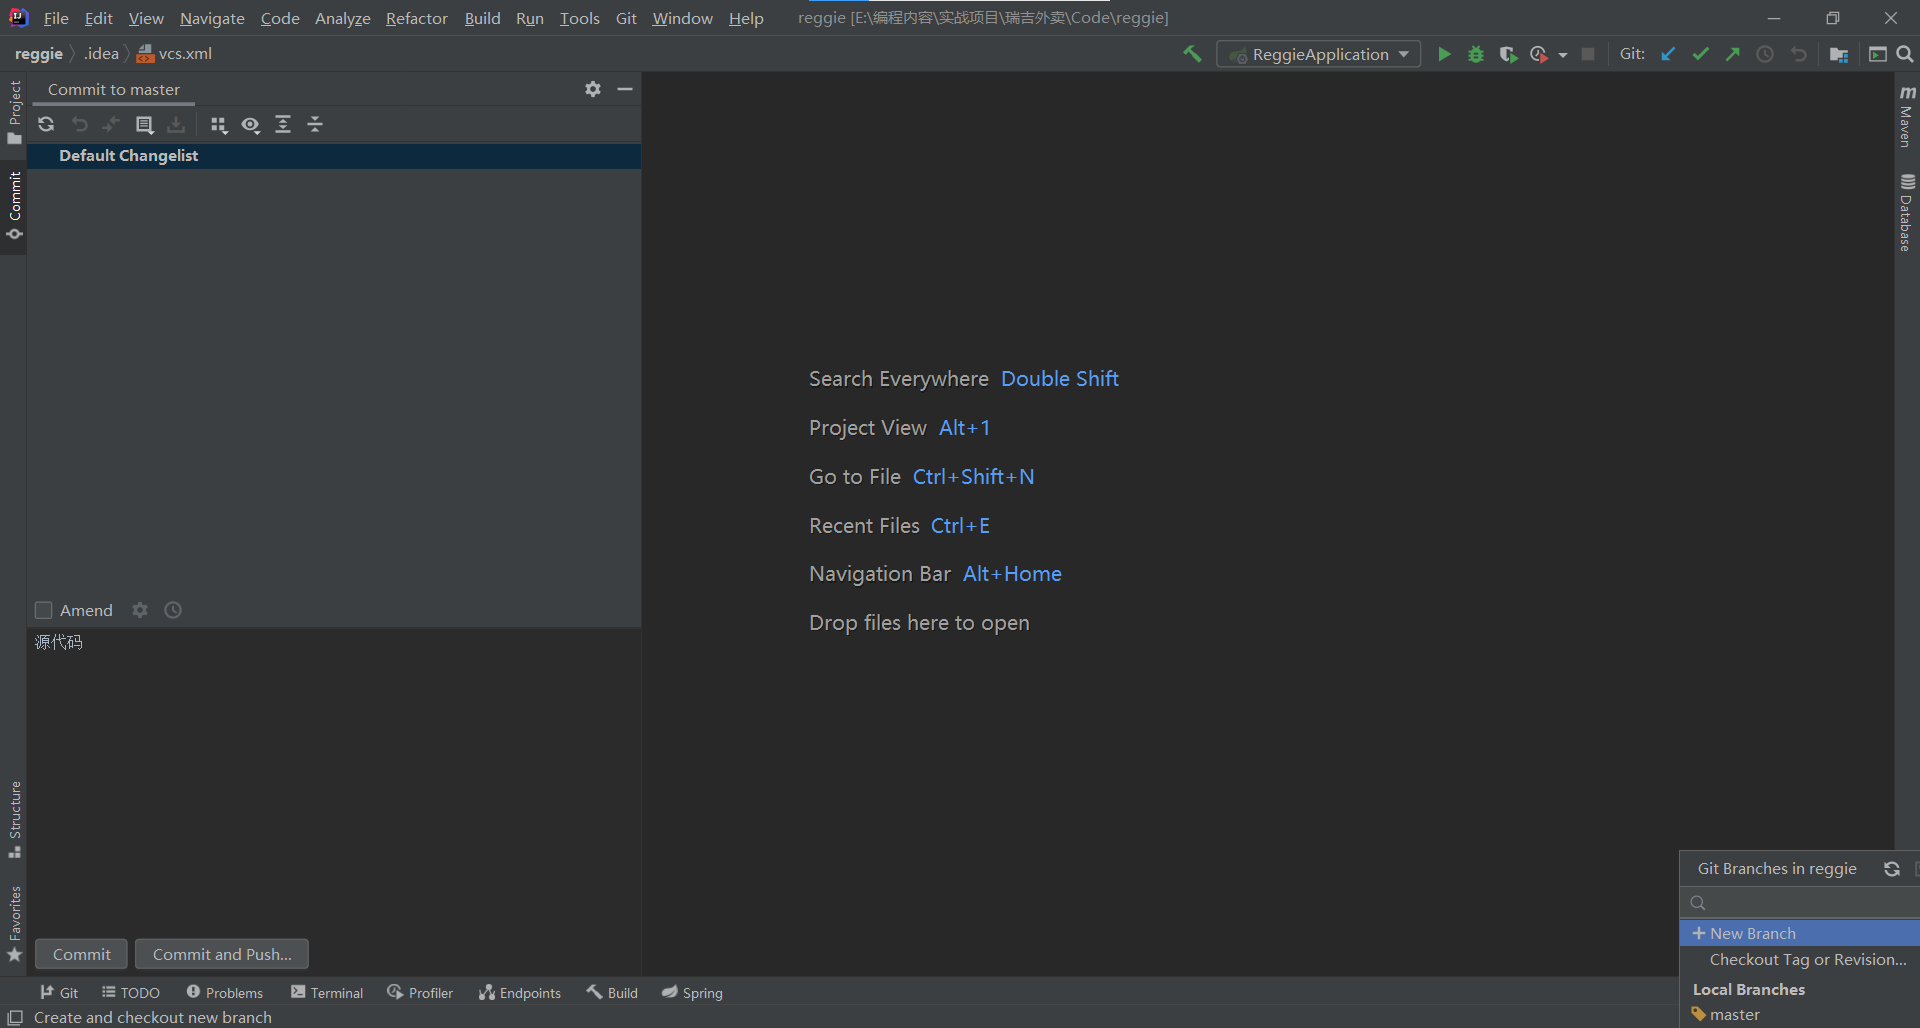
- 將當前分支傳給遠端倉庫,並使用該分支進行開發

至此我們的Git管理就完成了
Redis環境搭建
我們第一天的優化主要針對於快取優化,我們採用Redis來進行快取儲存
在正式進行快取優化之前,我們需要先將Redis的環境搭建完成,下面我們開始進行搭建:
- 匯入Redis座標
        <dependency>
            <groupId>org.springframework.boot</groupId>
            <artifactId>spring-boot-starter-data-redis</artifactId>
        </dependency>
- 設定yaml組態檔
server:
  port: 8080

# redis設定在spring下
spring:
  application:
    name: qiuluo
  datasource:
    druid:
      driver-class-name: com.mysql.cj.jdbc.Driver
      url: jdbc:mysql://localhost:3306/reggie
      username: root
      password: 123456
  redis:
    host: localhost
    port: 6379
    # password: 123456
    database: 0

mybatis-plus:
  configuration:
    map-underscore-to-camel-case: true
    log-impl: org.apache.ibatis.logging.stdout.StdOutImpl
  global-config:
    db-config:
      id-type: ASSIGN_ID
reggie:
  path: E:\程式設計內容\實戰專案\瑞吉外賣\Code\reggie\imgs\
- 設定序列化設定類
// 我們希望在Redis資料庫中可以直接檢視到key的原始名稱,所以我們需要修改其序列化方法

package com.qiuluo.reggie.config;

import org.springframework.cache.annotation.CachingConfigurerSupport;
import org.springframework.context.annotation.Bean;
import org.springframework.context.annotation.Configuration;
import org.springframework.data.redis.connection.RedisConnectionFactory;
import org.springframework.data.redis.core.RedisTemplate;
import org.springframework.data.redis.serializer.StringRedisSerializer;

@Configuration
public class RedisConfig extends CachingConfigurerSupport {
    @Bean
    public RedisTemplate<Object, Object> redisTemplate(RedisConnectionFactory connectionFactory) {
        RedisTemplate<Object, Object> redisTemplate = new RedisTemplate<>();
        //預設的Key序列化器為:JdkSerializationRedisSerializer
        redisTemplate.setKeySerializer(new StringRedisSerializer());
        redisTemplate.setConnectionFactory(connectionFactory);
        return redisTemplate;
    }
}
至此我們的Redis環境搭建就完成了
快取簡訊驗證碼
我們的功能開發分為三部分
實現思路
前面我們已經完成了簡訊驗證碼的開發功能,但我們的簡訊驗證碼是儲存在Session中的,有效期只有30s
在學習Redis後,我們可以將簡訊驗證碼儲存到Redis中並設定相應儲存時間,當時間到達或賬號登陸後自動刪除即可
同時我們的登入功能在獲得驗證碼時,也需要來到Redis資料庫中獲得驗證碼並進行比對,比對成功後後刪除該驗證碼即可
程式碼實現
我們直接在UserController服務層實現即可:
package com.qiuluo.reggie.controller;

import com.baomidou.mybatisplus.core.conditions.query.LambdaQueryWrapper;
import com.qiuluo.reggie.common.Result;
import com.qiuluo.reggie.domain.User;
import com.qiuluo.reggie.service.UserService;
import com.qiuluo.reggie.utils.SMSUtils;
import com.qiuluo.reggie.utils.ValidateCodeUtils;
import lombok.extern.slf4j.Slf4j;
import org.apache.commons.lang.StringUtils;
import org.springframework.beans.factory.annotation.Autowired;
import org.springframework.data.redis.core.RedisTemplate;
import org.springframework.web.bind.annotation.PostMapping;
import org.springframework.web.bind.annotation.RequestBody;
import org.springframework.web.bind.annotation.RequestMapping;
import org.springframework.web.bind.annotation.RestController;

import javax.jws.soap.SOAPBinding;
import javax.servlet.http.HttpSession;
import java.util.Map;
import java.util.concurrent.TimeUnit;

@RestController
@RequestMapping("/user")
@Slf4j
public class UserController {

    @Autowired
    private UserService userService;

    @Autowired
    private RedisTemplate redisTemplate;

    /**
    * 傳送驗證碼功能
    */
    @PostMapping("/sendMsg")
    public Result<String> sendMsg(@RequestBody User user, HttpSession session){

        // 儲存手機號
        String phone = user.getPhone();

        // 判斷手機號是否存在並設定內部邏輯
        if (phone != null){

            // 隨機生成四位密碼
            String code = ValidateCodeUtils.generateValidateCode(4).toString();

            // 因為無法申請signName簽名,我們直接在後臺檢視密碼
            log.info(code);

            // 我們採用阿里雲傳送驗證碼
            // SMSUtils.sendMessage("簽名","模板",phone,code);

            // 將資料放在session中待比對(之前我們將驗證碼存放在session中)
            // session.setAttribute(phone,code);

            // 現在我們存放在Redis中(存放五分鐘)
            redisTemplate.opsForValue().set(phone,code,5, TimeUnit.MINUTES);


            return Result.success("驗證碼傳送成功");

        }

        return Result.success("驗證碼傳送失敗");
    }

    /**
    * 登入功能
    */
    @PostMapping("/login")
    public Result<User> login(@RequestBody Map map, HttpSession session){
        log.info(map.toString());

        // 獲得手機號
        String phone = map.get("phone").toString();

        // 獲得驗證碼
        String code = map.get("code").toString();

        // 獲得Session中的驗證碼
        // String codeInSession = session.getAttribute(phone).toString();

        // 獲得Redis中的驗證碼
        Object codeInSession = redisTemplate.opsForValue().get(phone);

        // 進行驗證碼比對
        if (codeInSession != null && codeInSession.equals(code) ){
            // 登陸成功
            log.info("使用者登陸成功");

            // 判斷是否為新使用者,如果是自動註冊
            LambdaQueryWrapper<User> queryWrapper = new LambdaQueryWrapper<>();
            queryWrapper.eq(User::getPhone,phone);

            User user = userService.getOne(queryWrapper);

            if (user == null){

                user = new User();

                 user.setPhone(phone);
                 user.setStatus(1);
                 userService.save(user);
            }

            // 登陸成功就刪除驗證碼
            redisTemplate.delete(phone);

            session.setAttribute("user",user.getId());

            return Result.success(user);
        }

        // 比對失敗登陸失敗
        return Result.error("登陸失敗");
    }
}
實際測試
在實際測試中,我們主要分為兩部分:
-
開啟專案,輸入手機號,點選傳送驗證碼,這時我們來到Redis資料庫中會發現有一個key為手機號的值,檢視內容為密碼
-
我們輸入密碼,進入到程式中,再回到Redis資料庫中檢視key,會發現當時存放的key消失,資料庫又變為空白狀態
快取菜品資料
我們的功能開發分為三部分
實現思路
由於每次查詢菜品時我們都需要採用Mysql到後臺去查詢,當用戶增多後,大量的存取導致後臺存取速度減慢可能會使系統崩潰
所以我們需要修改之前的菜品查詢程式碼,使其先到Redis資料庫中存取資料
如果Redis包含資料,直接存取;如果Redis不包含資料,在Mysql查詢後將資料放入Redis儲存一定時間
此外,如果我們的菜品進行修改時,為了保證行動端和後臺的資料一致,我們需要刪除Redis中的快取使其重新從資料庫匯入資料
程式碼實現
我們首先來完成查詢菜品的程式碼修改:
package com.qiuluo.reggie.controller;

import com.baomidou.mybatisplus.core.conditions.query.LambdaQueryWrapper;
import com.qiuluo.reggie.common.Result;
import com.qiuluo.reggie.domain.Category;
import com.qiuluo.reggie.domain.Dish;
import com.qiuluo.reggie.domain.DishFlavor;
import com.qiuluo.reggie.dto.DishDto;
import com.qiuluo.reggie.service.impl.CategoryServiceImpl;
import com.qiuluo.reggie.service.impl.DishFlavorServiceImpl;
import com.qiuluo.reggie.service.impl.DishServiceImpl;
import lombok.extern.slf4j.Slf4j;
import org.springframework.beans.BeanUtils;
import org.springframework.beans.factory.annotation.Autowired;
import com.baomidou.mybatisplus.extension.plugins.pagination.Page;
import org.springframework.data.redis.core.RedisTemplate;
import org.springframework.web.bind.annotation.*;

import java.util.ArrayList;
import java.util.List;
import java.util.Set;
import java.util.concurrent.TimeUnit;
import java.util.stream.Collectors;

@Slf4j
@RestController
@RequestMapping("/dish")
public class DishController {

    @Autowired
    private DishServiceImpl dishService;

    @Autowired
    private DishFlavorServiceImpl dishFlavorService;

    @Autowired
    private CategoryServiceImpl categoryService;

    @Autowired
    private RedisTemplate redisTemplate;

    /**
     * 根據id查詢菜品
     * @param dish
     * @return
     */
    @GetMapping("/list")
    public Result<List<DishDto>> list(Dish dish){

        // 構造返回型別
        List<DishDto> dishDtoList = null;

        // 動態構造構造Redis的key
        String key = "dish_" + dish.getCategoryId() + "_" + dish.getStatus();

        // 1. 先從Redis中查詢是否有菜品快取
        dishDtoList = (List<DishDto>) redisTemplate.opsForValue().get(key);

        // 2.如果存在,則直接返回即可
        if (dishDtoList != null){
            return Result.success(dishDtoList);
        }

        // 3.如果不存在,採用mysql語法呼叫獲得值

        // 提取CategoryID
        Long id = dish.getCategoryId();

        // 判斷條件
        LambdaQueryWrapper<Dish> queryWrapper = new LambdaQueryWrapper<>();
        queryWrapper.eq(id != null,Dish::getCategoryId,id);
        queryWrapper.eq(Dish::getStatus,1);
        queryWrapper.orderByAsc(Dish::getSort);

        List<Dish> list = dishService.list(queryWrapper);

        // 建立返回型別
        dishDtoList = list.stream().map((item) -> {

            // 建立新的返回型別內部
            DishDto dishDto = new DishDto();

            // 將元素複製過去
            BeanUtils.copyProperties(item,dishDto);

            // 設定CategoryName
            Long categoryId = item.getCategoryId();

            LambdaQueryWrapper<Category> categoryLambdaQueryWrapper = new LambdaQueryWrapper<>();
            categoryLambdaQueryWrapper.eq(Category::getId,categoryId);

            Category category = categoryService.getOne(categoryLambdaQueryWrapper);

            String categoryName = category.getName();

            dishDto.setCategoryName(categoryName);

            // 設定flavor
            Long dishId = item.getId();

            LambdaQueryWrapper<DishFlavor> lambdaQueryWrapper = new LambdaQueryWrapper();
            lambdaQueryWrapper.eq(DishFlavor::getDishId,dishId);

            List<DishFlavor> dishFlavors = dishFlavorService.list(lambdaQueryWrapper);

            dishDto.setFlavors(dishFlavors);

            return dishDto;
        }).collect(Collectors.toList());

        // 4.最後獲得成功後,將資料存入redis快取中
        redisTemplate.opsForValue().set(key,dishDtoList,60, TimeUnit.MINUTES);

        return Result.success(dishDtoList);

    }
}
然後我們再來完成菜品的儲存,更新和刪除時的消除快取的操作:
package com.qiuluo.reggie.controller;

import com.baomidou.mybatisplus.core.conditions.query.LambdaQueryWrapper;
import com.qiuluo.reggie.common.Result;
import com.qiuluo.reggie.domain.Category;
import com.qiuluo.reggie.domain.Dish;
import com.qiuluo.reggie.domain.DishFlavor;
import com.qiuluo.reggie.dto.DishDto;
import com.qiuluo.reggie.service.impl.CategoryServiceImpl;
import com.qiuluo.reggie.service.impl.DishFlavorServiceImpl;
import com.qiuluo.reggie.service.impl.DishServiceImpl;
import lombok.extern.slf4j.Slf4j;
import org.springframework.beans.BeanUtils;
import org.springframework.beans.factory.annotation.Autowired;
import com.baomidou.mybatisplus.extension.plugins.pagination.Page;
import org.springframework.data.redis.core.RedisTemplate;
import org.springframework.web.bind.annotation.*;

import java.util.ArrayList;
import java.util.List;
import java.util.Set;
import java.util.concurrent.TimeUnit;
import java.util.stream.Collectors;

@Slf4j
@RestController
@RequestMapping("/dish")
public class DishController {

    @Autowired
    private DishServiceImpl dishService;

    @Autowired
    private DishFlavorServiceImpl dishFlavorService;

    @Autowired
    private CategoryServiceImpl categoryService;

    @Autowired
    private RedisTemplate redisTemplate;

    /**
     * 新增菜品
     * @param dishDto
     * @return
     */
    @PostMapping
    public Result<String> save(@RequestBody DishDto dishDto){

        dishService.saveWithFlavor(dishDto);

        // 全域性快取清理
        // Set keys = redisTemplate.keys("dish_*");
        // redisTemplate.delete(keys);

        // 單個清理
        String key = "dish_" + dishDto.getCategoryId() + "_1";
        redisTemplate.delete(key);

        return Result.success("新創成功");
    }

    /**
     * 修改資料
     * @param
     * @return
     */
    @PutMapping
    public Result<String> update(@RequestBody DishDto dishDto){

        dishService.updateWithFlavor(dishDto);

        log.info("修改完成");

        // 全域性快取清理
        // Set keys = redisTemplate.keys("dish_*");
        // redisTemplate.delete(keys);

        // 單個清理
        String key = "dish_" + dishDto.getCategoryId() + "_1";
        redisTemplate.delete(key);

        return Result.success("修改完成");


    }

    /**
     * 多個刪除
     * @param ids
     * @return
     */
    @DeleteMapping
    public Result<String> deleteByIds(Long[] ids){

        for (Long id:ids
             ) {
            dishService.removeById(id);
        }

        // 全域性快取清理
        // Set keys = redisTemplate.keys("dish_*");
        // redisTemplate.delete(keys);

        // 單個清理
        String key = "dish_" + ids + "_1";
        redisTemplate.delete(key);

        return Result.success("刪除成功");
    }

}
實際測試
在實際測試中,我們主要分為兩部分:
- 我們進入菜品介面,點選菜品分類後,來到Redis資料庫,會發現存在對應的key,裡面儲存了該套餐的菜品
- 我們來到後臺介面,對菜品做一定修改,儲存後,來到Redis資料庫,會發現對應的分類的key消失
Spring Cache
這一小節我們將會介紹一個方便我們使用快取的新技術
Spring Cache 介紹
Spring Cache是一個框架,實現了基於註解的快取功能,只需要簡單的加一個註解,就能實現快取功能
Spring Cache提供了一層抽象,底層可以切換不同的Cache實現,具體是通過CacheManager介面來統一不同的快取技術
針對於不同的快取技術需要實現不同的CacheManager:
| CacheManager | 描述 |
|---|---|
| EhCacheCacheManager | 使用EhCache作為快取技術 |
| GuavaCacheManager | 使用Google的GuavaCache作為快取技術 |
| RedisCacheManager | 使用Redis作為快取技術 |
Spring Cache 常用註解
我們來介紹Spring Cache用於快取的常用的四個註解:
| 註解 | 說明 |
|---|---|
| @EnableCaching | 開啟快取註解功能 |
| @Cacheable | 在方法執行前先檢視快取中是否存有資料,如果有資料直接返回資料;如果沒有,呼叫方法並將返回值存入快取 |
| @CachePut | 將方法的返回值放到快取 |
| @CacheEvict | 將一條或多條從快取中刪除 |
在Spring專案中,使用快取技術只需要匯入相關快取技術的依賴包,並在啟動類上加上@EnableCaching開啟快取支援即可
Spring Cache 入門案例
接下來我們通過一個簡單的小案例來接觸Spring Cache的使用
案例解釋
首先我們先來簡單介紹一下這個案例的內容:
- 我們專案中包含最基本的domain,mapper,service,serviceImpl,controller,主要對資料表user進行操作
然後我們這裡給出User的實現類來簡單檢視其資料表內容:
package com.itheima.entity;

import lombok.Data;
import java.io.Serializable;

@Data
public class User implements Serializable {

    private static final long serialVersionUID = 1L;

    private Long id;

    private String name;

    private int age;

    private String address;

}
案例準備
我們首先採用系統自帶的map快取來進行基於記憶體的快取處理
下面我們完成一些準備工作:
- 匯入相關座標
<?xml version="1.0" encoding="UTF-8"?>
<project xmlns="http://maven.apache.org/POM/4.0.0"
         xmlns:xsi="http://www.w3.org/2001/XMLSchema-instance"
         xsi:schemaLocation="http://maven.apache.org/POM/4.0.0 http://maven.apache.org/xsd/maven-4.0.0.xsd">
    <modelVersion>4.0.0</modelVersion>
    <parent>
        <groupId>org.springframework.boot</groupId>
        <artifactId>spring-boot-starter-parent</artifactId>
        <version>2.4.5</version>
        <relativePath/> <!-- lookup parent from repository -->
    </parent>
    <groupId>com.itheima</groupId>
    <artifactId>cache_demo</artifactId>
    <version>1.0-SNAPSHOT</version>
    <properties>
        <java.version>1.8</java.version>
    </properties>

    <dependencies>

        <!--spring-boot-starter-web中包含了我們的快取最基本的依賴-->
        <dependency>
            <groupId>org.springframework.boot</groupId>
            <artifactId>spring-boot-starter-web</artifactId>
            <scope>compile</scope>
        </dependency>

        <dependency>
            <groupId>org.projectlombok</groupId>
            <artifactId>lombok</artifactId>
            <version>1.18.20</version>
        </dependency>

        <dependency>
            <groupId>com.alibaba</groupId>
            <artifactId>fastjson</artifactId>
            <version>1.2.76</version>
        </dependency>

        <dependency>
            <groupId>commons-lang</groupId>
            <artifactId>commons-lang</artifactId>
            <version>2.6</version>
        </dependency>

        <dependency>
            <groupId>mysql</groupId>
            <artifactId>mysql-connector-java</artifactId>
            <scope>runtime</scope>
        </dependency>

        <dependency>
            <groupId>com.baomidou</groupId>
            <artifactId>mybatis-plus-boot-starter</artifactId>
            <version>3.4.2</version>
        </dependency>

        <dependency>
            <groupId>com.alibaba</groupId>
            <artifactId>druid-spring-boot-starter</artifactId>
            <version>1.1.23</version>
        </dependency>

    </dependencies>

    <build>
        <plugins>
            <plugin>
                <groupId>org.springframework.boot</groupId>
                <artifactId>spring-boot-maven-plugin</artifactId>
                <version>2.4.5</version>
            </plugin>
        </plugins>
    </build>
</project>
- 啟動類註解
package com.itheima;

import lombok.extern.slf4j.Slf4j;
import org.springframework.boot.SpringApplication;
import org.springframework.boot.autoconfigure.SpringBootApplication;
import org.springframework.cache.annotation.EnableCaching;

// @EnableCaching開啟快取註解
@Slf4j
@SpringBootApplication
@EnableCaching
public class CacheDemoApplication {
    public static void main(String[] args) {
        SpringApplication.run(CacheDemoApplication.class,args);
        log.info("專案啟動成功...");
    }
}
案例內容
下面我們來進行服務層核心程式碼的編寫,我們一共會使用三個註解:
package com.itheima.controller;

import com.baomidou.mybatisplus.core.conditions.query.LambdaQueryWrapper;
import com.itheima.entity.User;
import com.itheima.service.UserService;
import lombok.extern.slf4j.Slf4j;
import org.springframework.beans.factory.annotation.Autowired;
import org.springframework.beans.factory.annotation.Value;
import org.springframework.cache.CacheManager;
import org.springframework.cache.annotation.CacheEvict;
import org.springframework.cache.annotation.CachePut;
import org.springframework.cache.annotation.Cacheable;
import org.springframework.web.bind.annotation.*;
import java.util.ArrayList;
import java.util.List;

@RestController
@RequestMapping("/user")
@Slf4j
public class UserController {

    @Autowired
    private CacheManager cacheManager;

    @Autowired
    private UserService userService;

    /**
     * 儲存資料
     * @CachePut將返回值放入快取
     * value:快取的名字,表示一個型別
     * key:快取的鍵,裡面儲存我們的返回值
     * key的值:這裡採用的動態,用#來表示參照
     * key的值:可以參照引數的值#user,也可以以#root.args[n]和#pn來表示引數的第n個值,可以參照返回值#result
     * @param user
     * @return
     */
    @PostMapping
    @CachePut(value = "userCache",key = "#root.args[0]")
    public User save(User user){
        userService.save(user);
        return user;
    }

    /**
     * 刪除資料
     * 我們刪除資料時,需要將對應的快取也刪除
     * @CacheEvict將該key刪除
     * @param id
     */
    @DeleteMapping("/{id}")
    @CacheEvict(value = "userCache",key = "#id")
    public void delete(@PathVariable Long id){
        userService.removeById(id);
    }

    /**
     * 更新資料
     * 我們更新資料時,需要將對應的快取也刪除
     * @CacheEvict將該key刪除
     * @param user
     * @return
     */
    @PutMapping
    @CacheEvict(value = "userCache",key = "#user.id")
    public User update(User user){
        userService.updateById(user);
        return user;
    }

    /**
     * 獲得資料
     * @Cacheable先從快取中貨的返回值,若存在直接返回,若不存在,執行方法並將返回值放入快取
     * 其中我們設定了condition表示快取條件,只有當返回值不為空時我們才將資料快取
     * @param id
     * @return
     */
    @GetMapping("/{id}")
    @Cacheable(value = "userCache",key = "#id",condition = "#result != null ")
    public User getById(@PathVariable Long id){
        User user = userService.getById(id);
        return user;
    }

    /**
     * 獲得多個資料
     * @Cacheable先從快取中貨的返回值,若存在直接返回,若不存在,執行方法並將返回值放入快取
     * 我們將資料匹配的兩個條件作為key,為了方便區分並獲得該值
     * @param user
     * @return
     */
    @GetMapping("/list")
    @Cacheable(value = "userCache",key = "#user.id + '_' + #user.name")
    public List<User> list(User user){
        LambdaQueryWrapper<User> queryWrapper = new LambdaQueryWrapper<>();
        queryWrapper.eq(user.getId() != null,User::getId,user.getId());
        queryWrapper.eq(user.getName() != null,User::getName,user.getName());
        List<User> list = userService.list(queryWrapper);
        return list;
    }
}
案例優化
在上面我們已經瞭解了四個註解的使用方式,接下來讓我們開始Redis快取:
- 新增對應的註解:
        <dependency>
            <groupId>org.springframework.boot</groupId>
            <artifactId>spring-boot-starter-cache</artifactId>
        </dependency>

        <dependency>
            <groupId>org.springframework.boot</groupId>
            <artifactId>spring-boot-starter-data-redis</artifactId>
        </dependency>
- 書寫yaml組態檔中的Redis設定池
server:
  port: 8080
spring:
  application:
    #應用的名稱,可選
    name: cache_demo
  datasource:
    druid:
      driver-class-name: com.mysql.cj.jdbc.Driver
      url: jdbc:mysql://localhost:3306/cache_demo
      username: root
      password: root
  redis:
    host: localhost
    port: 6379
    password: 123456
    database: 0
  cache:
    redis:
      time-to-live: 180000 # 這裡設定快取時間,注意單位是毫秒
mybatis-plus:
  configuration:
    map-underscore-to-camel-case: true
    log-impl: org.apache.ibatis.logging.stdout.StdOutImpl
  global-config:
    db-config:
      id-type: ASSIGN_ID
- 在啟動類上加上EnableCaching註解,開啟快取註解功能,這裡不用修改
package com.itheima;

import lombok.extern.slf4j.Slf4j;
import org.springframework.boot.SpringApplication;
import org.springframework.boot.autoconfigure.SpringBootApplication;
import org.springframework.cache.annotation.EnableCaching;

@Slf4j
@SpringBootApplication
@EnableCaching
public class CacheDemoApplication {
    public static void main(String[] args) {
        SpringApplication.run(CacheDemoApplication.class,args);
        log.info("專案啟動成功...");
    }
}
- 在Controller方法上新增@Cache相關注解,這裡做簡單修改(getById修改)
package com.itheima.controller;

import com.baomidou.mybatisplus.core.conditions.query.LambdaQueryWrapper;
import com.itheima.entity.User;
import com.itheima.service.UserService;
import lombok.extern.slf4j.Slf4j;
import org.springframework.beans.factory.annotation.Autowired;
import org.springframework.beans.factory.annotation.Value;
import org.springframework.cache.CacheManager;
import org.springframework.cache.annotation.CacheEvict;
import org.springframework.cache.annotation.CachePut;
import org.springframework.cache.annotation.Cacheable;
import org.springframework.web.bind.annotation.*;
import java.util.ArrayList;
import java.util.List;

@RestController
@RequestMapping("/user")
@Slf4j
public class UserController {

    @Autowired
    private CacheManager cacheManager;

    @Autowired
    private UserService userService;

    /**
     * 儲存資料
     * @CachePut將返回值放入快取
     * value:快取的名字,表示一個型別
     * key:快取的鍵,裡面儲存我們的返回值
     * key的值:這裡採用的動態,用#來表示參照
     * key的值:可以參照引數的值#user,也可以以#root.args[n]和#pn來表示引數的第n個值,可以參照返回值#result
     * @param user
     * @return
     */
    @PostMapping
    @CachePut(value = "userCache",key = "#root.args[0]")
    public User save(User user){
        userService.save(user);
        return user;
    }

    /**
     * 刪除資料
     * 我們刪除資料時,需要將對應的快取也刪除
     * @CacheEvict將該key刪除
     * @param id
     */
    @DeleteMapping("/{id}")
    @CacheEvict(value = "userCache",key = "#id")
    public void delete(@PathVariable Long id){
        userService.removeById(id);
    }

    /**
     * 更新資料
     * 我們更新資料時,需要將對應的快取也刪除
     * @CacheEvict將該key刪除
     * @param user
     * @return
     */
    @PutMapping
    @CacheEvict(value = "userCache",key = "#user.id")
    public User update(User user){
        userService.updateById(user);
        return user;
    }

    /**
     * 獲得資料
     * @Cacheable先從快取中貨的返回值,若存在直接返回,若不存在,執行方法並將返回值放入快取
     * redis無法使用condition條件,我們只能更換unless條件,表示滿足什麼條件時將不存入快取資料
     * @param id
     * @return
     */
    @GetMapping("/{id}")
    @Cacheable(value = "userCache",key = "#id",unless = "#result == null ")
    public User getById(@PathVariable Long id){
        User user = userService.getById(id);
        return user;
    }

    /**
     * 獲得多個資料
     * @Cacheable先從快取中貨的返回值,若存在直接返回,若不存在,執行方法並將返回值放入快取
     * 我們將資料匹配的兩個條件作為key,為了方便區分並獲得該值
     * @param user
     * @return
     */
    @GetMapping("/list")
    @Cacheable(value = "userCache",key = "#user.id + '_' + #user.name")
    public List<User> list(User user){
        LambdaQueryWrapper<User> queryWrapper = new LambdaQueryWrapper<>();
        queryWrapper.eq(user.getId() != null,User::getId,user.getId());
        queryWrapper.eq(user.getName() != null,User::getName,user.getName());
        List<User> list = userService.list(queryWrapper);
        return list;
    }
}
快取套餐資料
我們的功能開發分為三部分
實現思路
由於每次查詢套餐時我們都需要採用Mysql到後臺去查詢,當用戶增多後,大量的存取導致後臺存取速度減慢可能會使系統崩潰
我們在前面已經接觸了Spring Cache,下面我們將用Spring Cache來實現Redis快取操作
程式碼實現
我們通過多步完成Spring Cache操作:
- 匯入Spring Cache和Redis相關的Maven座標:
<?xml version="1.0" encoding="UTF-8"?>
<project xmlns="http://maven.apache.org/POM/4.0.0"
         xmlns:xsi="http://www.w3.org/2001/XMLSchema-instance"
         xsi:schemaLocation="http://maven.apache.org/POM/4.0.0 http://maven.apache.org/xsd/maven-4.0.0.xsd">
    <modelVersion>4.0.0</modelVersion>

    <parent>
        <groupId>org.springframework.boot</groupId>
        <artifactId>spring-boot-starter-parent</artifactId>
        <version>2.4.5</version>
        <relativePath/> <!-- lookup parent from repository -->
    </parent>


    <groupId>com.xyl</groupId>
    <artifactId>mydelivery</artifactId>
    <version>1.0-SNAPSHOT</version>

    <properties>
        <java.version>1.8</java.version>
    </properties>

    <dependencies>

        <!--阿里雲簡訊服務-->
        <dependency>
            <groupId>com.aliyun</groupId>
            <artifactId>aliyun-java-sdk-core</artifactId>
            <version>4.5.16</version>
        </dependency>
        <dependency>
            <groupId>com.aliyun</groupId>
            <artifactId>aliyun-java-sdk-dysmsapi</artifactId>
            <version>2.1.0</version>
        </dependency>

        <!--Redis座標-->
        <dependency>
            <groupId>org.springframework.boot</groupId>
            <artifactId>spring-boot-starter-data-redis</artifactId>
        </dependency>

        <!--Cache座標-->
        <dependency>
            <groupId>org.springframework.boot</groupId>
            <artifactId>spring-boot-starter-cache</artifactId>
        </dependency>

        <dependency>
            <groupId>org.springframework.boot</groupId>
            <artifactId>spring-boot-starter-thymeleaf</artifactId>
        </dependency>

        <dependency>
            <groupId>org.springframework.boot</groupId>
            <artifactId>spring-boot-starter-cache</artifactId>
        </dependency>

        <dependency>
            <groupId>org.springframework.boot</groupId>
            <artifactId>spring-boot-starter-mail</artifactId>
            <version>2.2.6.RELEASE</version>
        </dependency>

        <dependency>
            <groupId>org.springframework.boot</groupId>
            <artifactId>spring-boot-starter</artifactId>
        </dependency>

        <dependency>
            <groupId>org.springframework.boot</groupId>
            <artifactId>spring-boot-starter-test</artifactId>
            <scope>test</scope>
        </dependency>

        <dependency>
            <groupId>org.springframework.boot</groupId>
            <artifactId>spring-boot-starter-web</artifactId>
            <scope>compile</scope>
        </dependency>

        <dependency>
            <groupId>com.baomidou</groupId>
            <artifactId>mybatis-plus-boot-starter</artifactId>
            <version>3.4.2</version>
        </dependency>

        <dependency>
            <groupId>org.projectlombok</groupId>
            <artifactId>lombok</artifactId>
            <version>1.18.20</version>
        </dependency>

        <!--         將物件 轉化為JSON格式-->
        <dependency>
            <groupId>com.alibaba</groupId>
            <artifactId>fastjson</artifactId>
            <version>1.2.76</version>
        </dependency>

        <dependency>
            <groupId>commons-lang</groupId>
            <artifactId>commons-lang</artifactId>
            <version>2.6</version>
        </dependency>

        <dependency>
            <groupId>mysql</groupId>
            <artifactId>mysql-connector-java</artifactId>
            <scope>runtime</scope>
        </dependency>

        <dependency>
            <groupId>com.alibaba</groupId>
            <artifactId>druid-spring-boot-starter</artifactId>
            <version>1.1.23</version>
        </dependency>

    </dependencies>

    <build>
        <plugins>
            <plugin>
                <groupId>org.springframework.boot</groupId>
                <artifactId>spring-boot-maven-plugin</artifactId>
                <version>2.4.5</version>
            </plugin>
        </plugins>
    </build>

</project>
- 在application.yaml中設定快取資料的過期時間
server:
  port: 8080
spring:
  application:
    name: qiuluo
  datasource:
    druid:
      driver-class-name: com.mysql.cj.jdbc.Driver
      url: jdbc:mysql://localhost:3306/reggie?serverTimezone=Asia/Shanghai&useUnicode=true&characterEncoding=utf-8&zeroDateTimeBehavior=convertToNull&useSSL=false&allowPublicKeyRetrieval=true
      username: root
      password: 123456
  redis:
    host: localhost
    port: 6379
    # password: 123456
    database: 0
  cache:
    redis:
      time-to-live: 180000 # 注意單位是毫秒

mybatis-plus:
  configuration:
    #在對映實體或者屬性時,將資料庫中表名和欄位名中的下劃線去掉,按照駝峰命名法對映
    map-underscore-to-camel-case: true
    log-impl: org.apache.ibatis.logging.stdout.StdOutImpl
  global-config:
    db-config:
      id-type: ASSIGN_ID
reggie:
  path: E:\程式設計內容\實戰專案\瑞吉外賣\Code\reggie\imgs\
- 在啟動類上新增@EnableCaching註解,開啟快取註解功能
package com.qiuluo.reggie;

import lombok.extern.slf4j.Slf4j;
import org.springframework.boot.SpringApplication;
import org.springframework.boot.autoconfigure.SpringBootApplication;
import org.springframework.boot.web.servlet.ServletComponentScan;
import org.springframework.cache.annotation.Cacheable;
import org.springframework.cache.annotation.EnableCaching;
import org.springframework.transaction.annotation.EnableTransactionManagement;
import org.springframework.transaction.event.TransactionalEventListener;

@Slf4j
@SpringBootApplication
@ServletComponentScan
@EnableCaching
public class ReggieApplication {
    public static void main(String[] args) {
        SpringApplication.run(ReggieApplication.class,args);
        log.info("專案成功執行");
    }
}
- 在SetmealController的list方法上加上@Cacheable註解
package com.qiuluo.reggie.controller;


import com.baomidou.mybatisplus.core.conditions.query.LambdaQueryWrapper;
import com.baomidou.mybatisplus.extension.api.R;
import com.baomidou.mybatisplus.extension.plugins.pagination.Page;
import com.qiuluo.reggie.common.Result;
import com.qiuluo.reggie.domain.Category;
import com.qiuluo.reggie.domain.Dish;
import com.qiuluo.reggie.domain.Setmeal;
import com.qiuluo.reggie.domain.SetmealDish;
import com.qiuluo.reggie.dto.DishDto;
import com.qiuluo.reggie.dto.SetmealDto;
import com.qiuluo.reggie.service.impl.CategoryServiceImpl;
import com.qiuluo.reggie.service.impl.DishServiceImpl;
import com.qiuluo.reggie.service.impl.SetmealDishServiceImpl;
import com.qiuluo.reggie.service.impl.SetmealServiceImpl;
import lombok.extern.slf4j.Slf4j;
import org.springframework.beans.BeanUtils;
import org.springframework.beans.factory.annotation.Autowired;
import org.springframework.cache.annotation.CacheEvict;
import org.springframework.cache.annotation.Cacheable;
import org.springframework.web.bind.annotation.*;

import java.util.List;
import java.util.stream.Collectors;

@Slf4j
@RestController
@RequestMapping("/setmeal")
public class SetmealController {

    @Autowired
    private DishServiceImpl dishService;

    @Autowired
    private SetmealServiceImpl setmealService;

    @Autowired
    private SetmealDishServiceImpl setmealDishService;

    @Autowired
    private CategoryServiceImpl categoryService;

    /**
     * 根據條件查詢套餐資料
     * @param setmeal
     * @return
     */
    @Cacheable(value = "setmealCache",key = "#setmeal.categoryId + '_' + #setmeal.status")
    @GetMapping("/list")
    public Result<List<Setmeal>> list(Setmeal setmeal){
        LambdaQueryWrapper<Setmeal> queryWrapper = new LambdaQueryWrapper<>();
        queryWrapper.eq(setmeal.getCategoryId() != null,Setmeal::getCategoryId,setmeal.getCategoryId());
        queryWrapper.eq(setmeal.getStatus() != null,Setmeal::getStatus,setmeal.getStatus());
        queryWrapper.orderByDesc(Setmeal::getUpdateTime);

        List<Setmeal> list = setmealService.list(queryWrapper);

        return Result.success(list);
    }
}
- 在SetmealController的save,update,delete方法上加上@CacheEvict註解
package com.qiuluo.reggie.controller;


import com.baomidou.mybatisplus.core.conditions.query.LambdaQueryWrapper;
import com.baomidou.mybatisplus.extension.api.R;
import com.baomidou.mybatisplus.extension.plugins.pagination.Page;
import com.qiuluo.reggie.common.Result;
import com.qiuluo.reggie.domain.Category;
import com.qiuluo.reggie.domain.Dish;
import com.qiuluo.reggie.domain.Setmeal;
import com.qiuluo.reggie.domain.SetmealDish;
import com.qiuluo.reggie.dto.DishDto;
import com.qiuluo.reggie.dto.SetmealDto;
import com.qiuluo.reggie.service.impl.CategoryServiceImpl;
import com.qiuluo.reggie.service.impl.DishServiceImpl;
import com.qiuluo.reggie.service.impl.SetmealDishServiceImpl;
import com.qiuluo.reggie.service.impl.SetmealServiceImpl;
import lombok.extern.slf4j.Slf4j;
import org.springframework.beans.BeanUtils;
import org.springframework.beans.factory.annotation.Autowired;
import org.springframework.cache.annotation.CacheEvict;
import org.springframework.cache.annotation.Cacheable;
import org.springframework.web.bind.annotation.*;

import java.util.List;
import java.util.stream.Collectors;

@Slf4j
@RestController
@RequestMapping("/setmeal")
public class SetmealController {

    @Autowired
    private DishServiceImpl dishService;

    @Autowired
    private SetmealServiceImpl setmealService;

    @Autowired
    private SetmealDishServiceImpl setmealDishService;

    @Autowired
    private CategoryServiceImpl categoryService;

    /**
     * 新增
     * @CacheEvict:刪除快取功能,allEntries = true表示刪除該value型別的所有快取
     * @param setmealDto
     * @return
     */
    @CacheEvict(value = "setmealCache",allEntries = true)
    @PostMapping
    public Result<String> save(@RequestBody SetmealDto setmealDto){

        setmealService.saveWithDish(setmealDto);

        log.info("套餐新增成功");

        return Result.success("新創套餐成功");
    }

     /**
     * 修改
     * @CacheEvict:刪除快取功能,allEntries = true表示刪除該value型別的所有快取
     * @param setmealDto
     * @return
     */
    @PutMapping
    @CacheEvict(value = "setmealCache",allEntries = true)
    public Result<String> update(@RequestBody SetmealDto setmealDto){

        setmealService.updateById(setmealDto);

        return Result.success("修改成功");
    }

    /**
     * 刪除
     * @CacheEvict:刪除快取功能,allEntries = true表示刪除該value型別的所有快取
     * @param ids
     * @return
     */
    @CacheEvict(value = "setmealCache",allEntries = true)
    @DeleteMapping
    public Result<String> delete(@RequestParam List<Long> ids){

        setmealService.removeWithDish(ids);

        return Result.success("刪除成功");
    }

}
實際測試
在實際測試中,我們主要分為兩部分:
- 來到行動端頁面,點選套餐,檢視Redis資料庫中是否產生了對應的key以及儲存的資料是否為該菜品資料
- 來到後臺頁面,點選新創,修改或刪除套餐,檢視資料庫中是否所有關於套餐的key值都被刪除
Git合併管理
到目前為止我們的快取的優化已經完整結束,我們需要先將該資料儲存到本地倉庫並上傳至遠端倉庫V1.0版本
我們的目前存在兩個分支,master相當於我們專案的主分支,V1.0相當於我們的開發分支
當我們的開發分支開發完畢並且能夠正常執行時,我們就可以將該分支合併到主分支:
- 將當前分支切換到主分支

- 將V1.0分支的資料合併到master分支,等待即可
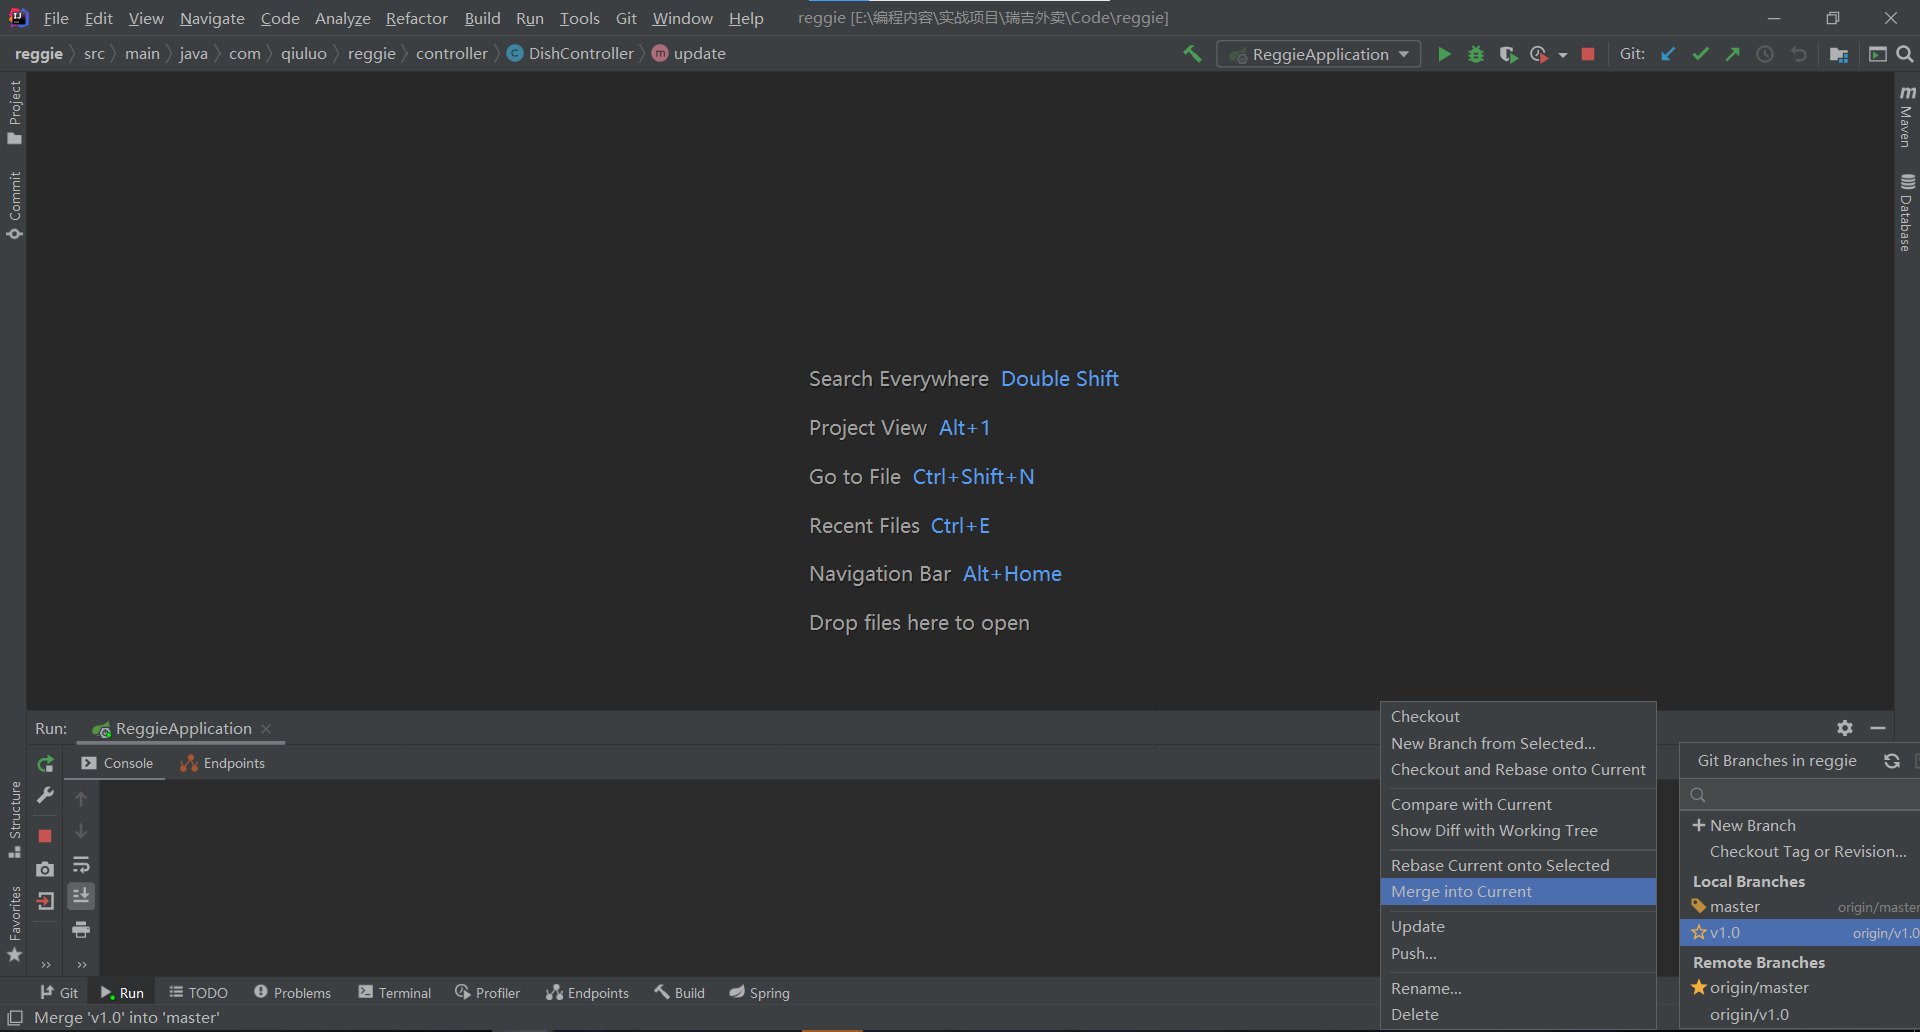
至此我們的Git合併管理就完成了
結束語
該篇內容到這裡就結束了,希望能為你帶來幫助~
附錄
該文章屬於學習內容,具體參考B站黑馬程式設計師的Java專案實戰《瑞吉外賣》
這裡附上視訊連結:專案優化Day1-01-本章內容介紹_嗶哩嗶哩_bilibili