鵝長微服務發現與治理鉅作PolarisMesh實踐-上
@
概述
定義
PolarisMesh 官網地址 https://polarismesh.cn/
PolarisMesh 官網中文檔案 https://polarismesh.cn/zh/doc/北極星是什麼/簡介.html
PolarisMesh GitHub原始碼地址 https://github.com/polarismesh
PolarisMesh(北極星)是騰訊開源的支援多語言、多框架的雲原生服務發現和治理中心,提供高效能SDK和無侵入Sidecar兩種接入方式。
前面多篇文章講解Spring Cloud Alibaba微服務一站式解決全元件的原理和實踐,Spring Cloud Alibaba主要服務於Java技術棧,而PolarisMesh提供多語言、框架無關、服務網格的實現,當之無愧的集大成者。北極星在騰訊內部的服務註冊數量超過百萬,日介面呼叫量超過十萬億,通用性和穩定性都得到了大規模的驗證。
PolarisMesh不僅提供無侵入Sidecar,還提供高效能SDK,實現語意相同的服務發現和治理功能,使用者可以根據業務場景自行選擇。對於請求量大和資源消耗敏感使用者,可以在業務應用或者開發框架中整合北極星SDK,快速補齊服務發現和治理功能。
核心功能
PolarisMesh的功能都是基於外掛化設計,可單獨使用,採用計算儲存分離,計算層節點可以隨著使用者端節點的增加平行擴充套件,輕鬆支援百萬級節點接入。從功能大類來看,分為註冊中心、設定中心以及服務網格三類功能
-
註冊中心
- 服務註冊發現及服務健康檢查:以服務為中心的分散式應用架構,通過服務和註冊發現的方式維護不斷變化的請求地址,提高應用的擴充套件能力,降低應用的遷移成本。北極星提供對註冊上來的服務範例進行健康檢查,阻止主調方對不健康的服務範例傳送請求,同時也提供了保護能力,範例剔除超過一定數量則停止剔除,防止因不健康範例過多導致雪崩效應。
-
設定中心
- 動態設定:提供設定管理的功能,支援應用設定、公共設定的訂閱釋出、版本管理、變更通知,實現應用設定動態生效。
-
服務網格
- 路由和負載均衡:根據請求標籤、範例標籤和標籤匹配規則,對線上流量進行動態排程,可以應用於按地域就近、單元化隔離和金絲雀釋出等多種場景。
- 熔斷降級和限流:及時熔斷異常的服務、介面、範例或者範例分組,降低請求失敗率。針對不同的請求來源和系統資源進行存取限流,避免服務被壓垮。
- 可觀測性:支援請求量、請求延時和請求成功率的指標查詢,支援服務呼叫關係和多維度的流量曲線查詢,實現服務治理功能和流量觀測一體化。
- Proxyless與Proxy接入:提供多語言SDK、以及無侵入的JavaAgent,適配使用者高效能低長尾時延以Porxyless模式的接入場景;同時提供獨立的Sidecar,支援使用者的低侵入性、基於流量接管的Proxy模式接入場景。
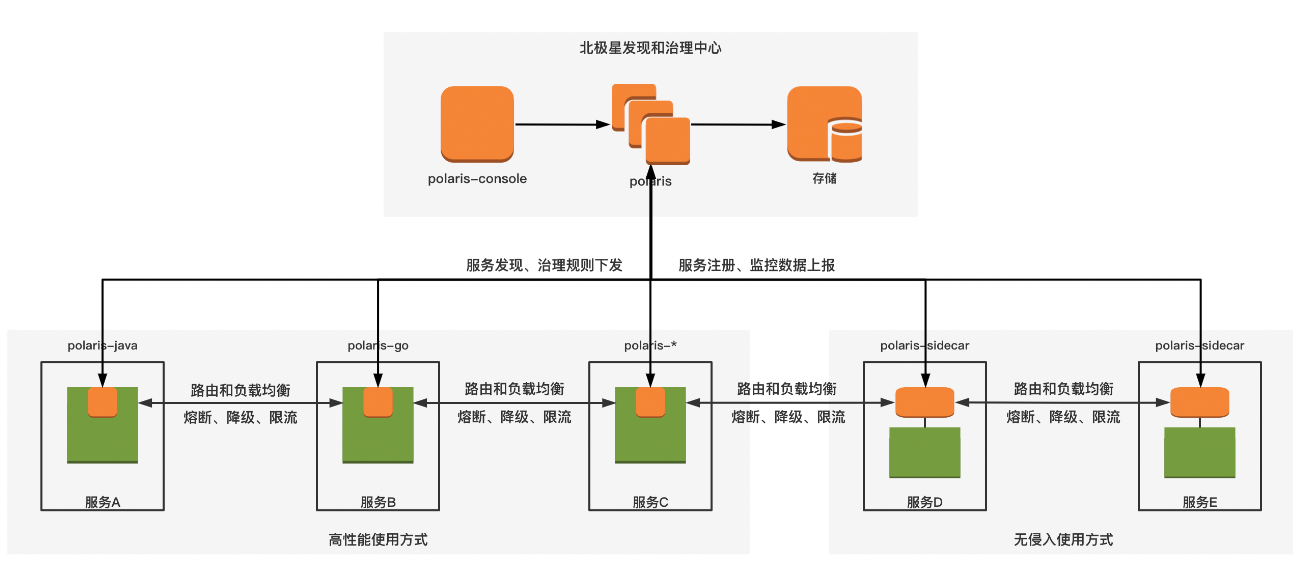
元件和生態
PolarisMesh分為控制平面、資料平面以及生態元件3大類,通過這3大類元件,組成一套完整的微服務治理體系。
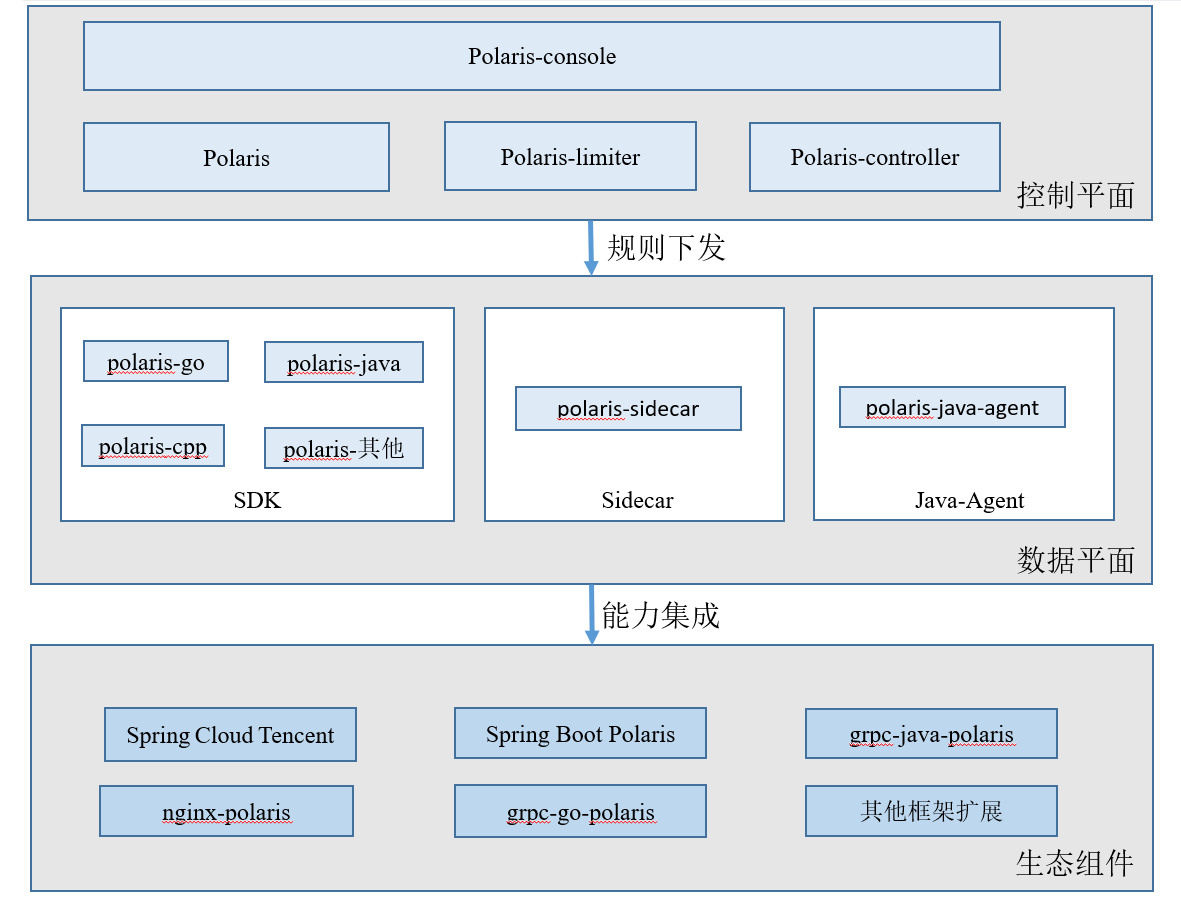
PolarisMesh相容常用的開源框架、閘道器和 kubernetes。主要包含服務發現和治理中心、多語言應用開發、DNS 和 Proxy、閘道器。
-
服務發現和治理中心
- polaris-console:北極星的視覺化控制檯,直接面對終端使用者,提供視覺化介面供使用者進行服務管理、設定管理、服務治理規則管理、可觀測性等操作。
- polaris:北極星的註冊設定中心,暴露API介面供服務、設定以及治理規則獲取及編輯。支援叢集化部署,多個polaris叢集之間可以共用同一份資料,支援使用者端就近接入。
- polaris-controller:北極星對接k8s的適配元件,可以將k8s的service以及endpoint的資料變更按需同步到北極星,實現 k8s service 和框架服務的統一管理。
- polaris-limiter:北極星分散式限流的token服務,支援限流配額的彙總以及下發分配。
-
多語言應用開發:支援Java、Go、C、C++、PHP、Lua,不劫持業務請求,幾乎不增加請求延時,CPU 消耗低,不需要部署和運維 Sidecar。支援 grpc 等框架和北極星 SDK 的整合,框架使用者不需要直接使用北極星 SDK。比如:
- Java應用開發:polaris-java(Polaris Java使用者端實現)、grpc-java-polaris(使用grpc-java與polaris-java的整合)、spring-cloud-tencent(SpringCloud與騰訊開源中介軟體的整合解決方案)、spring-boot-polaris(SpringBoot與polaris-java的整合)、polaris-java-agent(polaris-java注入到SpringCloud和Dubbo)。
- Go應用開發polaris-go(Polaris Go使用者端)、grpc-go-polaris(grpc-java與polaris-go的整合)、go-kratos(go-kratos與polaris-go的整合)、go-zero(go-zero與polaris-go的整合)、go-frame(go-frame與polaris-go的整合)、dubbo-go(dubbo-go與polaris-go的整合)、kitex(kitex與polaris-go的整合)。
-
Sidecar:劫持業務請求,有一定的請求延時,CPU 消耗較高,適用於無侵入的開發場景。
-
JavaAgent:對於Java的應用,直接通過位元組碼的方式載入到程序中,通過攔截器實現無感的接入。
-
支援 nginx 等閘道器和北極星 SDK 的整合,支援閘道器將請求轉發到北極星服務。
-
支援 k8s service 自動註冊到北極星,實現 k8s service 和框架服務的統一管理。
特色亮點
- 一站式服務治理中心:集服務註冊中心和服務治理控制面於一體,幫助業務解決分散式或者微服務架構面臨的註冊發現、故障容錯、流量控制和安全問題。
- 支援多種開發語言:提供Java、Go和C++等多種高效能、功能語意相同的SDK,可以輕鬆整合到不同的技術棧,幫助企業實現統一的服務發現和治理。
- 支援常用開發框架:北極星服務治理SDK可以整合到gRPC和Spring Cloud等開發框架中,幫助框架完善服務治理功能。框架使用者不感知,接入成本低。
- 支援Kubernetes:提供原生的k8s polaris-controller,支援k8s service自動注入,幫助k8s無縫相容微服務架構體系,實現跨叢集的服務發現和治理。
- 服務網格:提供高效能SDK和無侵入Sidecar兩種接入方式,採用SDK和Sidecar的服務可以互相存取,功能語意相同,適用於不同的業務場景。
- 大規模生產應用:騰訊服務治理中心的開源版本,為騰訊百萬服務提供標準的服務治理功能,沉澱了騰訊從虛擬機器器到容器時代的分散式服務治理經驗
解決哪些問題
在分散式架構及微服務架構實施過程中,業務可能面臨以下四類問題。北極星以服務為中心,提供一站式解決方案。

官方效能資料
在長時間的壓力測試下,不同規格的北極星叢集均維持正常執行狀態,叢集可承載的範例容量從1k範例到10w範例,相關依賴元件的系統資源消耗也均在預期內,並未出現相關依賴元件高負載不可用現象。通過壓測,不同規格的北極星叢集可以穩定支撐服務範例數量均滿足預期。
- 註冊範例的TPS最高可達35912,符合介面預期
- 服務發現的QPS最高可達116021,符合介面預期
- 範例心跳的TPS最高可達78077,符合介面預期
- 登出範例的TPS最高可達14356,符合介面預期
架構原理
資源模型
PolarisMesh的資源模型與前面學習Nacos很相似,包括如下:
- 名稱空間:提供了一種在相同註冊中心下資源的邏輯隔離的機制,同一名稱空間下的資源命名必須唯一,但是跨名稱空間允許存在同名的資源。名稱空間常用於多個團隊或者專案之間的資源的區分隔離。
- 服務:一種資源對外暴露的抽象方式,資源本身通過埠監聽的方式提供網路存取,並通過提供一系列預定義的服務介面,給主調端進行呼叫。
- 範例分組:是由一個或多個具有相同標籤屬性的範例組成,這些範例往往具備相同的特徵,比如屬於同一版本、屬於同一個地域、屬於同一環境。
- 服務範例:對應的是暴露一個或多個API介面供主調應用進行網路呼叫的節點,通過IP:PORT的方式進行唯一標識。
服務治理
基本原理
PolarisMesh是服務發現與治理中心,其主要應用在微服務之間的RPC呼叫過程中服務可見、流量控制、故障容錯等場景,涉及服務註冊、服務發現、動態路由、負載均衡、健康檢查、存取限流、熔斷降級。

整體流程如下:
- RPC呼叫過程的參與者主要涉及兩個角色:主調方和被調方。
- 首先,被調方使用
服務註冊功能,向北極星註冊自身服務資料,包括節點列表,治理規則等。 - 第二,主調方通過
服務發現功能,拉取被調方的全量服務資料。 - 第三,主調方通過
路由和負載均衡功能,篩選出一個合適的被調方範例,進行RPC呼叫。 - 第四,主調方記錄RPC呼叫的成功失敗結果,通過
熔斷降級功能,剔除出現故障的被調方節點。 - 第五,北極星通過
健康檢查功能,主動剔除已經下線的被調方節點。 - 第六,被調方通過
存取限流功能,保護自身不被主調方的異常流量給擊潰。
服務註冊
服務註冊指的是被調方按照服務模型將自身的服務資料註冊到PolarisMesh,以供主調方進行服務發現。服務資料主要包括以下部分:
- 服務名:服務的唯一標識,區分大小寫。
- 服務後設資料:服務的標籤資訊,KV格式,可對服務進行分類,可用於過濾。
- 服務範例:提供服務的節點列表,以IP:PORT的方式提供。
- 服務範例後設資料:服務範例的標籤資訊,KV格式,通常用於描述節點的叢集、版本等,用於後續流量治理等操作。
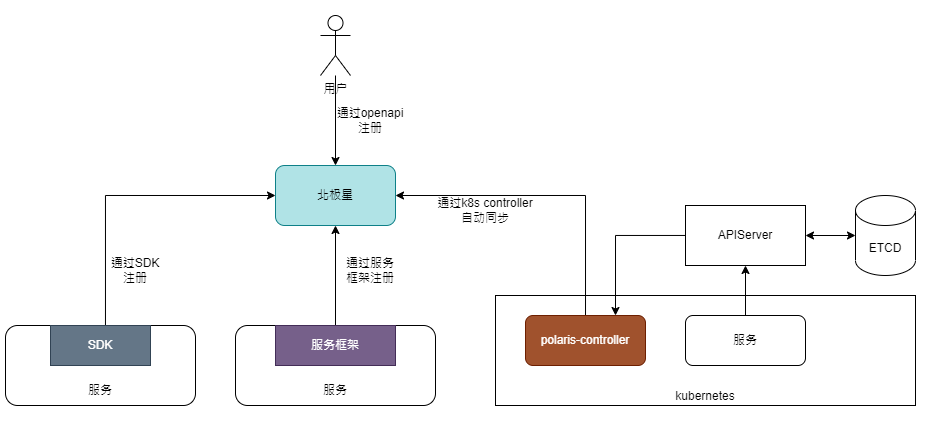
支援以下4種服務註冊方式:
- 通過SDK註冊:北極星提供了多語言SDK,服務可以通過整合SDK,呼叫registerInstance介面完成服務註冊。
- 通過服務架構註冊:服務一般與服務架構整合(比如Spring Cloud Tencent (opens new window)),框架本身會提供服務自動註冊功能,服務啟動後,框架會將服務資訊自動註冊到北極星。
- 通過k8s同步的方式註冊:使用者通過k8s部署服務,並註冊為k8s的service,北極星通過controller的機制,從k8s中將service和endpoint資訊同步到北極星,完成服務註冊。
- 通過OpenAPI註冊:北極星控制面提供基於Rest標準的OpenAPI,使用者可通過OpenAPI完成服務註冊的操作。
服務發現
服務發現指的主調方是根據服務名標識,拉取服務範例列表,以供後續進行服務呼叫的操作。

支援以下4種方式進行服務發現:
- 通過SDK服務發現:北極星提供了多語言SDK,服務可以通過整合SDK,呼叫getAllInstances介面完成全量服務列表拉取。
- 使用框架服務發現:北極星支援對接多個主流的服務架構(比如Spring Cloud Tencent (opens new window)),主調方服務通過服務架構進行發現RPC請求,即可通過框架內部擴充套件機制使用北極星服務發現能力。
- 使用sidecar服務發現:北極星提供服務網格能力,服務程式可以基於sidecar的方式,通過DNS或者流量攔截,進行服務發現。
- 使用OpenAPI服務發現:北極星控制面提供基於Rest標準的OpenAPI,使用者可通過OpenAPI完成服務發現的操作。
安裝
部署架構
由於單機安裝比較簡單,我們這裡就直接選擇叢集安裝,準備好兩臺部署伺服器,而MySQL、Redis、Promethes的安裝可以參考前面對應的文章,這裡就直接使用。
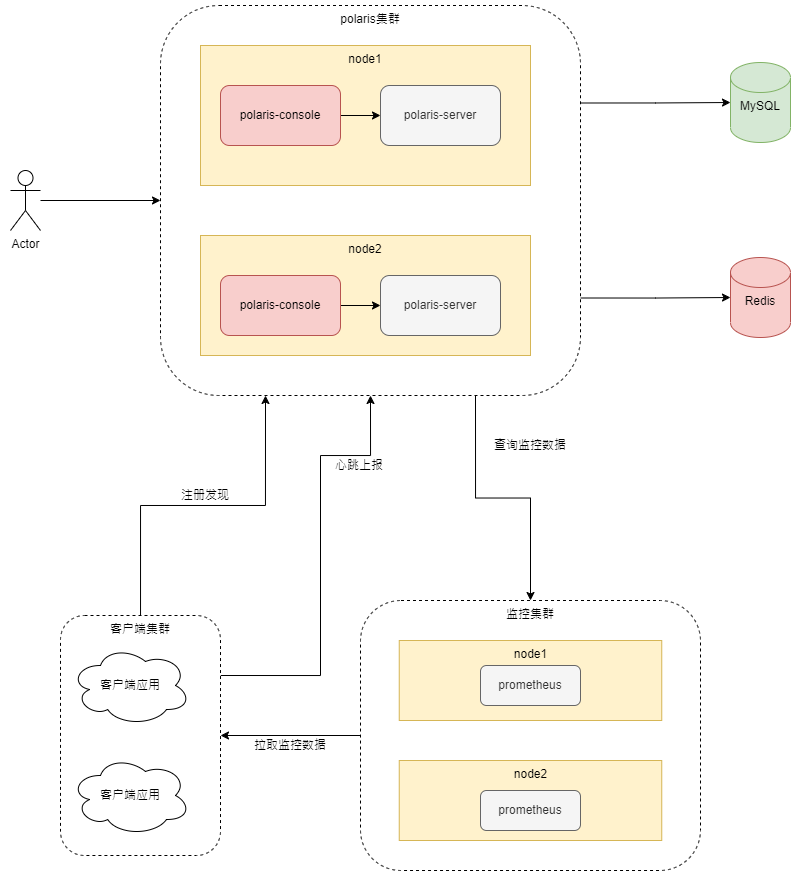
| 元件 | 型別 | 功能說明 | |
|---|---|---|---|
| polaris | 最新stable版本 | 系統元件 | 服務治理控制面 |
| polaris-console | 最新stable版本 | 系統元件 | 服務治理控制檯 |
| MySQL | >= 5.7 |
第三方依賴 | 服務資料儲存 |
| Redis | >=4.0 |
第三方依賴 | 心跳狀態資料快取 |
| Prometheus | >=2.28.0 |
第三方依賴 | 可觀測性 |
叢集安裝
- 初始資料匯入
# 下載polaris最新版本v1.12.1
wget https://github.com/polarismesh/polaris/releases/download/v1.12.1/polaris-server-release_v1.12.1.linux.amd64.zip
# 下載polaris-console最新版本v1.9.1
wget https://github.com/polarismesh/polaris-console/releases/download/v1.9.1/polaris-console-release_v1.9.1.linux.amd64.zip
# 解壓polaris-server
unzip polaris-server-release_v1.12.1.linux.amd64.zip
# 解壓polaris-console
unzip polaris-console-release_v1.9.1.linux.amd64.zip
# 進入polaris-server目錄
cd polaris-server-release_v1.12.1.linux.amd64
# 執行mysql指令碼匯入到mysql資料庫
mysql -u root -p 123456 -h 192.168.50.100 < store/sqldb/scripts/polaris_server.sql
將檔案拷貝到兩臺伺服器上,下面操作兩臺一樣
- 設定資料庫引數:修改polaris-server.yaml裡面的store設定,去掉單機檔案儲存的boltdbStore相關設定,並放開defaultStore相關設定。
# 儲存設定
store:
# 資料庫儲存外掛
  name: defaultStore
  option:
    master:
      dbType: mysql
      dbName: polaris_server
      dbAddr: 192.168.50.100:3306
      dbUser: root
      dbPwd: 123456
- 開啟自動註冊:修改polaris-server.yaml裡面的服務自注冊設定,將enable_register改成true,並填入probe_address:
bootstrap:
  polaris_service:
    # 設定為true代表啟用自動註冊
    enable_register: true
    # 填入資料庫地址,用於獲取當前節點ip資訊
    probe_address:192.168.50.100:3306
- 設定Redis引數:修改polaris-server.yaml裡面的healthcheck設定,去掉heartbeatMemory相關設定,並放開heartbeatRedis相關設定。
healthcheck:
  checkers:
  - name: heartbeatRedis
    option:
	  #填入redis的IP以及埠
      kvAddr: 192.168.50.100:6379
	  #填入redis的密碼
      kvPasswd: 123456
      maxIdle: 200
      idleTimeout: 120s
      connectTimeout: 200ms
      msgTimeout: 200ms
      concurrency: 200
- 啟動polaris-discover:
bash ./tool/start.sh
bash ./tool/p.sh

- 修改prometheus設定:開啟 prometheus.yml檔案,修改prometheus的job設定,增加http_sd_configs,其作用是告知prometheus需要從北極星獲取應用的監控上報的地址。
  - job_name: 'prometheus'
    static_configs:
    - targets: ['localhost:9090']

    http_sd_configs:
      - url: http://192.169.5.52:9000/prometheus/v1/clients

    honor_labels: true
- 啟動prometheus:
nohup ./prometheus --web.enable-lifecycle --web.enable-admin-api >> prometheus.out 2>&1 &
- 進入polaris-console目錄,修改polaris-console的設定:開啟polaris-console.yaml檔案,修改monitorServer的地址,將原來的127.0.0.1:9090替換成prometheus的監聽地址
monitorServer:
  address: "192.168.5.52:9090"
- 啟動polaris-console:
bash ./tool/start.sh
bash ./tool/p.sh

- 存取
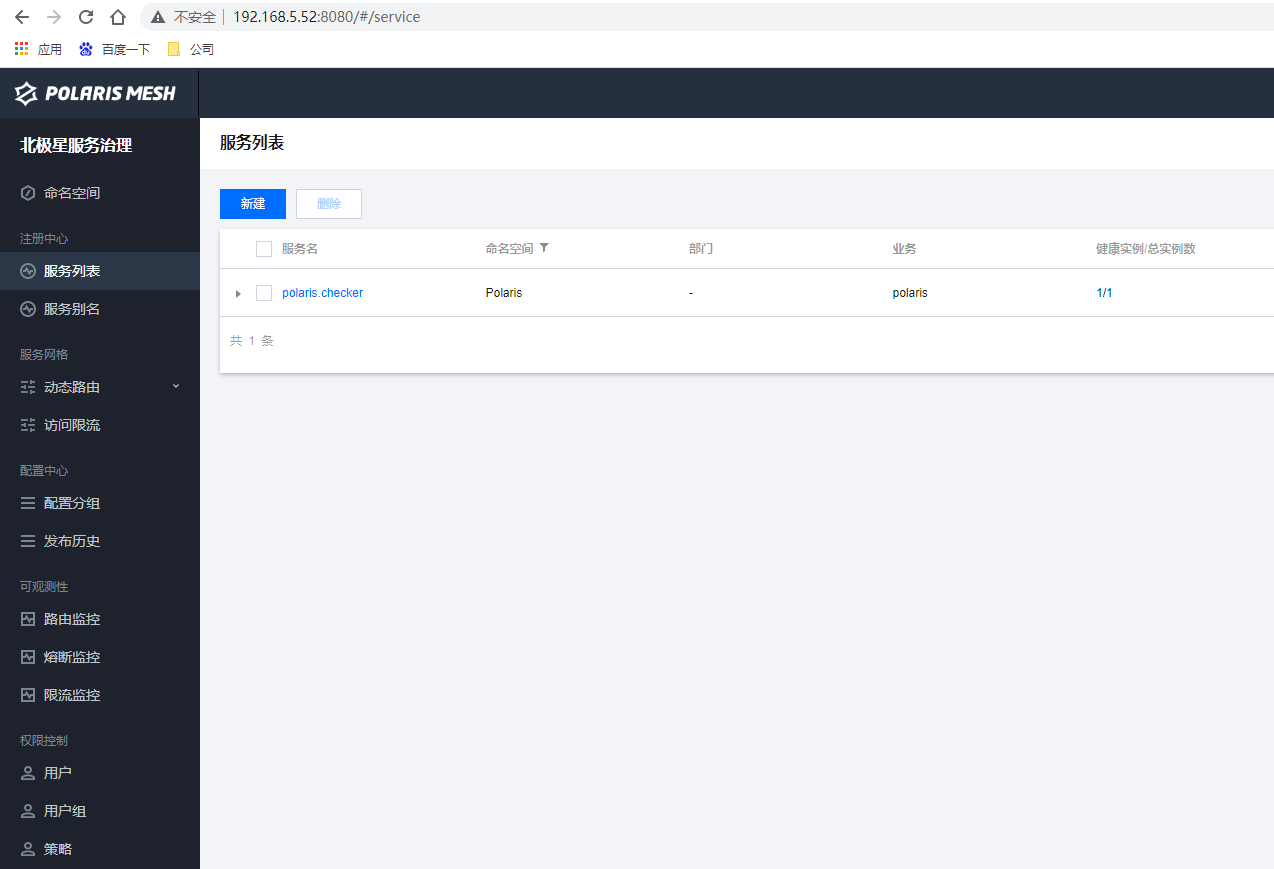
http://192.168.5.52:8080,可以看到登入頁面,輸入登入控制檯的預設登入賬戶資訊polaris/polaris,登入後可以成功看到北極星服務治理控制檯內容
SpringCloud應用接入
版本相容
Spring Cloud 是 Java 語言生態下的分散式微服務架構的一站式解決方案,為了方便 Spring Cloud 使用者快速接入北極星,我們通過以下幾個範例幫助使用者如何在 Spring Cloud 中體驗北極星的相關功能。 Spring Cloud 版本相對應的 Spring Cloud Tencent 版本如下:
[外連圖片轉存失敗,源站可能有防盜鏈機制,建議將圖片儲存下來直接上傳(img-nw4H2svH-1666971286536)(image-20221028134706394.png)]
選擇Spring Cloud 版本為 2021.0.3、Spring Cloud Tencent 版本為 1.7.0-2021.0.3
建立演示父專案
在Idea中新建一個空的maven專案,Pom檔案增加與Spring Cloud Tencent 的父依賴spring-cloud-tencent-dependencies和SpringBoot的父依賴spring-boot-starter-parent。
<?xml version="1.0" encoding="UTF-8"?><project xmlns="http://maven.apache.org/POM/4.0.0" xmlns:xsi="http://www.w3.org/2001/XMLSchema-instance" xsi:schemaLocation="http://maven.apache.org/POM/4.0.0 https://maven.apache.org/xsd/maven-4.0.0.xsd"> <parent> <groupId>org.springframework.boot</groupId> <artifactId>spring-boot-starter-parent</artifactId> <version>2.6.9</version> <relativePath/> <!-- lookup parent from repository --> </parent> <dependencyManagement> <dependencies> <dependency> <groupId>com.tencent.cloud</groupId> <artifactId>spring-cloud-tencent-dependencies</artifactId> <version>1.7.0-2021.0.3</version> <type>pom</type> <scope>import</scope> </dependency> <dependency> <groupId>org.springframework.cloud</groupId> <artifactId>spring-cloud-dependencies</artifactId> <version>2021.0.3</version> <type>pom</type> <scope>import</scope> </dependency> </dependencies> </dependencyManagement> <dependencies> <!-- 簡單的 Spring Cloud Web 依賴 --> <dependency> <groupId>org.springframework.boot</groupId> <artifactId>spring-boot-starter-web</artifactId> </dependency> <!-- 引入 Spring Cloud Tencent 的服務註冊發現依賴 --> <dependency> <groupId>com.tencent.cloud</groupId> <artifactId>spring-cloud-starter-tencent-polaris-discovery</artifactId> </dependency> </dependencies></project>
提供者微服務範例
在專案中新增一個provider-service模組,在提供者微服務的pom依賴中新增父Maven專案的依賴、 Web 服務依賴、polaris服務註冊依賴
<parent> <groupId>cn.itxs</groupId> <artifactId>spring-cloud-tencent-demo</artifactId> <version>1.0-SNAPSHOT</version> </parent> <!-- 簡單的 Spring Cloud Web 依賴 --> <dependency> <groupId>org.springframework.boot</groupId> <artifactId>spring-boot-starter-web</artifactId> </dependency> <!-- 引入 Spring Cloud Tencent 的服務註冊發現依賴 --> <dependency> <groupId>com.tencent.cloud</groupId> <artifactId>spring-cloud-starter-tencent-polaris-discovery</artifactId> </dependency> <dependency> <groupId>org.springframework.boot</groupId> <artifactId>spring-boot-autoconfigure</artifactId> </dependency>
在provider-service的 resources 目錄下建立 application.yml 檔案,並按照如下進行設定
server: port: 28888spring: application: name: provider-service cloud: polaris: # 設定polaris servre地址 address: grpc://192.168.5.52:8091 discovery: enabled: true stat: enabled: true port: 28082
建立提供者微服務演示控制器ProviderHelloController.java
package cn.itxs.controller;import com.tencent.cloud.polaris.PolarisDiscoveryProperties;import org.springframework.web.bind.annotation.PathVariable;import org.springframework.web.bind.annotation.RequestMapping;import org.springframework.web.bind.annotation.RestController;@RestControllerpublic class ProviderHelloController { private final PolarisDiscoveryProperties properties; ProviderHelloController(PolarisDiscoveryProperties properties) { this.properties = properties; } @RequestMapping("/hello/{val}") public String echo(@PathVariable String val) { return "Hello PolarisMesh,this is it xiao shen," + val + ", I'm " + properties.getService(); }}
啟動類ProviderApplication.java
package cn.itxs;import org.springframework.boot.SpringApplication;import org.springframework.boot.autoconfigure.SpringBootApplication;@SpringBootApplicationpublic class ProviderApplication{ public static void main(String[] args) { SpringApplication.run(ProviderApplication.class, args); }}
啟動提供者微服務ProviderApplication

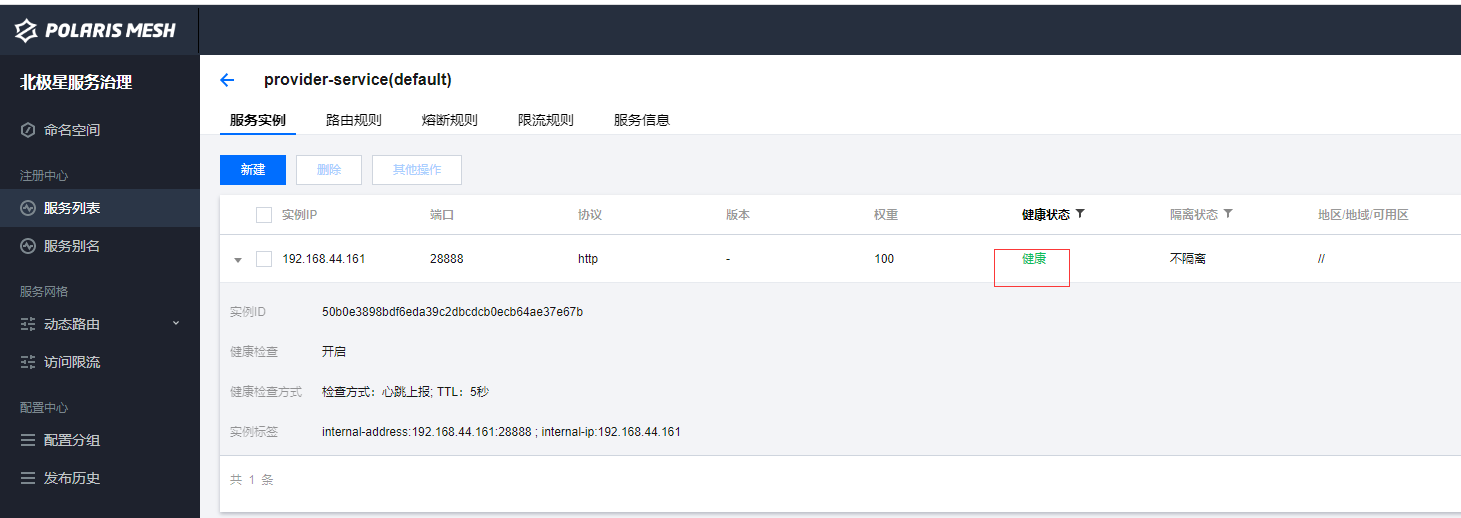
檢視控制檯頁面服務列表可以看到提供者微服務已經註冊到北極星中default名稱空間
消費者微服務範例
與上面服務提供類似,在專案中新增一個consumer-service模組,在消費者微服務的pom依賴中新增父Maven專案的依賴、 Web 服務依賴、polaris服務註冊依賴
   <parent>
    <groupId>cn.itxs</groupId>
    <artifactId>spring-cloud-tencent-demo</artifactId>
    <version>1.0-SNAPSHOT</version>
  </parent>

	<dependencies>
        <!-- 簡單的 Spring Cloud Web 依賴 -->
        <dependency>
            <groupId>org.springframework.boot</groupId>
            <artifactId>spring-boot-starter-web</artifactId>
        </dependency>
        <!-- 引入 Spring Cloud Tencent 的服務註冊發現依賴 -->
        <dependency>
            <groupId>com.tencent.cloud</groupId>
            <artifactId>spring-cloud-starter-tencent-polaris-discovery</artifactId>
        </dependency>
        <!-- 引入 Feign 依賴實現 Feign 呼叫 -->
        <dependency>
            <groupId>org.springframework.cloud</groupId>
            <artifactId>spring-cloud-starter-openfeign</artifactId>
        </dependency>
    </dependencies>
在consumer-service的 resources 目錄下建立 application.yml 檔案,並按照如下進行設定
server:
  port: 38888
spring:
  application:
    name: consumer-service
  cloud:
    polaris:
      address: grpc://192.168.5.52:8091
      discovery:
        enabled: true
      stat:
        enabled: true
        port: 38082
建立Feign介面HelloService.java,通過feign實現遠端方法的呼叫
package cn.itxs.service;

import org.springframework.cloud.openfeign.FeignClient;
import org.springframework.stereotype.Service;
import org.springframework.web.bind.annotation.PathVariable;
import org.springframework.web.bind.annotation.RequestMapping;

@Service
@FeignClient(name = "provider-service")
public interface HelloService {

    @RequestMapping("/hello/{value}")
    String hello(@PathVariable("value") String value);
}
建立提供者微服務演示控制器ProviderHelloController.java
package cn.itxs.controller;

import cn.itxs.service.HelloService;
import org.springframework.web.bind.annotation.PathVariable;
import org.springframework.web.bind.annotation.RequestMapping;
import org.springframework.web.bind.annotation.RestController;

@RestController
public class ConsumerHelloController {

    private final HelloService helloService;

    ConsumerHelloController(HelloService helloService) {
        this.helloService = helloService;
    }

    @RequestMapping(value = "/hello/{val}")
    public String echo(@PathVariable String val) {
        return helloService.hello(val);
    }
}
啟動類ConsumerApplication.java
package cn.itxs;

import org.springframework.boot.SpringApplication;
import org.springframework.boot.autoconfigure.SpringBootApplication;
import org.springframework.cloud.openfeign.EnableFeignClients;

@SpringBootApplication
@EnableFeignClients
public class ConsumerApplication
{
    public static void main(String[] args) {
        SpringApplication.run(ConsumerApplication.class, args);
    }
}
啟動消費者微服務ProviderApplication
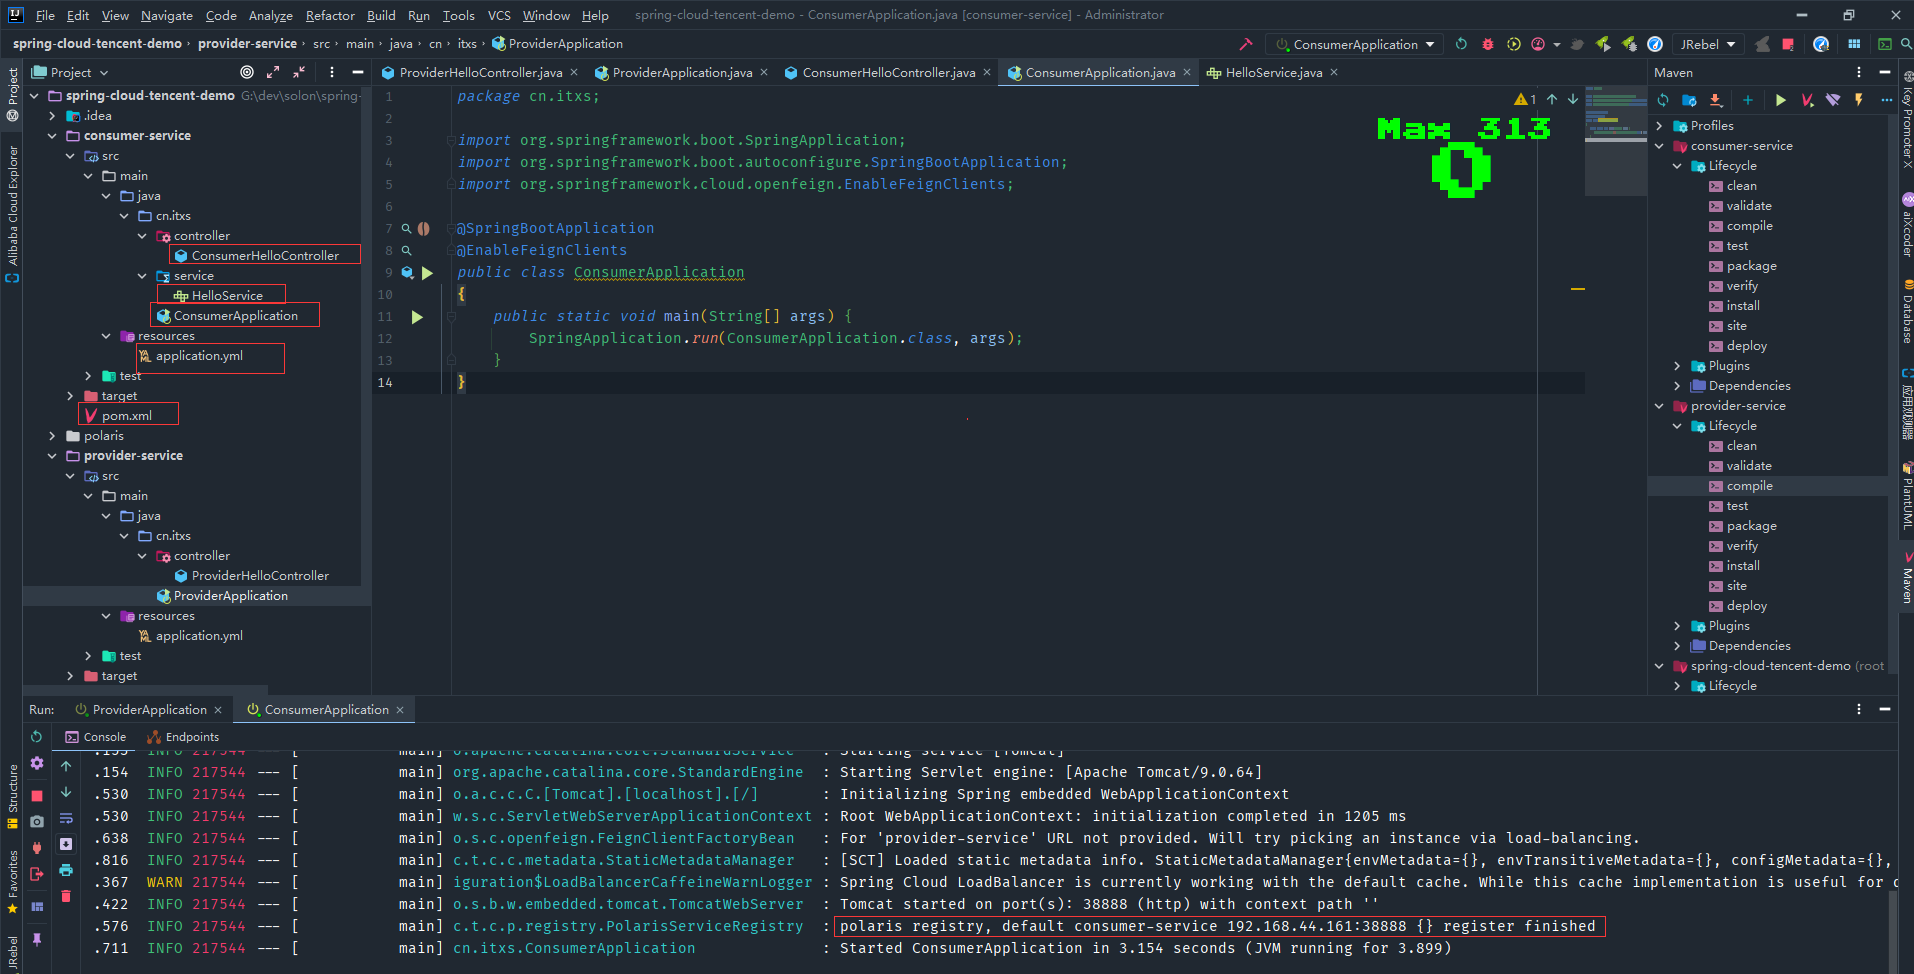
檢視控制檯頁面服務列表可以看到提供者微服務已經註冊到北極星中default名稱空間

通過消費者提供控制器存取介面存取,http://192.168.44.161:38888/hello/1 ,返回服務提供者的結果,成功實現服務註冊和發現。

動態設定範例
引入spring-cloud-starter-tencent-polaris-config 實現 Spring Cloud 設定的動態管理,spring-cloud-starter-bootstrap 以便可以支援 bootstrap.yml 的識別與載入。新增依賴如下:
    <dependency>
      <groupId>com.tencent.cloud</groupId>
      <artifactId>spring-cloud-starter-tencent-polaris-config</artifactId>
    </dependency>

    <dependency>
      <groupId>org.springframework.cloud</groupId>
      <artifactId>spring-cloud-starter-bootstrap</artifactId>
    </dependency>
在 resources 目錄下建立 bootstrap.yml 檔案,並按照如下進行設定
server:
  port: 48084
spring:
  application:
    name: config-group
  cloud:
    polaris:
      address: grpc://192.168.5.52:8091
      namespace: default
      config:
        auto-refresh: true # auto refresh when config file changed
        groups:
          - name: ${spring.application.name} # group name
            files: [ "config/user.yaml" ]
建立設定分組以及組態檔
- 建立設定分組 config-group
- 建立組態檔
config/user.yaml,編輯和釋出設定,編輯設定項內容為name: zhangsan
建立提供者微服務演示控制器ConfigController.java
package cn.itxs.controller;

import org.springframework.beans.factory.annotation.Value;
import org.springframework.cloud.context.config.annotation.RefreshScope;
import org.springframework.web.bind.annotation.RequestMapping;
import org.springframework.web.bind.annotation.RestController;

@RestController
@RefreshScope
public class ConfigController {

    @Value("${name}")
    private String name;

    @RequestMapping("/name")
    public String name() {
        return name;
    }
}

啟動後存取http://192.168.44.161:48084/name,成功讀到北極星設定中心的設定

**本人部落格網站 **IT小神 www.itxiaoshen.com