React實現一個簡易版Swiper
背景
最近在公司內部進行一個引導設定系統的開發中,需要實現一個多圖輪播的功能。到這時很多同學會說了,「那你直接用swiper不就好了嗎?」。但其實是,因為所有引導的展示都是作為npm依賴的形式來進行插入的,所以我們想要做的就是:儘量減少外部依賴以及包的體積。所以,我們開始了手擼簡易版swiper之路。
功能訴求
首先,由於我們所有的內容都是支援設定的,所以首先需要支援停留時間(delay)的可設定;由於不想讓使用者覺得可設定的內容太多,所以我們決定當停留時間(delay)大於0時,預設開啟autoplay。
其次,在常規的自動輪播外,還需要滿足設計同學對於分頁器(Pagination)的要求,也就是當前的展示內容對應的氣泡(bullet)需要是一個進度條的樣式,有一個漸進式的動畫效果。
最後,由於滑動效果實現起來太麻煩,所以就不做了,其他的基本都是swiper的常規功能了。
由此,整體我們要開發的功能就基本確定,後面就是開始逐步進行實現。
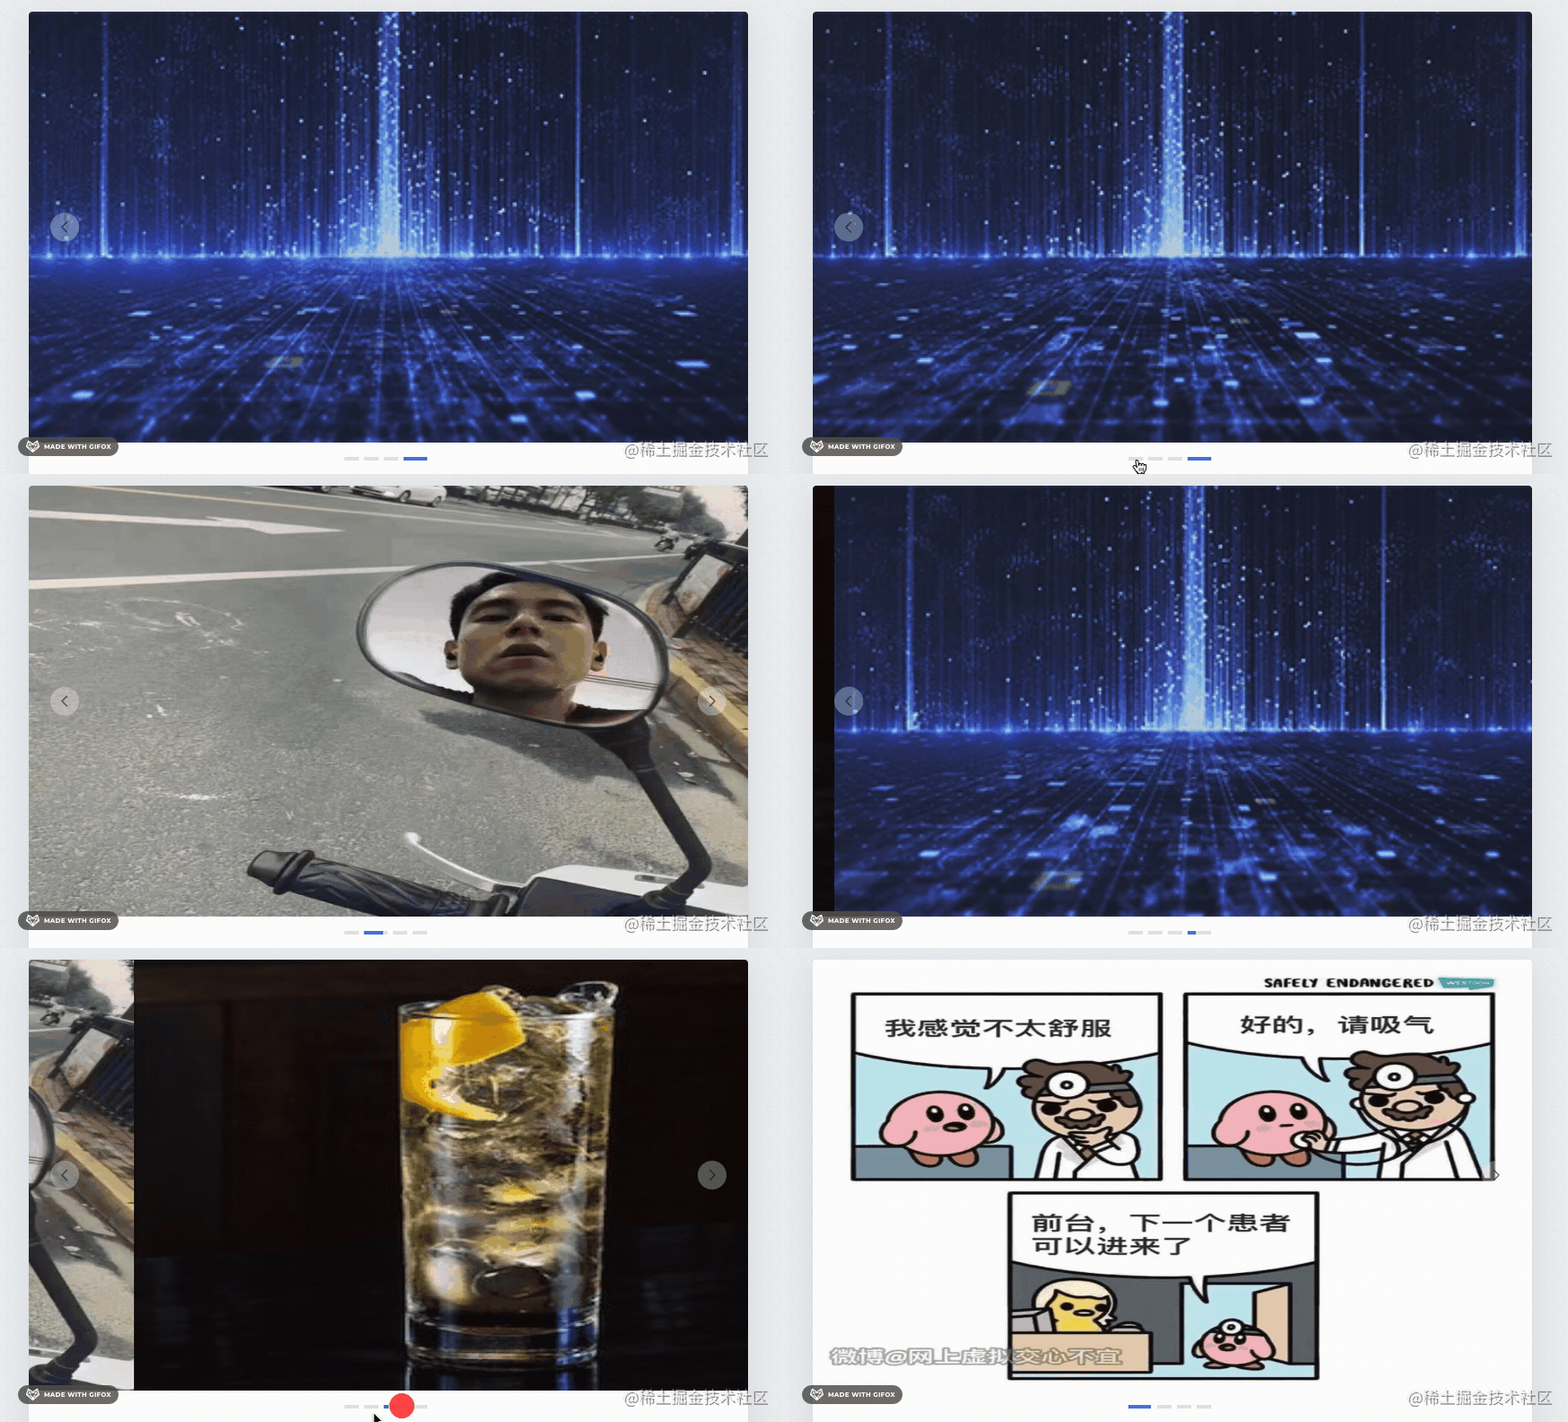
效果展示

整體思路
1、入參與變數定義
由於需要使用者自定義設定整體需要展示的圖片,並且支援自定義整體的寬高與輪播時間(delay);同樣,我們也應該支援使用者自定義輪播的方向(direction)。
綜上我們可以定義如下的入參:
{
  direction?: 'horizontal' | 'vertical';
  speed?: number;
  width: string;
  height: string;
  urls: string[];
}
而在整個swiper執行的過程中我們同樣是需要一些引數來幫助我們實現不同的基礎功能,比如
2、dom結構
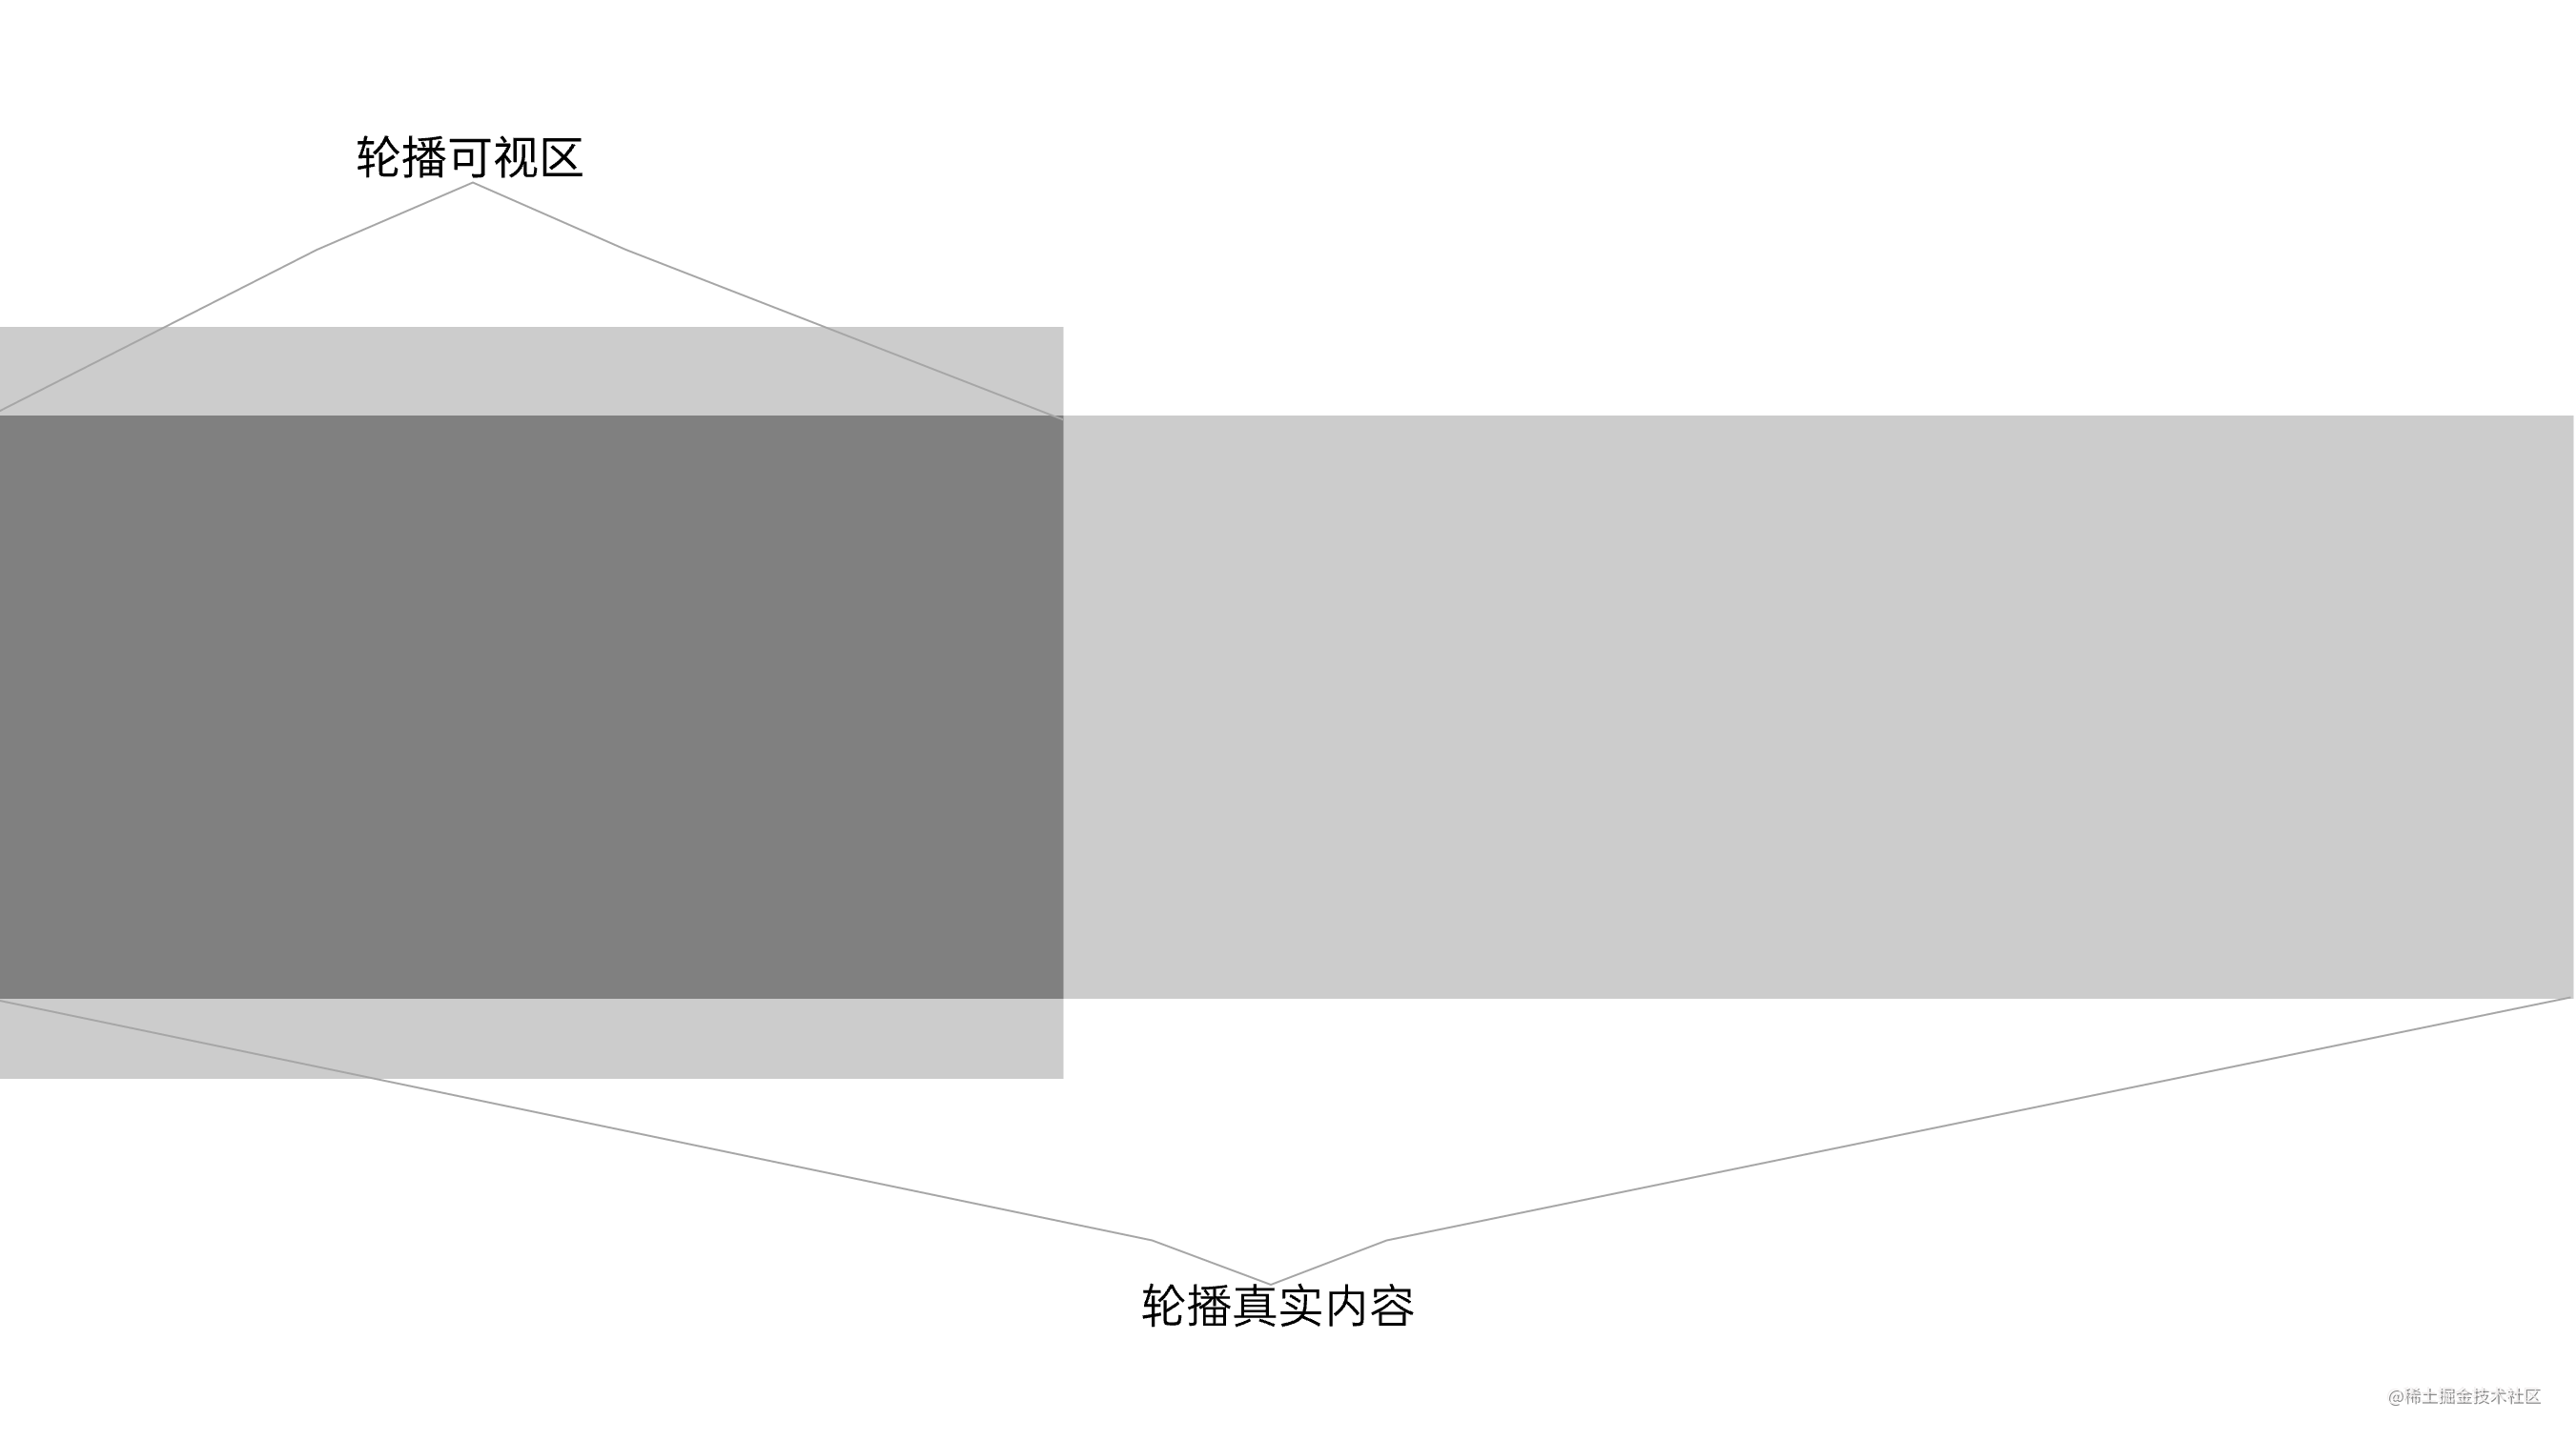
從dom結構上來說,swiper的核心邏輯就是,擁有單一的可視區,然後讓所有的內容都在可視區內移動、替換,以此來達到輪播的效果實現。

那麼如何來實現上的效果呢?這裡簡單梳理一下html的實現:
// 可見區域容器
<div id="swiper">
  // 輪播的真實內容區,也就是實際可以移動的區域
  <div className="swiper-container" id="swiper-container">
    // 內部節點的渲染
    {urls.map((f: string, index: number) => (
      <div className="slide-node">
        <img src={f} alt="" />
      </div>
    ))}
  </div>
</div>
到這裡一個簡陋的dom結構就出現了。接下來就需要我們為他們補充一些樣式。
3、樣式(style)
為了減少打包時處理的檔案型別,並且以儘可能簡單的進行樣式開發為目標。所以我們在開發過程中選擇了使用styled-components來進行樣式的編寫,具體使用方式可參考styled-components: Documentation。
首先,我們先來梳理一下對於最外層樣式的要求。最基本的肯定是要支援引數設定寬高以及僅在當前區域內可檢視。
而真正的程式碼實現其實很簡單:
import styled from "styled-components";
import React, { FC } from "react";

const Swiper = styled.div`
  overflow: hidden;
  position: relative;
`;

const Swiper: FC<
  {
    direction?: 'horizontal' | 'vertical';
    speed?: number;
    width: string;
    height: string;
    urls: string[];
  }
> = ({
  direction = "horizontal",
  speed = 3,
  width = "",
  height = "",
  urls = []
}) => {
    return (<Swiper style={{ width, height }}></Swiper>);
}

export default Swiper;
其次,我們來進行捲動區的樣式的開發。
但是這裡我們要明確不同的是,我們除了單獨的展示樣式的開發外,我們還要主要對於過場動畫效果的實現。
import styled from "styled-components";
import React, { FC } from "react";

const Swiper = styled.div`
  overflow: hidden;
  position: relative;
`;

const SwiperContainer = styled.div`
  position: relative;
  width: auto;
  display: flex;
  align-item: center;
  justify-content: flex-start;
  transition: all 0.3s ease;
  -webkit-transition: all 0.3s ease;
  -moz-transition: all 0.3s ease;
  -o-transition: all 0.3s ease;
`;

const Swiper: FC<
  {
    direction?: 'horizontal' | 'vertical';
    speed?: number;
    width: string;
    height: string;
    urls: string[];
  }
> = ({
  direction = "horizontal",
  speed = 3,
  width = "",
  height = "",
  urls = []
}) => {
  return (<Swiper style={{ width, height }}>
    <SwiperContainer
      id="swiper-container"
      style={{
        height,
        // 根據輪播方向引數,調整flex佈局方向
        flexDirection: direction === "horizontal" ? "row" : "column",
      }}
    >
    </SwiperContainer>
  </Swiper>);
}

export default Swiper;
在這裡,我們給了他預設的寬度為auto,來實現整體寬度自適應。而使用transition讓後續的圖片輪換可以有動畫效果。
最後,我們只需要將圖片迴圈渲染在列表中即可。
import styled from "styled-components";
import React, { FC } from "react";

const Swiper = styled.div`
  overflow: hidden;
  position: relative;
`;

const SwiperContainer = styled.div`
  position: relative;
  width: auto;
  display: flex;
  align-item: center;
  justify-content: flex-start;
  transition: all 0.3s ease;
  -webkit-transition: all 0.3s ease;
  -moz-transition: all 0.3s ease;
  -o-transition: all 0.3s ease;
`;

const SwiperSlide = styled.div`
  display: flex;
  align-item: center;
  justify-content: center;
  flex-shrink: 0;
`;

const Swiper: FC<
  {
    direction?: 'horizontal' | 'vertical';
    speed?: number;
    width: string;
    height: string;
    urls: string[];
  }
> = ({
  direction = "horizontal",
  speed = 3,
  width = "",
  height = "",
  urls = []
}) => {
  return (<Swiper style={{ width, height }}>
    <SwiperContainer
      id="swiper-container"
      style={{
        height,
        // 根據輪播方向引數,調整flex佈局方向
        flexDirection: direction === "horizontal" ? "row" : "column",
      }}
    >
     {urls.map((f: string, index: number) => (
        <SwiperSlide style={{ ...styles }}>
          <img src={f} style={{ ...styles }} alt="" />
        </SwiperSlide>
      ))}
    </SwiperContainer>
  </Swiper>);
}

export default Swiper;
至此為止,我們整體的dom結構與樣式就編寫完成了,後面要做的就是如何讓他們按照我們想要的那樣,動起來。
4、動畫實現
既然說到了輪播動畫的實現,那麼我們最先想到的也是最方便的方式,肯定是我們最熟悉的setInterval,那麼整體的實現思路是什麼樣的呢?
先思考一下我們想要實現的功能:
1、按照預設的引數實現定時的圖片切換功能;
2、如果沒有預設delay的話,則不自動輪播;
3、每次輪播的距離,是由使用者設定的圖片寬高決定;
4、輪播至最後一張後,停止輪播。
首先,為了保證元素可以正常的移動,我們在元素身上新增ref和id便於獲取正確的dom元素。
import React, { FC, useRef } from "react";

const swiperContainerRef = useRef<HTMLDivElement>(null);
...
<SwiperContainer
  id="swiper-container"
  ref={swiperContainerRef}
  style={{
    height,
    // 根據輪播方向引數,調整flex佈局方向
    flexDirection: direction === "horizontal" ? "row" : "column",
  }}
>
...
</SwiperContainer>
...
其次,我們需要定義activeIndex這個state,用來標記當前展示的節點;以及用isDone標記是否所有圖片都已輪播完成(所以反饋引數)。
import React, { FC, useState } from "react";

const [activeIndex, setActiveIndex] = useState<number>(0);
const [isDone, setDone] = useState<boolean>(false);
然後,我們還需要進行timer接收引數的定義,這裡我們可以選擇使用useRef來進行定義。
import React, { FC, useRef } from "react";

const timer = useRef<any>(null);
在上面的一切都準備就緒後,我們可以進行封裝啟動方法的封裝
  // 使用定時器,定時進行activeIndex的替換
  const startPlaySwiper = () => {
    if (speed <= 0) return;
    timer.current = setInterval(() => {
      setActiveIndex((preValue) => preValue + 1);
    }, speed * 1000);
  };
但是到此為止,我們只是進行了activeIndex的自增,並沒有真正的讓頁面上的元素動起來,為了實現真正的動畫效果,我們使用useEffect對於activeIndex進行監聽。
import React, { FC, useEffect, useRef, useState } from "react";

useEffect(() => {
  const swiper = document.querySelector("#swiper-container") as any;
  // 根據使用者傳入的輪播方向,決定是在bottom上變化還是right變化
  if (direction === "vertical") {
    // 相容使用者輸入百分比的模式
    swiper.style.bottom = (height as string)?.includes("%")
      ? `${activeIndex * +(height as string)?.replace("%", "")}vh`
      : `${activeIndex * +height}px`;
  } else {
    swiper.style.right = (width as string)?.includes("%")
      ? `${activeIndex * +(width as string)?.replace("%", "")}vw`
      : `${activeIndex * +width}px`;
  // 判斷如果到達最後一張,停止自動輪播
  if (activeIndex >= urls.length - 1) {
    clearInterval(timer?.current);
    timer.current = null;
    setDone(true);
  }
}, [activeIndex, urls]);
截止到這裡,其實簡易的自動輪播就完成了,但是其實很多同學也會有疑問❓,是不是還缺少分頁器(Pagination)。
5、分頁器(Pagination)
分頁器的原理其實很簡單,我們可以分成兩個步驟來看。
1、渲染與圖片相同個數的節點;
2、根據activeIndex動態改變分頁樣式。
import React, { FC } from "react";
import styled from "styled-components";

const SwiperSlideBar = styled.div`
  margin-top: 16px;
  width: 100%;
  height: 4px;
  display: flex;
  align-items: center;
  justify-content: center;
`;

const SwiperSlideBarItem: any = styled.div`
  cursor: pointer;
  width: ${(props: any) => (props.isActive ? "26px" : "16px")};
  height: 4px;
  background: #e6e6e6;
  margin-right: 6px;
`;

const SlideBarInner: any = styled.div`
  width: 100%;
  height: 100%;
  background: #0075ff;
  animation: ${innerFrame} ${(props: any) => `${props.speed}s`} ease;
`;

{urls?.length > 1 ? (
  <SwiperSlideBar>
    {urls?.map((f: string, index: number) => (
      <SwiperSlideBarItem
        onClick={() => slideToOne(index)}
        isActive={index === activeIndex}
      >
        {index === activeIndex ? <SlideBarInner speed={speed} /> : null}
      </SwiperSlideBarItem>
    ))}
  </SwiperSlideBar>
) : null}
細心的同學可能看到我在這裡為什麼還有一個SlideBarInner元素,其實是在這裡實現了一個當前所在分頁停留時間進度條展示的功能,感興趣的同學可以自己看一下,我這裡就不在贅述了。
6、整體實現程式碼
最後,我們可以看到完整的Swiper程式碼如下:
import React, { FC, useEffect, useRef, useState } from "react";
import styled, { keyframes } from "styled-components";

const innerFrame = keyframes`
  from {
    width: 0%;
  }
  to {
    width: 100%;
  }
`;

const Swiper = styled.div`
  overflow: hidden;
  position: relative;
`;

const SwiperNextTip = styled.div`
  position: absolute;
  top: 50%;
  transform: translateY(-50%);
  right: 24px;
  width: 32px;
  height: 32px;
  border-radius: 50%;
  background: #ffffff70;
  display: flex;
  justify-content: center;
  align-items: center;
  cursor: pointer;
  opacity: 0.7;
  user-select: none;
  :hover {
    opacity: 1;
    background: #ffffff80;
  }
`;

const SwiperPrevTip = (styled as any)(SwiperNextTip)`
  left: 24px;
`;

const SwiperContainer = styled.div`
  position: relative;
  display: flex;
  align-item: center;
  justify-content: flex-start;
  transition: all 0.3s ease;
  -webkit-transition: all 0.3s ease;
  -moz-transition: all 0.3s ease;
  -o-transition: all 0.3s ease;
`;

const SwiperSlide = styled.div`
  display: flex;
  align-item: center;
  justify-content: center;
  flex-shrink: 0;
`;

const SwiperSlideBar = styled.div`
  margin-top: 16px;
  width: 100%;
  height: 4px;
  display: flex;
  align-items: center;
  justify-content: center;
`;

const SwiperSlideBarItem: any = styled.div`
  cursor: pointer;
  width: ${(props: any) => (props.isActive ? "26px" : "16px")};
  height: 4px;
  background: #e6e6e6;
  margin-right: 6px;
`;

const SlideBarInner: any = styled.div`
  width: 100%;
  height: 100%;
  background: #0075ff;
  animation: ${innerFrame} ${(props: any) => `${props.speed}s`} ease;
`;

const Swiper: FC<
  {
    direction?: 'horizontal' | 'vertical';
    speed?: number;
    width: string;
    height: string;
    urls: string[];
  }
> = ({
  direction = "horizontal",
  speed = 3,
  width = "",
  height = "",
  urls = []
}) => {
  const [activeIndex, setActiveIndex] = useState<number>(0);
  const [isDone, setDone] = useState<boolean>(false);
  const [swiperStyle, setSwiperStyle] = useState<{
    width: string;
    height: string;
  }>({
    width: (width as string)?.replace("%", "vw"),
    height: (height as string)?.replace("%", "vh"),
  } as any);

  const timer = useRef<any>(null);
  const swiperContainerRef = useRef<HTMLDivElement>(null);

  const styles = {
    width: isNaN(+swiperStyle.width)
      ? swiperStyle!.width
      : `${swiperStyle!.width}px`,
    height: isNaN(+swiperStyle.height)
      ? swiperStyle.height
      : `${swiperStyle.height}px`,
  };

  const startPlaySwiper = () => {
    if (speed <= 0) return;
    timer.current = setInterval(() => {
      setActiveIndex((preValue) => preValue + 1);
    }, speed * 1000);
  };

  const slideToOne = (index: number) => {
    if (index === activeIndex) return;
    setActiveIndex(index);
    clearInterval(timer?.current);
    startPlaySwiper();
  };

  useEffect(() => {
    if (swiperContainerRef?.current) {
      startPlaySwiper();
    }
    return () => {
      clearInterval(timer?.current);
      timer.current = null;
    };
  }, [swiperContainerRef?.current]);

  useEffect(() => {
    const swiper = document.querySelector("#swiper-container") as any;
    if (direction === "vertical") {
      swiper.style.bottom = (height as string)?.includes("%")
        ? `${activeIndex * +(height as string)?.replace("%", "")}vh`
        : `${activeIndex * +height}px`;
    } else {
      swiper.style.right = (width as string)?.includes("%")
        ? `${activeIndex * +(width as string)?.replace("%", "")}vw`
        : `${activeIndex * +width}px`;
    }

    if (activeIndex >= urls.length - 1) {
      clearInterval(timer?.current);
      timer.current = null;
      setDone(true);
    }
  }, [activeIndex, urls]);

  return (<>
      <Swiper style={{ width, height }}>
        <SwiperContainer
          id="swiper-container"
          ref={swiperContainerRef}
          style={{
            height,
            // 根據輪播方向引數,調整flex佈局方向
            flexDirection: direction === "horizontal" ? "row" : "column",
          }}
        >
         {urls.map((f: string, index: number) => (
            <SwiperSlide style={{ ...styles }}>
              <img src={f} style={{ ...styles }} alt="" />
            </SwiperSlide>
          ))}
        </SwiperContainer>
      </Swiper>

      // Pagination分頁器
      {urls?.length > 1 ? (
        <SwiperSlideBar>
          {urls?.map((f: string, index: number) => (
            <SwiperSlideBarItem
              onClick={() => slideToOne(index)}
              isActive={index === activeIndex}
            >
              {index === activeIndex ? <SlideBarInner speed={speed} /> : null}
            </SwiperSlideBarItem>
          ))}
        </SwiperSlideBar>
      ) : null}
  </>);
}

export default Swiper;
總結
其實很多時候,我們都會覺得對於一個需求(功能)的開發無從下手。可是如果我們耐下心來,將我們要實現的目標進行抽絲剝繭樣的拆解,讓我們從最最簡單的部分開始進行實現和設計,然後逐步自我迭代,將功能細化、優化、深化。那麼最後的效果可能會給你自己一個驚喜哦。
妙言至徑,大道至簡。