從0搭建vue3元件庫:自動化釋出、管理版本號、生成 changelog、tag
2022-10-26 12:07:42
今天看到一篇文章中提到了一個好用的工具release-it。剛好可以用在我正在開發的vue3元件庫。紙上得來終覺淺,絕知此事要躬行,說幹就幹,下面就介紹如何將release-it應用到實際專案中,讓元件庫可以自動化釋出、管理版本號、生成 changelog、tag等
專案調整
在使用這個工具之前先對元件庫進行進行一些調整,這裡僅是對專案本身的優化和release-it無關。
- 首先修改
vite.config.ts將打包後的目錄dist更改為kitty-ui - 自動打包中的刪除打包檔案改成nodejs方式實現(script/utils/delpath.ts)。打包之前先將
kitty-ui檔案下的目錄全部刪除只留下package.json,這個package.json就是正式釋出元件庫所用的設定
import fs from 'fs'
const delDir = async (path: string) => {
    let files: string[] = [];
    if (fs.existsSync(path)) {
        files = fs.readdirSync(path);
        files.forEach(async (file) => {
            let curPath = path + "/" + file;
            if (fs.statSync(curPath).isDirectory()) {
                await delDir(curPath);
            } else { // 保留package.json檔案
                if (file != 'package.json') {
                    fs.unlinkSync(curPath);
                }
            }

        });

        if (path != `${componentPath}/kitty-ui`) fs.rmdirSync(path);
    }

};
export default delDir
使用release-it
安裝
pnpm add release-it -D -w
設定
在打包後檔案kitty-ui下的package.json中加入script指令碼以及git倉庫
{
  "name": "kitty-ui",
  "version": "4.2.0",
  "main": "lib/index.js",
  "module": "es/index.mjs",
  "files": [
    "es",
    "lib"
  ],
  "scripts": {
    "release": "release-it"
  },
  "repository": {
    "type": "git",
    "url": "https://github.com/geeksdidi/kittyui"
  },
  "keywords": [
    "kitty-ui",
    "vue3元件庫"
  ],
  "dependencies": {
    "@kitty-ui/utils": "2.0.3"
  },
  "sideEffects": [
    "**/*.css"
  ],
  "author": "小月",
  "license": "MIT",
  "description": "",
  "typings": "lib/index.d.ts"
}
修改根目錄package.json的script中的publish:kitty,讓其進入打包後資料夾kitty-ui執行release命令.

在釋出之前需要先將我們的改動提交到git上,然後在根目錄執行
pnpm run publish:kitty


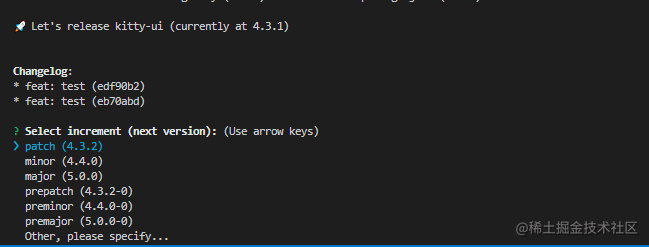
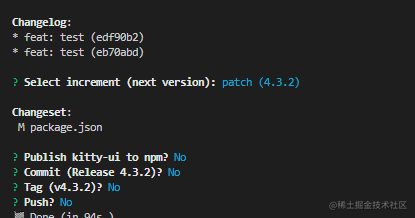
這裡會讓我們選擇釋出版本號、是否釋出、是否建立tag等等
生成changelog
- 安裝
@release-it/conventional-changelog
pnpm add @release-it/conventional-changelog -D -w
- 根目錄新建
.release-it.json
{
  "plugins": {
    "@release-it/conventional-changelog": {
      "preset": {
        "name": "conventionalcommits",
        "types": [
          { "type": "feat", "section": "Features" },
          { "type": "fix", "section": "Bug Fixes" },
          { "type": "chore", "hidden": true },
          { "type": "docs", "hidden": true },
          { "type": "style", "hidden": true },
          { "type": "refactor", "hidden": true },
          { "type": "perf", "hidden": true },
          { "type": "test", "hidden": true }
        ]
      },
      "infile": "../../../CHANGELOG.md"
    }
  }
}
然後執行pnpm run publish:kitty,就會發現根目錄下生成CHANGELOG.md檔案
## [4.2.0](https://github.com/geeksdidi/kittyui/compare/v4.1.1...v4.2.0) (2022-10-21)


### Features

* test ([b69303c](https://github.com/geeksdidi/kittyui/commit/b69303c1c542bd51cd66330b89dd2bb774b09f73))
preset中type設定表示只有feat和fix才會被記錄,如提交的commit為fix: 改了一個bug

元件庫
如果你對元件庫開發感興趣的話,歡迎掃碼關注公眾號:web前端進階,元件庫所有實現包括環境搭建,自動打包釋出,檔案搭建,vitest單元測試等等都在這裡
