帶你開發一個提示顏色程式碼的VS Code外掛

php入門到就業線上直播課:進入學習
Apipost = Postman + Swagger + Mock + Jmeter 超好用的API偵錯工具:
參考資料
官方檔案:code.visualstudio.com/api
官方提供的各類外掛範例:github.com/microsoft/v…
需求
我在寫css時,經常會有顏色選擇困難症,雖然VS Code內建的外掛提供了取色器,但在256^3的顏色中去選取,未必能找到符合期望的顏色。於是我想要是有個顏色提示外掛就好了,只要我輸入# + 顏色名,就能以程式碼提示的方式,將對應的顏色列出來供我選擇。【推薦學習:《》】
我在VS Code外掛市場搜了一圈,沒找到類似的外掛,最終決定自己寫一個,本著學習的態度,我將學習過程記錄下來。
這是最終效果:
演示是使用拼音,直接用漢字也是可行的。
在VS Code外掛市場搜尋Chinese Colors或者「中國色」即可找到我寫的這個外掛。
獲取顏色
首先第一件事就是要有現成的顏色程式碼,很快我就找到了這個網站:中國色
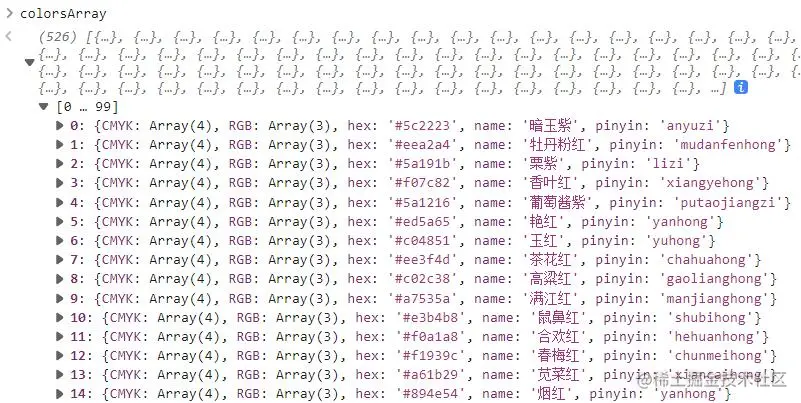
這個網站提供了500多種顏色的rgb值以及hex值,開啟瀏覽器控制檯,輸入colorsArray就能全部拿到,這就是我想要的。
從網站底部的資訊來看,這個網站是山寨自日本色,顏色據稱來自中科院科技情報編委會名詞室編寫、科學出版社1957年出版的《色譜》。
這個顏色來源是否可信我無從考證,隨便百度一下「中國傳統色」,就可以找到很多版本的所謂中國色,我在github上還找到了另一個接近2k star的中國色專案:中國傳統顏色手冊,這個網站使用的顏色與前者完全不同,是來自於一篇現在已經無法檢視的新浪部落格,顏色數量我沒有統計,粗略估計在200以內。
初始化專案
安裝開發工具
npm i -g yo generator-code
登入後複製新建專案
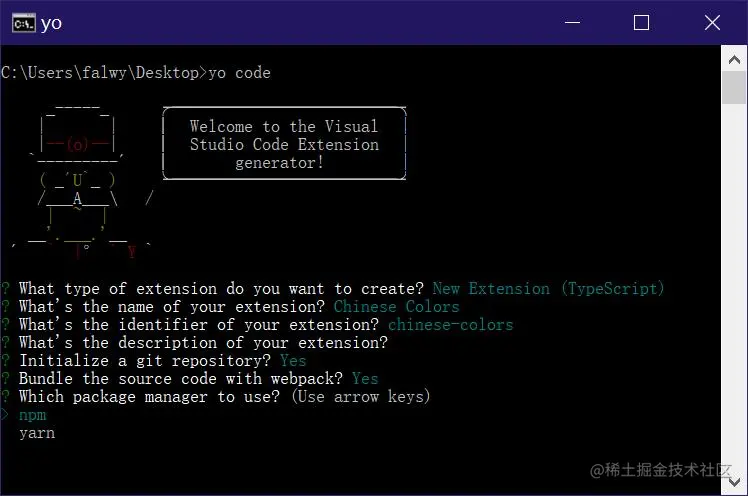
yo code
登入後複製各項設定如下:
Hello World
初始專案中有個Hello World,用VS Code開啟專案,然後按F5(或者點選「執行-->啟動偵錯」)可以開啟偵錯視窗。
然後在偵錯視窗下 Ctrl + Shift + P (或者點選「設定-->命令面板」),輸入並選擇 Hello World 命令,就會在編輯器右下角彈出一個訊息提示。
extension.ts是外掛的入口檔案:
 import * as vscode from 'vscode';

 // activate方法會在外掛被啟用時呼叫
 export function activate(context: vscode.ExtensionContext) {

     // 註冊命令,第一個引數是命令名稱,第二引數是回撥
     let disposable = vscode.commands.registerCommand('chinese-colors.helloWorld', () => {
         // 彈出訊息提示
         vscode.window.showInformationMessage('Hello World from Chinese Colors!');
     });

     // 新增到外掛上下文
     context.subscriptions.push(disposable);
 }

 // deactivate方法會在外掛失活時呼叫
 export function deactivate() {}登入後複製
package.json
檢視package.json,其中比較重要的兩項:
 {
     "activationEvents": [
         "onCommand:chinese-colors.helloWorld"
     ],
     "contributes": {
         "commands": [
             {
                 "command": "chinese-colors.helloWorld",
                 "title": "Hello World"
             }
         ]
     },
 }登入後複製
activationEvents是外掛的啟用設定,它是一個陣列,每一項對應一個啟用外掛的條件,格式為「<型別>:<名稱>」,onCommand是呼叫命令(也就是上面的輸入Hello World)。
contributes:一般翻譯為貢獻點,設定了一個「chinese-colors.helloWorld」,與activationEvents設定項對應。
其他packege.json設定見下表:
| 名稱 | 必要 | 型別 | 說明 |
|---|---|---|---|
name | 是 | string | 外掛名稱,必須為小寫且不能有空格。 |
version | 是 | string | 外掛版本 |
publisher | 是 | string | 釋出者 |
engines | 是 | object | 一個至少包含vscode鍵值對的物件,該鍵表示的是本外掛可相容的VS Code的版本,其值不能為*。比如 ^0.10.5 表示外掛相容VS Code的最低版本是0.10.5。 |
license | 否 | string | 授權。如果有授權檔案LICENSE.md,可以把license值設為"SEE LICENSE IN LICENSE.md"。 |
displayName | 否 | string | 外掛市場中顯示的名字。 |
description | 否 | string | 描述,說明本外掛是什麼以及做什麼。 |
categories | 否 | string[] | 外掛型別:[Languages, Snippets, Linters, Themes, Debuggers, Other] |
keywords | 否 | array | 一組 關鍵字 或者 標記,方便在外掛市場中查詢。 |
galleryBanner | 否 | object | 外掛市場中橫幅的樣式。 |
preview | 否 | boolean | 在市場中把本外掛標記為預覽版本。 |
main | 否 | string | 外掛的入口檔案。 |
contributes | 否 | object | 一個描述外掛 貢獻點 的物件。 |
activationEvents | 否 | array | 一組用於本外掛的啟用事件。 |
dependencies | 否 | object | 生產環境Node.js依賴項。 |
devDependencies | 否 | object | 開發環境Node.js依賴項。 |
extensionDependencies | 否 | array | 一組本外掛所需的其他外掛的ID值。格式 ${publisher}.${name}。比如:vscode.csharp。 |
scripts | 否 | object | 和 npm的 scripts一樣,但還有一些額外VS Code特定欄位。 |
icon | 否 | string | 一個128x128畫素圖示的路徑。 |
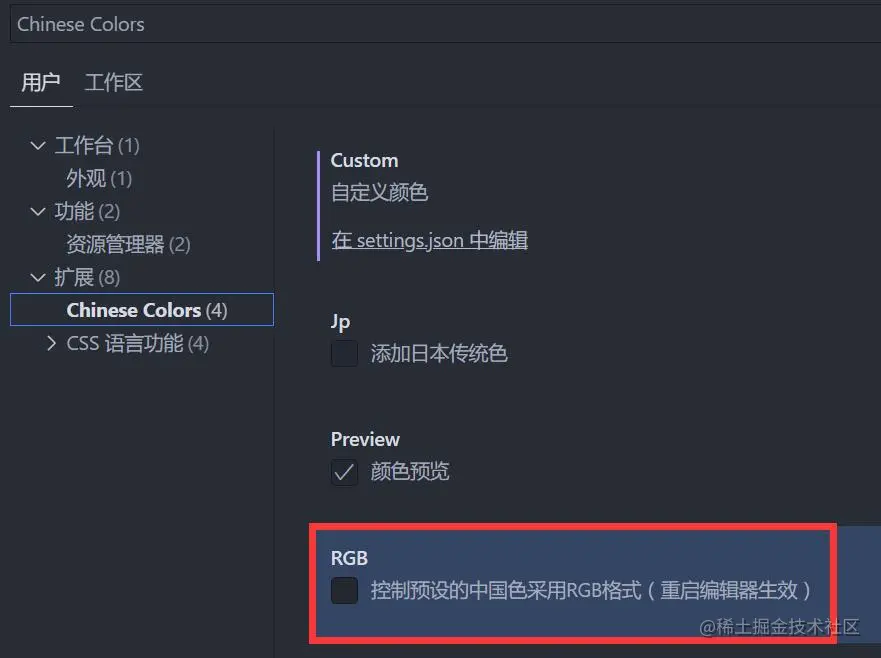
使用者自定設定項
顏色程式碼有多種表示方式,比較常用的是16進位制(#ffffff)和rgb(255,255,255)這兩種,因此我需要讓使用者自己選擇採用哪種方式。
在contributes中有個configuration,允許使用者對外掛進行一些自定義設定。
package.json:
 {
     // ...
     "contributes": {
         "configuration": [{
             "title": "color mode",// 設定項名稱
             "properties": {
                 // 設定屬性
                 "RGB": {
                     "type": "boolean",  // 屬性值型別
                     "default": false,   // 屬性預設值
                     "description": "控制預設的中國色採用RGB格式"    // 屬性描述
                 }
             }
         }]
     },
 }登入後複製
這樣就可以在擴充套件設定中進行一些自定義的設定:
我們可以通過workspace.getConfiguration()獲取使用者的設定。
 import { workspace } from "vscode";
 const configuration = workspace.getConfiguration();
 const isRGB = configuration.RGB;登入後複製
程式碼補全
API
程式碼補全API:
vscode.languages.registerCompletionItemProvider(selector, provider, …triggerCharacters)
該方法有三個引數:
| 引數 | Description |
|---|---|
| selector: string/string[] | 選擇程式語言,比如python |
| provider | 供應者設定物件 |
| triggerCharacters: string/string[] | 觸發字元, 比如 . 或 : |
register completion item provider(註冊完成件供應者),這個provider也是比較費解的一個詞,直譯是供應者,我猜:程式碼補全就相當於外掛給我們供應了程式碼,所以叫provider。
provider是一個物件,要求必須包含一個叫provideCompletionItems的方法,該方法需要返回一個陣列,陣列的每一項是一個CompletionItem物件,規定了程式碼提示和補全的規則。
官方範例
 import * as vscode from 'vscode';

 export function activate(context: vscode.ExtensionContext) {

     // 註冊供應者:languages.registerCompletionItemProvider
     const provider2 = vscode.languages.registerCompletionItemProvider(
         'plaintext',// plaintext,表示對txt檔案啟用該外掛
         {
             // 實現provideCompletionItems方法
             // document的內容見下文,position為當前遊標的位置
             provideCompletionItems(document: vscode.TextDocument, position: vscode.Position) {

                 // 獲取當前這行程式碼
                 const linePrefix = document.lineAt(position).text.substr(0, position.character);
                 // 如果這行程式碼不是以console.結尾,返回undefined,表示不會彈出程式碼提示
                 if (!linePrefix.endsWith('console.')) {
                     return undefined;
                 }

                 // 返回CompletionItem物件組成的陣列,補全程式碼列表:log、warn、error
                 // CompletionItem物件可以自己建立,也可以像下面這樣new vscode.CompletionItem的方式建立
                 // vscode.CompletionItem()有兩個引數:
                 // 第一個是補全的程式碼,第二個是程式碼型別,用於控制顯示在每一行提示前的圖示
                 // vscode.CompletionItemKind.Method表示該程式碼是一個方法
                 return [
                     new vscode.CompletionItem('log', vscode.CompletionItemKind.Method),
                     new vscode.CompletionItem('warn', vscode.CompletionItemKind.Method),
                     new vscode.CompletionItem('error', vscode.CompletionItemKind.Method),
                 ];
             }
         },
         '.' // 以.作為觸發
     );

     context.subscriptions.push(provider2);
}登入後複製provideCompletionItems引數:
position:當前遊標所處的位置。
document:用於獲取、控制檔案的內容或狀態,這裡列舉幾個常用的方法和屬性:
方法:
- getWordRangeAtPosition(position): Range:獲取指定位置單詞的範圍(起始位置)
- getText(Range):string:獲取指定範圍的文字
- lineAt(position):string:獲取指定位置的文字
- validatePosition(position):Position:獲取滑鼠停留的位置
屬性
- lineCount:總程式碼行數
- languageId:語言名稱
- isClosed:當前檔案是否關閉
- isDirty:當前檔案的程式碼是否更改未儲存
CompletionItem物件
CompletionItem物件可以通過new vscode.CompletionItem()的方式建立,但它預設只能補全程式碼,不能自定義替換,並不能滿足我的需求,因此需要自己建立。
CompletionItem物件包含的屬性:
| 屬性 | 說明 |
|---|---|
| detail: string | 語意化描述 |
| documentation: string | 語意化描述 |
| filterText: string | 程式碼過濾。匹配輸入的內容,沒有設定時,使用label |
| insertText: string | 插入、補全的程式碼。沒有設定時,使用label |
| label: string | 預設的匹配程式碼、補全程式碼 |
| kind | 程式碼型別,控制顯示程式碼提示前的圖示 |
| sortText: string | 排序文字,與sortText匹配的提示程式碼會排在靠前的位置 |
| textEdit | 對補全程式碼進行編輯,如果設定了textEdit,insertText會失效 |
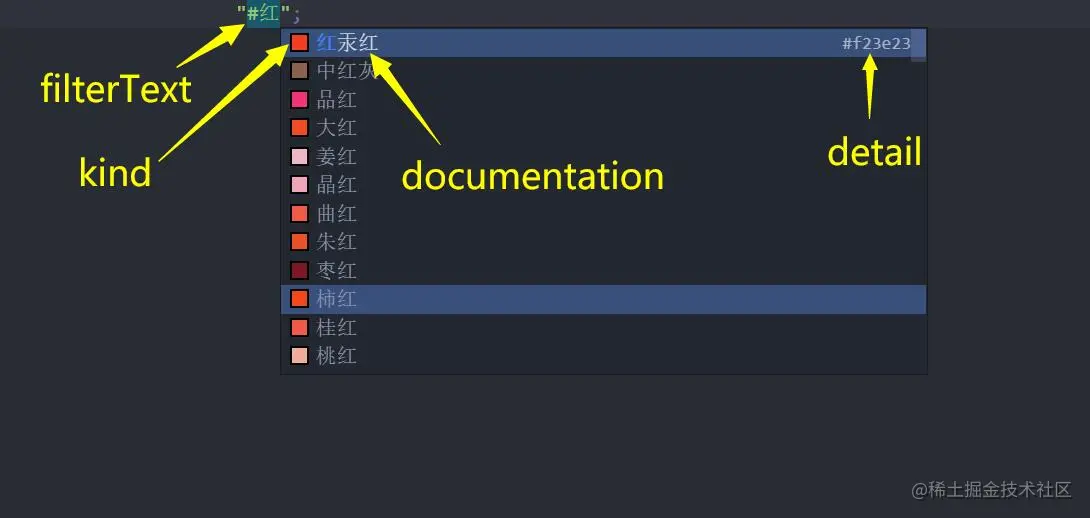
kind的取值:
- Class
- Color
- Constructor
- Enum
- Field
- File
- Function
- Interface
- Keyword
- Method
- Module
- Property
- Reference
- Snippet
- Text
- Unit
- Value
- Variable
簡單的範例
 import * as vscode from "vscode";
 import { CompletionItemKind } from "vscode";

 export function activate(context: vscode.ExtensionContext) {
   const cc = vscode.languages.registerCompletionItemProvider(
     "css",
     {
       provideCompletionItems() {
         return [
             {
                 detail: '#66ccff',
                 documentation: '天依藍',
                 kind: CompletionItemKind.Color,
                 filterText: `#66ccff天依藍`,
                 label: '天依藍',
                 insertText: '#66ccff'
             },
             {
                 detail: '#39c5bb',
                 documentation: '初音綠',
                 kind: CompletionItemKind.Color,
                 filterText: `#39c5bb初音綠`,
                 label: '初音綠',
                 insertText: '#39c5bb'
             }
         ];
       },
     },
     "#"
   );
   context.subscriptions.push(cc);
 }

 export function deactivate() {}登入後複製
記得要在package.json裡設定啟用:
"activationEvents": [
    "onLanguage:css"
  ]登入後複製
中國色外掛
package.json關鍵設定:
 {
     "activationEvents": [
         "onLanguage:css",
         "onLanguage:scss",
         "onLanguage:sass",
         "onLanguage:less",
         "onLanguage:stylus",
         "onLanguage:html",
         "onLanguage:xml",
         "onLanguage:json",
         "onLanguage:javascript",
         "onLanguage:typescript",
         "onLanguage:javascriptreact",
         "onLanguage:typescriptreact",
         "onLanguage:vue",
         "onLanguage:vue-html"
     ],
     "contributes": {
         "configuration": [{
             "title": "Chinese Colors",
             "properties": {
                 "RGB": {
                     "type": "boolean",
                     "default": false,
                     "description": "控制預設的中國色採用RGB格式"
                 }
             }
         }]
     },
}登入後複製顏色列表colors.ts:
 // 宣告Color型別
 export type Color = {
   rgb: number[];
   hex: string;
   name: string;
   phonics: string;
 };

 // 這裡只列兩個顏色
 export const colors: Color[] = [
   {
     rgb: [92, 34, 35],
     hex: "#5c2223",
     name: "暗玉紫",
     phonics: "anyuzi",
   },
   {
     rgb: [238, 162, 164],
     hex: "#eea2a4",
     name: "牡丹粉紅",
     phonics: "mudanfenhong",
   },
   // ...
 ]登入後複製
extensions.ts
 import * as vscode from "vscode";
 import { workspace, CompletionItemKind } from "vscode";
 import { colors, Color } from "./colors";

 const isRgb = workspace.getConfiguration().RGB;

 export function activate(context: vscode.ExtensionContext) {
   const cc = vscode.languages.registerCompletionItemProvider(
     [
       "css",
       "scss",
       "sass",
       "less",
       "stylus",
       "html",
       "xml",
       "json",
       "javascript",
       "typescript",
       "javascriptreact",
       "typescriptreact",
       "vue",
       "vue-html",
     ],// activationEvents
     {
       provideCompletionItems() {
         const list = [] as CompletionItemKind[];

         colors.forEach((color: Color) => {
           list.push({
             detail: isRgb ? rgb : hex,
             documentation: color.name,
             kind: CompletionItemKind.Color,
             filterText: "#" + color.name + color.phonics,
             label: color.name,
             insertText: isRgb ? rgb : hex,
           });
         });
         return list;
       },
     },
     "#"
   );
   context.subscriptions.push(cc);
 }

 export function deactivate() {}登入後複製
如此,程式碼補全的功能已經基本實現,實際開發時,為了便於維護,需要將這部分邏輯抽離出來。
顏色預覽
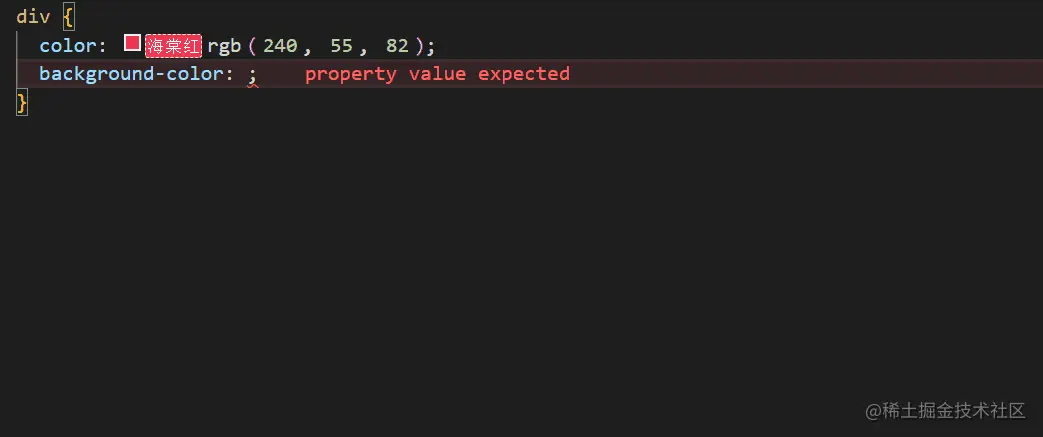
接下來,需要實現顏色的預覽,雖然VS Code內建的外掛已經實現了這項功能,但我的需求是:不僅能預覽顏色,還得顯示顏色名稱。

API
實現顏色預覽需要用到裝飾效果,涉及以下這些API:
window.createTextEditorDecorationType(options):建立裝飾效果的型別
window.activeTextEditor.setDecorations(decorationType, decorations):新增裝飾效果至檔案
window.onDidChangeActiveTextEditor:檔案內容變化事件
workspace.onDidChangeTextDocument:切換檔案事件
官方範例
首先來看一下官方提供的範例片段
完整範例: github.com/microsoft/v…
import * as vscode from 'vscode';

// 外掛啟用時呼叫
export function activate(context: vscode.ExtensionContext) {

	console.log('decorator sample is activated');

	let timeout: NodeJS.Timer | undefined = undefined;

    // 為small numbers建立裝飾效果型別
	const smallNumberDecorationType = vscode.window.createTextEditorDecorationType({
        // 以下是裝飾效果的樣式
		borderWidth: '1px',
		borderStyle: 'solid',
		overviewRulerColor: 'blue',
		overviewRulerLane: vscode.OverviewRulerLane.Right,
		light: {
			// 亮色主題下的邊框顏色
			borderColor: 'darkblue'
		},
		dark: {
			// 暗色主題下的邊框顏色
			borderColor: 'lightblue'
		}
	});

	// 為large numbers建立裝飾效果型別
	const largeNumberDecorationType = vscode.window.createTextEditorDecorationType({
		cursor: 'crosshair',
		// 設定裝飾的背景顏色, 在package.json中可以設定該名稱對應的顏色
		backgroundColor: { id: 'myextension.largeNumberBackground' }
	});

    // activeEditor是當前活躍(展示)的檔案編輯器範例
	let activeEditor = vscode.window.activeTextEditor;

    // updateDecorations方法,在每次檔案被更新或切換檔案時呼叫。
	function updateDecorations() {
		if (!activeEditor) {
			return;
		}
        // 匹配數位的正則
		const regEx = /\d+/g;
        // 獲取檔案的文字
		const text = activeEditor.document.getText();
        // 裝飾效果陣列,用於歸集每一個Decoration物件
		const smallNumbers: vscode.DecorationOptions[] = [];
		const largeNumbers: vscode.DecorationOptions[] = [];
		let match;
		while ((match = regEx.exec(text))) {
            // 獲取匹配結果的起始位置
			const startPos = activeEditor.document.positionAt(match.index);// 開始位置
			const endPos = activeEditor.document.positionAt(match.index + match[0].length);// 結束位置
            // Decoration物件
			const decoration = {
                // 裝飾效果的位置
                range: new vscode.Range(startPos, endPos),
                // 滑鼠懸停(hover)的提示資訊
                hoverMessage: 'Number **' + match[0] + '**'
            };
            // 將符合的結果歸集
			if (match[0].length < 3) {
				smallNumbers.push(decoration);
			} else {
				largeNumbers.push(decoration);
			}
		}
        // 新增裝飾效果
		activeEditor.setDecorations(smallNumberDecorationType, smallNumbers);
		activeEditor.setDecorations(largeNumberDecorationType, largeNumbers);
	}

    // 給方法節流
	function triggerUpdateDecorations(throttle = false) {
		if (timeout) {
			clearTimeout(timeout);
			timeout = undefined;
		}
		if (throttle) {
			timeout = setTimeout(updateDecorations, 500);
		} else {
			updateDecorations();
		}
	}

    // 開啟檔案時呼叫一次
	if (activeEditor) {
		triggerUpdateDecorations();
	}

	// 切換檔案時呼叫
	vscode.window.onDidChangeActiveTextEditor(editor => {
        // 這一步賦值是必須的,確保activeEditor是當前開啟的檔案編輯器範例
		activeEditor = editor;
		if (editor) {
			triggerUpdateDecorations();
		}
	}, null, context.subscriptions);

    // 檔案內容傳送改變時呼叫
	vscode.workspace.onDidChangeTextDocument(event => {
		if (activeEditor && event.document === activeEditor.document) {
			triggerUpdateDecorations(true);
		}
	}, null, context.subscriptions);

}登入後複製
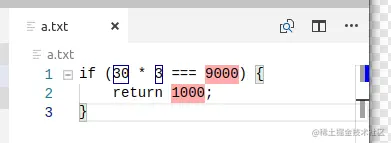
效果如下:
DecorationType
DecorationType是通過window.createTextEditorDecorationType(options)建立的物件,它主要用來設定裝飾效果的樣式,其實就是css樣式,比如border、color、backgroundColor等等。
如果要在匹配結果之前或之後新增裝飾,可以新增before/after欄位進行設定,還可以分別給dark、light模式設定不同的樣式。
const decorationType =  window.createTextEditorDecorationType({
    // 在匹配位置之前新增裝飾效果:
    before: {
        color: '#eee',
        backgroundColor: '#fff',
        width: 'fit-content'
    }
})登入後複製
由於該方法支援的樣式欄位有限,有些樣式(比如line-height)無法在options裡直接新增,但我們可以在任意欄位後新增分號,將這些樣式寫在後面,比如:
const decorationType =  window.createTextEditorDecorationType({
    // 在匹配位置之後新增裝飾效果:
    after: {
        color: '#333',
        backgroundColor: '#fff',
        width: 'fit-content',
        height: '0.8em',
        // fontSize: '0.6em', 這麼設定是無效的,因為並不支援fontSize欄位,
        // 但我們可以將其新增在任意欄位後面
        fontStyle: 'normal;font-size:0.6em;line-height:0.8em'
    }
})登入後複製
具體支援哪些欄位,可以檢視此API的官方檔案:
VS Code API | Visual Studio Code Extension API
Decoration物件
Decoration物件有三個屬性:
range:裝飾效果的位置,range物件可以通過new vscode.Range(start, end)建立hoverMessage:滑鼠懸停時的提示資訊renderOptions:和decorationType類似,可以單獨對每一個裝飾效果設定樣式。但只支援before、after、dark、light四個欄位,也就是說,無法再對匹配的內容本身設定樣式。
範例
由於實現的程式碼比較長,和上述官方範例其實差不多,這裡就不再貼出來了,感興趣的可以我去文章開頭的倉庫地址檢視。
值得一提的是,為了顏色的名稱在不同的顏色背景下都能清晰的顯現,我這裡用到了一個計算對比色的方法,貼出來供參考:
// 通過hex值計算應該使用的字型顏色
function getContrastColor(hexcolor: string) {
  const r = parseInt(hexcolor.substring(1, 2), 16)
  const g = parseInt(hexcolor.substring(3, 4), 16)
  const b = parseInt(hexcolor.substring(5, 6), 16)
  const yiq = (r * 299 + g * 587 + b * 114) / 1000
  return yiq >= 8 ? 'black' : 'white'
}登入後複製
外掛打包
打包命令:
vsce package
登入後複製如果打包失敗,可能的原因:
- packege.json缺少上文表格中必要的設定項
- VS Code版本與packege.json裡設定的版本不相容
- 根目錄下缺少README.md檔案
- 根目錄下缺少LICENSE.md檔案
更多關於VSCode的相關知識,請存取:!
以上就是帶你開發一個提示顏色程式碼的VS Code外掛的詳細內容,更多請關注TW511.COM其它相關文章!
