一篇文章帶你掌握主流基礎框架——Spring
一篇文章帶你掌握主流基礎框架——Spring
這篇文章中我們將會介紹Spring的框架以及本體內容,包括核心容器,註解開發,AOP以及事務等內容
那麼簡單說明一下Spring的必要性:
- Spring技術是JavaEE開發的必備技能,企業開發技術選型率高達90%!
- Spring可以幫助簡化開發,降低企業級開發的複雜度
- Spring可以進行框架整合,高效整合其他技術,提高企業級應用開發與執行效率
Spring的核心內容:
- Ioc技術
- DI技術
- AOP
- 事務處理
Spring可進行的框架整合:
- MaBatis
- MyBatis-plus
- Struts
- Struts2
- Hibernate
在接下來的文章中,我們會學習Spring的框架思想,學習Spring的基本操作,結合案例熟練掌握
溫馨提醒:在學習本篇文章前請先學習JavaWeb相關內容
(HTTP,Tomcat,Servlet,Request,Response,MVC,Cookie,Session,Ajax,Vue等內容)
初識Spring
Spring發展至今已經形成了一套開發的生態圈,Spring提供了相當多的專案,每個專案用於完成特定功能
我們常用的主流技術包括有:
- Spring Framework:Spring框架
- Spring Boot:Spring簡化程式碼開發
- Spring Cloud:Spring分佈設計
Spring FrameWork系統架構
在系統學習Spring之前,我們需要先來了解FrameWork系統結構
- Spring FrameWork是Spring生態圈中最基本的專案,是其他專案的根基
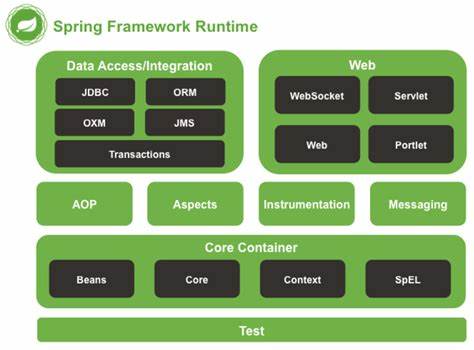
我們現在所使用的Spring FrameWork是4.0版本,已經趨於穩定
下面我們對架構圖進行解釋:
- Core Container:核心容器
- AOP:面向切面程式設計
- Aspects:AOP思想實現
- Data Access:資料存取
- Data Intergration:資料整合
- Web:Web開發
- Test:單元測試與整合測試
我們可以在官方中獲得如此評價:
- 強大的基於 JavaBeans 的採用控制反轉(Inversion of Control,IoC)原則的設定管理,使得應用程式的組建更加快捷簡易。
- 資料庫事務的一般化抽象層,允許外掛式事務管理器,簡化事務的劃分使之與底層無關。
- 一個可用於從 applet 到 Java EE 等不同執行環境的核心 Bean 工廠。
核心概念介紹
首先我們思索一下我們之前的業務層與資料層:
// 資料層介面
public interface BookDao {
    public void save();
}
// 資料層實現
public class BookDaoImpl implements BookDao {
    public void save() {
        System.out.println("book dao save ...");
    }
}
// 業務層介面
public interface BookService {
    public void save();
}
// 業務層實現
public class BookServiceImpl implements BookService {
    private BookDao bookDao;

    public void save() {
        bookDao.save();
    }

}
如果我們修改BookDaoImpl內容,那麼相對應的業務層實現中的bookDao的new實現也要進行修改,甚至下方方法的物件也要進行修改
Spring使用前問題
程式碼書寫現狀:
- 耦合度偏高
解放方案:
- 使用物件時,在程式中不要主動使用new產生物件,轉換為由外部提供物件
Spring思想以及實現
IoC(Inversion of Control)控制反轉思想:
- 使用物件時,由主動new建立物件轉換為由外部提供物件
- 此過程中物件建立控制權由程式轉移到外部,被稱為控制反轉
DI(Dependency Injection)依賴注入:
- 在容器中建立Bean與Bean之間的依賴關係和整個過程,被稱為依賴注入
Spring技術對Ioc思想進行了實現:
- Spring提供了一個容器,被稱為Ioc容器,用來充當IoC思想的外部
- IoC容器負責物件的建立,初始化等一系列工作,被建立和管理的物件在IoC容器中被稱為Bean
// 資料層實現
public class BookDaoImpl implements BookDao {
    public void save() {
        System.out.println("book dao save ...");
    }
}
// IoC容器
/*
包含
dao
service
兩者可以建立連線
*/
// 業務層實現
public class BookServiceImpl implements BookService {
    private BookDao bookDao;

    public void save() {
        bookDao.save();
    }

}
目的:充分解耦
- IoC:使用IoC容器管理bean
- DI:在IoC容器內將有依賴關係的bean進行關係繫結
最終效果:
- 使用物件不僅可以直接從IoC容器中獲取,還可以將已獲得的Bean之間繫結依賴關係
IoC入門
首先我們需要明白IoC的使用規則:
- IoC負責管理什麼:Service和Dao
- 如何被管理的物件告知IoC容器:(設定)
- 被管理的物件交給IoC容器,如何獲得IoC容器:(介面)
- IoC容器得到之後,如何獲得Bean:(介面方法)
- 使用Spring所需要匯入的座標:(pom.xml)
下面我們給出IoC入門的詳細步驟:
- 建立Maven專案,在pom.xml中匯入座標
  <dependencies>
    <dependency>
      <groupId>org.springframework</groupId>
      <artifactId>spring-context</artifactId>
      <version>5.2.10.RELEASE</version>
    </dependency>
  </dependencies>
- 建立Spring.xml的設定包(applicationContext.xml,匯入座標後xml中更新該XML)
<?xml version="1.0" encoding="UTF-8"?>
<beans xmlns="http://www.springframework.org/schema/beans"
       xmlns:xsi="http://www.w3.org/2001/XMLSchema-instance"
       xsi:schemaLocation="http://www.springframework.org/schema/beans http://www.springframework.org/schema/beans/spring-beans.xsd">

    <!--2.設定bean-->
    <!--bean標籤標示設定bean
    id屬性標示給bean起名字
    class屬性表示給bean定義型別(注意需要是實現類)-->

    <bean id="bookDao" class="com.itheima.dao.impl.BookDaoImpl"/>

    <bean id="bookService" class="com.itheima.service.impl.BookServiceImpl"/>

</beans>
- 主函數
package com.itheima;

import com.itheima.dao.BookDao;
import com.itheima.service.BookService;
import org.springframework.context.ApplicationContext;
import org.springframework.context.support.ClassPathXmlApplicationContext;

public class App2 {
    public static void main(String[] args) {
        //3.獲取IoC容器
        ApplicationContext ctx = new ClassPathXmlApplicationContext("applicationContext.xml");

        //4.獲取bean(根據bean設定id獲取)
		//BookDao bookDao = (BookDao) ctx.getBean("bookDao");
		//bookDao.save();

        // 注意:需要型別轉化

        BookService bookService = (BookService) ctx.getBean("bookService");
        bookService.save();

    }
}
DI入門
首先我們需要明白DI的使用規則:
- 基於IoC管理bean
- Service中使用new形式建立Dao物件是否保留:(否)
- Service中需要Dao物件如何進入到Service中:(提供方法)
- Service與Dao之間的關係如何描述:(設定)
下面我們給出DI入門的詳細步驟(基於IoC入門):
- 刪除new方法
public class BookServiceImpl implements BookService {
    //5.刪除業務層中使用new的方式建立的dao物件
    private BookDao bookDao;

    public void save() {
        System.out.println("book service save ...");
        bookDao.save();
    }

}
- 建立物件的set方法
public class BookServiceImpl implements BookService {
    //5.刪除業務層中使用new的方式建立的dao物件
    private BookDao bookDao;

    public void save() {
        System.out.println("book service save ...");
        bookDao.save();
    }

    //6.提供對應的set方法
    public void setBookDao(BookDao bookDao) {
        this.bookDao = bookDao;
    }
}
- 建立Dao和Service的連線
<?xml version="1.0" encoding="UTF-8"?>
<beans xmlns="http://www.springframework.org/schema/beans"
       xmlns:xsi="http://www.w3.org/2001/XMLSchema-instance"
       xsi:schemaLocation="http://www.springframework.org/schema/beans http://www.springframework.org/schema/beans/spring-beans.xsd">

    <!--2.設定bean-->
    <!--
	bean標籤標示設定bean
    id屬性標示給bean起名字
    class屬性表示給bean定義型別
	-->
    <bean id="bookDao" class="com.itheima.dao.impl.BookDaoImpl"/>

    <bean id="bookService" class="com.itheima.service.impl.BookServiceImpl">
        <!--7.設定server與dao的關係-->
        <!--
		注意:在server中設定關係
		property標籤表示設定當前bean的屬性
        name屬性表示設定哪一個具體的屬性
        ref屬性表示參照哪一個bean
		-->
        <property name="bookDao" ref="bookDao"/>
    </bean>

</beans>
Bean整體介紹
Bean是儲存在IoC中的物件,我們通過設定的方式獲得Bean
下面我們從三個方面分別講解Bean:
bean基本設定
首先我們先介紹bean本身性質:
| 類別 | 描述 |
|---|---|
| 名稱 | bean |
| 型別 | 標籤 |
| 所屬 | beans標籤 |
| 功能 | 定義Spring核心容器管理物件 |
| 格式 | <beans> <bean> </bean> </beans> |
| 屬性列表 | id:bean的id,使用容器可以通過id值獲得對應的bean,在一個容器中id值唯一 class:bean的型別,即設定的bean的全路徑類名 |
| 範例 | <bean id="bookService" class="com.itheima.service.impl.BookServiceImpl"> |
然後我們介紹一下bean的別名:
| 類別 | 描述 |
|---|---|
| 名稱 | name |
| 型別 | 標籤 |
| 所屬 | bean標籤 |
| 功能 | 定義bean的別名,可定義多個,使用逗號,分號,空格分隔 |
| 範例 | <bean id="bookService" name="service service4 bookEbi" class="com.itheima.service.impl.BookServiceImpl"> |
正常情況下,使用id和name都可以獲得bean,但推薦還是使用唯一id
獲得bean無論通過id還是name獲取,如果無法找到則丟擲異常NosuchBeanDefinitionException
最後我們介紹一下bean的作用範圍scope:
| 類別 | 描述 |
|---|---|
| 名稱 | scope |
| 型別 | 標籤 |
| 所屬 | bean標籤 |
| 功能 | 定義bean的作用範圍,可選範圍如下: singleton:單列(預設) prototype:非單列 |
| 範例 | <bean id="bookDao" name="dao" class="com.itheima.dao.impl.BookDaoImpl" scope="prototype"/> |
這裡的scope指產生物件的數量
我們的scope在預設情況下是singleton,因為很多物件只需要建立一次,多次建立會導致記憶體膨脹
合適交給容器進行管理的bean(singleton):
- 表現層物件
- 業務層物件
- 資料層物件
- 工具物件
不合適交給容器進行管理的bean(prototype):
- 封裝實體的域物件(帶有狀態的bean)
bean範例化
bean的範例化通常分為四種方法,我們在下面一一介紹:
- 構造方法(常用)
我們需要在資料類中提供構造方法,設定條件中不需要改變
// 資料類

public class BookDaoImpl implements BookDao {

    public BookDaoImpl() {
        System.out.println("book dao constructor is running ....");
    }

    public void save() {
        System.out.println("book dao save ...");
    }

}
<?xml version="1.0" encoding="UTF-8"?>
<beans xmlns="http://www.springframework.org/schema/beans"
       xmlns:xsi="http://www.w3.org/2001/XMLSchema-instance"
       xsi:schemaLocation="http://www.springframework.org/schema/beans http://www.springframework.org/schema/beans/spring-beans.xsd">

    <!--方式一:構造方法範例化bean-->
    <bean id="bookDao" class="com.itheima.dao.impl.BookDaoImpl"/>

</beans>
若無參構造方法不存在,則丟擲異常BeanCreationException
- 靜態工廠(瞭解)
我們在之前的案例中存在有物件工廠的說法,我們可以設定工廠並呼叫其方法得到bean
// 靜態工廠
package com.itheima.factory;

import com.itheima.dao.OrderDao;
import com.itheima.dao.impl.OrderDaoImpl;
//靜態工廠建立物件
public class OrderDaoFactory {
    public static OrderDao getOrderDao(){
        System.out.println("factory setup....");
        return new OrderDaoImpl();
    }
}
<?xml version="1.0" encoding="UTF-8"?>
<beans xmlns="http://www.springframework.org/schema/beans"
       xmlns:xsi="http://www.w3.org/2001/XMLSchema-instance"
       xsi:schemaLocation="http://www.springframework.org/schema/beans http://www.springframework.org/schema/beans/spring-beans.xsd">

    <!--方式二:使用靜態工廠範例化bean-->
    <bean id="orderDao" class="com.itheima.factory.OrderDaoFactory" factory-method="getOrderDao"/>

</beans>
- 範例工廠(瞭解)
和靜態工廠相同,但不同點是方法不是靜態,我們需要提前建立一個bean
// 範例工廠
package com.itheima.factory;

import com.itheima.dao.UserDao;
import com.itheima.dao.impl.UserDaoImpl;
//範例工廠建立物件
public class UserDaoFactory {
    public UserDao getUserDao(){
        return new UserDaoImpl();
    }
}
<?xml version="1.0" encoding="UTF-8"?>
<beans xmlns="http://www.springframework.org/schema/beans"
       xmlns:xsi="http://www.w3.org/2001/XMLSchema-instance"
       xsi:schemaLocation="http://www.springframework.org/schema/beans http://www.springframework.org/schema/beans/spring-beans.xsd">
    <!--方式三:使用範例工廠範例化bean-->
    <bean id="userFactory" class="com.itheima.factory.UserDaoFactory"/>

    <!--
	factory-bean:範例工廠本身bean
	factory-method:使用呼叫bean的方法
	-->
    <bean id="userDao" factory-method="getUserDao" factory-bean="userFactory"/>

</beans>
- FactoryBean(重要實用)
除了我們之前自己定義的工廠外,Spring提供了一種官方版本的FactoryBean
// FactoryBean工廠(需介面,< >中填寫資料類介面)
package com.itheima.factory;

import com.itheima.dao.UserDao;
import com.itheima.dao.impl.UserDaoImpl;
import org.springframework.beans.factory.FactoryBean;
//FactoryBean建立物件
public class UserDaoFactoryBean implements FactoryBean<UserDao> {
    //代替原始範例工廠中建立物件的方法

    // 返回建立物件型別為UserDaoImpl()
    public UserDao getObject() throws Exception {
        return new UserDaoImpl();
    }

    // 這裡填寫介面型別
    public Class<?> getObjectType() {
        return UserDao.class;
    }

    // 可以修改來修改其scope屬性
    public boolean isSingleton() {
        return false;
    }
}
<?xml version="1.0" encoding="UTF-8"?>
<beans xmlns="http://www.springframework.org/schema/beans"
       xmlns:xsi="http://www.w3.org/2001/XMLSchema-instance"
       xsi:schemaLocation="http://www.springframework.org/schema/beans http://www.springframework.org/schema/beans/spring-beans.xsd">

    <!--方式四:使用FactoryBean範例化bean-->
    <bean id="userDao" class="com.itheima.factory.UserDaoFactoryBean"/>

</beans>
bean生命週期
我們先來接單介紹生命週期相關概念:
- 生命週期:從建立到消亡的完整過程
- bean生命週期:bean從建立到銷燬的整體過程
- bean生命週期控制:在bean建立後到銷燬前做一些事情
接下來我們介紹生命週期控制方法:
- 資料層提供控制方法
由資料層提供方法,在xml組態檔中設定該方法
// 資料層
package com.itheima.dao.impl;

import com.itheima.dao.BookDao;

public class BookDaoImpl implements BookDao {

    public void save() {
        System.out.println("book dao save ...");
    }

    //表示bean初始化對應的操作
    public void init(){
        System.out.println("init...");
    }
    //表示bean銷燬前對應的操作
    public void destory(){
        System.out.println("destory...");
    }

}
<!--組態檔-->

<?xml version="1.0" encoding="UTF-8"?>
<beans xmlns="http://www.springframework.org/schema/beans"
       xmlns:xsi="http://www.w3.org/2001/XMLSchema-instance"
       xsi:schemaLocation="http://www.springframework.org/schema/beans http://www.springframework.org/schema/beans/spring-beans.xsd">

    <!--init-method:設定bean初始化生命週期回撥函數-->
    <!--destroy-method:設定bean銷燬生命週期回撥函數,僅適用於單例物件-->
    <bean id="bookDao" class="com.itheima.dao.impl.BookDaoImpl" init-method="init" destroy-method="destory"/>

    <bean id="bookService" class="com.itheima.service.impl.BookServiceImpl">
        <property name="bookDao" ref="bookDao"/>
    </bean>

</beans>
- 介面控制方法(瞭解)
Spring為建立提供了兩個介面,我們只需要繼承並實現該方法即可
package com.itheima.service.impl;

import com.itheima.dao.BookDao;
import com.itheima.service.BookService;
import org.springframework.beans.factory.DisposableBean;
import org.springframework.beans.factory.InitializingBean;

// InitializingBean,DisposableBean 分別對應afterPropertiesSet,destroy方法,代表建立和銷燬
public class BookServiceImpl implements BookService, InitializingBean, DisposableBean {
    private BookDao bookDao;

    public void setBookDao(BookDao bookDao) {
        System.out.println("set .....");
        this.bookDao = bookDao;
    }

    public void save() {
        System.out.println("book service save ...");
        bookDao.save();
    }

    public void destroy() throws Exception {
        System.out.println("service destroy");
    }

    public void afterPropertiesSet() throws Exception {
        System.out.println("service init");
    }
}
<?xml version="1.0" encoding="UTF-8"?>
<beans xmlns="http://www.springframework.org/schema/beans"
       xmlns:xsi="http://www.w3.org/2001/XMLSchema-instance"
       xsi:schemaLocation="http://www.springframework.org/schema/beans http://www.springframework.org/schema/beans/spring-beans.xsd">

    <bean id="bookDao" class="com.itheima.dao.impl.BookDaoImpl" init-method="init" destroy-method="destory"/>

    <!--直接呼叫即可-->
    <bean id="bookService" class="com.itheima.service.impl.BookServiceImpl">
        <property name="bookDao" ref="bookDao"/>
    </bean>

</beans>
我們需要提及一下bean的銷燬時機:(瞭解即可)
- 因為預設情況下,我們的bean不會被銷燬,因為虛擬機器器會直接退出,ClassPathXmlApplicationContext會被忽略銷燬過程
所以如果我們希望銷燬bean觀察到destroy的實現,需要手動關閉:
- 手動關閉容器方法:
package com.itheima;

import com.itheima.dao.BookDao;
import org.springframework.context.ApplicationContext;
import org.springframework.context.support.ClassPathXmlApplicationContext;

public class AppForLifeCycle {
    public static void main( String[] args ) {
        // 注意:這裡需要採用ClassPathXmlApplicationContext作為物件,因為只有這個類才具有close方法
        ClassPathXmlApplicationContext ctx = new ClassPathXmlApplicationContext("applicationContext.xml");

        BookDao bookDao = (BookDao) ctx.getBean("bookDao");
        bookDao.save();
        //關閉容器
        ctx.close();
    }
}
- 註冊關閉勾點,在虛擬機器器退出前先關閉容器再推出虛擬機器器
package com.itheima;

import com.itheima.dao.BookDao;
import org.springframework.context.ApplicationContext;
import org.springframework.context.support.ClassPathXmlApplicationContext;

public class AppForLifeCycle {
    public static void main( String[] args ) {
        ClassPathXmlApplicationContext ctx = new ClassPathXmlApplicationContext("applicationContext.xml");

        BookDao bookDao = (BookDao) ctx.getBean("bookDao");
        bookDao.save();
        //註冊關閉勾點函數,在虛擬機器器退出之前回撥此函數,關閉容器
        ctx.registerShutdownHook();
    }
}
最後我們統計一下整體生命週期:
- 初始化容器:建立物件(分配記憶體)->執行構造方法->執行屬性注入(set操作)->執行bean初始化方法
- 使用bean:執行業務操作
- 關閉/銷燬容器:執行bean銷燬方法
依賴注入方式
首先我們要知道類中傳遞資料的方法有兩種:
- 普通方法(Set方法)
- 構造方法
然後我們要知道資料的型別大體分為兩種:
- 引入型別(資料層)
- 簡單型別(基本資料型別和String)
所以我們把依賴注入方式分為四種:
- setter注入
- 簡單型別
- 參照型別
- 構造器注入
- 簡單型別
- 引入型別
setter注入簡單型別
首先我們需要在bean種定義簡單型別屬性並提供可以存取的set方法
package com.itheima.dao.impl;

import com.itheima.dao.BookDao;

public class BookDaoImpl implements BookDao {

    private String databaseName;
    private int connectionNum;
    //setter注入需要提供要注入物件的set方法
    public void setConnectionNum(int connectionNum) {
        this.connectionNum = connectionNum;
    }
    //setter注入需要提供要注入物件的set方法
    public void setDatabaseName(String databaseName) {
        this.databaseName = databaseName;
    }

    public void save() {
        System.out.println("book dao save ..."+databaseName+","+connectionNum);
    }
}
然後在設定中使用property標籤value屬性注入簡單型別資料
<?xml version="1.0" encoding="UTF-8"?>
<beans xmlns="http://www.springframework.org/schema/beans"
       xmlns:xsi="http://www.w3.org/2001/XMLSchema-instance"
       xsi:schemaLocation="http://www.springframework.org/schema/beans http://www.springframework.org/schema/beans/spring-beans.xsd">

    <!--注入簡單型別-->
    <bean id="bookDao" class="com.itheima.dao.impl.BookDaoImpl">
        <!--property標籤:設定注入屬性-->
        <!--name屬性:設定注入的屬性名,實際是set方法對應的名稱-->
        <!--value屬性:設定注入簡單型別資料值-->
        <property name="connectionNum" value="100"/>
        <property name="databaseName" value="mysql"/>
    </bean>

</beans>
setter注入參照型別
首先我們需要在bean種定義參照型別屬性並提供可以存取的set方法
package com.itheima.service.impl;

import com.itheima.dao.BookDao;
import com.itheima.dao.UserDao;
import com.itheima.service.BookService;

public class BookServiceImpl implements BookService{
    private BookDao bookDao;
    private UserDao userDao;
    //setter注入需要提供要注入物件的set方法
    public void setUserDao(UserDao userDao) {
        this.userDao = userDao;
    }
    //setter注入需要提供要注入物件的set方法
    public void setBookDao(BookDao bookDao) {
        this.bookDao = bookDao;
    }

    public void save() {
        System.out.println("book service save ...");
        bookDao.save();
        userDao.save();
    }
}
然後在設定中使用property標籤ref屬性注入參照型別資料
<?xml version="1.0" encoding="UTF-8"?>
<beans xmlns="http://www.springframework.org/schema/beans"
       xmlns:xsi="http://www.w3.org/2001/XMLSchema-instance"
       xsi:schemaLocation="http://www.springframework.org/schema/beans http://www.springframework.org/schema/beans/spring-beans.xsd">

    <bean id="bookDao" class="com.itheima.dao.impl.BookDaoImpl">
        <property name="connectionNum" value="100"/>
        <property name="databaseName" value="mysql"/>
    </bean>

    <bean id="userDao" class="com.itheima.dao.impl.UserDaoImpl"/>

    <!--注入參照型別-->
    <bean id="bookService" class="com.itheima.service.impl.BookServiceImpl">
        <!--property標籤:設定注入屬性-->
        <!--name屬性:設定注入的屬性名,實際是set方法對應的名稱-->
        <!--ref屬性:設定注入參照型別bean的id或name-->
        <property name="bookDao" ref="bookDao"/>
        <property name="userDao" ref="userDao"/>
    </bean>

</beans>
構造器注入簡單型別(瞭解)
在bean中定義簡單型別屬性並提供可存取的set方法
public class BookDaoImpl implements BookDao{
	private int connectionNumber;

    pubilc void setConnectionNumber(int connectionNumber){
		this.connectionNumber = connectionNumber;
    }
}
設定中使用constructor-arg標籤value屬性注入簡單型別資料
<?xml version="1.0" encoding="UTF-8"?>
<beans xmlns="http://www.springframework.org/schema/beans"
       xmlns:xsi="http://www.w3.org/2001/XMLSchema-instance"
       xsi:schemaLocation="http://www.springframework.org/schema/beans http://www.springframework.org/schema/beans/spring-beans.xsd">

    <bean id="bookDao" class="com.itheima.dao.impl.BookDaoImpl">
        根據構造方法引數名稱注入
        <constructor-arg name="connectionNum" value="10"/>
    </bean>
    <bean id="userDao" class="com.itheima.dao.impl.UserDaoImpl"/>

</beans>
構造器注入參照型別(瞭解)
在bean中定義參照型別屬性並提供可存取的構造方法
public class BookDaoImpl implements BookDao{
	private BookBao bookBao;

    pubilc void setConnectionNumber(int connectionNumber){
		this.bookBao = bookBao;
    }
}
設定中使用constructor-arg標籤ref屬性注入簡單型別資料
<?xml version="1.0" encoding="UTF-8"?>
<beans xmlns="http://www.springframework.org/schema/beans"
       xmlns:xsi="http://www.w3.org/2001/XMLSchema-instance"
       xsi:schemaLocation="http://www.springframework.org/schema/beans http://www.springframework.org/schema/beans/spring-beans.xsd">

    <bean id="bookService" class="com.itheima.service.impl.BookServiceImpl">
        <constructor-arg name="userDao" ref="userDao"/>
        <constructor-arg name="bookDao" ref="bookDao"/>
    </bean>

</beans>
構造器注入引數設定問題(瞭解)
在前面我們已經介紹了構造器的注入方法
但如果我們在bean中的資料名稱發生改變,設定就不再適配,所以提供了一些方法來解決引數設定問題:
- 設定中使用constructor-arg標籤type屬性設定按形參型別注入
	<!--解決形參名稱的問題,與形參名不耦合-->
    <bean id="bookDao" class="com.itheima.dao.impl.BookDaoImpl">
        根據構造方法引數型別注入
        <constructor-arg type="int" value="10"/>
        <constructor-arg type="java.lang.String" value="mysql"/>
    </bean>
    <bean id="userDao" class="com.itheima.dao.impl.UserDaoImpl"/>

    <bean id="bookService" class="com.itheima.service.impl.BookServiceImpl">
        <constructor-arg name="userDao" ref="userDao"/>
        <constructor-arg name="bookDao" ref="bookDao"/>
    </bean>
- 設定中使用constructor-arg標籤index屬性設定按形參型別注入
    <!--解決引數型別重複問題,使用位置解決引數匹配-->
    <bean id="bookDao" class="com.itheima.dao.impl.BookDaoImpl">
        <!--根據構造方法引數位置注入-->
        <constructor-arg index="0" value="mysql"/>
        <constructor-arg index="1" value="100"/>
    </bean>
    <bean id="userDao" class="com.itheima.dao.impl.UserDaoImpl"/>

    <bean id="bookService" class="com.itheima.service.impl.BookServiceImpl">
        <constructor-arg name="userDao" ref="userDao"/>
        <constructor-arg name="bookDao" ref="bookDao"/>
    </bean>
依賴注入方式選擇
依賴注入方式有以下選擇標準:
- 強制依賴使用構造器進行,使用setter注入有概率不進行注入導致null物件出現
- 可選依賴使用setter注入進行,靈活性高
- Spring框架倡導使用構造器,第三方框架內部大多數採用構造器注入的形式進行資料初始化,相對嚴謹
- 如果有必要可以兩者並用,使用構造器注入完成強制依賴的注入,使用setter注入完成可選依賴的注入
- 實際開發中根據情況分析,如果受控物件沒有提供setter方法則只能採用構造器注入
- 自己開發的模組儘量推薦setter注入
依賴自動裝配
在前面我們學習了手動注入的方法,但Spring其實為我們提供了一種依賴自動裝配的語法:
- IoC容器根據bean所依賴的資源在容器中自動查詢並注入bean中的過程稱為自動裝配
自動裝配方式:
- 按型別(常用)
- 按名稱
- 按構造方法
- 不啟用
自動裝配語法:
<?xml version="1.0" encoding="UTF-8"?>
<beans xmlns="http://www.springframework.org/schema/beans"
       xmlns:xsi="http://www.w3.org/2001/XMLSchema-instance"
       xsi:schemaLocation="http://www.springframework.org/schema/beans http://www.springframework.org/schema/beans/spring-beans.xsd">

    <bean class="com.itheima.dao.impl.BookDaoImpl"/>
    <!--autowire屬性:開啟自動裝配,通常使用按型別裝配-->
    <bean id="bookService" class="com.itheima.service.impl.BookServiceImpl" autowire="byType"/>

</beans>
依賴自動裝配特徵:
- 自動裝配用於參照型別注入,不能對簡單型別進行操作
- 使用按型別裝配時(byType)必須保障容器中相同型別的bean唯一,推薦使用
- 使用按名稱裝配時(byName)必須保障容器中具有指定名稱的bean,因變數名與設定耦合,不推薦使用
- 自動裝配優先順序低於setter注入和構造器注入,同時出現時,自動裝配設定失效
依賴集合注入
除了基本型別和引入型別外,我們有時也需要注入集合
下面我們簡單介紹一下結合的注入:
// 資料類

package com.itheima.dao.impl;

import com.itheima.dao.BookDao;

import java.util.*;

public class BookDaoImpl implements BookDao {

    private int[] array;

    private List<String> list;

    private Set<String> set;

    private Map<String,String> map;

    private Properties properties;


    public void setArray(int[] array) {
        this.array = array;
    }

    public void setList(List<String> list) {
        this.list = list;
    }

    public void setSet(Set<String> set) {
        this.set = set;
    }

    public void setMap(Map<String, String> map) {
        this.map = map;
    }

    public void setProperties(Properties properties) {
        this.properties = properties;
    }


    public void save() {
        System.out.println("book dao save ...");

        System.out.println("遍歷陣列:" + Arrays.toString(array));

        System.out.println("遍歷List" + list);

        System.out.println("遍歷Set" + set);

        System.out.println("遍歷Map" + map);

        System.out.println("遍歷Properties" + properties);
    }
}
<!--xml注入-->

<?xml version="1.0" encoding="UTF-8"?>
<beans xmlns="http://www.springframework.org/schema/beans"
       xmlns:xsi="http://www.w3.org/2001/XMLSchema-instance"
       xsi:schemaLocation="http://www.springframework.org/schema/beans http://www.springframework.org/schema/beans/spring-beans.xsd">
    <bean id="bookDao" class="com.itheima.dao.impl.BookDaoImpl">
        <!--陣列注入-->
        <!--
		注意:
		name:對應實現類中的內部成員名稱
		<>裡的array等為固定詞彙
		-->
        <property name="array">
            <array>
                <value>100</value>
                <value>200</value>
                <value>300</value>
            </array>
        </property>
        <!--list集合注入-->
        <property name="list">
            <list>
                <value>itcast</value>
                <value>itheima</value>
                <value>boxuegu</value>
                <value>chuanzhihui</value>
            </list>
        </property>
        <!--set集合注入-->
        <property name="set">
            <set>
                <value>itcast</value>
                <value>itheima</value>
                <value>boxuegu</value>
                <value>boxuegu</value>
            </set>
        </property>
        <!--map集合注入-->
        <property name="map">
            <map>
                <entry key="country" value="china"/>
                <entry key="province" value="henan"/>
                <entry key="city" value="kaifeng"/>
            </map>
        </property>
        <!--Properties注入-->
        <property name="properties">
            <props>
                <prop key="country">china</prop>
                <prop key="province">henan</prop>
                <prop key="city">kaifeng</prop>
            </props>
        </property>
    </bean>
</beans>
案例:資料來源物件管理
針對一個新的資料來源物件,我們採用兩步來建立bean(我們以druid為案例):
- 匯入druid座標
<?xml version="1.0" encoding="UTF-8"?>
<project xmlns="http://maven.apache.org/POM/4.0.0"
         xmlns:xsi="http://www.w3.org/2001/XMLSchema-instance"
         xsi:schemaLocation="http://maven.apache.org/POM/4.0.0 http://maven.apache.org/xsd/maven-4.0.0.xsd">
    <modelVersion>4.0.0</modelVersion>

    <groupId>com.itheima</groupId>
    <artifactId>spring_09_datasource</artifactId>
    <version>1.0-SNAPSHOT</version>

    <dependencies>
        <dependency>
            <groupId>org.springframework</groupId>
            <artifactId>spring-context</artifactId>
            <version>5.2.10.RELEASE</version>
        </dependency>
        <!--這裡匯入druid座標-->
        <dependency>
            <groupId>com.alibaba</groupId>
            <artifactId>druid</artifactId>
            <version>1.1.16</version>
        </dependency>
        <dependency>
            <groupId>mysql</groupId>
            <artifactId>mysql-connector-java</artifactId>
            <version>5.1.47</version>
        </dependency>
    </dependencies>
</project>
- 設定資料來源物件作為Spring管理的bean
<?xml version="1.0" encoding="UTF-8"?>
<beans xmlns="http://www.springframework.org/schema/beans"
       xmlns:xsi="http://www.w3.org/2001/XMLSchema-instance"
       xsi:schemaLocation="
            http://www.springframework.org/schema/beans
            http://www.springframework.org/schema/beans/spring-beans.xsd
            ">

<!--    管理DruidDataSource物件-->
    <!--起id 設定class地址-->
    <bean id="dataSource" class="com.alibaba.druid.pool.DruidDataSource">
        <!--設定基本資訊-->
        <property name="driverClassName" value="com.mysql.jdbc.Driver"/>
        <property name="url" value="jdbc:mysql://localhost:3306/spring_db"/>
        <property name="username" value="root"/>
        <property name="password" value="123456"/>
    </bean>

</beans>
案例:載入properties檔案
這個案例我們將會介紹如何載入properties檔案,並將檔案帶入到property基本資訊中
我們大致將步驟分為以下三步:
- 開闢context名稱空間:
<?xml version="1.0" encoding="UTF-8"?>
<beans xmlns="http://www.springframework.org/schema/beans"
       xmlns:xsi="http://www.w3.org/2001/XMLSchema-instance"
       xmlns:context="http://www.springframework.org/schema/context"
       xsi:schemaLocation="
            http://www.springframework.org/schema/beans
            http://www.springframework.org/schema/beans/spring-beans.xsd
            http://www.springframework.org/schema/context
            http://www.springframework.org/schema/context/spring-context.xsd
            ">
<!--
上述beans中的內容是我們的名稱空間開闢過程
在原本的xml中只有:
xmlns="http://www.springframework.org/schema/beans"
       xmlns:xsi="http://www.w3.org/2001/XMLSchema-instance"
       xsi:schemaLocation="
            http://www.springframework.org/schema/beans
            http://www.springframework.org/schema/beans/spring-beans.xsd
            ">
在下面的內容中我們新增:
       xmlns:context="http://www.springframework.org/schema/context"
並在xsi:schemaLocation中新增:
       http://www.springframework.org/schema/context
       http://www.springframework.org/schema/context/spring-context.xsd
(整體從上述內容複製,然後修改末尾xsi即可)
-->
</beans>
- 使用context名稱空間,載入指定properties檔案
<!--    2.使用context空間載入properties檔案-->

<context:property-placeholder location="jdbc.properties"/>
- 使用${}讀取載入的屬性值
<!--    3.使用屬性預留位置${}讀取properties檔案中的屬性-->

<!--    說明:idea自動識別${}載入的屬性值,需要手工點選才可以查閱原始書寫格式-->
    <bean class="com.alibaba.druid.pool.DruidDataSource">
        <property name="driverClassName" value="${jdbc.driver}"/>
        <property name="url" value="${jdbc.url}"/>
        <property name="username" value="${jdbc.username}"/>
        <property name="password" value="${jdbc.password}"/>
    </bean>
除了上述的基本操作,我們在context名稱空間的使用中有很多需要注意的點:
- 不載入系統屬性
<!--
因為我們的系統屬性優先順序>定義優先順序,當我們properties中的屬性與系統設定屬性名相同時,會優先匹配系統屬性導致錯誤
可以採用system-properties-mode進行設定
-->
<context:property-placeholder location="jdbc.properties" system-properties-mode="NEVER"/>
- 載入多個properties檔案
<!--
我們可以採用逗號或空格分隔載入多個properties檔案
-->
<context:property-placeholder location="jdbc.properties,jdbc2.properties" system-properties-mode="NEVER"/>
- 載入所有properties檔案
<!--
我們可以採用萬用字元來設定載入檔案
用*來代替所有字首,只保留字尾為properties即可
-->
<context:property-placeholder location="*.properties" system-properties-mode="NEVER"/>
- 載入properties檔案標準格式
<!--
我們通常以classpath表示路徑,下述形式更為標準
classpath:*.properties  :   設定載入當前工程類路徑中的所有properties檔案
-->
 <context:property-placeholder location="classpath:*.properties" system-properties-mode="NEVER"/>
- 從類路徑或jar包中搜尋並載入properties檔案
<!--
我們通常以classpath*來表示路徑來源
classpath*:*.properties  :  設定載入當前工程類路徑和當前工程所依賴的所有jar包中的所有properties檔案
-->
<context:property-placeholder location="classpath*:*.properties" system-properties-mode="NEVER"/>
核心容器
前面已經完成bean與依賴注入的相關知識學習,接下來我們主要學習的是IOC容器中的核心容器。
這裡所說的核心容器,大家可以把它簡單的理解為ApplicationContext,接下來我們從以下幾個問題入手來學習下容器的相關知識:
- 如何建立容器?
- 建立好容器後,如何從容器中獲取bean物件?
- 容器類的層次結構是什麼?
- BeanFactory是什麼?
容器的建立方式
案例中建立ApplicationContext的方式為(類路徑下的XML組態檔):
ApplicationContext ctx = new ClassPathXmlApplicationContext("applicationContext.xml");
除了上面這種方式,Spring還提供了另外一種建立方式為(檔案的絕對路徑):
ApplicationContext ctx = new FileSystemXmlApplicationContext("D:\\workspace\\spring\\spring_10_container\\src\\main\\resources\\applicationContext.xml");
Bean的三種獲取方式
方式一,就是目前案例中獲取的方式:
BookDao bookDao = (BookDao) ctx.getBean("bookDao");
這種方式存在的問題是每次獲取的時候都需要進行型別轉換
方式二:
BookDao bookDao = ctx.getBean("bookDao",BookDao.class);
這種方式可以解決型別強轉問題,但是引數又多加了一個,相對來說沒有簡化多少。
方式三:
BookDao bookDao = ctx.getBean(BookDao.class);
這種方式就類似我們之前所學習依賴注入中的按型別注入。必須要確保IOC容器中該型別對應的bean物件只能有一個。
容器類層次結構
下面我們給出容器的層次圖

BeanFactory的使用
使用BeanFactory來建立IOC容器的具體實現方式為:
public class AppForBeanFactory {
    public static void main(String[] args) {
        Resource resources = new ClassPathResource("applicationContext.xml");
        BeanFactory bf = new XmlBeanFactory(resources);
        BookDao bookDao = bf.getBean(BookDao.class);
        bookDao.save();
    }
}
為了更好的看出BeanFactory和ApplicationContext之間的區別,在BookDaoImpl新增如下建構函式:
public class BookDaoImpl implements BookDao {
    public BookDaoImpl() {
        System.out.println("constructor");
    }
    public void save() {
        System.out.println("book dao save ..." );
    }
}
如果不去獲取bean物件,列印會發現:
-
BeanFactory是延遲載入,只有在獲取bean物件的時候才會去建立
-
ApplicationContext是立即載入,容器載入的時候就會建立bean物件
-
ApplicationContext要想成為延遲載入,只需要按照如下方式進行設定
<?xml version="1.0" encoding="UTF-8"?>
<beans xmlns="http://www.springframework.org/schema/beans"
       xmlns:xsi="http://www.w3.org/2001/XMLSchema-instance"
       xsi:schemaLocation="
            http://www.springframework.org/schema/beans http://www.springframework.org/schema/beans/spring-beans.xsd">
    <bean id="bookDao" class="com.itheima.dao.impl.BookDaoImpl"  lazy-init="true"/>
</beans>
核心概念總結
接下來我們對前面知識的一個總結,共包含如下內容:
容器相關
- BeanFactory是IoC容器的頂層介面,初始化BeanFactory物件時,載入的bean延遲載入
- ApplicationContext介面是Spring容器的核心介面,初始化時bean立即載入
- ApplicationContext介面提供基礎的bean操作相關方法,通過其他介面擴充套件其功能
- ApplicationContext介面常用初始化類
- ClassPathXmlApplicationContext(常用)
- FileSystemXmlApplicationContext
bean相關
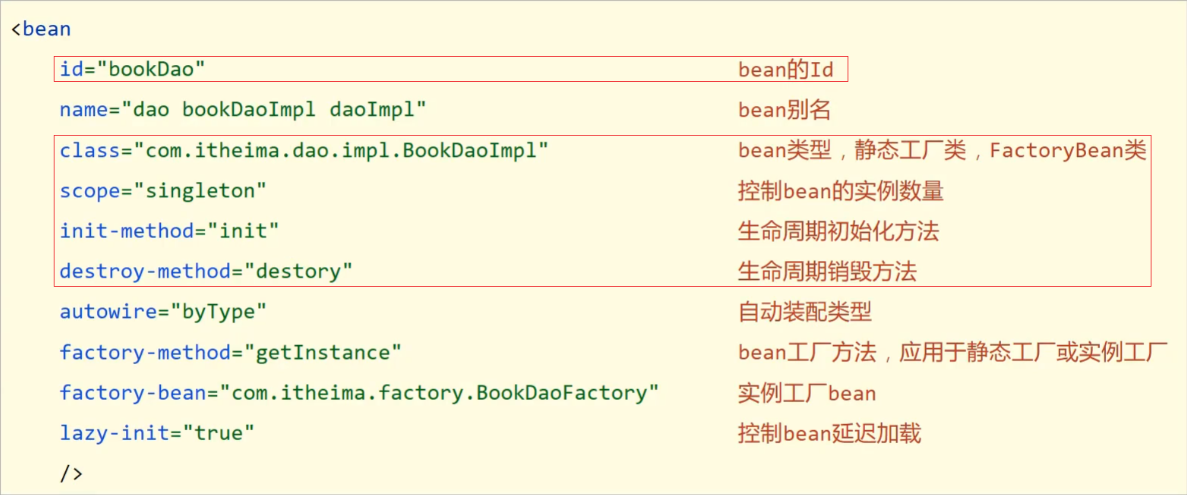
依賴注入相關
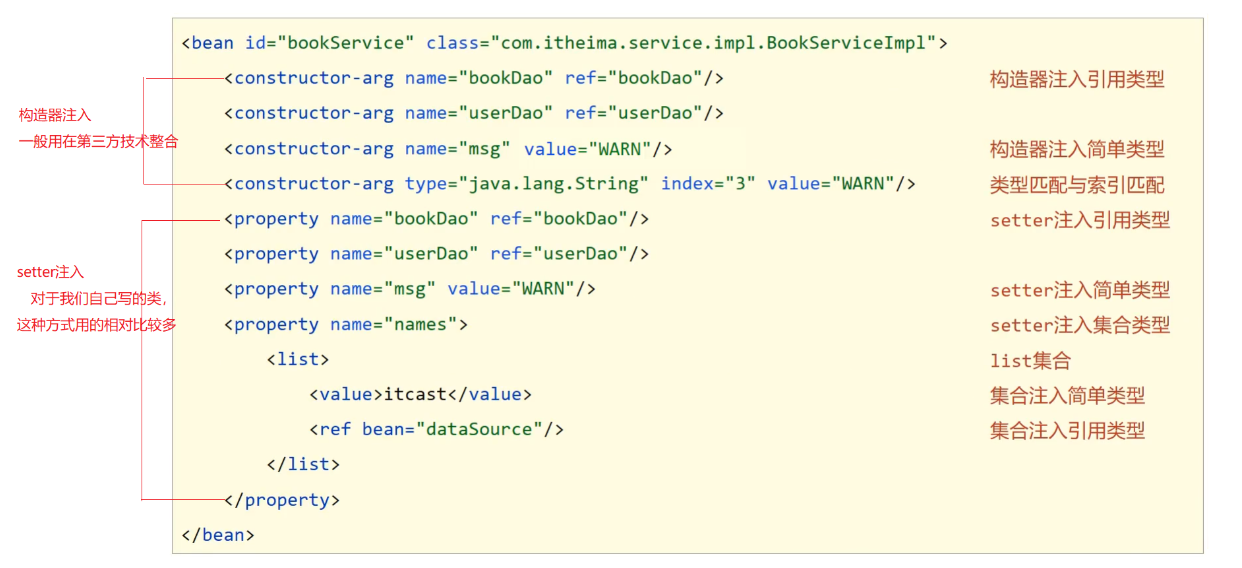
註解開發
在上述的開發中,我們採用xml組態檔的形式來說依舊顯得有些複雜
這時我們就需要發揮Spring的優點:簡化開發,通過註解來簡化開發過程
下面我們會通過多個方面將Bean逐步轉化為註解
註解開發Bean
在前面的內容中,我們的bean在xml組態檔中裝配
<?xml version="1.0" encoding="UTF-8"?>
<beans xmlns="http://www.springframework.org/schema/beans"
       xmlns:xsi="http://www.w3.org/2001/XMLSchema-instance"
       xsi:schemaLocation="
            http://www.springframework.org/schema/beans http://www.springframework.org/schema/beans/spring-beans.xsd">

    <!--原生bean-->
    <bean id="bookDao" class="com.itheima.dao.impl.BookDaoImpl"/>

</beans>
在後期,我們的bean可以採用註解的形式,直接在實現類中註解表示為bean
我們採用@Component定義bean,可以新增參數列示id,也可以不新增引數,後期我們採用class類的型別來進行匹配
package com.itheima.dao.impl;

import com.itheima.dao.BookDao;
import org.springframework.stereotype.Component;
import org.springframework.stereotype.Controller;
import org.springframework.stereotype.Repository;

//@Component定義bean
@Component("bookDao")
public class BookDaoImpl implements BookDao {
    public void save() {
        System.out.println("book dao save ...");
    }
}
package com.itheima.service.impl;

import com.itheima.dao.BookDao;
import com.itheima.service.BookService;
import org.springframework.stereotype.Component;
import org.springframework.stereotype.Service;

//@Component定義bean
@Component
public class BookServiceImpl implements BookService {
    private BookDao bookDao;

    public void setBookDao(BookDao bookDao) {
        this.bookDao = bookDao;
    }

    public void save() {
        System.out.println("book service save ...");
        bookDao.save();
    }
}
@Componenty延伸出了三種型別,在實現手法上是一致,但可以具體使用於各種類中(僅用於自我識別)
- @Controller:用於表現層bean定義
- @Service:用於業務層bean定義
- @Repository:用於資料層定義
package com.itheima.dao.impl;

import com.itheima.dao.BookDao;
import org.springframework.stereotype.Component;
import org.springframework.stereotype.Controller;
import org.springframework.stereotype.Repository;
//@Component定義bean
//@Component("bookDao")
//@Repository:@Component衍生註解
@Repository("bookDao")
public class BookDaoImpl implements BookDao {
    public void save() {
        System.out.println("book dao save ...");
    }
}
package com.itheima.service.impl;

import com.itheima.dao.BookDao;
import com.itheima.service.BookService;
import org.springframework.stereotype.Component;
import org.springframework.stereotype.Service;
//@Component定義bean
//@Component
//@Service:@Component衍生註解
@Service
public class BookServiceImpl implements BookService {
    private BookDao bookDao;

    public void setBookDao(BookDao bookDao) {
        this.bookDao = bookDao;
    }

    public void save() {
        System.out.println("book service save ...");
        bookDao.save();
    }
}
但是,在上述情況下,即使我們將@Component的類定義為bean
我們的xml檔案是無法探測到的,所以我們需要設定相關掃描元件來掃描bean
<?xml version="1.0" encoding="UTF-8"?>
<beans xmlns="http://www.springframework.org/schema/beans"
       xmlns:context="http://www.springframework.org/schema/context"
       xmlns:xsi="http://www.w3.org/2001/XMLSchema-instance"
       xsi:schemaLocation="
        http://www.springframework.org/schema/beans http://www.springframework.org/schema/beans/spring-beans.xsd
        http://www.springframework.org/schema/context http://www.springframework.org/schema/context/spring-context.xsd">

    <!--
	<context:component-scan />:表示掃描檔案
	base-package:表示掃描路徑
	-->

    <context:component-scan base-package="com.itheima"/>

</beans>
純註解開發
我們前面所提到的註解開發屬於2.5的附屬版本
在Spring3.0版本,Spring就提供了純註解開發模式,利用java類代替組態檔,開啟了Spring快速開發時代
在之前我們的xml組態檔是很繁瑣的:
<!--原生xml組態檔-->

<?xml version="1.0" encoding="UTF-8"?>
<beans xmlns="http://www.springframework.org/schema/beans"
       xmlns:xsi="http://www.w3.org/2001/XMLSchema-instance"
       xsi:schemaLocation="
            http://www.springframework.org/schema/beans http://www.springframework.org/schema/beans/spring-beans.xsd">


    <bean id="bookDao" class="com.itheima.dao.impl.BookDaoImpl"/>

</beans>
但是我們可以通過建立單獨的類來表示組態檔:
- @Configuration:用於宣告當前類為Spring設定類
- @ComponentScan:用於掃描類檔案(類似於<context:component-scan base-package="com.itheima"/>)
package com.itheima.config;

import org.springframework.context.annotation.ComponentScan;
import org.springframework.context.annotation.Configuration;

//宣告當前類為Spring設定類
@Configuration
//設定bean掃描路徑,多個路徑書寫為字串陣列格式
@ComponentScan({"com.itheima.service","com.itheima.dao"})
public class SpringConfig {
}
注意:因為該類屬於設定類,我們通常單列一個資料夾來表示
常用資料夾:config
命名規範:SpringConfig,UserConfig...
因為我們的開發不再依靠於xml組態檔,所以在主函數中的Spring容器獲得方式也發生了改變:
package com.itheima;

import com.itheima.dao.BookDao;
import com.itheima.service.BookService;
import org.springframework.context.ApplicationContext;
import org.springframework.context.support.ClassPathXmlApplicationContext;

public class App {
    public static void main(String[] args) {

        // 這是我們之前的獲取方式,採用路徑獲取xml檔案
        // ApplicationContext ctx = new ClassPathXmlApplicationContext("applicationContext.xml");

        // 這是新的獲取方式,直接提供設定類的型別
        // AnnotationConfigApplicationContext載入Spring設定類初始化Spring容器
        ApplicationContext ctx = new AnnotationConfigApplicationContext(SpringConfig.class);

        // 後面操作無需變化

        BookDao bookDao = (BookDao) ctx.getBean("bookDao");
        System.out.println(bookDao);
        //按型別獲取bean
        BookService bookService = ctx.getBean(BookService.class);
        System.out.println(bookService);
    }
}
註解開發Bean作用範圍與管理
既然我們的Bean開發從xml轉移到註解開發,那麼一些設定設定同樣發生改變
首先我們介紹Scope範圍的設定方式:
- @Scope:定義bean的作用範圍
package com.itheima.dao.impl;

import com.itheima.dao.BookDao;
import org.springframework.context.annotation.Scope;
import org.springframework.stereotype.Repository;

import javax.annotation.PostConstruct;
import javax.annotation.PreDestroy;

@Repository
//@Scope設定bean的作用範圍(singleton或prototype),可以不新增預設singleton
@Scope("singleton")
public class BookDaoImpl implements BookDao {

    public void save() {
        System.out.println("book dao save ...");
    }

}
然後我們介紹一下bean生命週期的init和destroy操作:
- @PostConstruct:定義init操作,表示構造後操作
- @PreDestroy:定義destroy操作,表示銷燬前操作
依賴注入(自動裝配)
在Spring3.0中,省略掉了前面繁瑣的依賴注入,我們的bean依賴注入只留下了自動裝配這一操作:
- 使用@Autowired註解開啟自動裝配模式(按型別)
- 當存在相同型別時,我們採用@Qualifier開啟按名自動裝配
package com.itheima.service.impl;

import com.itheima.dao.BookDao;
import com.itheima.service.BookService;
import org.springframework.beans.factory.annotation.Autowired;
import org.springframework.beans.factory.annotation.Qualifier;
import org.springframework.beans.factory.annotation.Value;
import org.springframework.stereotype.Service;

@Service
public class BookServiceImpl implements BookService {
    //@Autowired:注入參照型別,自動裝配模式,預設按型別裝配
    @Autowired
    //@Qualifier:自動裝配bean時按bean名稱裝配
    @Qualifier("bookDao")
    private BookDao bookDao;

    public void save() {
        System.out.println("book service save ...");
        bookDao.save();
    }
}
注意:自動裝配基於反射設計建立物件並暴力反射對應屬性為私有屬性初始化資料,因此無需提供setter方法
注意:自動轉配建議使用無參構造方法建立物件(預設),如果不提供對應構造方法,請提供唯一的構造方法
注意:@Qualifier是基於@Autowired實現的,必須保證先有Autowired才能存在Qualifier
除了上述的bean型別裝配,我們的簡單型別裝配依舊存在:
- 我們採用@Value的形式來設定簡單型別的值
package com.itheima.dao.impl;

import com.itheima.dao.BookDao;
import org.springframework.beans.factory.annotation.Value;
import org.springframework.stereotype.Repository;

@Repository("bookDao")
public class BookDaoImpl implements BookDao {
    //@Value:注入簡單型別(無需提供set方法)
    @Value("123")
    private String name;

    public void save() {
        System.out.println("book dao save ..." + name);
    }
}
之所以使用@Value的形式設定,是因為我們的型別值不一定是由手動輸入的,有可能來自於Properties資源:
- 首先我們需要在Springconfig中設定相關資源
package com.itheima.config;

import org.springframework.context.annotation.ComponentScan;
import org.springframework.context.annotation.Configuration;
import org.springframework.context.annotation.PropertySource;

@Configuration
@ComponentScan("com.itheima")
//@PropertySource載入properties組態檔
@PropertySource({"jdbc.properties"})
public class SpringConfig {
}
- 然後我們在資料層呼叫時,採用${}來匹配資料
package com.itheima.dao.impl;

import com.itheima.dao.BookDao;
import org.springframework.beans.factory.annotation.Value;
import org.springframework.stereotype.Repository;

@Repository("bookDao")
public class BookDaoImpl implements BookDao {
    //@Value:注入簡單型別(無需提供set方法)
    @Value("${name}")
    private String name;

    public void save() {
        System.out.println("book dao save ..." + name);
    }
}
註解開發第三方bean
我們在實際開發中不僅僅需要對自己的bean進行管理,有時候可能需要引進其他的bean
下面我們以Druid為例進行講解:
- 首先在pom.xml中匯入Druid座標
<?xml version="1.0" encoding="UTF-8"?>

<project xmlns="http://maven.apache.org/POM/4.0.0" xmlns:xsi="http://www.w3.org/2001/XMLSchema-instance"
  xsi:schemaLocation="http://maven.apache.org/POM/4.0.0 http://maven.apache.org/xsd/maven-4.0.0.xsd">
  <modelVersion>4.0.0</modelVersion>

  <groupId>com.itheima</groupId>
  <artifactId>spring_14_annotation_third_bean_manager</artifactId>
  <version>1.0-SNAPSHOT</version>

  <dependencies>
    <dependency>
      <groupId>org.springframework</groupId>
      <artifactId>spring-context</artifactId>
      <version>5.2.10.RELEASE</version>
    </dependency>
    <dependency>
      <groupId>com.alibaba</groupId>
      <artifactId>druid</artifactId>
      <version>1.1.16</version>
    </dependency>
  </dependencies>
</project>
- 使用@Bean設定第三方Bean
// 該bean同樣屬於config檔案,我們同樣放置在config資料夾下
// 在後續我們將會講解如何進行連線

package com.itheima.config;

import com.alibaba.druid.pool.DruidDataSource;
import com.itheima.dao.BookDao;
import org.springframework.beans.factory.annotation.Value;
import org.springframework.context.annotation.Bean;
import org.springframework.context.annotation.Configuration;

import javax.sql.DataSource;

public class JdbcConfig {

    // 1.定義一個方法獲得要管理的物件
    // 2.新增@Bean,表示當前方法的返回值是一個bean
    // @Bean修飾的方法,形參根據型別自動裝配
    @Bean
    public DataSource dataSource(){
        DruidDataSource ds = new DruidDataSource();
        ds.setDriverClassName("com.mysql.jdbc.Driver");
        ds.setUrl("jdbc:mysql://localhost:3306/spring_db");
        ds.setUsername("root");
        ds.setPassword("123456");
        return ds;
    }
}
- 將獨立的設定類加入核心設定(匯入法)
// SpringConfig

package com.itheima.config;

import com.alibaba.druid.pool.DruidDataSource;
import org.springframework.context.annotation.Bean;
import org.springframework.context.annotation.ComponentScan;
import org.springframework.context.annotation.Configuration;
import org.springframework.context.annotation.Import;

import javax.sql.DataSource;

@Configuration
@ComponentScan("com.itheima")
//@Import:匯入設定資訊(如果需要多個,同樣採用{}陣列形式)
@Import({JdbcConfig.class})
public class SpringConfig {
}
// JdbcConfig

package com.itheima.config;

import com.alibaba.druid.pool.DruidDataSource;
import com.itheima.dao.BookDao;
import org.springframework.beans.factory.annotation.Value;
import org.springframework.context.annotation.Bean;
import org.springframework.context.annotation.Configuration;

import javax.sql.DataSource;

//@Configuration
public class JdbcConfig {
    //@Bean修飾的方法,形參根據型別自動裝配
    @Bean
    public DataSource dataSource(){
        DruidDataSource ds = new DruidDataSource();
		// 設定資訊
        return ds;
    }
}
注意:除了上述的匯入法外還存在有其他方法,但匯入法屬於主流,因此我們不介紹其他流派,感興趣的同學可以去查閱一下
註解開發為第三方匯入資源
我們的第三方bean也可能需要匯入部分資源,下面我們進行簡單介紹:
- 簡單型別依賴注入
package com.itheima.config;

import com.alibaba.druid.pool.DruidDataSource;
import com.itheima.dao.BookDao;
import org.springframework.beans.factory.annotation.Value;
import org.springframework.context.annotation.Bean;
import org.springframework.context.annotation.Configuration;

import javax.sql.DataSource;

//@Configuration
public class JdbcConfig {

    //1.定義一個方法獲得要管理的物件
    @Value("com.mysql.jdbc.Driver")
    private String driver;
    @Value("jdbc:mysql://localhost:3306/spring_db")
    private String url;
    @Value("root")
    private String userName;
    @Value("root")
    private String password;

    //2.新增@Bean,表示當前方法的返回值是一個bean
    //@Bean修飾的方法,形參根據型別自動裝配
    @Bean
    public DataSource dataSource(){
        DruidDataSource ds = new DruidDataSource();
        ds.setDriverClassName(driver);
        ds.setUrl(url);
        ds.setUsername(userName);
        ds.setPassword(password);
        return ds;
    }
}
- 依賴型別依賴注入
package com.itheima.config;

import com.alibaba.druid.pool.DruidDataSource;
import com.itheima.dao.BookDao;
import org.springframework.beans.factory.annotation.Value;
import org.springframework.context.annotation.Bean;
import org.springframework.context.annotation.Configuration;

import javax.sql.DataSource;

public class JdbcConfig {

    @Bean
    public DataSource dataSource(BookDao bookDao){
        // 我們只需要呼叫即可,系統會為我們自動裝配
        System.out.println(bookDao);
    }

}
引入型別注入只需要為bean定義方法設定形參即可,容器會根據型別自動裝配物件
註解開發對比
最後我們通過和前述非註解開發的對比來結束這一章節:
| 功能 | XML設定 | 註解 |
|---|---|---|
| 定義bean | bean標籤: - id標籤 - class標籤 |
@Component - @controller - @Service - @Repository @ComponentScan |
| 設定依賴注入 | Setter注入 構造器注入 自動裝配 |
@Autowired @Qualifier @Value |
| 設定第三方bean | bean標籤 靜態工廠 範例工廠 FactoryBean |
@Bean |
| 作用範圍 | scope屬性 | @Scope |
| 生命週期 | 標準介面 init-method destroy-method |
@PostConstructor @preDestroy |
Spring整合MyBatis和Junit
在前面的內容中我們已經學習了Spring的Framework的大部分內容
接下來讓我們來整合我們之前所學習的內容,整體的運用Spring來簡化操作
Spring整合MyBatis
首先我們來詳細講解MyBatis的整合
Spring整合MyBatis思維導論
在整合之前,我們回憶一下MyBatis的單體操作:
- 首先我們需要準備資料庫內容(這裡不做展示)
- 連線資料庫組態檔
<?xml version="1.0" encoding="UTF-8"?>
<!DOCTYPE configuration
        PUBLIC "-//mybatis.org//DTD Config 3.0//EN"
        "http://mybatis.org/dtd/mybatis-3-config.dtd">
<configuration>
    <properties resource="jdbc.properties"></properties>
    <typeAliases>
        <package name="com.itheima.domain"/>
    </typeAliases>
    <environments default="mysql">
        <environment id="mysql">
            <transactionManager type="JDBC"></transactionManager>
            <dataSource type="POOLED">
                <property name="driver" value="${jdbc.driver}"></property>
                <property name="url" value="${jdbc.url}"></property>
                <property name="username" value="${jdbc.username}"></property>
                <property name="password" value="${jdbc.password}"></property>
            </dataSource>
        </environment>
    </environments>
    <mappers>
        <package name="com.itheima.dao"></package>
    </mappers>
</configuration>
- 與資料庫相關的實體類
package com.itheima.domain;

import java.io.Serializable;

public class Account implements Serializable {

    private Integer id;
    private String name;
    private Double money;

    public Integer getId() {
        return id;
    }

    public void setId(Integer id) {
        this.id = id;
    }

    public String getName() {
        return name;
    }

    public void setName(String name) {
        this.name = name;
    }

    public Double getMoney() {
        return money;
    }

    public void setMoney(Double money) {
        this.money = money;
    }

    @Override
    public String toString() {
        return "Account{" +
                "id=" + id +
                ", name='" + name + '\'' +
                ", money=" + money +
                '}';
    }
}
- 資料層(這裡全做註解,採取Mapper全權管理的形式)
package com.itheima.dao;

import com.itheima.domain.Account;
import org.apache.ibatis.annotations.Delete;
import org.apache.ibatis.annotations.Insert;
import org.apache.ibatis.annotations.Select;
import org.apache.ibatis.annotations.Update;

import java.util.List;

public interface AccountDao {

    @Insert("insert into tbl_account(name,money)values(#{name},#{money})")
    void save(Account account);

    @Delete("delete from tbl_account where id = #{id} ")
    void delete(Integer id);

    @Update("update tbl_account set name = #{name} , money = #{money} where id = #{id} ")
    void update(Account account);

    @Select("select * from tbl_account")
    List<Account> findAll();

    @Select("select * from tbl_account where id = #{id} ")
    Account findById(Integer id);
}
- 服務層
package com.itheima.service.impl;

import com.itheima.dao.AccountDao;
import com.itheima.domain.Account;
import com.itheima.service.AccountService;
import org.springframework.beans.factory.annotation.Autowired;
import org.springframework.stereotype.Service;

import java.util.List;
@Service
public class AccountServiceImpl implements AccountService {

    @Autowired
    private AccountDao accountDao;

    public void save(Account account) {
        accountDao.save(account);
    }

    public void update(Account account){
        accountDao.update(account);
    }

    public void delete(Integer id) {
        accountDao.delete(id);
    }

    public Account findById(Integer id) {
        return accountDao.findById(id);
    }

    public List<Account> findAll() {
        return accountDao.findAll();
    }
}
- 主函數
import com.itheima.dao.AccountDao;
import com.itheima.domain.Account;
import org.apache.ibatis.io.Resources;
import org.apache.ibatis.session.SqlSession;
import org.apache.ibatis.session.SqlSessionFactory;
import org.apache.ibatis.session.SqlSessionFactoryBuilder;

import java.io.IOException;
import java.io.InputStream;

public class App {
    public static void main(String[] args) throws IOException {
        // 1. 建立SqlSessionFactoryBuilder物件
        SqlSessionFactoryBuilder sqlSessionFactoryBuilder = new SqlSessionFactoryBuilder();
        // 2. 載入SqlMapConfig.xml組態檔
        InputStream inputStream = Resources.getResourceAsStream("SqlMapConfig.xml.bak");
        // 3. 建立SqlSessionFactory物件
        SqlSessionFactory sqlSessionFactory = sqlSessionFactoryBuilder.build(inputStream);
        // 4. 獲取SqlSession
        SqlSession sqlSession = sqlSessionFactory.openSession();
        // 5. 執行SqlSession物件執行查詢,獲取結果User
        AccountDao accountDao = sqlSession.getMapper(AccountDao.class);

        Account ac = accountDao.findById(2);
        System.out.println(ac);

        // 6. 釋放資源
        sqlSession.close();
    }
}
在上述內容中,我們重點分析組態檔和主函數的內容,因為我們的Spring的主要目的是為了管理Bean
所以我們需要在MyBatis中找到符合要求的Bean:
<?xml version="1.0" encoding="UTF-8"?>
<!DOCTYPE configuration
        PUBLIC "-//mybatis.org//DTD Config 3.0//EN"
        "http://mybatis.org/dtd/mybatis-3-config.dtd">
<configuration>
    <!--properties屬於設定核心內容,屬於Bean(負責連線資料庫)-->
    <properties resource="jdbc.properties"></properties>
    <typeAliases>
        <package name="com.itheima.domain"/>
    </typeAliases>
    <environments default="mysql">
        <environment id="mysql">
            <transactionManager type="JDBC"></transactionManager>
            <dataSource type="POOLED">
                <property name="driver" value="${jdbc.driver}"></property>
                <property name="url" value="${jdbc.url}"></property>
                <property name="username" value="${jdbc.username}"></property>
                <property name="password" value="${jdbc.password}"></property>
            </dataSource>
        </environment>
    </environments>
    <!--對映設定包位置,屬於Bean(負責業務層)-->
    <mappers>
        <package name="com.itheima.dao"></package>
    </mappers>
</configuration>
import com.itheima.dao.AccountDao;
import com.itheima.domain.Account;
import org.apache.ibatis.io.Resources;
import org.apache.ibatis.session.SqlSession;
import org.apache.ibatis.session.SqlSessionFactory;
import org.apache.ibatis.session.SqlSessionFactoryBuilder;

import java.io.IOException;
import java.io.InputStream;

public class App {
    public static void main(String[] args) throws IOException {
        // SqlSessionFactory屬於主體Bean
        SqlSessionFactoryBuilder sqlSessionFactoryBuilder = new SqlSessionFactoryBuilder();
        InputStream inputStream = Resources.getResourceAsStream("SqlMapConfig.xml.bak");
        SqlSessionFactory sqlSessionFactory = sqlSessionFactoryBuilder.build(inputStream);

        // SqlSession由SqlSessionFactory建立
        SqlSession sqlSession = sqlSessionFactory.openSession();

        AccountDao accountDao = sqlSession.getMapper(AccountDao.class);

        Account ac = accountDao.findById(2);
        System.out.println(ac);

        sqlSession.close();
    }
}
所以我們的整體操作其實就是為了整合MyBatis的Bean
Spring整合MyBatis具體操作
接下來我們給出具體操作:
- 匯入相關包
<!--pom.xml-->

<?xml version="1.0" encoding="UTF-8"?>

<project xmlns="http://maven.apache.org/POM/4.0.0" xmlns:xsi="http://www.w3.org/2001/XMLSchema-instance"
  xsi:schemaLocation="http://maven.apache.org/POM/4.0.0 http://maven.apache.org/xsd/maven-4.0.0.xsd">
  <modelVersion>4.0.0</modelVersion>

  <groupId>com.itheima</groupId>
  <artifactId>spring_15_spring_mybatis</artifactId>
  <version>1.0-SNAPSHOT</version>

  <dependencies>
      <!--spring-->
    <dependency>
      <groupId>org.springframework</groupId>
      <artifactId>spring-context</artifactId>
      <version>5.2.10.RELEASE</version>
    </dependency>
      <!--druid-->
    <dependency>
      <groupId>com.alibaba</groupId>
      <artifactId>druid</artifactId>
      <version>1.1.16</version>
    </dependency>
	  <!--mybatis-->
    <dependency>
      <groupId>org.mybatis</groupId>
      <artifactId>mybatis</artifactId>
      <version>3.5.6</version>
    </dependency>
	  <!--mysql-->
    <dependency>
      <groupId>mysql</groupId>
      <artifactId>mysql-connector-java</artifactId>
      <version>5.1.47</version>
    </dependency>
	  <!--spring-jdbc:Spring與資料庫連線所需庫-->
    <dependency>
      <groupId>org.springframework</groupId>
      <artifactId>spring-jdbc</artifactId>
      <version>5.2.10.RELEASE</version>
    </dependency>
	  <!--mybatis-spring:MyBatis與Spring連線所需庫-->
      <!--需要注意:mybatis-spring的版本與mybatis版本有一定對應關係,不要濫用版本-->
    <dependency>
      <groupId>org.mybatis</groupId>
      <artifactId>mybatis-spring</artifactId>
      <version>1.3.0</version>
    </dependency>

  </dependencies>
</project>
- 建立設定環境Config
// SpringConfig(前面已講解)

package com.itheima.config;

import org.springframework.context.annotation.ComponentScan;
import org.springframework.context.annotation.Configuration;
import org.springframework.context.annotation.Import;
import org.springframework.context.annotation.PropertySource;

@Configuration
@ComponentScan("com.itheima")
//@PropertySource:載入類路徑jdbc.properties檔案
@PropertySource("classpath:jdbc.properties")
@Import({JdbcConfig.class,MybatisConfig.class})
public class SpringConfig {
}
// JdbcConfig(前面已講解)

package com.itheima.config;

import com.alibaba.druid.pool.DruidDataSource;
import org.springframework.beans.factory.annotation.Value;
import org.springframework.context.annotation.Bean;
import org.springframework.context.annotation.Configuration;

import javax.sql.DataSource;


public class JdbcConfig {
    @Value("${jdbc.driver}")
    private String driver;
    @Value("${jdbc.url}")
    private String url;
    @Value("${jdbc.username}")
    private String userName;
    @Value("${jdbc.password}")
    private String password;

    @Bean
    public DataSource dataSource(){
        DruidDataSource ds = new DruidDataSource();
        ds.setDriverClassName(driver);
        ds.setUrl(url);
        ds.setUsername(userName);
        ds.setPassword(password);
        return ds;
    }
}
// MyBatisConfig(MyBatis重點內容)

package com.itheima.config;

import org.mybatis.spring.SqlSessionFactoryBean;
import org.mybatis.spring.mapper.MapperScannerConfigurer;
import org.springframework.context.annotation.Bean;

import javax.sql.DataSource;

public class MybatisConfig {
    //定義bean,SqlSessionFactoryBean,用於產生SqlSessionFactory物件
    @Bean
    public SqlSessionFactoryBean sqlSessionFactory(DataSource dataSource){
        SqlSessionFactoryBean ssfb = new SqlSessionFactoryBean();
        ssfb.setTypeAliasesPackage("com.itheima.domain");
        ssfb.setDataSource(dataSource);
        return ssfb;
    }

    /*
    SqlSessionFactoryBean屬於mybatis-spring提供的新的物件,用於快速產生SqlSessionFactory物件

    ssfb.setTypeAliasesPackage("com.itheima.domain");
    對應於
    <typeAliases>
        <package name="com.itheima.domain"/>
    </typeAliases>

    ssfb.setDataSource(dataSource);
    對應於
    DataSource的設定資訊

    上述語句基本均為固定語句
    只有Package的別名包需要修改內容

    */

    //定義bean,返回MapperScannerConfigurer物件
    @Bean
    public MapperScannerConfigurer mapperScannerConfigurer(){
        MapperScannerConfigurer msc = new MapperScannerConfigurer();
        msc.setBasePackage("com.itheima.dao");
        return msc;
    }

    /*
	MapperScannerConfigurer屬於mybatis-spring提供的新的物件,返回MapperScannerConfigurer物件
	我們同樣只需要設定對映包setBasePackage

	上述語句基本均為固定語句
    只有Package的對映名包需要修改內容

    */
}
- 主函數(其他內容基本不做修改)
import com.itheima.config.SpringConfig;
import com.itheima.domain.Account;
import com.itheima.service.AccountService;
import org.springframework.context.ApplicationContext;
import org.springframework.context.annotation.AnnotationConfigApplicationContext;

public class App {
    public static void main(String[] args) {
        ApplicationContext ctx = new AnnotationConfigApplicationContext(SpringConfig.class);

        AccountService accountService = ctx.getBean(AccountService.class);

        Account ac = accountService.findById(1);
        System.out.println(ac);
    }
}
Spring整合Junit
我們對於Junit的整合建立於Spring與MyBatis已經整合的基礎上,所以上述內容請務必明白!
Spring整合Junit具有一定固定格式,我們直接寫出步驟:
- 匯入包
<?xml version="1.0" encoding="UTF-8"?>

<project xmlns="http://maven.apache.org/POM/4.0.0" xmlns:xsi="http://www.w3.org/2001/XMLSchema-instance"
  xsi:schemaLocation="http://maven.apache.org/POM/4.0.0 http://maven.apache.org/xsd/maven-4.0.0.xsd">
  <modelVersion>4.0.0</modelVersion>

  <groupId>com.itheima</groupId>
  <artifactId>spring_16_spring_junit</artifactId>
  <version>1.0-SNAPSHOT</version>

  <dependencies>
    <dependency>
      <groupId>org.springframework</groupId>
      <artifactId>spring-context</artifactId>
      <version>5.2.10.RELEASE</version>
    </dependency>
    <dependency>
      <groupId>com.alibaba</groupId>
      <artifactId>druid</artifactId>
      <version>1.1.16</version>
    </dependency>

    <dependency>
      <groupId>org.mybatis</groupId>
      <artifactId>mybatis</artifactId>
      <version>3.5.6</version>
    </dependency>

    <dependency>
      <groupId>mysql</groupId>
      <artifactId>mysql-connector-java</artifactId>
      <version>5.1.47</version>
    </dependency>

    <dependency>
      <groupId>org.springframework</groupId>
      <artifactId>spring-jdbc</artifactId>
      <version>5.2.10.RELEASE</version>
    </dependency>

    <dependency>
      <groupId>org.mybatis</groupId>
      <artifactId>mybatis-spring</artifactId>
      <version>1.3.0</version>
    </dependency>

      <!--junit包-->
    <dependency>
      <groupId>junit</groupId>
      <artifactId>junit</artifactId>
      <version>4.12</version>
      <scope>test</scope>
    </dependency>

	   <!--Spring與junit聯絡包-->
    <dependency>
      <groupId>org.springframework</groupId>
      <artifactId>spring-test</artifactId>
      <version>5.2.10.RELEASE</version>
    </dependency>

  </dependencies>
</project>
- 書寫Junit的Test程式碼內容
// 下述內容均在test資料夾下進行

package com.itheima.service;

import com.itheima.config.SpringConfig;
import org.junit.Test;
import org.junit.runner.RunWith;
import org.springframework.beans.factory.annotation.Autowired;
import org.springframework.test.context.ContextConfiguration;
import org.springframework.test.context.junit4.SpringJUnit4ClassRunner;

//設定類執行器(固定形式)
@RunWith(SpringJUnit4ClassRunner.class)
//設定Spring環境對應的設定類(匹配你所使用的Spring,注意需要寫classes的形式)
@ContextConfiguration(classes = SpringConfig.class)
public class AccountServiceTest {
    //支援自動裝配注入bean
    @Autowired
    private AccountService accountService;

    @Test
    public void testFindById(){
        System.out.println(accountService.findById(1));

    }

    @Test
    public void testFindAll(){
        System.out.println(accountService.findAll());
    }

}
SpringAOP
我們在開篇有提及到AOP,現在讓我們來詳細介紹一下AOP~
SpringAOP簡介
首先我們來介紹一下AOP:
- AOP(Aspect Oriented Programming)面向切面程式設計,一種程式設計正規化,指導開發者如何組織程式結構
- OOP(Object Oriented Programming)物件導向程式設計,也是一種程式設計正規化,我們列舉出來是為了表示和AOP概念相似
AOP作用:
- 在不驚動原始設計的基礎上為其進行功能增強
Spring理念:
- 無入侵式/無侵入式
AOP核心概念:
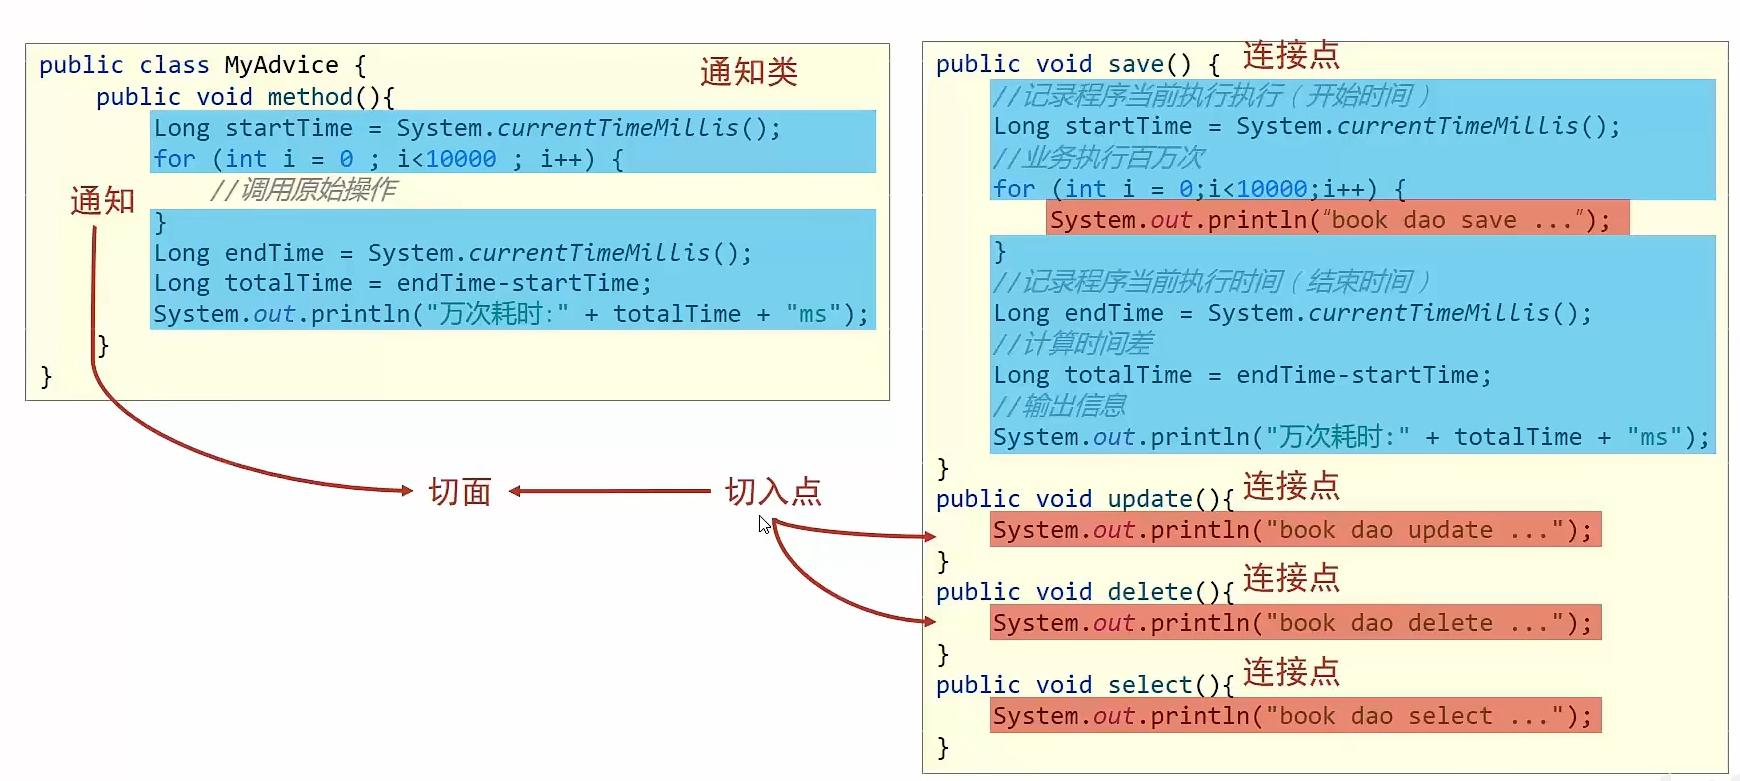
- 連線點:程式執行過程中的任意位置,粒度為執行方法,丟擲異常,設定變數等
- 切入點:匹配連線點的式子
- 通知:在切入點處執行的操作,也就是共性功能
- 通知類:存放通知的類
- 切面:描述通知與切入點的關係
通俗解釋:
實現類中的各個方法被稱為連線點
如果我們希望在這些連線點中設定相同的部分,可以採用通知進行設定
我們利用通知和連線點進行連線,連線點就可以執行通知中的方法並且同時執行連線點的方法
被連線的連線點被稱為切入點,存放通知的類被稱為通知類
SpringAOP入門
我們同樣採用一個案例進行SpringAOP入門介紹
案例設定:測試介面執行效率
簡化設定:在介面執行前輸出當前系統時間
開發模式:XML or 註解(我們現在大部分使用註解)
具體操作:
- 匯入座標(pom.xml)
<?xml version="1.0" encoding="UTF-8"?>

<project xmlns="http://maven.apache.org/POM/4.0.0" xmlns:xsi="http://www.w3.org/2001/XMLSchema-instance"
  xsi:schemaLocation="http://maven.apache.org/POM/4.0.0 http://maven.apache.org/xsd/maven-4.0.0.xsd">
  <modelVersion>4.0.0</modelVersion>

  <groupId>com.itheima</groupId>
  <artifactId>spring_18_aop_quickstart</artifactId>
  <version>1.0-SNAPSHOT</version>

  <dependencies>
    <dependency>
      <groupId>org.springframework</groupId>
      <artifactId>spring-context</artifactId>
      <version>5.2.10.RELEASE</version>
    </dependency>
      <!--aspectjweaver座標,對應aspects(AOP的具體實現)-->
    <dependency>
      <groupId>org.aspectj</groupId>
      <artifactId>aspectjweaver</artifactId>
      <version>1.9.4</version>
    </dependency>
  </dependencies>
</project>
- 製作連線點方法(原始方法,不發生改變)
// 介面BookDao

com.itheima.dao;

public interface BookDao {
    public void save();
    public void update();
}
// 實現類BookDaoImpl

package com.itheima.dao.impl;

import com.itheima.dao.BookDao;
import org.springframework.beans.factory.annotation.Value;
import org.springframework.stereotype.Repository;

@Repository
public class BookDaoImpl implements BookDao {

    public void save() {
        System.out.println(System.currentTimeMillis());
        System.out.println("book dao save ...");
    }

    public void update(){
        System.out.println("book dao update ...");
    }
}
- 製作共性功能(通知類與通知)
// 我們推薦單獨列出一個AOP資料夾,寫下所有通知相關程式碼

// MyAdvice通知類
package com.itheima.aop;

import org.aspectj.lang.annotation.Aspect;
import org.aspectj.lang.annotation.Before;
import org.aspectj.lang.annotation.Pointcut;
import org.springframework.stereotype.Component;

/*
具體流程:
1.建立該類
2.將該類設定為Spring中的Bean集中管理:@Component
3.設定為切面類註明該類作用:@Aspect
4.首先寫出具體共性方法method,正常書寫即可
5.寫出切入點pt:切入點定義依託一個不具有實際意義的方法進行,即無引數,無返回值,無方法體,最好私有
6.對切入點進行設定:@Pointcut;我們後續講解
7.對切入點和通知進行連線:@Before;我們後續進行講解

這裡簡單介紹一下@Pointcut("execution(void com.itheima.dao.BookDao.update())")
@Pointcut:註釋
execution:表示執行
void:返回型別
com.itheima.dao.BookDao.update():地址+類/介面+方法+方法引數
*/

//通知類必須設定成Spring管理的bean
@Component
//設定當前類為切面類類
@Aspect
public class MyAdvice {
    //設定切入點,要求設定在方法上方
    @Pointcut("execution(void com.itheima.dao.BookDao.update())")
    private void pt(){}

    //設定在切入點pt()的前面執行當前操作(前置通知)
    @Before("pt()")
    public void method(){
        System.out.println(System.currentTimeMillis());
    }
}

/*
在執行後,我們會發現,每次呼叫方法後,在執行前給出當前系統時間
*/
- 為SpringConfig設定相關需求
// SpringConfig

package com.itheima.config;

import org.springframework.context.annotation.ComponentScan;
import org.springframework.context.annotation.Configuration;
import org.springframework.context.annotation.EnableAspectJAutoProxy;

@Configuration
@ComponentScan("com.itheima")
//開啟註解開發AOP功能(我們的通知類採用註解開發)
@EnableAspectJAutoProxy
public class SpringConfig {
}
SpringAOP工作流程
我們先簡單介紹AOP的大概工作流程便於講解底層知識:
- Spring容器啟動
- 讀取所有切面設定中的切入點
- 初始化bean,判定對應的類中的方法是否能匹配到任意切入點
- 獲得bean執行方法
首先我們要注意切入點的讀取問題:
- 我們在讀取切入點時唯讀取匹配成功的切入點,其他未使用的切入點不進行讀取,節省記憶體
然後我們會根據bean是否能匹配切入點來分別處理:
- 當我們匹配失敗時,建立物件,獲得bean,呼叫方法並執行,完成操作
- 當我們匹配成功時,建立原始物件(目標物件)的代理物件,獲得代理物件的bean,根據代理物件的執行模式執行原始方法與增強內容,完成操作
這裡我們進行幾個名詞解釋:
目標物件:我們的初始物件,被一個或者多個切面所通知的物件
代理物件:我們根據目標物件所衍生出來的物件,不再是原物件;我們希望通過對代理物件的修改來完成AOP操作
SpringAOP切入點表示式
我們已經簡單瞭解了SpringAOP的具體使用,接下來讓我們來仔細分析AOP的各部分
首先我們先來介紹AOP的切入點和切入點表示式定義:
- 切入點:要進行加強的方法
- 切入點表示式:要進行增強的方法的描述方式
AOP切入點表示式大致分為兩種:
- 介面下的方法:execution(void com.itheima.dao.BookDao.update())
- 實現類的方法:execution(void com.itheima.dao.impl.BookDaoImpl.update())
切入點表示式的具體格式:
- 動作關鍵字(存取修飾符 返回值 包名.類/介面.方法名(引數)異常名)
- execution(public User com.itheima.service.UserService.findById(int))
具體名詞解釋:
- 動作關鍵字:描述切入點的行為動作,例如execution表示執行到指定切入點
- 存取修飾符:public,private,可省略(省略為public)
- 異常名:方法定義中丟擲指定異常,可省略
AOP切入點表示式萬用字元:
- *:單個的獨立的任意符號,可以獨立出現,也可以作為字首或者字尾的匹配符出現
- ..:多個連續的任意符號,可以獨立出現,常用於簡化包名與引數的書寫
- +:專用於匹配子類型別
我們給出相關例子:
package com.itheima.aop;

import org.aspectj.lang.annotation.Aspect;
import org.aspectj.lang.annotation.Before;
import org.aspectj.lang.annotation.Pointcut;
import org.springframework.stereotype.Component;

@Component
@Aspect
public class MyAdvice {
    //切入點表示式:

    //	表示介面下的方法
	//    @Pointcut("execution(void com.itheima.dao.BookDao.update())")

    //	表示實現類的方法
	//    @Pointcut("execution(void com.itheima.dao.impl.BookDaoImpl.update())")

    //	表示任意返回型別的單個引數的BookDaoImpl實現類的update方法
	//    @Pointcut("execution(* com.itheima.dao.impl.BookDaoImpl.update(*))")

    //	表示com開頭兩層檔案(第三層為類或介面)的update方法
	//    @Pointcut("execution(void com.*.*.*.update())")

    //	表示所有以e結尾方法
	//    @Pointcut("execution(* *..*e(..))")

    //	表示以com開頭所有無參方法
	//    @Pointcut("execution(void com..*())")

    //	表示com.itheima下的任意資料夾下的以Service結尾的實現類的以find開頭的方法
	//    @Pointcut("execution(* com.itheima.*.*Service.find*(..))")

    //執行com.itheima包下的任意包下的名稱以Service結尾的類或介面中的save方法,引數任意,返回值任意
    @Pointcut("execution(* com.itheima.*.*Service.save(..))")
    private void pt(){}

    @Before("pt()")
    public void method(){
        System.out.println(System.currentTimeMillis());
    }
}
AOP切入點書寫技巧:
- 所有程式碼按照規範開發,否則下述技巧失效
- 描述切入點通常描述介面,而不是描述實現類
- 存取控制修飾符針對介面開發均採用public描述(可省略存取控制修飾符描述)
- 返回值型別對於增刪改類使用精準型別加速匹配,對於查詢類使用*通配快速描述
- 包名書寫儘量不使用..匹配,效率過低,常用*做單個包描述匹配,或精準匹配
- 介面名/類名書寫名稱與模組相關的採用*匹配,例如UserService採用*Service,繫結業務層介面名
- 方法名書寫以動詞進行精準匹配,名詞采用*匹配,例如getById採用getBy*
- 引數規則較為複雜,根據業務方法靈活調整
- 通常不使用異常作為匹配規則
SpringAOP通知型別
AOP通知描述了抽取的共性功能,根據共性功能抽取位置的不同,最終執行程式碼時要加入到合理的位置
AOP通知一共分為五種:
- 前置通知
package com.itheima.aop;

import org.aspectj.lang.ProceedingJoinPoint;
import org.aspectj.lang.annotation.*;
import org.springframework.stereotype.Component;

@Component
@Aspect
public class MyAdvice {
    @Pointcut("execution(void com.itheima.dao.BookDao.update())")
    private void pt(){}
    @Pointcut("execution(int com.itheima.dao.BookDao.select())")
    private void pt2(){}

    //@Before:前置通知,在原始方法執行之前執行
    @Before("pt()")
    public void before() {
        System.out.println("before advice ...");
    }
}
- 後置通知
package com.itheima.aop;

import org.aspectj.lang.ProceedingJoinPoint;
import org.aspectj.lang.annotation.*;
import org.springframework.stereotype.Component;

@Component
@Aspect
public class MyAdvice {
    @Pointcut("execution(void com.itheima.dao.BookDao.update())")
    private void pt(){}
    @Pointcut("execution(int com.itheima.dao.BookDao.select())")
    private void pt2(){}

    //@After:後置通知,在原始方法執行之後執行
    @After("pt2()")
    public void after() {
        System.out.println("after advice ...");
    }
}
- 環繞通知(重點)
package com.itheima.aop;

import org.aspectj.lang.ProceedingJoinPoint;
import org.aspectj.lang.annotation.*;
import org.springframework.stereotype.Component;

@Component
@Aspect
public class MyAdvice {
    @Pointcut("execution(void com.itheima.dao.BookDao.update())")
    private void pt(){}
    @Pointcut("execution(int com.itheima.dao.BookDao.select())")
    private void pt2(){}

    //@Around:環繞通知,在原始方法執行的前後執行
    @Around("pt()")
    public Object around(ProceedingJoinPoint pjp) throws Throwable {
        System.out.println("around before advice ...");
        //表示對原始操作的呼叫
        Object ret = pjp.proceed();
        System.out.println("around after advice ...");
        return ret;
    }

}

/*

@Around注意事項:
1.環繞通知必須依賴形參ProceedingJoinPoint才能實現對原始方法的呼叫,進而實現原始方法呼叫前後同時新增通知
2.通知中如果未使用ProceedingJoinPoint對原始方法進行呼叫將跳過原始方法的執行
3.對原始方法的呼叫可以不接收返回值,通知方法設定為void即可,如果接收返回值,必須設定為Object型別
4.原始方法的返回型別如果是void型別,通知方法的返回型別可以設定成void,也可以設定為Object
5.由於無法預知原始方法執行後是否出現問題,因此需要丟擲異常,丟擲Throwable物件

*/
- 返回後通知(瞭解)
package com.itheima.aop;

import org.aspectj.lang.ProceedingJoinPoint;
import org.aspectj.lang.annotation.*;
import org.springframework.stereotype.Component;

@Component
@Aspect
public class MyAdvice {
    @Pointcut("execution(void com.itheima.dao.BookDao.update())")
    private void pt(){}
    @Pointcut("execution(int com.itheima.dao.BookDao.select())")
    private void pt2(){}

    //@AfterReturning:返回後通知,在原始方法執行完畢後執行,且原始方法執行過程中未出現異常現象
    @AfterReturning("pt2()")
    public void afterReturning() {
        System.out.println("afterReturning advice ...");
    }

}
- 丟擲異常後通知(瞭解)
package com.itheima.aop;

import org.aspectj.lang.ProceedingJoinPoint;
import org.aspectj.lang.annotation.*;
import org.springframework.stereotype.Component;

@Component
@Aspect
public class MyAdvice {
    @Pointcut("execution(void com.itheima.dao.BookDao.update())")
    private void pt(){}
    @Pointcut("execution(int com.itheima.dao.BookDao.select())")
    private void pt2(){}

    //@AfterThrowing:丟擲異常後通知,在原始方法執行過程中出現異常後執行
    @AfterThrowing("pt2()")
    public void afterThrowing() {
        System.out.println("afterThrowing advice ...");
    }
}
下面我們針對環繞通知給出一個案例講解:
需求:任意業務層介面執行均顯示其執行效率(執行時長)
// 我們這裡只給出SpringAOP的程式碼解釋

package com.itheima.aop;

import org.aspectj.lang.ProceedingJoinPoint;
import org.aspectj.lang.Signature;
import org.aspectj.lang.annotation.Around;
import org.aspectj.lang.annotation.Aspect;
import org.aspectj.lang.annotation.Pointcut;
import org.springframework.stereotype.Component;

@Component
@Aspect
public class ProjectAdvice {
    //匹配業務層的所有方法
    @Pointcut("execution(* com.itheima.service.*Service.*(..))")
    private void servicePt(){}

    //設定環繞通知,在原始操作的執行前後記錄執行時間
    @Around("servicePt()")
    public void runSpeed(ProceedingJoinPoint pjp) throws Throwable {
        //獲取執行的簽名物件
        Signature signature = pjp.getSignature();
        String className = signature.getDeclaringTypeName();
        String methodName = signature.getName();

        long start = System.currentTimeMillis();
        for (int i = 0; i < 10000; i++) {
           pjp.proceed();
        }
        long end = System.currentTimeMillis();
        System.out.println("萬次執行:"+ className+"."+methodName+"---->" +(end-start) + "ms");
    }

}
SpringAOP通知獲得資料
我們可以注意到在上述通知中我們是存在有引數的,接下來我們針對這些引數做出相關解釋~
通知可選引數:
- 環繞通知:ProceedingJoinPoint物件
- 其他通知:JoinPoint物件
注意:JoinPoint是ProceedingJoinPoint的父類別
接下來我們分別從引數資料,返回值資料,異常資料三個方面進行講解:
- 引數資料:JoinPoint物件描述了連線點方法的執行狀態,可以獲得到原始方法的呼叫引數
package com.itheima.aop;

import org.aspectj.lang.JoinPoint;
import org.aspectj.lang.ProceedingJoinPoint;
import org.aspectj.lang.annotation.*;
import org.springframework.stereotype.Component;

import java.util.Arrays;

@Component
@Aspect
public class MyAdvice {
    @Pointcut("execution(* com.itheima.dao.BookDao.findName(..))")
    private void pt(){}

    //JoinPoint:用於描述切入點的物件,必須設定成通知方法中的第一個引數,可用於獲取原始方法呼叫的引數
    @Before("pt()")
    public void before(JoinPoint jp) {
        Object[] args = jp.getArgs();
        System.out.println(Arrays.toString(args));
        System.out.println("before advice ..." );
    }

    @After("pt()")
    public void after(JoinPoint jp) {
        Object[] args = jp.getArgs();
        System.out.println(Arrays.toString(args));
        System.out.println("after advice ...");
    }

    //ProceedingJoinPoint:專用於環繞通知,是JoinPoint子類,可以實現對原始方法的呼叫
    @Around("pt()")
    public Object around(ProceedingJoinPoint pjp) {
        Object[] args = pjp.getArgs();
        System.out.println(Arrays.toString(args));
    }

}
- 返回值資料
package com.itheima.aop;

import org.aspectj.lang.JoinPoint;
import org.aspectj.lang.ProceedingJoinPoint;
import org.aspectj.lang.annotation.*;
import org.springframework.stereotype.Component;

import java.util.Arrays;

@Component
@Aspect
public class MyAdvice {
    @Pointcut("execution(* com.itheima.dao.BookDao.findName(..))")
    private void pt(){}

    @Around("pt()")
    public Object around(ProceedingJoinPoint pjp) {
        Object ret = pjp.proceed(args);
        return ret;
    }

    //設定返回後通知獲取原始方法的返回值,要求returning屬性值必須與方法形參名相同
    @AfterReturning(value = "pt()",returning = "ret")
    public void afterReturning(JoinPoint jp,String ret) {
        System.out.println("afterReturning advice ..." + ret);
    }
}
- 返回異常資料
package com.itheima.aop;

import org.aspectj.lang.JoinPoint;
import org.aspectj.lang.ProceedingJoinPoint;
import org.aspectj.lang.annotation.*;
import org.springframework.stereotype.Component;

import java.util.Arrays;

@Component
@Aspect
public class MyAdvice {
    @Pointcut("execution(* com.itheima.dao.BookDao.findName(..))")
    private void pt(){}

    @Around("pt()")
    public Object around(ProceedingJoinPoint pjp) {
        Object[] args = pjp.getArgs();
        System.out.println(Arrays.toString(args));
        args[0] = 666;
        Object ret = null;
        try {
            ret = pjp.proceed(args);
        } catch (Throwable t) {
            t.printStackTrace();
        }
        return ret;
    }

    //設定丟擲異常後通知獲取原始方法執行時丟擲的異常物件,要求throwing屬性值必須與方法形參名相同
    @AfterThrowing(value = "pt()",throwing = "t")
    public void afterThrowing(Throwable t) {
        System.out.println("afterThrowing advice ..."+t);
    }
}
下面我們針對資料處理給出一個案例講解:
需求:對密碼的尾部空格作出相容性處理
package com.itheima.aop;

import org.aspectj.lang.ProceedingJoinPoint;
import org.aspectj.lang.annotation.Around;
import org.aspectj.lang.annotation.Aspect;
import org.aspectj.lang.annotation.Pointcut;
import org.springframework.stereotype.Component;

@Component
@Aspect
public class DataAdvice {
    @Pointcut("execution(boolean com.itheima.service.*Service.*(*,*))")
    private void servicePt(){}

    @Around("DataAdvice.servicePt()")
    public Object trimStr(ProceedingJoinPoint pjp) throws Throwable {
        Object[] args = pjp.getArgs();
        for (int i = 0; i < args.length; i++) {
            //判斷引數是不是字串
            if(args[i].getClass().equals(String.class)){
                args[i] = args[i].toString().trim();
            }
        }
        Object ret = pjp.proceed(args);
        return ret;
    }

}
Spring事務
我們在之前的文章中已經多次提及過事務,這裡再重新宣告一下事務:
- 事務作用:在資料層保障一系列的資料庫操作同成功與失敗
- Spring事務作用:在資料層或業務層保障一系列的資料庫操作成功與失敗
Spring事務入門
我們通過一個案例來進行事務的講解:
需求:實現任意兩個賬戶間轉賬操作
需求微縮:A賬戶減錢,B賬戶加錢
分析:
- 資料層提供基礎操作,指定使用者減錢,指定使用者加錢
- 業務層提供轉賬操作,呼叫減錢和加錢操作
- 提供兩個賬號和操作金額執行轉賬操作
- 基於Spring整合MyBatis環境搭配上述操作
結果分析:
- 程式正常執行,賬戶A減錢賬戶B加錢
- 程式失敗執行,轉賬失敗,但異常前操作成功,異常後操作失敗,整體業務失敗
具體修改實施步驟:
- 業務層介面上新增Spring事務管理
package com.itheima.service;

import org.springframework.transaction.annotation.Transactional;

import java.io.FileNotFoundException;
import java.io.IOException;

public interface AccountService {
    /**
     * 轉賬操作
     * @param out 傳出方
     * @param in 轉入方
     * @param money 金額
     */

    //設定當前介面方法具有事務
    @Transactional
    public void transfer(String out,String in ,Double money) ;
}

/*
Spring註解式事務通常新增在業務層介面而不會新增到業務層實現類,降低耦合
註解式事務可以新增到業務方法上表示當前方法開始事務,也可以新增到介面上表示當前介面所有方法開啟事務
*/
- 設定事務管理器
package com.itheima.config;

import com.alibaba.druid.pool.DruidDataSource;
import org.springframework.beans.factory.annotation.Value;
import org.springframework.context.annotation.Bean;
import org.springframework.context.annotation.Configuration;
import org.springframework.jdbc.datasource.DataSourceTransactionManager;
import org.springframework.transaction.PlatformTransactionManager;

import javax.sql.DataSource;


public class JdbcConfig {
    @Value("${jdbc.driver}")
    private String driver;
    @Value("${jdbc.url}")
    private String url;
    @Value("${jdbc.username}")
    private String userName;
    @Value("${jdbc.password}")
    private String password;

    @Bean
    public DataSource dataSource(){
        DruidDataSource ds = new DruidDataSource();
        ds.setDriverClassName(driver);
        ds.setUrl(url);
        ds.setUsername(userName);
        ds.setPassword(password);
        return ds;
    }

    //設定事務管理器,mybatis使用的是jdbc事務
    @Bean
    public PlatformTransactionManager transactionManager(DataSource dataSource){
        DataSourceTransactionManager transactionManager = new DataSourceTransactionManager();
        transactionManager.setDataSource(dataSource);
        return transactionManager;
    }
}

/*
同MyBatis的設定java檔案一樣上述語句基本屬於固定語句

事務管理器根據實現技術進行選擇
MyBatis框架使用的是Jdbc事務
*/
- 開啟註解式事務驅動
package com.itheima.config;

import org.springframework.context.annotation.ComponentScan;
import org.springframework.context.annotation.Configuration;
import org.springframework.context.annotation.Import;
import org.springframework.context.annotation.PropertySource;
import org.springframework.transaction.annotation.EnableTransactionManagement;

@Configuration
@ComponentScan("com.itheima")
@PropertySource("classpath:jdbc.properties")
@Import({JdbcConfig.class,MybatisConfig.class})
//開啟註解式事務驅動
@EnableTransactionManagement
public class SpringConfig {
}
這裡我們介紹兩個新概念:
- 事務管理員:發起事務方,在Spring中通常指業務層開啟事務的方法(上述表示transfer方法)
- 事務協調員:加入事務方,在Spring中通常代表資料層方法,也可以是業務層方法(上述表示out和in方法)
Spring事務屬性
Spring的事務通常用@Transactional註解來表示
我們同樣可以為@Transactional註解攜帶一些資訊來管理事務的屬性
| 屬性 | 作用 | 範例 |
|---|---|---|
| readOnly | 設定是否為唯讀事務 | readOnly=true 唯讀事務 |
| timeout | 設定事務超時時間 | timeout=-1永不超時 |
| rollbackFor | 設定事務回滾異常(class) | rollbackFor={NullPointException.class} |
| rollbackForClassName | 設定事務回滾異常(String) | 同上格式為字串 |
| noRollbackFor | 設定事務不回滾異常(class) | noRollbackFor={NullPointException.class} |
| noRollbackForClassName | 設定事務不回滾異常(String) | 同上格式為字串 |
| propagation | 設定事務傳播行為 | ........ |
除了上述屬性外,我們還需要仔細介紹propagation屬性:
- 事務傳播行為:事務協調員對事務管理員所攜帶事務的處理態度
在實際開發中我們會利用propagation屬性完成一些特殊操作
我們採用一個案例來進行說明:
需求:在上述轉賬的基礎上,無論失敗成功均儲存一條紀錄檔記錄轉賬資訊
需求微縮:A賬戶減錢,B賬戶加錢,資料庫記錄紀錄檔
分析:
- 基於轉賬操作案例新增紀錄檔模組,實現資料庫中記錄紀錄檔
- 業務層轉賬操作,呼叫減錢,加錢與記錄紀錄檔功能
實現效果預期:
- 無論轉賬操作是否成功,均進行紀錄檔記錄
存在問題:
- 紀錄檔記錄與轉賬操作隸屬於一個事務,兩者只能同時成功同時失敗
新增程式碼:
- 給出紀錄檔相關資訊
// 紀錄檔資料層

package com.itheima.dao;

import org.apache.ibatis.annotations.Insert;

public interface LogDao {
    @Insert("insert into tbl_log (info,createDate) values(#{info},now())")
    void log(String info);
}
// 紀錄檔業務層

package com.itheima.service.impl;

import com.itheima.dao.LogDao;
import com.itheima.service.LogService;
import org.springframework.beans.factory.annotation.Autowired;
import org.springframework.stereotype.Service;
import org.springframework.transaction.annotation.Propagation;
import org.springframework.transaction.annotation.Transactional;

@Service
public class LogServiceImpl implements LogService {

    @Autowired
    private LogDao logDao;

    public void log(String out,String in,Double money ) {
        logDao.log("轉賬操作由"+out+"到"+in+",金額:"+money);
    }
}
- 主函數
package com.itheima.service.impl;

import com.itheima.dao.AccountDao;
import com.itheima.service.AccountService;
import com.itheima.service.LogService;
import org.springframework.beans.factory.annotation.Autowired;
import org.springframework.stereotype.Service;
import org.springframework.transaction.annotation.Transactional;

import java.io.*;

@Service
public class AccountServiceImpl implements AccountService {

    @Autowired
    private AccountDao accountDao;

    @Autowired
    private LogService logService;

    public void transfer(String out,String in ,Double money) {
        try{
            accountDao.outMoney(out,money);
            int i = 1/0;
            accountDao.inMoney(in,money);
        }finally {
            logService.log(out,in,money);
        }
    }

}
修改後程式碼:
- 在紀錄檔業務層設定紀錄檔操作為單獨事務
// 紀錄檔業務層

package com.itheima.service.impl;

import com.itheima.dao.LogDao;
import com.itheima.service.LogService;
import org.springframework.beans.factory.annotation.Autowired;
import org.springframework.stereotype.Service;
import org.springframework.transaction.annotation.Propagation;
import org.springframework.transaction.annotation.Transactional;

@Service
public class LogServiceImpl implements LogService {

    @Autowired
    private LogDao logDao;

    @Transactional(propagation = Propagation.REQUIRES_NEW)
    public void log(String out,String in,Double money ) {
        logDao.log("轉賬操作由"+out+"到"+in+",金額:"+money);
    }
}
最後我們給出事務傳播行為表:
| 傳播屬性 | 事務管理員 | 事務協調員 |
|---|---|---|
| REQUIRED(預設) | 開啟T | 加入T |
| REQUIRED(預設) | 無 | 新建T |
| REQUIRES_NEW | 開啟T | 新建T |
| REQUIRES_NEW | 無 | 新建T |
| SUPPORTS | 開啟T | 加入T |
| SUPPORTS | 無 | 無 |
| NOT_SUPPORTED | 開啟T | 無 |
| NOT_SUPPORTED | 無 | 無 |
| MANDATORY | 開啟T | 加入T |
| MANDATORY | 無 | ERROR |
| NEVER | 開啟T | ERROR |
| NEVER | 無 | 無 |
| NESTED |
NESTED:設定savePoint,一旦事務回滾,事務將回滾到savePoint處,交由客戶響應提交/回滾
結束語
好的,關於Spring的內容就介紹到這裡,希望能為你帶來幫助!
附錄
該文章屬於學習內容,具體參考B站黑馬程式設計師李老師的SMM框架課程
這裡附上連結:Spring-00-Spring課程介紹_嗶哩嗶哩_bilibili