Java開發學習(三十六)----SpringBoot三種組態檔解析
一、 組態檔格式
我們現在啟動伺服器預設的埠號是 8080,存取路徑可以書寫為
http://localhost:8080/books/1線上上環境我們還是希望將埠號改為 80,這樣在存取的時候就可以不寫埠號了,如下
http://localhost/books/1而 SpringBoot 程式如何修改呢?SpringBoot 提供了多種屬性設定方式
-
application.propertiesserver.port=80 -
application.ymlserver: port: 81 -
application.yamlserver: port: 82
注意:
SpringBoot程式的組態檔名必須是application,只是字尾名不同而已。
1.1 環境準備
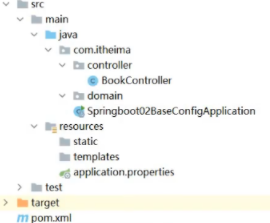
延用Java開發學習(三十五)----SpringBoot快速入門及起步依賴解析裡面的環境,結構如下

在該工程中的 com.itheima.controller 包下建立一個名為 BookController 的控制器。內容如下:
@RestController
@RequestMapping("/books")
public class BookController {
@GetMapping("/{id}")
public String getById(@PathVariable Integer id){
System.out.println("id ==> "+id);
return "hello , spring boot!";
}
}1.2 不同組態檔演示
-
application.properties組態檔
現在需要進行設定,配合檔案必須放在 resources 目錄下,而該目錄下有一個名為 application.properties 的組態檔,我們就可以在該組態檔中修改埠號,在該組態檔中書寫 port 。
application.properties 組態檔內容如下:
server.port=80啟動服務,會在控制檯列印出紀錄檔資訊,從紀錄檔資訊中可以看到繫結的埠號已經修改了

-
application.yml組態檔
刪除 application.properties 組態檔中的內容。在 resources 下建立一個名為 application.yml 的組態檔,在該檔案中書寫埠號的設定項,格式如下:
server:
port: 81注意: 在
:後,資料前一定要加空格。
啟動服務,可以在控制檯看到繫結的埠號是 81

-
application.yaml組態檔
刪除 application.yml 組態檔和 application.properties 組態檔內容,然後在 resources 下建立名為 application.yaml 的組態檔,設定內容和字尾名為 yml 的組態檔中的內容相同,只是使用了不同的字尾名而已
application.yaml 組態檔內容如下:
server:
port: 83啟動服務,在控制檯可以看到繫結的埠號

1.3 三種組態檔的優先順序
在三種配合檔案中分別設定不同的埠號,啟動服務檢視繫結的埠號。用這種方式就可以看到哪個組態檔的優先順序更高一些
application.properties 檔案內容如下:
server.port=80application.yml 檔案內容如下:
server:
port: 81application.yaml 檔案內容如下:
server:
port: 82啟動服務,在控制檯可以看到使用的埠號是 80。說明 application.properties 的優先順序最高
註釋掉 application.properties 組態檔內容。再次啟動服務,在控制檯可以看到使用的埠號是 81,說明 application.yml 組態檔為第二優先順序。
從上述的驗證結果可以確定三種組態檔的優先順序是:
application.properties > application.yml > application.yaml
yml格式一般最常使用
二、yaml格式
上面講了三種不同型別的組態檔,而 properties 型別的配合檔案之前我們學習過,接下來我們重點介紹 yaml 型別的組態檔。
YAML(YAML Ain't Markup Language),一種資料序列化格式。這種格式的組態檔在近些年已經佔有主導地位,那麼這種組態檔和前期使用的組態檔是有一些優勢的,我們先看之前使用的組態檔。
最開始我們使用的是 xml ,格式如下:
<enterprise>
    <name>itcast</name>
    <age>16</age>
    <tel>4006184000</tel>
</enterprise>
而 properties 型別的組態檔如下
enterprise.name=itcast
enterprise.age=16
enterprise.tel=4006184000
yaml 型別的組態檔內容如下
enterprise:
    name: itcast
    age: 16
    tel: 4006184000
優點:
-
容易閱讀
yaml型別的組態檔比xml型別的組態檔更容易閱讀,結構更加清晰 -
容易與指令碼語言互動
-
以資料為核心,重資料輕格式
yaml更注重資料,而xml更注重格式
YAML 副檔名:
-
.yml(主流) -
.yaml
上面兩種字尾名都可以,以後使用更多的還是 yml 的。
2.1 語法規則
-
大小寫敏感
-
屬性層級關係使用多行描述,每行結尾使用冒號結束
-
使用縮排表示層級關係,同層級左側對齊,只允許使用空格(不允許使用Tab鍵)
空格的個數並不重要,只要保證同層級的左側對齊即可。
-
屬性值前面新增空格(屬性名與屬性值之間使用冒號+空格作為分隔)
-
# 表示註釋
核心規則:資料前面要加空格與冒號隔開
陣列資料在資料書寫位置的下方使用減號作為資料開始符號,每行書寫一個資料,減號與資料間空格分隔,例如
enterprise:
  name: itcast
  age: 16
  tel: 4006184000
  subject:
    - Java
    - 前端
    - 巨量資料
三、3種yaml組態檔資料讀取
3.1 環境準備
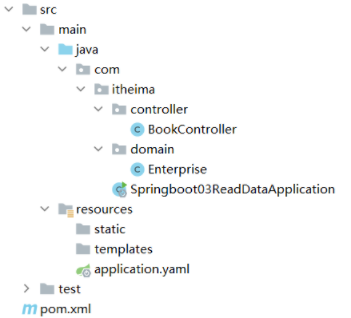
新建立一個名為 springboot_03_read_data 的 SpringBoot 工程,參考Java開發學習(三十五)----SpringBoot快速入門及起步依賴解析,目錄結構如下

在 com.itheima.controller 包寫建立名為 BookController 的控制器,內容如下
@RestController
@RequestMapping("/books")
public class BookController {
@GetMapping("/{id}")
public String getById(@PathVariable Integer id){
System.out.println("id ==> "+id);
return "hello , spring boot!";
}
}在 com.itheima.domain 包下建立一個名為 Enterprise 的實體類等會用來封裝資料,內容如下
public class Enterprise {
    private String name;
    private int age;
    private String tel;
    private String[] subject;

    //setter and getter

    //toString
}
在 resources 下建立一個名為 application.yml 的組態檔,裡面設定了不同的資料,內容如下
lesson: SpringBoot
server:
port: 80
enterprise:
name: itcast
age: 16
tel: 4006184000
subject:
- Java
- 前端
- 巨量資料3.2 讀取設定資料
3.2.1 使用 @Value註解
使用 @Value("表示式") 註解可以從配合檔案中讀取資料,註解中用於讀取屬性名參照方式是:${一級屬性名.二級屬性名……}
我們可以在 BookController 中使用 @Value 註解讀取配合檔案資料,如下
@RestController
@RequestMapping("/books")
public class BookController {
@Value("${lesson}")
private String lesson;
@Value("${server.port}")
private Integer port;
@Value("${enterprise.subject[0]}")
private String subject_00;
@GetMapping("/{id}")
public String getById(@PathVariable Integer id){
System.out.println(lesson);
System.out.println(port);
System.out.println(subject_00);
return "hello , spring boot!";
}
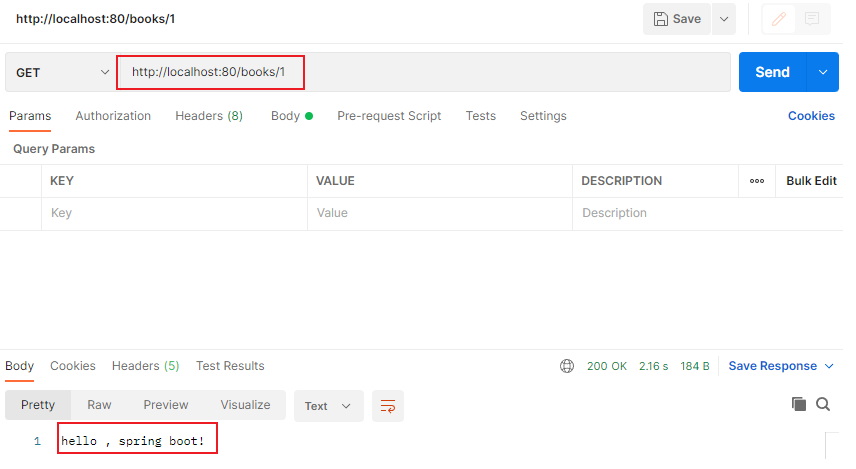
}使用postman調介面

可以看到結果已經返回

3.2.2 Environment物件
上面方式讀取到的資料特別零散,SpringBoot 還可以使用 @Autowired 註解注入 Environment 物件的方式讀取資料。這種方式 SpringBoot 會將組態檔中所有的資料封裝到 Environment 物件中,如果需要使用哪個資料只需要通過呼叫 Environment 物件的 getProperty(String name) 方法獲取。具體程式碼如下:
@RestController
@RequestMapping("/books")
public class BookController {

    @Autowired
    private Environment env;

    @GetMapping("/{id}")
    public String getById(@PathVariable Integer id){
        System.out.println(env.getProperty("lesson"));
        System.out.println(env.getProperty("enterprise.name"));
        System.out.println(env.getProperty("enterprise.subject[0]"));
        return "hello , spring boot!";
    }
}
注意:這種方式,框架內容大量資料,框架使用的比較多,而在開發中我們很少使用。
3.2.3 自定義物件
SpringBoot 還提供了將組態檔中的資料封裝到我們自定義的實體類物件中的方式。具體操作如下:
-
將實體類
bean的建立交給Spring管理。在類上新增
@Component註解 -
使用
@ConfigurationProperties註解表示載入組態檔在該註解中也可以使用
prefix屬性指定只載入指定字首的資料 -
在
BookController中進行注入
具體程式碼如下:
Enterprise 實體類內容如下:
@Component
@ConfigurationProperties(prefix = "enterprise")
public class Enterprise {
private String name;
private int age;
private String tel;
private String[] subject;
public String getName() {
return name;
}
public void setName(String name) {
this.name = name;
}
public int getAge() {
return age;
}
public void setAge(int age) {
this.age = age;
}
public String getTel() {
return tel;
}
public void setTel(String tel) {
this.tel = tel;
}
public String[] getSubject() {
return subject;
}
public void setSubject(String[] subject) {
this.subject = subject;
}
@Override
public String toString() {
return "Enterprise{" +
"name='" + name + '\'' +
", age=" + age +
", tel='" + tel + '\'' +
", subject=" + Arrays.toString(subject) +
'}';
}
}BookController 內容如下:
@RestController
@RequestMapping("/books")
public class BookController {
@Autowired
private Enterprise enterprise;
@GetMapping("/{id}")
public String getById(@PathVariable Integer id){
System.out.println(enterprise.getName());
System.out.println(enterprise.getAge());
System.out.println(enterprise.getSubject());
System.out.println(enterprise.getTel());
System.out.println(enterprise.getSubject()[0]);
return "hello , spring boot!";
}
}注意:使用第三種方式,在實體類上有如下警告提示

這個警告提示解決是在 pom.xml 中新增如下依賴即可
<dependency>
    <groupId>org.springframework.boot</groupId>
    <artifactId>spring-boot-configuration-processor</artifactId>
    <optional>true</optional>
</dependency>
本文來自部落格園,作者:|舊市拾荒|,轉載請註明原文連結:https://www.cnblogs.com/xiaoyh/p/16468145.html