Pytest測試框架一鍵動態切換環境思路及方案
前言
在上一篇文章《Pytest fixture及conftest詳解》中,我們介紹了fixture的一些關鍵特性、用法、作用域、引數等,本篇文章將結合fixture及conftest實現一鍵動態切換自動化測試環境。在開始前,我們可以先思考幾個問題:動態切換測試環境的目的是什麼(能夠解決什麼問題)?該如何實現(實現方案)?具體步驟是什麼(實現過程)?
一、動態切換測試環境的目的是什麼?
動態切換測試環境的目的是什麼,或者說它能解決什麼樣的問題:
- 便於快速驗證功能在不同環境中的表現。比如:有的功能(背後的介面)在開發環境是正常的,但到了測試或預釋出環境就出問題了,可以便於快速驗證各個功能在不同環境中的表現;
- 省去修改設定引數的繁瑣步驟。通常情況下,我們的設定資訊都是寫在組態檔中,然後測試用例讀取組態檔中不同的設定資訊。如果想要切換環境,就需要修改組態檔或讀取設定的邏輯。而動態切換測試環境則可以自動根據我們傳入的命令列引數和預製好的讀取設定的策略,自動識別、解析並返回對應的資料。
- 為測試框架賦能。之前看過一篇文章《13條自動化測試框架設計原則》中說道:測試框架要能做到,一套指令碼多環境執行,支援環境切換,並且能根據環境進行自動化的設定(包括系統設定、測試資料設定等)。
其實以上總結起來就是:一套測試指令碼,能根據環境進行自動化的設定,省去手動設定引數的步驟,可以實現在多環境中執行,從而快速驗證各個介面及相關服務在不同環境中的表現。
二、動態切換測試環境如何實現?
1.實現方案
我們希望:可以有個開關,自由控制執行指令碼的執行環境,而不是需要我們手動修改,比如:選擇dev時,自動讀取的是開發環境的設定及測試資料:url、資料庫設定、賬號密碼、測試資料;當切換到test時,自動讀取的是測試環境的設定及測試資料。
大致實現原理如下所示:
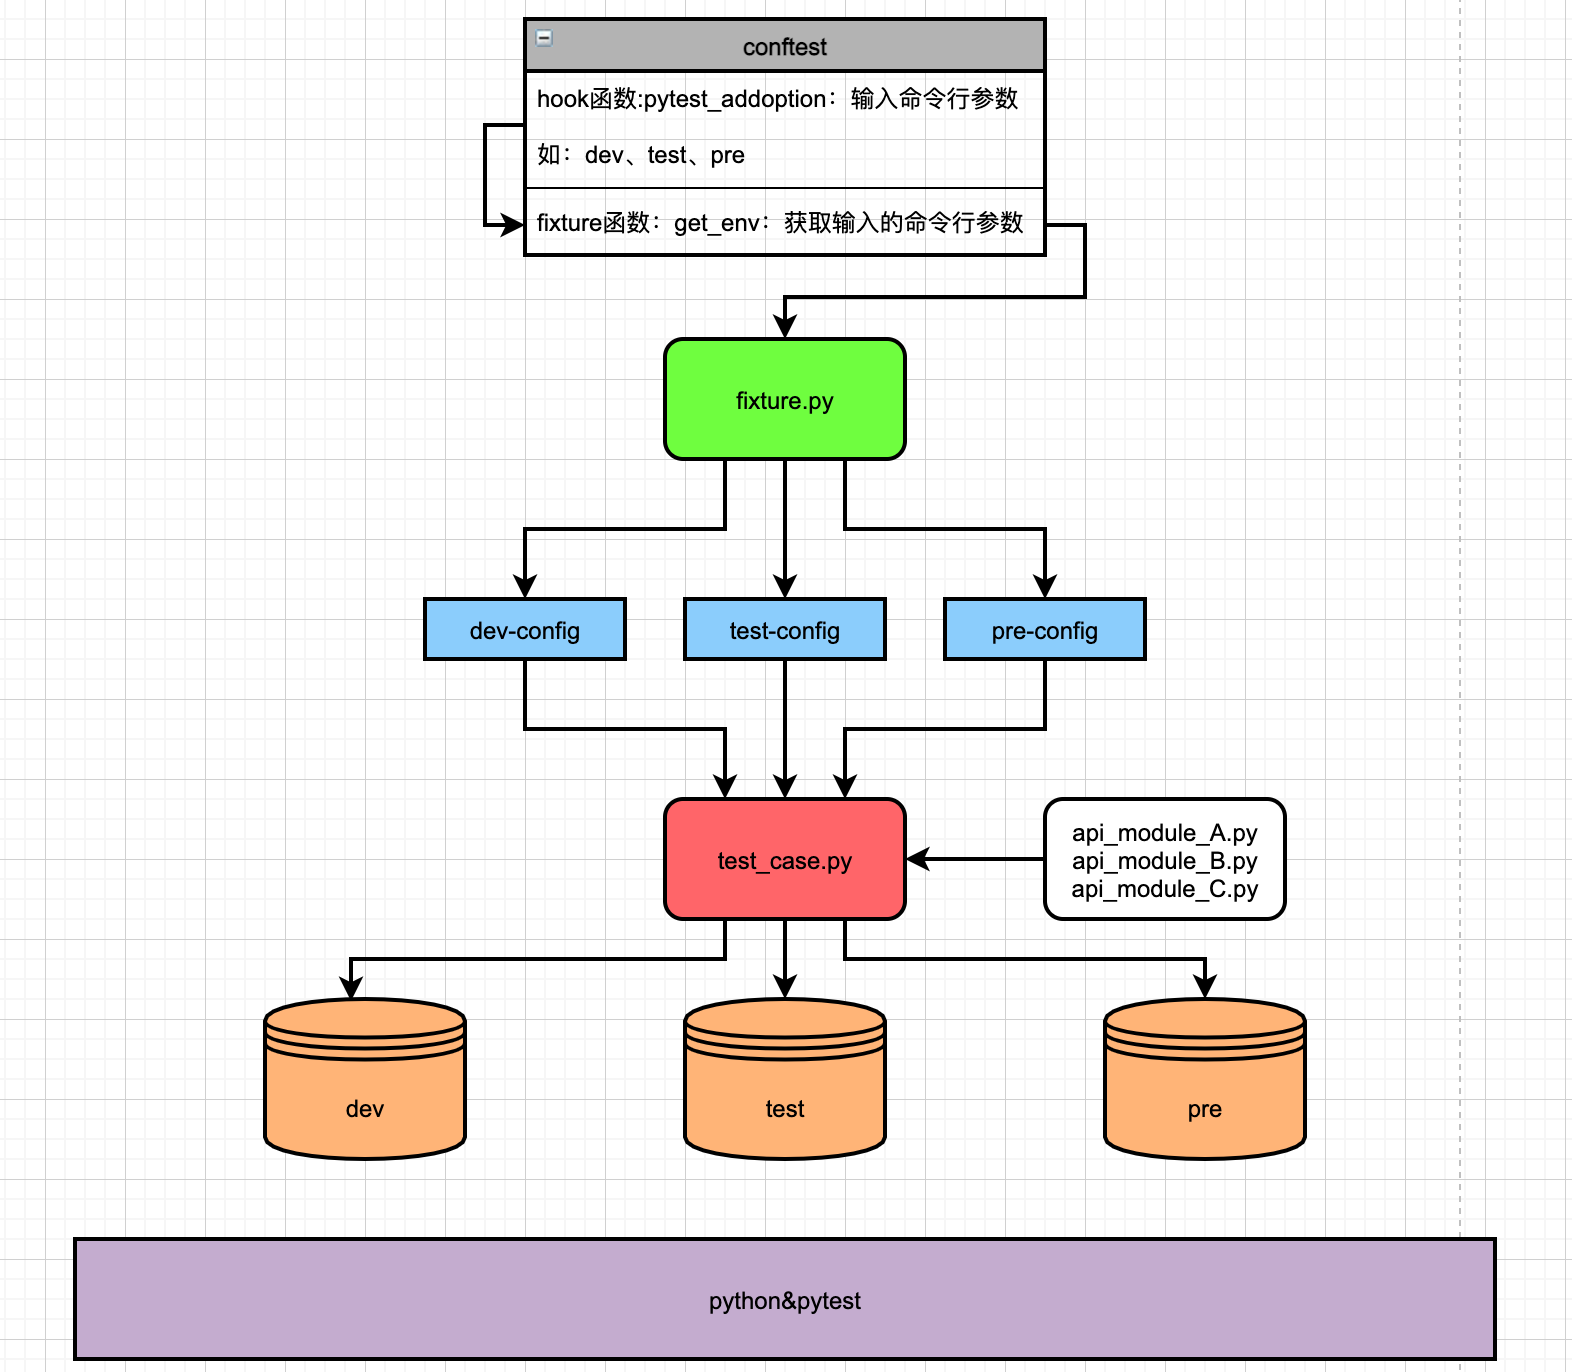
- 使用者通過pytest命令列傳入引數驅動指令碼執行(pytest_addoption用於實現自定義命令列引數);
- fixture函數get_env用於獲取使用者輸入的命令列引數,傳遞給fixture.py中的各個fixture函數;
- fixture.py中的各個fixture函數根據get_env提供的環境引數值,解析測試環境對應的資料檔案內容:URL(get_url)、賬號(get_user)、資料庫設定(get_db),同時傳遞給api類(api_module_A...B...C)、登入方法(login)、資料庫連線方法(use_db)等,用於範例化操作,這部分fixture函數再傳遞給測試用例,用於用例前後置操作(相當於setup/teardown);
- 最後測試用例再根據各個fixture函數返回的範例物件、設定資訊,呼叫各個模組的api函數,執行測試,並讀寫資料庫實現資料校驗、斷言,從而最終實現切換環境策略;
2.目錄結構&框架設計小技巧
1)目錄結構
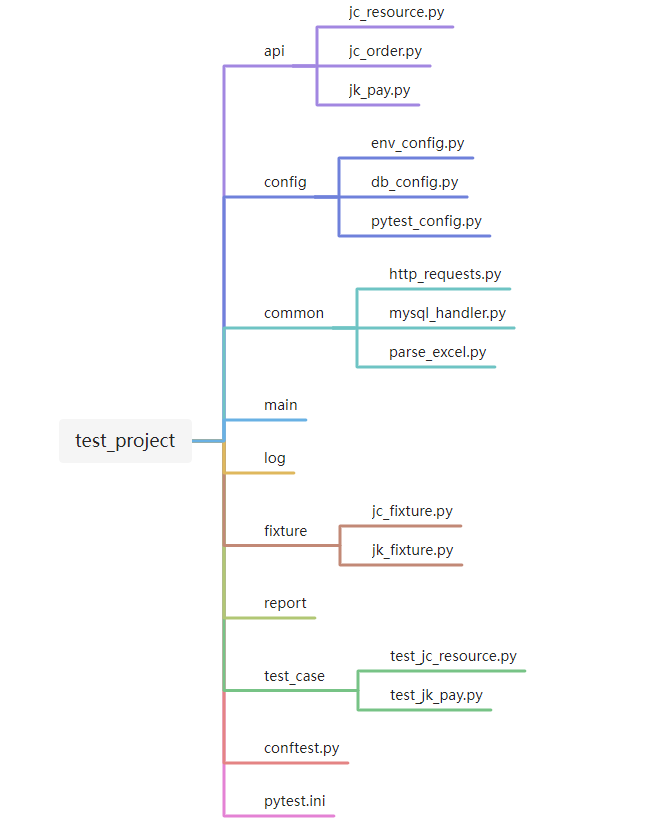
專案結構大致如下,至於目錄結構和檔案命名,只能說蘿蔔青菜各有所愛。比如有人喜歡把存放公共方法的common目錄命名為utils,存放各個api模組的api目錄命名為src......
2)自動化測試框架設計小技巧
- api:存放封裝各個專案、各個模組的api,如jk專案支付模組,可以命名為jk_pay.py;
- config:存放組態檔,直接用py檔案即可,不推薦使用ini、yaml,反而會多了一層解析,增大出錯概率;
- common:存放公共方法,如基於http協定requests庫,則可以命名為http_requests.py;通過檔名稱,大概率就能知道這個檔案的作用,比如通過parse_excel的命名直接就能知道是解析excel檔案;
- main:框架主入口,存放用來批次執行用例的檔案,比如:run_testcase_by_tag.py(前提是用例都打了標籤)、run_testcase_by_name.py;
- fixture:存放fixture檔案,建議每個專案一個fixture檔案,互不影響,如:jk_fixture.py、jc_fixture.py;
- test_case:存放測試用例檔案;
- conftest.py:存放一些hook函數、全域性fixture函數,如前面提到的自定義命令列引數的函數pytest_addoption、獲取命令列引數的fixture函數get_env;
- pytest.ini:pytest框架組態檔;
三、實現過程
上述的方案單從文字層面可能有些難以理解,下面我們結合具體的程式碼案例來詳細講述一下實現過程。
1.實現自定義命令列引數工具
在conftest.py中定義一個hook函數,實現自定義命令列工具,名為pytest_addoption(固定寫法),用來在命令列中傳入不同的環境引數;
def pytest_addoption(parser):
    """
    新增命令列引數
    parser.addoption為固定寫法
    default 設定一個預設值,此處設定預設值為test
    choices 引數範圍,傳入其他值無效
    help 幫助資訊
    """
    parser.addoption(
        "--env", default="test", choices=["dev", "test", "pre"], help="enviroment parameter"
    )
2.定義獲取命令列引數的fixture函數
在conftest.py中定義get_env的fixture函數,用來獲取使用者在命令列輸入的引數值,傳遞給fixture.py中的各個fixture函數。pytestconfig是request.config的快捷方式,所以request.config也可以寫成pytestconfig。
@pytest.fixture(scope="session")
def get_env(request):
    return request.config.getoption("--env")
來測試一下命令列能否輸入引數以及fixture函數get_env能否獲取到。我們可以簡單定義一個測試用例:
def test_env(get_env):
    print(f"The current environment is: {get_env}")
然後通過命令列執行此測試用例:
pytest -s -v --env dev test_env.py::test_env
執行結果如下:

3.定義環境解析策略
例如當前專案為jc專案,則可以在fixture目錄下定義一個jc_fixture.py的檔案,用於專門存放此專案相關的fixture函數。fixture.py中的各個fixture函數根據get_env提供的環境引數值,解析測試環境對應的資料檔案內容:URL(get_url)、賬號(get_user)、資料庫設定(get_db),同時傳遞給api類(api_module_A...B...C)進行範例化,登入方法(login)、資料庫連線方法(use_db)等,進行初始化,這部分fixture函數再傳遞給測試用例,用於用例前後置操作(相當於setup/teardown);
import pytest
from config.config import URLConf, PasswordConf, UsernameConf, ProductIDConf
from api.jc_common import JCCommon
from api.jc_resource import JCResource
from config.db_config import DBConfig
from common.mysql_handler import MySQL

@pytest.fixture(scope="session")
def get_url(get_env):
    """解析URL"""
    global url
    if get_env == "test":
        print("當前環境為測試環境")
        url = URLConf.RS_TEST_URL.value
    elif get_env == "dev":
        print("當前環境為開發環境")
        url = URLConf.RS_DEV_URL.value
    elif get_env == "pre":
        print("當前環境為預釋出環境")
        url = URLConf.RS_PRE_URL.value
    return url

@pytest.fixture(scope="session")
def get_user(get_env):
    """解析登入使用者"""
    global username_admin, username_boss
    # 若get_env獲取到的是test,則讀取組態檔中測試環境的使用者名稱
        if get_env == "test":
        username_admin = UsernameConf.RS_TEST_ADMIN.value
        username_boss = UsernameConf.RS_TEST_BOSS.value
      # 若get_env獲取到的是dev,則讀取組態檔中開發環境的使用者名稱
    elif get_env == "dev":
        username_admin = UsernameConf.RS_TEST_ADMIN.value
        username_boss = UsernameConf.RS_TEST_BOSS.value
      # 若get_env獲取到的是pre,則讀取組態檔中預釋出環境的使用者名稱
    elif get_env == "pre":
        username_admin = UsernameConf.RS_TEST_ADMIN.value
        username_boss = UsernameConf.RS_TEST_BOSS.value

@pytest.fixture(scope="session")
def get_db(get_env):
    """解析資料庫設定"""
    global db_host, db_pwd, db_ssh_host, db_ssh_pwd, db_name
    if get_env == "test":
        db_host = DBConfig.db_test.get('host')
        db_pwd = DBConfig.db_test.get('pwd')
        db_ssh_host = DBConfig.db_test.get('ssh_host')
        db_ssh_pwd = DBConfig.db_test.get('ssh_pwd')
        db_name = DBConfig.db_test.get('dbname_jc')
    elif get_env == "dev":
        db_host = DBConfig.db_test.get('host')
        db_pwd = DBConfig.db_test.get('pwd')
        db_ssh_host = DBConfig.db_test.get('ssh_host')
        db_ssh_pwd = DBConfig.db_test.get('ssh_pwd')
        db_name = DBConfig.db_test.get('dbname_jc')
    elif get_env == "pre":
        db_host = DBConfig.db_test.get('host')
        db_pwd = DBConfig.db_test.get('pwd')
        db_ssh_host = DBConfig.db_test.get('ssh_host')
        db_ssh_pwd = DBConfig.db_test.get('ssh_pwd')
        db_name = DBConfig.db_test.get('dbname_jc')

@pytest.fixture(scope="session")
def jc_common(get_env, get_url):
    """傳入解析到的URL、範例化jc專案公共介面類"""
    product_id = ProductIDConf.JC_PRODUCT_ID.value
    jc_common = JCCommon(product_id=product_id, url=get_url)
    return jc_common

@pytest.fixture(scope="session")
def jc_resource(get_env, get_url):
    """傳入解析到的URL、範例化jc專案測試介面類"""
    product_id = ProductIDConf.JC_PRODUCT_ID.value
    jc_resource = JCResource(product_id=product_id, url=get_url)
    return jc_resource

@pytest.fixture(scope="class")
def rs_admin_login(get_user, jc_common):
    """登入的fixture函數"""
    password = PasswordConf.PASSWORD_MD5.value
    login = jc_common.login(username=username_shipper, password=password)
    admin_user_id = login["b"]
    return admin_user_id

@pytest.fixture(scope="class")
def jc_get_admin_user_info(jc_common, jc_admin_login):
    """獲取使用者資訊的fixture函數"""
    user_info = jc_common.get_user_info(user_id=rs_shipper_login)
    admin_cpy_id = user_info["d"]["b"]
    return admin_cpy_id

@pytest.fixture(scope="class")
def use_db(get_db):
    """連結資料庫的fixture函數"""
    mysql = MySQL(host=db_host, pwd=db_pwd, ssh_host=db_ssh_host, ssh_pwd=db_ssh_pwd, dbname=db_name)
    yield mysql
    mysql.disconnect()
4.測試用例參照fixture
1)封裝各個待測模組的api函數
登入模組:jc_common.py
from common.http_requests import HttpRequests


class JcCommon(HttpRequests):
    def __init__(self, url, product_id):
        super(JcCommon, self).__init__(url)
        self.product_id = product_id

    def login(self, username, password):
        '''使用者登入'''
        headers = {"product_id": str(self.product_id)}
        params = {"a": int(username), "b": str(password)}
        response = self.post(uri="/userlogin", headers=headers, params=params)
        return response

    def get_user_info(self, uid, token):
        '''獲取使用者資訊'''
        headers = {"user_id": str(uid), "product_id": str(self.product_id), "token": token}
        response = self.post(uri="/user/login/info", headers=headers)
        return response
業務模組:jc_resource.py
import random
from common.http_requests import HttpRequests
from faker import Faker


class RSResource(HttpRequests):
    def __init__(self, url, product_id):
        super(RSResource, self).__init__(url)
        self.product_id = product_id
        self.faker = Faker(locale="zh_CN")

    def add_goods(self, cpy_id, user_id, goods_name, goos_desc='', goods_type='', goos_price=''):
        """新增商品"""
        headers = {"product_id": str(self.product_id), "cpy_id": str(cpy_id), "user_id": str(user_id)}
        params = {"a": goods_name, "b": goos_desc, "c": goods_type, "d": goos_price}
        r = self.post(uri="/add/goods", params=params, headers=headers)
        return r

    def modify_goods(self, cpy_id, user_id, goods_name, goos_desc='', goods_type='', goos_price=''):
        """修改商品資訊"""
        headers = {"product_id": str(self.product_id), "cpy_id": str(cpy_id), "user_id": str(user_id)}
        params = {"a": car_name, "ab": car_id, "b": company_id, "c": car_or_gua}
        r = self.post(uri="/risun/res/car/add/blacklist?md=065&cmd=006", params=params, headers=headers)
        return r
各個模組的api函數作為獨立的存在,將設定與函數隔離,且不涉及任何fixture的參照。這樣無論測試URL、使用者名稱、資料庫怎麼變換,也無需修改待測模組的api函數,基本可以做到一勞永逸,除非介面地址和傳參發生變化。
2)測試用例
JC專案的測試用例類TestJcSmoke根據各個jc_fixture.py中各個fixture函數返回的範例物件、設定資訊,呼叫各個業務模組的api函數,執行測試,並讀寫資料庫實現資料校驗、斷言;
import os
import sys
sys.path.append(os.path.dirname(os.path.dirname(os.path.dirname(os.path.realpath(__file__)))))
import allure
from fixture.jc_fixture import *
from common.parse_excel import ParseExcel

logger = LogGen("JC介面Smoke測試").getLog()

@allure.feature("JC專案介面冒煙測試")
class TestJcSmoke:
    def setup_class(self):
        self.fake = Faker("zh_CN")

    # 將fixture中的jc_resource範例、資料庫範例、登入等fixture函數傳遞給測試用例進行呼叫
    @pytest.mark.jc_smoke
    @allure.story("商品管理")
    def test_01_goods_flow(self, jc_resource, jc_admin_login, jc_get_admin_user_info, use_db):
        """測試商品增刪改查介面"""
        user_id = jc_admin_login
        cpy_id = jc_get_admin_user_info
        goods_name = "iphone 14pro max 512G"
        try:
            logger.info(f"新增'{goods_name}'商品")
            with allure.step("呼叫新增商品介面"):
                add_goods = jc_resource.add_goods(cpy_id, user_id, goods_name, goods_type=1)
                assert add_goods["a"] == 200
                self.goods_id = add_goods["d"]
                select_db = use_db.execute_sql(
                    f"SELECT * FROM goods_info WHERE company_id = {cpy_id} AND id = {self.goods_id}")  # 查詢資料庫是否存在新增的資料
                assert goods_name in str(select_db)
                logger.info(f"商品'{goods_name}'新增成功")

            logger.info(f"修改'{goods_name}'的商品資訊")
            with allure.step("呼叫修改商品介面"):
                modify_goods = jc_resource.modify_goods(cpy_id, user_id, goods_id=self.goods_id, goods_name=goods_name, goods_type=2)
                assert modify_goods["a"] == 200
                select_db = use_db.execute_sql(
                    f"SELECT goodsType FROM goods_info WHERE company_id = {cpy_id} AND id = {self.goods_id}")
                assert str(select_db[0]) == '2'
                logger.info(f"修改'{goods_name}'的商品資訊成功")

            logger.info(f"開始刪除商品'{goods_name}'")
            with allure.step("呼叫刪除商品介面"):
                del_goods = jc_resource.delete_goods(cpy_id, user_id, goods_id=self.goods_id)
                assert del_goods["a"] == 200
                select_db = use_db.execute_sql(
                    f"SELECT * FROM goods_info WHERE id = {self.goods_id}")
                print(select_db)
                logger.info(f"刪除商品'{goods_name}'成功")
        except AssertionError as e:
            logger.info(f"商品流程測試失敗")
            raise e
在上述smoke測試用例test_01_goods_flow中,同時驗證了商品的增、改、刪三個介面,形成一個簡短的業務流,如果介面都是暢通的話,則最後會刪除商品,無需再手動維護。
注:
1、上述模組介面及測試用例僅為演示使用,非真實存在。
2、傳統的測試用例設計模式中,會把一些範例化放在setup或setup_class中,如:jc_resource = JcResource(xxx),但因為fixture函數無法在前後置方法中傳遞的緣故,所以要把一些範例化的操作放在fixture函數中進行,並return一個記憶體地址,直接傳遞給測試用例,從而使測試用例能夠呼叫到範例物件中的業務api。
四、執行專案
完成了命令列引數、解析策略、封裝介面、測試用例編寫後,既可以直接在編輯器中點選執行按鈕執行測試,也可以在命令列驅動執行。以下演示命令列執行用例方法:
- -v:列印詳細執行過程;
- -s:控制檯輸出用例中的print語句;
- --env:前面pytest_addoption定義的命令列引數,預設值:test,輸入範圍choices=["dev", "test", "pre"]
1.輸入一個不存在的--env引數
pytest -v -s --env online test_jc_smoke.py
此時會提示我們引數錯誤,online為不可用選項。

2.執行測試環境
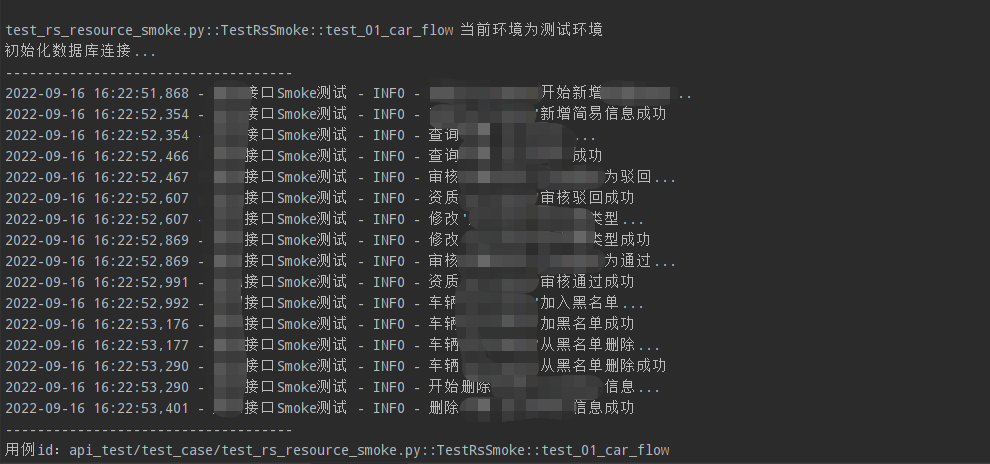
pytest -v -s --env test test_jc_smoke.py
為了方便起見,我直接執行了現有專案的測試用例,當傳入test時,會在測試環境執行。
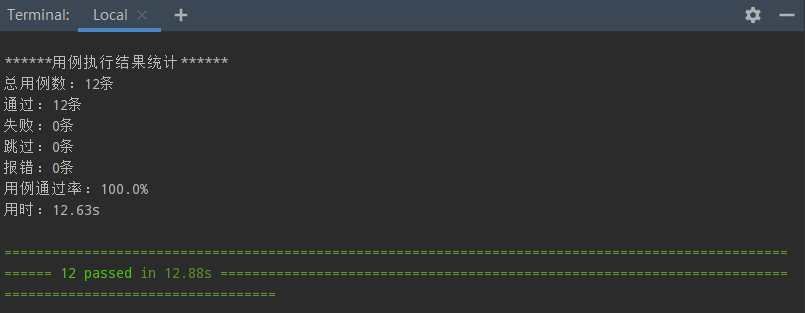
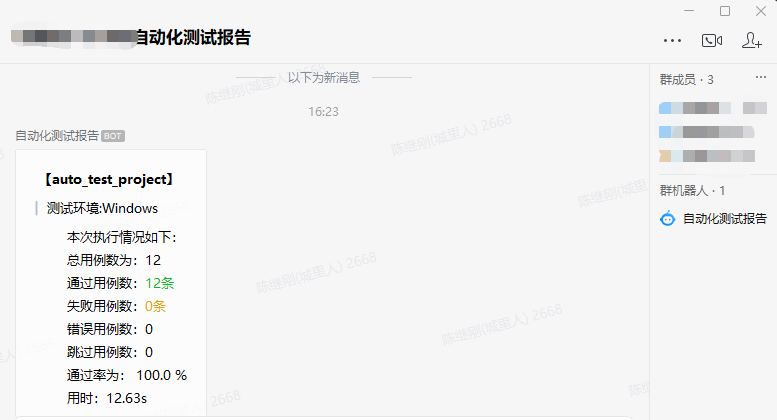
一共12條測試用例,全部執行通過:
同時,測試結果傳送到企業微信群,關於自動化測試結果自動傳送企業微信的實現思路,可參考前面分享過的一篇文章《利用pytest hook函數實現自動化測試結果推播企業微信 》
3.執行開發及預釋出環境
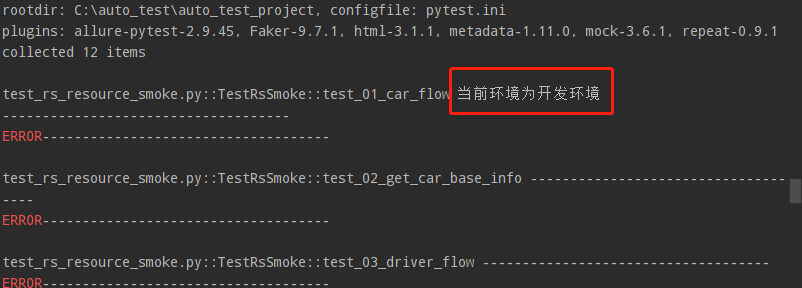
pytest -v -s --env dev test_jc_smoke.py  # 開發環境
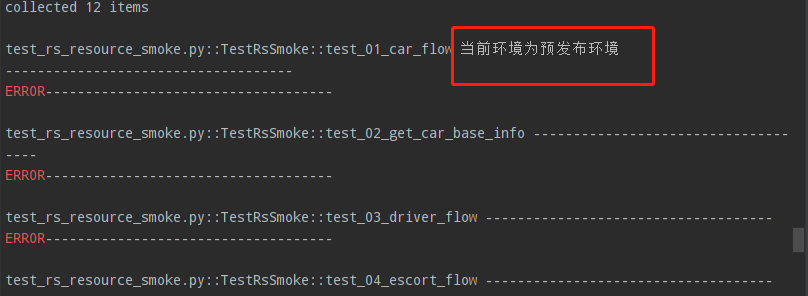
pytest -v -s --env pre test_jc_smoke.py  # 預釋出環境
dev、pre引數接收正常,不過因為開發、預釋出環境沒啟動的緣故,所以執行失敗。
五、Pytest實現一鍵切換環境方案原理小結
原理說明:
- 測試環境變數由使用者輸入提供;
- 測試框架定義測試資料解析函數,並根據使用者輸入的測試變數,解析並返回測試環境對應的資料檔案內容;
當然,以上也並非最佳設計方案、實現起來也比較複雜,尤其是fixture模組的運用。如果你有更好的實現方案,歡迎討論、交流!
