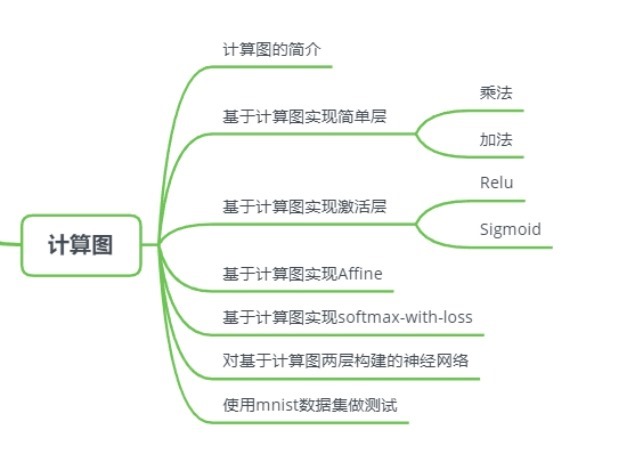
動手實現深度學習(5):計算圖的實現
第三篇:基於計算圖的神經網路的設計與實現
傳送門: https://www.cnblogs.com/greentomlee/p/12314064.html
github: Leezhen2014: https://github.com/Leezhen2014/python_deep_learning
在第二篇中介紹了用數值微分的形式計算神經網路的梯度,數值微分的形式比較簡單也容易實現,但是計算上比較耗時。本章會介紹一種能夠較為高效的計算出梯度的方法:基於圖的誤差反向傳播。
根據 deep learning from scratch 這本書的介紹,在誤差反向傳播方法的實現上有兩種方法:一種是基於數學式的(第二篇就是利用的這種方法),一種是基於計算圖的。這兩種方法的本質是一樣的,有所不同的是表述方法。計算圖的方法可以參考feifei li負責的斯坦福大學公開課CS231n 或者theano的tutorial/Futher readings/graph Structures.
之前我們的誤差傳播是基於數學式的,可以看出對程式碼編寫者來說很麻煩;
這次我們換成基於計算圖的;
五、計算圖
上一張我們實現了梯度下降演演算法,並且能訓練出一個簡單的神經網路了;本章會基於圖計算的方式去實現神經網路。
P.S.:利用計算圖的求導數的步驟類似於鏈式法則, 這裡先挖個坑,稍後求sigmoid的微分的時候會舉例。
5.1簡單層的實現
Ps: 在前面的幾章中,我對程式碼的重視程度並不大,這是因為前幾章的涉及的程式碼都是作為理論基礎。在後面的章節中會注意程式碼的組織結構。
在實現方面會盡量使用python的類。
為此,建立一個所有類的基礎類別:BaseLayer
forward() 是推理過程中需要呼叫的函數;其內部的實現是基於公式本身。
backward() 是反向傳播過程中需要呼叫的函數;其內部的實現是基於導數實現的。
以下是BaseLayer的具體實現方式。
  1 class BaseLayer:
  2     '''
  3     所有層的基礎類別
  4     '''
  5     def forward(self,x,y):
  6         raise NotImplementedError
  7     def backward(self,dout):
  8         raise NotImplementedError
  9     def toString(self):
 10         raise NotImplementedError
為了能夠更好的說明如何使用BaseLayer,我們給出乘法和加法的實現。
5.1.1 乘法層的實現
反向傳播的導數是:
- l我們將乘法層命名為 MulLayer, 這個層裡面的forward() 是將兩個矩陣相乘,x與y均為numpy.Ndarray型別;並且初始化self.x 與self.y
- backward() 是傳入引數dout, dout是反向傳播的梯度差,也是公式中的
 和
和 , 因根據我們之前瞭解的梯度公式,可以知道反向傳播的主要任務是更新權重,因此只需要將成員變數x,y的數值更新即可
  1 class MulLayer(BaseLayer):
  2     def __init__(self):
  3         self.x = None
  4         self.y = None
  5
  6     def forward(self,x,y):
  7         self.x = x
  8         self.y = y
  9         out = x*y
 10
 11         return out
 12
 13     def backward(self,dout):
 14         '''
 15         反饋方面是反轉x,y
 16         :param dout:
 17         :return:
 18         '''
 19         dx = dout * self.y
 20         dy = dout * self.x
 21         return  dx,dy
 22
 23     def toString(self):
 24         print("name: Multi")
 25         print("x.shape %s"%str(self.x.shape))
 26         print("y.shape %s"%str(self.y.shape))
 27
5.1.2 加法層的實現
首先我們可以看看加法的公式:
其反向傳播就是在對加法求導數,分別對x和y求導數後,其公式為:
根據權重更新的公式,可知 x = dout *1 , y = dout*1
  1 class AddLayer(BaseLayer):
  2     def __init__(self):
  3         self.x = None
  4         self.y = None
  5
  6     def forward(self,x,y):
  7         self.x = x
  8         self.y = y
  9         out = self.x+self.y
 10         return  out
 11     def backward(self,dout):
 12         dx = dout*1
 13         dy = dout*1
 14         return dx,dy
 15     def toString(self):
 16         print("name: Add")
 17         print("x.shape %s"%str(self.x.shape))
 18         print("y.shape %s"%str(self.y.shape))
小結
本節給出了基於計算圖的實現方法; 並結合反向傳播機制,對乘法和加法的backward進行了實現。


