electron 起步
electron 起步
為什麼要學 Electron,因為公司需要偵錯 electron 的應用。
Electron 是 node 和 chromium 的結合體,可以使用 JavaScript,HTML 和 CSS 等 Web 技術建立桌面應用程式,支援 Mac、Window 和 Linux 三個平臺。
electron 的成功案例有許多,比如大名鼎鼎的 vscode。
hello-world
官網有個快速啟動的應用程式,我們將其下載到本地執行看一下。
# Clone this repository
git clone https://github.com/electron/electron-quick-start
# Go into the repository
cd electron-quick-start
# Install dependencies
npm install
# Run the app
npm start
注:執行 npm i 時卡在> node install.js,許久後報錯如下
$ npm i

> [email protected] postinstall electron\electron-quick-start\node_modules\electron
> node install.js

RequestError: read ECONNRESET
    at ClientRequest.<anonymous> (electron\electron-quick-start\node_modules\got\source\request-as-event-emitter.js:178:14)
    at Object.onceWrapper (events.js:422:26)
    at ClientRequest.emit (events.js:327:22)
    at ClientRequest.origin.emit (electron\electron-quick-start\node_modules\@szmarczak\http-timer\source\index.js:37:11)
    at TLSSocket.socketErrorListener (_http_client.js:432:9)
    at TLSSocket.emit (events.js:315:20)
    at emitErrorNT (internal/streams/destroy.js:84:8)
    at processTicksAndRejections (internal/process/task_queues.js:84:21)
npm ERR! code ELIFECYCLE
npm ERR! errno 1
npm ERR! [email protected] postinstall: `node install.js`
npm ERR! Exit status 1
npm ERR!
npm ERR! Failed at the [email protected] postinstall script.
npm ERR! This is probably not a problem with npm. There is likely additional logging output above.
網上搜尋 postinstall: node install.js 的解決辦法是將 electron 下載地址指向 taobao 映象:
// 將electron下載地址指向taobao映象
$ npm config set electron_mirror "https://npm.taobao.org/mirrors/electron/"
新建專案 electron-demo 並參考 electron-quick-start:
// 新建資料夾
$ mkdir electron-demo
// 進入專案
$ cd electron-demo
// 初始化專案
$ npm init -y
// 安裝依賴包
$ npm i -D electron
新建 electron 入口檔案 index.js:
// electorn-demo/index.js
const { app, BrowserWindow } = require('electron')
const path = require('path')

function createWindow() {
    const mainWindow = new BrowserWindow({
        width: 800,
        height: 600,
    })
    // 載入html頁面
    mainWindow.loadFile('index.html')
}

app.whenReady().then(() => {
    createWindow()
})
新建一個 html 頁面(例如 index.html):
<!DOCTYPE html>
<html lang="en">
<head>
    <meta charset="UTF-8">
    <meta http-equiv="X-UA-Compatible" content="IE=edge">
    <meta name="viewport" content="width=device-width, initial-scale=1.0">
    <title>Electron 網頁</title>
</head>
<body>
    hello world
</body>
</html>
在 package.json 中增加啟動 electron 的命令:
{
  "name": "electron-demo",
  "version": "1.0.0",
  "description": "",
  "main": "index.js",
  "scripts": {
    "test": "echo \"Error: no test specified\" && exit 1",
    // 會執行 main 欄位指向的 indx.js 檔案
  + "start": "electron ."
  },
  "keywords": [],
  "author": "",
  "license": "ISC",
  "devDependencies": {
    "electron": "^20.1.1"
  }
}
啟動 electron 應用:
$ npm run start
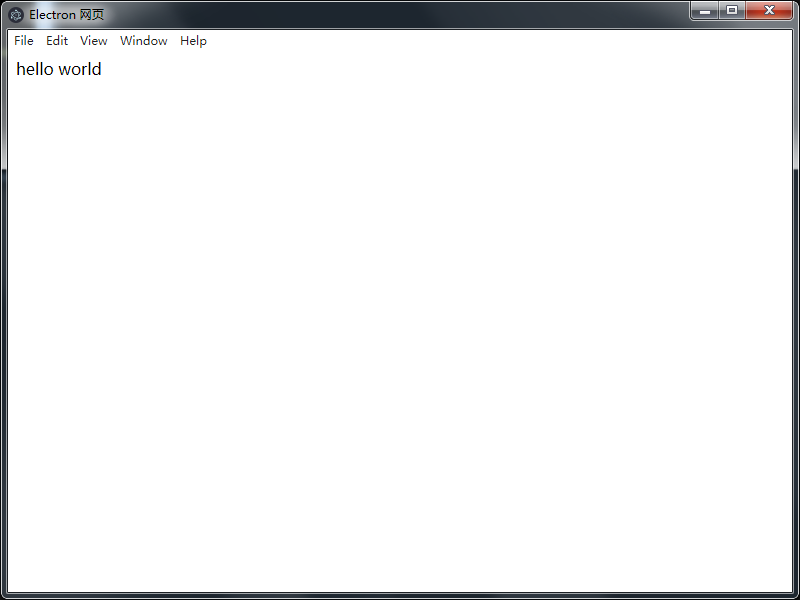
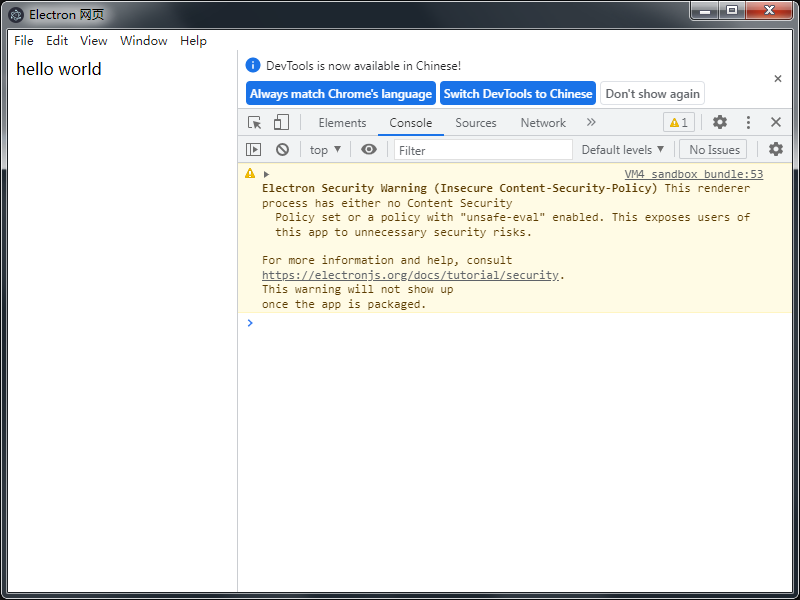
Tip:windows 下通過 ctrl+shift+i 可以開啟偵錯介面。或使用 mainWindow.webContents.openDevTools()也可以開啟。
    // 載入html頁面
    mainWindow.loadFile('index.html')
    // 預設開啟偵錯工具
+   mainWindow.webContents.openDevTools()
熱載入
現在非常不利於偵錯:修改 index.js 或 index.html 需要新執行 npm run start 才能看到效果。
可以 electron-reloader 來解決這個問題。只要已修改程式碼,無需重啟就能看到效果。
首先安裝依賴包,然後修改 electron 入口檔案即可:
$ npm i -D electron-reloader
npm WARN optional SKIPPING OPTIONAL DEPENDENCY: fsevents@~2.3.2 (node_modules\chokidar\node_modules\fsevents):
npm WARN notsup SKIPPING OPTIONAL DEPENDENCY: Unsupported platform for [email protected]: wanted {"os":"darwin","arch":"any"} (current: {"os":"win32","arch":"x64"})
npm WARN [email protected] No description
npm WARN [email protected] No repository field.

+ [email protected]
added 30 packages from 19 contributors and audited 109 packages in 26.217s

20 packages are looking for funding
  run `npm fund` for details

found 1 moderate severity vulnerability
  run `npm audit fix` to fix them, or `npm audit` for details
electron 入口檔案增加如下程式碼:
$ git diff index.js
 const { app, BrowserWindow } = require('electron')
 const path = require('path')
// 參考 npmjs 包
+try {
+       require('electron-reloader')(module);
+} catch {}
+
重啟服務後,再次修改 index.js、index.html 等檔案,只要儲存就會自動看到效果。
主程序和渲染程序
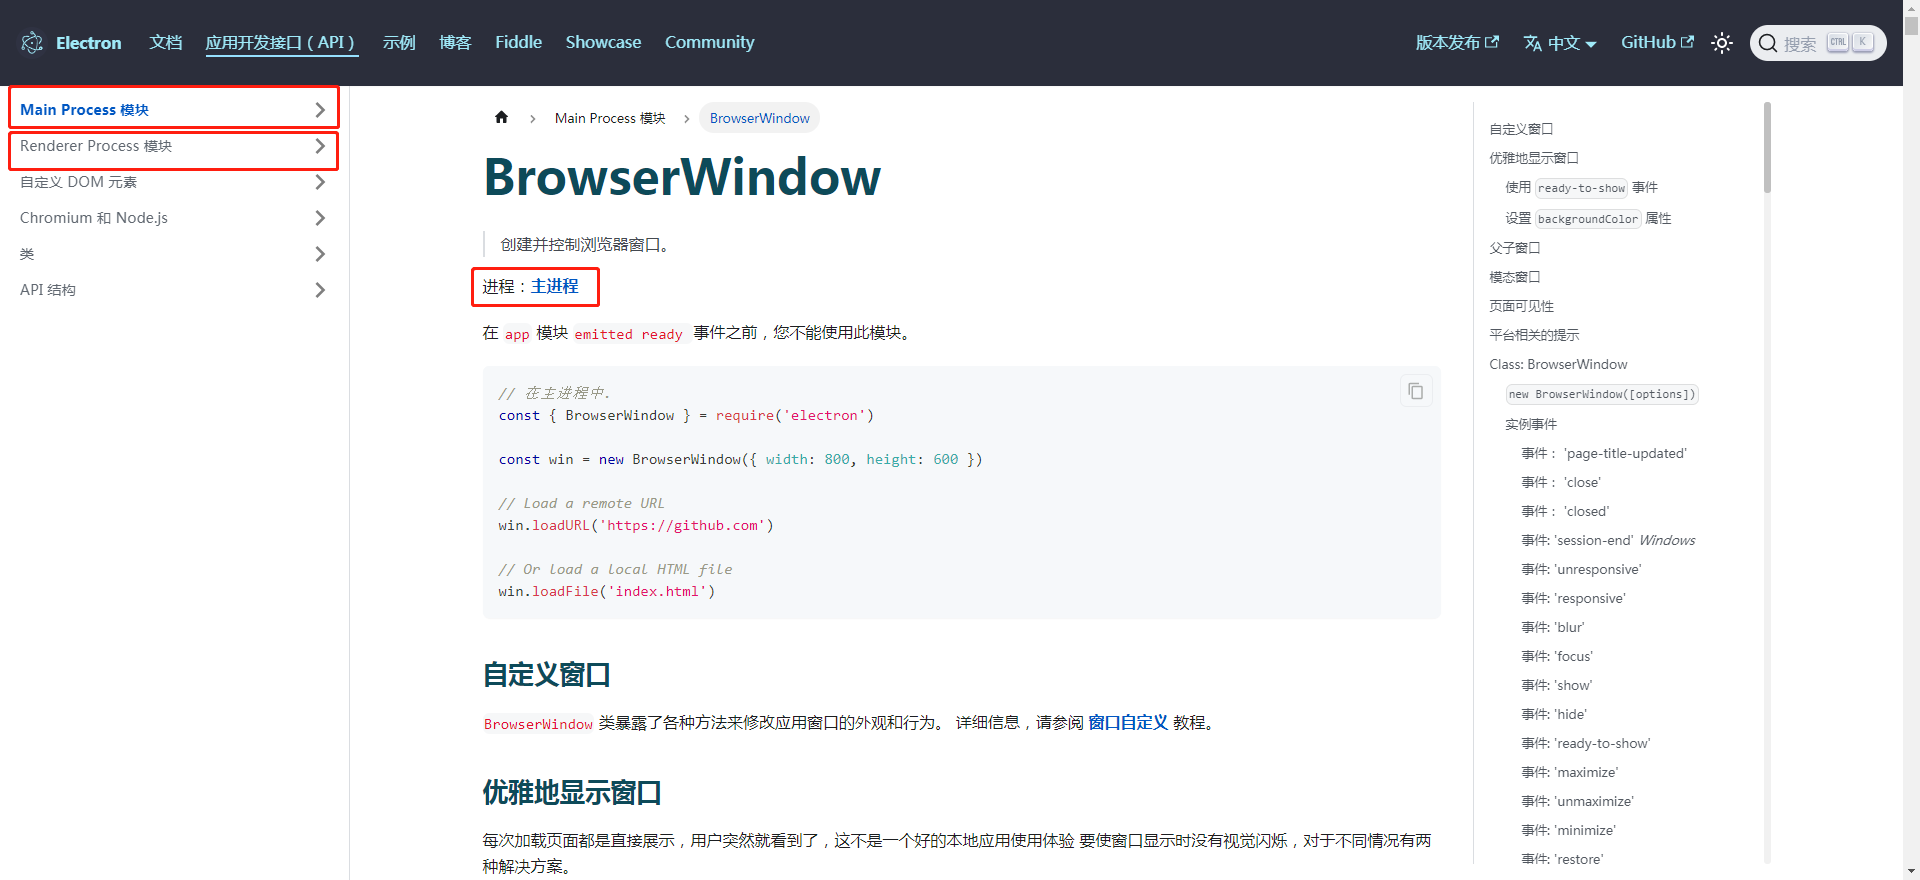
官方api中有Main Process 模組 和 Renderer Process 模組,比如我們在 hello-world 範例中使用的 BrowserWindow 標記了主程序,什麼意思?
- 主程序,通常是指
main.js檔案,是每個 Electron 應用的入口檔案。控制著整個應用的生命週期,從開啟到關閉。主程序負責建立 APP 的每一個渲染程序。一個 electron 應用有且只有一個主執行緒。 - 渲染程序是應用中的瀏覽器視窗。 與主程序不同,渲染程序可能同時存在
多個。 - 如果一個api同時屬於兩個程序,這裡會歸納到
Main Process 模組。 - 如果在渲染程序中需要使用主程序的 api,需要通過
remote的方式(下面會用到)。
選單
通過 Menu.setApplicationMenu 新增選單。程式碼如下:
// index.js
require('./menu.js')
// menu.js
const { BrowserWindow, Menu } = require('electron')
const template = [

    {
        id: '1', label: 'one',
        submenu: [
            {
                label: '新開視窗',
                click: () => {
                    const ArticlePage = new BrowserWindow({
                        width: 500,
                        height: 500,
                    })
                    ArticlePage.loadFile('article.html')
                }
            },
        ]
    },
    { id: '2', label: 'two' },
]
const menu = Menu.buildFromTemplate(template)
Menu.setApplicationMenu(menu)
效果如下圖所示:
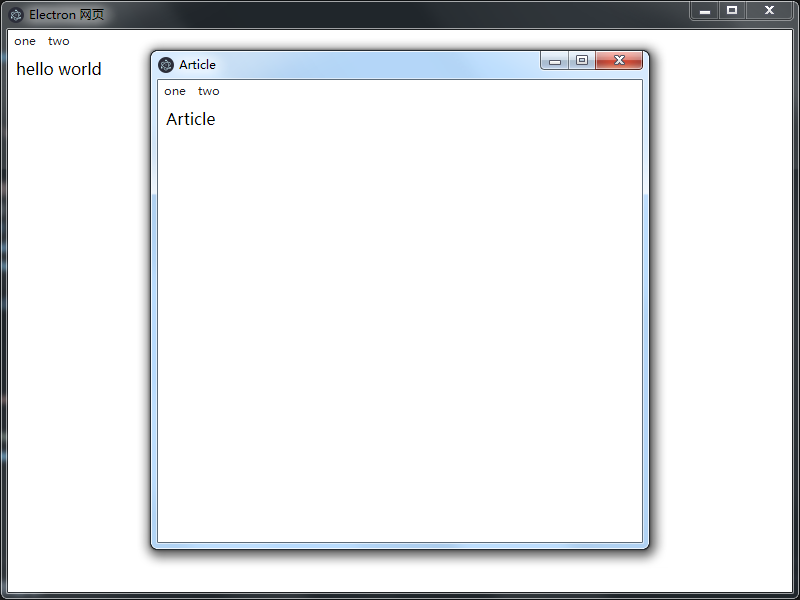
注:新增視窗的選單和主視窗的選單相同。
自定義選單
比如酷狗音樂,導航是比較好看。做法是隱藏原生選單,用自己的 html 代替。
下面我們將原生選單功能改為自定義選單。
首先通過 frame 將應用的邊框去除,原始選單也不再可見:
const mainWindow = new BrowserWindow({
    // frame boolean (可選) - 設定為 false 時可以建立一個無邊框視窗 預設值為 true。
    // 去除邊框,選單也不可見了
  + frame: false,
    width: 1500,
    height: 500,
})
Tip: frame boolean (可選) - 設定為 false 時可以建立一個無邊框視窗 預設值為 true
接著在 html 頁面實現自己的選單。例如:
<p class="nav">
    <span class="j-new">新建視窗</span>
    <span>選單2</span>
</p>
原始的導航是可以通過滑鼠拖動。
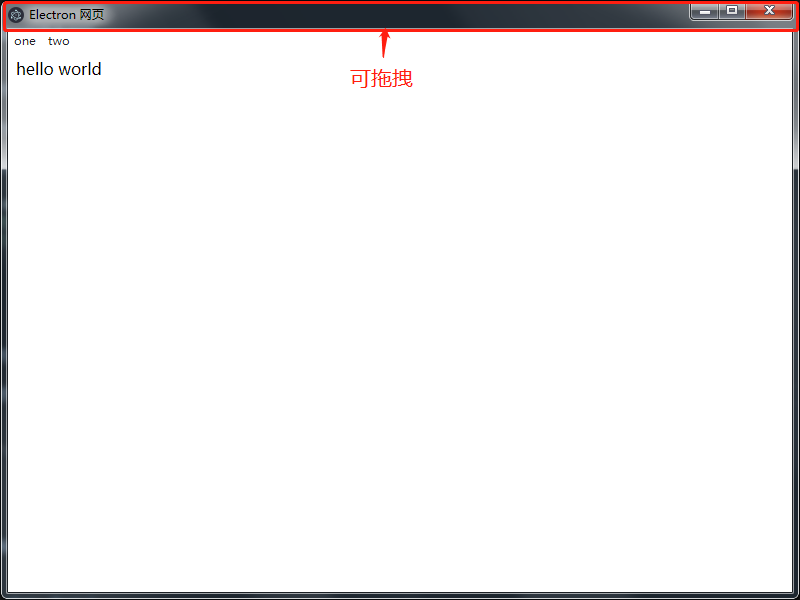
我們可以使用 -webkit-app-region 來增加可拖拽效果:
<style>
    .nav{-webkit-app-region: drag;}
    .nav span{
      -webkit-app-region: no-drag;
      background-color:pink;
      cursor: pointer;
    }
</style>
注:需要給選單關閉拖拽效果,否則 cursor: pointer 會失效,點選也沒反應,無法繼續進行。
接下來給選單新增事件,點選時開啟新視窗。
這裡得使用 BrowserWindow,則需要使用 require。
直接使用 require 會報錯 require is not defined。需要在主程序中開啟:
const mainWindow = new BrowserWindow({
        webPreferences: {
            // 否則報錯:require is not defined
          + nodeIntegration: true,
            // 在新版本的electron中由於安全性的原因還需要設定 contextIsolation: false
          + contextIsolation: false,
        },
    })
接下來就得在引入 BrowserWindow,相當於在渲染程序中使用主程序的 api,需要使用 remote。如果這麼用則會報錯 const BrowserWindow = require("electron").remote.BrowserWindow,網友說:electron12 中已經廢棄了remote 模組,如果需要則需自己安裝 @electron/remote。
進入 npmjs 中搜尋 @electron/remote,用於連線主程序到渲染程序的 js 物件:
// @electron/remote是Electron 模組,連線主程序到渲染程序的 js 物件

@electron/remote is an Electron module that bridges JavaScript objects from the main process to the renderer process. This lets you access main-process-only objects as if they were available in the renderer process.

// @electron/remote是electron內建遠端模組的替代品,該模組已被棄用,最終將被刪除。

@electron/remote is a replacement for the built-in remote module in Electron, which is deprecated and will eventually be removed.
用法如下:
// 安裝依賴
$ npm install --save @electron/remote

// 在主程序中進行初始化
require('@electron/remote/main').initialize()
require("@electron/remote/main").enable(mainWindow.webContents);

// 渲染程序
const { BrowserWindow } = require('@electron/remote')
核心頁面的完整程式碼如下:
- 主程序頁面:
// index.js 入口檔案(主程序)

const { app, BrowserWindow} = require('electron')
// 在主程序中進行初始化,然後才能從渲染器中使用
require('@electron/remote/main').initialize()

// 熱載入
try {
    require('electron-reloader')(module);
} catch { }

function createWindow() {
    const mainWindow = new BrowserWindow({

        // 去除邊框,選單也不可見了
        frame: false,
        width: 1500,
        height: 500,
        webPreferences: {
            // 否則報錯:require is not defined
            nodeIntegration: true,
            // 在新版本的electron中由於安全性的原因還需要設定 contextIsolation: false
            contextIsolation: false,
            // 不需要 enableremoteModule,remote 也生效
            // enableremoteModule: true
        },
    })
    // 在electron >= 14.0.0中,您必須使用新的enableAPI 分別為每個所需的遠端模組啟用WebContents
    // 筆者:"electron": "^20.1.1"
    require("@electron/remote/main").enable(mainWindow.webContents);

    // 載入html頁面
    mainWindow.loadFile('index.html')
}

app.whenReady().then(() => {
    createWindow()
})

// 載入選單
require('./menu.js')
- 渲染程序頁面
<!-- index.html -->
<!DOCTYPE html>
<html lang="en">
<head>
    <meta charset="UTF-8">
    <meta http-equiv="X-UA-Compatible" content="IE=edge">
    <meta name="viewport" content="width=device-width, initial-scale=1.0">
    <title>Electron 網頁</title>
    <style>
        .nav{-webkit-app-region: drag;}
        .nav span{-webkit-app-region: no-drag;background-color:pink;cursor: pointer;}
    </style>
</head>
<body>
    <p class="nav">
        <span class="j-new">新建視窗</span>
        <span><a href='www.baidu.com'>百度</a></span>
    </p>

    hello world2
    <script src="index-js.js"></script>
</body>
</html>
// index-js.js 渲染程序

// 渲染視窗使用 require 瀏覽器報錯:Uncaught ReferenceError: require is not defined
const { BrowserWindow } = require('@electron/remote')

const elem = document.querySelector('.j-new')
elem.onclick = function(){
    const ArticlePage = new BrowserWindow({
        width: 500,
        height: 500,
    })
    ArticlePage.loadFile('article.html')
}
開啟瀏覽器
現在需要點選自定義選單中的百度,然後開啟瀏覽器並跳轉到百度。
這裡主要用到 shell,它屬於主程序也屬於渲染程序,所以這裡無需使用 remote 方式引入。首先在 index.html 中增加 a 標籤,然後在 js 中註冊點選事件,最後呼叫 shell.openExternal 即可。請看程式碼:
<p class="nav">
    <span class="j-new">新建視窗</span>
    <span><a href='https://www.baidu.com'>百度</a></span>
</p>
// index-js.js
const { shell} = require('electron')
// 渲染視窗使用 require 瀏覽器報錯:Uncaught ReferenceError: require is not defined
const { BrowserWindow } = require('@electron/remote')

...
const aElem = document.querySelectorAll('a');

[...aElem].forEach(item => item.onclick=(e)=>{
    // 防止主程序開啟頁面
    e.preventDefault()
    const url = e.target.getAttribute('href');
    shell.openExternal(url)
})
點選百度,會開啟本地預設瀏覽器。
Tip:如果不要 http 直接寫成 www.baidu.com,筆者測試失敗。
檔案讀取和儲存
先看要實現的效果:
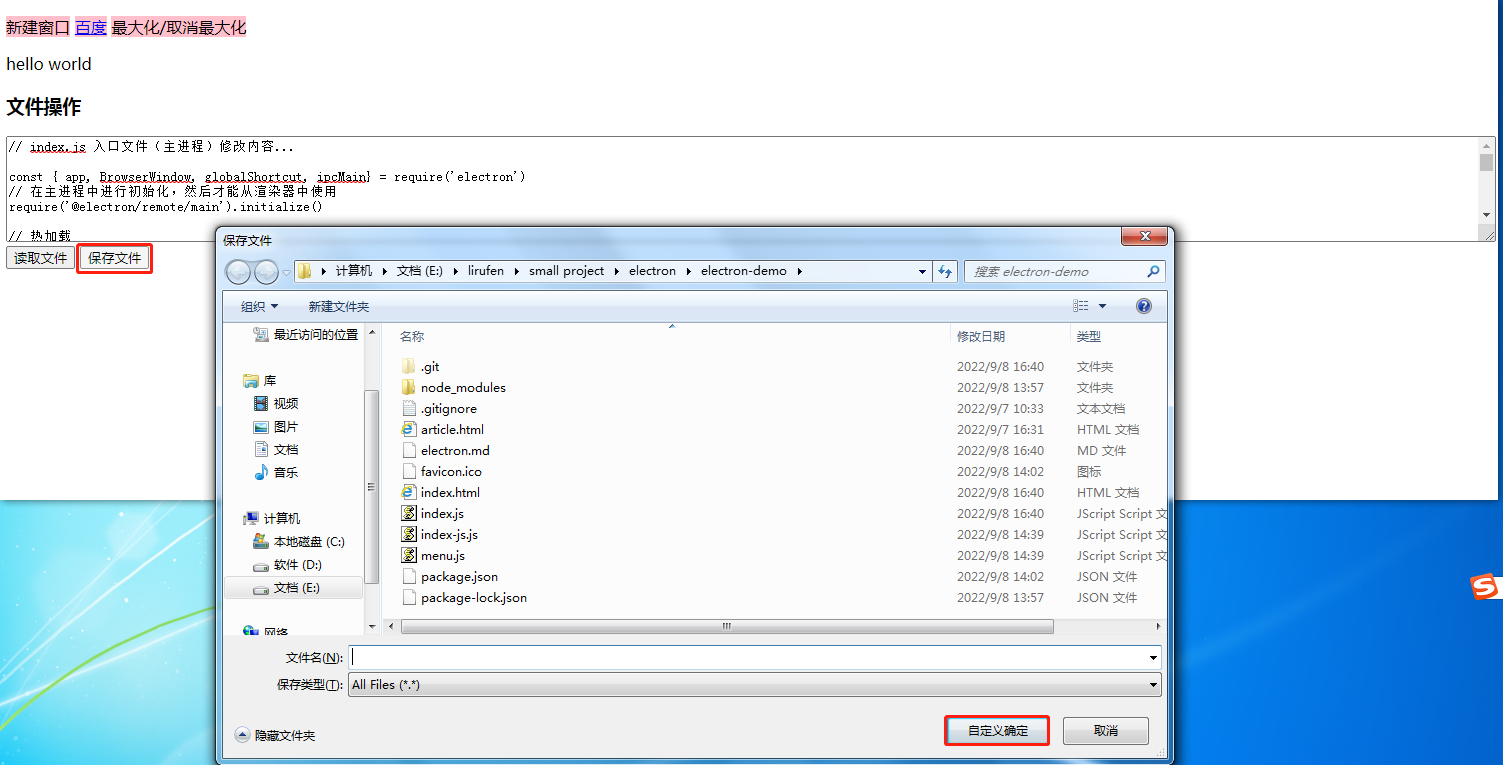
點選讀取,選擇檔案後,檔案內容會顯示到 textarea 中,對 textarea 進行修改文案,點選儲存,輸入要儲存的檔名即可儲存。
這裡需要使用主程序的 dialog api。由於 dialog 屬於主程序,要在渲染程序中使用,則需要使用 remote。
dialog - 顯示用於開啟和儲存檔案、警報等的本機系統對話方塊。這裡用到兩個 api 分別用於開啟讀取檔案和儲存檔案的系統視窗:
dialog.showOpenDialogSync,開啟讀取檔案的系統視窗,可以定義標題、確定按鈕的文字、指定可顯示檔案的陣列型別等等,點選儲存,返回使用者選擇的檔案路徑。接下來就得用 node 去根據這個路徑讀取檔案內容dialog.showSaveDialogSync,與讀檔案類似,這裡是儲存,返回要儲存的檔案路徑
Tip:真正讀取檔案和儲存檔案還是需要使用 node 的 fs 模組。有關 node 的讀寫檔案可以參考這裡
核心程式碼如下:
// index-js.js
const fs = require('fs')
const { BrowserWindow, dialog } = require('@electron/remote')
...

// 檔案操作
const readElem = document.querySelector('.j-readFile')
const textarea = document.querySelector('textarea')
const writeElem = document.querySelector('.j-writeFile')
// 讀檔案
readElem.onclick = function () {
    // 返回 string[] | undefined, 使用者選擇的檔案路徑,如果對話方塊被取消了 ,則返回undefined。
    const paths = dialog.showOpenDialogSync({ title: '選擇檔案', buttonLabel: '自定義確定' })
    console.log('paths', paths)
    fs.readFile(paths[0], (err, data) => {
        if (err) throw err;
        textarea.value = data.toString()
        console.log(data.toString());
    });
}

// 寫檔案
writeElem.onclick = function () {
    // 返回 string | undefined, 使用者選擇的檔案路徑,如果對話方塊被取消了 ,則返回undefined。
    const path = dialog.showSaveDialogSync({ title: '儲存檔案', buttonLabel: '自定義確定' })
    console.log('path', path)
    // 讀取要儲存的內容
    const data = textarea.value
    fs.writeFile(path, data, (err) => {
        if (err) throw err;
        console.log('The file has been saved!');
    });
}
註冊快捷鍵
比如 vscode 有快捷鍵,這裡我們也給加上。比如按 ctrl+m 時,最大化或取消最大化視窗。
這裡需要使用 globalShortcut(主程序 ):在應用程式沒有鍵盤焦點時,監聽鍵盤事件。
用法很簡單,直接註冊即可。請看程式碼:
const { app, BrowserWindow, globalShortcut} = require('electron')

app.whenReady().then(() => {
    const mainWindow = createWindow()
    // 註冊快捷鍵
    globalShortcut.register('CommandOrControl+M', () => {
        // 主程序會在 node 中輸出,而非瀏覽器
        console.log('CommandOrControl+M is pressed')
        // 如果是不是最大,就最大化,否則取消最大化
        !mainWindow.isMaximized() ? mainWindow.maximize() : mainWindow.unmaximize()
    })
})
渲染程序中註冊快捷鍵也類似,不過需要通過 remote 的方式引入。就像這樣:
const { BrowserWindow, dialog, globalShortcut } = require('@electron/remote')

// 渲染程序中註冊快捷鍵
globalShortcut.register('CommandOrControl+i', () => {
    // 主程序會在 node 中輸出,而非瀏覽器
    console.log('CommandOrControl+i is pressed')
})
主執行緒和渲染程序通訊
需求:在渲染程序中點選一個按鈕,來觸發主執行緒的放大或取消放大功能。
需要使用以下兩個 api:
ipcMain主程序 - 從主程序到渲染程序的非同步通訊。ipcRenderer渲染程序 - 從渲染器程序到主程序的非同步通訊。
Tip:在 Electron 中,程序使用 ipcMain 和 ipcRenderer 模組,通過開發人員定義的「通道」傳遞訊息來進行通訊。 這些通道是 任意 (您可以隨意命名它們)和 雙向 (您可以在兩個模組中使用相同的通道名稱)的。
首先在主程序註冊事件:
ipcMain.on('max-unmax-event', (evt, ...args) => {
    // max-unmax-event。args= [ 'pjl' ]
    console.log('max-unmax-event。args=', args)
})
接著在 index.html 中增加最大化/取消最大化按鈕:
<p class="nav">
    <span class="j-new">新建視窗</span>
  + <span class="j-max">最大化/取消最大化</span>
</p>
最後在渲染程序中,點選按鈕時通過 ipcRenderer 觸發事件,並可傳遞引數。就像這樣
// 最大化/取消最大化
const maxElem = document.querySelector('.j-max')
maxElem.onclick = function() {
    ipcRenderer.send('max-unmax-event', 'pjl')
    console.log('max')
}
打包
打包可以藉助 electron-packager 來完成。
// 安裝
$ npm install --save-dev electron-packager

// 用法
npx electron-packager <sourcedir> <appname> --platform=<platform> --arch=<arch> [optional flags...]

// 就像這樣
"build": "electron-packager ./ electron-demo --platform=win32 --arch=x64 ./outApp --overwrite --icon=./favicon.ico"
筆者環境是 node13.14,構建失敗:
$ npm run build

> [email protected] build electron\electron-demo
> electron-packager ./ electron-demo --platform=win32 --arch=x64 ./outApp --overwrite --icon=./favicon.ico

CANNOT RUN WITH NODE 13.14.0
Electron Packager requires Node >= 14.17.5.
npm ERR! code ELIFECYCLE
...
react/vue 中使用 electron
用法很簡單,首先準備好 react 或 vue 專案,筆者就以多次使用的 react(spug) 專案來進行。
安裝 electron 包:
$ npm i -D electron
在 package.json 中增加執行命令,指定 electron 入口檔案:
$ git diff package.json
   "name": "spug_web",
+  "main": "electron-main.js",
    "scripts": {
        "test": "react-app-rewired test",
        "eject": "react-scripts eject",
+       "electron": "electron ."
    },
   "devDependencies": {
+    "electron": "^20.1.2",
編寫 electron 入口檔案如下,其中 loadFile 要改為 loadURL。
// electron-main.js
const { app, BrowserWindow } = require('electron')
const path = require('path')

function createWindow() {
    const mainWindow = new BrowserWindow({
        width: 800,
        height: 600,
    })
    // loadFile 改為 loadURL
    mainWindow.loadURL('http://localhost:3000/')
}

app.whenReady().then(() => {
    createWindow()
})
// 啟動 react 專案,在瀏覽器中能通過 http://localhost:3000/ 正常存取
$ npm run start
// 啟動 electron
$ npm run electron
正常的話, electron 中就能看到 react 的專案。效果如下:
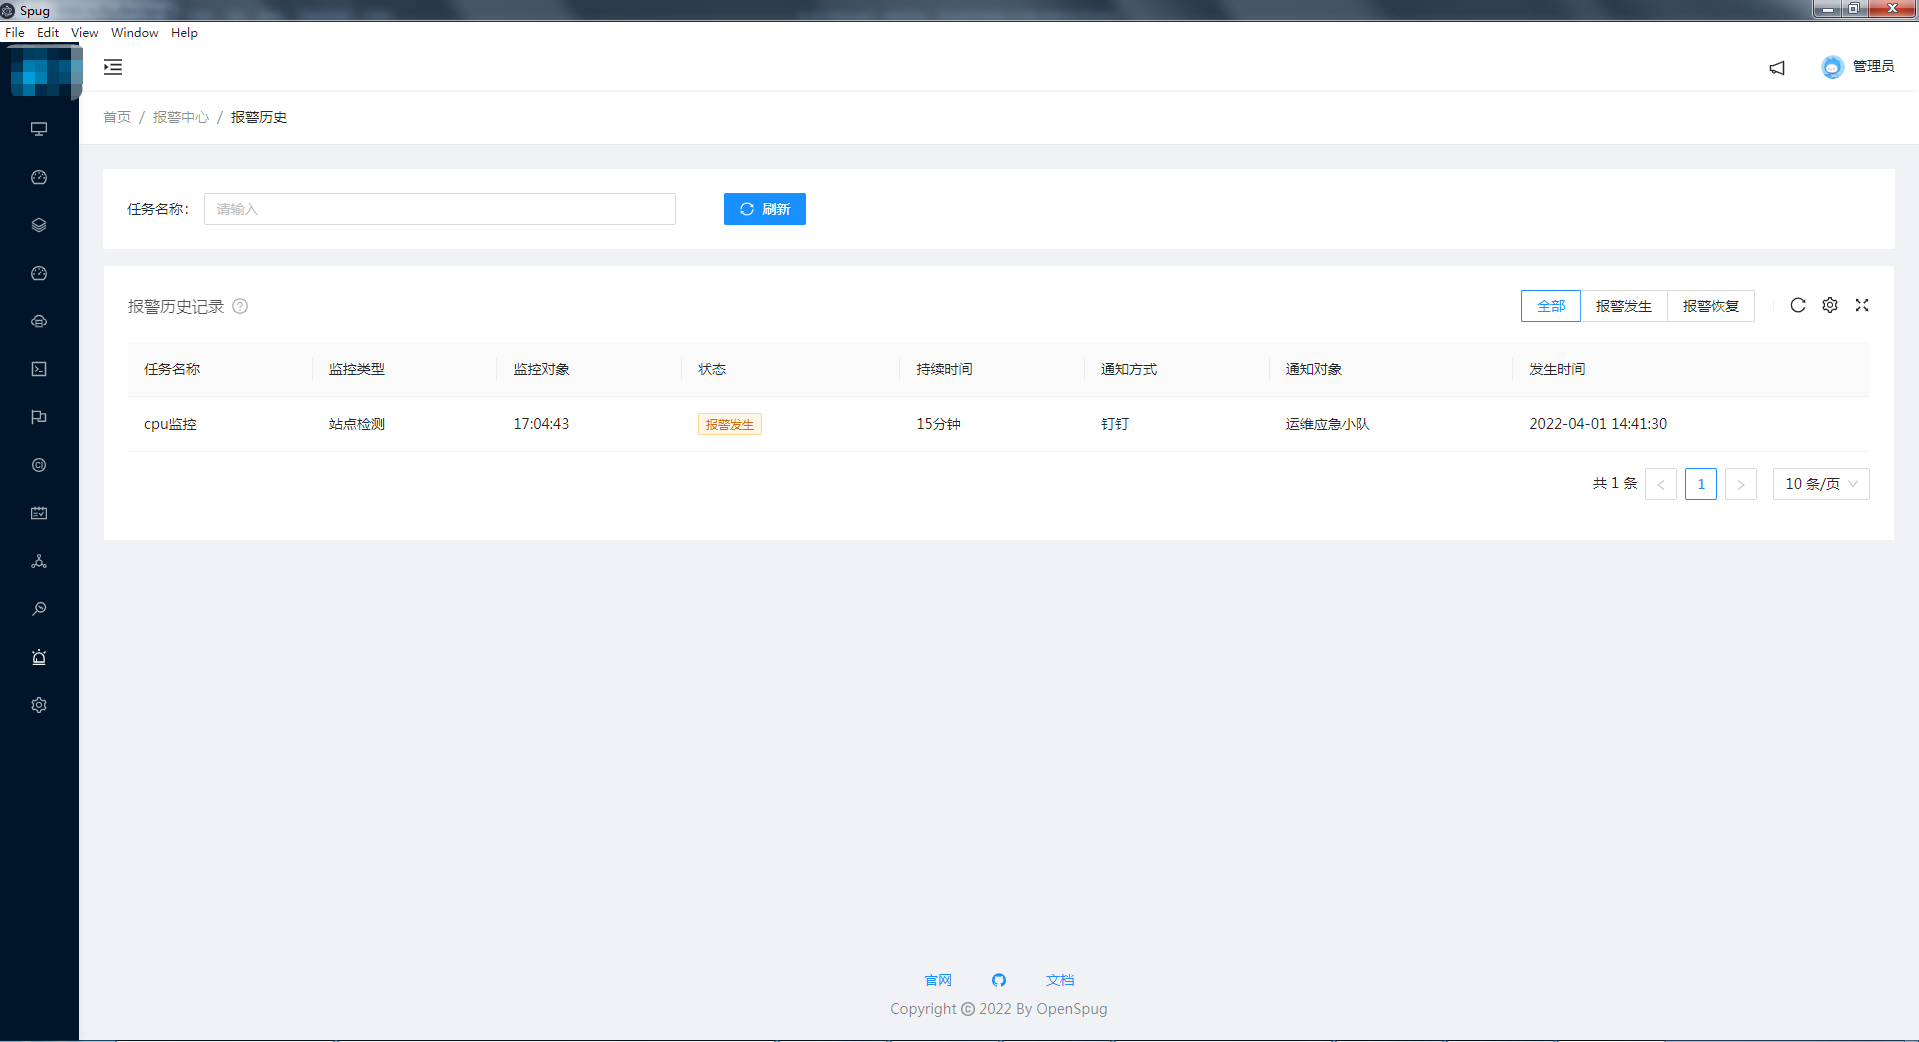
Tip:如果釋出的話,首先通過 react 構建,例如輸出 dir,然後將 loadURL 改為 loadFile('./dir/index.html')。
完整程式碼
index.js
// index.js 入口檔案(主程序)

const { app, BrowserWindow, globalShortcut, ipcMain} = require('electron')
// 在主程序中進行初始化,然後才能從渲染器中使用
require('@electron/remote/main').initialize()

// 熱載入
try {
    require('electron-reloader')(module);
} catch { }

function createWindow() {
    const mainWindow = new BrowserWindow({

        // frame boolean (可選) - 設定為 false 時可以建立一個無邊框視窗 預設值為 true。
        // 去除邊框,選單也不可見了
        frame: false,
        width: 1500,
        height: 500,
        webPreferences: {
            // 否則報錯:require is not defined
            nodeIntegration: true,
            // 在新版本的electron中由於安全性的原因還需要設定 contextIsolation: false
            contextIsolation: false,
            // 不需要 enableremoteModule,remote 也生效
            // enableremoteModule: true
        },
    })
    // 在electron >= 14.0.0中,您必須使用新的enableAPI 分別為每個所需的遠端模組啟用WebContents
    // 筆者:"electron": "^20.1.1"
    require("@electron/remote/main").enable(mainWindow.webContents);

    // 載入html頁面
    mainWindow.loadFile('index.html')
    return mainWindow
}

app.whenReady().then(() => {
    const mainWindow = createWindow()
    // 註冊快捷鍵
    globalShortcut.register('CommandOrControl+M', () => {
        // 主程序會在 node 中輸出,而非瀏覽器
        console.log('CommandOrControl+M is pressed')
        // 如果是不是最大,就最大化,否則取消最大化
        !mainWindow.isMaximized() ? mainWindow.maximize() : mainWindow.unmaximize()
    })
})

// 載入選單
require('./menu.js')

ipcMain.on('max-unmax-event', (evt, ...args) => {
    console.log('max-unmax-event。args=', args)
})
index.html
<!-- index.html -->
<!DOCTYPE html>
<html lang="en">
<head>
    <meta charset="UTF-8">
    <meta http-equiv="X-UA-Compatible" content="IE=edge">
    <meta name="viewport" content="width=device-width, initial-scale=1.0">
    <title>Electron 網頁</title>
    <style>
        .nav{-webkit-app-region: drag;}
        .nav span{-webkit-app-region: no-drag;background-color:pink;cursor: pointer;}
    </style>
</head>
<body>
    <p class="nav">
        <span class="j-new">新建視窗</span>
        <span><a href='https://www.baidu.com'>百度</a></span>
        <span class="j-max">最大化/取消最大化</span>
    </p>

    <p>hello world</p>

    <section>
        <h3>檔案操作</h3>
        <textarea style="height:100px;width:100%;" placeholder="請先讀取檔案,修改後儲存"></textarea>
        <button class="j-readFile">讀取檔案</button>
        <button class="j-writeFile">儲存檔案</button>
    </section>
    <script src="index-js.js"></script>
</body>
</html>
index-js.js
// index-js.js
const { shell, ipcRenderer } = require('electron')
const fs = require('fs')
// 渲染視窗使用 require 瀏覽器報錯:Uncaught ReferenceError: require is not defined
const { BrowserWindow, dialog, globalShortcut } = require('@electron/remote')

const elem = document.querySelector('.j-new')
elem.onclick = function () {
    const ArticlePage = new BrowserWindow({
        width: 500,
        height: 500,
    })
    ArticlePage.loadFile('article.html')
}

const aElem = document.querySelectorAll('a');

[...aElem].forEach(item => item.onclick = (e) => {
    e.preventDefault()
    const url = e.target.getAttribute('href');
    console.log('href', url)

    shell.openExternal(url)
})

// 檔案操作
const readElem = document.querySelector('.j-readFile')
const textarea = document.querySelector('textarea')
const writeElem = document.querySelector('.j-writeFile')
// 讀檔案
readElem.onclick = function () {
    // 返回 string[] | undefined, 使用者選擇的檔案路徑,如果對話方塊被取消了 ,則返回undefined。
    const paths = dialog.showOpenDialogSync({ title: '選擇檔案', buttonLabel: '自定義確定' })
    console.log('paths', paths)
    fs.readFile(paths[0], (err, data) => {
        if (err) throw err;
        textarea.value = data.toString()
        console.log(data.toString());
    });
}

// 寫檔案
writeElem.onclick = function () {
    // 返回 string | undefined, 使用者選擇的檔案路徑,如果對話方塊被取消了 ,則返回undefined。
    const path = dialog.showSaveDialogSync({ title: '儲存檔案', buttonLabel: '自定義確定' })
    console.log('path', path)
    // 讀取要儲存的內容
    const data = textarea.value
    console.log('data', data)
    fs.writeFile(path, data, (err) => {
        if (err) throw err;
        console.log('The file has been saved!');
    });
}

// 渲染程序中註冊快捷鍵
globalShortcut.register('CommandOrControl+i', () => {
    // 主程序會在 node 中輸出,而非瀏覽器
    console.log('CommandOrControl+i is pressed')
    // mainWindow.webContents.openDevTools()
    // // 如果是不是最大,就最大化,否則取消最大化
    // !mainWindow.isMaximized() ? mainWindow.maximize() : mainWindow.unmaximize()
})

// 最大化/取消最大化
const maxElem = document.querySelector('.j-max')
maxElem.onclick = function() {
    ipcRenderer.send('max-unmax-event', 'pjl')
    console.log('max')
}
menu.js
// menu.js
const { BrowserWindow, Menu } = require('electron')
const template = [

    {
        id: '1', label: 'one',
        submenu: [
            {
                label: '新開視窗',
                click: () => {
                    const ArticlePage = new BrowserWindow({
                        width: 500,
                        height: 500,
                    })
                    ArticlePage.loadFile('article.html')
                }
            },
        ]
    },
    { id: '2', label: 'two' },
]
const menu = Menu.buildFromTemplate(template)
Menu.setApplicationMenu(menu)
package.json
{
  "name": "electron-demo",
  "version": "1.0.0",
  "description": "",
  "main": "index.js",
  "scripts": {
    "test": "echo \"Error: no test specified\" && exit 1",
    "start": "electron .",
    "build": "electron-packager ./ electron-demo --platform=win32 --arch=x64 ./outApp --overwrite --icon=./favicon.ico"
  },
  "keywords": [],
  "author": "",
  "license": "ISC",
  "devDependencies": {
    "electron": "^20.1.1",
    "electron-packager": "^16.0.0",
    "electron-reloader": "^1.2.3"
  },
  "dependencies": {
    "@electron/remote": "^2.0.8"
  }
}
出處:https://www.cnblogs.com/pengjiali/p/16671784.html
本文版權歸作者和部落格園共有,歡迎轉載,但未經作者同意必須保留此段宣告,且在文章頁面明顯位置給出原文連線。