深入瞭解Angular中的NgModule(模組)

前端(vue)入門到精通課程:進入學習
NgModule 會把相關的程式碼收集到一些功能集中,形成功能單元。在使用Angular CL 命令新建一個專案的時候,會給我們生成一個根模組,命名為 AppModule,根模組有一個根元件AppComponent,引導這個根模組就可以啟動應用。Angular 應用是模組化的,我們在開發中會根據其功能 作用 以及其特性,建立大大小小各種模組,從而構建其成為一個應用程式,任何模組都能包含任意數量的其它元件。【相關教學推薦:《》】
1.@NgModule()
import { BrowserModule } from '@angular/platform-browser';
import { NgModule } from '@angular/core';

import { AppRoutingModule } from './app-routing.module';
import { AppComponent } from './app.component';

@NgModule({
  declarations: [
    AppComponent
  ],
  imports: [
    BrowserModule,
    AppRoutingModule
  ],
  providers: [],
  bootstrap: [AppComponent]
})
export class AppModule { }
由⬆️程式碼我們可以看到,NgModule 是一個帶有 @NgModule() 裝飾器的類,它接受一個後設資料物件,該物件的屬性用來描述這個模組。
點進去@NgModule() 裝飾器的類我們可以看到他有如下屬性以及官方的對其屬性的解釋。
export declare interface NgModule {
    providers?: Provider[];// 本模組向全域性服務中貢獻的那些服務的建立器。 這些服務能被本應用中的任何部分使用。(你也可以在元件級別指定服務提供商,這通常是首選方式。)
    declarations?: Array<Type<any> | any[]>;// 那些屬於本 NgModule 的元件、指令、管道
    imports?: Array<Type<any> | ModuleWithProviders<{}> | any[]>;// 那些匯出了本模組中的元件模板所需的類的其它模組
    exports?: Array<Type<any> | any[]>;//那些能在其它模組的元件模板中使用的可宣告物件的子集
    entryComponents?: Array<Type<any> | any[]>;
    bootstrap?: Array<Type<any> | any[]>;
    schemas?: Array<SchemaMetadata | any[]>;
}
以下是本人使用Angular後對此後設資料屬性個人口語化的理解
providers:將本模組所有在元件中注入的服務,在這裡提前定義好,否則在此模組中使用這個服務會有錯誤提示。
declaration:declaration 英文意思為宣告。在這裡宣告一些模組中要使用到的一些元件,指令,管道等。
imports:匯入一些模組,比如說我把所有的指令構成一個模組 我使用其中某些指令的時候,我可以選擇匯入整個指令模組。也可以匯入一些通過npm install 安裝的一些模組匯入其中,才可以使用。
exports:匯出元件or指令管道等,以供參照此模組的模組可以使用此模組的元件or 指令管道等。
exporyComponents:entry component 表示 angular 的入口元件,可以引導元件是一個入口元件,Angular 會在引導過程中把它載入到 DOM 中。 其它入口元件是在其它時機動態載入的。字面上的意義,但是啥時候用呢,比如,我要彈出一個元件,那麼這個元件是要動態載入到DOM中了吧,這個時候就需要將這個元件xxxComponent寫上了。
bootstrap:這個模組啟動的時候應該啟動的元件,上面程式碼可以看到AppModule是作為根模組的啟動元件。
schemas:不屬於Angular的元件或者指令的元素或者屬性都需要在這裡進行宣告。
2.JavaScript 模組 與 NgModule
JavaScript 和 Angular 都使用模組來組織程式碼,雖然它們的組織形式不同,但 Angular 的應用會同時依賴兩者。
JavaScript 模組:
模組是內含 JavaScript 程式碼的獨立檔案。要讓其中的東西可用,要寫一個匯出語句
例:
export class AppComponent { ... }在其他檔案中需要使用
import { AppComponent } from './app.component';而NgModulem模組我們在隨筆的開頭以及介紹他的後設資料,對其有一定的瞭解了。
NgModule 類 與 JavaScript 模組有下列關鍵性的不同:
1.NgModule 只繫結了可宣告的類,這些可宣告的類只是供 Angular 編譯器用的。
2.NgModule 與 JavaScript 類把它所有的成員類都放在一個巨型檔案中不同,只要把該模組的類列在它的 @NgModule.declarations 列表中。
3.NgModule 只能匯出可宣告的類。這可能是它自己擁有的也可能是從其它模組中匯入的。它不會宣告或匯出任何其它型別的類。
4.與 JavaScript 模組不同,NgModule 可以通過把服務提供商加到 @NgModule.providers 列表中,來用服務擴充套件整個應用。
相比之下我們可以看出,NgModulem模組更靈活,擴充套件性強,更具優勢。
3.常用模組
首先要知道跑起來一個專案需要參照什麼基本的模組,以下是Angular 提供的一些官方的模組。
NgModule | 匯入自 | 為何使用 |
|---|---|---|
|
| 當你想要在瀏覽器中執行應用時 |
|
| 當你想要使用 |
|
| 當要構建模板驅動表單時(它包含 |
|
| 當要構建響應式表單時 |
RouterModule | @angular/router | 要使用路由功能,並且你要用到 |
|
| 當你要和伺服器對話時 |
4.特性模組的分類
官方檔案將模組分為五大類。
- 領域特性模組
- 帶路由的特性模組
- 路由模組
- 服務特性模組
- 可視部件特性模組
雖然我特麼當年根本不知道,但是在開發中慢慢摸索其實發現也是根據模組的特性將模組的分類,結果不經相同。
以下為個人在開發中對功能模組的劃分
1).業務型模組:整一個應用程式,根據其業務功能我們可以將程式拆分為一個個模組,有很明確的業務特性,圍繞其業務功能的模組。例如:使用者模組,訂單模組等。它有自己獨立的路由,有提供與此模組的服務,有一個or多個元件,它惰性懶載入,不會匯出or提供任何元件or指令管道,參照官方、本應用程式or第三方的功能模組。它有明確的業務特性,不與別的模組有耦合性。
2).元件模組:應用程式中通常都有規範化的標準設計 ,比如說統一的table,card date 等。將這些都抽出來,做成一個個元件,在模組中匯出此元件以供其他模組使用,這樣減少了應用程式中重複的樣式程式碼等。曾經我是將所有這種可能多處要使用的封裝為元件後,統一在一個模組中匯出,後來演變為每一個元件都拆分為一個模組。這樣也是發現如果這種通用性的元件多起來的話,假設有二三十個元件在這個UIComponent模組中,而我因為要使用其中一兩個元件而匯入這個模組,效能是很差的,所以後來都將元件拆分為一個個模組以供業務模組使用,例:DateModule,InputModule..等。
3).服務模組:提供一些通用型的服務。比如說http服務對httpClient二次包裝適用於專案,檔案服務,設定服務等。
4).其他模組:應用程式中我們會根據需要會做一些指令管道等,其就形成一個指令模組包含應用程式中所有等指令,管道模組包含應用程式中的所有管道。後來覺得,其實這些指令管道不需要集中起來統一匯出參照。因為一個模組並不會參照到指令模組中超過百分之八十的指令,so 只需要把它們集中到一個pipe資料夾下,哪個模組需要用到具體個指令or管道,直接宣告在其模組中使用便可。
5.建立,匯入特性模組
我們將系統根據其功能 業務劃分好模組,有利於合作開發,程式碼的維護和使用。
建立特性模組
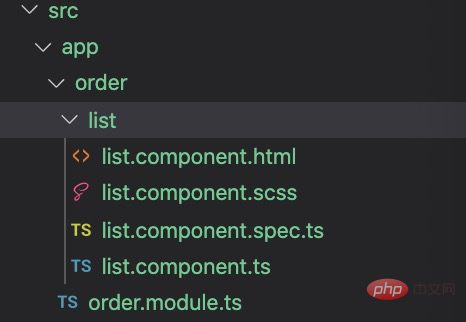
ng g m order
ng g c order/list // 訂單模組下新建一個list 元件
我們看最後cli給我們生成的目錄結構

order.module.ts
import { NgModule } from '@angular/core';
import { CommonModule } from '@angular/common';
import { ListComponent } from './list/list.component';

@NgModule({
  declarations: [ListComponent],//定義list元件
  exports: [ListComponent],//匯出list元件
  imports: [
    CommonModule
  ]
})
export class OrderModule { }
list.component.ts
import { Component, OnInit } from '@angular/core';

@Component({
  selector: 'app-list',
  templateUrl: './list.component.html',
  styleUrls: ['./list.component.scss']
})
export class ListComponent implements OnInit {

  constructor() { }

  ngOnInit() {
  }

}
匯入使用特性模組
現在我們匯入根模組
app.module.ts
import { BrowserModule } from '@angular/platform-browser';
import { NgModule } from '@angular/core';

import { AppRoutingModule } from './app-routing.module';
import { AppComponent } from './app.component';
import { OrderModule } from './order/order.module';

@NgModule({
  declarations: [
    AppComponent
  ],
  imports: [
    BrowserModule,
    AppRoutingModule,
    OrderModule //將order模組匯入
  ],
  providers: [],
  bootstrap: [AppComponent]
})
export class AppModule { }
app.component.html 在跟模組使用
<!--The content below is only a placeholder and can be replaced.-->
<div style="text-align:center">
  <h1>
    Welcome to {{ title }}!
  </h1>
</div>

<app-list></app-list>
<router-outlet></router-outlet>
我們可以看到渲染了order模組的list元件

6.惰性載入模組
如果我們將所有的模組都匯入根模組,那麼應用在初始化載入的時候就會非常慢。這時候我們應該考慮使用惰性載入。根據需求載入相應都模組,減少應用初始化包的大小以及減少載入的時間,提高使用者體驗性。
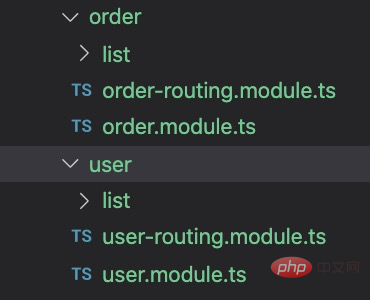
惰性載入的模組特點是該模組擁有路由模組。so 接著上面我們建立了一個訂單模組 我們給訂單模組加上路由。並再建立一個user.module以及user.module模組下的list元件。

order.module
import { NgModule } from '@angular/core';
import { CommonModule } from '@angular/common';

import { OrderRoutingModule } from './order-routing.module';
import { ListComponent } from './list/list.component';


@NgModule({
  declarations: [ListComponent],
  imports: [
    CommonModule,
    OrderRoutingModule
  ]
})
export class OrderModule { }
order-routing.module
import { NgModule } from '@angular/core';
import { Routes, RouterModule } from '@angular/router';
import { ListComponent } from './list/list.component';


const routes: Routes = [
  {
    path: 'list',
    component: ListComponent
  },
];

@NgModule({
  imports: [RouterModule.forChild(routes)],
  exports: [RouterModule]
})
export class OrderRoutingModule { }
user模組如此類推
接下來設定路由
AppRoutingModule在頂級路由中設定
import { NgModule } from '@angular/core';
import { Routes, RouterModule } from '@angular/router';

const routes: Routes = [
  {
    path: 'orders',
    loadChildren: './order/order.module#OrderModule'
  },
  {
    path: 'orders',
    loadChildren: './user/user.module#UserModule'
  }
];

@NgModule({
  imports: [RouterModule.forRoot(routes)],
  exports: [RouterModule]
})
export class AppRoutingModule { }
我們給app.component.html新增兩個button
<!--The content below is only a placeholder and can be replaced.-->
<div style="text-align:center">
  <h2>
    Welcome to {{ title }}!
  </h2>
</div>


<button routerLink="/user/list">user</button>
<button routerLink="/order/list">order</button>

<router-outlet></router-outlet>
效果圖

惰性載入模組有什麼好處呢,在大型專案中往往有許多個模組,而且大很大。如果一個模組1m,如果我們在瀏覽器輸入地址開啟這個應用,瞬間要載入100m 是非常慢的,而且我們並非要是用到著這100個模組。將系統業務拆分為各個模組,劃分好界限。按需載入,我點選了user 我載入user 模組我出現user 列表,對user進行操作。當我需要使用時才載入極大的減少了頁面初始載入的時間以及減少了資源的消耗。

7.共用模組
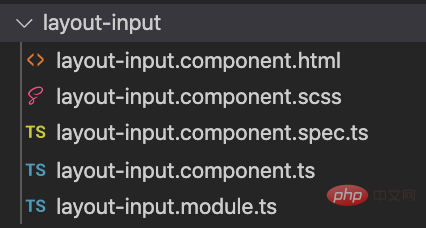
共用模組顧名思義,就是共用於所有的模組中。首先得定義好這個模組的具體功能特性,比如指令、管道和元件等分別封裝成一個個模組,哪些業務模組需要使用到其裡面的功能變匯入其模組中便可。簡單的比如,本系統的input 都是統一樣式的,我們可以製作一個input 模組 然後在其他模組直接匯入使用。這極大的規範了系統的統一性和降低了以後的維護成本。

更多程式設計相關知識,請存取:!!
以上就是深入瞭解Angular中的NgModule(模組)的詳細內容,更多請關注TW511.COM其它相關文章!
