spring專案中starter包的原理,以及自定義starter包的使用
MAVEN專案中starter的原理
一.原始方式
我們最早設定spring應用的時候,必須要經歷的步驟:1.pom檔案中引入相關的jar包,包括spring,redis,jdbc等等 2.通過properties或者xml設定相關的資訊 3.不斷偵錯直到可以使用。
問題:時間長,複雜,同時在寫下一個專案的時候大概率要經過相同的模式設定才能達到可以使用的狀態。同時在眾多的jar中,我們需要相互設定依賴間的版本關係,十分的複雜
原始版本:
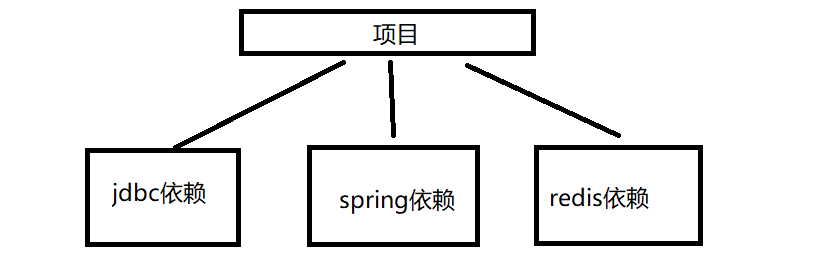
我們就想到能不能把這些jdbc整合起來,類似於深度學習中anaconda下載依賴一樣去管理,依賴間的關係不需要我們去負責,而是交給spring去管理。
starter版本:
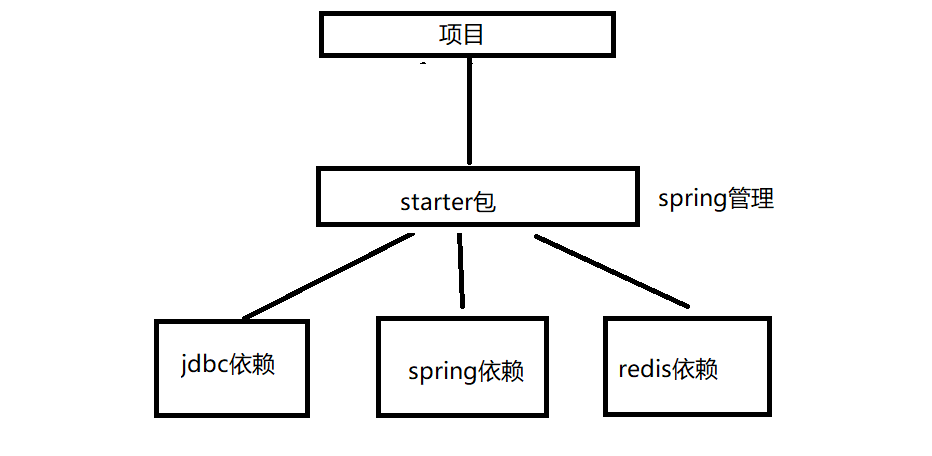
我們可以將starter包看作是一個包裝箱,把複雜的事情都交給了spring負責,官方維護starter包會匯入的東西。而我們只需要知道那個starter包是有什麼用處,例如:spring-boot-starter-web是負責spring web專案的依賴。
<dependency>
            <groupId>org.springframework.boot</groupId>
            <artifactId>spring-boot-starter-web</artifactId>
        </dependency>
二.starter內部詳情
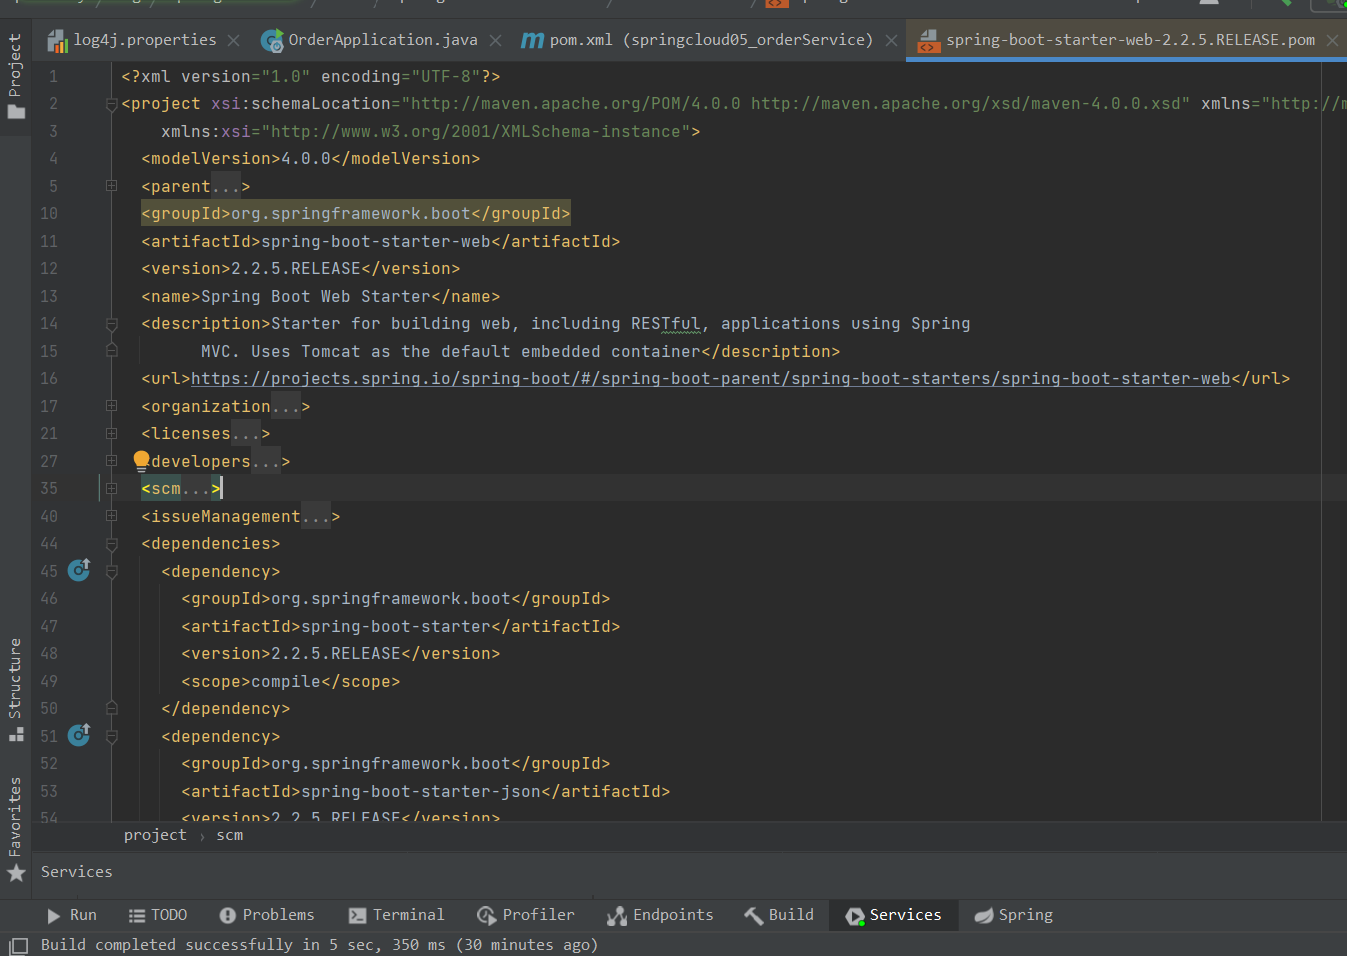
starter檔案也只是一個pom檔案,而不是jar,它的目的也是去自動的引入其他的jar檔案,上圖展示的spring-boot-starter-web中的依賴就有spring-boot-starter。
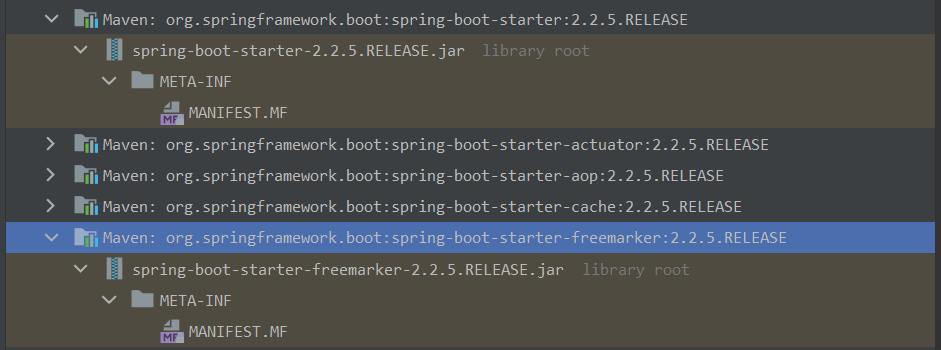
starter只是一個pom檔案
下面也就是starter的關鍵所在,請問我們為什麼引入了starter之後只需要設定一點點的個性化設定,例如建立application.properties僅僅設定埠等等就可以完成啟動應用?是誰幫助我們設定了其他複雜的資訊?
引出自動設定
三.自動設定
1.自動設定類的梳理
自動設定主要通過xxxAutoConfiguration這些類來實現,我們查詢一個這樣的類來進行範例演示
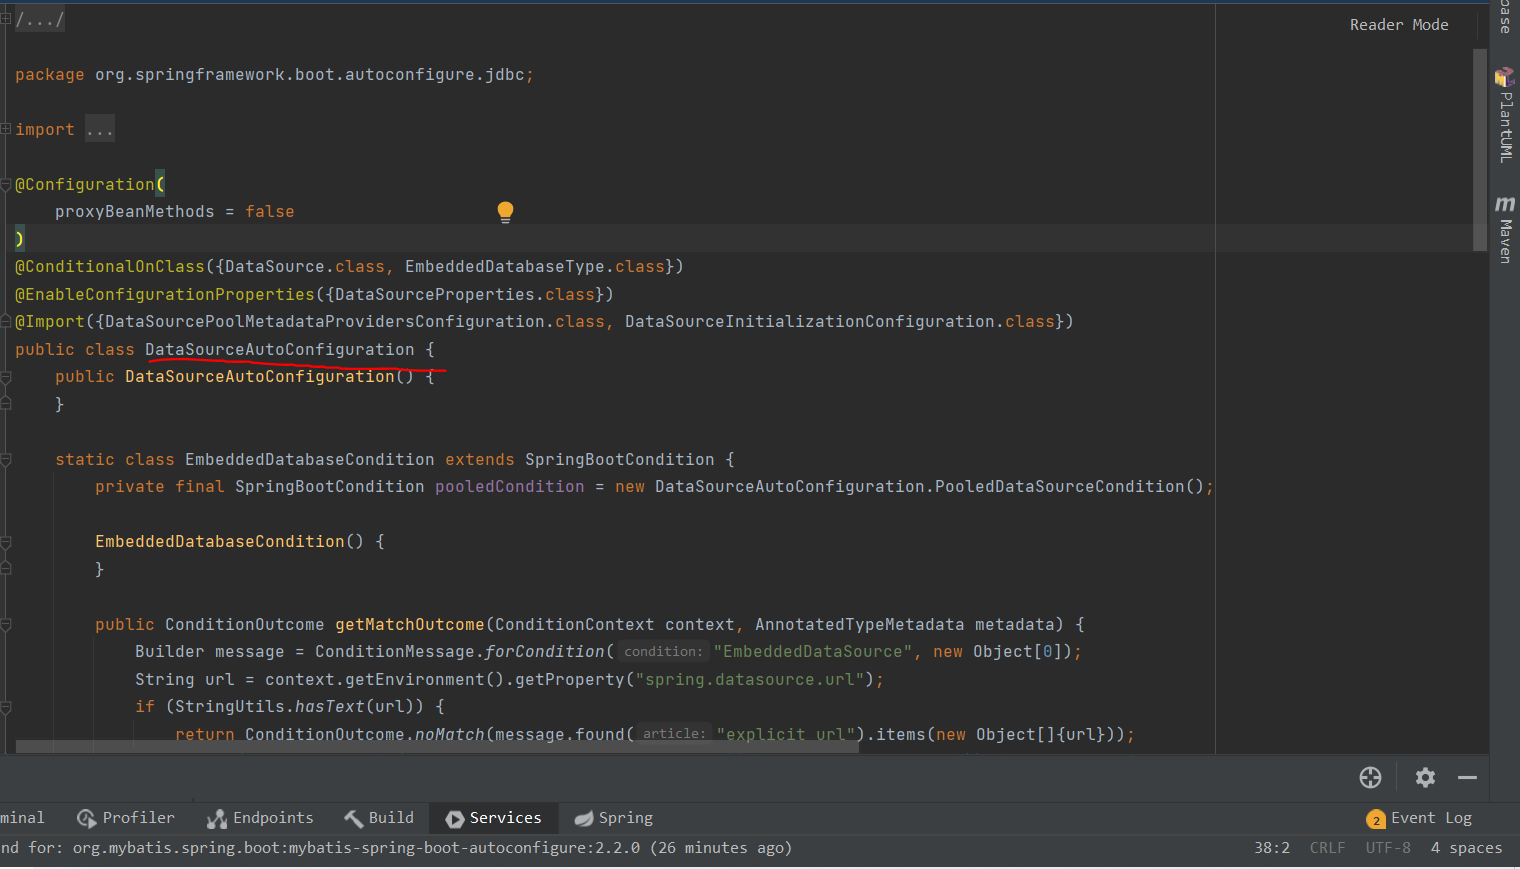
上圖是DataSourceAutoConfiguration這個自動設定類,我們可以看到類上的幾個註解。
- @Configuration 將該類標記為設定類,@Configuration註解的類可以看作是能生產讓Spring IoC容器管理的Bean範例的工廠
- @ConditionalOnClass表示某個類位於類路徑上時候,才會範例化這個bean
- @EnableConfigurationProperties註解的作用是使@ConfigurationProperties註解生效。如果只設定@ConfigurationProperties註解,在spring容器中是獲取不到yml或者properties組態檔轉化的bean的。
我們點選@EnableConfiguration註解中的@DataSourceProperties進去檢視
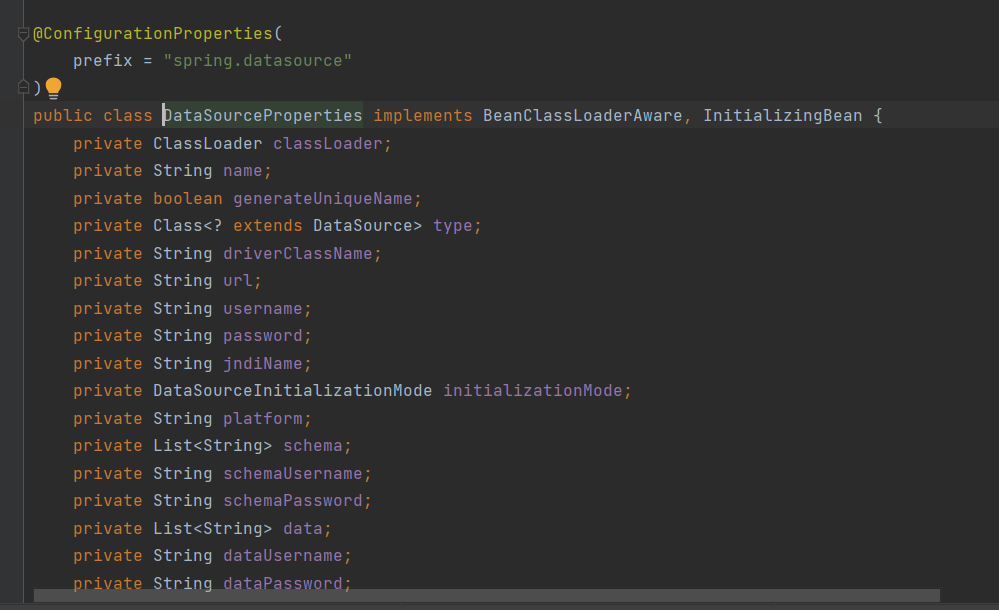
可以檢視到這裡使用@configurationPropertes,@ConfigurationProperties註解的作用是把yml或者properties組態檔轉化為bean。
同時這裡也設定了prefix字首,在我們專案的application.properties中設定的時候,提示的就是這些bean範例中的屬性。
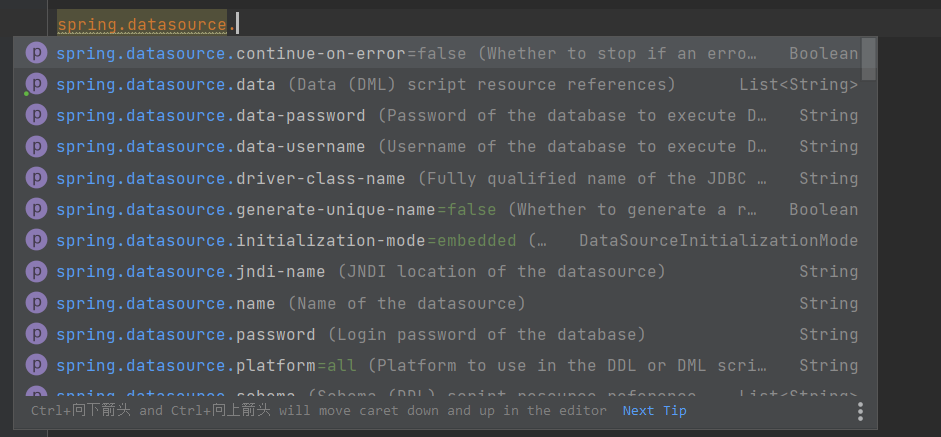
所以是使用@ConfigurationProperties和@EnableConfigurationProperties這兩個註解來完成將一個包含眾多屬性的類來註冊成為可供springIoc容器管理的bean。
而這個bean的註冊過程是在各個XXXAutoConfiguration類中完成的。
2.如何發現依賴包中的bean
我們都知道springboot預設掃描啟動類下面的主類和子類的bean來完成註解,但是並沒有包括依賴包中的類,那麼依賴包中的bean是如何被發現和載入的?
關鍵在於@SpringBootApplication這個註解
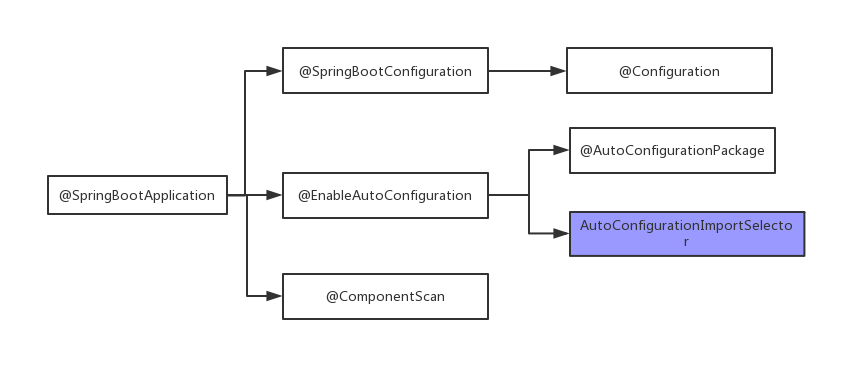
註解層次:
-
@springbootApplication
-
@SpringBootConfiguration:和@Configuration相同的用處,並且將裡面通過@bean註解標註的方法的返回值作為bean物件註冊到ioc容器之中。
獲得bean的兩種方式,一種是在設定類中通過方法返回,一種是直接在類上註解@bean(或者相同的註解,類似@Mapper等)來註冊為bean範例
-
@EnableAutoConfiguration:藉助@Import的支援,收集和註冊依賴包中相關的bean定義。
-
@Import({AutoConfigurationImportSelector.class}):該註解掃描依賴包下需要註冊為bean的自動設定類。
protected List<String> getCandidateConfigurations(AnnotationMetadata metadata, AnnotationAttributes attributes) { List<String> configurations = SpringFactoriesLoader.loadFactoryNames(this.getSpringFactoriesLoaderFactoryClass(), this.getBeanClassLoader()); Assert.notEmpty(configurations, "No auto configuration classes found in META-INF/spring.factories. If you are using a custom packaging, make sure that file is correct."); return configurations; }SpringFactoriesLoader.loadFactoryNames方法呼叫loadSpringFactories方法從所有的jar包中讀取META-INF/spring.factories檔案資訊。
而Spring.factories中key/value中就有一個key是:org.springframework.boot.autoconfigure.EnableAutoConfiguration,後面跟著的都是需要AutoConfigurationImportSelector來進行註冊的自動設定類
# Auto Configure org.springframework.boot.autoconfigure.EnableAutoConfiguration=\ org.mybatis.spring.boot.autoconfigure.MybatisLanguageDriverAutoConfiguration,\ org.mybatis.spring.boot.autoconfigure.MybatisAutoConfiguration -
@AutoConfigurationPackage
-
@Import({Registrar.class}):Registrar就是掃描啟動類目錄下的所有bean並且註冊,具體實現通過下列程式碼:
static class Registrar implements ImportBeanDefinitionRegistrar, DeterminableImports {
        Registrar() {
        }

        public void registerBeanDefinitions(AnnotationMetadata metadata, BeanDefinitionRegistry registry) {
            AutoConfigurationPackages.register(registry, (new AutoConfigurationPackages.PackageImport(metadata)).getPackageName());
        }

        public Set<Object> determineImports(AnnotationMetadata metadata) {
            return Collections.singleton(new AutoConfigurationPackages.PackageImport(metadata));
        }
    }
-
-
-
註解層次圖示:
3.如何載入發現的bean
如果要讓一個普通類交給Spring容器管理,通常有以下方法:
- 使用 @Configuration與@Bean 註解
- 使用@Controller @Service @Repository @Component 註解標註該類,然後啟用@ComponentScan自動掃描
- 使用@Import 方法
springboot中使用了@Import 方法
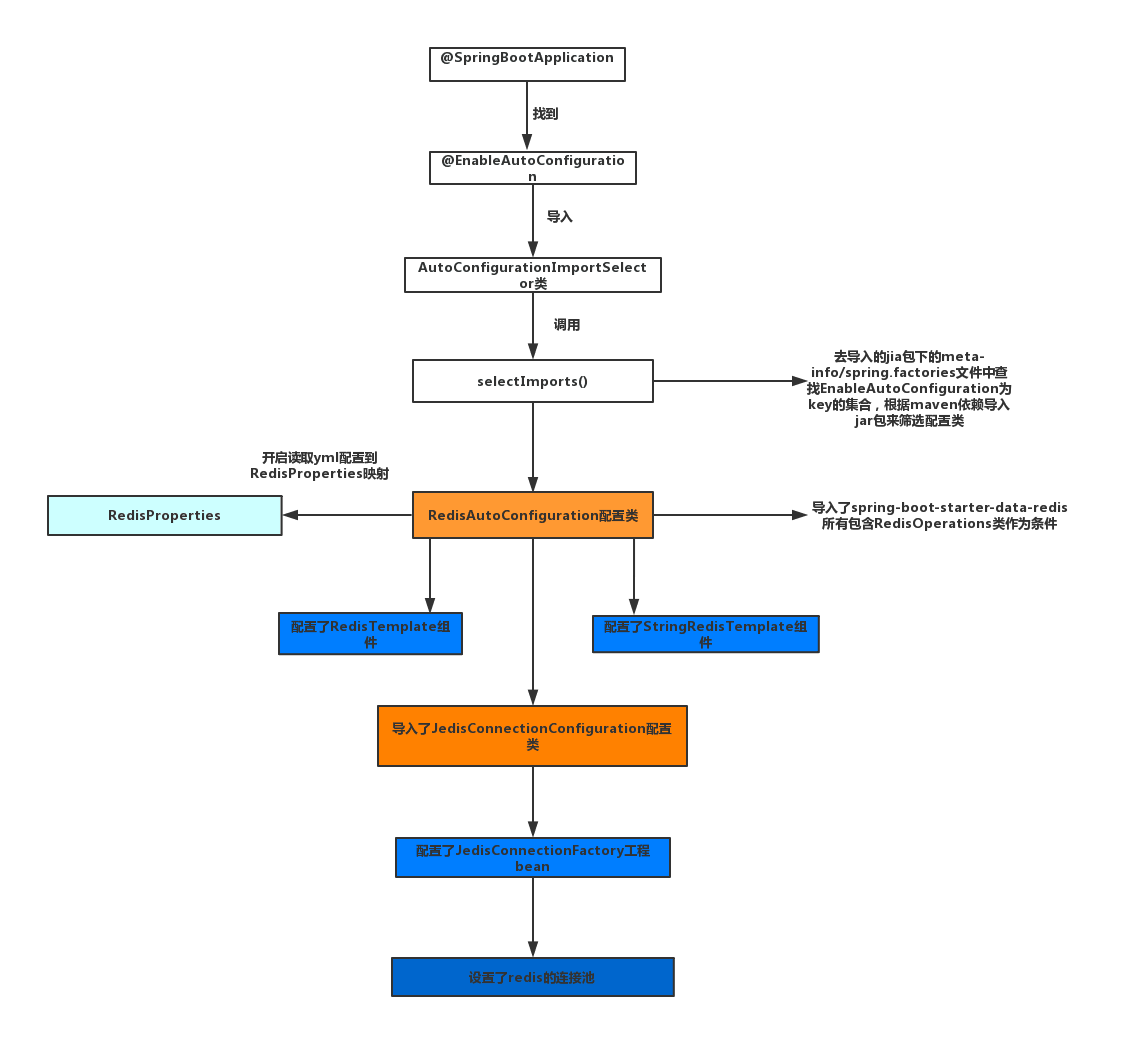
@EnableAutoConfiguration註解中使用了@Import({AutoConfigurationImportSelector.class})註解,AutoConfigurationImportSelector實現了DeferredImportSelector介面,
DeferredImportSelector介面繼承了ImportSelector介面,ImportSelector介面只有一個selectImports方法。
selectImports方法返回一組bean,@EnableAutoConfiguration註解藉助@Import註解將這組bean注入到spring容器中,springboot正式通過這種機制來完成bean的注入的。
關於@import註解的載入可以檢視這個文章:https://zhuanlan.zhihu.com/p/147025312
ps:暈乎乎的,我只看懂了一部分。
載入redisAutoConfiguration的流程圖示
四.自定義starter
下面我們演示自定義starter的流程:
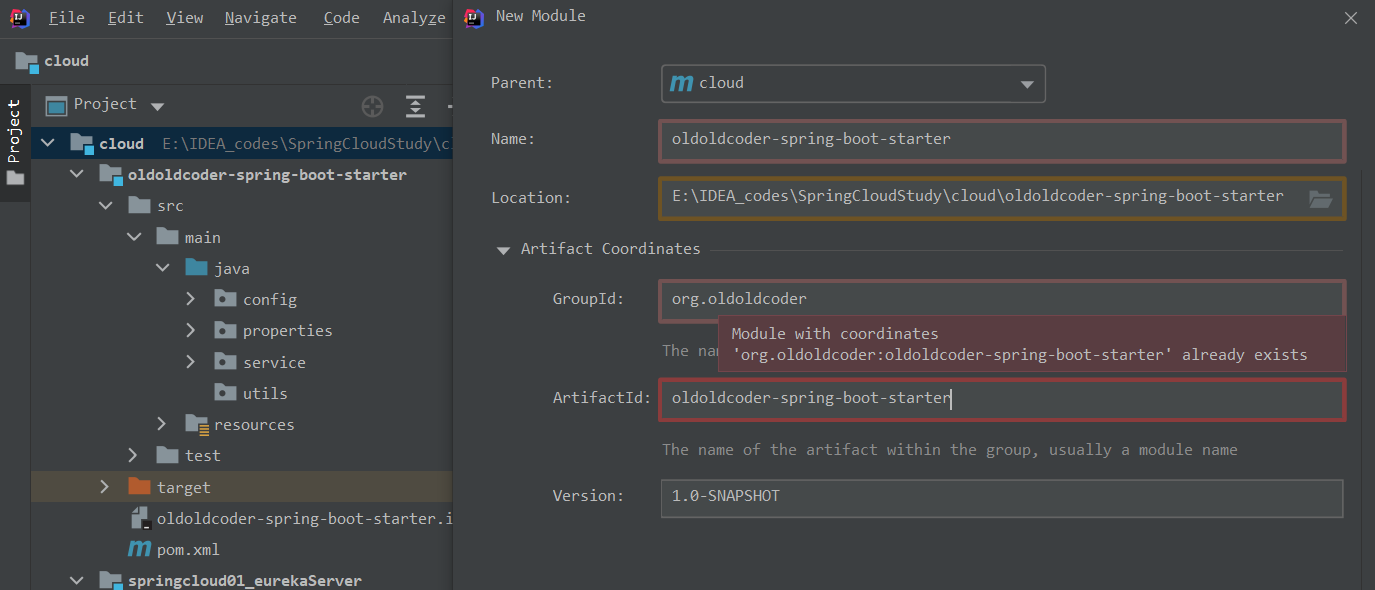
我們確定好自定義starter的GAV(groupId,ArtifactId,Version),這裡需要注意的是ArtifactId的命名,對於spring進行管理的starter包,命名規則是:spring-boot-starter-xxx,而為了區別spring進行管理的starter包,自定義的starter包一般命名規則是:xxx-spring-boot-starter,例如mybatis官方推出的starter包:mybatis-spring-boot-starter。
groupId使用自己域名的反寫即可。
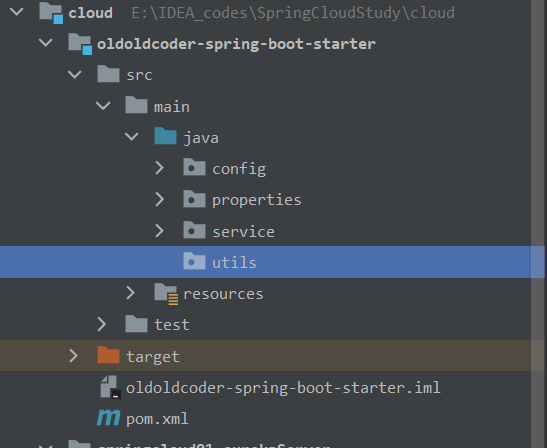
專案結構如下:
1.pom檔案匯入依賴
 <dependencies>
        <dependency>
            <groupId>org.springframework.boot</groupId>
            <artifactId>spring-boot-configuration-processor</artifactId>
            <version>2.7.3</version>
             <optional>true</optional>
        </dependency>
        <dependency>
            <groupId>org.springframework.boot</groupId>
            <artifactId>spring-boot-starter</artifactId>
            <version>2.7.1</version>
            <optional>true</optional>
        </dependency>
        <dependency>
            <groupId>org.projectlombok</groupId>
            <artifactId>lombok</artifactId>
            <version>1.18.24</version>
        </dependency>
    </dependencies>
依賴:spring-boot-configuration-processor 作用:匯入之後會自動生成後設資料(meta-data),在application.properties設定的時候會有提示。
例如:
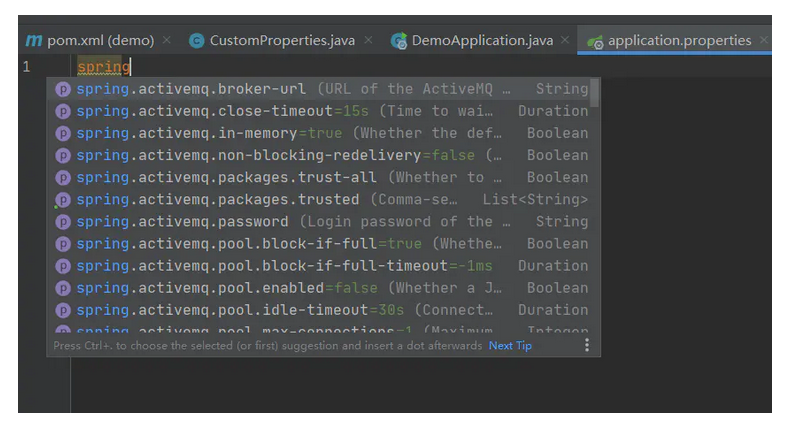
由於是自動生成,在你設定了@ConfigurationProperties之後就會自動生成後設資料,在你寫application.properties的時候就會進行自動提示。
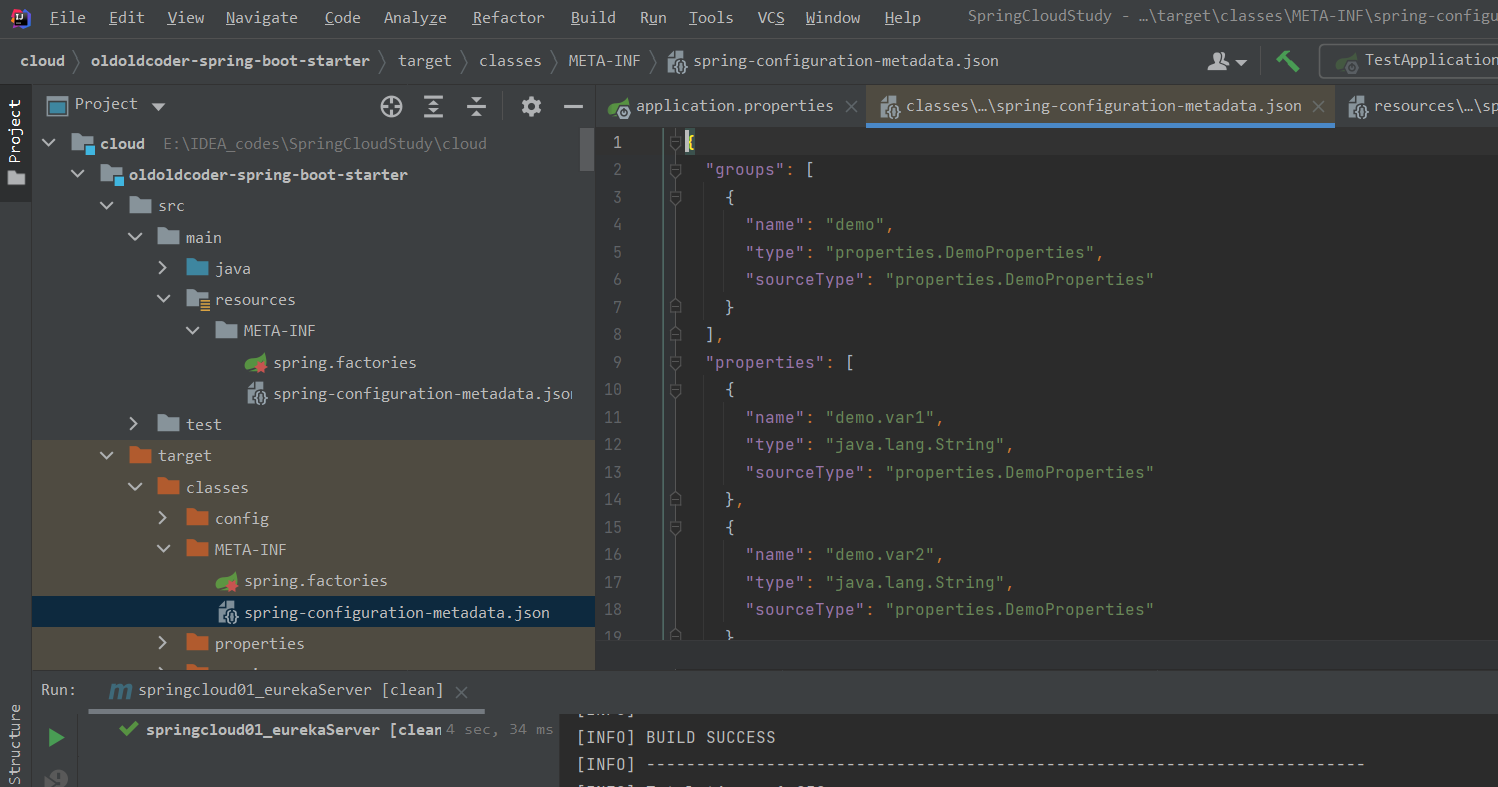
當無法提示的時候多次clean,之後再compile然後在install釋出。
具體可以看這個部落格 https://blog.csdn.net/wangleleb/article/details/104904348
依賴: spring-boot-starter 作用:是為了使用前面提到的自動設定的註解。註解@ConfigurationProperties和@EnableConfigurationProperties兩個註解都在spring-boot-context包中
2.編寫程式碼
編寫自動設定類程式碼:
package properties;

import lombok.Getter;
import lombok.Setter;
import org.springframework.boot.context.properties.ConfigurationProperties;


@ConfigurationProperties(prefix = "demo")
@Getter
@Setter
public class DemoProperties{

    private String var1;

    private String var2;

}
編寫service程式碼:
package service;


import lombok.AllArgsConstructor;

@AllArgsConstructor
public class DemoService {

    public String var1;

    public String var2;

    public String variable(){
        return this.var1 + " " + this.var2;
    }

}
編寫config類:
@Configuration
@EnableConfigurationProperties(DemoProperties.class)
// 只有當name的值與havingValue的值相同的時候載入
@ConditionalOnProperty(
        prefix = "demo",
        name = "isopen",
        havingValue = "true"
)
public class DemoConfig {

    @Resource
    private DemoProperties demoProperties;

    @Bean
    public DemoService demoService(){
        return new DemoService(demoProperties.getVar1(),demoProperties.getVar2());
    }
}
關於這裡@ConditionOnProperty這個註解,該註解的大概含義就是,對於字首是demo的屬性,底下的值isopen為true時候,該自動設定類才會生效。
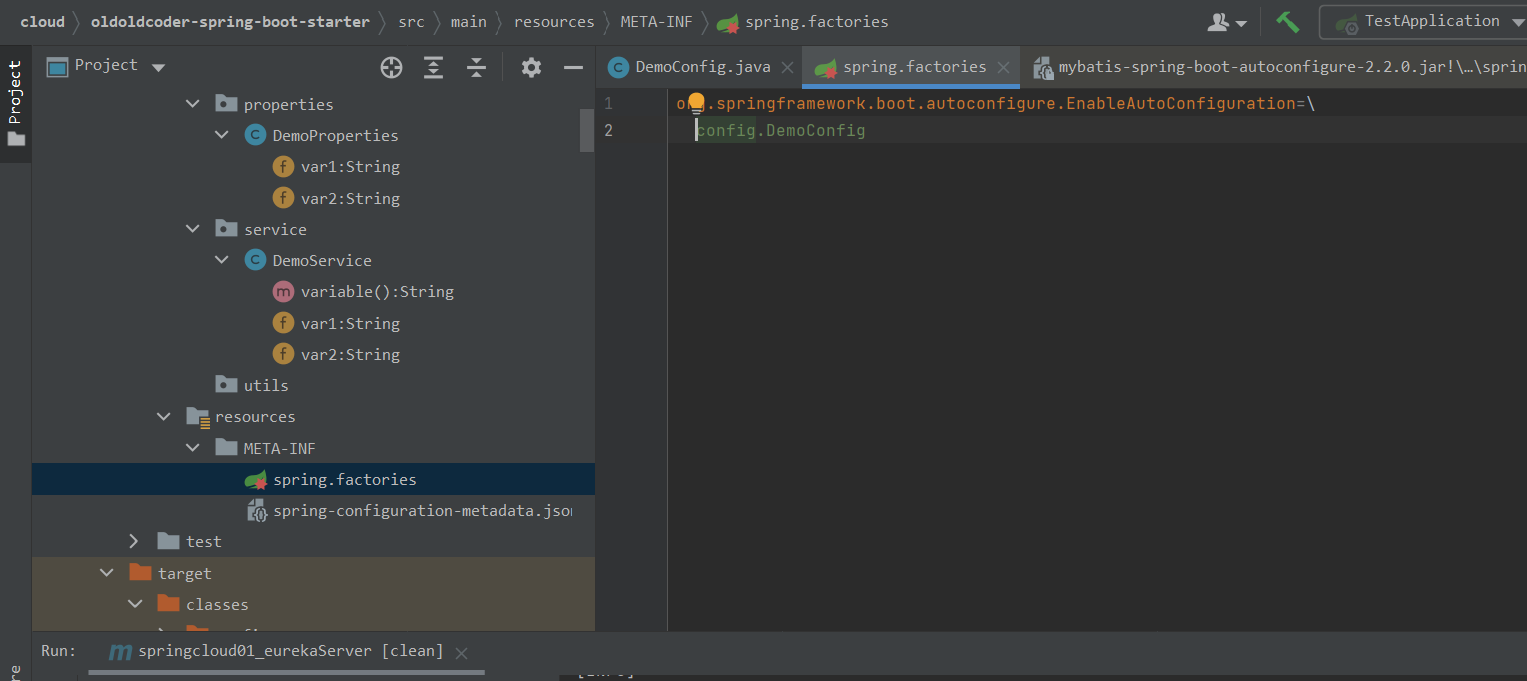
編寫spring.factories
將key:EnableAutoConfiguration-->DemoConfig這個類
3.打包
使用maven命令:mvn clean compile install 清理,編譯,釋出到本地倉庫中去
4.其他專案引入
<!--引入我寫的starter-->
<dependency>
    <groupId>org.oldoldcoder</groupId>
    <artifactId>oldoldcoder-spring-boot-starter</artifactId>
    <version>1.0-SNAPSHOT</version>
</dependency>
設定資原始檔

# 使用自己寫的starter
demo.isopen=true
demo.var1=var1
demo.var2==var2
隨便編寫一個類驗證
@Component
public class TestService {
    @Resource
    private DemoService demoService;

    @PostConstruct
    public void test(){
        System.out.println("你好"+demoService.variable());
    }
}
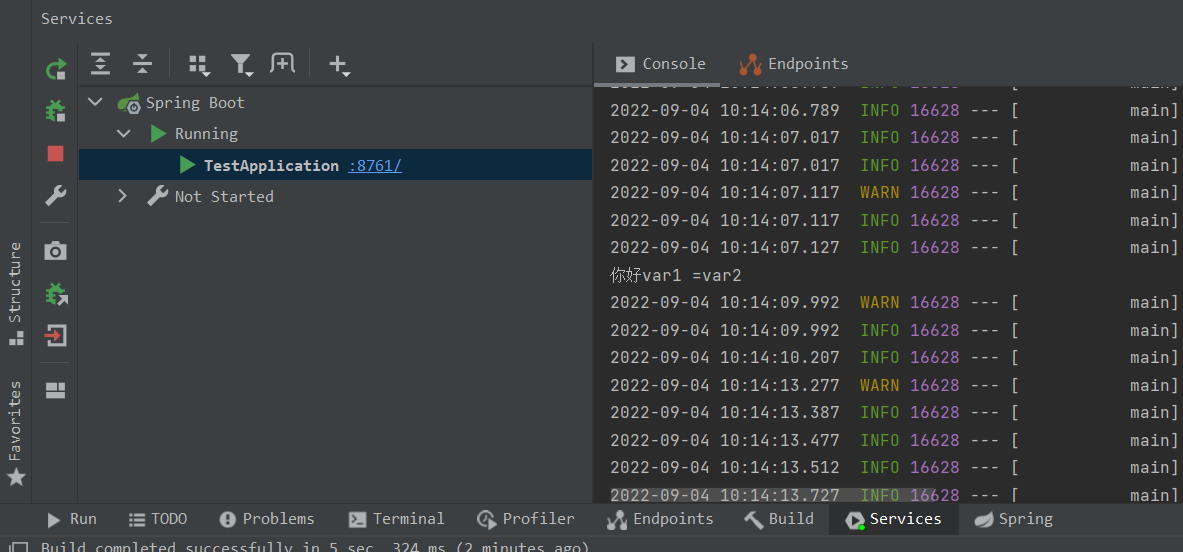
結果
