Python實現XMind測試用例快速轉Excel用例
2022-09-04 06:16:52
轉載請註明出處❤️
作者:測試蔡坨坨
原文連結:caituotuo.top/c2d10f21.html
你好,我是測試蔡坨坨。
今天分享一個Python編寫的小工具,實現XMind測試用例轉Excel用例。
前言
XMind和Excel是在日常測試工作中最常用的兩種用例編寫形式,兩者也有各自的優缺點。
使用XMind編寫測試用例更有利於測試思路的梳理,以及更加便捷高效,用例評審效率更高,但是由於每個人使用XMind的方式不同,設計思路也不一樣,可能就不便於其他人執行和維護。
使用Excel編寫測試用例由於有固定的模板,所以可能更加形式化和規範化,更利於用例管理和維護,以及讓其他人更容易執行用例,但是最大的缺點就是需要花費更多的時間成本。
由於專案需要,需要提供Excel形式的測試用例,同時編寫兩種形式的測試用例顯然加大了工作量,於是寫了個Python指令碼,可快速將XMind用例轉換成Excel用例。
設計思路
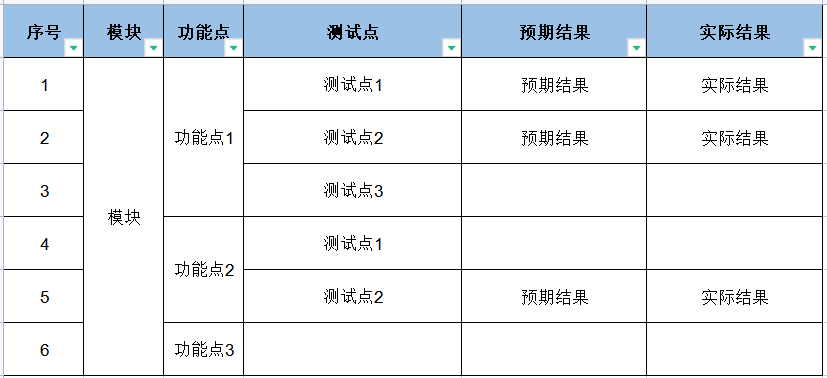
Excel測試用例模板樣式如下圖所示:

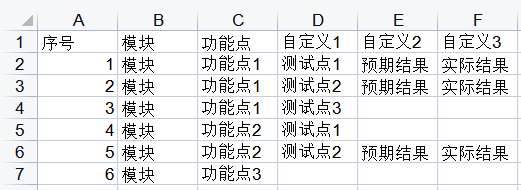
表頭固定欄位:序號、模組、功能點
為了讓指令碼更加靈活,後面的欄位會根據XMind中每一個分支的長度自增,例如:測試點/用例標題、預期結果、實際結果、前置條件、操作步驟、優先順序、編寫人、執行人等
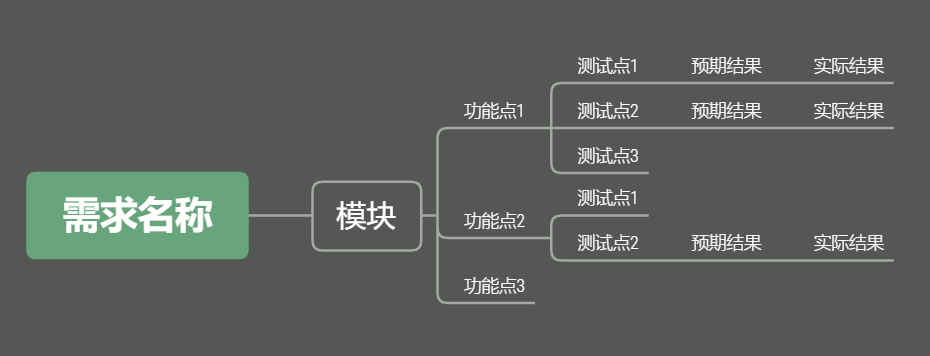
根據Excel模板編寫對應的XMind測試用例:

實現:
將XMind中的每一條分支作為一條序號的用例,再將每個欄位寫入Excel中的每一個單元格中

再手動調整美化一下表格:

完整程式碼
# author: 測試蔡坨坨
# datetime: 2022/8/16 22:44
# function: XMind轉Excel

from typing import List, Any
import xlwt
from xmindparser import xmind_to_dict


def resolve_path(dict_, lists, title):
    """
    通過遞迴取出每個主分支下的所有小分支並將其作為一個列表
    :param dict_:
    :param lists:
    :param title:
    :return:
    """
    # 去除title首尾空格
    title = title.strip()
    # 若title為空,則直接取value
    if len(title) == 0:
        concat_title = dict_["title"].strip()
    else:
        concat_title = title + "\t" + dict_["title"].strip()
    if not dict_.__contains__("topics"):
        lists.append(concat_title)
    else:
        for d in dict_["topics"]:
            resolve_path(d, lists, concat_title)


def xmind_to_excel(list_, excel_path):
    f = xlwt.Workbook()
    # 生成單sheet的Excel檔案,sheet名自取
    sheet = f.add_sheet("XX模組", cell_overwrite_ok=True)

    # 第一行固定的表頭標題
    row_header = ["序號", "模組", "功能點"]
    for i in range(0, len(row_header)):
        sheet.write(0, i, row_header[i])

    # 增量索引
    index = 0

    for h in range(0, len(list_)):
        lists: List[Any] = []
        resolve_path(list_[h], lists, "")
        # print(lists)
        # print('\n'.join(lists))  # 主分支下的小分支

        for j in range(0, len(lists)):
            # 將主分支下的小分支構成列表
            lists[j] = lists[j].split('\t')
            # print(lists[j])

            for n in range(0, len(lists[j])):
                # 生成第一列的序號
                sheet.write(j + index + 1, 0, j + index + 1)
                sheet.write(j + index + 1, n + 1, lists[j][n])
                # 自定義內容,比如:測試點/用例標題、預期結果、實際結果、操作步驟、優先順序……
                # 這裡為了更加靈活,除序號、模組、功能點的標題固定,其餘以【自定義+序號】命名,如:自定義1,需生成Excel表格後手動修改
                if n >= 2:
                    sheet.write(0, n + 1, "自定義" + str(n - 1))
            # 遍歷完lists並給增量索引賦值,跳出for j迴圈,開始for h迴圈
            if j == len(lists) - 1:
                index += len(lists)
    f.save(excel_path)


def run(xmind_path):
    # 將XMind轉化成字典
    xmind_dict = xmind_to_dict(xmind_path)
    # print("將XMind中所有內容提取出來並轉換成列表:", xmind_dict)
    # Excel檔案與XMind檔案儲存在同一目錄下
    excel_name = xmind_path.split('\\')[-1].split(".")[0] + '.xlsx'
    excel_path = "\\".join(xmind_path.split('\\')[:-1]) + "\\" + excel_name
    print(excel_path)
    # print("通過切片得到所有分支的內容:", xmind_dict[0]['topic']['topics'])
    xmind_to_excel(xmind_dict[0]['topic']['topics'], excel_path)


if __name__ == '__main__':
    xmind_path_ = r"F:\Desktop\coder\python_operate_files\用例模板.xmind"
    run(xmind_path_)
程式碼解析
1. 呼叫xmind_to_dict()方法將XMind中所有內容取出並轉成字典
xmind_dict = xmind_to_dict(xmind_path)
[{'title': '畫布 1', 'topic': {'title': '需求名稱', 'topics': [{'title': '模組', 'topics': [{'title': '功能點1', 'topics': [{'title': '測試點1', 'topics': [{'title': '預期結果', 'topics': [{'title': '實際結果'}]}]}, {'title': '測試點2', 'topics': [{'title': '預期結果', 'topics': [{'title': '實際結果'}]}]}, {'title': '測試點3'}]}, {'title': '功能點2', 'topics': [{'title': '測試點1'}, {'title': '測試點2', 'topics': [{'title': '預期結果', 'topics': [{'title': '實際結果'}]}]}]}, {'title': '功能點3'}]}]}, 'structure': 'org.xmind.ui.logic.right'}]
2. 通過切片得到所有分支的內容
xmind_dict[0]['topic']['topics']
[{'title': '模組', 'topics': [{'title': '功能點1', 'topics': [{'title': '測試點1', 'topics': [{'title': '預期結果', 'topics': [{'title': '實際結果'}]}]}, {'title': '測試點2', 'topics': [{'title': '預期結果', 'topics': [{'title': '實際結果'}]}]}, {'title': '測試點3'}]}, {'title': '功能點2', 'topics': [{'title': '測試點1'}, {'title': '測試點2', 'topics': [{'title': '預期結果', 'topics': [{'title': '實際結果'}]}]}]}, {'title': '功能點3'}]}]
3. 通過遞迴取出每個主分支下的所有小分支並將其作為一個列表
def resolve_path(dict_, lists, title):
    """
    通過遞迴取出每個主分支下的所有小分支並將其作為一個列表
    :param dict_:
    :param lists:
    :param title:
    :return:
    """
    # 去除title首尾空格
    title = title.strip()
    # 若title為空,則直接取value
    if len(title) == 0:
        concat_title = dict_["title"].strip()
    else:
        concat_title = title + "\t" + dict_["title"].strip()
    if not dict_.__contains__("topics"):
        lists.append(concat_title)
    else:
        for d in dict_["topics"]:
            resolve_path(d, lists, concat_title)
    for h in range(0, len(list_)):
        lists: List[Any] = []
        resolve_path(list_[h], lists, "")
        print(lists)
        print('\n'.join(lists))  # 主分支下的小分支

        for j in range(0, len(lists)):
            # 將主分支下的小分支構成列表
            lists[j] = lists[j].split('\t')
            print(lists[j])
lists:
['模組\t功能點1\t測試點1\t預期結果\t實際結果', '模組\t功能點1\t測試點2\t預期結果\t實際結果', '模組\t功能點1\t測試點3', '模組\t功能點2\t測試點1', '模組\t功能點2\t測試點2\t預期結果\t實際結果', '模組\t功能點3']

主分支下的小分支:
模組	功能點1	測試點1	預期結果	實際結果
模組	功能點1	測試點2	預期結果	實際結果
模組	功能點1	測試點3
模組	功能點2	測試點1
模組	功能點2	測試點2	預期結果	實際結果
模組	功能點3

將主分支下的小分支構成列表:
['模組', '功能點1', '測試點1', '預期結果', '實際結果']
['模組', '功能點1', '測試點2', '預期結果', '實際結果']
['模組', '功能點1', '測試點3']
['模組', '功能點2', '測試點1']
['模組', '功能點2', '測試點2', '預期結果', '實際結果']
['模組', '功能點3']
4. 寫入Excel(生成單sheet的Excel檔案、生成固定的表頭標題、列序號取值、固定標題外的自定義標題)
    f = xlwt.Workbook()
    # 生成單sheet的Excel檔案,sheet名自取
    sheet = f.add_sheet("簽署模組", cell_overwrite_ok=True)

    # 第一行固定的表頭標題
    row_header = ["序號", "模組", "功能點"]
    for i in range(0, len(row_header)):
        sheet.write(0, i, row_header[i])
            for n in range(0, len(lists[j])):
                # 生成第一列的序號
                sheet.write(j + index + 1, 0, j + index + 1)
                sheet.write(j + index + 1, n + 1, lists[j][n])
                # 自定義內容,比如:測試點/用例標題、預期結果、實際結果、操作步驟、優先順序……
                # 這裡為了更加靈活,除序號、模組、功能點的標題固定,其餘以【自定義+序號】命名,如:自定義1,需生成Excel表格後手動修改
                if n >= 2:
                    sheet.write(0, n + 1, "自定義" + str(n - 1))