實時降噪(Real-time Denoising):Nvidia Real-time Denoisers 原始碼剖析
Nvidia Real-time Denoisers(NRD) v3.x
版本:NRD v3.4.0
NRD 是工業界內比較先進的降噪器,被實際應用於 Watch Dogs: Legion 和 Cyberpunk 2077 等遊戲,然而網上關於 NRD 裡降噪技術的具體介紹太少了,於是啃一啃原始碼,並且總結出了這篇剖析部落格。

模糊權重(blur weight)
權重考慮的因素(有些是需要聯合考慮的):
- geometry :沿平面方向的距離相差太大,權重調低
- normal :法線相差太大,以至於夾角大過 specular lobe 的半形就拒絕該樣本
- hit distance :hit distance 相差太大,權重調低
- roughness(僅 specular):roughness 相差太大,或者 roughness 太小(期望 specular 不那麼多模糊),權重調低
- direction and pdf(可選) :direction = L,而 NoL 越大,說明這個方向接受的光照越強,越應該參考它,權重調高。但為了能量守恆,必須還得除於一個 pdf。
sampling space & anisotropic sampling
不同的 brdf lobe,應該在不同的 取樣空間(sampling space) 進行取樣:
- 對於 specular 物體來說,更應該在 view 為法線的平面中(其實就是傳統 screen-space)進行模糊:符合直覺
- 對於 diffuse 來說,則更需要對以 n 為法線的平面上來進行模糊:在 tangent 平面可以保留更多 glancing angle 下的細節

為此,可以統一 specular 和 diffuse 的取樣平面計算方法:
- 根據 roughness 來決定取樣平面的朝向和半徑
- 在實現中,就是通過算出平面的切線 \(T\) 和副切線 \(B\) 來表示這個平面的朝向和半徑
取樣平面改進效果:
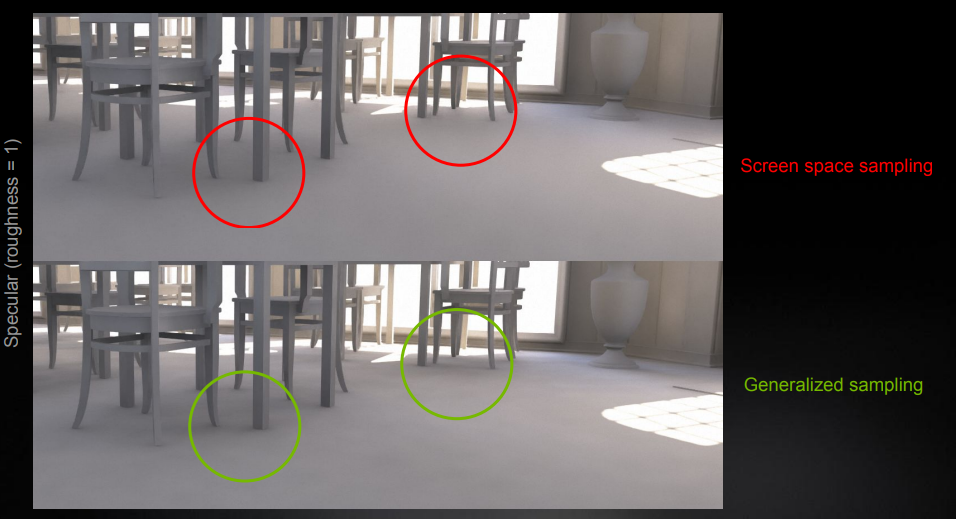
程式碼(包含取樣平面 & anisotropic sampling):
float2x3 GetKernelBasis( float3 D, float3 N, float NoD, float worldRadius, float roughness = 1.0, float anisoFade = 1.0 )
{
    float3x3 basis = STL::Geometry::GetBasis( N );
    float3 T = basis[ 0 ];
    float3 B = basis[ 1 ];
    if( roughness < 0.95 && NoD < 0.999 )
    {
        float3 R = reflect( -D, N );
        T = normalize( cross( N, R ) );
        B = cross( R, T );
        float skewFactor = lerp( roughness, 1.0, NoD );
        T *= lerp( skewFactor, 1.0, anisoFade );
    }
    T *= worldRadius;
    B *= worldRadius;
    return float2x3( T, B );
}
anisotropic sampling 效果:

時間濾波(Temporal Filtering):Diffuse
surface motion
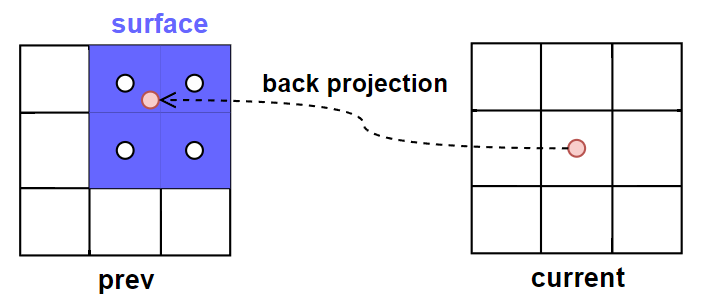
當前幀 pixel \(x\) 進行 back projection 後的位置 \(x_{prev}\),在大部分情況下都不會剛好處於畫素的中心(也就是有一定子畫素偏移),這時候就需要通過存取其相鄰 4 個 pixels 的屬性進行加權混合就能得到 \(x_{prev}\) 對應的屬性。
surface motion:這 4 個歷史幀的 pixels 相當於組成了一個歷史幀 surface,而這些組成 surface 的 pixels 也被稱為 footprints。
當前幀沒有 surface,因此預設這裡出現的 surface 術語都是指歷史幀的。
surface 至少需要包含以下資訊:
- previous 4x4 viewZ:實際只會用到 2x2 個
- previous 2x2 normal
- previous 2x2 materialID
- previous 2x2 diffuse accum speed
- previous 2x2 specular accum speed
下一步就是需要 計算各 footprint 的權重:
-
對每個 footprint 都做了以下一種或兩種測試,然後輸出自定義權重
smbOcclusion0:-
遮擋測試(occlusion test):檢查當前的 plane 是否與 previous plane 的距離相差不遠
-
ID測試(material ID test):檢查當前的 material id 是否和 previous material ID 一樣
自定義權重的 x,y,z,w 分別代表第 1,2,3,4 個 footprint 是否通過 occlusion test + material id test。
-
-
通過 uv 座標得到各個 footprint 的雙線性插值(bilinear)權重。
bilinear 權重和自定義權重直接相乘後就能得到各 footprint 的最終權重:
float4 GetBilinearCustomWeights(Bilinear f, float4 customWeights)
{
    float2 oneMinusWeights = 1.0 - f.weights;
    float4 weights = customWeights;
    weights.x *= oneMinusWeights.x * oneMinusWeights.y;
    weights.y *= f.weights.x * oneMinusWeights.y;
    weights.z *= oneMinusWeights.x * f.weights.y;
    weights.w *= f.weights.x * f.weights.y;
    return weights;
}
順便地,再另外計算一下 \(x_{prev}\) 的 quality(也就是用於衡量這個 surface 有多少參考價值,它決定了 temporal 的歷史混合係數):
quality = 0 為不具有參考性(意味著 4 個 footprints 都沒通過 test),quality = 1 為極度具有參考性。
- 直接對
smbOcclusion0應用雙線性插值,就能得到 \(x_{prev}\) 的 quality - 順便用 sqrt01 函數把 quality 往上提一下
float footprintQualityWithMaterialID = STL::Filtering::ApplyBilinearFilter( smbOcclusion0.z, smbOcclusion1.y, smbOcclusion2.y, smbOcclusion3.x, smbBilinearFilter );
footprintQualityWithMaterialID = STL::Math::Sqrt01( footprintQualityWithMaterialID );
歷史權重(history weight)
控制 diffuse temporal 混合係數的主要因素:
- diffAccumSpeed(即 accumulated frames 的數量)
- footprintQualityWithMaterialID(x_prev 的質量)
接著通過 bilinear custom weights 算出四個 footprint 的權值,就可以加權混合它們的 accum speed 得到 \(x_{prev}\) 的 accum speed:
// 計算出各個 footprint 的最終權值
float4 smbOcclusionWeightsWithMaterialID = STL::Filtering::GetBilinearCustomWeights( smbBilinearFilter, float4( smbOcclusion0.z, smbOcclusion1.y, smbOcclusion2.y, smbOcclusion3.x ) );
....
// AdvanceAccumSpped:加權混合 prevDiffAccumSpeeds 得到 diffAccumSpeed
float diffAccumSpeed = AdvanceAccumSpeed( prevDiffAccumSpeeds, gDiffMaterialMask ? smbOcclusionWeightsWithMaterialID : smbOcclusionWeights );
// 根據 quality 和 diffAccumSpeed,調整 diffAccumSpeed
diffAccumSpeed *= lerp( gDiffMaterialMask ? footprintQualityWithMaterialID : footprintQuality, 1.0, 1.0 / ( 1.0 + diffAccumSpeed ) );
最終,temporal 就是根據 \(x_{prev}\) 的 accum speed(並限制在最多 32 幀)混合,輸出結果:
\(A\) 為 accum speed(accumulated frames)的數量
float diffAccumSpeedNonLinear = 1.0 / ( min( diffAccumSpeed, gMaxAccumulatedFrameNum ) + 1.0 );
ReBLUR_TYPE diffResult = MixHistoryAndCurrent( smbDiffHistory, diff, diffAccumSpeedNonLinear );
此外,原始碼中還有個 fast history 選項:實際上就是將 accum speed 限制在更少的幀數(fast accum speed),從而歷史混合權重更小,滯後效應更小,但可能閃爍嚴重。
時間濾波(Temporal Filtering):Specular
surface motion
計算 surface motion 的流程,對於 specular 和 diffuse 來說基本是一樣的。
surface motion confidence
但是 surface 對 diffuse 和 sepcular 的參考價值各不同:
- 對於 diffuse 來說, surface motion 往往就是最具有參考價值的,其具體質量由 footprintQualityWithMaterialID 決定。
- 對於 specular 來說, surface motion 往往具有更低的參考價值,因為 specular 與很多因素相關,我們還需要除了 footprintQualityWithMaterialID 以外的其它衡量因素,如: parallax, nov, roughness(這些因素的可以合稱為 surface motion confidence)
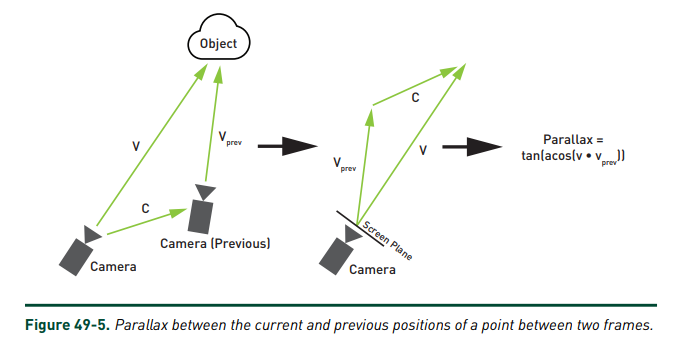
parallax :定義為新觀察方向 \(V\) 與舊觀察方向 \(V_{prev}\) 的偏差。
在觀察的物體不移動旋轉的情況下,如果 camera 不移動而只是旋轉,那麼 parallax = 0,此時直接的 back projection 是不會產生任何 artifacts 的。
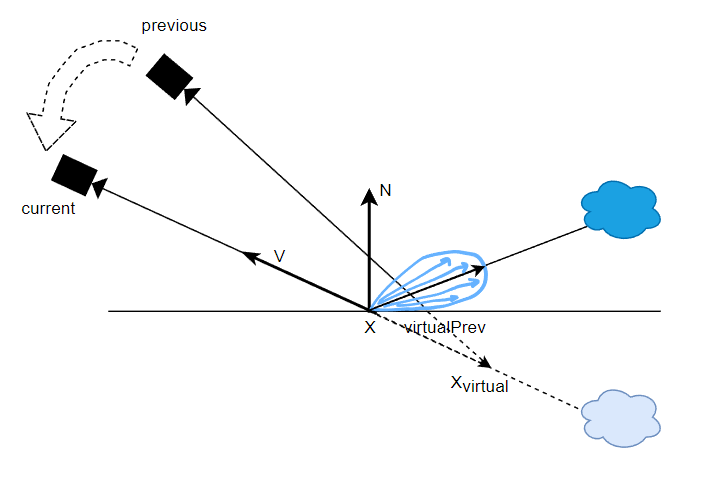
對於非 mirror reflection 的 lobe,我們希望應該參考反射稍弱一些的地方,因此可以根據 roughness 來調整 \(x_{virtual}\) 的位置:roughness 越大,那麼就讓它越靠近表面的 \(x\),從而得到更加偏離反射點的 \(virtualPrev\)。
// Virtual motion confidence - fixing trails if radiance on a flat surface is taken from a sloppy surface
float2 virtualMotionDelta = vmbPixelUv - smbPixelUv;
virtualMotionDelta *= STL::Math::Rsqrt( STL::Math::LengthSquared( virtualMotionDelta ) );
virtualMotionDelta /= gRectSizePrev;
virtualMotionDelta *= saturate( smbParallaxInPixels / 0.1 ) + smbParallaxInPixels;

float virtualMotionPrevPrevWeight = 1.0;
[unroll]
for( uint i = 1; i <= ReBLUR_VIRTUAL_MOTION_NORMAL_WEIGHT_ITERATION_NUM; i++ )
{
	float2 vmbPixelUvPrev = vmbPixelUv + virtualMotionDelta * i;

	float4 vmbNormalAndRoughnessPrev = UnpackNormalAndRoughness( gIn_Prev_Normal_Roughness.SampleLevel( gLinearClamp, vmbPixelUvPrev * gRectSizePrev * gInvScreenSize, 0 ) );
	float3 vmbNprev = STL::Geometry::RotateVector( gWorldPrevToWorld, vmbNormalAndRoughnessPrev.xyz );

	float w = GetEncodingAwareNormalWeight( N, vmbNprev, angle + curvatureAngle * i );

	float wr = GetEncodingAwareRoughnessWeights( roughness, vmbNormalAndRoughnessPrev.w, roughnessFraction );
	w *= lerp( 0.25 * i, 1.0, wr );

	// Ignore pixels from distant surfaces
	// TODO: with this addition test 3e shows a leak from the bright wall
	float vmbZprev = UnpackViewZ( gIn_Prev_ViewZ.SampleLevel( gLinearClamp, vmbPixelUvPrev * gRectSizePrev * gInvScreenSize, 0 ) );
	float wz = GetBilateralWeight( vmbZprev, Xvprev.z );
	w = lerp( 1.0, w, wz );

	virtualMotionPrevPrevWeight *= IsInScreen( vmbPixelUvPrev ) ? w : 1.0;
	virtualMotionRoughnessWeight *= wr;
}
根據 virtual motion confidence,計算出 virtual motion 的 accum speed:
// Virtual motion - accumulation acceleration
float responsiveAccumulationAmount = GetResponsiveAccumulationAmount( roughness );
float vmbSpecAccumSpeed = GetSpecAccumSpeed( specAccumSpeed, lerp( 1.0, roughnessModified, responsiveAccumulationAmount ), 0.99999, 0.0, 0.0, 1.0 );

float smc = GetSpecMagicCurve2( roughnessModified, 0.97 );
vmbSpecAccumSpeed *= lerp( smc, 1.0, virtualMotionHitDistWeight );
vmbSpecAccumSpeed *= virtualMotionPrevPrevWeight;
如果 virtual motion confidence 比較低,那麼還可以再給 surface motion 的 accum speed 額外調高些:
// Surface motion - allow more accumulation in regions with low virtual motion confidence ( test 9 )
float roughnessBoost = ( 0.1 + 0.3 * roughnessModified ) * ( 1.0 - roughnessModified );
float roughnessBoostAmount = virtualHistoryAmount * ( 1.0 - virtualMotionRoughnessWeight );
float roughnessBoosted = roughnessModified + roughnessBoost * roughnessBoostAmount;
float smbSpecAccumSpeed = GetSpecAccumSpeed( specAccumSpeed, roughnessBoosted, NoV, smbParallax, curvature, viewZ );
歷史權重(history weight)
有了基於 surface motion 計算出來的 smbSpecAccumSpeed 和基於 virtual motion 計算出來的 vmbSpecAccumSpeed,用於計算出兩種 motion 方式的混合比例:
// Fallback to surface motion if virtual motion doesn't go well
virtualHistoryAmount *= saturate( ( vmbSpecAccumSpeed + 0.1 ) / ( smbSpecAccumSpeed + 0.1 ) );
根據混合比例,混合出 specular 歷史 color 和 accum speed:
REBLUR_TYPE specHistory = lerp( smbSpecHistory, vmbSpecHistory, virtualHistoryAmount );
// Accumulation with checkerboard resolve // TODO: materialID support?
specAccumSpeed = InterpolateAccumSpeeds( smbSpecAccumSpeed, vmbSpecAccumSpeed, virtualHistoryAmount );
最終,和 diffuse temporal filtering 相似,根據 \(x_{prev}\) 的 accum speed(並限制在最多 32 幀)混合,輸出結果:
實際上,這裡的混合還是和 diffuse temporal filtering 有所不同,因為這裡還額外用 roughness 去稍微限制一下混合權重,具體可看原始碼。個人猜測理由是:specular 訊號相比 diffuse 訊號在時間域上的變化更加高頻,因此不易太多 accumulation(低頻化)。
float specAccumSpeedNonLinear = 1.0 / ( min( specAccumSpeed, gMaxAccumulatedFrameNum ) + 1.0 );
REBLUR_TYPE specResult = MixHistoryAndCurrent( specHistory, spec, specAccumSpeedNonLinear, roughnessModified );
ReBLUR Diffuse-Specular Pipeline
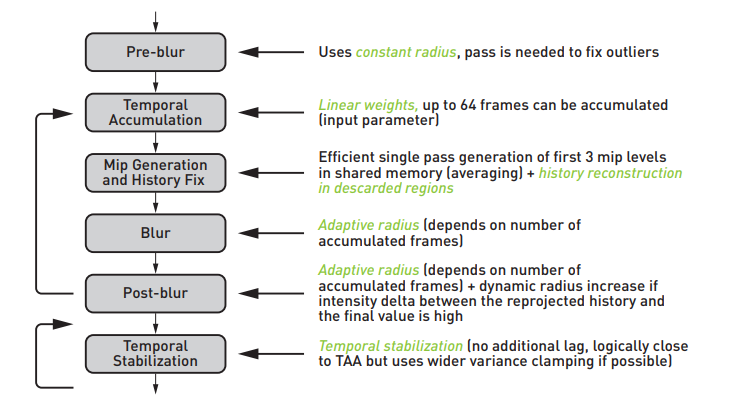
ps:反向的箭頭是指上一幀的輸出資訊被 temporal 所利用
其它功能:
- performance mode(效能模式):主要就是關閉了 History fix 的相當部分程式碼,增速至約 1.25 倍
- 支援 Checkerboard Resolve(棋盤式渲染),即 0.5 SPP 訊號
- 支援輸入 Occlusion 訊號,可以做額外實現 AO 降噪這個附加功能
Pass 1: Pre-blur
其實就是 spatial filtering:
- 使用固定的半徑(實際上取決於 hit dist):對原始輸入影象去做一個初步的降噪,從而粗略的完成 outliers removal
Pass 2: Accumulation
其實就是 temporal filtering,其所需的歷史幀資訊:
- accum speed:成功累積的幀數,可以理解成對應的 fragment 已經在螢幕中存活了多久
- viewz:深度
- normal & roughness
- material ID
- diffuse color
- specular color
可以看到 Accumulation 所需要的儲存和頻寬都比較大。
Pass 3: History Fix
有些 pixel 的 accumulated frames 數量很少(一般都是剛出現在螢幕0~3幀的 pixels),它只剩下初始的 1 spp 訊號(缺少歷史資訊,往往充滿噪聲),這時候就需要對其重建歷史:
- 取 3x3 周圍 pixels 的 accum speed 並進行混合得到該 pixel 的 accum speed
- 如果 accum speed 低於某個閾值,說明缺少歷史資訊,然後進行 5x5 的簡化版 spatial filtering 得到重建後(其實就希望用 blur 替代噪聲)的 diffuse/specular 訊號和 viewz
原始碼中並沒有看到對 diffuse/specular 訊號或 viewz 生成了 mip,可能是原方法太過耗時,效果提升不大,不如干脆就做一遍 blur。
此外,performance mode 相關的程式碼基本都在 History fix Pass,開啟 performance mode 可以加速 ReBLUR 效能到約 1.25 倍。
Pass 4: Blur & Pass 5: Post-blur
兩個 pass 也都是 spatial filtering:
- 都是自適應半徑(取決於 accumulated frames 和 hit dist)
- 但 Blur 使用較小的 radius scale,而 Post-blur 使用更大的 radius scale
為什麼 Blur 和 Post-Blur 兩個 Pass 幾乎沒區別,卻不合併成一個 Blur Pass,個人理解是跟 a-trous 思想類似,只不過這種方式只有兩層 Blur:
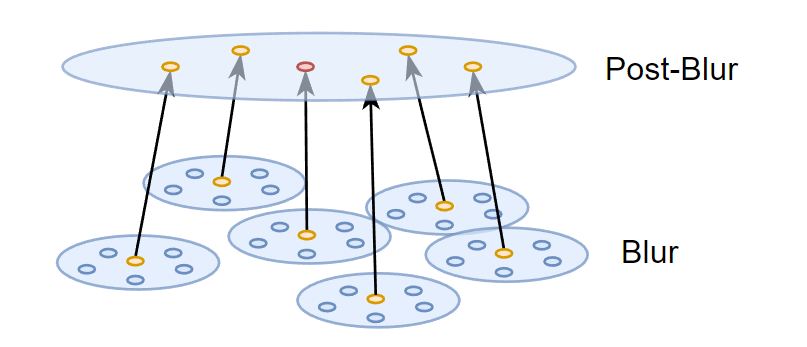
在以 n 為法線的平面上分佈的 poisson samples 還需要轉換回螢幕空間 uv 座標以便存取對應 pixel 的 visibility:
float2 GetKernelSampleCoordinates( float4x4 mToClip, float3 offset, float3 X, float3 T, float3 B, float4 rotator = float4( 1, 0, 0, 1 ) )
{
    #if( NRD_USE_QUADRATIC_DISTRIBUTION == 1 )
        offset.xy *= offset.z;
    #endif

    // We can't rotate T and B instead, because T is skewed
    offset.xy = STL::Geometry::RotateVector( rotator, offset.xy );

    float3 p = X + T * offset.x + B * offset.y;
    float3 clip = STL::Geometry::ProjectiveTransform( mToClip, p ).xyw;
    clip.xy /= clip.z;
    clip.y = -clip.y;

    float2 uv = clip.xy * 0.5 + 0.5;

    return uv;
}
SIGMA Shadow Pipeline
核心在於,輸入 shadows 訊號(是螢幕影象,而不是 shadowmap),每個 pixel 值代表了它的 visibility(可見性),對被標記的 tile 裡的所有 pixels 做 2 次空間濾波 + 1 次時域濾波。
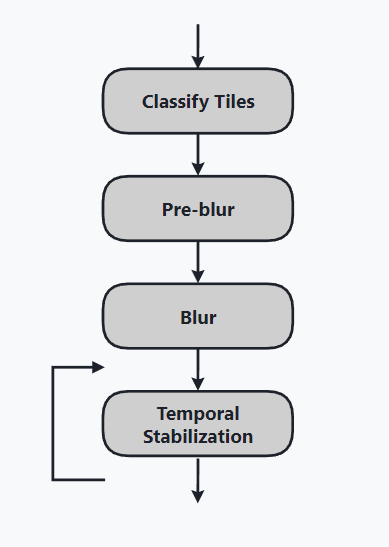
- 個人實測:RTX2060,2K 解析度,純跑光追 20+ ms:
- ReBLUR = ReLAX = 10 ms
- ReBLUR: performance mode = 7~8 ms = 1.25倍的提升
- SIGMA = 2~3 ms
總的來說,NRD 通過利用了非常多的歷史資訊(導致高頻寬高儲存)和多層 spatial/temporal pass 去做出非常高質量的降噪效果。也就是說它太過重量級了,如果我們要實際應用於自己的光追訊號,可以適當參考 NRD 的一些技術點,設計出一個更輕量級的 denoising pipeline。
當然,它的各種工業界的 trick 也很厲害,各種小引數用不同的函數形式(甚至還用一些 magic curves)倒來倒去,最後來影響最主要的引數(半徑、權重之類)。
參考
作者:KillerAery
出處:http://www.cnblogs.com/KillerAery/
本文版權歸作者和部落格園共有,歡迎轉載,但未經作者同意必須保留此段宣告,且在文章頁面明顯位置給出原文連線,否則保留追究法律責任的權利。