Rsync資料備份工具
2022-09-02 21:01:43
Rsync資料備份工具
1、Rsync基本概述
rsync是一款開源的備份工具,可以在不同主機之間進行同步(windows和Linux之間 Mac和 Linux Linux和Linux),可實現全量備份與增量備份,因此非常適合用於架構集中式備份或異地等應用。
rsync官方地址:https://rsync.samba.org/
rsync監聽埠:873
rsync執行架構:
C/S Client/Server
B/S Browser/Server
rsync常見的兩種備份方式
- 完全備份
- 將資料全部備份
- 增量備份
- 基於上一次備份,新增部分的資料備份
範例:
假設使用者端上有
file1file2file3檔案,伺服器端上有file1檔案,現要將使用者端上的資料備份至伺服器端
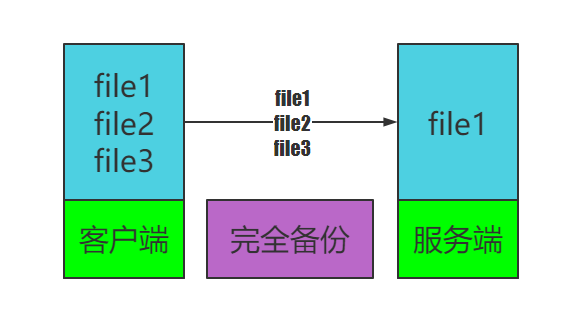
完全備份,將使用者端所有的資料內容file1、file2、file3全部備份至伺服器端 (效率低下, 佔用空間)
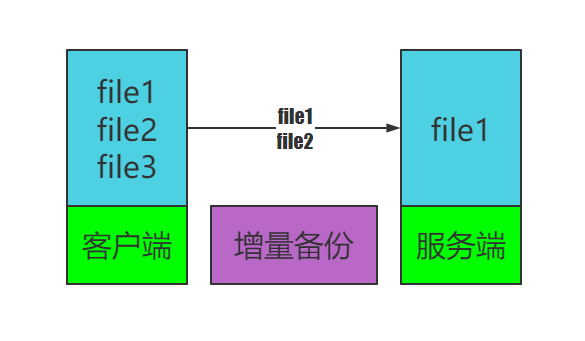
增量備份,將使用者端的file2、file3增量備份至伺服器端 (提高備份效率,節省空間, 適合異地備份 )
2、Rsync應用場景
2.1 資料推播(上傳)
所有主機推播本地資料至Rsync備份伺服器,這樣會導致資料同步緩慢(適合少量資料備份)
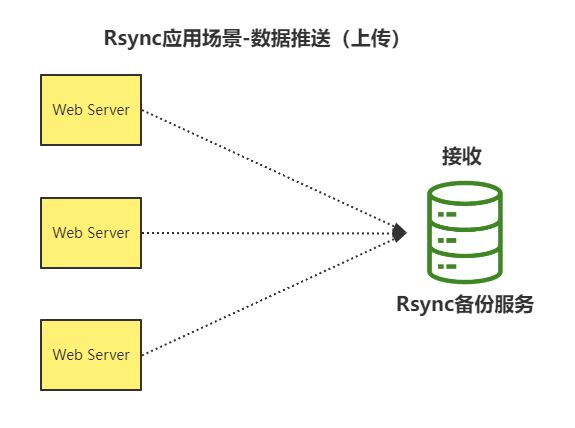
2.2 資料拉取(下載)
rsync備份伺服器端拉取所有主機上的資料,這樣操作會導致備份伺服器壓力比較大(適合較少伺服器場景)
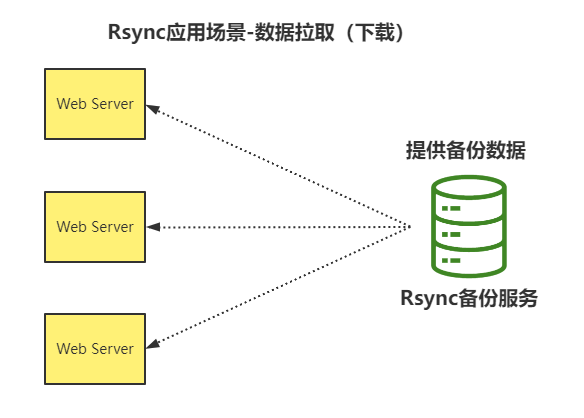
2.3 大量伺服器備份場景
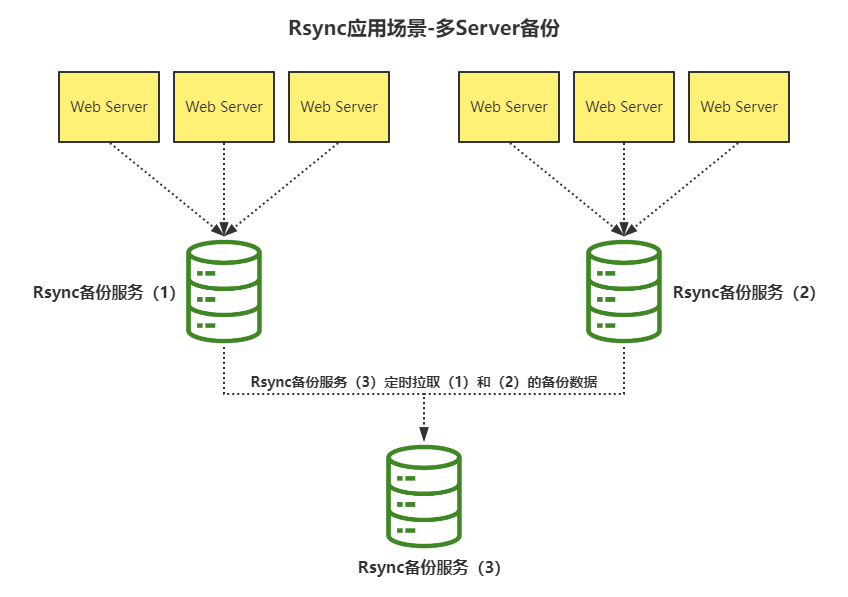
2.4 異地備份實現思路
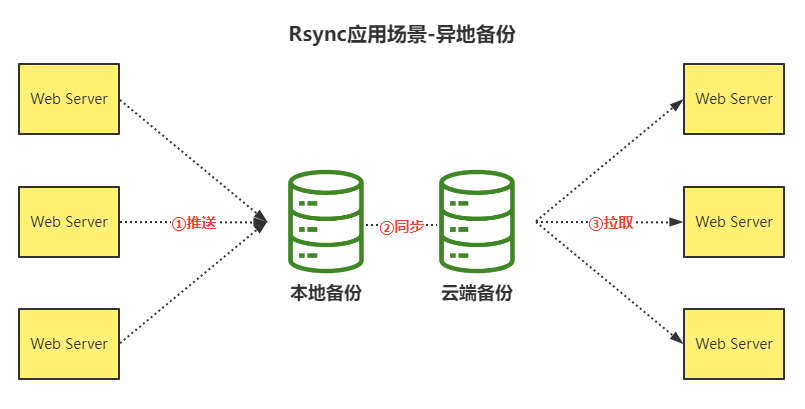
3、Rsync傳輸模式
Rsync大致使用三種主要的資料傳輸方式
本地方式
遠端方式
守護行程
3.1 rsync命令選項
-a	//歸檔模式傳輸,等於-tropglD
-v	//詳細模式輸出,顯示速率,檔案數量等
-z	//傳輸時進行壓縮,提高效率
-r	//遞迴傳輸,傳輸目錄,傳輸目錄時目錄名稱後加"/"表示傳輸目錄下的所有檔案
-t	//保持檔案時間資訊
-o	//保持檔案屬主資訊
-g	//保持檔案屬組資訊
-p	//保持檔案許可權
-l	//保留軟連結
-D	//保持裝置檔案資訊
-P	//顯示同步的過程及傳輸時的進度等資訊
-L	//保留軟連線指向的目標檔案
--delete		//讓目標目錄和源目錄資料保持一致
--bwlimit		//限速傳輸
--exclude=PATTERN	//指定排除不需要傳輸的檔案模式
--exclude-from=FILE	//排除FILE中指定模式的檔案
3.2 本地模式
適用單個主機之間的資料傳輸(類似於cp命令)
具體用法如下:
Local: rsync [OPTION...] SRC... [DEST]

rsync [選項] 原始檔.. 目標路徑
3.3 遠端模式
基於ssh通道傳輸(類似scp命令)
注意:rsync藉助ssh協定同步資料存在一些缺陷問題
- 使用系統使用者(不安全)
- 使用普通使用者(會導致許可權不足的情況)
具體用法如下:
Access via remote shell:
Pull: 拉 rsync [OPTION...] [USER@]HOST:SRC... [DEST]
Push: 推 rsync [OPTION...] SRC... [USER@]HOST:DEST

拉:rsync [選項] [使用者@]主機IP:檔案路徑 本機目錄
推:rsync [選項] 本機檔案 [使用者@]主機IP:目錄
3.4 守護行程模式
Access via rsync daemon:
Pull: rsync [OPTION...] [USER@]HOST::SRC... [DEST]
Push: rsync [OPTION...] SRC... [USER@]HOST::DEST

拉:rsync [選項..] [使用者名稱@]主機IP::組態檔中的模組名 本機目錄
推:rsync [選項..] 本機檔案 [使用者名稱@]主機IP::組態檔中的模組名
4、Rsync服務實踐
| 主機名 | IP | 角色 |
|---|---|---|
| server | 192.168.111.30 | rsync伺服器端 |
| client | 192.168.111.40 | rsync使用者端 |
4.1 伺服器端設定
# 1.安裝rsync
[root@server ~]# yum install -y rsync

# 2.修改服務組態檔/etc/rsyncd.conf
[root@server ~]# vim /etc/rsyncd.conf
uid = rsync		        #執行服務的使用者
gid = rsync		        #執行服務的組
port = 873		        #服務監聽埠
fake super = yes		#服務無需使用root使用者身份,即可接收檔案的完整屬性
use chroot = no			#禁錮目錄,不允許獲取root許可權
max connections = 4	        #最大連線數,最多能有多少個使用者端跟伺服器端的873埠建立連線
timeout = 600		        #超時時間
ignore errors		        #忽略錯誤
read only = false		#客戶是否唯讀
list = false			#不允許檢視模組資訊
auth users = rsync_backup	#定義虛擬使用者,使用者資料傳輸
secrets file = /etc/rsync.passwd		#定義虛擬使用者密碼認證檔案
log file = /var/log/rsyncd.log			#紀錄檔檔案存放的位置
#################################
[backup]		                # 模組名
comment = welcome to oldboyedu backup!	# 模組的描述資訊
path = /backup		                # 資料存放目錄

# 3.建立使用者以及資料存放目錄
[root@server ~]# useradd -r -M -s /sbin/nologin rsync
[root@server ~]# mkdir /backup
[root@server ~]# chown -R rsync.rsync /backup

# 4.建立虛擬使用者密碼檔案並設定許可權
[root@server ~]# vim /etc/rsync.passwd
rsync_backup:passwd123
[root@server ~]# chmod 600 /etc/rsync.passwd

# 5.關閉防火牆、selinux
[root@server ~]#systemctl status firewalld.service
● firewalld.service - firewalld - dynamic firewall daemon
   Loaded: loaded (/usr/lib/systemd/system/firewalld.service; disabled; vendor preset: enabled)
   Active: inactive (dead)
     Docs: man:firewalld(1)

# 6.重啟服務並設定服務開機自啟
[root@server ~]# systemctl restart rsyncd
[root@server ~]# systemctl enable rsyncd

# 7.檢查伺服器埠是否開啟
[root@server ~]# ss -anltup | grep "rsync"
tcp   LISTEN 0      5            0.0.0.0:873       0.0.0.0:*    users:(("rsync",pid=2320,fd=3))
tcp   LISTEN 0      5               [::]:873          [::]:*    users:(("rsync",pid=2320,fd=5))
4.2 使用者端設定
# 1.安裝rsync
[root@client ~]# yum -y install rsync

# 2.設定傳輸密碼
---方法1:將密碼寫入檔案
[root@client ~]# echo 'passwd123' > /etc/rsync.pass
[root@client ~]# cat /etc/rsync.pass
passwd123
[root@client ~]# chmod 600 /etc/rsync.pass

--測試收發資料:
[root@client ~]#rsync -avz --password-file=/etc/rsync.pass /root/file1 [email protected]::backup
sending incremental file list
file1

sent 87 bytes  received 43 bytes  260.00 bytes/sec
total size is 0  speedup is 0.00

[root@server ~]# ls /backup/
file1

---方法2:使用密碼環境變數RSYNC_PASSWORD
[root@client ~]# export RSYNC_PASSWORD='passwd123'

--測試收發資料:
[root@client ~]# touch file2
[root@client ~]#rsync -avz /root/file2 [email protected]::backup
sending incremental file list
file2

sent 88 bytes  received 43 bytes  87.33 bytes/sec
total size is 0  speedup is 0.00

[root@server ~]# ls /backup/
file1 file2
4.3 設定systemctl 管理 rsync 服務
# 1.建立/etc/sysconfig/rsyncd 檔案
[root@server ~]#vim /etc/sysconfig/rsyncd
OPTIONS=""

# 2. 建立rsyncd.service 檔案
[root@server ~]#vim /lib/systemd/system/rsyncd.service
[Unit]
Description=fast remote file copy program daemon

[Service]
EnvironmentFile=/etc/sysconfig/rsyncd
ExecStart=/usr/bin/rsync --daemon --config=/etc/rsyncd.conf --no-detach
ExecReload=/bin/kill -HUP $MAINPID
KillMode=process
Restart=on-failure
RestartSec=30s

[Install]
WantedBy=multi-user.target
4.4 報錯資訊
# 使用者密碼認證失敗
[root@client ~]#rsync -avz --password-file=/etc/rsync.pass /root/file1 [email protected]::backup
@ERROR: auth failed on module backup
rsync error: error starting client-server protocol (code 5) at main.c(1661) [sender=3.1.3]
## 原因:
1.使用者輸入錯誤
2.密碼輸入錯誤
3.密碼檔案的許可權不是600
4.傳輸的檔案不存在

[root@client ~]# rsync -avz /etc/passwd [email protected]::backup
rsync: failed to connect to 192.168.111.30 (192.168.111.30): No route to host (113)
rsync error: error in socket IO (code 10) at clientserver.c(125) [sender=3.1.3]
無法和192.168.111.30rsync服務建立連線
## 原因:
1.防火牆
2.selinux
3.服務沒啟動
4.服務的埠改了
4.5 排錯思路
## 伺服器端
# 1.檢查組態檔
[root@server ~]# cat /etc/rsyncd.conf

# 2.檢查密碼檔案的許可權
[root@server ~]#ll /etc/rsync.passwd
-rw-------. 1 root root 23 9月   2 16:30 /etc/rsync.passwd

# 3.檢查密碼檔案中的內容
檢查使用者名稱是否和組態檔中的使用者名稱一致

# 4.檢查模組目錄的許可權
模組目錄的許可權,必須是rsync組態檔中指定的uid和gid的許可權

## 使用者端
# 1.檢查命令使用者名稱
命令中的使用者名稱要跟伺服器端組態檔和密碼檔案中的使用者名稱一致 rsync_backup

# 2.檢查命令模組名
命令中的模組名要跟伺服器端組態檔中的模組名一致 backup

# 3.如果有密碼檔案,檢查許可權
600 root root

# 4.檢查密碼檔案內容
只需要寫密碼

# 5.檢查環境變數中的密碼
[root@server ~]# echo $RSYNC_PASSWORD
passwd123
5、Rsync企業級備份案例
環境準備
| 主機名 | IP | 角色 |
|---|---|---|
| server | 192.168.111.30 | rsync伺服器端 |
| client | 192.168.111.40 | rsync使用者端 |
使用者端需求
- 使用者端每天凌晨3點備份/etc目錄至/backup下以"主機名_IP地址_當前時間命名"的目錄中
- 使用者端推播/backup目錄下資料備份目錄至Rsync備份伺服器
- 使用者端只保留最近七天的備份資料,避免浪費磁碟空間
伺服器端需求
- 伺服器端部署rsync服務,用於接收使用者的備份資料
- 伺服器端每天校驗使用者端推播過來的資料是否完整,並將結果以郵件的方式傳送給管理員
- 伺服器端僅保留6個月的備份資料
注意:所有伺服器的備份目錄均為/backup,所有指令碼存放目錄均為/scripts。
伺服器端部署rsync服務
[root@server ~]# mkdir /scripts
[root@server ~]# vim /scripts/rsync_server.sh
#!/bin/bash
#安裝rsync服務
yum -y install rsync
#修改服務組態檔
cat > /etc/rsyncd.conf << EOF
uid = rsync
gid = rsync
port = 873
fake super = yes
use chroot = no
max connections = 4
timeout = 600
ignore errors
read only = false
list = false
auth users = rsync_backup
secrets file = /etc/rsync.passwd
log file = /var/log/rsyncd.log
[backup]
comment = welcome to oldboyedu backup!
path = /backup
EOF
#建立服務使用者,建立資料備份目錄並設定許可權
useradd -r -M -s /sbin/nologin rsync
mkdir /backup
chown -R rsync.rsync /backup
#生成資料傳輸使用者密碼檔案並設定許可權
echo "rsync_backup:passwd123" > /etc/rsync.passwd
chmod 600 /etc/rsync.passwd
#關閉防火牆和selinux
systemctl stop firewalld
setenforce 0
#設定服務開機自啟,並重啟服務
systemctl enable rsyncd
systemctl restart rsyncd

[root@server ~]# chmod +x /scripts/rsync_server.sh

[root@server ~]# /scripts/rsync_server.sh
使用者端備份資料並推播至rsync伺服器
[root@client ~]# mkdir /scripts
[root@client ~]# vim /scripts/etc_backup.sh
#!/bin/bash
#使用者端安裝rsync
yum -y install rsync
#設定rsync使用者端虛擬使用者密碼
export RSYNC_PASSWORD='passwd123'
#建立備份目錄
mkdir -p /backup/$(hostname)_$(ifconfig  | awk 'NR==2{print $2}')_$(date "+%F")
#打包備份/etc目錄下的資料至備份目錄中
tar -zcf /backup/$(hostname)_$(ifconfig  | awk 'NR==2{print $2}')_$(date "+%F")/etc_backup.tar.gz /etc/
#計算備份檔案的校驗值
md5sum /backup/$(hostname)_$(ifconfig  | awk 'NR==2{print $2}')_$(date "+%F")/etc_backup.tar.gz > /backup/$(hostname)_$(ifconfig  | awk 'NR==2{print $2}')_$(date "+%F")/checksum.txt
#將打包備份好的資料推播到rsync備份伺服器
rsync -az /backup/$(hostname)_$(ifconfig  | awk 'NR==2{print $2}')_$(date "+%F") [email protected]::backup
#刪除七天前的備份檔案
find /backup/ -mtime +7 | xargs rm -rf

[root@client ~]# chmod +x /scripts/etc_backup.sh

[root@client ~]# crontab -e
0 3 * * * /scripts/etc_backup.sh
伺服器端校驗資料並將結果以郵件傳送給管理員:
#設定郵件服務
[root@server ~]# yum -y install mailx
[root@server ~]# cat > /etc/mail.rc << EOF
# 傳送的郵件地址
set [email protected]
# 傳送郵件伺服器
set smtp=smtps://smtp.qq.com:465
# 發件人賬號,一般情況下為郵件地址
set [email protected]
# 發件郵箱的授權碼
set smtp-auth-password=xxxxxxxxxx
# 認證方式
set smtp-auth=login
# 忽略證書警告
set ssl-verify=ignore
# 證書所在目錄
set nss-config-dir=/etc/pki/nssdb/
EOF

#設定指令碼校驗資料並將結果傳送給管理員
[root@server ~]# vim /scripts/checksum.sh
#!/bin/bash
#校驗備份資料並將結果傳送給管理員
md5sum -c /backup/client_192.168.111.30_$(date "+%F")/checksum.txt | mail -s "/backup/client_192.168.111.30_$(date "+%F")" [email protected]
#刪除6個月以前的備份資料
find /backup/ -mtime +180 | xargs rm -rf

[root@server ~]# chmod +x /scripts/checksum.sh

[root@server ~]# crontab -e
0 5 * * * /scripts/checksum.sh
QQ郵箱的授權碼獲取
進入郵箱後–>設定–>賬戶,開啟下圖中的SMTP,點選生成授權碼
