業務流程視覺化-讓你的流程圖"Run"起來(7.執行狀態持久化&輕量工作流支援)
前言
感謝大家閱讀本專案系列文章和對專案的支援。
分享一下我對這個專案的新的改進。
之前專案做到了流程設計視覺化和流程執行結果視覺化。
本期釋出的版本中實現了中間的執行過程的實時視覺化,和流程狀態持久化問題。
大家可以根據專案提供的介面自由擴充套件自己的工作流實現。
和大家分享一下:
流程狀態實時視覺化
首先看效果:
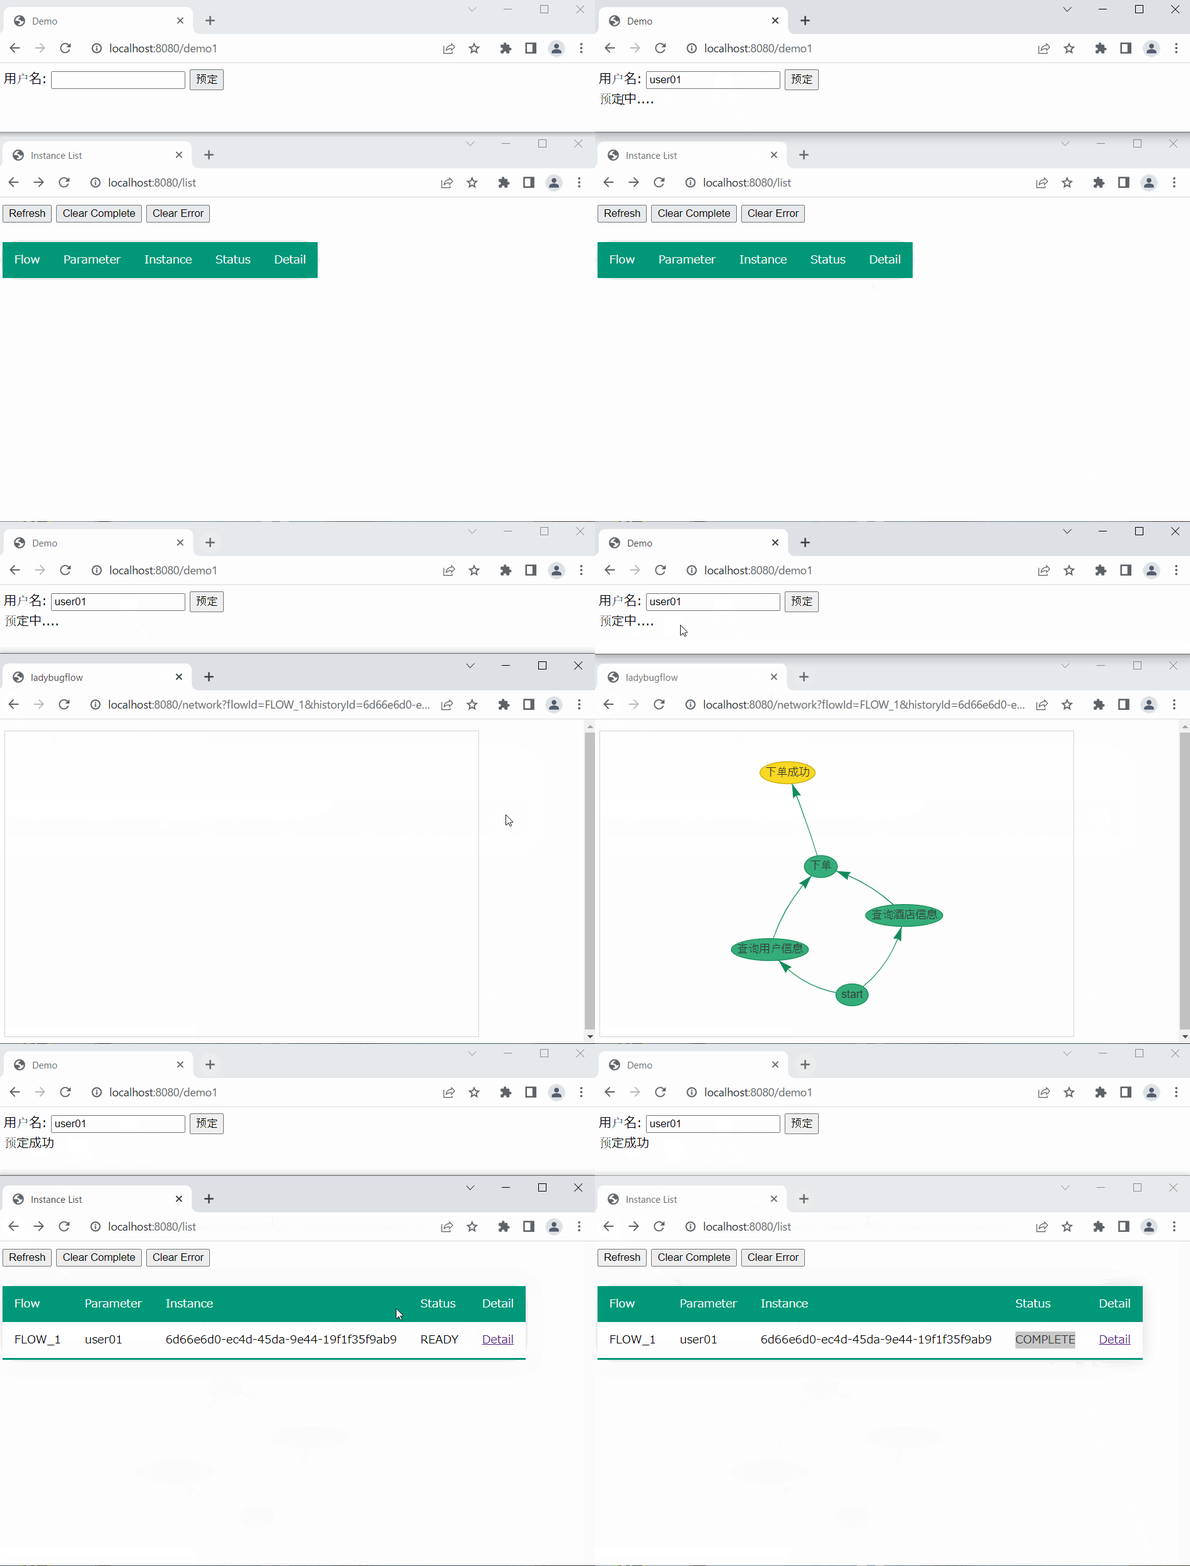
1. 不需要互動的自動化流程
點選預定按鈕,自動完成預定的流程。
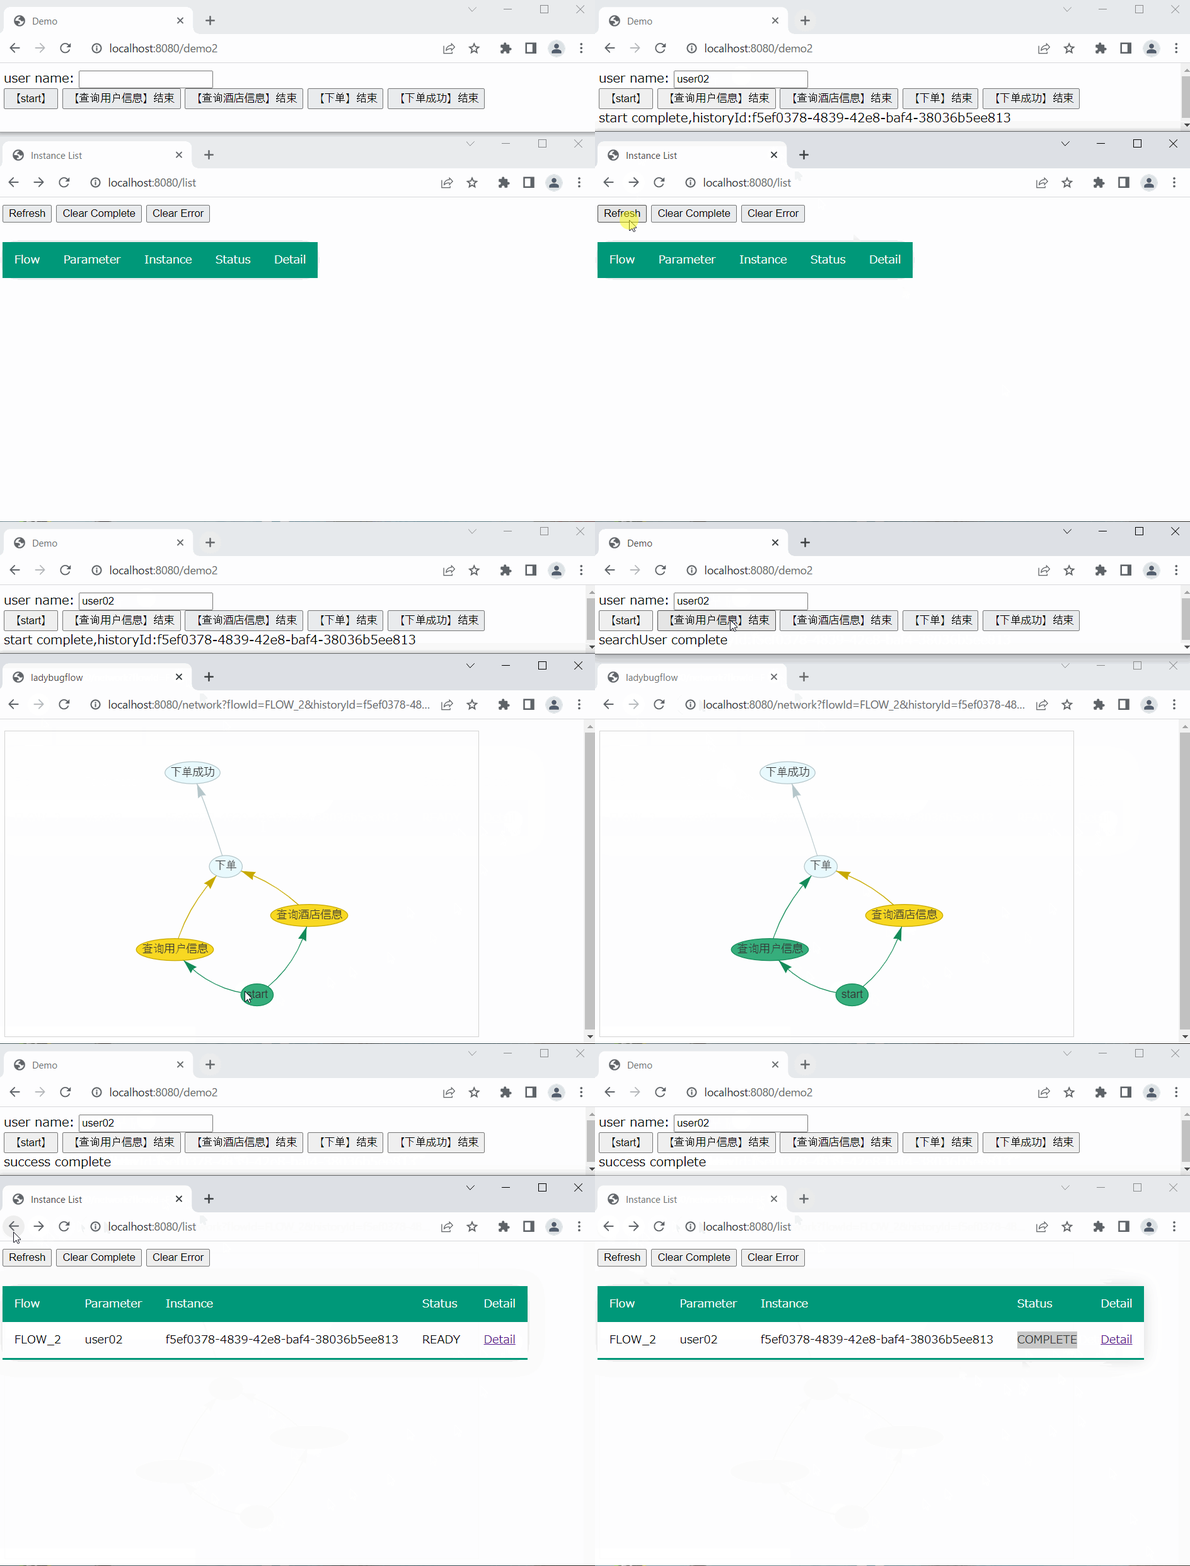
2. 需要互動的嚮導式流程
每點選一個按鈕,流程向前走一步。
實現方式
工程基於SpringBoot實現,程式碼釋出到下面的地址,大家可以自己酌情參照修改:
https://github.com/nobuglady/ladybugflow-ui
在ladybugFlow中,有一個介面,FlowUtil.dumpJson()
呼叫這個介面,可以實時的得到流程的狀態的Json字串,然後在頁面上用得到Json來生成流程圖即可。
對於【1. 不需要互動的自動化流程】,我們只需要啟動流程後不停的拿到流程狀態的Json即可完成實時視覺化的效果。
流程啟動程式碼:
@Service
public class Demo1Service {

	@Autowired
	private Demo1Flow demo1Flow;

	/**
	 * 啟動流程
	 */
	public void bookingHotel(String username) {
		demo1Flow.startFlow(true, username);
	}
}
對於【2. 需要互動的嚮導式流程】,流程執行到等待節點即進入等待狀態。
這是需要外部執行節點,並將節點執行結果傳給等待的節點,來喚醒該等待節點。
流程啟動&節點狀態更新程式碼:
@Service
public class Demo2Service {

	@Autowired
	private Demo2Flow demo2Flow;

	/**
	 * 啟動流程
	 */
	public String start(String username) {
		return demo2Flow.startFlow(false, username);
	}

	/**
	 * 根據流程ID,節點ID和啟動範例ID更新節點狀態(點選【查詢使用者資訊】結束後呼叫)
	 */
	public void searchUser(String historyId) {
		FlowComponentFactory.getCompleteQueueSender().putCompleteNode(
				"FLOW_2",
				historyId,
				"a1a38c2e-0e05-4c68-bd49-f12aea070876", // 節點ID【查詢使用者資訊】
				NodeStatusDetail.COMPLETE_SUCCESS,
				"0");
	}

	/**
	 * 根據流程ID,節點ID和啟動範例ID更新節點狀態(點選【查詢酒店資訊】結束後呼叫)
	 */
	public void searchHotel(String historyId) {
		FlowComponentFactory.getCompleteQueueSender().putCompleteNode(
				"FLOW_2",
				historyId,
				"1a90a997-4390-470a-ae7c-626a725438d2",// 節點ID【查詢酒店資訊】
				NodeStatusDetail.COMPLETE_SUCCESS,
				"0");
	}

	/**
	 * 根據流程ID,節點ID和啟動範例ID更新節點狀態(點選【下單】結束後呼叫)
	 */
	public void order(String historyId) {
		FlowComponentFactory.getCompleteQueueSender().putCompleteNode(
				"FLOW_2",
				historyId,
				"52289e99-363d-4453-8077-ca8bdc6d35bf",// 節點ID【下單】
				NodeStatusDetail.COMPLETE_SUCCESS,
				"0");
	}

	/**
	 * 根據流程ID,節點ID和啟動範例ID更新節點狀態(點選【下單成功】結束後呼叫)
	 */
	public void success(String historyId) {
		FlowComponentFactory.getCompleteQueueSender().putCompleteNode(
				"FLOW_2",
				historyId,
				"16422cbb-ccb0-4fe2-952b-e3ad5c3acbb2",// 節點ID【下單成功】
				NodeStatusDetail.COMPLETE_SUCCESS,
				"0");
	}
}
工作流的持久化方式設計
1. 工作流結構的持久化
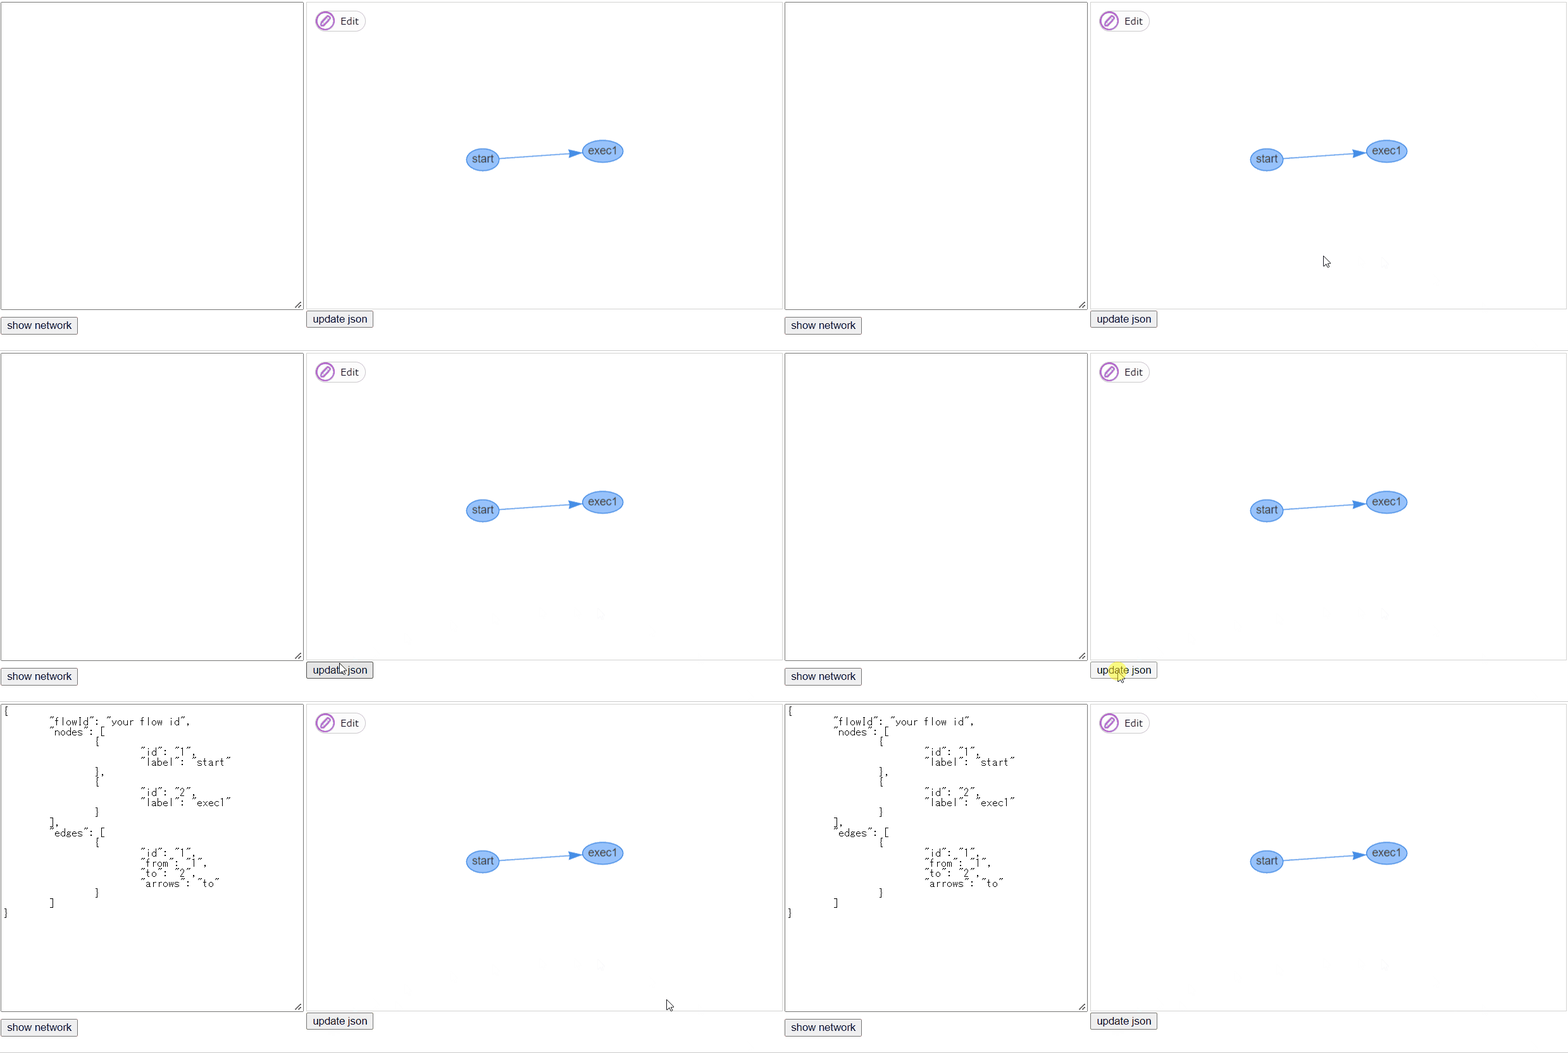
ladybugflow用Json檔案來做工作流結構的持久化。
工作流Json檔案包括:流程資訊,節點資訊和邊資訊
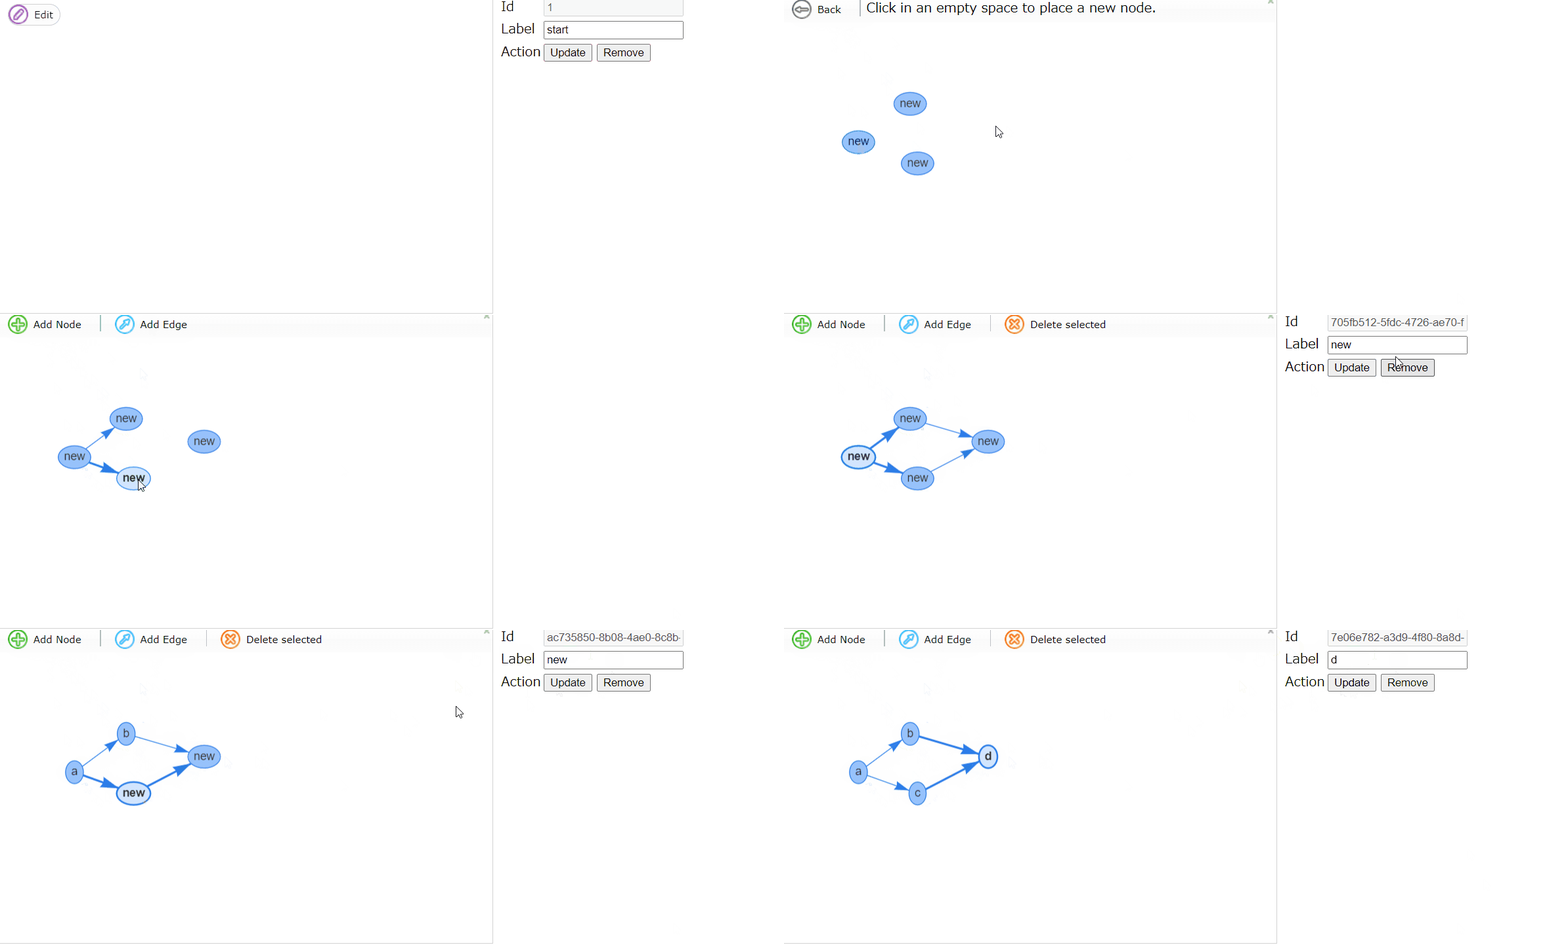
ladybugflow提供了圖形介面,可以用拖拽方式來完成工作流的設計和Json檔案的生成。
2. 工作流狀態的持久化
對於工作流狀態的儲存,我們預設提供了記憶體中儲存的方式。
大家可以根據自己需要,選擇資料庫儲存,檔案儲存,Redis,MogoDB儲存等。
系統用三個實體來儲存工作流的狀態:
・流程歷史實體・節點歷史實體・邊歷史實體
和一個介面來描述對上述實體的操作:
io.github.nobuglady.network.fw.component.IFlowAccessor
大家只要實現上面的介面中的方法,即可以完成對工作流狀態的儲存。
比如存到資料庫中,或者存到Redis中等。
對於自定義的持久化類,需要再ladybug.properties中做如下設定
flow.accessor = 你的持久化類全路徑
下面我們以mysql為例,介紹資料操作介面的實現方式。
流程狀態持久化實現(MySql)
接下來我們介紹mysql作為持久化的實現方式。
首先,需要做成實體對應的相關表,如下。
・流程歷史表
・節點歷史表
・邊歷史表
對應的SQL檔案參考這裡
https://github.com/nobuglady/ladybugflow-ui/blob/main/db/script.sql
然後,我們用sql的方式實現每個介面的方法。
我們針對每個表做一個Dao,實現針對表的操作
具體實現請參考這裡:
最後我們將Dao整合到SpringBoot中,即完成了流程狀態的持久化。
	private HistoryFlowDao historyFlowDao;
	private HistoryNodeDao historyNodeDao;
	private HistoryEdgeDao historyEdgeDao;

	public FlowAccessor() {
		historyFlowDao = SpringContextBridge.getInstance().getHistoryFlowDao();
		historyNodeDao = SpringContextBridge.getInstance().getHistoryNodeDao();
		historyEdgeDao = SpringContextBridge.getInstance().getHistoryEdgeDao();
	}
執行效果如下,可以看到系統已經通過發SQL的方式進行持久化查詢與更新。
[I]2022/08/25 17:17:46.015 [your flow id][5bc43da8-7b11-4746-b886-31fd1c1bf754] pool-1-thread-2:execute node id:16422cbb-ccb0-4fe2-952b-e3ad5c3acbb2
[I]2022/08/25 17:17:46.015 [your flow id][5bc43da8-7b11-4746-b886-31fd1c1bf754] pool-1-thread-2:execute node name:下單成功
下單成功開始 (模擬業務等待3秒)
下單成功結束
2022/08/25 17:17:49 DEBUG [Thread-4] - ==>  Preparing: SELECT * FROM history_node WHERE flow_id = ? and node_id = ? and history_id = ?
2022/08/25 17:17:49 DEBUG [Thread-4] - ==> Parameters: your flow id(String), 16422cbb-ccb0-4fe2-952b-e3ad5c3acbb2(String), 5bc43da8-7b11-4746-b886-31fd1c1bf754(String)
2022/08/25 17:17:49 DEBUG [Thread-4] - <==      Total: 1
2022/08/25 17:17:49 DEBUG [Thread-4] - ==>  Preparing: update history_node set node_status = ?, node_status_detail = ?, update_user = ?, update_time = now() where flow_id = ? and history_id = ? and node_id = ?
2022/08/25 17:17:49 DEBUG [Thread-4] - ==> Parameters: 22(Integer), 1(Integer), testUser(String), your flow id(String), 5bc43da8-7b11-4746-b886-31fd1c1bf754(String), 16422cbb-ccb0-4fe2-952b-e3ad5c3acbb2(String)
2022/08/25 17:17:49 DEBUG [Thread-4] - <==    Updates: 1
2022/08/25 17:17:49 DEBUG [Thread-4] - ==>  Preparing: update history_node set node_status = ?, update_user = ?, update_time = now() where flow_id = ? and history_id = ? and node_id = ?
2022/08/25 17:17:49 DEBUG [Thread-4] - ==> Parameters: 100(Integer), testUser(String), your flow id(String), 5bc43da8-7b11-4746-b886-31fd1c1bf754(String), 16422cbb-ccb0-4fe2-952b-e3ad5c3acbb2(String)
2022/08/25 17:17:49 DEBUG [Thread-4] - <==    Updates: 1
2022/08/25 17:17:49 DEBUG [Thread-4] - ==>  Preparing: SELECT * FROM history_edge WHERE flow_id = ? and history_id = ?
2022/08/25 17:17:49 DEBUG [Thread-4] - ==> Parameters: your flow id(String), 5bc43da8-7b11-4746-b886-31fd1c1bf754(String)
2022/08/25 17:17:49 DEBUG [Thread-4] - <==      Total: 6
2022/08/25 17:17:49 DEBUG [Thread-4] - ==>  Preparing: SELECT * FROM history_node WHERE flow_id = ? and history_id = ?
2022/08/25 17:17:49 DEBUG [Thread-4] - ==> Parameters: your flow id(String), 5bc43da8-7b11-4746-b886-31fd1c1bf754(String)
2022/08/25 17:17:49 DEBUG [Thread-4] - <==      Total: 5
2022/08/25 17:17:49 DEBUG [Thread-4] - ==>  Preparing: SELECT * FROM history_flow WHERE flow_id = ? and history_id = ?
2022/08/25 17:17:49 DEBUG [Thread-4] - ==> Parameters: your flow id(String), 5bc43da8-7b11-4746-b886-31fd1c1bf754(String)
2022/08/25 17:17:49 DEBUG [Thread-4] - <==      Total: 1
大家可以根據自己的需要自由的擴充套件持久化的方式。
小型工作流的使用
對於工作流在業務系統中的使用,我們建議增加一個Flow層來處理工作流,如下:
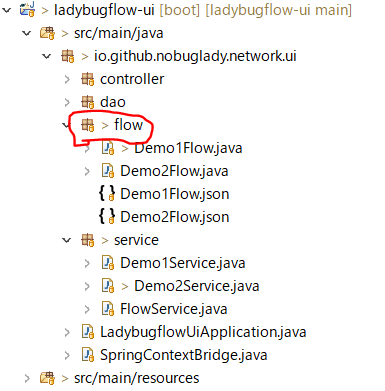
Service層呼叫Flow層來實現工作流的啟動,如下所示:
@Service
public class Demo1Service {

	@Autowired
	private Demo1Flow demo1Flow;

	public void bookingHotel(String username) {
		// 啟動流程
		demo1Flow.startFlow(true, username);
	}
}
工作流的設計
首先需要在我們提供的工具中設計工作流。

然後點選【update json】按鈕生成json檔案。

然後將生成的Json檔案放入Flow層中,並且建立一個同名的Java檔案整合自FlowRunner,來提供工作流的啟動。
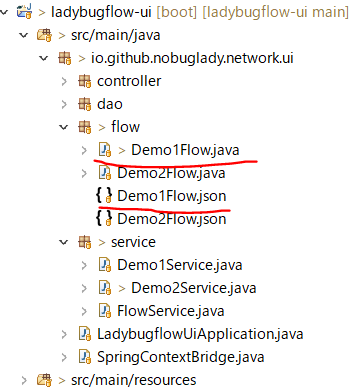
工作流的監控
ladybugflow提供了一個監控工作流的例子,大家可以根據需要自己擴充套件。
瀏覽器開啟 http://localhost:8080/list

可以顯示所有的工作流,點選【detail】連結,即可檢視工作流的詳細狀態。
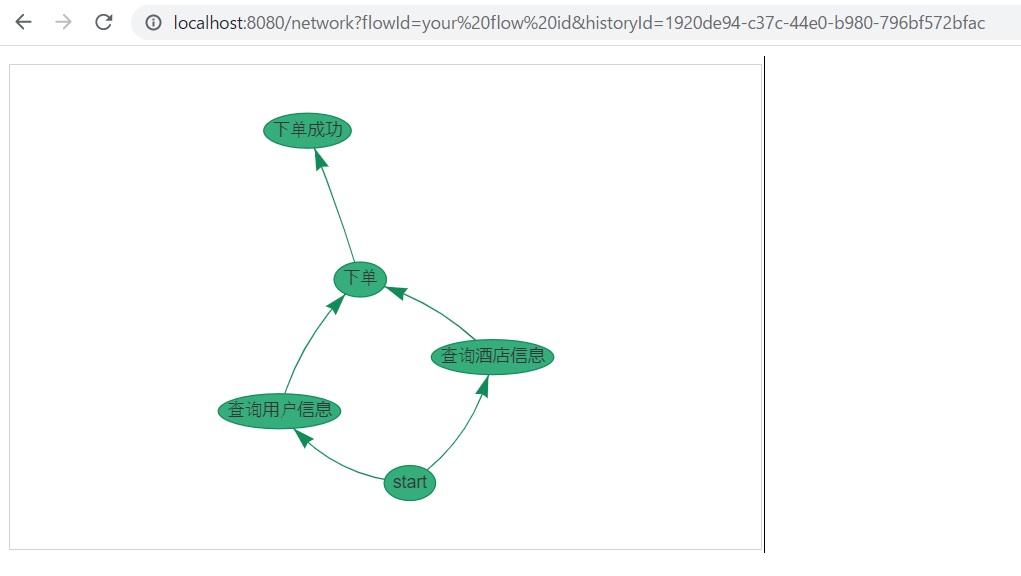
點選【clear complete】按鈕,即可刪除所有已經完成的工作流,
點選【clear error】按鈕,即可刪除所有的執行錯誤的工作流。
後續會加入許可權控制等功能,歡迎大家持續關注本專案。
感謝您閱讀到這裡
最後
原始碼:
https://github.com/nobuglady/ladybugflow
https://github.com/nobuglady/ladybugflow-ui