springAOP和AspectJ有關係嗎?如何使用springAOP面向切面程式設計
不知道大家有沒有這樣的感覺,平時經常說aop,但是對aop中的一些概念還是模糊,總感覺很飄渺,今天來梳理下關於aop的知識。
一、概念
我們知道現在開發都是spring,講的最多的也是springAOP,在說springAOP前,先了解下AOP是什麼?
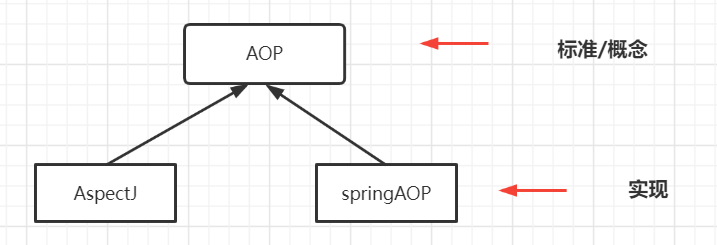
AOP是通過「預編譯方式」和「執行期間動態代理」實現程式功能的統一維護的一種技術。AOP是一個概念,其實現技術有AspectJ和springAOP
,現在對AOP有個清楚的瞭解了,再來看下AOP中的一些概念。
- 切面(aspect),業務層面是程式中的標準程式碼/功能,不同於實際的業務邏輯,比如紀錄檔功能、事務等。程式碼層面切點+通知構成了一個切面;
- 連線點(joinPoint),程式執行過程中的某個特定點,比如方法執行、欄位賦值、方法呼叫等;
- 切點/切入點(pointCut),一個匹配連線點的正規表示式。 每當任何連線點匹配一個切入點時,就執行與該切入點相關聯的通知。可以把切入點看作是符合條件的連線點;
- 通知(advice),在一個連線點中,切面採取的行動,簡單點說是對切點做什麼事,主要有before、afterReturning、round等通知
- 織入(weaving),連線切面和目標物件來建立一個通知物件的過程,簡單點說是把通知應用到連線點的過程;
通過一個圖瞭解下AOP、Aspectj、SpringAOP的關係,

1、AspectJ
AspcetJ作為AOP的一種實現,是基於編譯的方式實現的AOP,在程式執行期是不會做任何事情的,因為類和切面是直接編譯在一起的。AspectJ 使用了三種不同型別的織入方式,使用的是編譯期和類載入時進行織入
- Compile-time weaving:編譯期織入。編譯器將切面和應用的原始碼編譯在一個位元組碼檔案中。
- Post-compile weaving:編譯後織入。也稱為二進位制織入。將已有的位元組碼檔案與切面編制在一起。
- Load-time weaving:載入時織入。與編譯後織入一樣,只是織入時間會推遲到類載入到jvm時。
2、springAOP
springAOP作為AOP的一種實現,基於動態代理的實現AOP,意味著實現目標物件的切面會建立一個代理類,代理類的實現有兩種不同的模式,分為兩種不同的代理,Spring AOP利用的是執行時織入,在springAOP中連線點是方法的執行。
- JDK動態代理;
- cglib動態代理;
另外,在springAOP的實現中,借用了AspectJ的一些功能,比如@AspceJ、@Before、@PonitCut這些註解,都是AspectJ中的註解。在使用springAOP的時候需要引入AspectJ的依賴,
<!--使用springAOP需要引入該依賴-->
        <dependency>
            <groupId>org.aspectj</groupId>
            <artifactId>aspectjweaver</artifactId>
            <version>1.8.13</version>
        </dependency>
下面在演示過程中會再次提及這塊。
springAOP複用了AspectJ中的下面幾個通知,這些註解都是AspectJ中的註解,對應這些註解springAOP分別自己的處理類
- 方法執行前,使用MethodBeforeAdvice介面,使用AspectJ中的註解@Before表示
- 方法執行後,使用AfterReturningAdvice介面,使用AspectJ中的註解@After表示
- 方法執行中,使用註解@Around表示
- 方法執行完返回方法返回值,使用註解@AfterReturning表示
- 方法丟擲異常,使用註解@AfterThrowing表示
二、springAOP實踐
實踐出真知,有了上面的理論基礎現在開始實踐。
有一個service類執行save操作,要在saveUser方法執行的時候織入相應的通知。
UserService.java
package com.my.template.service;

import com.my.template.entity.User;
import org.springframework.stereotype.Service;

/**
 * @date 2022/8/9 15:28
 */
@Service
public class UserService implements Us{
    @Override
    public void saveUser(User user){
        System.out.println("儲存user物件到資料庫:"+user);
    }
}
該方法的呼叫是通過一個controller完成的,
UserController.java
package com.my.template.controller;

import com.my.template.entity.User;
import com.my.template.service.Us;
import com.my.template.service.UserService;
import org.springframework.beans.factory.annotation.Autowired;
import org.springframework.web.bind.annotation.RequestMapping;
import org.springframework.web.bind.annotation.RestController;

/**
 * @date 2022/8/9 15:35
 */
@RestController
public class UserController {
    @Autowired
    private Us us;
    @RequestMapping("/saveUser")
    public String saveUser(){

        User user=new User();
        user.setId("1");
        user.setName("張三");
        us.saveUser(user);
        return "success";
    }

}
在不加任何切面及通知前呼叫該方法的列印結果是,

下面看使用AOP後的結果是什麼樣子的。
1、使用springAOP的XML方式
前面知道springAOP提供了@Before、@After、@Round等註解的,這些註解是複用AspectJ的,下面看,如何使用XML的方式,定義一個通知類,
Log.java
package com.my.template.aop;

import org.springframework.stereotype.Component;
/**
 * @date 2022/8/10 14:13
 */
@Component
public class Log {

    /**
     * 方法執行前
     */
    public void before(){

        System.out.println("執行方法前");
    }
    /**方法執行後
     */
    public void after(){
        System.out.println("執行方法後");
    }
}
然後使用xml的方式,設定如下,
applicationContext.xml
<?xml version="1.0" encoding="UTF-8"?>
<beans xmlns:xsi="http://www.w3.org/2001/XMLSchema-instance"
       xmlns:context="http://www.springframework.org/schema/context"
       xmlns:aop="http://www.springframework.org/schema/aop"
       xmlns="http://www.springframework.org/schema/beans"
       xsi:schemaLocation="http://www.springframework.org/schema/beans  http://www.springframework.org/schema/beans/spring-beans-4.0.xsd
    http://www.springframework.org/schema/context  http://www.springframework.org/schema/context/spring-context-4.0.xsd
    http://www.springframework.org/schema/aop http://www.springframework.org/schema/aop/spring-aop-4.0.xsd"
       default-lazy-init="true">

    <description>Spring公共設定</description>
    <!--AOP設定-->
    <aop:config>
        <!--定義一個切點-->
        <aop:pointcut id="p" expression="execution(* com.my.template.service.UserService.*(..))"/>
        <!--定義一個切面-->
        <aop:aspect id="a" ref="log">
            <!--前置通知-->
            <aop:before method="before" pointcut-ref="p"></aop:before>
            <!--後置通知-->
            <aop:after-returning method="after" pointcut-ref="p"></aop:after-returning>
        </aop:aspect>
    </aop:config>
</beans>
上面使用<aop:config></aop:config>標籤進行aop的設定,在該標籤內使用<aop:pointcut></aop:ponitcut>宣告一個切點,又使用<aop:aspect></aop:aspect>定義了切面,切面中的ref是對通知類的參照,這裡使用的是spring容器的中的bean,前面說到前面中包含了通知,所以下面定義了前置和後置通知,分別指定了通知類中的不同方法,下面看具體的測試方法,我這裡使用的是springboot環境進行的測試,所以在啟動類上加了匯入組態檔的,
BootServer.java
package com.my.template;

import org.springframework.boot.SpringApplication;
import org.springframework.boot.autoconfigure.SpringBootApplication;
import org.springframework.context.annotation.EnableAspectJAutoProxy;
import org.springframework.context.annotation.ImportResource;

/**
 * 啟動類
 * @date 2022/6/3 21:32
 */
@SpringBootApplication()
@ImportResource(value = {"applicationContext.xml"})
public class BootServer {
    public static void main(String[] args) {
        try {
            SpringApplication.run(BootServer.class);
        }catch (Exception e){
            e.printStackTrace();
        }

    }
}
看下啟動結果,
Caused by: org.springframework.beans.factory.BeanCreationException: Error creating bean with name 'org.springframework.aop.aspectj.AspectJPointcutAdvisor#0':
Cannot create inner bean '(inner bean)#14c01636' of type [org.springframework.aop.aspectj.AspectJMethodBeforeAdvice] while setting constructor argument;
nested exception is org.springframework.beans.factory.BeanCreationException: Error creating bean with name '(inner bean)#14c01636':
Lookup method resolution failed; nested exception is java.lang.IllegalStateException:
Failed to introspect Class [org.springframework.aop.aspectj.AbstractAspectJAdvice] from ClassLoader [sun.misc.Launcher$AppClassLoader@18b4aac2]
	at org.springframework.beans.factory.support.BeanDefinitionValueResolver.resolveInnerBean(BeanDefinitionValueResolver.java:389) ~[spring-beans-5.2.8.RELEASE.jar:5.2.8.RELEASE]
	at org.
可以看到啟動報錯,提示無法建立「org.springframework.aop.aspectj.AspectJMethodBeforeAdvice」,那就是說在applicationContext.xml中設定的,
<aop:aspect id="a" ref="log">
           <!--前置通知-->
            <aop:before method="before" pointcut-ref="p"></aop:before>
            <aop:after-returning method="after" pointcut-ref="p"></aop:after-returning>
        </aop:aspect>
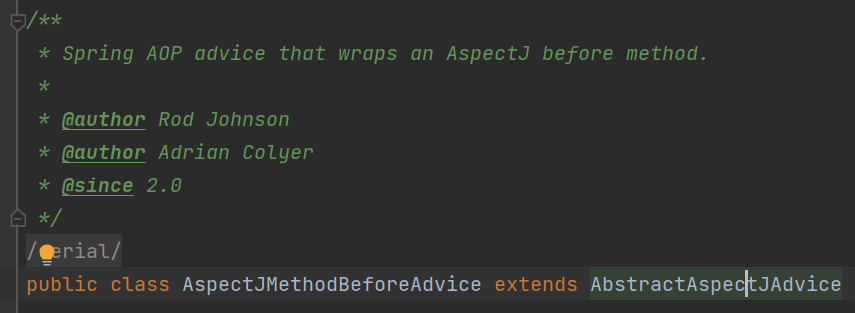
字首通知失敗,也就是說<aop:before>標籤會被解析為AspectJ中的某些類,看下AspectJMethodBeforeAdvice

其類上註釋有「Spring AOP advice that wraps an AspectJ before method」,也就是說這個類會包裹一個AspectJ的@Before通知的方法,看其父類別AbstractAspectJAdvice,在該類中有對Aspect中類的參照,

所以這裡需要引入AspectJ的依賴,也就是前邊提到的,
<!--使用springAOP需要引入該依賴-->
        <dependency>
            <groupId>org.aspectj</groupId>
            <artifactId>aspectjweaver</artifactId>
            <version>1.8.13</version>
        </dependency>
再次啟動專案無報錯,測試結果如下,
2022-08-12 20:00:56.293  INFO 20708 --- [nio-9099-exec-1] o.s.web.servlet.DispatcherServlet        : Completed initialization in 4 ms
執行方法前
儲存user物件到資料庫:User{name='張三', id='1'}
執行方法後也就是說明設定的AOP成功了。有的小夥伴會說,使用springAOP必須要引入AspectJ的依賴嗎,不是的。
2、不依賴AspectJ使用springAOP
前邊,我們演示了使用XML的方式設定AOP,細心的小夥伴發現了這種方式依賴了AspectJ,那麼有沒有不使用AspectJ的,有的,springAOP提供了MethodBeforeAdvice、AfterReturningAdvice、MethodInterceptor、ThrowsAdvice可以分別對應@Before、@AfterReturning、@Around、@AfterThrowing,下面看不使用AspectJ怎麼使用springAOP,
LogBeforeAdvice.java
package com.my.template.aop;

import org.springframework.aop.BeforeAdvice;
import org.springframework.aop.MethodBeforeAdvice;
import org.springframework.stereotype.Component;

import java.lang.reflect.Method;
/**
 * @date 2022/8/9 15:59
 */
@Component
public class LogBeforeAdvice implements MethodBeforeAdvice {
    @Override public void before(Method method, Object[] objects, Object o) throws Throwable {

        System.out.println("執行:"+o.getClass().getName()+"的"+method.getName()+"方法");
    }
}
另外一個,LogAfterAdvice.java
package com.my.template.aop;

import org.springframework.aop.AfterReturningAdvice;
import org.springframework.stereotype.Component;

import java.lang.reflect.Method;
/**
 * @date 2022/8/9 16:07
 */
@Component
public class LogAfterAdvice implements AfterReturningAdvice {
    @Override public void afterReturning(Object returnValue, Method method, Object[] args, Object target)
        throws Throwable {
        System.out.println("執行結束:"+target.getClass().getName()+"方法"+method.getName());
    }
}
上面定義了兩個通知類,下面看具體設定,applicationContext.xml
<?xml version="1.0" encoding="UTF-8"?>
<beans xmlns:xsi="http://www.w3.org/2001/XMLSchema-instance"
       xmlns:context="http://www.springframework.org/schema/context"
       xmlns:aop="http://www.springframework.org/schema/aop"
       xmlns="http://www.springframework.org/schema/beans"
       xsi:schemaLocation="http://www.springframework.org/schema/beans  http://www.springframework.org/schema/beans/spring-beans-4.0.xsd
    http://www.springframework.org/schema/context  http://www.springframework.org/schema/context/spring-context-4.0.xsd
    http://www.springframework.org/schema/aop http://www.springframework.org/schema/aop/spring-aop-4.0.xsd"
       default-lazy-init="true">

    <description>Spring公共設定</description>

    <!--springAOP的設定-->
    <aop:config>
    <!--切點-->
        <aop:pointcut id="p" expression="execution(* com.my.template.service.UserService.*(..))"/>
        <!--通知-->
        <aop:advisor advice-ref="logBeforeAdvice" pointcut-ref="p"></aop:advisor>
        <aop:advisor advice-ref="logAfterAdvice" pointcut-ref="p"></aop:advisor>
    </aop:config>
</beans>
看下測試結果,
2022-08-13 14:39:13.124  INFO 25116 --- [nio-9099-exec-1] o.s.web.servlet.DispatcherServlet        : Completed initialization in 18 ms
執行:com.my.template.service.UserService的saveUser方法
儲存user物件到資料庫:User{name='張三', id='1'}
執行結束:com.my.template.service.UserService方法saveUser
看到上面的測試結果,大家明白了吧,同樣可以不依賴AspectJ使用springAOP,但是有個不好的地方,那就是每次都需要實現相應的介面,也就是上面提到的MethodBeforeAdvice、AfterReturningAdvice、MethodInterceptor、ThrowsAdvice,不如使用AspectJ簡單。
3、使用AspectJ註解
springAOP利用AspectJ的註解完成了其註解的功能,下面看下怎麼使用,先定義一個切面(@Aspect),
LogAspect.java
package com.my.template.aop;

import org.aspectj.lang.JoinPoint;
import org.aspectj.lang.annotation.AfterReturning;
import org.aspectj.lang.annotation.Aspect;
import org.aspectj.lang.annotation.Before;
import org.aspectj.lang.annotation.Pointcut;
import org.springframework.stereotype.Component;

/**
 * @date 2022/8/11 14:12
 @Component註解不要忘,該註解的意思是將該切面交給spring管理
 */
@Component
@Aspect
public class LogAspect {
    /**切點
    */
    @Pointcut("execution(* com.my.template.service.UserService.*(..))")
    public void pointCut(){

    }
    /**前置通知
    */
    @Before(value = "pointCut()")
    public void before(JoinPoint joinPoint){
        System.out.println("方法執行前11");
    }
    /**後置通知
    */
    @AfterReturning(value = "pointCut()")
    public void after(JoinPoint joinPoint){
        System.out.println("方法執行後");
    }
}
上面是一個切面,看下怎麼使用,如果是使用XML的方式,記得要在XML中設定如下,
applicationContext.xml
    <!-- 開啟自動切面代理-->
<aop:aspectj-autoproxy/>此設定相當於@EnableAspectJAutoProxy,在springboot的環境中這兩個都不需要設定,這是為什麼?後邊會講
下面看我的啟動類,

啟動類上既沒有引入applicationContext.xml也沒用加@EnableAspectJAutoProxy,但是測試結果是,

從結果來看AOP起作用了。
三、總結
本文主要分享了AOP、springAOP、AspectJ三者的關係,以及springAOP在使用註解的過程中其實是借用了AspectJ的註解。另外還存有一個問題,springboot下需要使用@EnableAspectJAutoProxy註解嗎,下期分享,敬請期待!
