使用 Liquibase 管理資料庫版本
優雅哥 SpringBoot 2.7 .2 實戰基礎 - 05 -使用 Liquibase 管理資料庫版本
在企業開發中,資料庫版本管理好像是一個偽命題,大多專案都是通過 Power Designer 之類的工具建模、生成 SQL 語句,然後去資料庫中執行。在開發過程中如果遇到修改表結構,再補充修改表結構的語句,大家依次去執行,在本地及各個環境中同步表結構。但這種模式,在我參與過的專案中或多或少都出現過問題:忘記同步表結構,導致在服務啟動或執行時出錯。
1 Liquibase 介紹
SpringBoot 官方檔案中推薦了兩款工具來管理資料庫版本:Flyway 和 Liquibase。前者我沒有在專案中使用過,所以本文就只討論 Liquibase。
使用 Liquibase 需要定義一堆 XML 檔案,這些 XML 稱為 changelog 檔案。每個 changelog 檔案中又包含多個變化集合 changeSet,每個 changeSet 記錄了作者、改變的內容。changeSet 中要修改的內容,通過 createTable 、addColumn 等標籤進行操作。通過這種 XML 檔案的方式,就可以將程式碼版本與資料庫版本關聯在一起。專案啟動,會自動執行 changelog XML 檔案。Liquibase 具有執行鎖,已經執行過的內容不會重複執行。在執行 changeSet 時,由於改動的內容可以通過 Liquibase 提供的標籤編寫,所以無關具體的資料庫產品(MySQL、Oracle 等),Liquibase 底層會根據實際使用的資料庫型別轉化為對應的 SQL。
通過上面的描述,可以看出 Liquibase 帶來的幾個好處:
- 支援多型別的資料庫產品,無需維護 SQL 指令碼;
- 專案啟動可以自動升級資料庫;
- 程式碼版本與資料庫版本關聯在一起。
2 在老專案中使用 Liquibase
在咱們的 demo hero-springboot-demo 中,之前已經手動通過 SQL 語句建立了資料庫表 computer,現在想通過 Liquibase 來管理資料庫版本和維護表結構,該怎麼辦呢?本節就通過這個案例來說明已存在的老專案中如何參照 Liquibase。
2.1 設定 Maven 外掛
Liquibase 提供了 Maven 外掛,使用該外掛可以根據資料庫逆向生成 changlog 檔案。在 pom.xml 的 plugins 下新增 Liquibase 外掛:
<plugin>
<groupId>org.liquibase</groupId>
<artifactId>liquibase-maven-plugin</artifactId>
<version>4.9.1</version>
<configuration>
<propertyFileWillOverride>true</propertyFileWillOverride>
<outputChangeLogFile>temp/temp-changelog.xml</outputChangeLogFile>
<driver>com.mysql.cj.jdbc.Driver</driver>
<url>jdbc:mysql://127.0.0.1:3306/hero_springboot_demo?useUnicode=true&characterEncoding=utf8&useSSL=true</url>
<username>root</username>
<password>Mysql.123</password>
<outputFileEncoding>UTF-8</outputFileEncoding>
<verbose>true</verbose>
<diffTypes>tables, views, columns, indexs,foreignkeys, primarykeys, uniqueconstraints, data</diffTypes>
</configuration>
</plugin>
上面設定 Liquibase 的 Maven 外掛:資料庫連線資訊和Liquibase生成規則設定。生成的檔案路徑為 temp 目錄下的 temp-changelog.xml,Liquibase 不會自動生成資料夾,需要手動在專案根目錄下建立 temp 目錄。
2.2 逆向生成 changelog
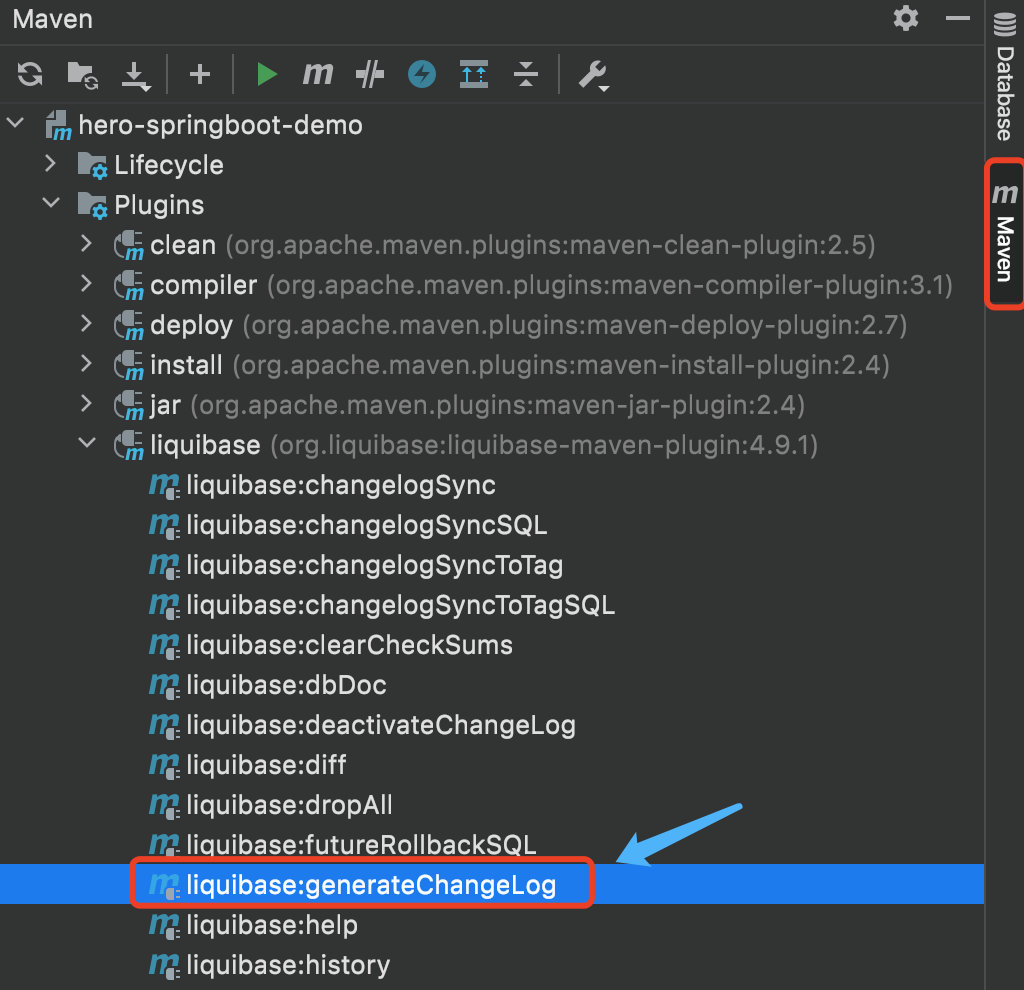
在控制檯執行 mvn liquibase:generateChangeLog 或者在介面上執行 generateChangeLog:

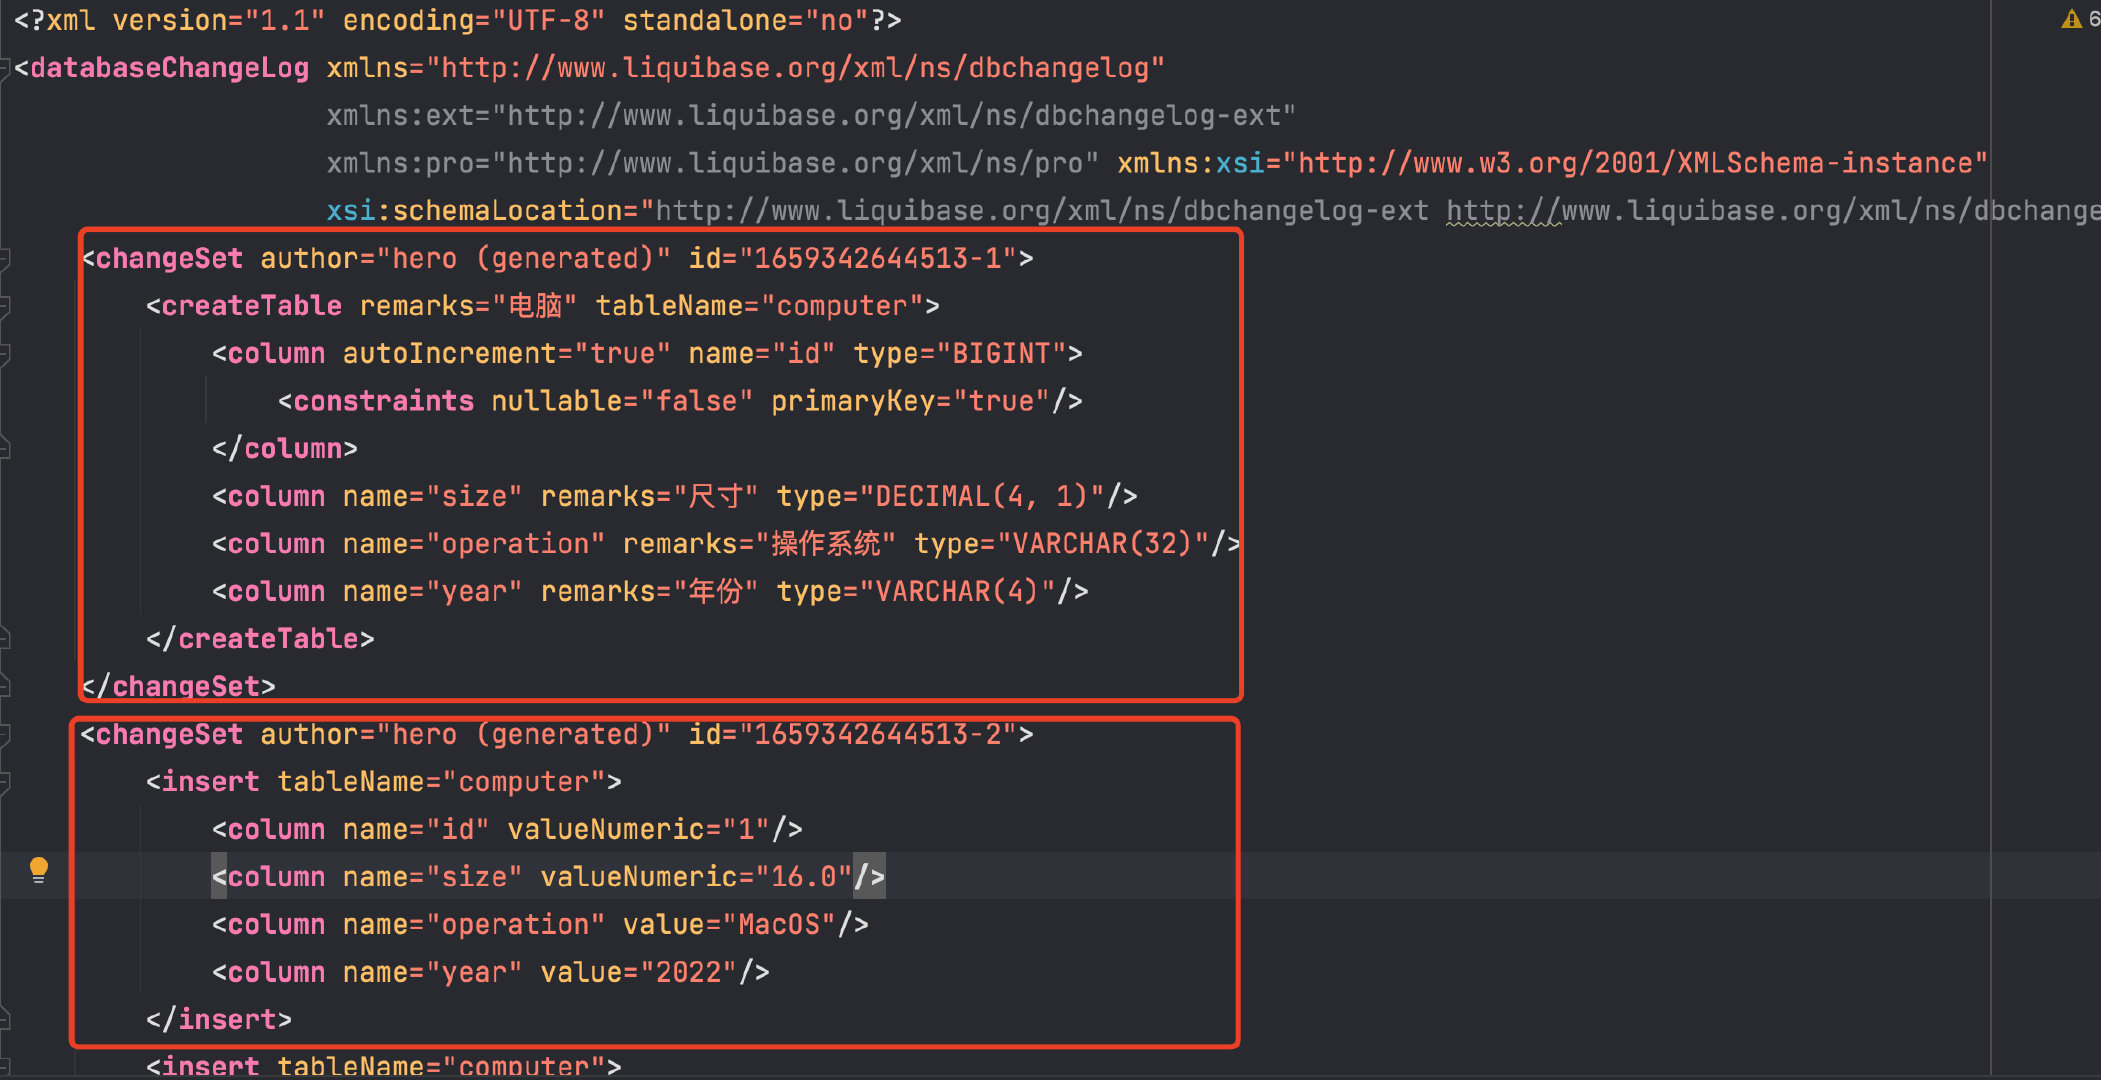
執行後檢視 temp/temp-changelog.xml 檔案:

生成的這個檔案就是 changelog 檔案,該檔案中包括兩個 changeSet:第一個是建立表結構;第二個初始化資料。
在第一個 changeSet 的 createTable 中,對 id 欄位設定了自增屬性 autoIncrement:
<column autoIncrement="true" name="id" type="BIGINT">
    <constraints nullable="false" primaryKey="true"/>
</column>
不知道為啥,我這不生效。要使該欄位自增,要用 addAutoIncrement 標籤。第一個 changeSet 需要新增上該標籤,新增後如下:
<changeSet id="T100-20220801-yyg-001" author="yyg">
    <createTable remarks="電腦" tableName="computer">
        <column autoIncrement="true" name="id" type="BIGINT">
            <constraints nullable="false" primaryKey="true"/>
        </column>
        <column name="size" remarks="尺寸" type="DECIMAL(4, 1)"/>
        <column name="operation" remarks="作業系統" type="VARCHAR(32)"/>
        <column name="year" remarks="年份" type="VARCHAR(4)"/>
    </createTable>
    <addAutoIncrement tableName="computer" columnName="id" columnDataType="BIGINT"/>
</changeSet>
獲取到歷史表結構及資料的 changelog 檔案後,接下來的步驟與 SpringBoot 整合 Liquibase 一致。
3 在 SpringBoot 中使用 Liquibase
3.1 新增依賴
在 pom.xml 檔案中新增 liquibase 依賴 liquibase-core,該依賴版本號在 spring-boot-dependencies中已定義,直接新增依賴即可。
<dependency>
    <groupId>org.liquibase</groupId>
    <artifactId>liquibase-core</artifactId>
</dependency>
3.2 新增 changelog
在 src/main/resources 建立目錄 db, db 目錄用來存放 Liquibase 相關的 changelog 檔案。
db 目錄下還可以按模組建立其他目錄,由於我們這裡只有一個 computer 類,屬於 demo 演示,故就在 db 目錄下建立子目錄 demo, db/demo/ 目錄就存放 demo 演示的所有 changelog 組態檔。將前面 Liquibase 逆向生成的 temp-changelog.xml 檔案移動到 db/demo/ 目錄下,並重新命名為 demo-changelog-v1.xml。
在 db 目錄下建立 changelog-master.xml 檔案,該檔案為主組態檔,作用就是引入所有模組的 changelog 檔案:
<?xml version="1.0" encoding="UTF-8"?>
<databaseChangeLog xmlns:xsi="http://www.w3.org/2001/XMLSchema-instance"
                   xmlns="http://www.liquibase.org/xml/ns/dbchangelog"
                   xsi:schemaLocation="http://www.liquibase.org/xml/ns/dbchangelog
                        https://www.liquibase.org/xml/ns/dbchangelog/dbchangelog-3.1.xsd">

    <includeAll path="demo" relativeToChangelogFile="true"/>
</databaseChangeLog>
除了根節點,裡面就一句話,表示將當前路徑下 demo 目錄中的 changelog 檔案都引入。假設 db 目錄下還有其他模組(目錄),繼續通過 <includeAll> 元素引入即可。
src/main/resources 中檔案目錄結構如下:
src/main/resources/
|- db/
	|- demo/
		|- demo-changelog-v1.xml
	|- changelog-master.xml
3.3 changeSet
回過頭來看 demo-changelog-v1.xml 檔案,裡面的內容是之前生成的,前面講過包括兩個 changeSet。changeSet 用來定義對資料庫的表更操作,包括:
表結構的操作:建立表、刪除表、修改表結構(新增列、刪除列等)
表資料的操作:表中資料的增刪改查
檢視的操作、索引的操作等
幾乎只要是對資料庫的操作,都可以寫在 changeSet 中。當服務啟動的時候,會自動執行主組態檔中包含的所有 changeSet。需要特別注意:changeSet 一經執行,就不能修改!! 雖然 changeSet 元素有一個屬性 runOnChange ,非常不建議亂用。如果要修改 changeSet裡面的內容怎麼辦呢?重新寫一個 changeSet,在裡面編寫要修改的內容。例如在第一個 changeSet 中使用 <createTable> 建立表,表中有一個列名為 field,在該 changeSet 執行後(成功啟動過服務),想將該列列名 field 修改為 f,這時候不能直接修改第一個 changeSet,而是要寫第二個 changeSet,通過 <renameColumn> 來修改列名,然後重啟服務。
changeSet元素有兩個必填的屬性 author 和 id。author 表示作者,當前的是誰定義的這個changeSet,就填誰的名字,這樣便於追溯。 id 要求唯一,我在專案開發中,id一般按照這個規則:[任務ID]-[日期]-[作者]-[序號],如 T100-20220801-yyg-001。
通常小版本更新(如欄位級別的變更),就在同一個檔案中追加新的 changeSet 即可。一個 changelog 檔案可以包括多個 changeSet,每個 changeSet 中可以包括多個語句,如多個 createTable、insert 等。
大版本更新,就重新編寫 changeLog 檔案,如 demo-changelog-v2.xml。
按照上面所講,我們修改一下 demo-changelog-v1.xml 中的兩個 changeSet 的 id 和 author:
<?xml version="1.0" encoding="UTF-8"?>
<databaseChangeLog xmlns:xsi="http://www.w3.org/2001/XMLSchema-instance"
                   xmlns="http://www.liquibase.org/xml/ns/dbchangelog"
                   xsi:schemaLocation="http://www.liquibase.org/xml/ns/dbchangelog
                    https://www.liquibase.org/xml/ns/dbchangelog/dbchangelog-3.1.xsd">
    <!--
    1. id使用[任務ID]-[日期]-[作者]-[序號],如 T100-20220801-yyg-001
    2. 必須填寫author
    3. 所有 表、列 必須加remarks進行註釋
    4. 已經執行過的ChangeSet嚴禁修改
    -->
    <changeSet id="T100-20220801-yyg-001" author="yyg">
        <createTable remarks="電腦" tableName="computer">
				...
				</createTable>
    </changeSet>
    <changeSet id="T100-20220801-yyg-002" author="yyg">
        ...
    </changeSet>
</databaseChangeLog>
3.4 新增設定
在 application.yml 中新增 liquibase 的設定:
spring:
  liquibase:
    enabled: true
    drop-first: false
    change-log: classpath:/db/changelog-master.xml
上述設定開啟 liquibase,並指定主檔案的路徑。
3.5 啟動服務測試
現在啟動服務,會發現服務啟動失敗,而且控制檯會出現如下提示:
Reason: liquibase.exception.DatabaseException: Table 'computer' already exists
此時需要刪除資料庫中的表,然後重新啟動服務。
服務啟動成功後,會自動建立兩張 liquibase 相關的表:DATABASECHANGELOG 和 DATABASECHANGELOGLOCK表。
現在嘗試在 demo-changelog-v1.xml中編寫第三個 changeSet:
<changeSet id="T100-20220801-yyg-003" author="yyg">
    <addColumn tableName="computer">
        <column name="color" type="VARCHAR(8)" defaultValue="red" remarks="顏色"/>
    </addColumn>
</changeSet>
這個 changeSet 為 computer 表新增列 color,預設值為 red。重啟服務,服務啟動後檢視 computer 表:
- 已新增列 color
- color 預設值已設定為 red

這樣便成功在 SpringBoot 中使用 liquibase。
4 常見問題
4.1 Waiting for changelog lock
如果啟動服務時,控制檯提示如下資訊:
Liquibase - Waiting for changelog lock
Waiting for changelog lock....
通常是由於 Liquibase 在重構資料庫時使資料庫死鎖。解決方法如下:
1 檢視鎖住資料庫的id:
SELECT * FROM DATABASECHANGELOGLOCK where LOCKED = true;
2 解鎖:
UPDATE DATABASECHANGELOGLOCK
SET locked=0, lockgranted=null, lockedby=null
WHERE id={id}
{id} 為第一步中查詢出來對應記錄的id。
4.2 主鍵自增無效
前面已經談到,需要設定 addAutoIncrement 標籤
<addAutoIncrement tableName="xxx" columnName="xx" columnDataType="BIGINT"/>
4.3 預設值無效
與主鍵自增無效類似,為 column 設定預設值 defaultValue、defaultValueNumeric也無效。
設定預設值需要使用標籤 addDefaultValue:
<addDefaultValue tableName="xxx" columnName="xx" defaultValueNumeric="0"/>
Liquibase 還有很多強大的功能,就留給大家在使用過程中一步一步探索吧。

今日程式設計師優雅哥(/ youyacoder;[email protected])學習到此結束~~~