VUE元件的建立、渲染、及註冊(總結分享)

【相關推薦:、】
元件的建立
建立元件用Vue.extend()
建立的元件不要寫el因為最終所有的元件都要被vm管理,由vm決定服務的物件
date不能寫物件形式而是寫成函數形式,且其中一定要return一個物件
// 建立一個元件
const school=Vue.extend({
    // 設定template,裡面存放的是通過當前元件中的內容生成的標籤,最終會作為模板在頁面中解析出來
    template:`
            <!--最外層為template必須具有的根標籤-->
            <div>
                <!--div中的標籤會在頁面中使用到該元件的地方解析並顯示出來,那麼name就是此元件中
                  data中設定的name,adress同理-->
                <h1>我的名字:{{name}}</h1>
                <h2>地址:{{adress}}</h2>
            </div>`,
   // 設定date
      data(){
        return{
            name:'z',
            adress:'earth'
             }
        }
})
注意:在全域性環境下使用Vue.entend({})建立的元件,在不使用Vue.component('元件名',最終元件名)宣告時,就是區域性元件,不可以被其他vm範例使用,如果使用了Vue.component建立的元件時為全域性元件(Vue.entend可以省略,直接const 元件名={ })
元件的渲染
當元件註冊完成之後,在頁面中vm服務的el內使用,使用方式就是將最終元件名作為一個標籤放到想要的位置等待瀏覽器解析即可
const vm=new Vue({
        el:'root',
        components:{
            // 註冊元件
            sl:school
            }
        })
頁面中
<!DOCTYPE html>
<html>
<head>
    <meta charset="UTF-8">
    <meta http-equiv="X-UA-Compatible" content="IE=edge">
    <meta name="viewport" content="width=device-width, initial-scale=1.0">
    <title>Document</title>
    <script src="./vue.js"></script>
</head>
<body>
    <div id="root">
        <!-- 用元件標籤將想用的元件放到頁面上,那麼元件中template屬性中的標籤就會在這個位置被解析出來-->
        <sl></sl>
    </div>
</body>
</html>
總結:vm範例相當於起了一個橋樑作用,使得元件中的內容最終會被展現在頁面上,這樣提高了程式碼的利用率,當我們需要重複使用某一個內容時,可以直接找到這個內容所在的元件,然後將元件註冊到範例上即可在頁面中展示。
Vue的元件註冊
1、全域性註冊:當Vue建立,元件就會被載入,不管該元件使不使用,都會被載入【佔記憶體】【入門程式】
2、區域性註冊:當我們使用到某個元件,該元件才會被建立,如果不使用該元件,那麼該元件不會被建立
建立vm,設定el(決定components中的元件為誰服務)
設定components物件,其中元素以key,value儲存,key是在當前範例中的元件名(最終元件名),value是我們在全域性環境下設定的元件名
全域性註冊
    Vue.component("button-a",{
        template:"\n" +
            "    <button @click=\"count++\">{{count}}</button>",
        data:function () {
            return{
                count:0
            }
        },
        methods:{

        }
    })
區域性註冊
    let componentA = {
        template:"\n" +
                "    <button @click=\"count++\">{{count}}</button>",
            data:function () {
                return{
                    count:0
                }
            },
            methods:{

            }
    }
    new Vue({
        el:"#app",
        components:{
            "component-a":componentA,
        }
    })
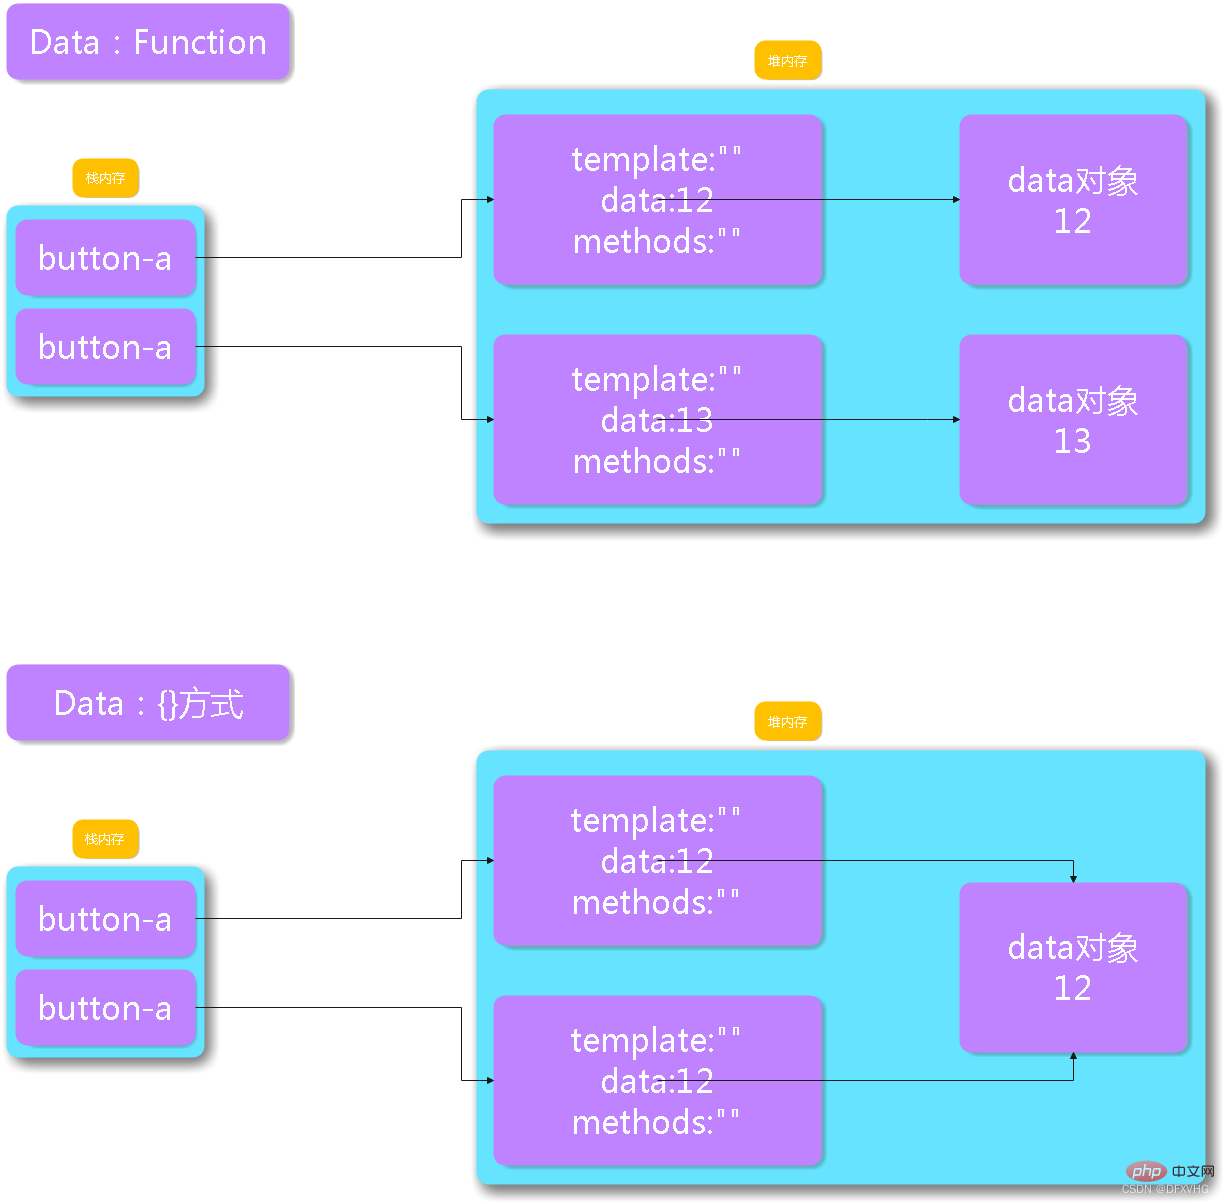
關於data為什麼是一個函數

元件註冊優化
在元件中編寫html結構時,來回複製黏貼,非常麻煩,也很佔記憶體。解決辦法是在html裡用模板編寫,並且和js分離
1、模板需要寫在template標籤中,template標籤寫在容器外部
2、在template標籤中只能有一個根標籤
<body>
    <div id="app">
        <button-color></button-color>
    </div>
    <template id="cId">
        <div>
            <h1>元件</h1>
            <h2>阿薩德</h2>
        </div>
    </template>
</body>
</html>
<script>
    let ButtonColor = {
        template:"#cId",
        data:function () {

        }
    }
    new Vue({
        el:"#app",
        components:{
            ButtonColor
        }
    })
</script>
is屬性
在html中有一些父子標籤,在父標籤中只能有特定的子標籤【嚴格規範】【table、ul、ol、dl.....】,如果把子標籤封裝成元件,在父標籤中通過傳統方式使用元件,那麼會出現顯示的效果問題,我們需要通過is進行使用元件
<body>
<div id="app">
   <table>
       <thead>
            <tr>
                <th>序號</th>
                <th>姓名</th>
                <th>年齡</th>
            </tr>
       </thead>
       <tbody is="ButtonTable">

       </tbody>
       <tfoot>
            <tr>
                <td colspan="3">尾部</td>
            </tr>
       </tfoot>
   </table>
</div>

<template id="tId">
    <tbody>
        <tr>
            <td>1</td>
            <td>阿斯頓</td>
            <td>26</td>
        </tr>
    </tbody>
</template>

<script>
    let ButtonTable = {
        template:"#tId",

    }
    new Vue({
        el:"#app",
        components:{
            ButtonTable
        }
    })
</script>
</body>
元件巢狀
在一個元件中使用另一個元件
<body>
    <div id="app">
        <base-color></base-color>
    </div>
    <template id="color">
        <div>
            <h1>這是父元件</h1>
            <base-colo1></base-colo1>
        </div>
    </template>
    <template id="color1">
        <h1 style="color: red">這是子元件</h1>
    </template>
</body>
</html>
<script>
    // //建立子元件
    let BaseColo1 ={
        template:"#color1",

    }
    //建立父元件
    let BaseColor ={
        template:"#color",
        components:{
            BaseColo1
        }
    }
    new Vue({
        el:"#app",
        components:{
            BaseColor
        }
    })
</script>
元件通訊
1.宣告屬性
在子元件中通過宣告props屬性來接收資料
    // //建立子元件
    let BaseColo1 ={
        template:"#color1",
        props:["msg"]
    }
2.傳遞資料
在父元件中使用子元件時,使用v-bind進行傳遞資料
    <div>
        <base-colo1 :msg = "message"></base-colo1>
    </div>
3.在子元件中使用接收到的資料
<h2>{{msg}}</h2>【相關推薦:、】
以上就是VUE元件的建立、渲染、及註冊(總結分享)的詳細內容,更多請關注TW511.COM其它相關文章!
