webpack核心概念之輸出(Output)

輸出(Output):設定 output 選項可以控制 webpack 如何向硬碟寫入編譯檔案。注意,即使可以存在多個入口起點,但只指定一個輸出設定。
起步
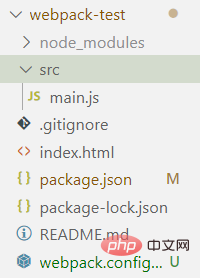
我們先npm init初始化一個專案,本地安裝webpack和webpack-cli,然後在根目錄建立index.html、webpack.config.js和src資料夾,在資料夾內再建立一個main.js作為入口檔案
準備工作完成後如圖所示:
main.js
function Component(){
    var div=document.createElement('div')
    div.innerHTML="來一起學習出口設定吧~"
    return div
}
document.body.appendChild(Component())
index.html
<body>
    <script src="./dist/bundle.js"></script>
</body>
packag.json
"scripts": {
  "test": "echo \"Error: no test specified\" && exit 1",
  "build":"webpack" //加上
},接下來就是設定部分:webpack.config.js
輸出(Output))
設定 output 選項可以控制 webpack 如何向硬碟寫入編譯檔案。
注意,即使可以存在多個入口起點,但只指定一個輸出設定
下面是輸出設定的幾個概念:
1、path
path指定資源輸出的位置,要求值必須為絕對路徑,如:
const path=require('path')
module.exports={
    entry:'./src/main.js',
    output:{
        filename:'bundle.js',
        //將資源輸出位置設定為該專案的dist目錄
        path: path.resolve(__dirname, 'dist')
    },
}
在Webpack 4之後,output.path已經預設為dist目錄。除非我們需要更改它,否則不必單獨設定,所以如果是webpack4以上,你可以寫成:
module.exports={
    entry:'./src/main.js',
    output:{
        filename:'bundle.js',
    },
}
2、filename
filename的作用是控制輸出資源的檔名,其形式為字串。在這裡我把它命名為bundle.js,意為我希望資源輸出在一個叫bundle.js的檔案中:
module.exports={
    entry:'./src/main.js',
    output:{
        filename:'bundle.js',
    },
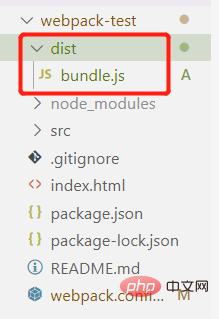
}打包後如圖,會自動生成一個dist資料夾,裡面有個bundle.js檔案
filename可以不僅僅是bundle的名字,還可以是一個相對路徑
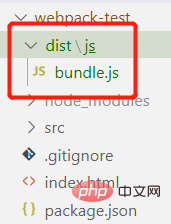
即便路徑中的目錄不存在也沒關係,Webpack會在輸出資源時建立該目錄,比如:
  module.exports = {
    output: {
      filename: './js/bundle.js',
    },
  };
打包後如圖:
在多入口的場景中,我們需要對產生的每個bundle指定不同的名字,Webpack支援使用一種類似模板語言的形式動態地生成檔名
在此之前,我們再去src中建立一個新的入口檔案
vender.js:
function Component(){
    var div=document.createElement('div')
    div.innerHTML="我是第二個入口檔案"
    return div
}
document.body.appendChild(Component())
webpack.config.js:
module.exports = {
    entry:{
        main:'./src/main.js',
        vender:'./src/vender.js'
    },
    output: {
      filename: '[name].js',
    },
 };
打包後如圖:
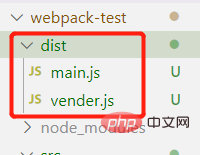
filename中的[name]會被替換為chunk name即main和vender。因此最後會生成vendor.js與main.js
此時如果你希望看到內容,你還需在index.html中改下內容,將路徑對應上最後打包出來的bundle
<body>
    <script src="./dist/main.js"></script>
    <script src="./dist/vender.js"></script>
</body>
[問題]這時候就會有個需求了,如何讓
index.html自動幫我們將生成的bundle新增到html中呢?這裡可以用到外掛 HtmlWebpackPlugin,詳細看下方
3、其他
除了[name]可以指代chunk name以外,還有其他幾種模板變數可以用於filename的設定中:
- [hash]:指代Webpack此次打包所有資源生成的hash
- [chunkhash]:指代當前chunk內容的hash
- [id]:指代當前chunk的id
- [query]:指代filename設定項中的query
它們可以:控制使用者端快取
[hash]和[chunkhash]都與chunk內容直接相關,如果在filename中使用,當chunk的內容改變時,可以同時引起資原始檔名的更改,從而使使用者在下一次請求資原始檔時會立即下載新的版本而不會使用本地快取。
[query]也可以起到類似的效果,但它與chunk內容無關,要由開發者手動指定。
4、publicPath
publicPath是一個非常重要的設定項,用來指定資源的請求位置
以載入圖片為例
import Img from './img.jpg';
function component() {
    //...
    var img = new Image();
    myyebo.src = Img //請求url
	//...
}
{
//...
query: {
name: '[name].[ext]',
outputPath: 'static/img/',
publicPath: './dist/static/img/'
}
}由上面的例子所示,原本圖片請求的地址是./img.jpg,而在設定上加上publicPath後,實際路徑就變成了了./dist/static/img/img.jpg,這樣就能從打包後的資源中獲取圖片了
publicPath有3種形式:
HTML相關
我們可以將publicPath指定為HTML的相對路徑,在請求這些資源時會以當前頁面HTML所在路徑加上相對路徑,構成實際請求的URL
//假設當前html地址為:https://www.example.com/app/index.html
//非同步載入的資源名為 1.chunk.js
pubilicPath:"" 		//-->https://www.example.com/app/1.chunk.js
pubilicPath:"./js" 	//-->https://www.example.com/app/js/1.chunk.js
pubilicPath:"../assets/"  	//-->https://www.example.com/assets/1.chunk.js
Host相關
若publicPath的值以「/」開始,則代表此時publicPath是以當前頁面的host name為基礎路徑的
//假設當前html地址為:https://www.example.com/app/index.html
//非同步載入的資源名為 1.chunk.js
pubilicPath:"/" 	//-->https://www.example.com/1.chunk.js
pubilicPath:"/js/" 	//-->https://www.example.com/js/1.chunk.js
CDN相關
上面兩個都是相對路徑,我們也可以使用絕對路徑的形式設定publicPath
這種情況一般發生於靜態資源放在CDN上面時,由於其域名與當前頁面域名不一致,需要以絕對路徑的形式進行指定
當publicPath以協定頭或相對協定的形式開始時,代表當前路徑是CDN相關
//假設當前html地址為:https://www.example.com/app/index.html
//非同步載入的資源名為 1.chunk.js
pubilicPath:"http://cdn.com/" 	//-->http://cdn.com/1.chunk.js
pubilicPath:"https://cdn.com/"	//-->https://cdn.com/1.chunk.js
pubilicPath:"//cdn.com/assets"	//-->//cdn.com/assets/1.chunk.js
應用
1、單個入口
在 webpack 中設定 output 屬性的最低要求是將它的值設定為一個物件,包括以下兩點:
filename用於輸出檔案的檔名。- 目標輸出目錄
path的絕對路徑
module.exports={
    entry:'./src/main.js',
    output:{
        filename:'bundle.js',
    },
}
//webpack4以後dist會預設生成,於是這裡省略了path
2、多個入口
如果設定建立了多個單獨的 "chunk",則應該使用預留位置來確保每個檔案具有唯一的名稱
這裡用到了上面所講的filename的[name]
另外,如果想將這些資源放進指定的資料夾,可以加上path設定
module.exports={
    entry: {
      main: './src/main.js',
      vender: './src/vender.js'
    },
    output: {
      filename: '[name].js',
      path: __dirname + '/dist/assets' //指定打包後的bundle放在/dist/assets目錄下
    }
  }
// 打包後生成:./dist/assets/main.js, ./dist/assets/vender.js
HtmlWebpackPlugin
本章上方遺留的問題可以通過使用外掛HtmlWebpackPlugin解決
安裝外掛
npm install --save-dev html-webpack-plugin
設定外掛
const HtmlWebpackPlugin=require('html-webpack-plugin') //載入模組
module.exports = {
    entry:{
        main:'./src/main.js',
        vender:'./src/vender.js'
    },
    //新增外掛
    plugins:[
        new HtmlWebpackPlugin({
            title:'output management'
        })
    ],
    output: {
      filename: '[name].js',
    },
 };
打包
打包完成後你會發現dist中出現了一個新的index.html,上面自動幫我們新增所生成的資源,開啟後會發現瀏覽器會展示出內容

這意味著,以後初始化一個專案就不必寫index.html了
原始碼可從這裡獲取:
https://sanhuamao1.coding.net/public/webpack-test/webpack-test/git/files
更多程式設計相關知識,請存取:!!
以上就是webpack核心概念之輸出(Output)的詳細內容,更多請關注TW511.COM其它相關文章!
