Docker映象管理基礎
Docker映象管理基礎
1、映象的概念
映象可以理解為應用程式的集裝箱,而docker用來裝卸集裝箱。
docker映象含有啟動容器所需要的檔案系統及其內容,因此,其用於建立並啟動容器。
docker映象採用分層構建機制,最底層為bootfs,其上為rootfs
- bootfs:用於系統引導的檔案系統,包括bootloader和kernel,容器啟動完成後會被解除安裝以節約記憶體資源
- rootfs:位於bootfs之上,表現為docker容器的根檔案系統
- 傳統模式中,系統啟動之時,核心掛載rootfs會首先將其掛載為「唯讀」模式,完整性自檢完成後將其重新掛載為讀寫模式
- docker中,rootfs由核心掛載為「唯讀」模式,而後通過「聯合掛載」技術額外掛載一個「可寫」層
注意:當刪除容器時,這個容器自有的「可寫」層會一起被刪除

2、Docker映象層
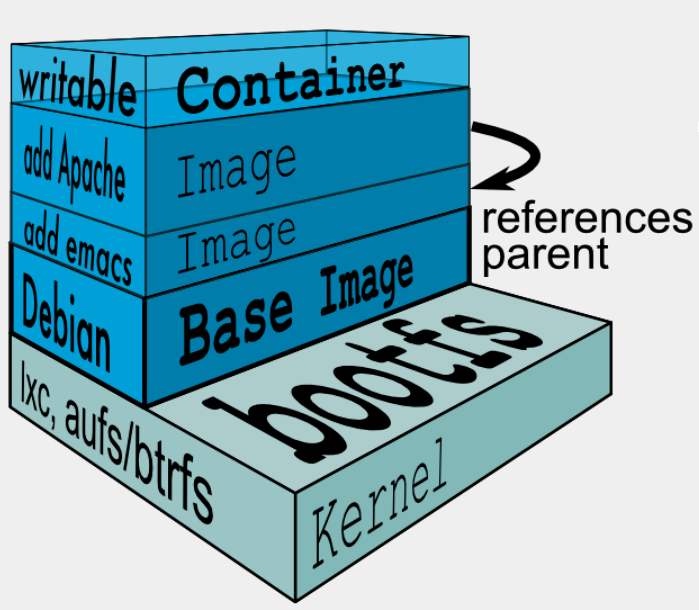
位於下層的映象稱為父映象(parrent image),最底層的稱為基礎映象(base image);
最上層為「可讀寫」層,其下的均為「唯讀」層。
3、Docker儲存驅動
docker提供了多種儲存驅動來實現不同的方式儲存映象,下面是常用的幾種儲存驅動:
- AUFS
- OverlayFS
- Devicemapper
- Btrfs
- VFS
3.1 AUFS
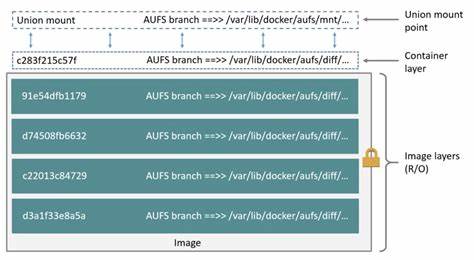
AUFS(AnotherUnionFS)是一種Union FS,是檔案級的儲存驅動。AUFS能透明覆蓋一或多個現有檔案系統的層狀檔案系統,把多層合併成檔案系統的單層表示。簡單來說就是支援將不同目錄掛載到同一個虛擬檔案系統下的檔案系統。這種檔案系統可以一層一層地疊加修改檔案。無論底下有多少層都是唯讀的,只有最上層的檔案系統是可寫的。當需要修改一個檔案時,AUFS建立該檔案的一個副本,使用CoW將檔案從唯讀層複製到可寫層進行修改,結果也儲存在可寫層。在Docker中,底下的唯讀層就是image,可寫層就是Container。結構如下圖所示:
3.2 OverlayFS
Overlay是Linux核心3.18後支援的,也是一種Union FS,和AUFS的多層不同的是Overlay只有兩層:一個upper檔案系統和一個lower檔案系統,分別代表Docker的映象層和容器層。當需要修改一個檔案時,使用CoW將檔案從唯讀的lower複製到可寫的upper進行修改,結果也儲存在upper層。在Docker中,底下的唯讀層就是image,可寫層就是Container。目前最新的OverlayFS為Overlay2。結構如下圖所示:

3.3 Device mapper
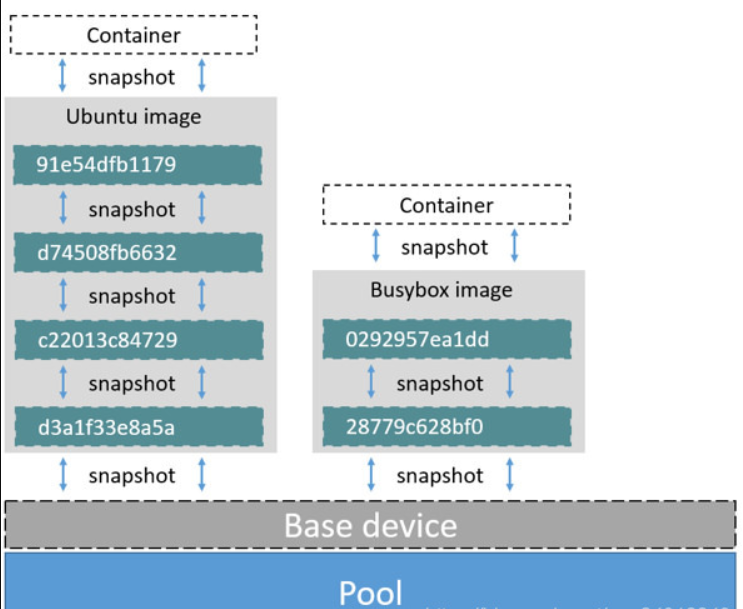
Device mapper是Linux核心2.6.9後支援的,提供的一種從邏輯裝置到物理裝置的對映框架機制,在該機制下,使用者可以很方便的根據自己的需要制定實現儲存資源的管理策略。前面講的AUFS和OverlayFS都是檔案級儲存,而Device mapper是塊級儲存,所有的操作都是直接對塊進行操作,而不是檔案。Device mapper驅動會先在塊裝置上建立一個資源池,然後在資源池上建立一個帶有檔案系統的基本裝置,所有映象都是這個基本裝置的快照,而容器則是映象的快照。所以在容器裡看到檔案系統是資源池上基本裝置的檔案系統的快照,並不有為容器分配空間。當要寫入一個新檔案時,在容器的映象內為其分配新的塊並寫入資料,這個叫用時分配。當要修改已有檔案時,再使用CoW為容器快照分配塊空間,將要修改的資料複製到在容器快照中新的塊裡再進行修改。Device mapper 驅動預設會建立一個100G的檔案包含映象和容器。每一個容器被限制在10G大小的卷內,可以自己設定調整。結構如下圖所示:
4、Docker registry
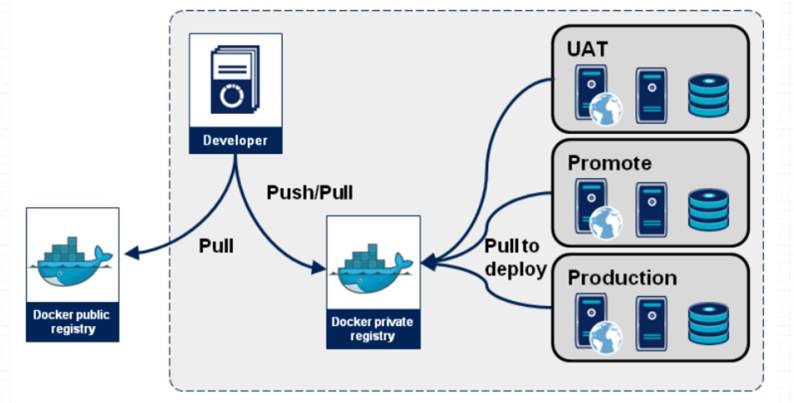
啟動容器時,docker daemon會試圖從本地獲取相關的映象,本地映象不存在時,其將從Registry中下載該映象並儲存到本地。
Registry用於儲存docker映象,包括映象的層次結構和後設資料。使用者可以自建Registry,亦可使用官方的Docker Hub。
docker registry的分類:
- Sponsor Registry:第三方的Registry,供客戶和Docker社群使用
- Mirror Registry:第三方的Registry,只讓客戶使用
- Vendor Registry:由釋出docker映象的供應商提供的registry
- Private Registry:通過設有防火牆和額外的安全層的私有實體提供的registry
docker registry的組成:
- Repository
- 由某特定的docker映象的所有迭代版本組成的映象倉庫
- 一個Registry中可以存在多個Repository
- Repository可分為「頂層倉庫」和「使用者倉庫」
- 使用者倉庫名稱格式為「使用者名稱/倉庫名」
- 每個倉庫可包含多個Tag(標籤),每個標籤對應一個映象
- Index
- 維護使用者帳戶、映象的檢驗以及公共名稱空間的資訊
- 相當於為Registry提供了一個完成使用者認證等功能的檢索介面
Docker Registry中的映象通常由開發人員製作,而後推播至「公共」或「私有」Registry上儲存,供其他人員使用,例如「部署」到生產環境。
5、Docker映象的製作
多數情況下,我們做映象是基於別人已存在的某個基礎映象來實現的,我們把它稱為base image。 比如一個純淨版的最小化的centos、ubuntu或debian。
那麼這個最小化的centos映象從何而來呢? 其實這個基礎映象一般是由Docker Hub的相關維護人員,也就是Docker官方手動製作的。 這個基礎映象的製作對於Docker官方的專業人員來說是非常容易的,但對於終端使用者來說就不是那麼容易製作的了。
5.1 Docker Hub
Docker Hub 是一項基於雲的登入檔服務,允許您連結到程式碼儲存庫、構建映像並對其進行測試、儲存手動推播的映像以及指向 Docker Cloud 的連結,以便將映像部署到主機。
它為容器映像發現、分發和更改管理、使用者和團隊共同作業以及整個開發管道中的工作流自動化提供了集中式資源。

Docker Hub 提供以下主要功能:
- 影象儲存庫
- 從社群和官方庫中查詢和提取映像,以及管理、推播到您有權存取的私有映像庫以及從中拉取映像庫。
- 自動構建
- 在對原始碼儲存庫進行更改時自動建立新映像。
- 網路勾點
- Webhooks 是自動構建的一項功能,可讓您在成功推播到儲存庫後觸發操作。
- 組織
- 建立工作組以管理對映像儲存庫的存取。
- GitHub 和 Bitbucket 整合
- 將中心和 Docker 映像新增到當前工作流。
5.2 Docker映象的獲取
要從遠端登入檔(例如您自己的 Docker 登入檔)獲取 Docker 映像並將其新增到本地系統,請使用 docker pull 命令:
# docker pull <registry>[:<port>]/[<namespace>/]<name>:<tag>
是一個在 TCP 上提供 docker 分發服務的主機(預設值:5000)
一起 識別由 登入檔控制的特定映像
- 一些登入檔也支援原始;對於這些, 是可選的
- 但是,當它被包括在內時,提供的附加層次結構級別對於區分具有相同影象是有用的
層次結構的附加層次
| 命名域 | 範例(<名稱空間>/<名稱>) |
|---|---|
| 組織(organization) | redhat/kubernetes, google/kubernetes |
| 使用者(username) | Alice/application, bob/application |
| 角色(role) | 開發/資料庫,測試/資料庫,生產/資料庫 |
5.3映象的生成
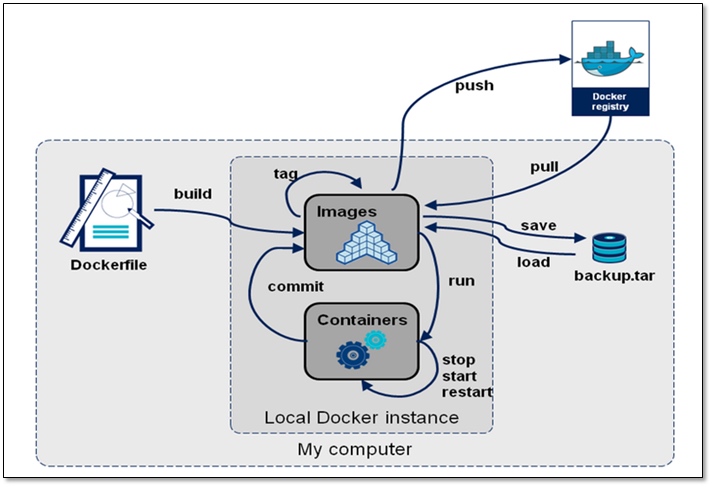
映象的生成途徑:
- Dockerfile
- 基於容器製作
- Docker Hub 自動構建
5.4基於容器製作映象
根據容器的更改建立新映像
用法:
docker commit [OPTIONS] CONTAINER [REPOSITORY[:TAG]]
| 選項 | 預設值 | 說明 |
|---|---|---|
| —author, -a | 作者(例如,「約翰·漢尼拔·史密斯[email protected]") | |
| -c, --change list | 對建立的映像應用Dockerfile指令 | |
| -m, --message string | 提交訊息 | |
| -p, --pause | true | 提交期間暫停容器 |
準備工作:安裝啟動docker並設定加速器(詳情見Docker基礎用法)
# 使用pull命令拉網上的busybox映象
[root@localhost ~]# docker pull busybox
Using default tag: latest
latest: Pulling from library/busybox
50783e0dfb64: Pull complete
Digest: sha256:ef320ff10026a50cf5f0213d35537ce0041ac1d96e9b7800bafd8bc9eff6c693
Status: Downloaded newer image for busybox:latest
docker.io/library/busybox:latest
[root@localhost ~]# docker images
REPOSITORY   TAG       IMAGE ID       CREATED      SIZE
busybox      latest    7a80323521cc   6 days ago   1.24MB

# 使用映象busybox建立並執行一個名叫bus1容器並使用互動模式進去編輯,建立一個index.html檔案
[root@localhost ~]# docker run -it --name bus1 busybox
/ # ls
bin   dev   etc   home  proc  root  sys   tmp   usr   var
/ # mkdir /data
/ # echo 'hellow world' > /data/index.html
/ # cat /data/index.html
hellow world

# 建立映象的時候不能關閉容器,必須使其處於執行狀態,所以我們必須要另起一個終端
[root@localhost ~]# docker commit -a "[email protected]" -p -m "first commit" bus1
sha256:c476706b4b674189c8c47342398195108dfab017006d0351b31196f2d83aed47
[root@localhost ~]# docker images
REPOSITORY   TAG       IMAGE ID       CREATED       SIZE
<none>       <none>    c476706b4b67   8 seconds ago   1.24MB
busybox      latest    beae173ccac6   7 months ago    1.24MB

# 替換資訊,名稱為web,版本為v1
[root@localhost ~]# docker tag c476706b4b67 web:v1
[root@localhost ~]# docker images
REPOSITORY   TAG       IMAGE ID       CREATED        SIZE
web        v1        c476706b4b67   44 seconds ago   1.24MB
busybox      latest    beae173ccac6   7 months ago     1.24MB

# 複製web映象,名稱為483607723,版本為v2
[root@localhost ~]# docker tag web:v1 483607723/web:v2
[root@localhost ~]# docker images
REPOSITORY      TAG       IMAGE ID       CREATED          SIZE
483607723/web    v2        c476706b4b67   About a minute ago   1.24MB
web           v1        c476706b4b67   About a minute ago   1.24MB
busybox        latest    beae173ccac6   7 months ago         1.24MB
開啟Docker官網(Home - Docker)右上角Sign in。
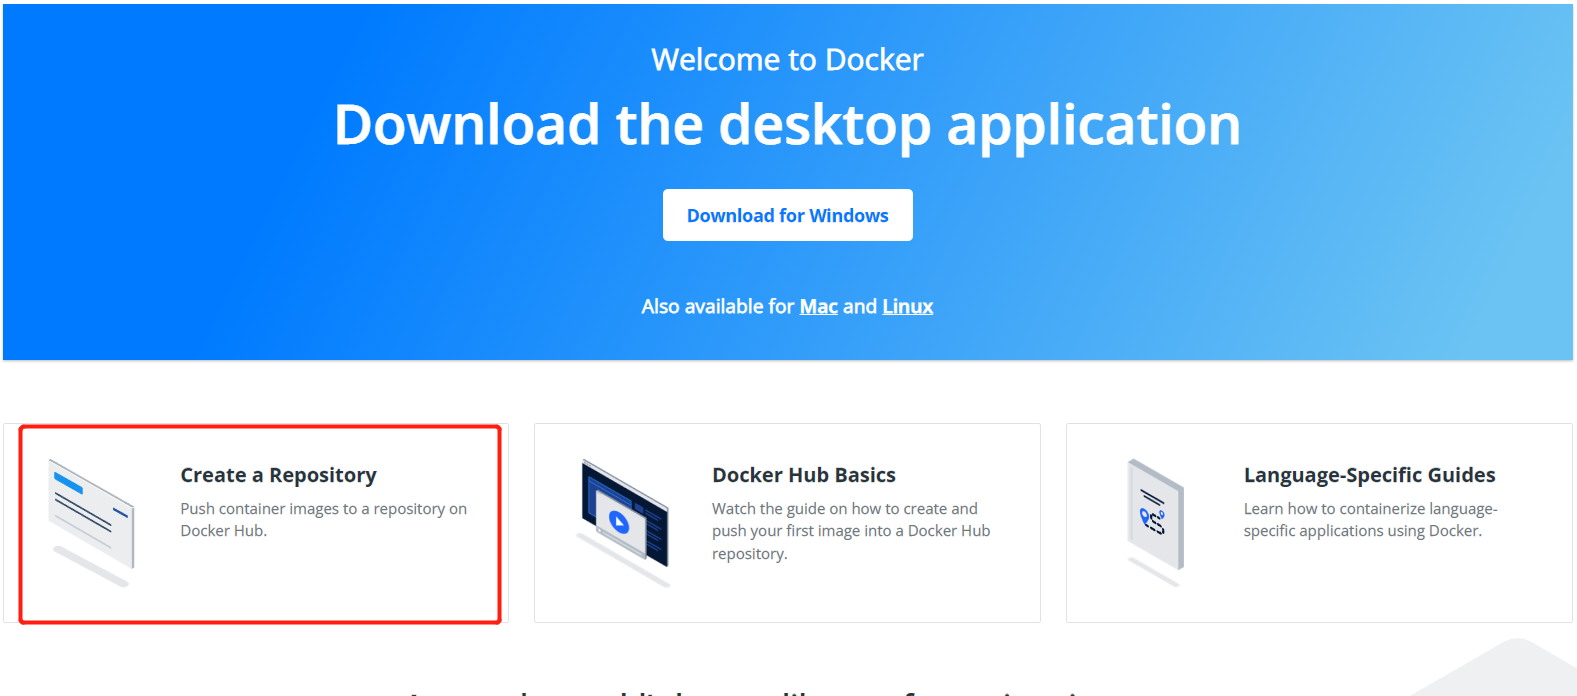
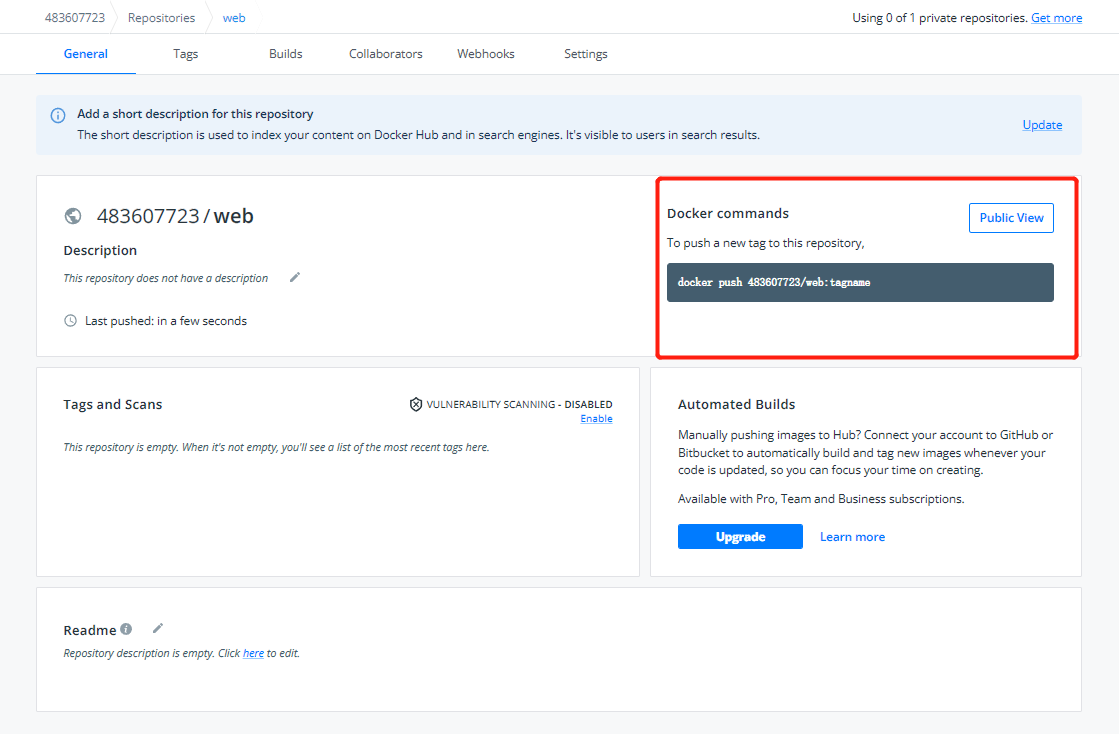
在首頁選擇Create a Repository
輸入倉庫名稱web,然後點選Create
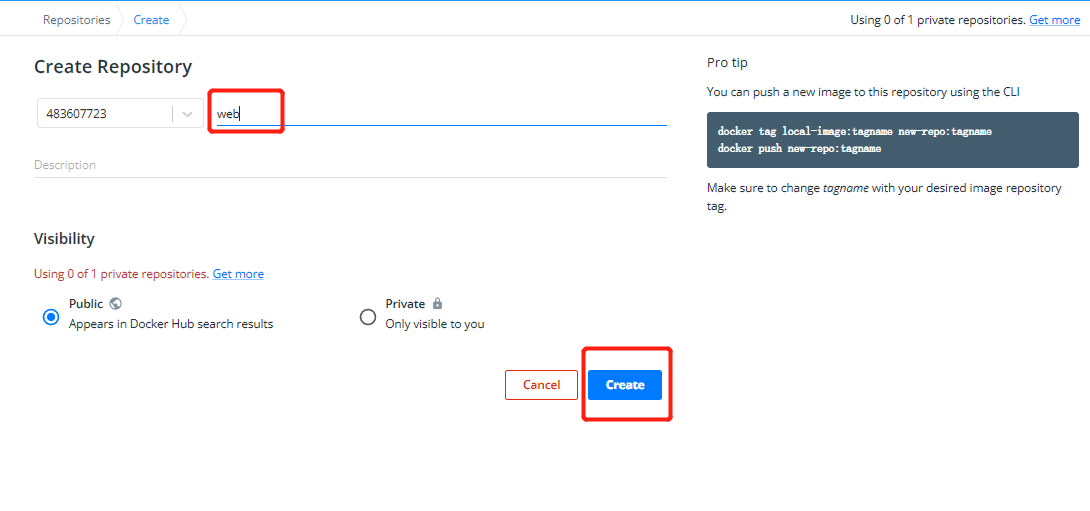
這裡有上傳方法
# 登陸我們dockerhub賬號
[root@localhost ~]# docker login
Login with your Docker ID to push and pull images from Docker Hub. If you don't have a Docker ID, head over to https://hub.docker.com to create one.
Username: 483607723
Password:
WARNING! Your password will be stored unencrypted in /root/.docker/config.json.
Configure a credential helper to remove this warning. See
https://docs.docker.com/engine/reference/commandline/login/#credentials-store

Login Succeeded

# 上傳剛才修改的映象webv2
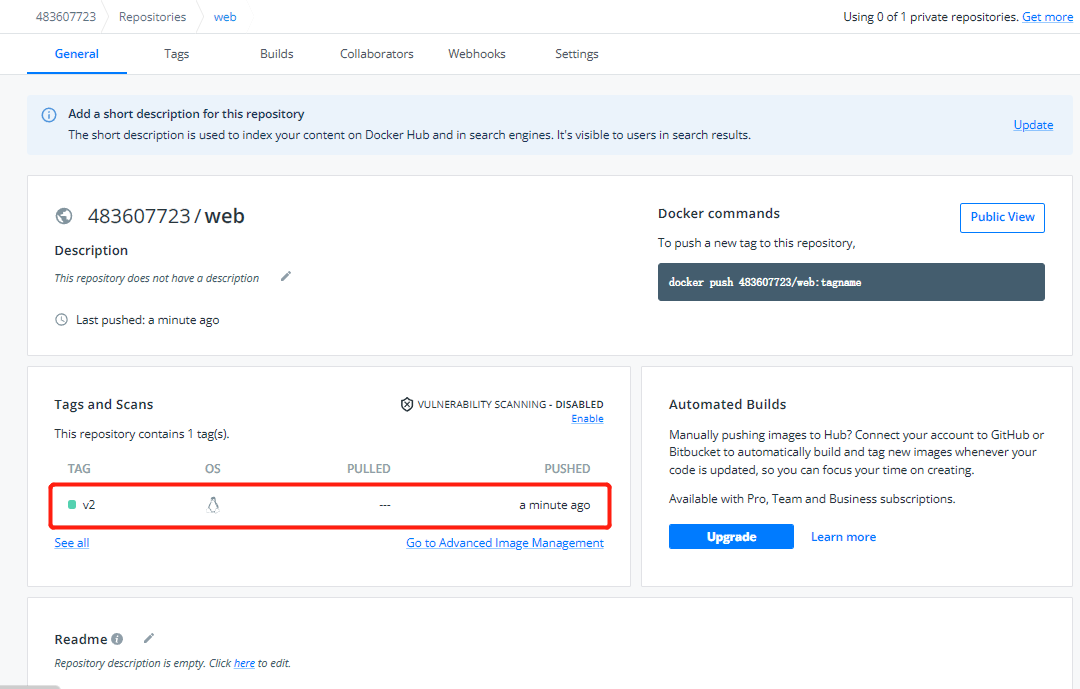
[root@localhost ~]# docker push 483607723/web:v2
The push refers to repository [docker.io/483607723/web]
af1fc705554b: Pushed
01fd6df81c8e: Mounted from library/busybox
v2: digest: sha256:e7ffae293a2b4ad19dcbd821198769af4b7abde789ec2109af6f71628e7ef730 size: 734
上傳成功
# 刪除剛剛上傳的映象web:v2
[root@localhost ~]# docker rmi -f 483607723/web:v2
Untagged: 483607723/web:v2
Untagged: 483607723/web@sha256:e7ffae293a2b4ad19dcbd821198769af4b7abde789ec2109af6f71628e7ef730
[root@localhost ~]# docker images
REPOSITORY   TAG       IMAGE ID       CREATED          SIZE
web          v1        c476706b4b67   12 minutes ago   1.24MB
busybox      latest    beae173ccac6   7 months ago     1.24MB

# 在網上下載我們剛上傳的映象web:v2
[root@localhost ~]# docker pull 483607723/web:v2
v2: Pulling from 483607723/web
Digest: sha256:e7ffae293a2b4ad19dcbd821198769af4b7abde789ec2109af6f71628e7ef730
Status: Downloaded newer image for 483607723/web:v2
docker.io/483607723/web:v2
[root@localhost ~]# docker images
REPOSITORY      TAG       IMAGE ID       CREATED          SIZE
483607723/web     v2        c476706b4b67   14 minutes ago   1.24MB
web            v1        c476706b4b67   14 minutes ago   1.24MB
busybox         latest    beae173ccac6   7 months ago     1.24MB

# 檢視裡面的內容是否一樣,rm可以在退出映象後自動刪除容器
[root@localhost ~]# docker run -it --rm 483607723/web:v2
/ # ls
bin   data  dev   etc   home  proc  root  sys   tmp   usr   var
/ # ls /data/
index.html
/ # cat /data/index.html
hello world
/ # exit
[root@localhost ~]# docker ps -a
CONTAINER ID   IMAGE     COMMAND   CREATED          STATUS          PORTS     NAMES
由此可見,新生成的映象中是包含了新增的內容的,但是此時有一個問題,那就是容器預設要啟動的程序是什麼?在這裡,預設情況下是啟動的sh程序,但我們是要啟動一個http站點,所以我們要在建立映象時將容器預設啟動的程序設為httpd,這樣一來我們就可以通過新生成的映象來快速構建一個簡單的http站點了。
5.5快速構建一個簡單的http站點
# 使用互動模式臨時進入web:v2
[root@localhost ~]# docker run -it --rm 483607723/web:v2

(另起一個終端)
[root@localhost ~]# docker ps
CONTAINER ID   IMAGE          COMMAND   CREATED          STATUS       PORTS     NAMES
2a77d42276da   483607723/web:v2   "sh"      37 seconds ago   Up 36 seconds          agitated_turing

# 把映象web:v2的啟動程序修改為httpd,另存為web:v3
[root@localhost ~]# docker ps
CONTAINER ID   IMAGE              COMMAND                  CREATED          STATUS          PORTS     NAMES
baa76767998e   483607723/web:v3   "/bin/httpd -f -h /d…"   49 seconds ago   Up 48 seconds             gifted_sinoussi
(-a是作者資訊,-c為修改預設啟動命令,/bin/httpd為啟動程序,-f是不讓它在後臺執行,-c修改預設啟動命令,-h指定目錄)
[root@localhost ~]# docker commit -a "[email protected]" -c 'CMD ["/bin/httpd","-f","-h","/data"]' -p 2a77d42276da 483607723/web:v3
sha256:886b2b24d0bf1c9b2bc19a17b88d9cae4817fe334d704ab3069a6643b7d2e8d7
[root@localhost ~]# docker images
REPOSITORY      TAG       IMAGE ID       CREATED          SIZE
483607723/web   v3        886b2b24d0bf   6 seconds ago    1.24MB
483607723/web   v2        c476706b4b67   26 minutes ago   1.24MB
web             v1        c476706b4b67   26 minutes ago   1.24MB
busybox         latest    beae173ccac6   7 months ago     1.24MB

# 上傳映象web:v3
[root@localhost ~]# docker push 483607723/web:v3
The push refers to repository [docker.io/483607723/web]
af1fc705554b: Layer already exists
01fd6df81c8e: Layer already exists
v3: digest: sha256:c7c0f6d6bdfba9a744a04a8f807ce33a19bdcbb96d428ce09bbd92ed20f47afc size: 734

# 使用互動模式臨時進入web:v3
[root@localhost ~]# docker run -it --rm 483607723/web:v3

(另起一個終端)
[root@localhost ~]# docker ps
CONTAINER ID   IMAGE              COMMAND                  CREATED          STATUS          PORTS     NAMES
baa76767998e   483607723/web:v3   "/bin/httpd -f -h /d…"   49 seconds ago   Up 48 seconds             gifted_sinoussi

# 使用inspect命令檢視它的IP地址
[root@localhost ~]# docker inspect baa76767998e
......
"Networks": {
                "bridge": {
                    "IPAMConfig": null,
                    "Links": null,
                    "Aliases": null,
                    "NetworkID": "3c24f137381af6bee978bf7087e142784d622cf7ef9271be5528048d4263be96",
                    "EndpointID": "84f33913c45e60c599a15b1bf6237c51ab368f5320ac4c5833569b09681a7605",
                    "Gateway": "172.17.0.1",
                    "IPAddress": "172.17.0.3",
                    "IPPrefixLen": 16,
                    "IPv6Gateway": "",
                    "GlobalIPv6Address": "",
                    "GlobalIPv6PrefixLen": 0,
                    "MacAddress": "02:42:ac:11:00:03",
                    "DriverOpts": null
......

# 存取這個IP地址,測試是否成功構成站點
[root@localhost ~]# curl 172.17.0.3
hello world
6、映象的匯入與匯出
假如有2臺主機,我們在主機1上做了一個映象,主機2想用這個映象怎麼辦呢?
我們可以在主機1上push映象到映象倉庫中,然後在主機2上pull把映象拉下來使用,這種方式就顯得比較麻煩,假如我只是測試用的,在一臺主機上做好映象後在另一臺主機上跑一下就行了,沒必要推到倉庫上然後又把它拉到本地來。
此時我們可以在已有映象的基礎上把映象打包成一個壓縮檔案,然後拷貝到另一臺主機上將其匯入,這就是映象的匯入和匯出功能。
docker中我們使用docker save進行匯出,使用docker load進行匯入。
[root@localhost ~]# docker images
REPOSITORY      TAG       IMAGE ID       CREATED          SIZE
483607723/web   v3        886b2b24d0bf   10 minutes ago   1.24MB
483607723/web   v2        c476706b4b67   36 minutes ago   1.24MB
web             v1        c476706b4b67   36 minutes ago   1.24MB
busybox         latest    beae173ccac6   7 months ago     1.24MB

# 用save命令儲存所有原生的映象,匯出到web.tar.gz中(不指定版本的話為所有版本)
[root@localhost ~]# docker save -o web.tar.gz 483607723/web
[root@localhost ~]# ls
anaconda-ks.cfg  web.tar.gz
[root@localhost ~]# file web.tar.gz
web.tar.gz: POSIX tar archive

# 刪除儲存的2個映象(模擬新的主機)
[root@localhost ~]# docker rmi 483607723/web:v2 483607723/web:v3
[root@localhost ~]# docker images
REPOSITORY   TAG       IMAGE ID       CREATED          SIZE
web          v1        c476706b4b67   39 minutes ago   1.24MB
busybox      latest    beae173ccac6   7 months ago     1.24MB

# 用load匯入web.tar,恢復兩個web映象
[root@localhost ~]# docker load -i web.tar.gz
Loaded image: 483607723/web:v2
Loaded image: 483607723/web:v3
[root@localhost ~]# docker images
REPOSITORY      TAG       IMAGE ID       CREATED          SIZE
483607723/web   v3        886b2b24d0bf   14 minutes ago   1.24MB
web             v1        c476706b4b67   41 minutes ago   1.24MB
483607723/web   v2        c476706b4b67   41 minutes ago   1.24MB
busybox         latest    beae173ccac6   7 months ago     1.24MB
作業練習
在Docker Hub上獲取一個centos基礎映象並建立容器,然後在容器裡原始碼安裝httpd服務,並將該容器重新制作成映象,並上傳到Docker Hub
# 使用pull命令拉網上的centos映象
[root@localhost ~]# docker pull centos
Using default tag: latest
latest: Pulling from library/centos
a1d0c7532777: Pull complete
Digest: sha256:a27fd8080b517143cbbbab9dfb7c8571c40d67d534bbdee55bd6c473f432b177
Status: Downloaded newer image for centos:latest
docker.io/library/centos:latest
[root@localhost ~]# docker images
REPOSITORY      TAG       IMAGE ID       CREATED         SIZE
483607723/web   v3        886b2b24d0bf   2 hours ago     1.24MB
483607723/web   v2        c476706b4b67   2 hours ago     1.24MB
web             v1        c476706b4b67   2 hours ago     1.24MB
busybox         latest    beae173ccac6   7 months ago    1.24MB
centos          latest    5d0da3dc9764   10 months ago   231MB

# 使用映象centos建立並執行一個名叫centos1容器
[root@localhost ~]# docker run -it --name centos1 centos /bin/bash
[root@2f0c1da981f3 /]# ls
bin  dev  etc  home  lib  lib64  lost+found  media  mnt  opt  proc  root  run  sbin  srv  sys  tmp  usr  var

# 在容器centos1中設定yum源
[root@2f0c1da981f3 /]# rm -rf /etc/yum.repos.d/*
[root@2f0c1da981f3 /]# curl -o /etc/yum.repos.d/CentOS-Base.repo https://mirrors.aliyun.com/repo/Centos-vault-8.5.2111.repo
[root@2f0c1da981f3 /]# sed -i -e '/mirrors.cloud.aliyuncs.com/d' -e '/mirrors.aliyuncs.com/d' /etc/yum.repos.d/CentOS-Base.repo
[root@2f0c1da981f3 /]# yum install -y https://mirrors.aliyun.com/epel/epel-release-latest-8.noarch.rpm
[root@2f0c1da981f3 /]# sed -i 's|^#baseurl=https://download.example/pub|baseurl=https://mirrors.aliyun.com|' /etc/yum.repos.d/epel*[root@2f0c1da981f3 /]# sed -i 's|^metalink|#metalink|' /etc/yum.repos.d/epel*

# 開發工具準備
[root@2f0c1da981f3 /]# dnf groups mark install -y "Development Tools"

# 建立apache服務的使用者和組
[root@2f0c1da981f3 /]# useradd -r -M -s /sbin/nologin apache
[root@2f0c1da981f3 /]# id apache
uid=998(apache) gid=996(apache) groups=996(apache)

# 安裝依賴包
[root@2f0c1da981f3 /]#  yum -y install openssl-devel pcre-devel expat-devel libtool gcc gcc-c++

# 下載apr、apr-util、httpd安裝包至/usr/src/下
[root@2f0c1da981f3 /]# cd /usr/src/
[root@2f0c1da981f3 src]# wget https://downloads.apache.org/apr/apr-1.6.5.tar.bz2
[root@2f0c1da981f3 src]# wget https://downloads.apache.org/apr/apr-util-1.6.1.tar.bz2
[root@2f0c1da981f3 src]# wget https://downloads.apache.org/httpd/httpd-2.4.54.tar.bz2
[root@2f0c1da981f3 src]# ls
apr-1.6.5.tar.bz2  apr-util-1.6.1.tar.bz2  debug  httpd-2.4.54.tar.bz2	kernels

# 解壓和安裝apr
[root@2f0c1da981f3 src]# tar -xf apr-1.6.5.tar.bz2
[root@2f0c1da981f3 src]# ls
apr-1.6.5  apr-1.6.5.tar.bz2  apr-util-1.6.1.tar.bz2  debug  httpd-2.4.54.tar.bz2  kernels
[root@2f0c1da981f3 src]# cd apr-1.6.5
[root@2f0c1da981f3 apr-1.6.5]# vim configure
 cfgfile="${ofile}T"
    trap "$RM \"$cfgfile\"; exit 1" 1 2 15
    # $RM "$cfgfile"        //將此行加上註釋,或者刪除此行

[root@2f0c1da981f3 apr-1.6.5]# ./configure --prefix=/usr/local/apr
設定過程略...
[root@2f0c1da981f3 apr-1.6.5]#make && make install
設定過程略...

# 解壓和安裝apr-util
[root@2f0c1da981f3 src]# tar -xf apr-util-1.6.1.tar.bz2
[root@2f0c1da981f3 src]# cd apr-util-1.6.1
[root@2f0c1da981f3 apr-util-1.6.1]# ./configure --prefix=/usr/local/apr-util --with-apr=/usr/local/apr
設定過程略...
[root@2f0c1da981f3 apr-util-1.6.1]#  make && make install
設定過程略...

# 編譯安裝httpd
[root@2f0c1da981f3 httpd-2.4.54]# ./configure --prefix=/usr/local/apache --enable-so --enable-ssl --enable-cgi --enable-rewrite --with-zlib --with-pcre --with-apr=/usr/local/apr --with-apr-util=/usr/local/apr-util/ --enable-modules=most --enable-mpms-shared=all --with-mpm=prefork
[root@2f0c1da981f3 httpd-2.4.54]# make && make install

# 編輯apache啟動指令碼
[root@2f0c1da981f3 /]# vim httpd.sh
#!/bin/bash
/usr/local/apache/bin/apachectl
sleep 5d
[root@2f0c1da981f3 /]# chmod +x httpd.sh 		#給指令碼執行許可權
[root@2f0c1da981f3 /]# ls -l | grep httpd.sh
-rwxr-xr-x. 1 root root   53 Aug  6 15:56 httpd.sh

(另起一個終端)
# 基於容器centos1製作映象
[root@localhost ~]# docker commit -a 'zsl <[email protected]>' -c 'CMD ["/httpd.sh"]' -p centos1 483607723/centos-httpd:v1
sha256:ca1d47fbafabae0791a9ce96c4052a90522c734ff1a434fa9e2d21a642de0a4d
[root@localhost ~]# docker images
REPOSITORY               TAG       IMAGE ID       CREATED          SIZE
483607723/centos-httpd   v1        ca1d47fbafab   18 seconds ago   776MB
centos                   latest    5d0da3dc9764   10 months ago    231MB

# 用新生成的映象建立容器
[root@localhost ~]# docker run -d -it --name web1 483607723/centos-httpd:v1
50efb3b77296224ec572ded4c65a349abb726e90d6af26e8d431c64b75984a78
[root@localhost ~]# docker ps
CONTAINER ID   IMAGE                       COMMAND       CREATED         STATUS         PORTS     NAMES
50efb3b77296   483607723/centos-httpd:v1   "/httpd.sh"   9 seconds ago   Up 7 seconds             web1
2f0c1da981f3   centos                      "/bin/bash"   3 hours ago     Up 3 hours               centos1
[root@localhost ~]# docker inspect web1
......
"Networks": {
                "bridge": {
                    "IPAMConfig": null,
                    "Links": null,
                    "Aliases": null,
                    "NetworkID": "3c24f137381af6bee978bf7087e142784d622cf7ef9271be5528048d4263be96",
                    "EndpointID": "6611f8535de660d6f74efb36925faf3ff02153283e4f417abad5cd2d8005db3a",
                    "Gateway": "172.17.0.1",
                    "IPAddress": "172.17.0.3",
                    "IPPrefixLen": 16,
                    "IPv6Gateway": "",
                    "GlobalIPv6Address": "",
                    "GlobalIPv6PrefixLen": 0,
                    "MacAddress": "02:42:ac:11:00:03",
                    "DriverOpts": null
                }
......
[root@localhost ~]# curl 172.17.0.3
<html><body><h1>It works!</h1></body></html>

# 設定埠對映
[root@localhost ~]# docker run -d -it --name web2 -p 8080:80 483607723/centos-httpd:v1
fd7563facbe81ad04343cfb6488ade3781cbe87d5510002edef00c7e3581f54c
[root@localhost ~]# docker ps
CONTAINER ID   IMAGE                       COMMAND       CREATED          STATUS          PORTS                                   NAMES
fd7563facbe8   483607723/centos-httpd:v1   "/httpd.sh"   12 seconds ago   Up 11 seconds   0.0.0.0:8080->80/tcp, :::8080->80/tcp   web2
50efb3b77296   483607723/centos-httpd:v1   "/httpd.sh"   6 minutes ago    Up 6 minutes                                            web1
2f0c1da981f3   centos                      "/bin/bash"   3 hours ago      Up 3 hours                                              centos1
[root@localhost ~]# ss -anlt | grep 80
LISTEN 0      128          0.0.0.0:8080      0.0.0.0:*
LISTEN 0      128             [::]:8080         [::]:*

#

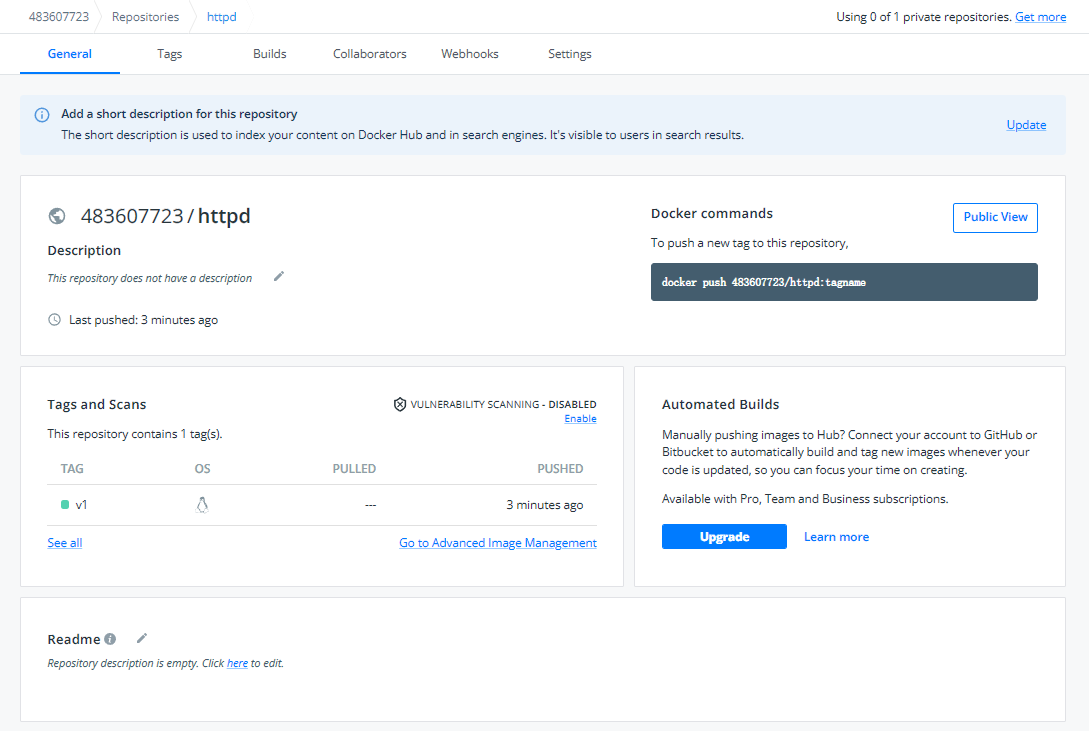
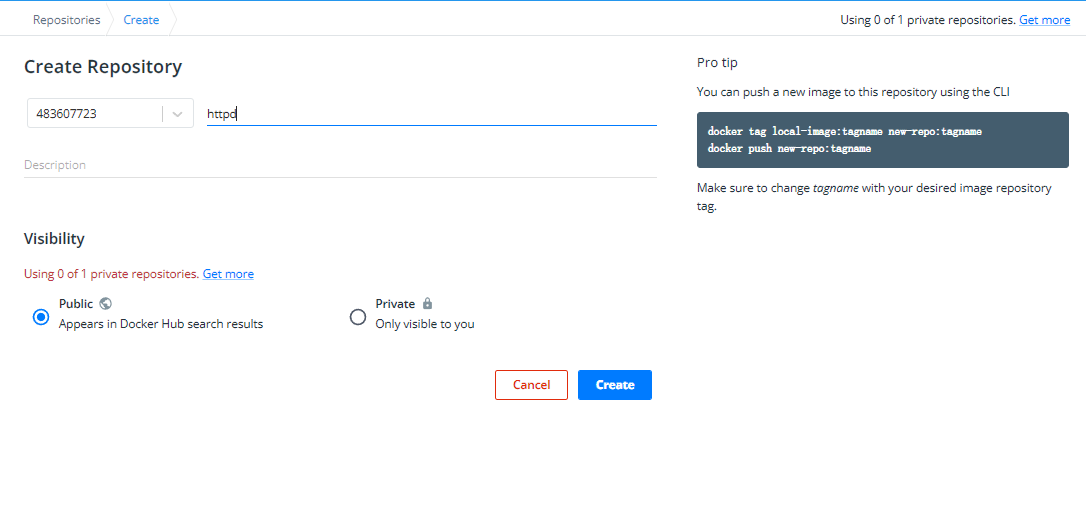
進入Docker Hub建立倉庫
# 登陸我們dockerhub賬號
[root@localhost ~]# docker login
Authenticating with existing credentials...
WARNING! Your password will be stored unencrypted in /root/.docker/config.json.
Configure a credential helper to remove this warning. See
https://docs.docker.com/engine/reference/commandline/login/#credentials-store

Login Succeeded

# 修改上傳映象的名稱
[root@localhost ~]# docker tag 483607723/centos-httpd:v1 483607723/httpd:v1
[root@localhost ~]# docker images
REPOSITORY               TAG       IMAGE ID       CREATED          SIZE
483607723/centos-httpd   v1        ca1d47fbafab   38 minutes ago   776MB
483607723/httpd          v1        ca1d47fbafab   38 minutes ago   776MB
centos                   latest    5d0da3dc9764   10 months ago    231MB

# 使用push命令將映象上傳
[root@localhost ~]# docker push 483607723/httpd:v1
The push refers to repository [docker.io/483607723/httpd]
c76332ad693c: Mounted from 483607723/centos-httpd
74ddd0ec08fa: Mounted from 483607723/centos-httpd
v1: digest: sha256:43698f0ad872c35669c61feb19f3568b25a7ef4c9271518c945f0b3cc68f9800 size: 742
上傳成功
