釋出Android庫至MavenCentral詳解
最近,使用compose編寫了一個類QQ的image picker。完成android library的編寫,在此記錄下釋出這個Library到maven central的流程以及碰到的問題。
maven: https://mvnrepository.com/artifact/io.github.huhx/compose-image-picker
github:https://github.com/huhx/compose_image_picker
Sonatype 賬號
MavenCentral 和 Sonatype 的關係
| 庫平臺 | 運營商 | 管理後臺 |
|---|---|---|
| MavenCentral | Sonatype | s01.oss.sonatype.org |
因此我們要釋出Library到Maven Central的話,首先需要Sonatype的賬號以及許可權。
申請 Sonatype 賬號
申請地址:https://issues.sonatype.org/secure/Signup!default.jspa
登入賬號建立issue
建立issue地址:https://issues.sonatype.org/secure/ViewProfile.jspa

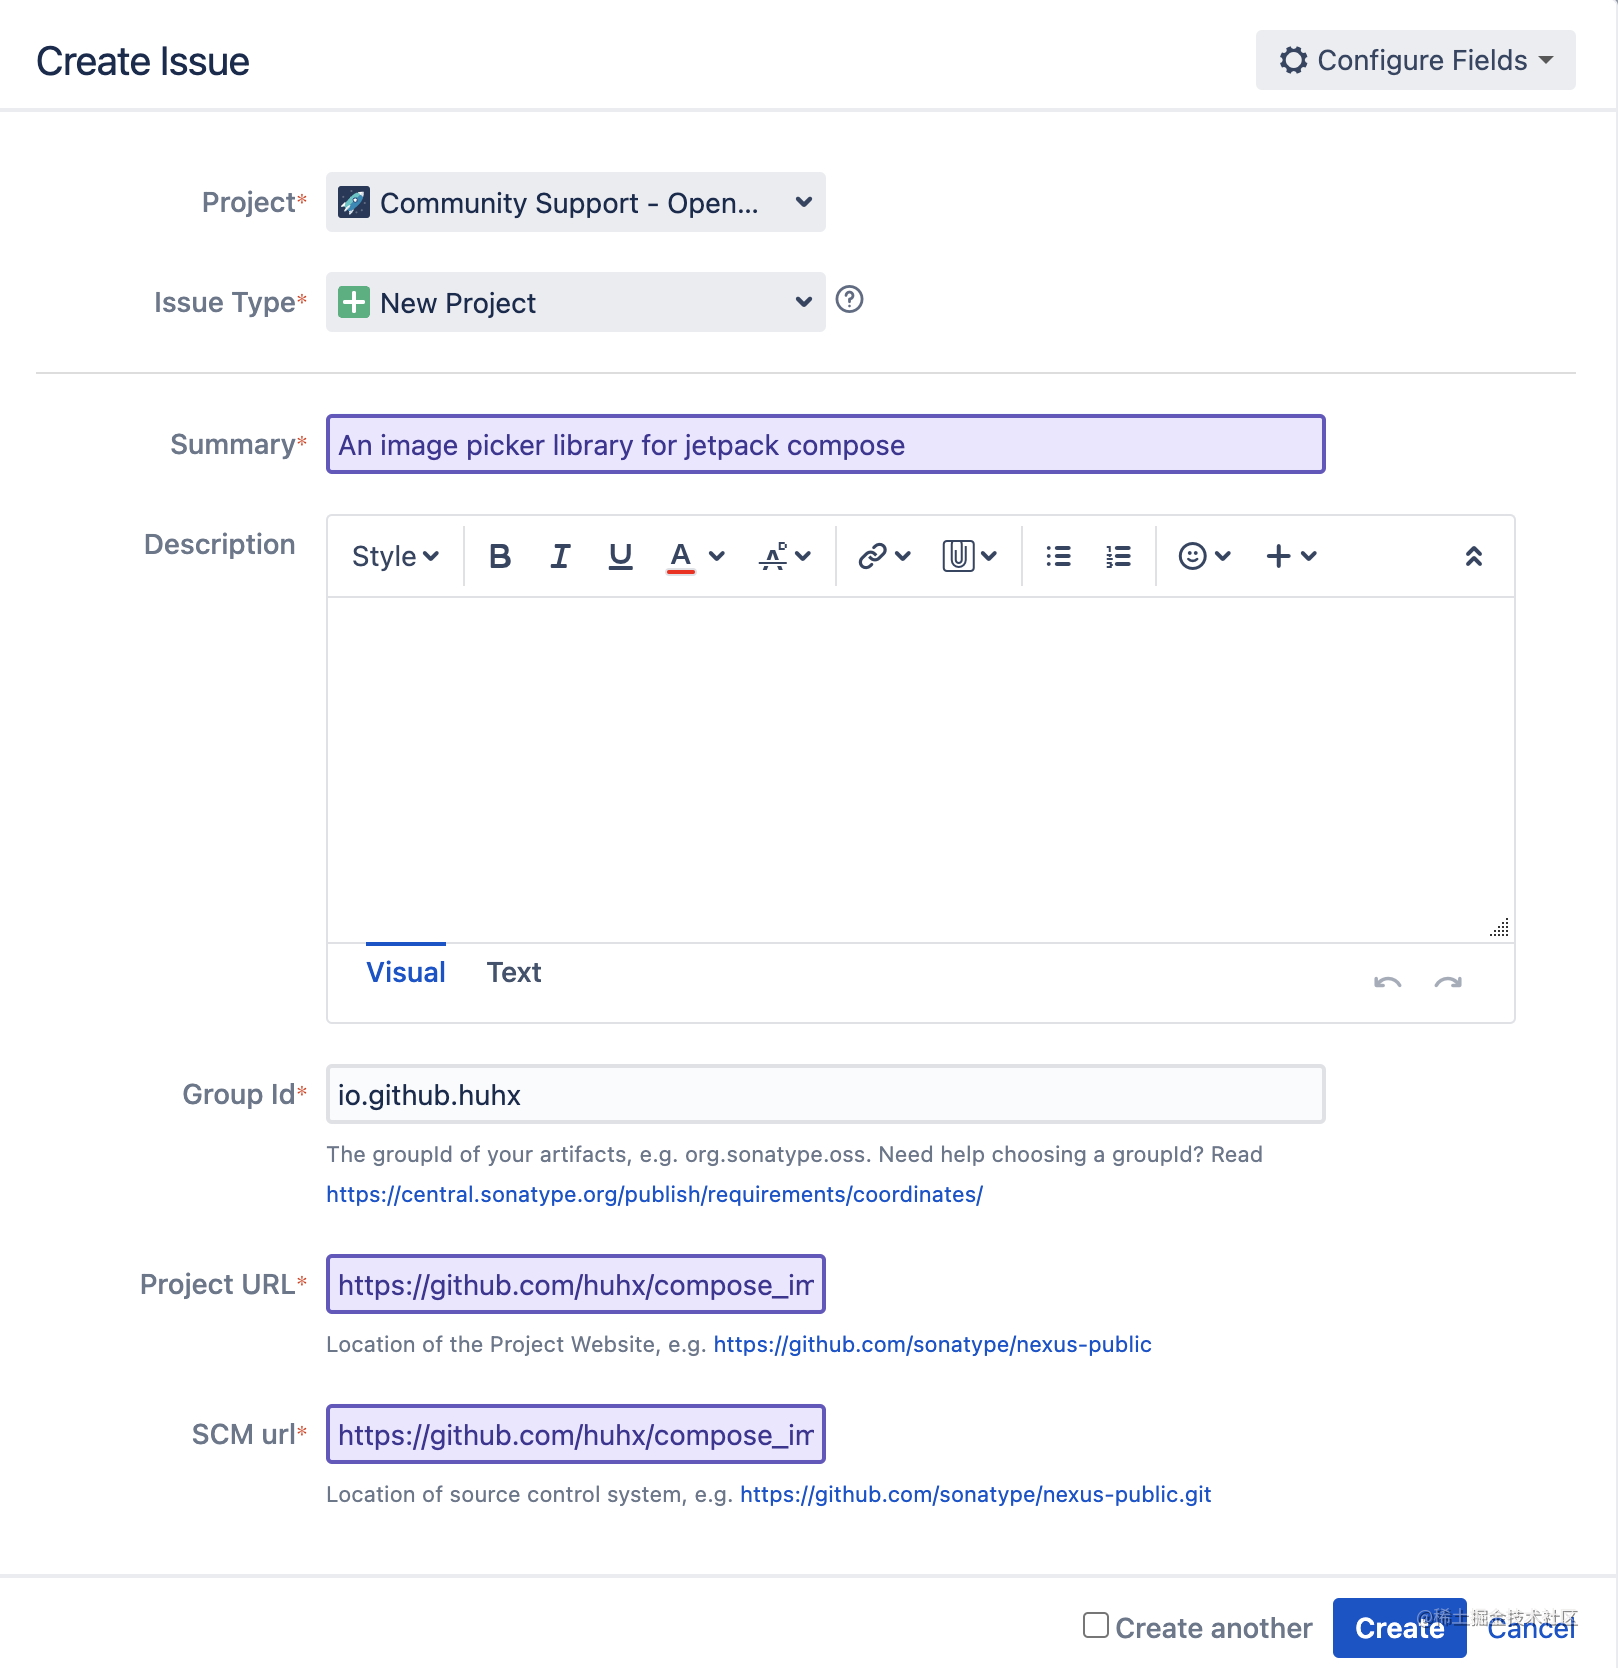
點選 Create 按鈕, 然後會彈出 Create Issue的視窗:

點選Configure Fields, 選擇 Custom 選項

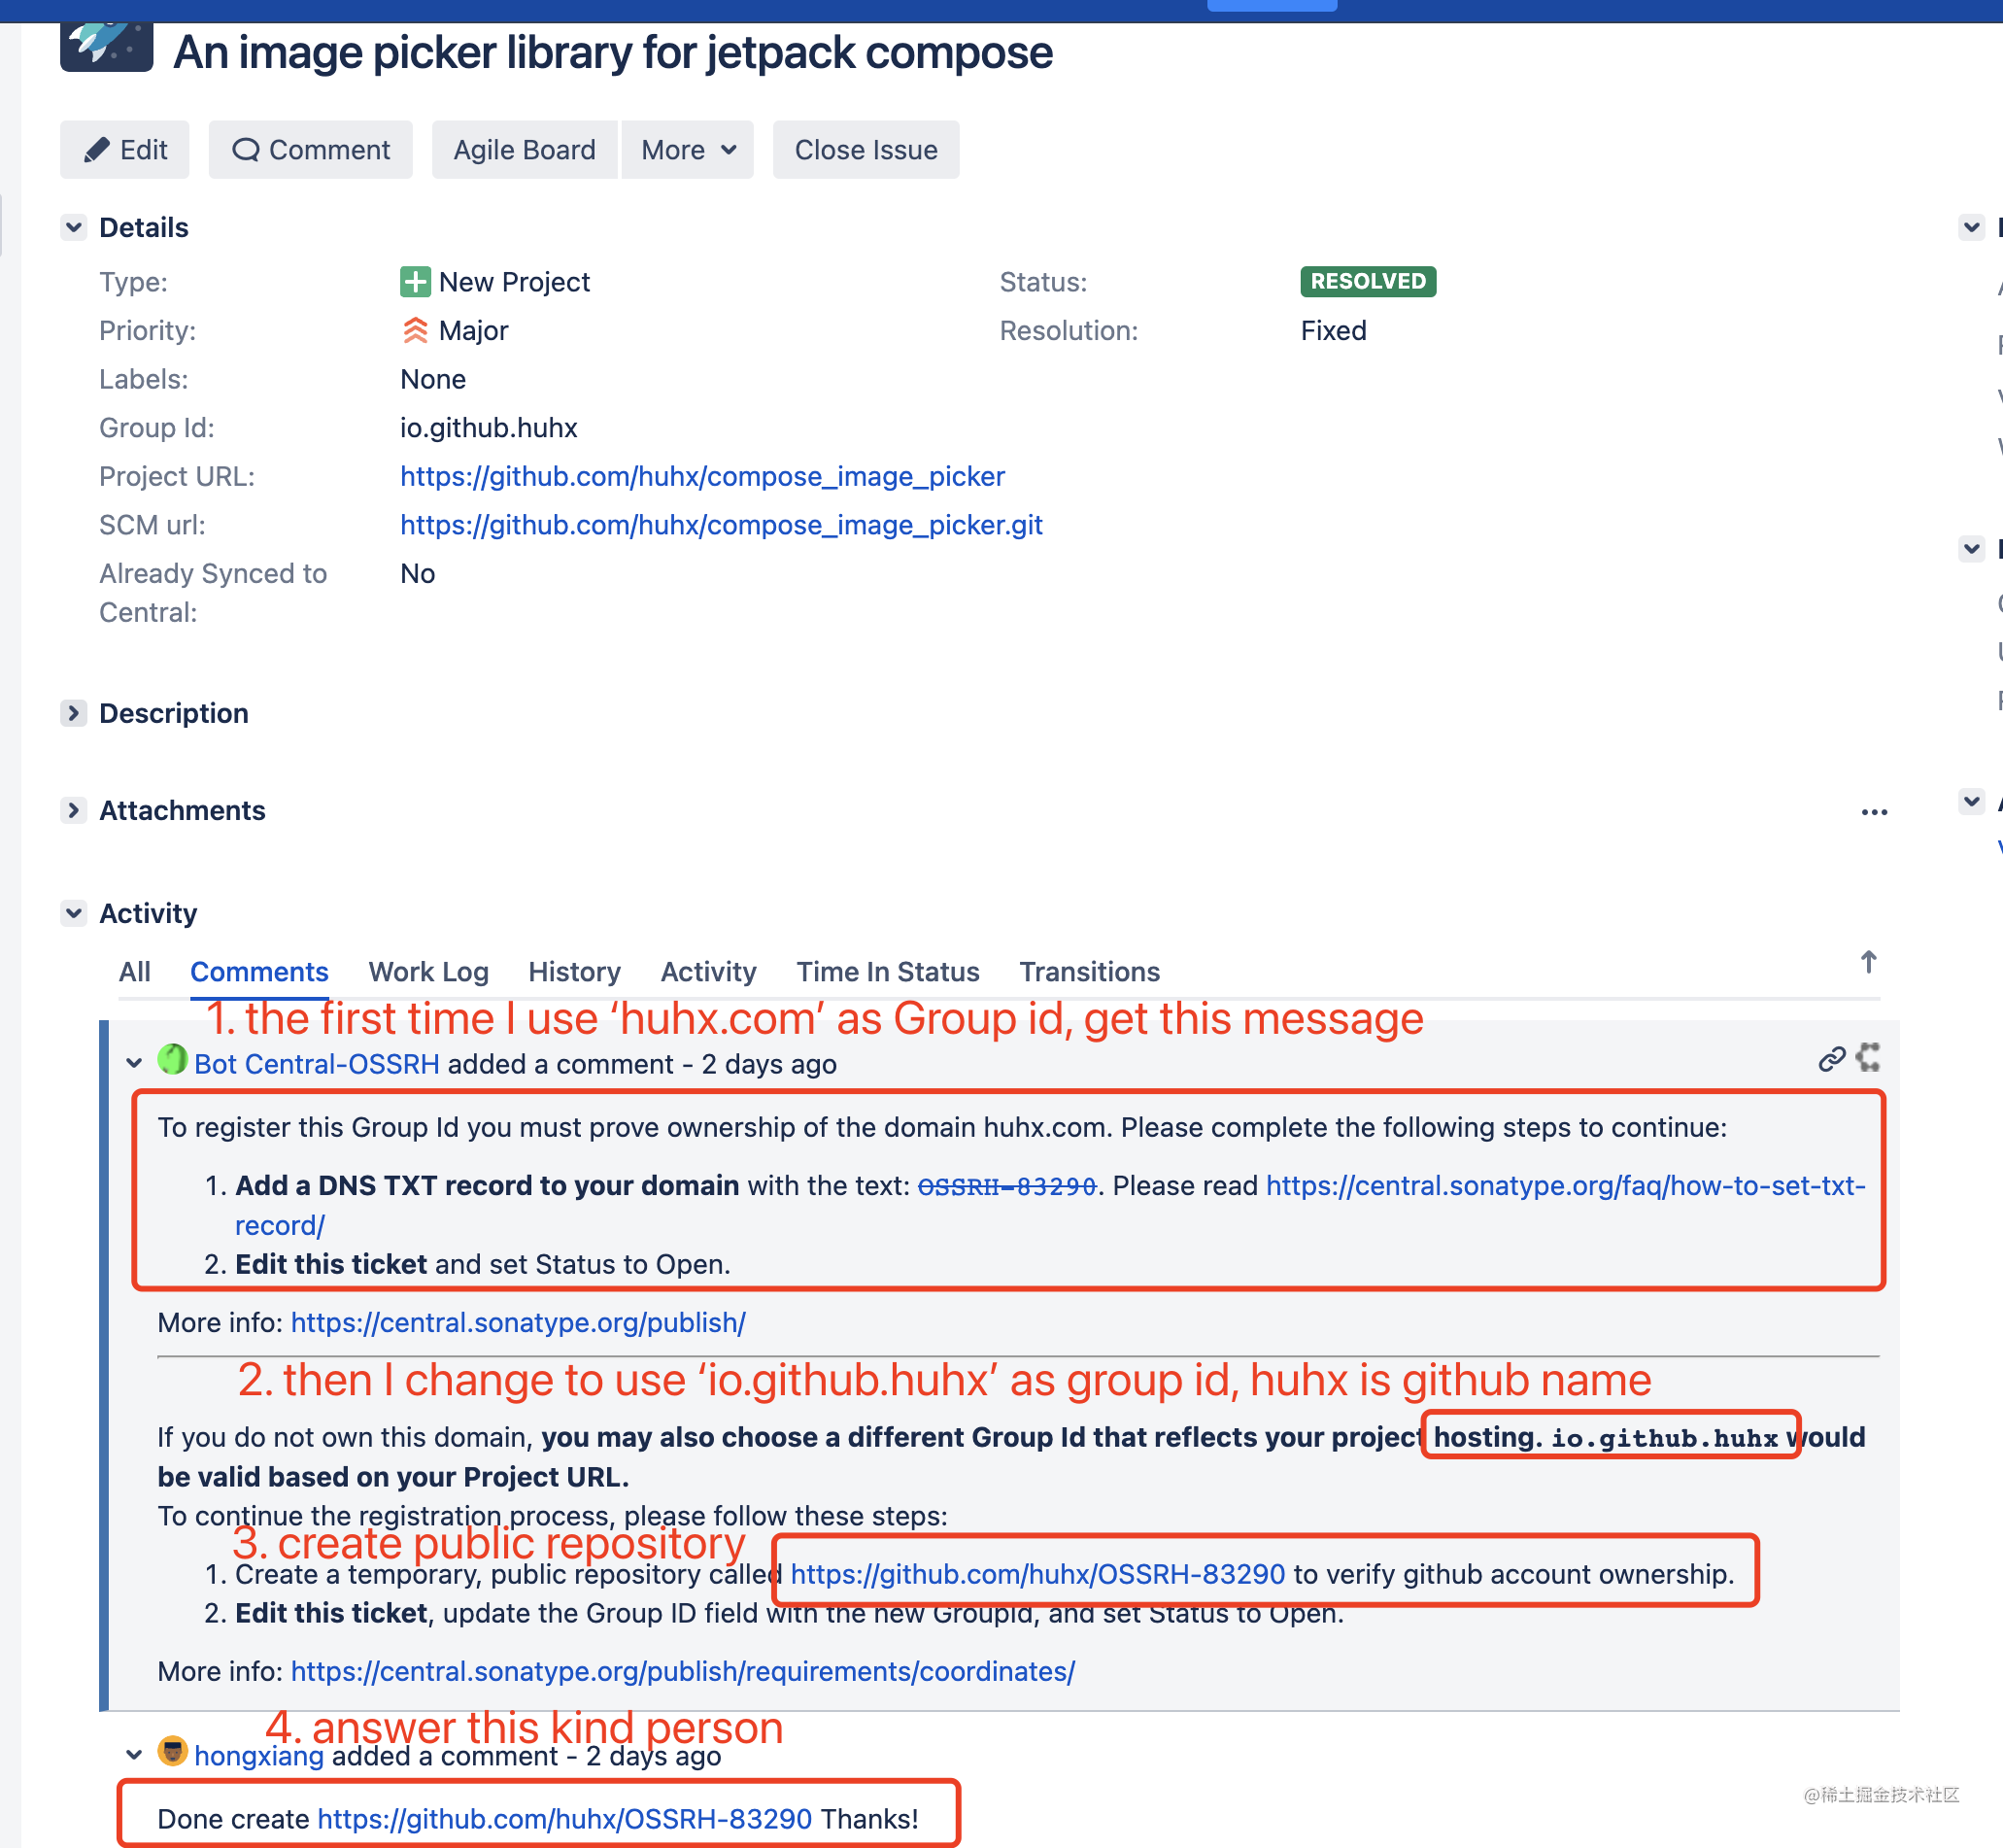
grouId的話最好使用: io.github.github_name, 要不然使用其他的還需要在 DNS 設定中設定一個TXT記錄來驗證域名所有權
填寫完所有的資訊點選建立,一個新的issue就建立成功了,以下就是我建立的issue,附上連結:https://issues.sonatype.org/browse/OSSRH-83290

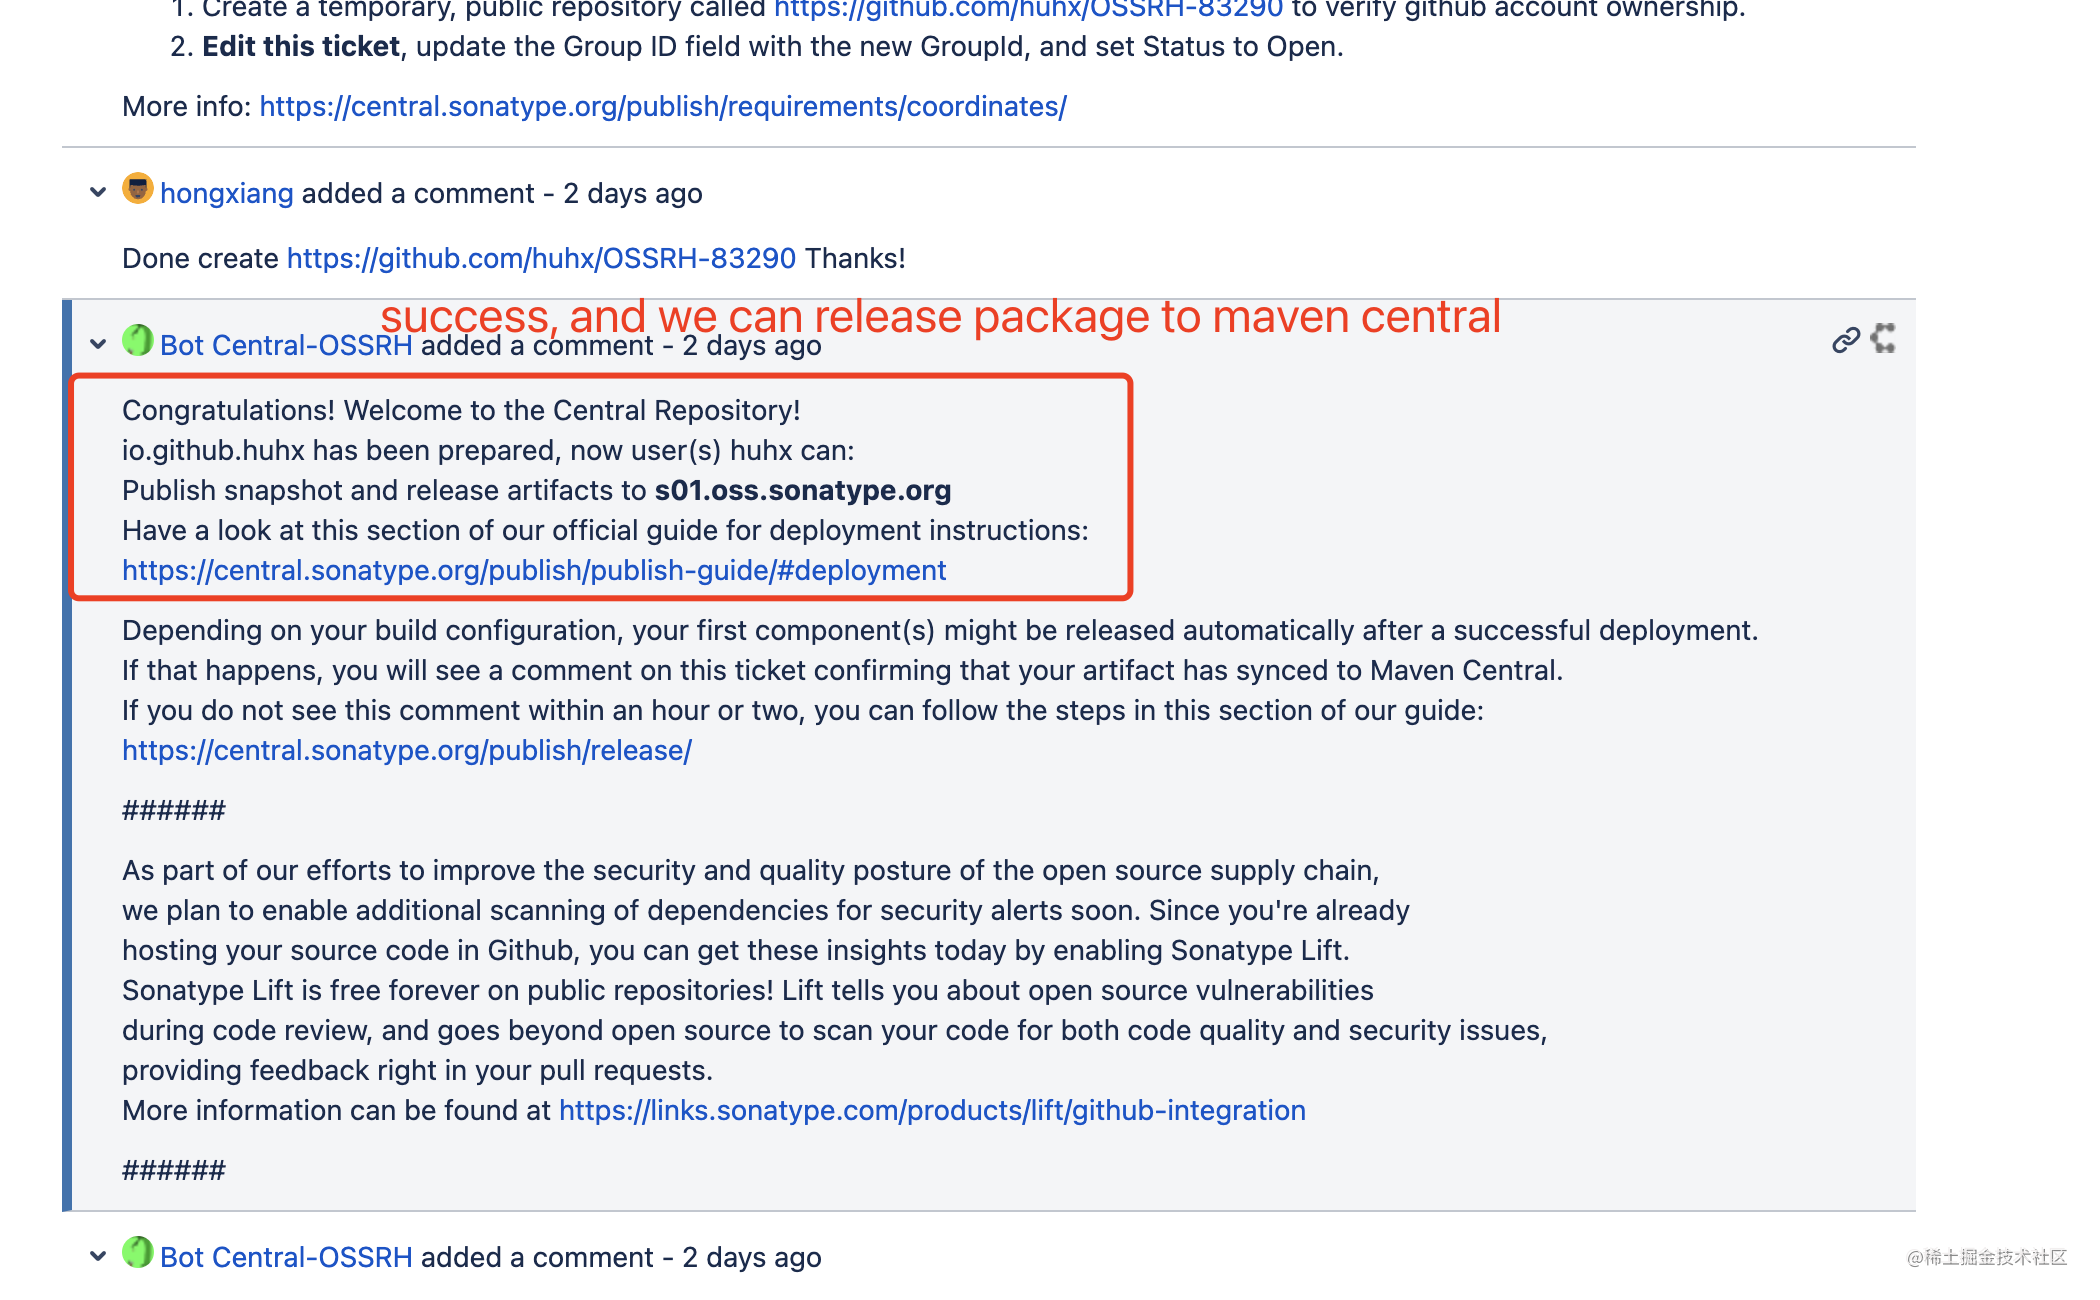
值得注意的是sonatype要求我們建立一個github倉庫來驗證我們的gihu賬號。建立完倉庫之後,我們回覆熱心的工作人員,接下來就是等他們的處理結果了。大概30分鐘就能好吧

收到這樣的回覆,代表一切ready了你可以上傳package到maven central。
編寫gradle指令碼上傳Lib
這篇文章裡面,我是使用的android library做例子的。如果你想要釋出java的Library,可以參考:https://docs.gradle.org/current/userguide/publishing_maven.html
In module project, build.gradle file
// add maven-publish and signing gradle plugin
plugins {
    id 'maven-publish'
    id 'signing'
}

// add publish script
publishing {
    publications {
        release(MavenPublication) {
            pom {
                name = 'Image Picker Compose'
                description = 'An Image Picker Library for Jetpack Compose'
                url = 'https://github.com/huhx/compose_image_picker'

                licenses {
                    license {
                        name = 'The Apache License, Version 2.0'
                        url = 'http://www.apache.org/licenses/LICENSE-2.0.txt'
                    }
                }

                developers {
                    developer {
                        id = 'huhx'
                        name = 'hongxiang'
                        email = '[email protected]'
                    }
                }

                scm {
                    connection = 'https://github.com/huhx/compose_image_picker.git'
                    developerConnection = 'https://github.com/huhx/compose_image_picker.git'
                    url = 'https://github.com/huhx/compose_image_picker'
                }
            }

            groupId "io.github.huhx"
            artifactId "compose-image-picker"
            version "1.0.2"

            afterEvaluate {
                from components.release
            }
        }
    }
    repositories {
        maven {
            url "https://s01.oss.sonatype.org/service/local/staging/deploy/maven2/"
            credentials {
                username ossrhUsername // ossrhUsername is your sonatype username
                password ossrhPassword // ossrhUsername is your sonatype password
            }
        }
    }
}

// signing, this need key, secret, we put it into gradle.properties
signing {
    sign publishing.publications.release
}
ossrhUsername 和 ossrhPassword 是我們在第一步註冊的sonatype賬號。使用者名稱和密碼是敏感資訊,所以我們放在gradle.properties並且不會提交到github. 所以在 gradle.properties檔案中,我們新增了以下內容:
# signing information
signing.keyId=key
signing.password=password
signing.secretKeyRingFile=file path

# sonatype account
ossrhUsername=username
ossrhPassword=password
其中包含了簽名的三個重要資訊,這個我們會在下面詳細講解
建立gpg金鑰
我使用的是mac,這裡就拿mac來說明如何建立gpg金鑰。以下是shell指令碼
# 安佳 gpg
> brew install gpg

# 建立gpg key,過程中會提示你輸入密碼。
# 記住這裡要輸入的密碼就是上述提到你需要設定的signing.password
> gpg --full-gen-key

# 切換目錄到~/.gnupg/openpgp-revocs.d, 你會發現有一個 .rev檔案。
# 這個檔名稱的末尾8位元字元就是上述提到你需要設定的signing.keyId
> cd ~/.gnupg/openpgp-revocs.d && ls

# 建立secretKeyRingFile, 以下命令會建立一個檔案secring.gpg
# 然後~/.gnupg/secring.gpg就是上述提到你需要設定的signing.secretKeyRingFile
> cd ~/.gnupg/ && gpg --export-secret-keys -o secring.gpg
把signing相關的資訊成功填寫到gradle.properties之後,我們就可以藉助maven-publish外掛釋出我們的andoird包到maven的中心倉庫了
maven publish的gradle task
# 這個是釋出到我們的本地,你可以在~/.m2/repository/的目錄找到你釋出的包
> ./gradlew clean publishToMavenLocal

# 這個是釋出到maven的中心倉庫,你可以在https://s01.oss.sonatype.org/找到
> ./gradlew clean publish
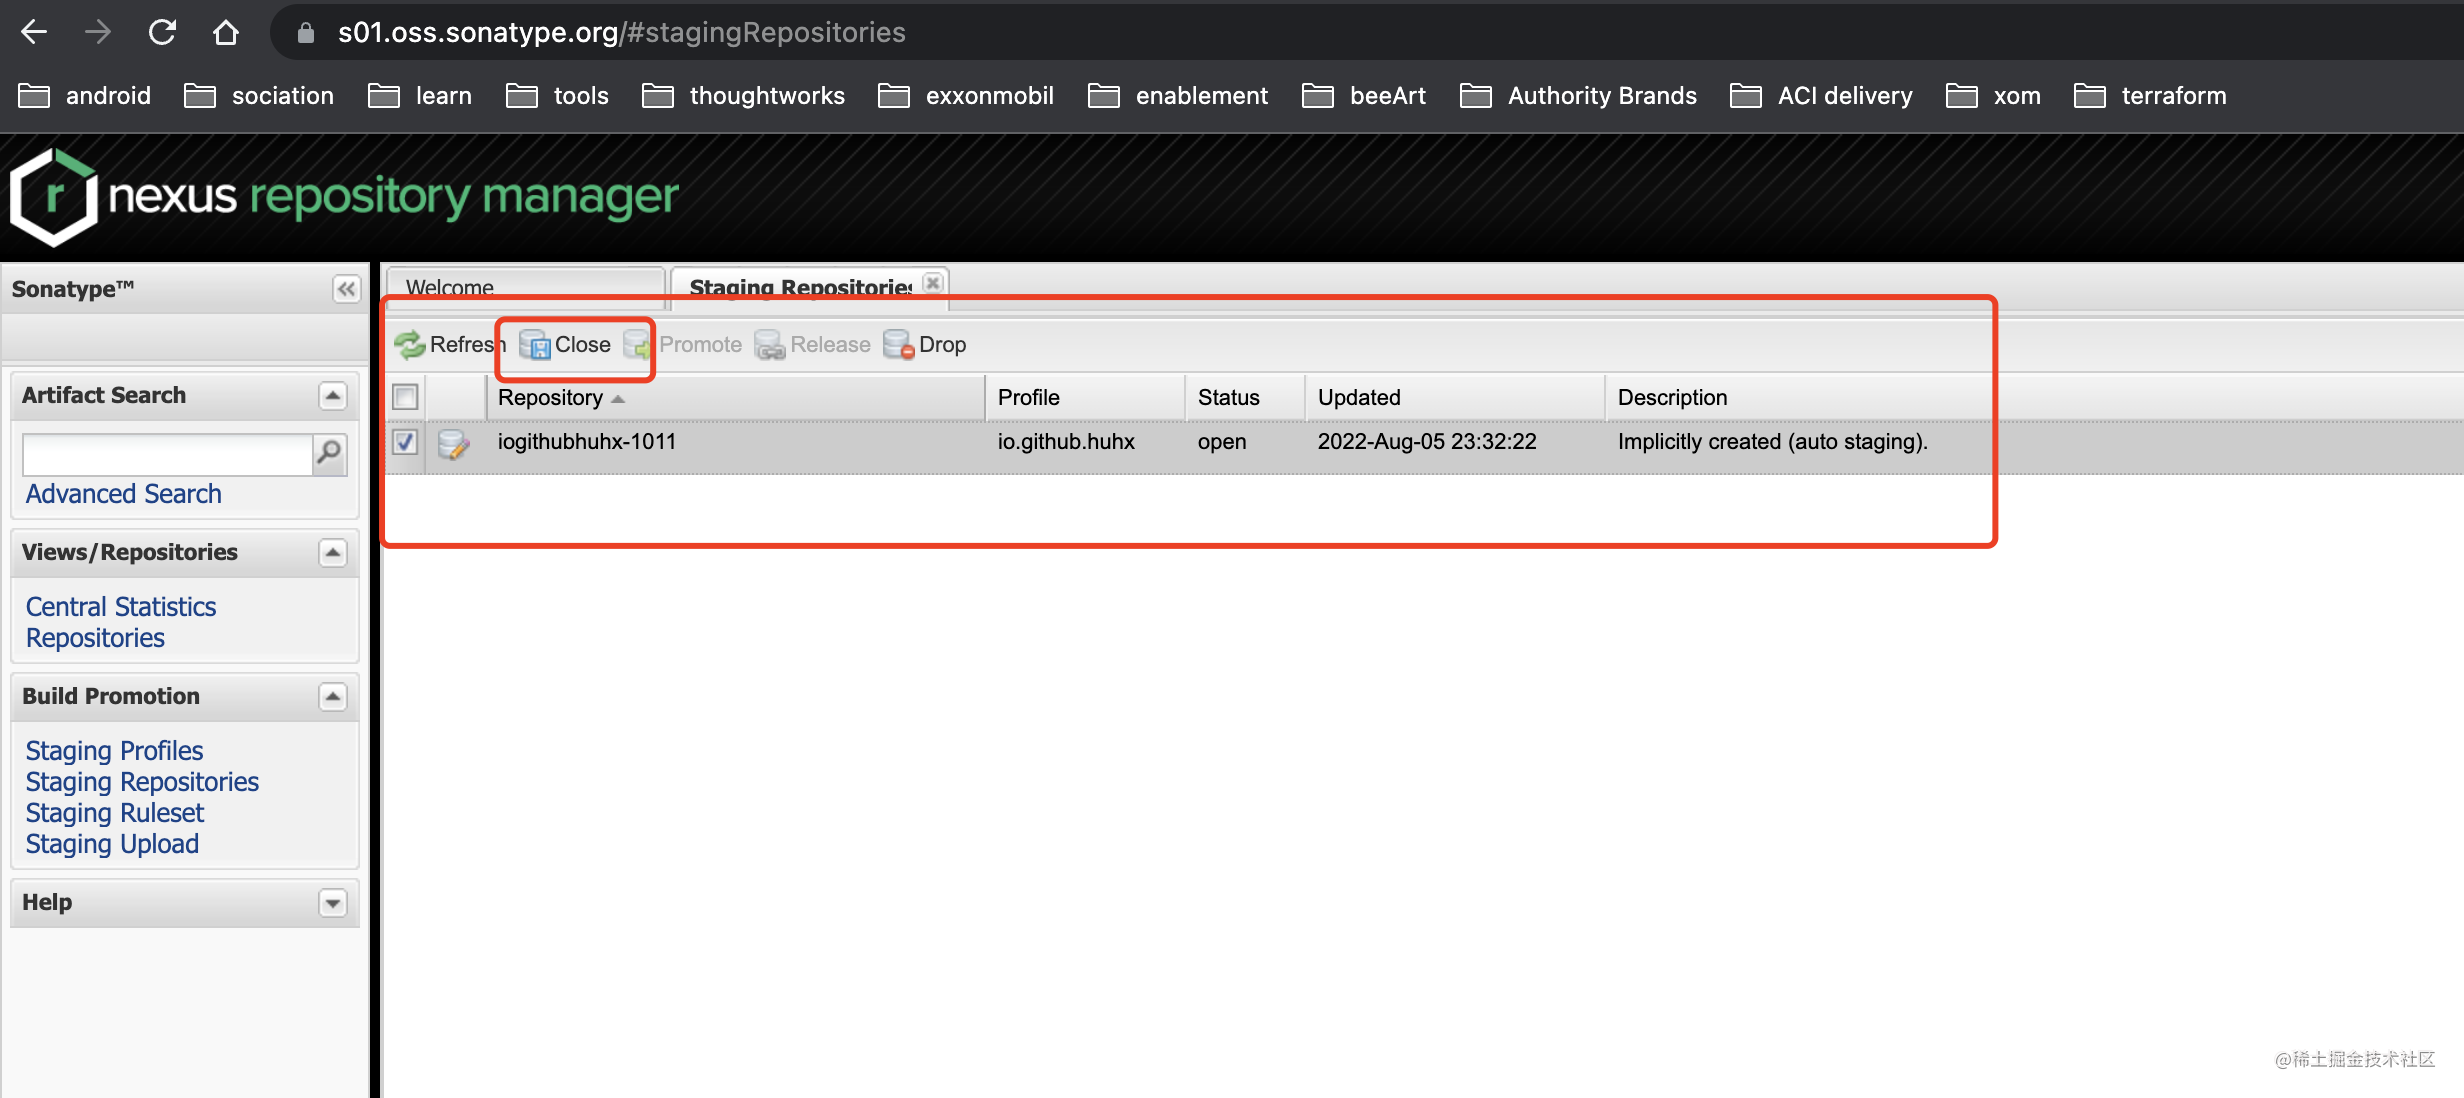
我們執行./gradlew clean publish釋出之後,存取地址:https://s01.oss.sonatype.org/

你會看到你的android包已經在nexus repository了。接下來你要做的兩步就是Close and Release.
檢驗以及釋出
第一步:點選Close按鈕,它會觸發對你釋出包的檢驗。我在這個過程中碰到一個signature validation失敗的問題。
# 失敗原因:No public key inhkp://keyserver.ubuntu.com:11371,是因為同步key可能會花些時間。這裡我們可以手動釋出我們的key到相應的伺服器上
> gpg --keyserver hkp://keyserver.ubuntu.com:11371 --send-keys signing.keyId
第二步:確保你填入的資訊是滿足要求之後,Release按鈕就會被啟用。點選Release,接下來就是等待時間了,不出意外的話。30分鐘你可以在nexus repository manager找到,但是在https://mvnrepository.com/找到的話得花更長的時間。
出處: www.cnblogs.com/huhx
格言:你盡力了,才有資格說自己的運氣不好。
版權:本文版權歸作者huhx和部落格園共有,歡迎轉載。未經作者同意必須保留此段宣告,且在文章頁面明顯位置給出原文連結,否則保留追究法律責任的權利。