MMDetection 使用範例:從入門到出門
前言
最近對目標識別感興趣,想做一些有趣目標識別專案自己玩耍,本來選擇的是 YOLOV5 的,但無奈自己使用 YOLOV5 環境訓練模型時,不管訓練多少次 mAP 指標總是為 0,而其它 pytorch 專案卻能正常執行,嘗試解決無果後發現另一個更好用的目標識別庫——MMDetection ,最終實現了自己的需求。本文首先介紹了 MMDetection 庫在 Windows 11 下的安裝方式,及可能遇到的問題和解決方法;然後說明了其自帶的單圖片檢測、視訊檢測、攝像頭檢測工具的使用方法,並在此之上擴充套件了一個同時包含上述功能並且能夠批次檢測圖片的 Python 程式碼;最後以資料集 CelebA 資料集為例,詳細記錄了使用 MMDetection 訓練私有資料集的方法。
安裝說明
基本環境
| 軟體 | 版本 |
|---|---|
| Windows | 11 |
| CUDA | 11.6 |
| conda | 4.12.0 |
| python | 3.9.12 |
| torch | 1.11.0+cu113 |
| torchaudio | 0.11.0+cu113 |
| torchvision | 0.12.0+cu113 |
| mmcv-full | 1.5.1 |
| mmdet | 2.24.1 |
安裝 MMCV
MMDetection 的執行依賴 MMCV ,它是一個面向計算機視覺的基礎庫,其中支援了很多開源工具,如影象分類工具、目標檢測工具、語意分割工具、姿態估計工具等常用工具。 MMDetection 的版本跟 MMCV 的版本依賴關係如下表:
| MMDetection 版本 | MMCV 版本 |
|---|---|
| master | mmcv-full>=1.3.17, <1.6.0 |
| 2.25.0 | mmcv-full>=1.3.17, <1.6.0 |
| 2.24.1 | mmcv-full>=1.3.17, <1.6.0 |
| 2.24.0 | mmcv-full>=1.3.17, <1.6.0 |
| 2.23.0 | mmcv-full>=1.3.17, <1.5.0 |
| 2.22.0 | mmcv-full>=1.3.17, <1.5.0 |
| 2.21.0 | mmcv-full>=1.3.17, <1.5.0 |
一般,MMCV 可以通過 pip 直接安裝:
pip install mmcv-full -f https://download.openmmlab.com/mmcv/dist/{cu_version}/{torch_version}/index.html
具體的只需要將連結中的 {cu_version} 和 {torch_version} 根據自身需求替換成實際的版本號即可,例如:
pip install mmcv-full -f https://download.openmmlab.com/mmcv/dist/cu111/torch1.9.0/index.html
偶有例外情況,比如本文中使用的 CUDA 11.6 和 torch 1.11.0+cu113 就不能直接帶入其中,此時可嘗試逐漸降低所裝 MMCV 的 CUDA 或 torch 版本號,然後直接在瀏覽器中開啟連結觀察是否存在資料以確定版本匹配,對於本文環境則使用以下安裝連結:
pip install mmcv-full -f https://download.openmmlab.com/mmcv/dist/cu115/torch1.11.0/index.html
安裝 MMDetection
可直接在使用 pip 命令安裝 MMDetection :
pip install mmdet
也可以下載 git 倉庫原始碼本地編譯安裝:
git clone https://github.com/open-mmlab/mmdetection.git
cd mmdetection
pip install -r requirements/build.txt
pip install -v -e .
我在兩臺電腦上分別安裝 MMDetection 環境,第一臺通過 pip 可以完全正常安裝,第二臺安裝過程中出現了幾個錯誤:
- 缺少
Microsoft Visual C++庫
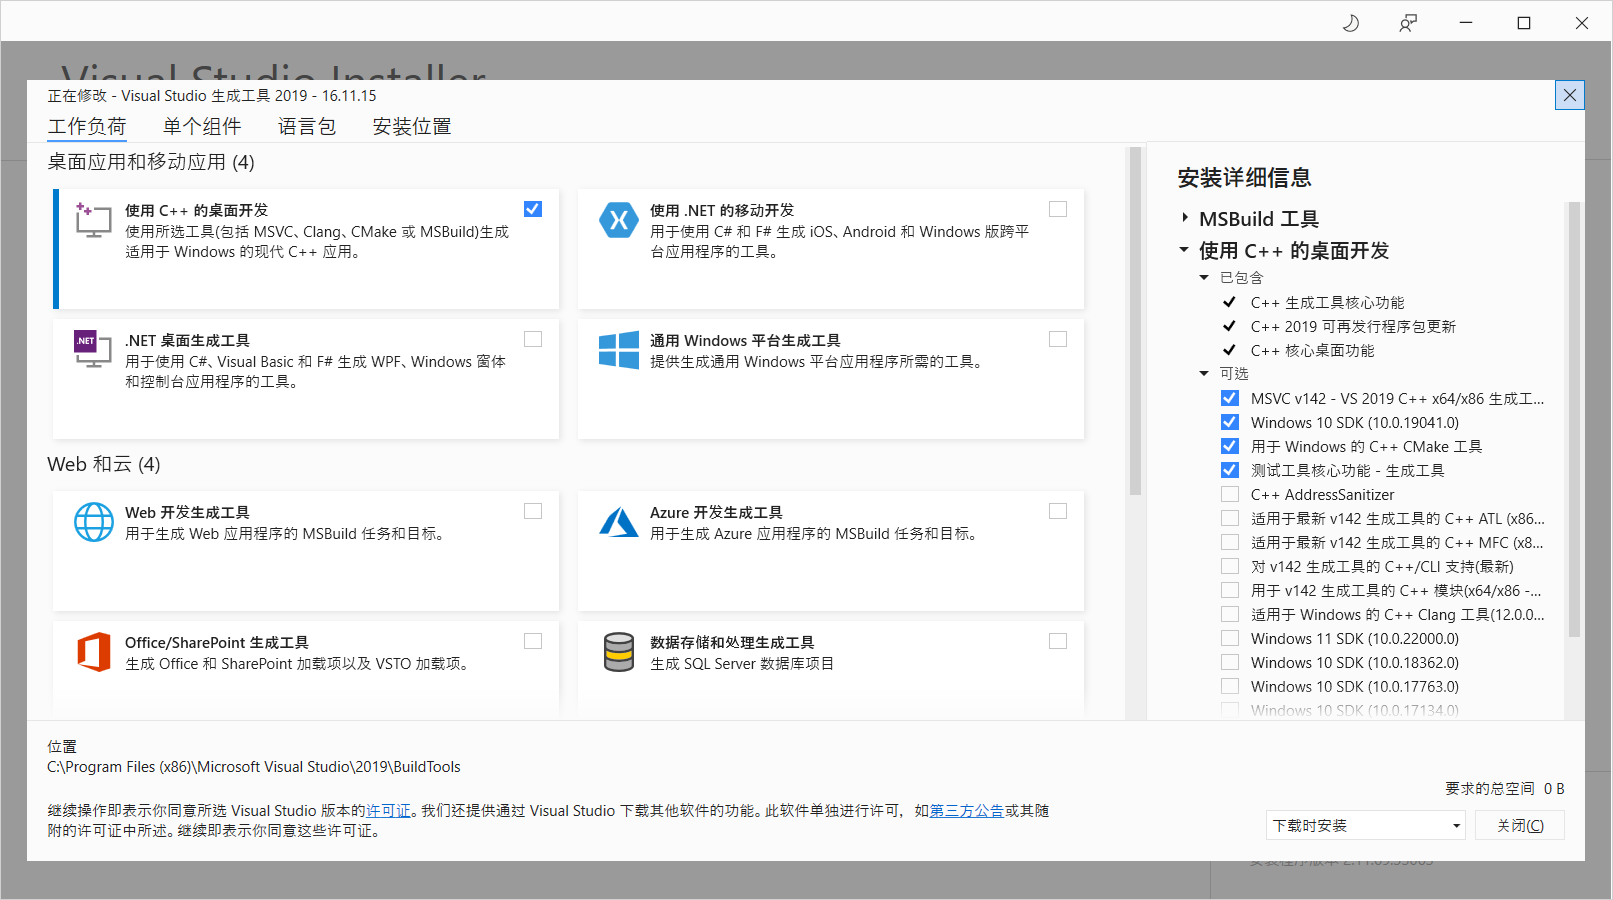
此時只需要根據錯誤提示連結下載官方構建工具即可,執行工具後選擇error: Microsoft Visual C++ 14.0 or greater is required. Get it with "Microsoft C++ Build Tools": https://visualstudio.microsoft.com/visual-cpp-build-tools/使用 C++ 的桌面開發它會推薦4個構建工具,建議不要試圖為了節省硬碟容量而更改,最終安裝的內容如下:
如果因為網速不好無法下載而導致安裝失敗,可自行搜尋離線安裝包進行安裝。 - 缺少
pycocotools庫
這個錯誤卡了很久,試過本地編譯、降低版本、pip 安裝No module named ‘pycocotools’pycocotools、 conda 安裝pycocotools等各種方式想解決這個問題都失敗,最後根據 win10python3.9安裝pycocotools 成功安裝 。
簡單使用
使用前,先將 MMDetection 原始碼拷貝到本地,並在其根目錄開啟命令列啟用 mmdet 環境,如無特殊說明,本文所有命令皆在此目錄此環境下執行:
git clone [email protected]:open-mmlab/mmdetection.git
其中主要目錄介紹如下:
configs:模型網路結構設定目錄,基本所有主流模型都在裡面被定義,其中每個模型目錄下的README.md包含本模型的預訓練模型demo:官方識別範例,包含圖片識別、視訊識別、攝像頭識別等docker: docker 環境檔案docs:相關說明檔案mmdet:MMDetection 的主要原始碼檔案,包含資料處理、模型載入、API 介面等tests:包含各種場景下的使用範例tools:包含各種有用的工具——訓練程式碼、測試程式碼、資料集分析、紀錄檔分析等
識別單張圖片
識別單張圖片的程式碼是 demo 目錄下的 image_demo.py ,開啟原始碼可發現其執行需要指定四個引數:
img:待識別圖片地址config:所用模型組態檔地址,即專案根目錄下的configs目錄對應地址checkpoint:與config引數對應的訓練好的模型檔案--out-file:輸出檔案地址
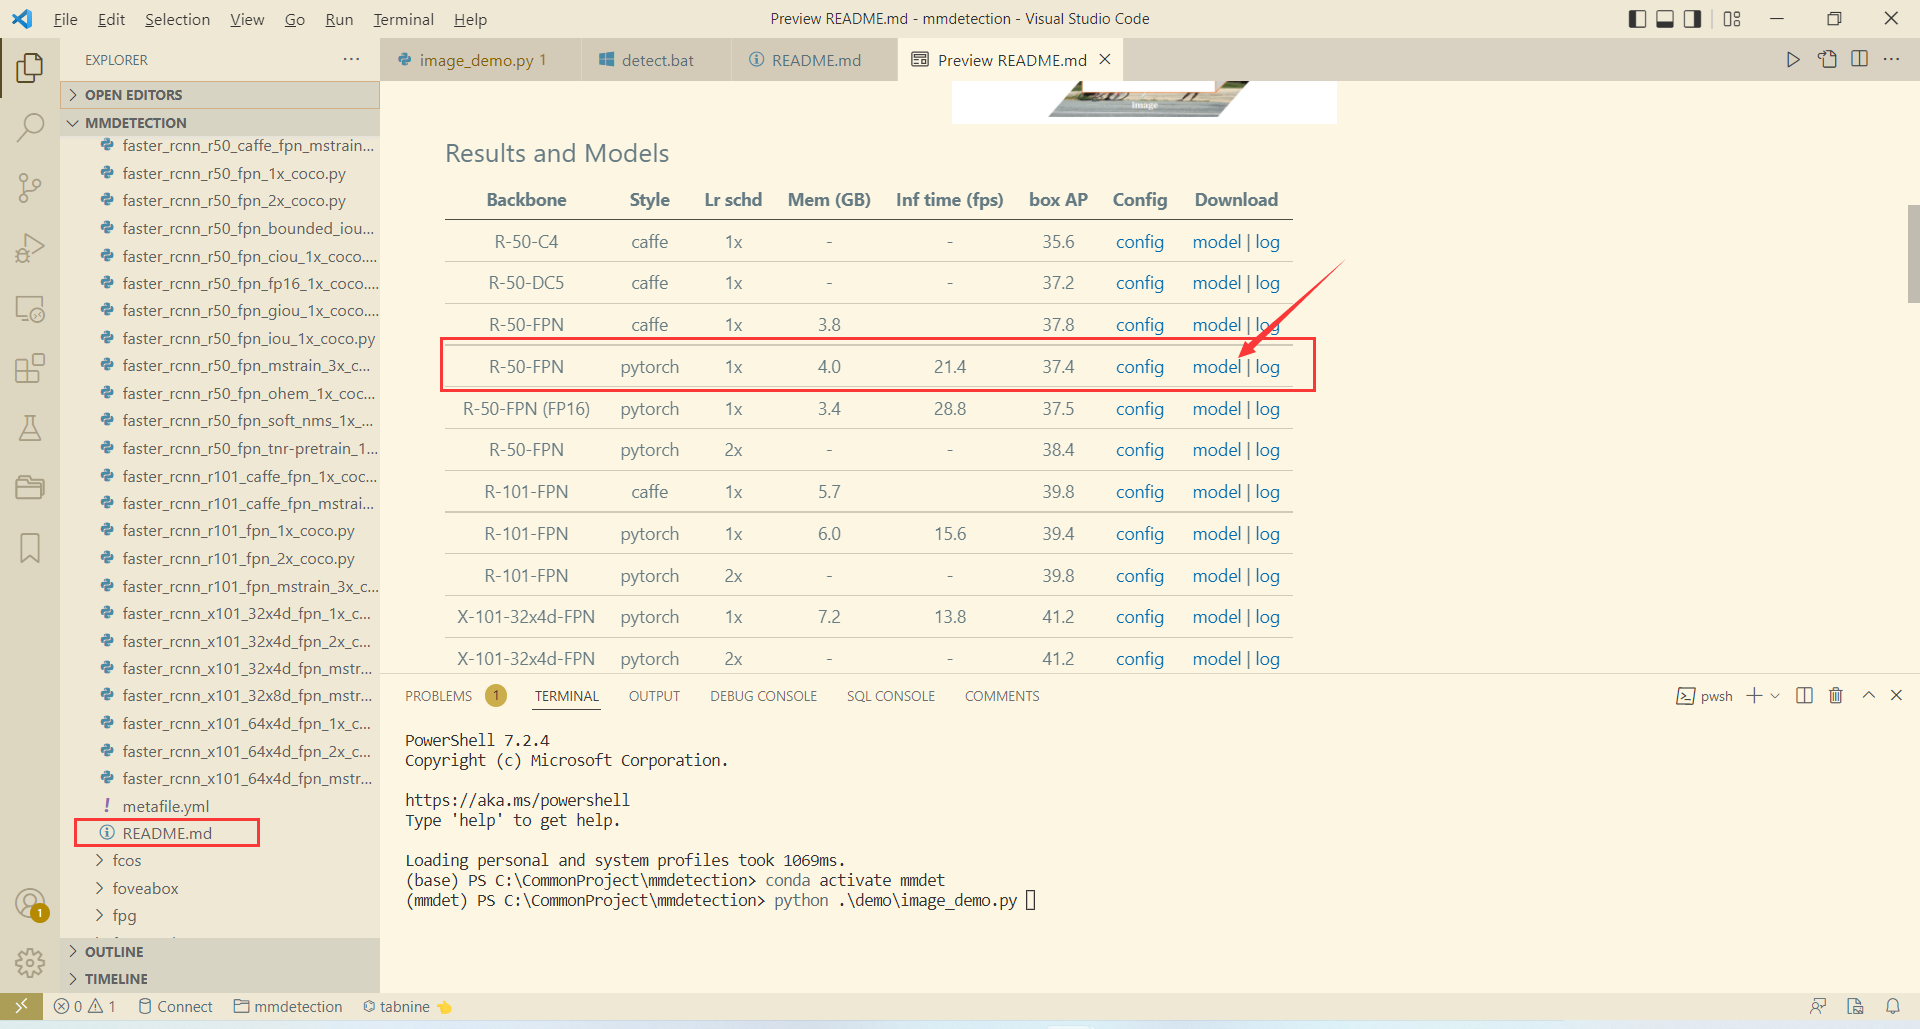
在此我們選擇使用的模型組態檔是 configs/faster_rcnn/faster_rcnn_r50_fpn_1x_coco.py (MMDetection 的名稱規範為 [model]_(model setting)_[backbone]_[neck]_(norm setting)_(misc)_(gpu x batch)_[schedule]_[dataset].py),在具體使用前,還需要下載該模型對應訓練好的模型檔案,在模型組態檔對應目錄 faster_rcnn 下的 README.md 檔案中可找到預訓練模型的下載地址:
將預訓練模型訓練好後放入專案根目錄的 checkpoints 目錄下,然後就可以開始識別具體圖片了,以官方圖片為例:
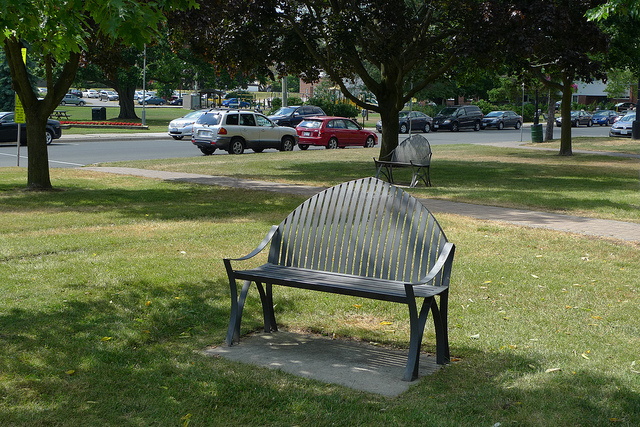
在根目錄下執行以下命令:
python demo/image_demo.py --out-file demo-result.jpg demo/demo.jpg configs/faster_rcnn/faster_rcnn_r50_fpn_1x_coco.py checkpoints/faster_rcnn_r50_fpn_1x_coco_20200130-047c8118.pth
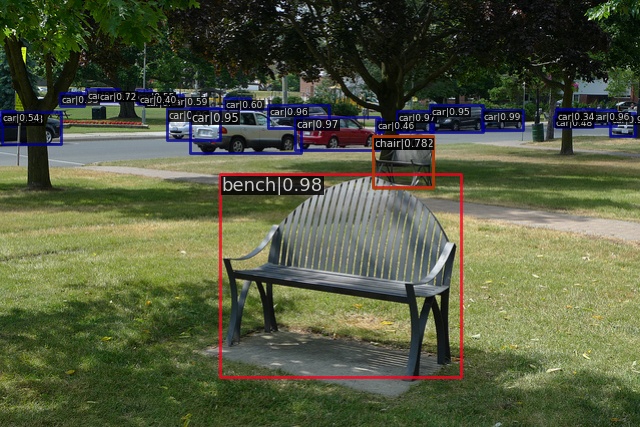
隨後可在根目錄下找到識別輸出圖片 demo-result.jpg :
識別視訊檔
識別視訊檔的程式碼是 demo 目錄下的 video_demo.py ,開啟原始碼可發現其執行需要指定四個引數:
video:待識別視訊檔地址config:所用模型組態檔地址,即專案根目錄下的configs目錄對應地址checkpoint:與config引數對應的訓練好的模型檔案--out:輸出檔案地址
我們仍然使用上節指定的模型組態檔和模型檔案,輸入視訊為demo/demo.mp4,原視訊如下:
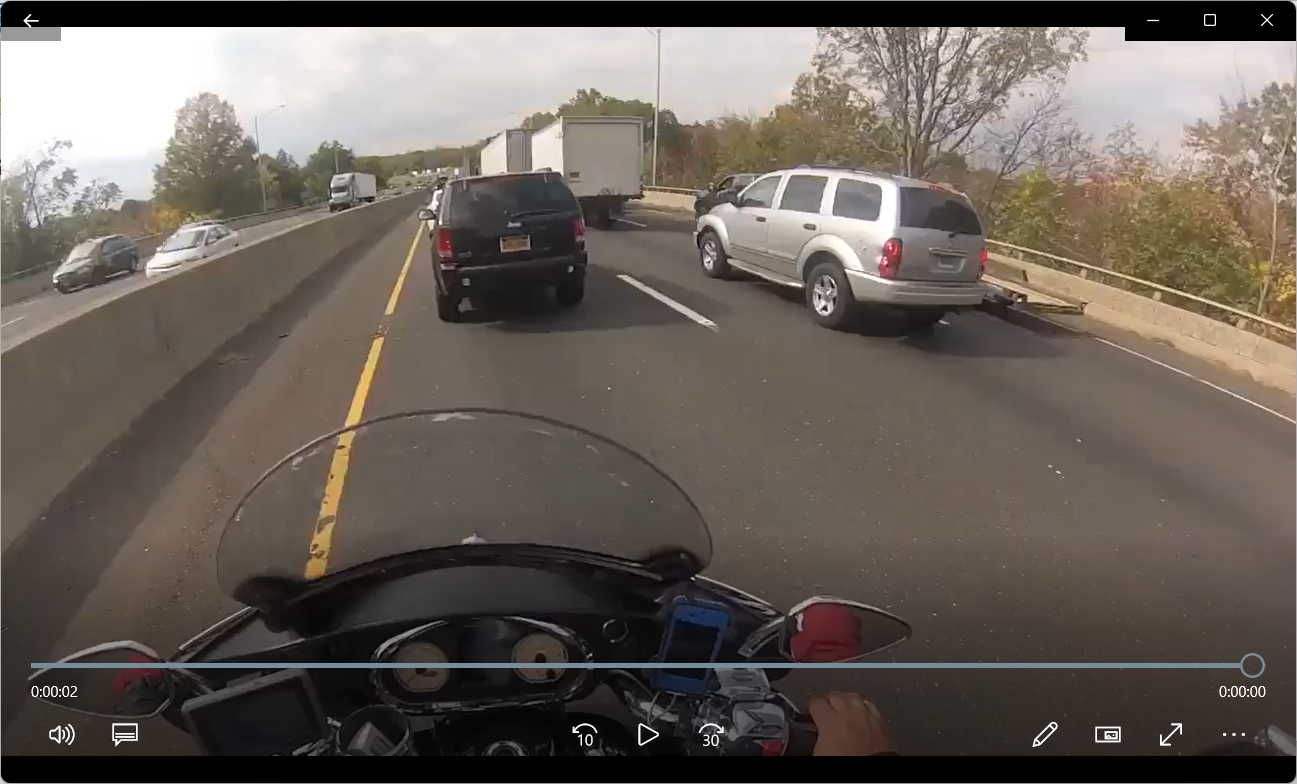
在根目錄下執行以下命令:
python demo/video_demo.py --out demo-result.mp4 demo/demo.mp4 configs/faster_rcnn/faster_rcnn_r50_fpn_1x_coco.py checkpoints/faster_rcnn_r50_fpn_1x_coco_20200130-047c8118.pth
隨後可在根目錄下找到識別輸出視訊 demo-result.mp4 :
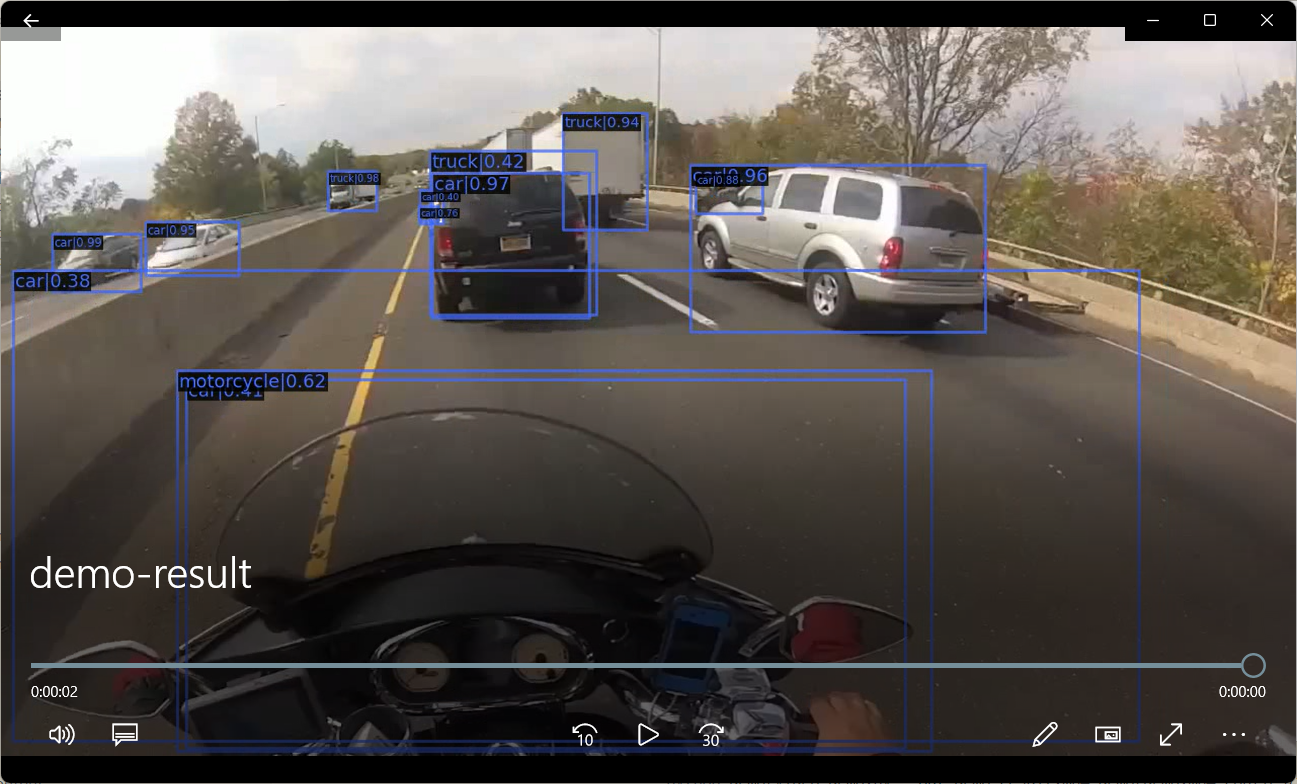
識別攝像頭
識別視訊檔的程式碼是 demo 目錄下的 webcam_demo.py ,開啟原始碼可發現其執行需要指定四個引數:
config:所用模型組態檔地址,即專案根目錄下的configs目錄對應地址checkpoint:與config引數對應的訓練好的模型檔案
在根目錄下執行以下命令:
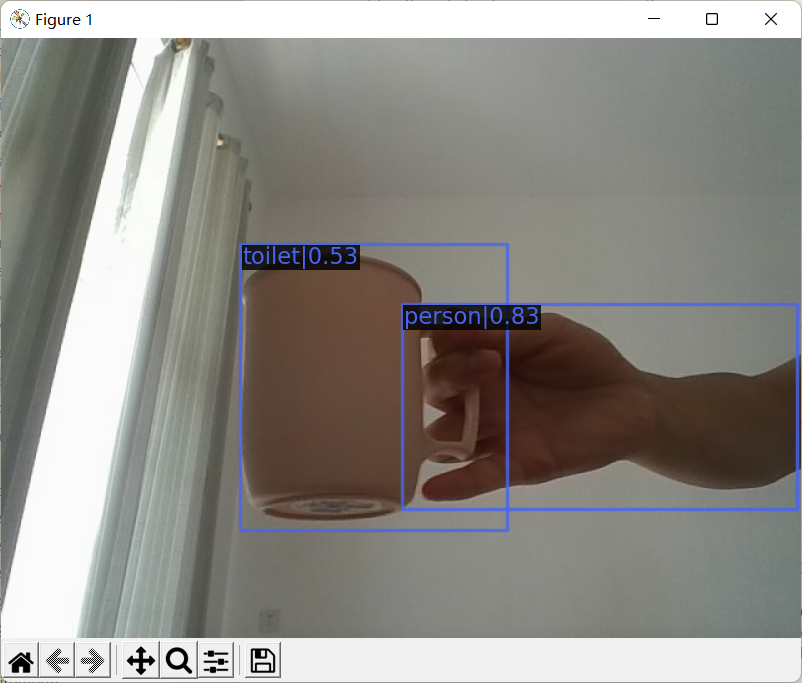
python demo/webcam_demo.py configs/faster_rcnn/faster_rcnn_r50_fpn_1x_coco.py checkpoints/faster_rcnn_r50_fpn_1x_coco_20200130-047c8118.pth
隨後程式會一直呼叫電腦可用攝像頭進行拍照識別,一箇中間過程截圖為:
識別整合/批次圖片
MMDetection 自帶的 Demo 是不支援資料夾批次圖片識別的,而且常用的視訊識別和圖片識別分開且引數不一致使用起來也比較麻煩,因此本小節嘗試將視訊識別和圖片識別進行合併,並使其支援批次圖片識別:
- 格式化引數:
def parse_args():
    parser = ArgumentParser()
    parser.add_argument('source', help='source')
    parser.add_argument('config', help='Config file')
    parser.add_argument('checkpoint', help='Checkpoint file')
    parser.add_argument('--out_path', default=None, help='Path to output')
    parser.add_argument('--device', default='cuda:0', help='Device used for inference')
    parser.add_argument('--palette', default='coco', choices=['coco', 'voc', 'citys', 'random'], help='Color palette used for visualization')
    parser.add_argument('--score-thr', type=float, default=0.3, help='bbox score threshold')
    args = parser.parse_args()
    return args
- 單圖片識別:
def single_image(args):
    model = init_detector(args.config, args.checkpoint, device=args.device)
    basename = os.path.basename(args.source)
    result = inference_detector(model, args.source)
    model.show_result(args.source, result, args.score_thr, show=False, win_name=basename, bbox_color=args.palette, text_color=args.palette, mask_color=None, out_file=os.path.join(args.out_path, "detect_" + basename))
- 多圖片識別:
def multi_image(args):
    model = init_detector(args.config, args.checkpoint, device=args.device)
    imgs = glob.glob(os.path.join(args.source, "*.jpg"))
    with alive_bar(len(imgs), ctrl_c=False, title=f'Detecting') as bar:
        for img in imgs:
            basename = os.path.basename(img)
            result = inference_detector(model, img)
            model.show_result(img, result, args.score_thr, show=False, win_name=basename, bbox_color=args.palette, text_color=args.palette, mask_color=None, out_file=os.path.join(args.out_path, "detect_" + basename))
            bar()
- 單視訊識別:
def single_video(args):
    import matplotlib
    matplotlib.use('agg')
    model = init_detector(args.config, args.checkpoint, device=args.device)
    video_reader = mmcv.VideoReader(args.source)
    video_writer = None

    basename = os.path.basename(args.source)
    fourcc = cv2.VideoWriter_fourcc(*'mp4v')
    video_writer = cv2.VideoWriter(os.path.join(args.out_path, "detect_" + basename), fourcc, video_reader.fps, (video_reader.width, video_reader.height))

    for frame in mmcv.track_iter_progress(video_reader):
        result = inference_detector(model, frame)
        frame = model.show_result(frame, result, score_thr=args.score_thr, bbox_color=args.palette, text_color=args.palette, mask_color=None)
        video_writer.write(frame)

    if video_writer:
        video_writer.release()
    cv2.destroyAllWindows()
- 入口函數:
def main(args):
    if os.path.isdir(args.source):
        multi_image(args)
    elif args.source.endswith(('.bmp', '.dib', '.png', '.jpg', '.jpeg', '.pbm', '.pgm', '.ppm', '.tif', '.tiff')):
        single_image(args)
    elif args.source.endswith(".mp4", ".avi", ".wmv"):
        single_video(args)
完整程式碼為:
# Copyright (c) OpenMMLab. All rights reserved.
import os
import cv2
import mmcv
import glob
from alive_progress import alive_bar
from argparse import ArgumentParser

from mmdet.apis import (inference_detector, init_detector, show_result_pyplot)


def parse_args():
    parser = ArgumentParser()
    parser.add_argument('source', help='source')
    parser.add_argument('config', help='Config file')
    parser.add_argument('checkpoint', help='Checkpoint file')
    parser.add_argument('--out_path', default=None, help='Path to output')
    parser.add_argument('--device', default='cuda:0', help='Device used for inference')
    parser.add_argument('--palette', default='coco', choices=['coco', 'voc', 'citys', 'random'], help='Color palette used for visualization')
    parser.add_argument('--score-thr', type=float, default=0.3, help='bbox score threshold')
    args = parser.parse_args()
    return args


def single_image(args):
    model = init_detector(args.config, args.checkpoint, device=args.device)
    basename = os.path.basename(args.source)
    result = inference_detector(model, args.source)
    model.show_result(args.source, result, args.score_thr, show=False, win_name=basename, bbox_color=args.palette, text_color=args.palette, mask_color=None, out_file=os.path.join(args.out_path, "detect_" + basename))


def multi_image(args):
    model = init_detector(args.config, args.checkpoint, device=args.device)
    imgs = glob.glob(os.path.join(args.source, "*.jpg"))
    with alive_bar(len(imgs), ctrl_c=False, title=f'Detecting') as bar:
        for img in imgs:
            basename = os.path.basename(img)
            result = inference_detector(model, img)
            model.show_result(img, result, args.score_thr, show=False, win_name=basename, bbox_color=args.palette, text_color=args.palette, mask_color=None, out_file=os.path.join(args.out_path, "detect_" + basename))
            bar()


def single_video(args):
    import matplotlib
    matplotlib.use('agg')
    model = init_detector(args.config, args.checkpoint, device=args.device)
    video_reader = mmcv.VideoReader(args.source)
    video_writer = None

    basename = os.path.basename(args.source)
    fourcc = cv2.VideoWriter_fourcc(*'mp4v')
    video_writer = cv2.VideoWriter(os.path.join(args.out_path, "detect_" + basename), fourcc, video_reader.fps, (video_reader.width, video_reader.height))

    for frame in mmcv.track_iter_progress(video_reader):
        result = inference_detector(model, frame)
        frame = model.show_result(frame, result, score_thr=args.score_thr, bbox_color=args.palette, text_color=args.palette, mask_color=None)
        video_writer.write(frame)

    if video_writer:
        video_writer.release()
    cv2.destroyAllWindows()


def main(args):
    if os.path.isdir(args.source):
        multi_image(args)
    elif args.source.endswith(('.bmp', '.dib', '.png', '.jpg', '.jpeg', '.pbm', '.pgm', '.ppm', '.tif', '.tiff')):
        single_image(args)
    elif args.source.endswith(".mp4", ".avi", ".wmv"):
        single_video(args)


if __name__ == '__main__':
    args = parse_args()
    main(args)
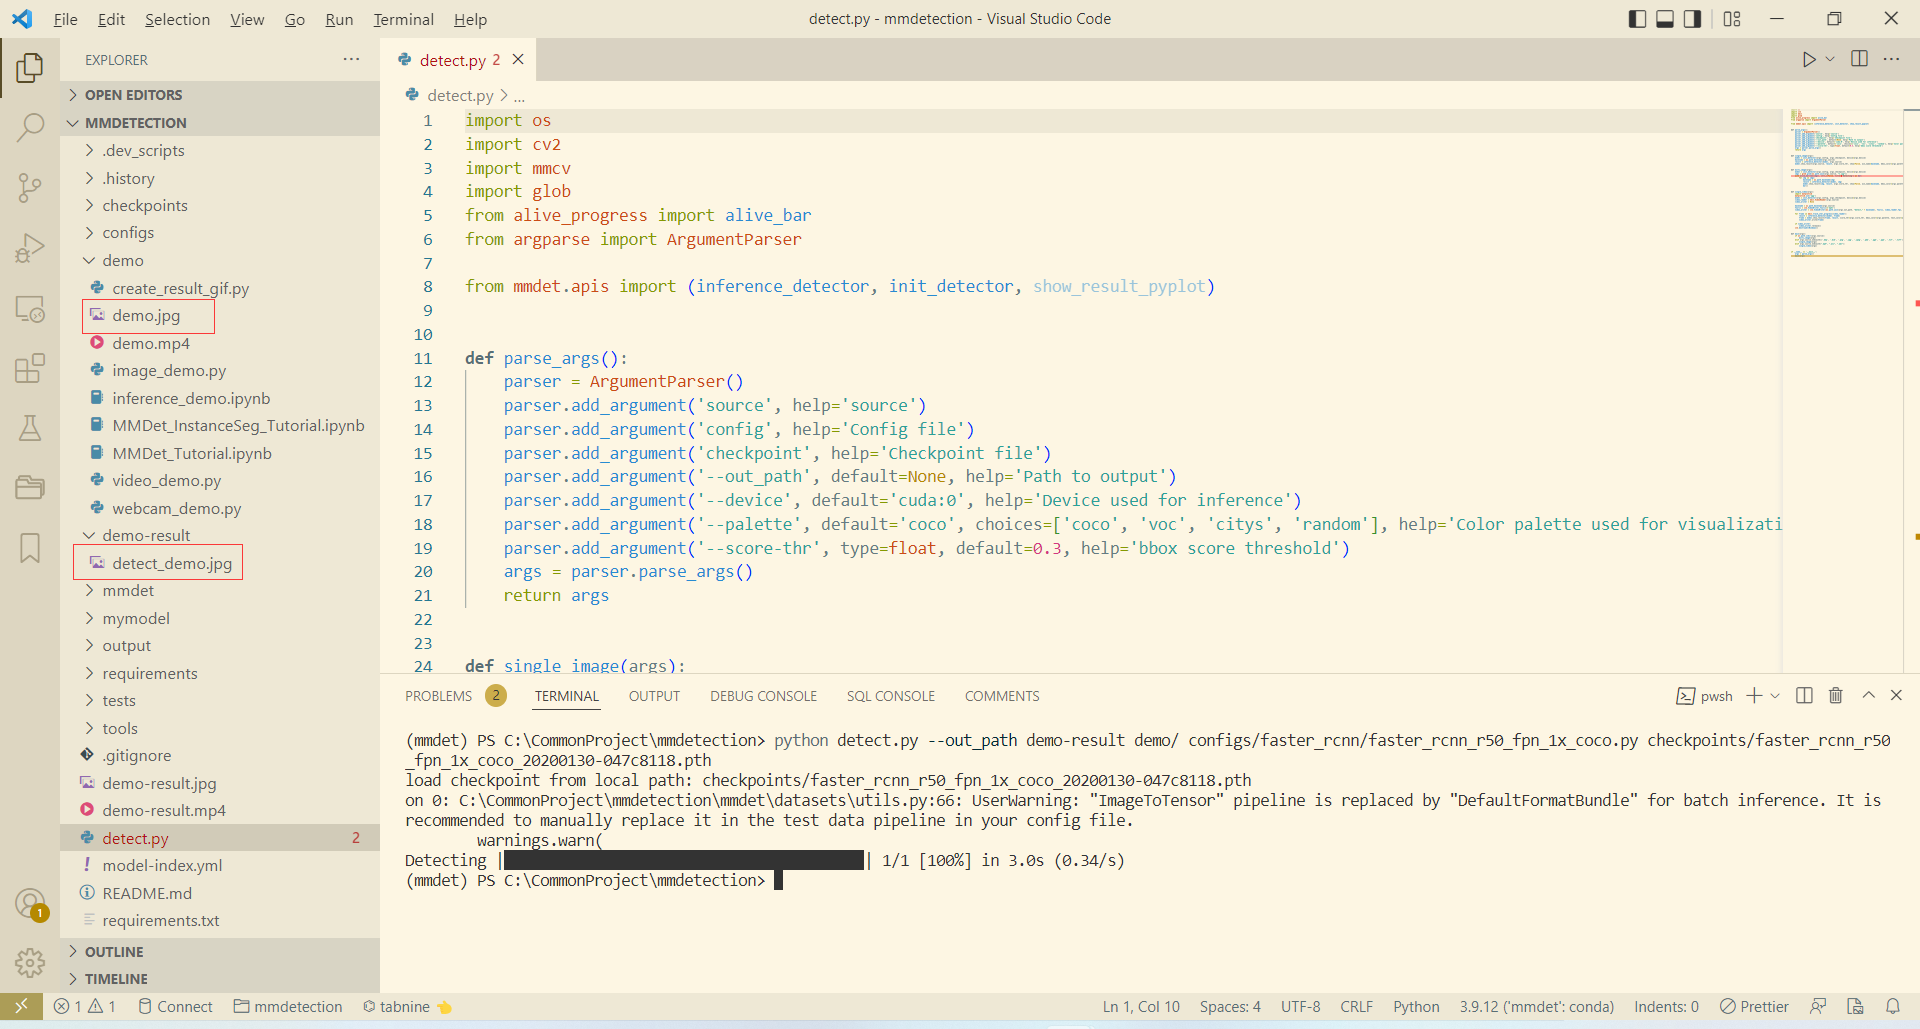
將完整程式碼儲存至專案根目錄下的 detect.py 檔案中,一個批次識別 demo 下的所有圖片,並將結果儲存至 demo-result 下的範例為:
python detect.py --out_path demo-result demo/ configs/faster_rcnn/faster_rcnn_r50_fpn_1x_coco.py checkpoints/faster_rcnn_r50_fpn_1x_coco_20200130-047c8118.pth
由於 demo 目錄下只有一張圖片,所以執行很快結束:
訓練私有資料
資料集介紹
CelebA 是 CelebFaces Attribute 的縮寫,意即名人人臉屬性資料集,其包含 10177 個名人身份的 202599 張人臉圖片,每張圖片都做好了特徵標記,包含人臉 bbox 標註框、 5 個人臉特徵點座標以及 40 個屬性標記, CelebA 由香港中文大學開放提供,廣泛用於人臉相關的計算機視覺訓練任務,可用於人臉屬性標識訓練、人臉檢測訓練以及 landmark 標記等,官方網址:Large-scale CelebFaces Attributes (CelebA) Dataset 。通過官網下載的 CelebA 資料集目錄結構如下:

其中各檔案目錄介紹如下:
img_align_celeba:經過人臉對齊和裁剪了的影象img_celeba:原始「野生」人臉影象,從網路爬取未有做任何裁剪縮放操作的人臉影象labels: 標籤檔案identity_CelebA.txt:每張圖片對應的身份編號資訊list_attr_celeba.txt:40 個屬性標籤檔案,第一行為影象張數,第二行為屬性名,有該屬性則標記為1,否則標記為-1list_bbox_celeba.txt:人臉標註框座標註釋檔案,包含每一張圖片對應的 bbox 起點座標及其寬高list_eval_partition.txt:用於劃分為training,validation及testing等資料集的標籤檔案,標籤0對應training,標籤1對應validation,標籤2對應testinglist_landmarks_align_celeba.txt:人臉對齊後的5個特徵點landmark座標註釋檔案
資料集預處理
CelebA 包含大量資料,本節我們只想討論 MMDetection 自定義資料集的訓練方法而非真的要訓練出一個效果極好的影象分類識別模型,因此需要對資料集進行簡化,大致流程如下:
- 建立訓練資料資料夾
celeba100 - 將
CelebA/img_celeba中前100張圖片複製到celeba100/images目錄下 - 將
CelebA/labels/list_bbox_celeba.txt複製到celeba100/list_bbox_celeba.txt - 建立
celeba100/classes.txt檔案並寫入一行資料face,此時訓練集目錄如下:

- 用程式碼將
celeba100/list_bbox_celeba.txt中前100行標籤格式轉為 COCO 格式存放於celeba100/annotations/label.json
list_bbox_celeba.txt 轉為 COCO 程式碼如下:
import os
from PIL import Image
import json
basepath = r"C:\CommonProject\celeba100"
imagepath = os.path.join(basepath, "images")
annpath = os.path.join(basepath, "annotations")
annfile = os.path.join(annpath, "label.json")
labeltxt = os.path.join(basepath, "list_bbox_celeba.txt")
calssestxt = os.path.join(basepath, "classes.txt")
def get_image_size(infile):
    im = Image.open(infile)
    return im.size

label = {}
with open(calssestxt, 'r+') as f:
    classes = []
    lines = f.readlines()
    for i, line in enumerate(lines):
        c = {}
        c['id'] = i
        c['name'] = line
        c['supercategory'] = "mark"
        classes.append(c)
label['categories'] = classes

images = []
annotations = []
with open(labeltxt, 'r+') as f:
    lines = f.readlines()[:101]
    for i, line in enumerate(lines):
        d = line.split()
        imgpath = os.path.join(imagepath, d[0])
        img = {}
        img_size = get_image_size(imgpath)
        img['id'] = i
        img['file_name'] = d[0]
        img['width'] = img_size[0]
        img['height'] = img_size[1]
        images.append(img)
        ann = {}
        ann['id'] = i
        ann['image_id'] = i
        ann['category_id'] = 0
        ann['iscrowd'] = 0
        ann['bbox'] = [int(t) for t in d[1:]]
        ann['area'] = (ann['bbox'][2] - ann['bbox'][0]) * (ann['bbox'][3] - ann['bbox'][1])
        annotations.append(ann)

label['images'] = images
label['annotations'] = annotations

with open(annfile, "w+") as f:
    json.dump(label, f)
設定 MMDetection
上節我們已經整理出 MMDetection 能直接使用的小資料集,現在需要編寫我們訓練所使用的模型組態檔。在 mmdetection 根目錄下建立一個 celeba 資料夾,並在其下建立模型組態檔 celeba.py ,寫入內容如下:
_base_ = '../configs/fcos/fcos_r101_caffe_fpn_gn-head_mstrain_640-800_2x_coco.py'

import os
model = dict(bbox_head=dict(num_classes=1))

dataset_type = 'COCODataset'
classes = ('face', )
data_root = "C:/CommonProject/celeba100"
data = dict(
    samples_per_gpu=2,
    workers_per_gpu=0,
    train=dict(img_prefix=data_root + '/images', classes=classes, ann_file=data_root + '/annotations/label.json'),
    val=dict(img_prefix=data_root + '/images', classes=classes, ann_file=data_root + '/annotations/label.json'),
    test=dict(img_prefix=data_root + '/images', classes=classes, ann_file=data_root + '/annotations/label.json'),
)
work_dir = os.path.join(data_root, 'work_dir')
runner = dict(type='EpochBasedRunner', max_epochs=100)
checkpoint_config = dict(interval=5)
load_from = r'C:\CommonProject\mmdetection\checkpoints\fcos_r101_caffe_fpn_gn-head_mstrain_640-800_2x_coco-511424d6.pth'
其中主要設定解釋如下(所有欄位詳細解釋參考 學習組態檔):
_base_:繼承的基準模型,跟類的繼承差不多model:模型的設定,用於覆蓋所繼承基準模型的部分內容dataset_type:資料集型別,主要有CocoDataset、CityscapesDataset、LVISV05Dataset、VOCDataset等classes:分類識別的類名data:定義資料集位置,這裡我們的訓練集、驗證集、測試集都為一個runner:設定訓練時所需的引數,這裡設定了epoch為 100checkpoint_config:設定每 5 輪訓練儲存一個checkpointload_from:要載入的預訓練模型
開始訓練
除了直接訓練, MMDetection 還提供很多有用的指令碼用以校準模型和資料:
- 輸出全組態檔
python tools/misc/print_config.py celeba/celeba.py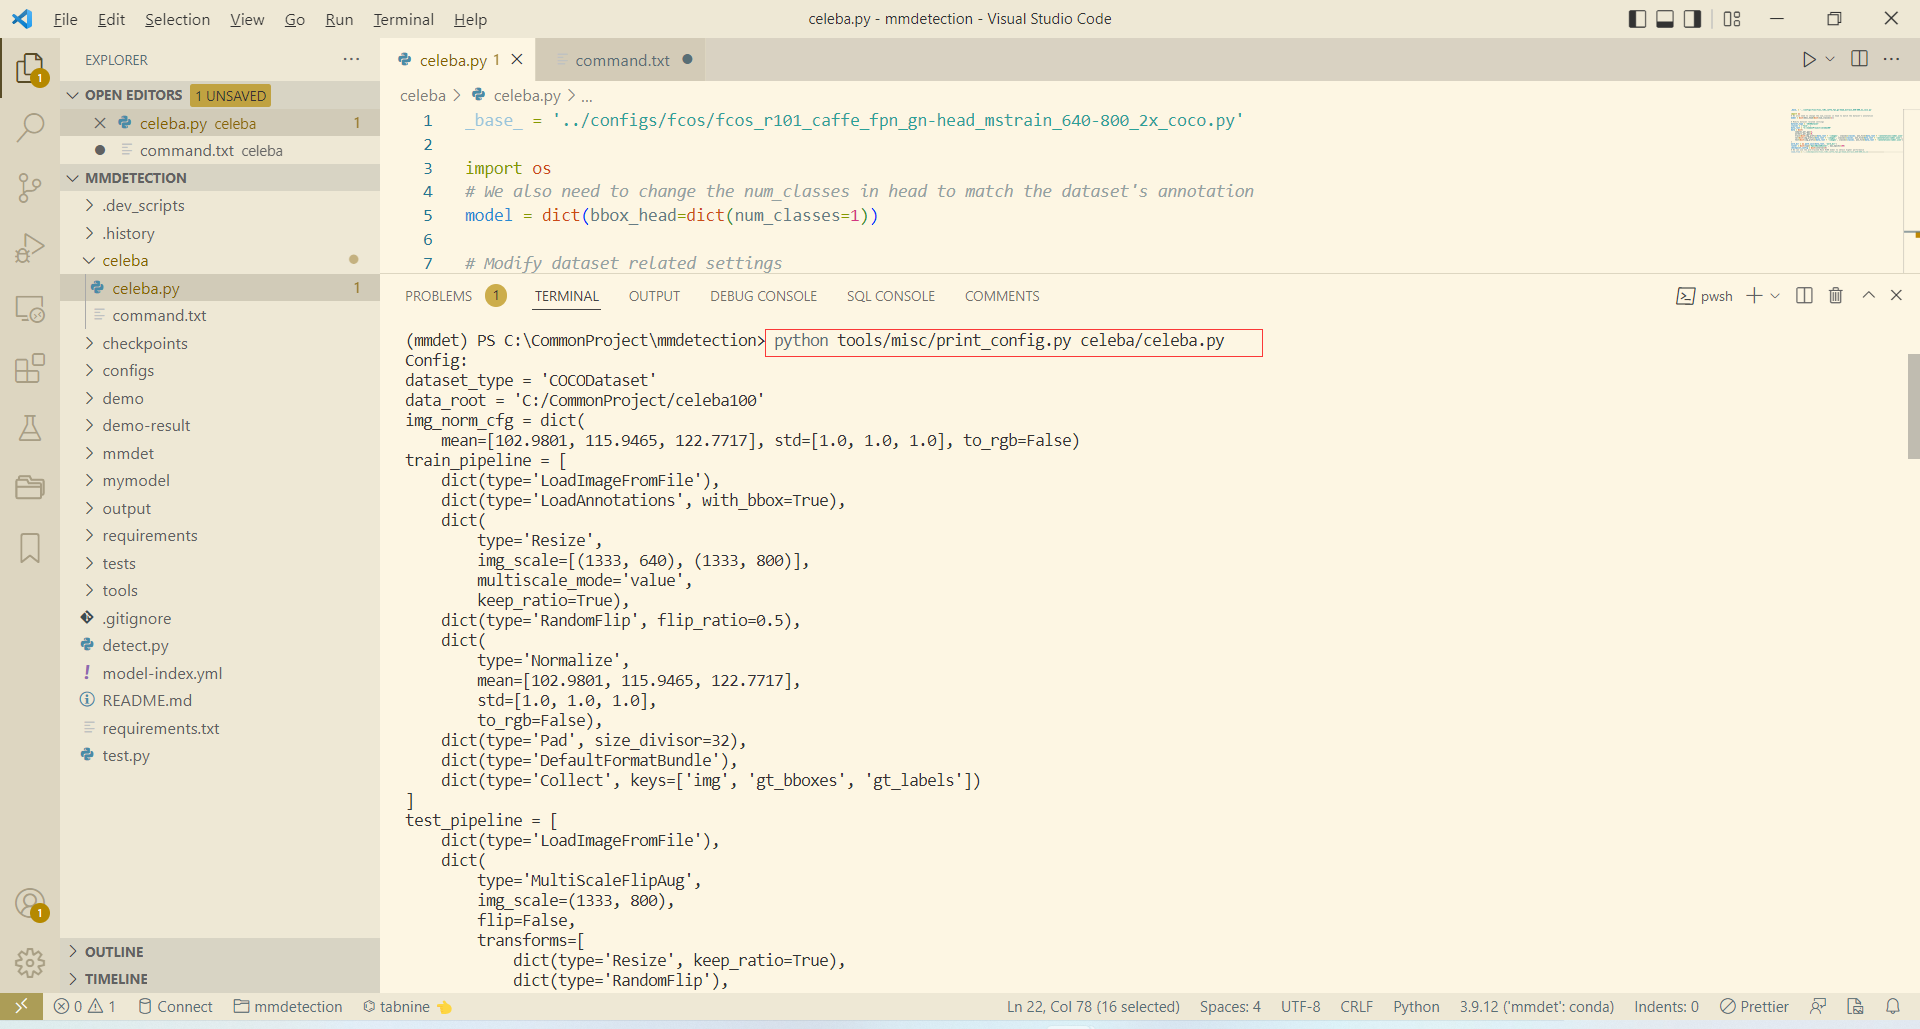
- 以5秒間隔檢視資料集
python tools/misc/browse_dataset.py celeba/celeba.py --show-interval 5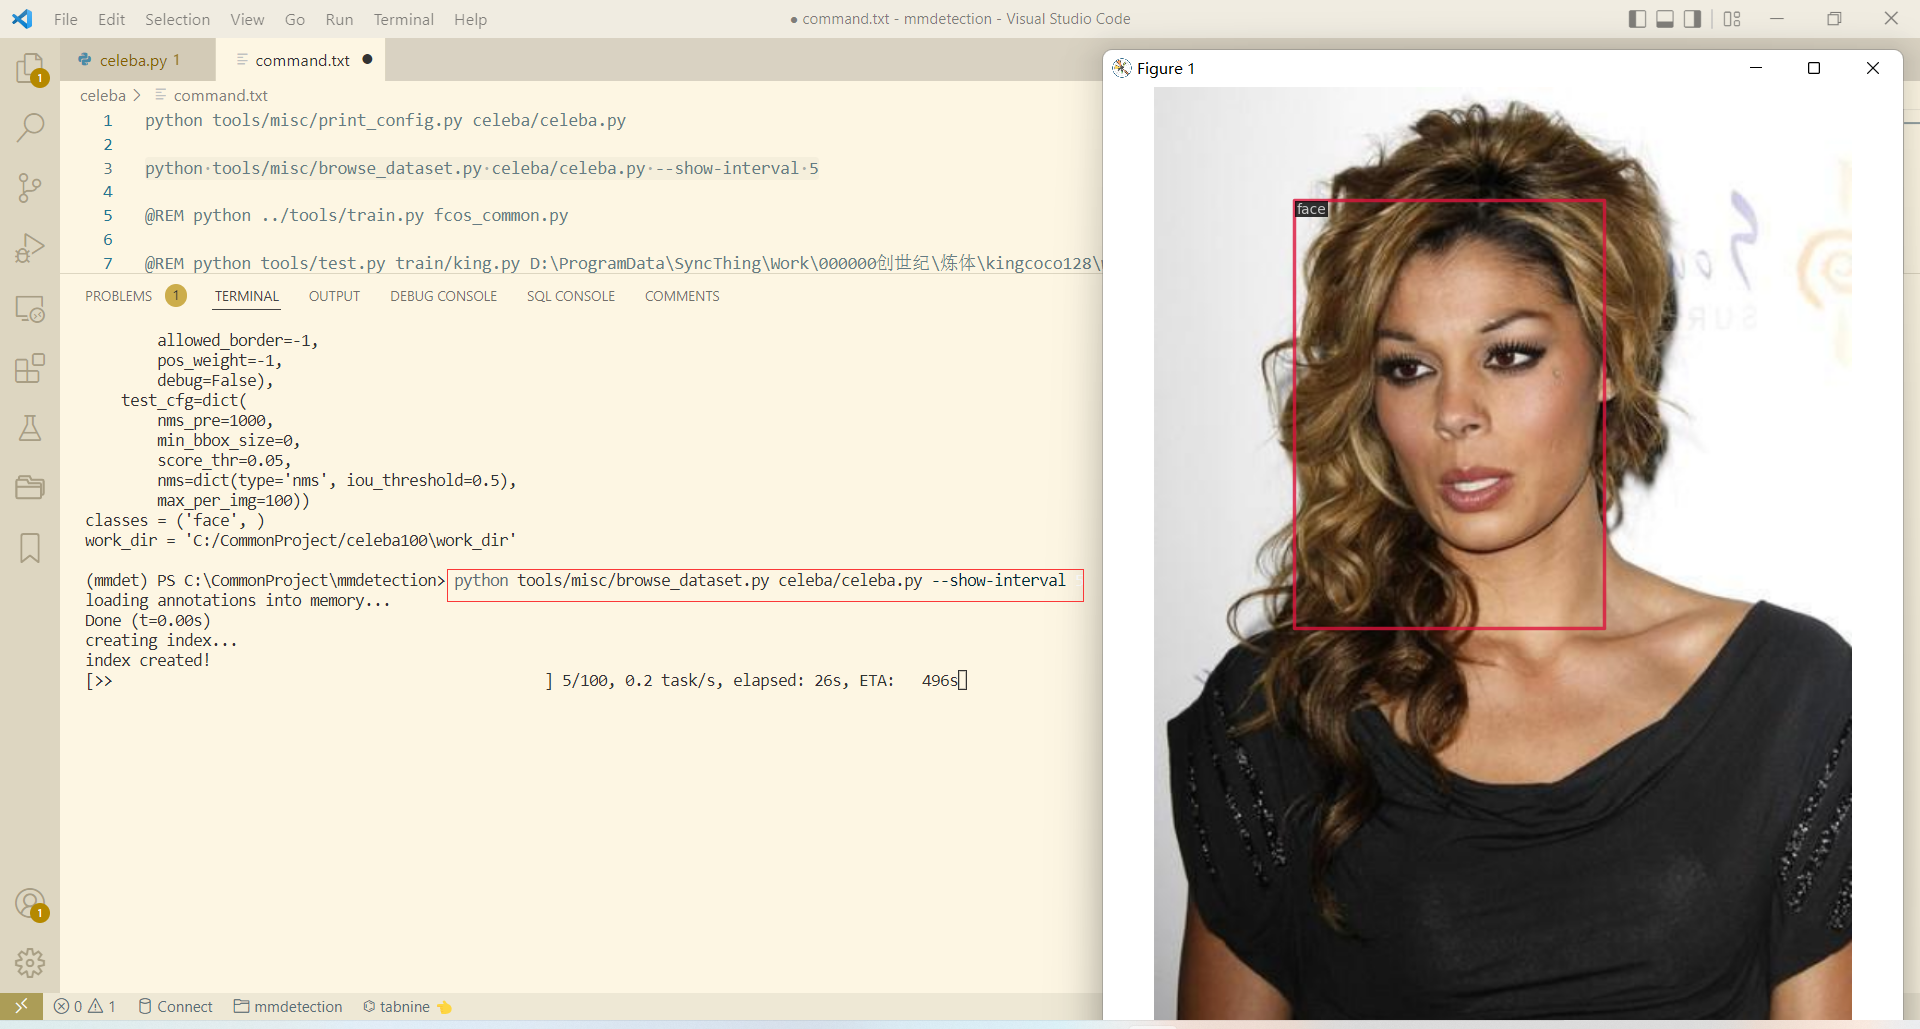
- 開始訓練
如果缺少python tools/train.py celeba/celeba.pycheckpoints檔案它會自動下載,然後只需等待其訓練完成即可:

其它說明
-
去掉檢測結果方框的填充
修改 mmdet\core\visualization\image.py#line 324 -
長視訊檢測時出現: Fail to create pixmap with Tk_GetPixmap in TkImgPhotoInstanceSetSize ( Fail to allocate bitmap) #7035
在檢測視訊前插入以下程式碼:
import matplotlib
matplotlib.use('agg')
參考
[1]: open-mmlab. 依賴 MMDetection 2.24.1 檔案. TesterHome. [-]
[2]: open-mmlab. 安裝 MMCV — mmcv 1.5.1 檔案. readthedocs.io. [-]
[3]: open-mmlab. mmdetection. github.com. [-]
[4]: 隔壁恆哥. win10python3.9安裝pycocotools. CSDN. [2022-04-06]
[5]: Clear butterfly. coco資料集格式介紹. CSDN. [2021-01-17]