Blazor和Vue對比學習(進階2.2.3):狀態管理之狀態共用,Blazor的依賴注入和第三方庫Fluxor
Blazor沒有提供狀態共用的方案,雖然依賴注入可以實現一個全域性物件,這個物件可以擁有狀態、計算屬性、方法等特徵,但並不具備響應式。比如,元件A和元件B,都注入了這個全域性物件,並參照了全域性物件上的資料。我們通過元件A,修改全域性物件的資料,全域性物件上的資料更新,但參照了這個資料的元件B,並不會自動更新。如果要實現真正的狀態共用,需要藉助第三方庫Fluxor。
一、通過依賴注入,實現全域性狀態
開啟官方預製的Counter模板,無論是WASM模式,還是Server模式,元件切換/URL地址變更/頁面重新整理等情況下,元件的狀態CurrenCount資料,都會恢復為初始值,狀態無法保持。依賴注入有三種生命週期,我們可以利用單例AddSingleton(WASM和Serve的注入生命週期有差異,此處不展開)。在應用啟動時,建立一個物件(實現類和服務類一致),在元件中注入這個物件後,就可以使用。這個物件,與Pinia相似,獨立於元件樹,所有元件都可以存取,同時,它位於應用程序的記憶體中,元件切換時,它不會消失。但是,它不具備響應式。全域性物件資料的更新,並不會響應式的更新所有參照這個資料的元件。WASM和Server的實現差不多,但兩者表現有一點差異,後文詳述,先來看實現程式碼。
//先建立一個儲存庫類
public class CountState
{
    public int Count { get; set; } = 0;
    public void AddCount()
    {
        Count++;
    }
}


//在服務容器中注入
builder.Services.AddSingleton<CountState, CountState>();


//在元件中注入服務,並使用
@page "/counter"
@inject CountState countState

<PageTitle>Counter</PageTitle>
<h1>Counter</h1>
<p">Current count: @countState.Count</p>
<button @onclick="IncrementCount">點選增加</button>
<CounterChild></CounterChild>

@code {
    private void IncrementCount()
    {
        countState.AddCount();
    }
}


//子元件CounterChild,用於測試儲存庫物件資料更新時,其它參照元件是否可以響應式更新
//結論:不能響應式更新
@inject CountState countState
<h3>@countState.Count</h3>
<button @onclick="()=>{countState.Count++;}">在Child中點選增加/button>
通過以上方式,我們實現了一個獨立於元件樹的儲存庫,任何一個元件,都可以通過注入這個儲存庫物件的方式,來繫結或修改儲存庫中的資料,或呼叫儲存庫中的方法。我們再具體看一下,繫結了儲存庫的兩個父子元件,都有哪些表現:
- 無論在父元件中,還是在子元件中,點選增加按鈕,都只可以更新本元件中繫結的儲存庫物件。實際上儲存庫的狀態已經更新了,但沒有通知其它元件更新
- 元件切換/頁面跳轉後,再回到頁面時,父元件和子元件繫結的儲存庫資料,都更新為最新資料
- WASM模式下,重新整理頁面時,重新載入整個應用,儲存在記憶體中儲存庫清空,所以父子元件繫結的儲存庫資料,都恢復為初始值。但Server模式下重新整理,因為儲存庫物件儲存在SignalR連線的上下文中(伺服器記憶體),只要和伺服器的連線沒有斷開,狀態會一直儲存。(即使斷開,Signal可以設定讓伺服器儲存一段時間,在這段時間內,如果重連成功,狀態依然能夠保持)
總結:依賴注入是實現全域性狀態的首先方案,使用便捷、操作簡單。但如果要實現響應式更新,我們還是需要藉助第三方庫Fluxor
二、Fluxor的使用
1、一個最簡單的案例
Blazor的入門學習,有一個非常有名的教學《blazor university》。這個教學的作者叫Peter Morris,Fluxor正是出自他手,最近的更新也是比較頻繁,值得一試。相比於Vue的Pinia和Vuex,使用上會比較繁瑣,主要原因是多了一個action機制,中間轉了一下,後面會詳細解讀,我們先上手,擼一個簡單的案例:
第一步:安裝依賴
Fluxor.Blazor.Web
第二步:入口程式Program.cs,註冊Fluxor服務
var currentAssembly = typeof(Program).Assembly;
builder.Services.AddFluxor(options => options.ScanAssemblies(currentAssembly));
第三步:根元件App.razor中,初始化年有儲存庫
<Fluxor.Blazor.Web.StoreInitializer/>
<Router AppAssembly="@typeof(App).Assembly">
......
</Router>
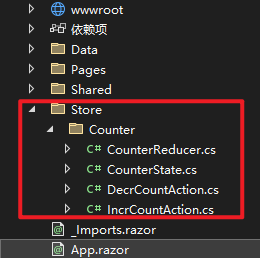
第四步:建立儲存庫的狀態類State、操作類Reducer和事件類Action(先稱它為信使),建議將這三個類統一放到一個資料夾中。檔案結構如下圖所示:
//===========================================================================
//①狀態類CounterState
using Fluxor;
namespace StateManageFluxor.Store.Counter
{
    //狀態State類,需要標註FeatureState特性
    [FeatureState]
    public class CounterState
    {
        //定義了一個Count狀態資料,必須為唯讀
        public int Count { get; }
        public CounterState(int count)
        {
            Count = count;
        }

        //初始化Store時,系統呼叫,建議私有,必須有
        private CounterState() { Count = 0; }
    }
}


//==================================================================================================
//②操作類Reducer,類似於Pinia中的Action,用於操作狀態State
//建議為靜態類和靜態方法
//可以寫多個Reducer,每個操作方法標註ReducerMethod特性
using Fluxor;

namespace StateManageFluxor.Store.Counter
{
    public static class CounterReducer
    {
        //狀態count遞增1操作
        //接收兩個引數,一個是原state,一個是信使action
        [ReducerMethod]
        public static CounterState ReduceIncrCountAction(CounterState state, IncrCountAction action)
        {
            return new CounterState(count: state.Count + 1);
        }

        //狀態count遞減1操作
        [ReducerMethod]
        public static CounterState ReduceDecrCountAction(CounterState state, DecrCountAction action)
        {
            return new CounterState(count: state.Count - action.DecrNum);
        }

        //如果信使不傳遞引數,還可以寫成如下格式:
        //[ReducerMethod(typeof(IncrCountAction))]
        //public static CounterState ReduceIncrCountAction(CounterState state)
        //{
        //    return new CounterState(count: state.Count + 1);
        //}
    }
}


//================================================================================================
//③事件類Action(稱它為信使)
//一個Reducer對應一個Action
//在元件中,通過Fluxor提供的Dispatcher/排程者,釋放信使Action
//信使傳遞訊號給相應的Reducer,通知它執行,並根據需要傳遞引數

//信使IncrCountAction,一個空類,不傳遞引數
namespace StateManageFluxor.Store.Counter
{
    public class IncrCountAction
    {
    }
}

//信使DecrCountAction,定義了一個DecrNum屬性
//排程者釋放信使時,可以定義DecrNum值,傳遞資訊
namespace StateManageFluxor.Store.Counter
{
    public class DecrCountAction
    {
        public int DecrNum { get; set; }
        public DecrCountAction(int decrNum)
        {
            DecrNum = decrNum;
        }
    }
}
第五步:Counter.razor元件,在元件中使用①繫結狀態;②通過排程者,釋放信使,從而觸發Reducer操作狀態
//參照需要的三個名稱空間,可以統一放到_Imports.razor中
@using Fluxor
@using Microsoft.AspNetCore.Components
@using StateManageFluxor.Store.Counter

//注入儲存庫的State,CounterState
@inject IState<CounterState> CounterState

//注入Fluxor提供的排程者物件Dispatcher
//用於釋放信使Action
@inject IDispatcher Dispatcher

//繼承Fluxor提供的一個元件內
//「只有」繼續了這個類,元件才能實現響應式更新
@inherits Fluxor.Blazor.Web.Components.FluxorComponent

@page "/counter"

<p>Current count: @CounterState.Value.Count</p>

<button @onclick="IncrCount">增加</button>
<button @onclick="DecrCount">減少</button>

@code {
    //IncrCount方法中,排程者釋放一個空的信使IncrCountAction
    private void IncrCount()
    {
        var action = new IncrCountAction();
        Dispatcher.Dispatch(action);
    }

    //DecrCount方法中,排程者釋放一個攜帶資訊的信使DecrCountAction
    private void DecrCount()
    {
        var action = new DecrCountAction(2);
        Dispatcher.Dispatch(action);
    }
}
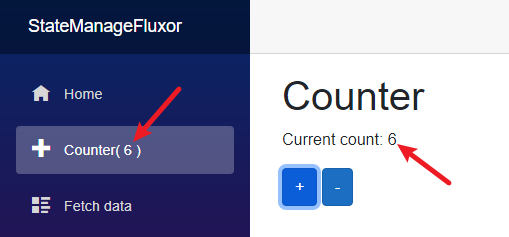
第六步:完成以上五步,即實現了一個共用儲存庫的簡單應用。我們可以在另外一個元件中(選左側導航欄的NavMenu.razor),也繫結儲存庫的狀態,驗證一下是否能夠響應式的更新
//注入儲存庫的State
@inject IState<CounterState> CounterState

//繼承Fluxor提供的一個元件類,這樣才可以實現響應式更新
@inherits Fluxor.Blazor.Web.Components.FluxorComponent

<div class="top-row ps-3 navbar navbar-dark">
    ............
            <NavLink class="nav-link" href="counter">
                 @($"Counter( {CounterState.Value.Count} )")
            </NavLink>
    ............
</div>

@code {
    ......
}
以下六步完成後,我們實現的效果如下所示:
2、如果狀態資料來源於非同步操作的結果,我們希望在非同步操作完成前,狀態資料更新為結果1;非同步操作完成後,狀態資料更新為結果2
這種情況,我們需要藉助Fluxor提供的另外一個特性Effect來實現。Effect就像是,信使到達Reducer之前的一箇中介軟體,在中介軟體中,我們執行非同步操作,非同步操作完成前,原信使先抵達相應的Reducer,非同步操作完成後,中介軟體會釋放一個新的信使到相應的Reducer。我們延續前面的案例,來學習Effect的使用:
//①首先,我們新增一個Reducer,這個Reducer是非同步任務完成後,要執行的狀態操作
//開啟檔案Store/Counter/CounterReducer.cs,新增以下方法
//這個操作相對於遞增1操作來設計
//假設非同步任務完成前,遞增1;非同步任務完成後,遞增10
[ReducerMethod]
public static CounterState ReduceIncr10CountAction(CounterState state, Incr10CountActionAsync action)
{
     return new CounterState(count: state.Count + 10);
}


//②然後,新增一個信使類Incr10CountActionAsync,不用傳遞引數,所以一個空類就可以
namespace StateManageFluxor.Store.Counter
{
    public class Incr10CountActionAsync
    {
    }
}


//③最後,新增一個Effect類CounterEffect.cs,進行非同步操作
//注入信使IncrCountAction,非同步任務完成後,釋放新的信使。Action/Effect/Reducer,如果配對?關鍵一是[EffectMethod]特殊,關鍵2是Action。
//在這個Effect類中,可以根據需要,注入其它服務
using Fluxor;
namespace StateManageFluxor.Store.Counter
{
    public class CounterEffect
    {
        [EffectMethod(typeof(IncrCountAction))]
        public async Task IncrCountAsync(IDispatcher Dispatcher)
        {
            await Task.Delay(1000);
            var action = new Incr10CountActionAsync();
            Dispatcher.Dispatch(action);
        }
    }
}


//第③步的另外一種寫法
//如果需要使用信使IncrCountAction攜帶的引數,則使用這種寫法
using Fluxor;
namespace StateManageFluxor.Store.Counter
{
    public class CounterEffect
    {
        [EffectMethod(typeof(IncrCountAction))]
        public async Task IncrCountAsync(IDispatcher Dispatcher, IncrCountAction action)
        {
            await Task.Delay(1000);
            var action = new Incr10CountActionAsync();
            Dispatcher.Dispatch(action);
        }
    }
}
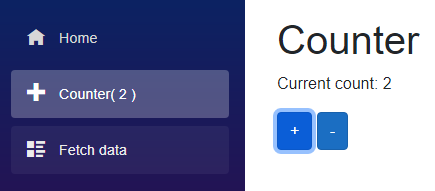
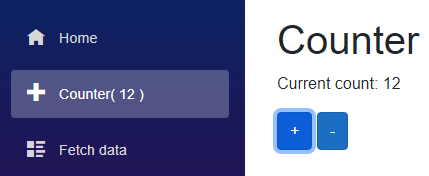
以上操作完成後,頁面效果如下:
點選後,count先遞增1,變成2
延遲1秒後,非同步任務完成,count再遞增10,變成12
3、最後,我們將整個Fluxor的框架邏輯,使用圖例進行總結:
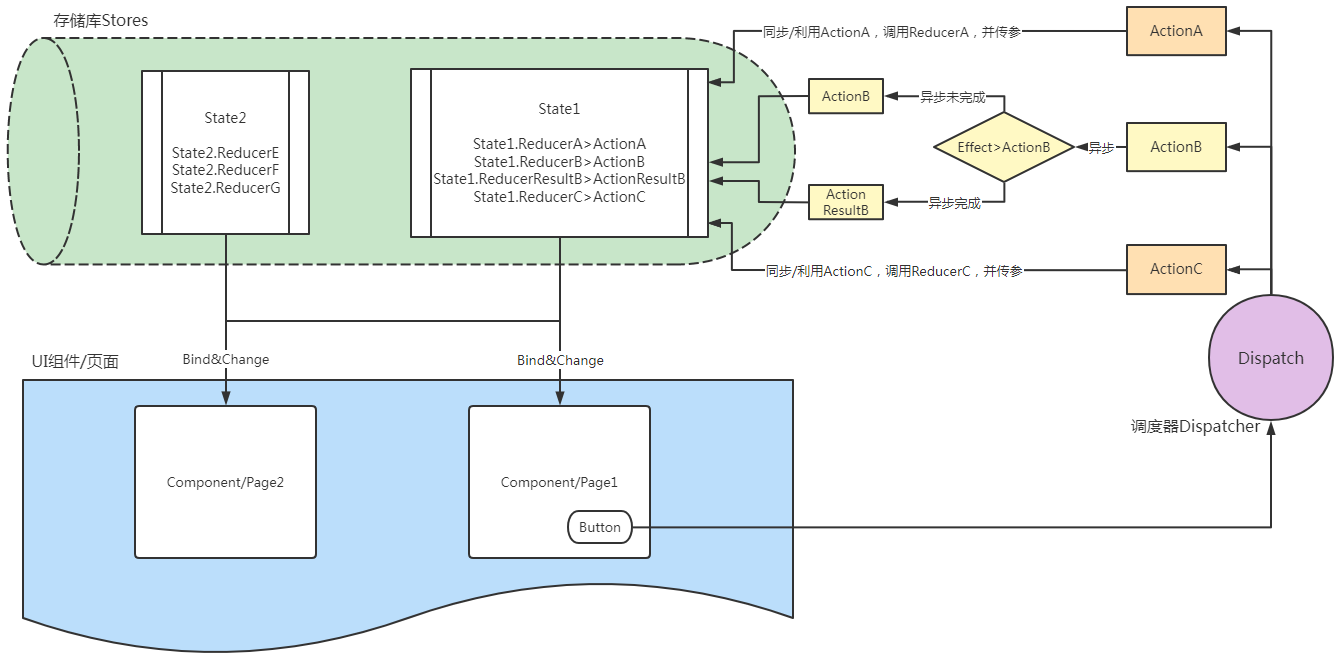
- 因為和Vue的Pinia放在一起學習,所以我們先把概念理清一下。(1)Pinia中的state,相當於Fluxor中的state;(2)Pinia中的Action,相當於Fluxor中的Reducer和Effect;(3)兩者裡面都有一個Action,但兩者天差地別,不要混淆了。Pinia中的Action就是方法,可同步、可非同步,Fluxor中的Action,取意action委託,和事件、訊息,是同一個方向上的概念,和一些框架的訊息機制很相似
- Fluxor的邏輯雖然比較複雜,但套路還是熟悉的事件訂閱機制。我們雅稱Action為信使,其實它就好比事件訂閱機制中的事件,狀態方法Reducer訂閱事件,並在事件響應程式中修改狀態,排程者Dispatcher觸發事件。事件,即可以是一個空物件(只起到通知作用),也可以攜帶引數。
- Effect像是事件傳送到訂閱者過程中的一箇中介軟體,這個中介軟體可以執行一個非同步請求,根據非同步請求結果,決定傳遞原事件,還是一個新的事件。
- 如果元件要實現響應式更新,「必須」繼承【@inherits Fluxor.Blazor.Web.Components.FluxorComponent】,必須打了引號,是因為排程器所在的元件,可以不用繼承,因為不需要通知,元件就已經觸發的StateHasChange。其實,繼承FluxorComponent類,底層也是觸發元件重新渲染。
4、Fluxor還提供了中介軟體和偵錯工作Redux Dev Tools,可詳見github上的倉庫檔案