1個小時!從零製作一個! AI圖片識別WEB應用!
0 前言
近些年來,所謂的人工智慧也就是AI。
在媒體的炒作下,變得神乎其神,但實際上,類似於圖片識別的AI,其原理只不過是數學的應用。
線性代數,概率論,微積分(著名的反向傳播演演算法)。
大家覺得這些東西離自己很遠,沒錯!
這東西底層實在是很難,斯坦福公開課網站上(Coursera), 有吳恩達教授的機器學習課程,需要利用Matlab用向量化的程式設計方式完成線性迴歸,邏輯迴歸,甚至是神經網路,以及反向傳播程式碼。這些內容無論在任何方面都是艱澀的難以理解的。
而這隻能算是人工智慧機器學習的入門課程。本人21年利用零碎時間將近3個月,拿到了這門課的證書,99分,到現今幾乎忘的差不多了。再純手寫神經網路已經寫不出來了。
但是時間在向前流動,一些所謂難以觸及的東西也在普及化。汽車,電腦,飛機,智慧電話...。
人工智慧也不例外!如今隨著技術的發展,以及抽象。我們有現成的框架,可以非常方便製作屬於自己的AI。
這篇博文,會從資料蒐集,模型訓練,web應用來做一個可用的圖片識別AI專案。(當然是縮減版本,有許多需要優化的地方。)
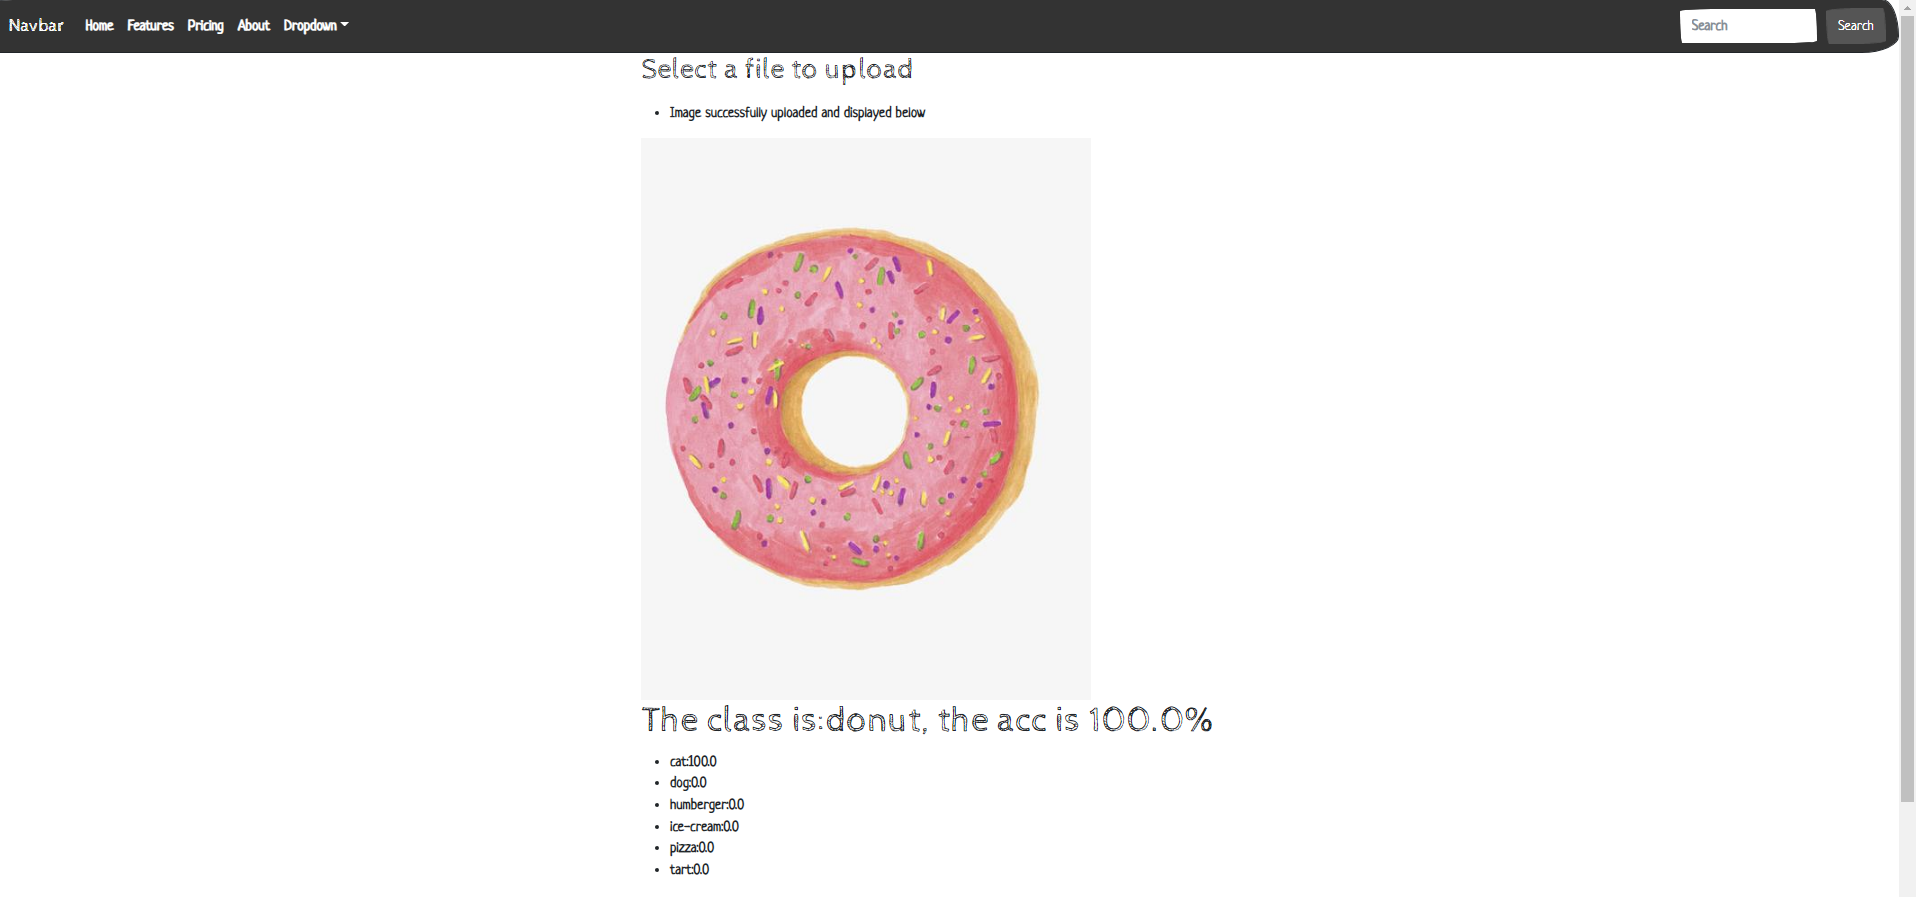
最終結果如下:
1 資料蒐集
1.1 為什麼需要資料?
資料對於AI程式來說非常重要,AI程式通過對資料的觀察,來獲取對於事物的「理解」。
舉個例子:給Ai看10張貓咪的照片後,當AI看到新的貓咪後,會識別出這是一個貓咪。
這看似與人類很像,但實際上有非常大的不同!
總的來說,資料越多,AI程式識別的效果也會更好。近幾十年中,神經網路的逆襲之路就是因為資料的爆發。
1.2 如何蒐集資料?
-
圖片資料的蒐集可以用手機來拍攝,之後讓AI學習。這是可行的,但是是低效的。
-
通過爬蟲來進行圖片的爬取。速度快,質量低。
這裡我們使用一個百度圖片搜尋的爬蟲,即將百度圖片搜尋到的圖片爬取到本地上來。
1.3 百度圖片爬取
前導條件:
Python3.7requets包>>pip install requests -i https://pypi.tuna.tsinghua.edu.cn/simple從清華那裡把這個python元件給下載回來。
import os
import sys
import re
import requests
class baidu_img_crawl():
def __init__(self):
# after ? we use the get method to transefer a request
self.target_url = "https://image.baidu.com/search/acjson?"
# we use this to pretend we're a normal human being
self.headers = {"User-Agent": "Mozilla/5.0 (Windows NT 10.0; Win64; x64) AppleWebKit/537.36 (KHTML, like Gecko) Chrome/102.0.0.0 Safari/537.36"}
# The name of the picture to be searched, using Baidu Image Search Engine
# self.keyword = input("Enter your food type:")
self.keyword = sys.argv[1]
# One respones page equal to 30 images
# self.page_nums = int(input("Enter the number of pages you need:"))
self.page_nums = int(sys.argv[2])
# self.file_name = input("Enter the file name where you want to store:")
self.file_name = sys.argv[3]
def generate_GET_params(self):
params = []
for page_num in range(1, self.page_nums+1):
# params from F12 network Fetch/XHR json payload:
# word = queryword := search keyword
# pn = 30*pageNum gsm = hex(pn)
params.append('tn=resultjson_com&logid=7230074900925652532&ipn=rj&ct=201326592&is=&fp=result&\
fr=&word={}&queryWord={}\
&cl=2&lm=-1&ie=utf-8&oe=utf-8&adpicid=&st=-1&z=undefined&ic=undefined&hd=undefined&latest=undefined©right=undefined&\
s=&se=&tab=&width=undefined&height=undefined&face=0&istype=2&qc=&nc=1&expermode=&nojc=&isAsync=&pn={}&rn=30&\
gsm={}&1657782304389='.format(self.keyword, self.keyword, 30*page_num, hex(30*page_num)[2:]))
return params
def get_request_url_list(self, params):
request_urls = []
for param in params:
request_urls.append(self.target_url + param)
return request_urls
def get_image_url_list(self, request_urls):
image_urls = []
for request_url in request_urls:
#{"data":[{1,"thumb":"https:xxx.com"},{2},...,{30},{NULL}]}
json_txt = requests.get(request_url, headers=self.headers).text
image_urls += re.findall(r'"thumbURL":"(.*?)",', json_txt)
return image_urls
def download_image(self, image_urls):
store_path = r'../' + self.file_name
if not os.path.exists(store_path):
os.makedirs(store_path)
index = 0
for image_url in image_urls:
with open(os.path.join(store_path, str(index) + ".jpg"),"wb") as f: # with寫檔案不用關
f.write(requests.get(image_url, headers=self.headers).content)
index += 1
if index % 30 == 0:
print("Page {} is downloaded!".format(index/30))
# Python 類中一個非常特殊的實體方法,即 __call__()
# 該方法的功能類似於在類中過載 () 運運算元,使得類範例物件可以像呼叫普通函數那樣,以「物件名()」的形式使用。
def __call__(self):
params = self.generate_GET_params()
request_urls = self.get_request_url_list(params)
image_urls = self.get_image_url_list(request_urls)
self.download_image(image_urls)
if __name__ == '__main__':
spider = baidu_img_crawl()
spider()
1.3.1 程式解釋
web的基本原理:你存取一個連結url,會向web伺服器傳送一個關於這個url的請求,web伺服器會根據這個url給你一個答覆,瀏覽器會根據這個答覆進行頁面的構建。你的一次存取就成功了。
爬蟲的基本原理:自動存取連結,獲取答覆,對於答覆進行資料分離,並下載到本地。
百度的圖片搜尋引擎會根據你搜尋的關鍵詞,自動的生成url連結,並且向百度web伺服器進行請求這個連結,而百度返回的答覆裡就有這些圖片的資源。
我們的爬蟲所要做的就是:
- 自動生成類似百度圖片引擎的url連結
params = self.generate_GET_params()request_urls = self.get_request_url_list(params)
- 存取這些連結,並分離圖片資源連結
image_urls = self.get_image_url_list(request_urls)
- 我們把這些圖片資源進本地下載
self.download_image(image_urls)
1.3.2 程式使用
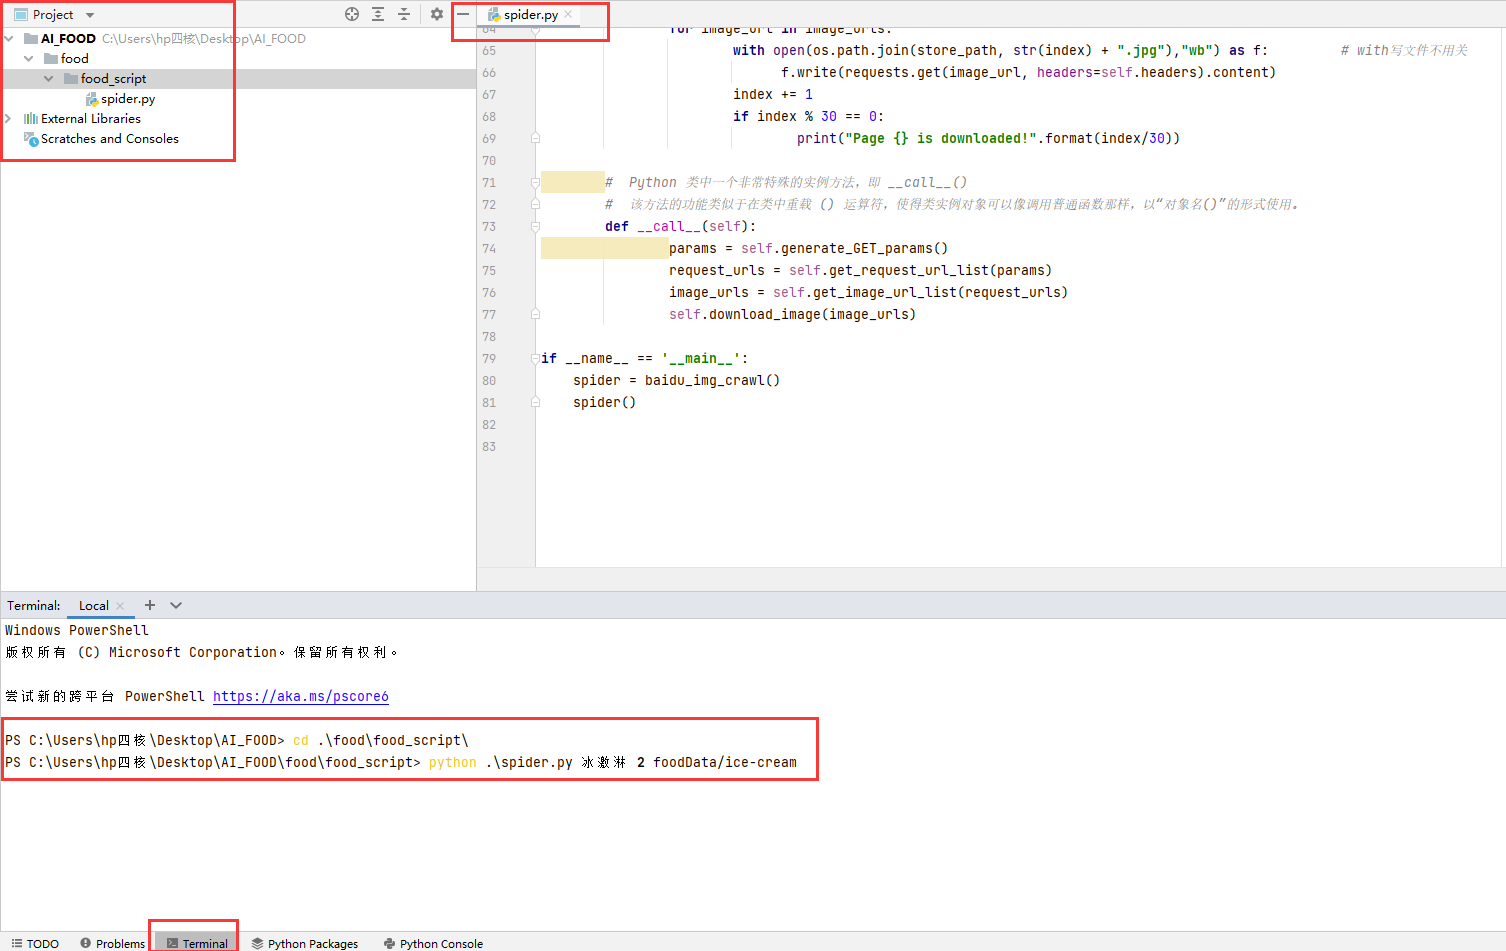
將本程式儲存為 spider.py。
命令列中切換到此程式所在路徑。
python .\spider.py 冰激淋 20 foodData/ice-cream
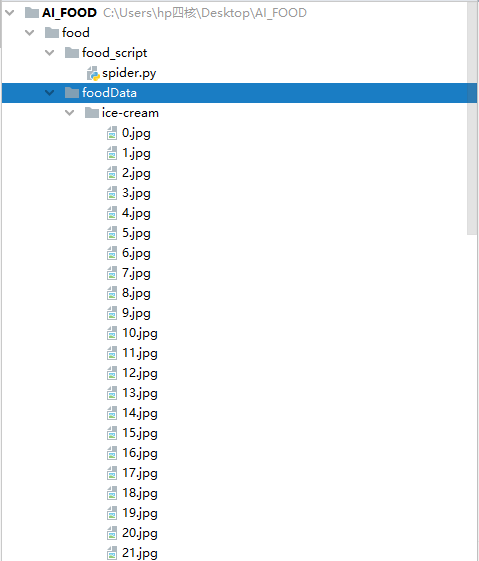
會在指令碼的上級目錄foodData下建立Ice-cream檔案,並下載 600=20*30 張冰激淋的圖片。
1.3.3 專案構建
-
首先建立專案資料夾: AI_FOOD
-
接著建立存放圖片資料的子資料夾: AI_FOOD/food
-
在接著建立存放爬蟲指令碼的資料夾: AI_FOOD/food/food_script
-
把爬蟲程式碼儲存為:AI_FOOD/food/food_script/spyder.py
-
命令列使用爬蟲爬取:
python .\spider.py 冰激淋 20 foodData/ice-cream
完成下載之後:
接著我們再下載5個類別!每個類別600張
python .\spider.py 漢堡包 20 foodData/hamburgerpython .\spider.py 蛋撻 20 foodData/tartpython .\spider.py 甜甜圈 20 foodData/donutpython .\spider.py 披薩 20 foodData/pizzapython .\spider.py 米飯 20 foodData/rice
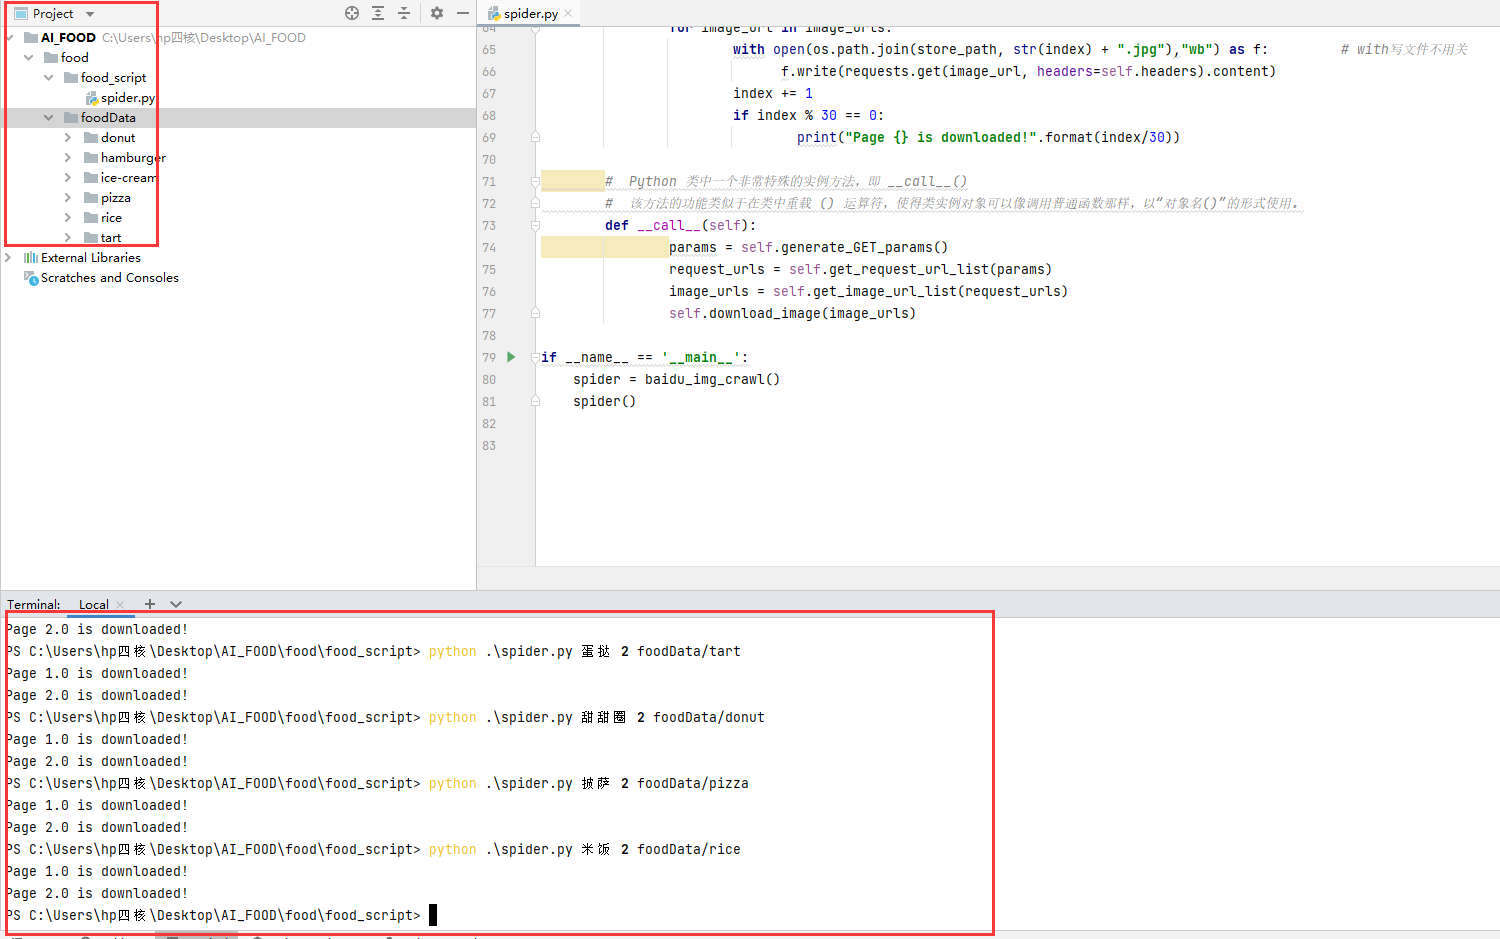
注:圖片中的演示只下載了60=2*30張,是為了好截圖。實際操作按照上述程式碼進行操作!
2. AI模型訓練
現在我們已經將資料蒐集過來了。
接下來就是進行模型的訓練。
在進行訓練時,我們通常將所有資料分為三個部分:
-
訓練集:拿這部分的資料進行模型的訓練,就是拿這裡的圖片給 AI程式學習。
-
交叉驗證集:拿這部分的資料進行模型訓練結果的驗證,這部分給出了當前模型的效果,如果效果不好,可以在之後更換模型或者演演算法!
-
測試集:交叉驗證集評估出了不錯的模型,我們將用此模型在測試集上觀察實際效果。
2.1 資料劃分
六個類別分別分到 訓練集資料夾,交叉驗證集資料夾,測試集資料夾,所以最後會出現 3*6 = 18個資料夾。
import os, shutil

def mkdirs(path):
    if not os.path.exists(path):
        os.makedirs(path)

def split_data(src_dir, dst_dir, train_prop, val_prop, test_prop):
    # 我們使用 kreas 一個資料夾代表一個種類 的 資料處理常式
    src_classes = os.listdir(src_dir)

    data_sets = ['train', 'val', 'test']

    for data_set in data_sets:
        for src_class in src_classes:
            mkdirs(os.path.join(dst_dir, data_set, src_class))

    for src_class in src_classes:
        class_images = os.listdir(os.path.join(src_dir, src_class))
        num = len(class_images)

        train_class_images = class_images[:int(num * train_prop)]
        val_class_images = class_images[int(num * train_prop): int(num * (train_prop + val_prop))]
        test_class_images = class_images[int(num * (train_prop + val_prop)):]

        print("Copying class:{} to train set!".format(src_class))
        for class_image in train_class_images:
            src = os.path.join(src_dir, src_class, class_image)
            dst = os.path.join(dst_dir, 'train' , src_class,  class_image)
            shutil.copyfile(src, dst)

        print("Copying class:{} to val set!".format(src_class))
        for class_image in val_class_images:
            src = os.path.join(src_dir, src_class, class_image)
            dst = os.path.join(dst_dir, 'val' , src_class,  class_image)
            shutil.copyfile(src, dst)

        print("Copying class:{} to test set!".format(src_class))
        for class_image in test_class_images:
            src = os.path.join(src_dir, src_class, class_image)
            dst = os.path.join(dst_dir, 'test' , src_class,  class_image)
            shutil.copyfile(src, dst)

        print("train_num:{}, val_num:{}, test_num:{}".format(len(train_class_images), len(val_class_images), len(test_class_images)))

    print('done!')


if __name__ == '__main__':
    src_dir = "foodData"
    dst_dir = "foodData_cnn_split"
    split_data(src_dir, dst_dir, 0.5, 0.25, 0.25)
此程式的執行需要指定:
-
src_dir: 為我們蒐集到的資料的一級資料夾,裡面存放這6個類別的圖片! -
dst_dir: 為我們對於src_dir裡圖片的劃分的資料夾(會根據你所寫的名字自動建立),裡面存放這6個類別的圖片! -
train_prop: 為訓練集的比例。300 -
val_prop: 為驗證集的比例。150 -
test_prop: 為測試集的比例。150
2.2 專案構建
-
首先將上述程式碼儲存為:
split.py -
接著將split.py放到:
AI_FOOD/food/split.py也就是與foodData資料夾同一級目錄。 -
直接執行該檔案即可!
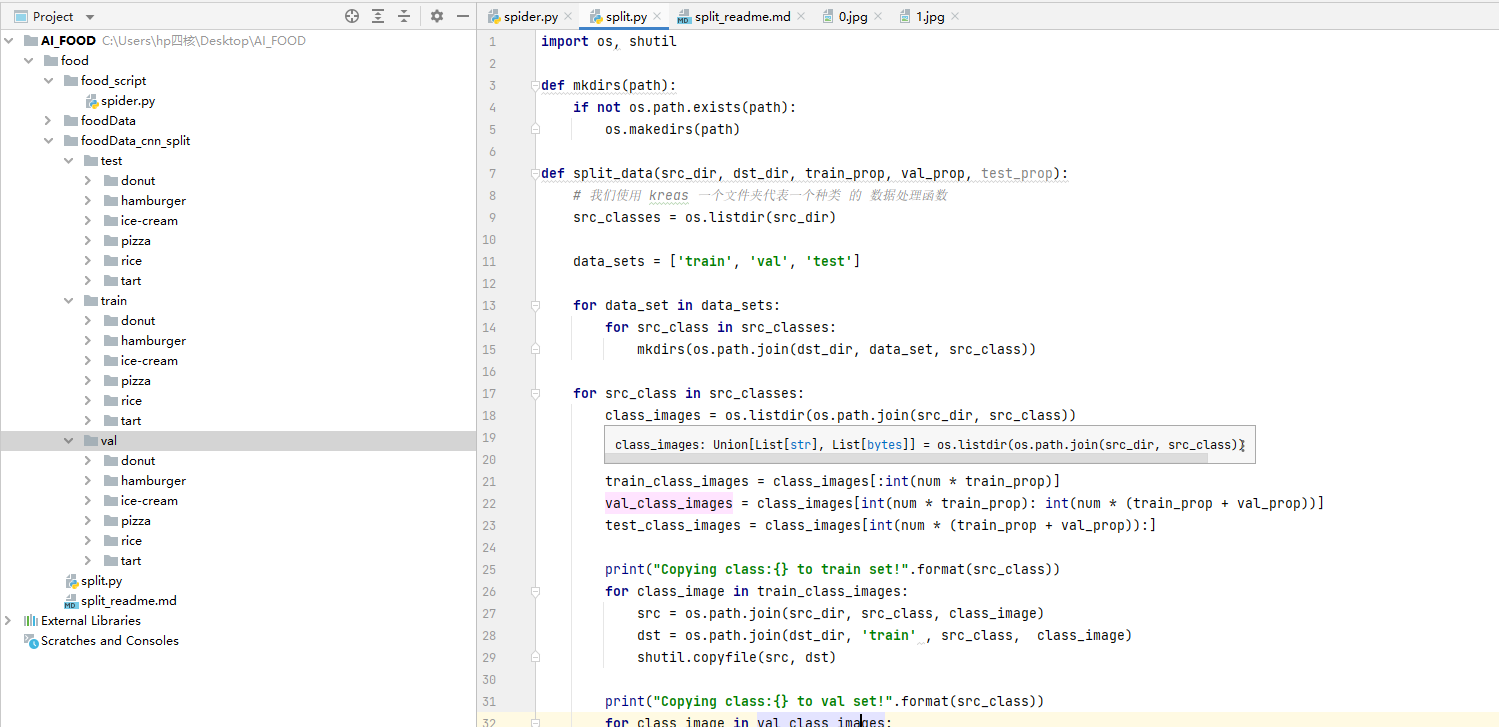
Copying class:donut to train set!
Copying class:donut to val set!
Copying class:donut to test set!
Copying class:hamburger to train set!
Copying class:hamburger to val set!
Copying class:hamburger to test set!
Copying class:ice-cream to train set!
Copying class:ice-cream to val set!
Copying class:ice-cream to test set!
Copying class:pizza to train set!
Copying class:pizza to val set!
Copying class:pizza to test set!
Copying class:rice to train set!
Copying class:rice to val set!
Copying class:rice to test set!
Copying class:tart to train set!
Copying class:tart to val set!
Copying class:tart to test set!
done!
2.3 模型訓練
Keras是一個由Python編寫的開源人工神經網路庫,可以作為Tensorflow、Microsoft-CNTK和Theano的高階應用程式介面,進行深度學習模型的設計、偵錯、評估、應用和視覺化。
將人工智慧程式變得簡單了許多!甚至是程式設計小白都可以熟練的使用。
構建一個AI只需要3個函數即可完成。
2.4 AI 是什麼
這裡對於圖片分類CNN折積神經網路AI進行一個解釋。
我們知道,計算機裡都是數位(二進位制),無論是文字還是視訊,還是圖片,在計算機看來都是數位。
有數位就有函數。
| 數位 \(x\) | 結果 \(y\) |
|---|---|
| 1 | 2 |
| 2 | 3 |
| 3 | 4 |
| 4 | 5 |
例如一個40*40的灰度手寫體數點陣圖片(0-9),既為1600個畫素點,每一個畫素點為一個數位,所以有1600個數位(特徵)。每1600個數位對應10個數位(標籤)。
我們把這1600個自變數輸入到AI中,AI會自動找到匹配10個因變數的特定函數。
就是這麼簡單。
我們所要做的就是將圖片還原為數位的形式。將自變數數位以及因變數數位輸入到設定好的AI演演算法中(尋找函數的演演算法)。
尋找函數的過程稱之為訓練,使用的演演算法為反向傳播,核心為微積分的鏈式求導法則。
普通演演算法為將1600個自變數送入AI進行訓練,但這個計算量會非常大!
而CNN折積神經網路的工作就是將1600個自變數變為更少數量的自變數(eg.512), 但是還可以保留原來自變數的特徵!
2.5 keras CNN—AI模型 構建及訓練
- 首先下載
tensorflow包>>pip install tensorflow -i https://pypi.tuna.tsinghua.edu.cn/simple從清華那裡把這個python元件給下載回來。
from keras import layers
from keras import models
from keras.preprocessing.image import ImageDataGenerator
import matplotlib.pyplot as plt
from tensorflow import optimizers
import tensorflow as tf
import os

# model build

model = models.Sequential()

model.add(layers.Conv2D(32, (3, 3), activation='relu',input_shape=(224, 224, 3)))
model.add(layers.MaxPooling2D((2, 2)))

model.add(layers.Conv2D(64, (3, 3), activation='relu'))
model.add(layers.MaxPooling2D((2, 2)))

model.add(layers.Conv2D(128, (3, 3), activation='relu'))
model.add(layers.MaxPooling2D((2, 2)))

model.add(layers.Conv2D(128, (3, 3), activation='relu'))
model.add(layers.MaxPooling2D((2, 2)))


model.add(layers.Flatten())
model.add(layers.Dropout(0.1))
model.add(layers.Dense(512, activation='relu'))
model.add(layers.Dense(6, activation='softmax'))

model.compile(optimizer='rmsprop', loss='categorical_crossentropy', metrics=['accuracy'])

model.summary()


# Data preprocessing and Using data augmentation
train_dir = './foodData_cnn_split/train'
validation_dir = './foodData_cnn_split/val'

train_datagen = ImageDataGenerator(
                    rescale=1./255,
                    rotation_range=40,
                    width_shift_range=0.2,
                    height_shift_range=0.2,
                    shear_range=0.2,
                    zoom_range=0.2,
                    horizontal_flip=True,
                    fill_mode='nearest')

test_datagen = ImageDataGenerator(rescale=1./255)

train_generator = train_datagen.flow_from_directory(
                    train_dir,
                    target_size=(224, 224),
                    batch_size=30,  # 每次找30張圖片變換
                    # save_to_dir = './train_gen', 這個會把資料增強的圖片儲存下來
                    class_mode='categorical')

validation_generator = test_datagen.flow_from_directory(
                    validation_dir,
                    target_size=(224, 224),
                    batch_size=30,
                    class_mode='categorical')

if not os.path.exists('./train_gen'):
    os.mkdir('./train_gen')

print(train_generator.class_indices)   # 輸出對應的標籤資料夾

# fit the model
history = model.fit(
                    train_generator,
                    steps_per_epoch=300*6//30,  # 總計1800張圖片,每次30張,所以需要60次可以遍歷一遍
                    epochs=3,
                    validation_data=validation_generator,
                    validation_steps=150*6//30)

# save the model
model.save('six_class_cnn.h5')

# show train data

acc = history.history['accuracy']
val_acc = history.history['val_accuracy']
loss = history.history['loss']
val_loss = history.history['val_loss']

epochs = range(1, len(acc) + 1)

plt.plot(epochs, acc, 'bo', label='Training acc')
plt.plot(epochs, val_acc, 'b', label='Validation acc')
plt.title('Training and validation accuracy')
plt.legend()

plt.figure()

plt.plot(epochs, loss, 'bo', label='Training loss')
plt.plot(epochs, val_loss, 'b', label='Validation loss')
plt.title('Training and validation loss')
plt.legend()

plt.show()
- model = models.Sequential(): 進行AI模型的構建(尋找函數的方式)
- model.compile(): 進行AI模型的編譯
- model.summary(): 輸出AI模型的詳細資訊
- model.fit(): 進行模型的訓練(函數尋找)
- model.save(): 將訓練過後的模型儲存(函數最終模式)
1800張訓練圖片,6個分類。遍歷3遍(epoch=3)進行訓練。最後輸出訓練過程的圖片。
遍歷次數越多,找到的模型預測結果越準確,但是如果資料或演演算法不好,預測的結果準確率會有上限。
- 這裡因為時間關係,就只遍歷了3遍,遍歷次數越多,時間越長!
- 如果需要更好的效果,可以將 設定 epoch=50
2.6 專案構建
-
首先將上述程式碼儲存為:
train_cnn.py -
接著將 train_cnn.py 放到:
AI_FOOD/food/train_cnn.py也就是與foodData資料夾同一級目錄。 -
直接執行該檔案即可!最後得到模型,之後直接拿這個模型預測即可!


3 Python Flask AI 上 web
Flask是一個Python的後端輕量框架,非常簡單以及輕簡。
3.1 Flask環境搭建以及檔案結構
-
首先下載
Flask包>>pip install Flask -i https://pypi.tuna.tsinghua.edu.cn/simple從清華那裡把這個python元件給下載回來。
-
檔案結構:
AI_FOOD/web
		|___static
			|__Image:存放上傳後的圖片
			|__CSS:存放bootstrap.min.css樣式檔案
		|__templates
			|__index.html:前端模板
		|__six_class_cnn.h5:訓練好的模型
		|__predict.py:預測指令碼
		|__index.py:後端程式碼
3.2 後端程式碼
# index.py
import os
import urllib.request
import time
from flask import Flask, flash, request, redirect, url_for, render_template
from werkzeug.utils import secure_filename
from predict import predict

app = Flask(__name__)

app.config["SECRET_KEY"] = 'TPmi4aLWRbyVq8zu9v82dWYW1'
ALLOWED_EXTENSIONS = set(['png', 'jpg', 'jpeg', 'gif'])


def allowed_file(filename):
    return '.' in filename and filename.rsplit('.', 1)[1].lower() in ALLOWED_EXTENSIONS


@app.route('/')
def upload_form():
    return render_template('index.html')


@app.route('/', methods=['POST'])
def upload_image():
    if 'file' not in request.files:
        flash('No file part')
        return redirect(request.url)
    file = request.files['file']
    if file.filename == '':
        flash('No image selected for uploading')
        return redirect(request.url)
    if file and allowed_file(file.filename):
        filename = str(int(time.time())) + secure_filename(file.filename)
        file.save(os.path.join("static/Image", filename))
        # print('upload_image filename: ' + filename)
        class_names = ['cat', 'dog', 'humberger', 'ice-cream', 'pizza', 'tart']
        type_class, outputs = predict(os.path.join("static/Image", filename))
        flash('Image successfully uploaded and displayed below')
        return render_template('index.html', filename=filename, type_class=type_class, outputs=outputs, class_names=class_names)
    else:
        flash('Allowed image types are -> png, jpg, jpeg, gif')
        return redirect(request.url)


@app.route('/display/<filename>')
def display_image(filename):
    print('display_image filename: ' + filename)
    return redirect(url_for('static', filename='Image/'+filename), code=301)


if __name__ == '__main__':
    # 執行本專案,host=0.0.0.0可以讓其他電腦也能存取到該網站,port指定存取的埠。預設的host是127.0.0.1,port為5000
    app.run(host='0.0.0.0',port=9000)
3.3 前端程式碼
index.html
<!DOCTYPE html>
<html lang="en">
<head>
    <meta charset="UTF-8">
    <meta http-equiv="X-UA-Compatible" content="IE=edge">
    <meta name="viewport" content="width=device-width, initial-scale=1.0">
    <link rel="stylesheet" type="text/css" href="{{url_for('static', filename='CSS/'+'bootstrap.min.css')}}">
    <title>Document</title>
</head>
<body>

    <nav class="navbar navbar-expand-lg navbar-dark bg-primary">
        <div class="container-fluid">
          <a class="navbar-brand" href="#">Navbar</a>
          <button class="navbar-toggler" type="button" data-bs-toggle="collapse" data-bs-target="#navbarColor01" aria-controls="navbarColor01" aria-expanded="false" aria-label="Toggle navigation">
            <span class="navbar-toggler-icon"></span>
          </button>
          <div class="collapse navbar-collapse" id="navbarColor01">
            <ul class="navbar-nav me-auto">
              <li class="nav-item">
                <a class="nav-link active" href="#">Home
                  <span class="visually-hidden">(current)</span>
                </a>
              </li>
              <li class="nav-item">
                <a class="nav-link" href="#">Features</a>
              </li>
              <li class="nav-item">
                <a class="nav-link" href="#">Pricing</a>
              </li>
              <li class="nav-item">
                <a class="nav-link" href="#">About</a>
              </li>
              <li class="nav-item dropdown">
                <a class="nav-link dropdown-toggle" data-bs-toggle="dropdown" href="#" role="button" aria-haspopup="true" aria-expanded="false">Dropdown</a>
                <div class="dropdown-menu">
                  <a class="dropdown-item" href="#">Action</a>
                  <a class="dropdown-item" href="#">Another action</a>
                  <a class="dropdown-item" href="#">Something else here</a>
                  <div class="dropdown-divider"></div>
                  <a class="dropdown-item" href="#">Separated link</a>
                </div>
              </li>
            </ul>
            <form class="d-flex">
              <input class="form-control me-sm-2" type="text" placeholder="Search">
              <button class="btn btn-secondary my-2 my-sm-0" type="submit">Search</button>
            </form>
          </div>
        </div>
      </nav>

      <div class="container-fluid">
        <div class="row">
            <div class="col-md-4">
                <!-- space -->
            </div>
            <div class="col-md-4">
                <!-- space -->
                <h2>Select a file to upload</h2>
                <p>
                    {% with messages = get_flashed_messages() %}
                    {% if messages %}
                        <ul>
                        {% for message in messages %}
                        <li>{{ message }}</li>
                        {% endfor %}
                        </ul>
                    {% endif %}
                    {% endwith %}
                </p>
                {% if filename %}
                    <div>
                        <img src="{{ url_for('display_image', filename=filename) }}">
                    </div>
                    <div>
                        <h1>{{type_class}}</h1>
                    </div>

                    <ul>

                    {% for i in range(6) %}
                         <li>{{ class_names[i]}}:{{outputs[0][i]*100}}</li>
                    {% endfor %}
                    </ul>
                {% endif %}
                <!-- space -->
                <form method="post" action="/" enctype="multipart/form-data">
                    <fieldset>
                      <div class="form-group">
                        <label for="formFile" class="form-label mt-4">Choose an Image!</label>
                        <input class="form-control" type="file" id="formFile" name="file" autocomplete="off" required>

                          <p></p>
                        <div class="progress">
                            <div class="progress-bar progress-bar-striped progress-bar-animated" role="progressbar" aria-valuenow="75" aria-valuemin="0" aria-valuemax="100" style="width: 75%;"></div>
                        </div>
                          <p></p>
                          <input type="submit" class="btn btn-primary">
                      </div>
                    </fieldset>
                </form>

                <p></p>


            </div>
            <div class="col-md-4">
                <!-- space -->
            </div>
        </div>
    </div>

</body>
</html>
3.4 css樣式程式碼
https://bootswatch.com/5/sketchy/bootstrap.min.css
儲存並放置在相應資料夾。
3.5 預測程式碼
predict.py
import tensorflow as tf
from PIL import Image
import numpy as np

def predict(filename):
    model = tf.keras.models.load_model("six_class_cnn.h5")  #  {'donut': 0, 'hamburger': 1, 'ice-cream': 2, 'pizza': 3, 'rice': 4, 'tart': 5}

    class_names = ['donut', 'hamburger', 'ice-cream' ,'pizza', 'rice','tart']
    img = Image.open(filename)  # 讀取圖片
    img = img.resize((224,224),Image.ANTIALIAS)
    img = np.asarray(img)  # 將圖片轉化為numpy的陣列
    outputs = model.predict(img.reshape(1, 224, 224, 3))  # 將圖片輸入模型得到結果
    result_index = int(np.argmax(outputs))
    result = class_names[result_index]  # 獲得對應的水果名稱
    acc =  outputs[0][result_index]*100
    print("The class is:{}, the acc is {}%".format(result, acc))
    return "The class is:{}, the acc is {}%".format(result, acc), outputs

if __name__ == '__main__':
    predict("static/Image/16589928990.jpg")
4. 最終結果
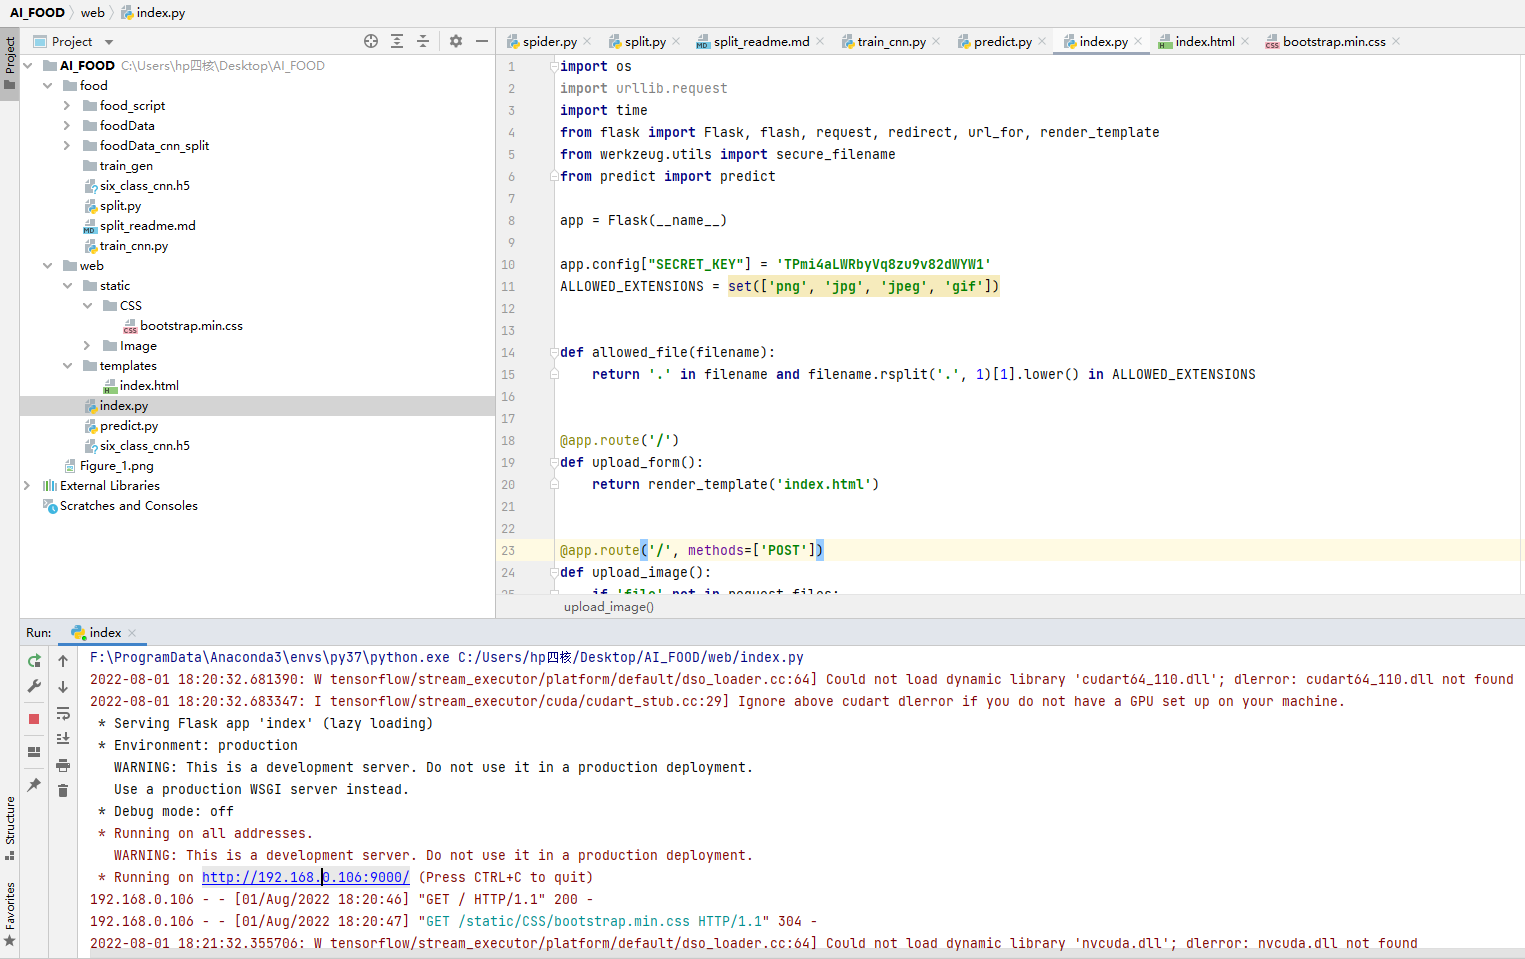
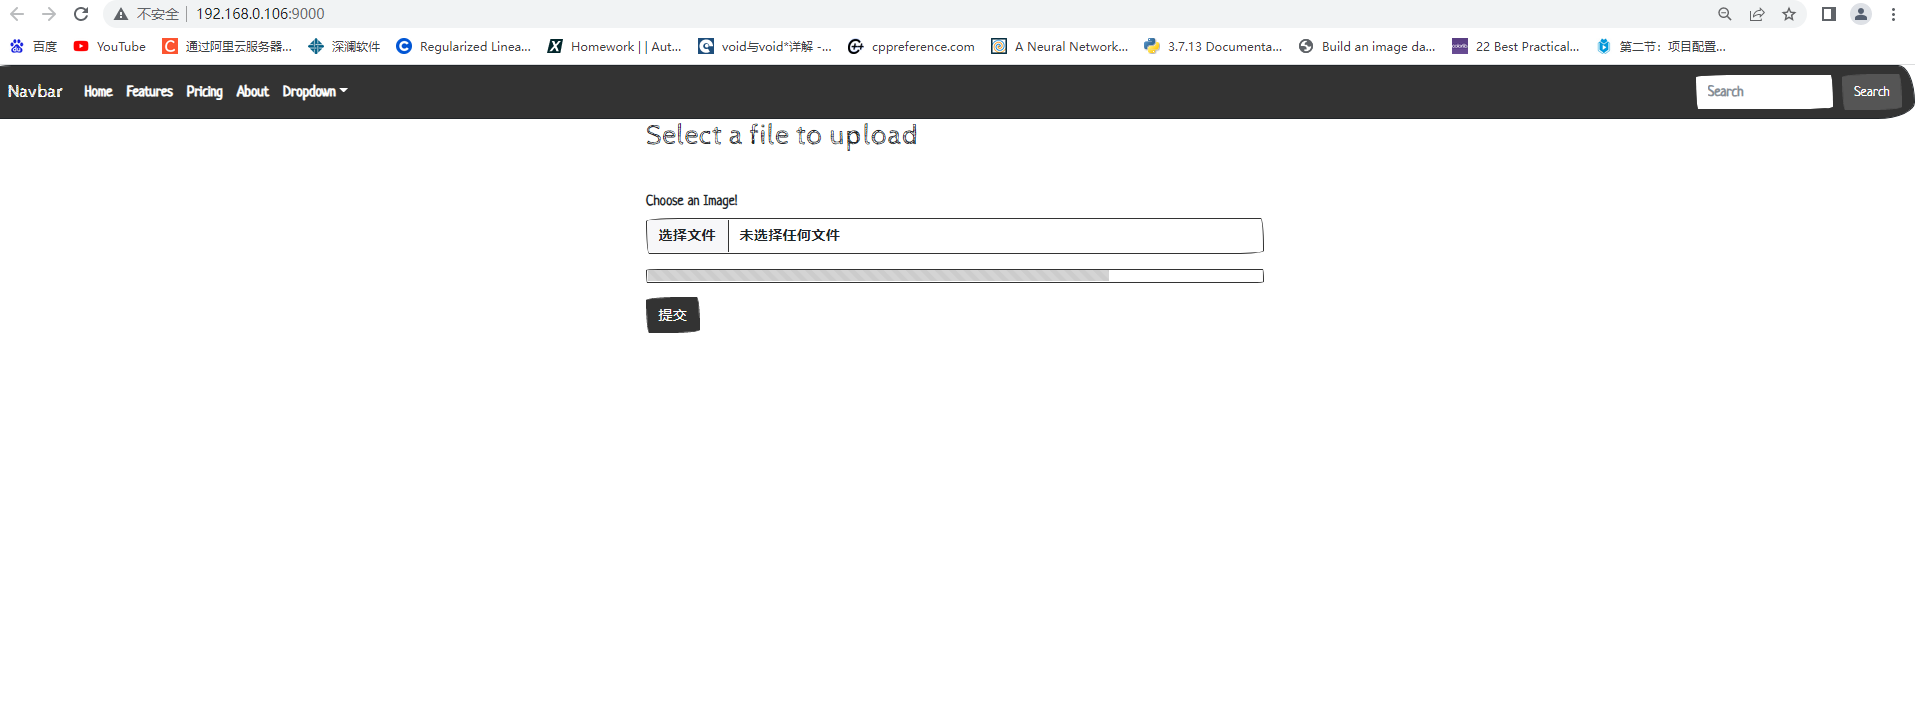
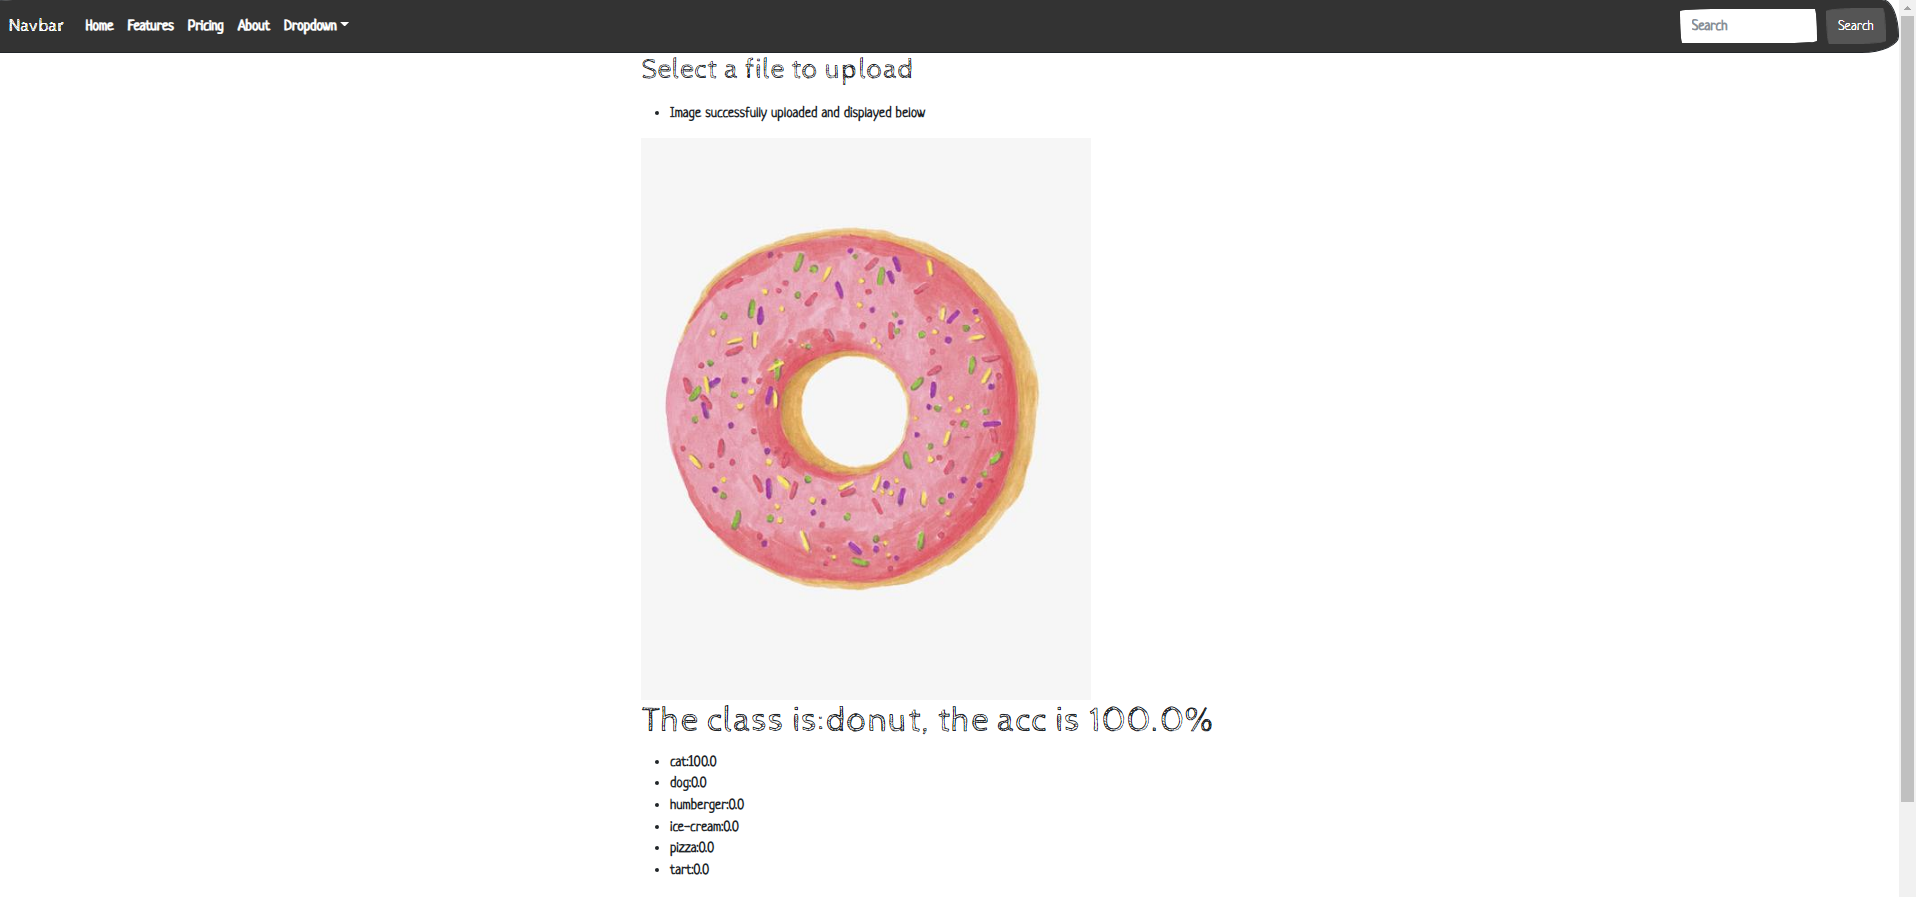
無論如何,我們已經看到了,在當下搭建一個AI應用是多麼簡單,從零開始。經過資料蒐集,模型訓練,模型上web。1個小時足以釋出到網際網路。
我對深度學習特別樂觀,因為即使未來十年沒有進一步的技術進展,將現有演演算法部署到所有適用的問題上,就能夠帶來大多數行業的變革。深度學習就是一場革命,目前正以驚人的速度快速發展,這得益於在資源和人力上的指數式投資。從我的立場來看,未來很光明,儘管短期期望有些過於樂觀。將深度學習部署到可能應用的所有領域需要超過十年的時間。__Keras 創始人
雖然現在製作非常簡單。利用折積神經網路,可以組建各個領域的圖片識別應用,日常,醫學影像。並以此創造出巨大的價值!
參考各大AI初創公司!幾年時間,利用折積神經網路演演算法,融資額度可以上達數十億元人民幣。
5. Refference
- 《Python 深度學習》
本文由Dba_sys創作,首發於部落格園。2022.8.01
文章會隨時改動,要到部落格園裡看偶。一些網站會爬取本文章,但是可能會有出入。
轉載請註明出處哦( ̄︶ ̄)↗
https://www.cnblogs.com/asmurmur/