SpringMVC基礎知識
一、SpringMVC瞭解
-
springmvc的底層是Servlet,以Servlet為核心,接收請求,處理請求,顯示處理結果給使用者。
-
DispatcherServlet 是框架一個Servlet物件,負責接收請求,響應處理結果。
-
DispatcherServlet 他的父類別是HttpServlet
-
M:Model,模型層,指工程中的JavaBean,作用是處理資料
-
V:View,檢視層,指工程中的html或jsp等頁面,作用是與使用者進行互動,展示資料
-
C:Controller,控制層,指工程中的servlet,作用是接收請求和響應瀏覽器
-
MVC的處理模式是:使用者通過檢視層(View)將資料傳送給伺服器的控制層(Controller),控制層通過呼叫業務層在呼叫資料層去獲取資料, 然後再將請求處理的結果返回給View檢視層,最後檢視層渲染資料響應給瀏覽器。
二、SpringMVC入門
2.1 springmvc設定
- 在springmvc.xml中設定
<!-- 新增註解掃描器 -->
    <context:component-scan base-package="com.meteor.controller"/>

    <!-- 新增檢視解析器 -->
    <bean class="org.springframework.web.servlet.view.InternalResourceViewResolver">
        <!-- 設定字首 -->
        <property name="prefix" value="/admin/"/>
        <!-- 設定字尾 -->
        <property name="suffix" value=".jsp"/>
    </bean>
- 在web.xml中設定
<!-- 註冊SpringMVC框架 -->
    <servlet>
        <servlet-name>springmvc</servlet-name>
        <servlet-class>org.springframework.web.servlet.DispatcherServlet</servlet-class>
        <init-param>
            <param-name>contextConfigLocation</param-name>
            <!-- 填寫springmvx.xml組態檔的名稱,讓它去讀取 -->
            <param-value>classpath:springmvc.xml</param-value>
        </init-param>
    </servlet>
    <servlet-mapping>
        <servlet-name>springmvc</servlet-name>
        <url-pattern>/</url-pattern>
    </servlet-mapping>

<!--註冊Spring框架,目的就是啟動spring容器-->
    <listener>
        <listener-class>org.springframework.web.context.ContextLoaderListener</listener-class>
    </listener>
    <context-param>
        <param-name>contextConfigLocation</param-name>
        <param-value>classpath:applicationContext_*.xml</param-value>
    </context-param>
2.2 解決post請求中文亂碼問題
<!--新增中文編碼過濾器
        private String encoding;
        private boolean forceRequestEncoding;
        private boolean forceResponseEncoding;
    -->
    <filter>
        <filter-name>encode</filter-name>
        <filter-class>org.springframework.web.filter.CharacterEncodingFilter</filter-class>
        <init-param>
            <param-name>encoding</param-name>
            <param-value>UTF-8</param-value>
        </init-param>
        <init-param>
            <param-name>forceRequestEncoding</param-name>
            <param-value>true</param-value>
        </init-param>
        <init-param>
            <param-name>forceResponseEncoding</param-name>
            <param-value>true</param-value>
        </init-param>
    </filter>
    <filter-mapping>
        <filter-name>encode</filter-name>
        <url-pattern>/*</url-pattern>
    </filter-mapping>
2.3 @RequestMapping註解
-
可以放在類的上面,相當於多加了一層路徑
-
可以放在方法上面,表示請求的路徑
-
value可以預設不寫,method預設是GET請求
-
引數最好使用包裝型別,例如Integer,能接收空值情況,接收的是null
@RequestMapping(value = "/some.do", method= RequestMethod.GET)
    public ModelAndView doSome() {
接收請求引數:
- 使用restful方式,在超連結或者位址列上提交資料時,需要使用@PathVariable這個註解來拿值
@RequestMapping("/hello/{name}/{age}")
    public String one(@PathVariable String name,@PathVariable Integer age) {
        return "main";
    }
- 如果我們前端的名稱和後端的名稱不一致,則需要使用RequestParam註解來設定相對應的值
@RequestMapping("/hello")
    public String one(@RequestParam("name") String uname,@RequestParam("age") Integer uage) {
        return "main";
    }
- 還可以使用老樣子,用request.getParameter()方法來獲取值
@RequestMapping("/hello")
    public String one(HttpServletRequest request) {
        String name = request.getParameter("name");
        int age = Integer.parseInt(request.getParameter("age"));
        return "main";
    }
- 當提交引數過多的時候,我們可以使用實體類來接收引數,但是在提交請求中,保證請求引數名稱與實體類中成員變數名稱一致,可以自動提交資料
@RequestMapping(value = "/test/receive-property.do")
    public ModelAndView doPropertyParam(User user) {
2.4 方法的返回值
-
String:使用者端資源的地址,自動拼裝字首和字尾,還可以遮蔽自動拼接字串,可以指定返回路徑
-
Object:返回json格式的物件,自動將物件或者集合轉為json,使用jackson工具進行轉換,必須新增jackson依賴,一般用於ajax
-
void:無返回值,一般用於ajax請求
-
基本資料型別,用於ajax請求
-
ModelAndView:返回資料和檢視物件,用的較少
-
當我們採用ajax方式請求的時候,需要設定註解驅動
<mvc:annotation-driven/>,並且在類上加入@ResponseBody,也可以使用@RestController,它是@Controller+@ResponseBody
2.5 HttpMessageConverter 訊息轉換器
HttpMessageConverter介面:
- 可以將json資料轉成java物件,同時也可以將java物件轉成json字串返回給前端
//把物件轉為json
ObjectMapper om = new ObjectMapper();
String json = om.writeValueAsString(student);
System.out.println("json=" + json);
- 需要在springmvc的組態檔中,加入註解驅動的標籤,
mvc:annotation-driven加入這個標籤後,springmvc專案啟動後,會建立HttpMessageConveter介面的7個實現類物件。包括StringHttpMessageConveter和Mappingjackson2HttpMessageConverter
三、請求轉發和重定向
3.1 請求轉發
-
請求轉發的url位址列是不變的
-
轉發使用
forward這個時候會清空我們的檢視解析器設定,需要我們自己寫明白具體的路徑
  @RequestMapping("/other")
    public String other() {
        System.out.println("存取了other");
        return "main";
    }


    @RequestMapping("/two")
    public String two() {
        System.out.println("請求轉發action跳轉");
        // forward:這組字串可以遮蔽字首和字尾的拼接
        return "forward:/other.do";
    }
3.2 重定向
-
重定向的url是改變的,並且變得是最終請求的地址url
-
重定向無法攜帶資料,並且需要使用
redirect,也要寫明路徑名稱
@RequestMapping("/three")
    public String three() {
        System.out.println("這是重定向頁面");
        return "redirect:/admin/main.jsp";
    }

    @RequestMapping("/four")
    public String four() {
        System.out.println("這是重定向action");
        return "redirect:/other.do";
    }
3.3 SpringMVC預設的引數型別
-
HttpServletRequest
-
HttpServletResponse
-
HttpSession
-
Model
-
Map
-
ModelMap
-
Model、Map、ModelMap和HttpServletRequest 一樣,使用請求作用域進行資料傳遞,所以伺服器跳轉必須是請求轉發。
- 這些引數我們都可以直接用,因為springmvc已經為我們準備好了。
四、SpringMVC資源處理問題
4.1 靜態資源的處理方法
由於我們的中央排程器設定的是 "/":
使用 "/" 導致中央排程器是預設的 default servlet
需要處理靜態資源和其他的為對映請求。 預設中央排程器沒有處理靜態資源的控制器物件,所以靜態資源都是404.
some.do這個請求有MyController物件,所以能存取。
如果專案中,中央排程器設定了"/",動態資源能存取,靜態資源不能存取,需要處理靜態資源的存取工作。
註解式方法:
<!--宣告註解驅動
	default-servlet-handler和@RequestMapping使用有衝突
-->
<mvc:annotation-driven />

<!--宣告靜態資源的第一種處理方式
	建立DefaultServletHttpRequestHandler處理靜態資源。
	DefaultServletHttpRequestHandler把接收的靜態資源的地址,轉發給tomcat的default
	優點:解決方式簡單
	缺點:依賴tomcat伺服器提供的能力
-->
<mvc:default-servlet-handler />
匯入靜態資源法:
-
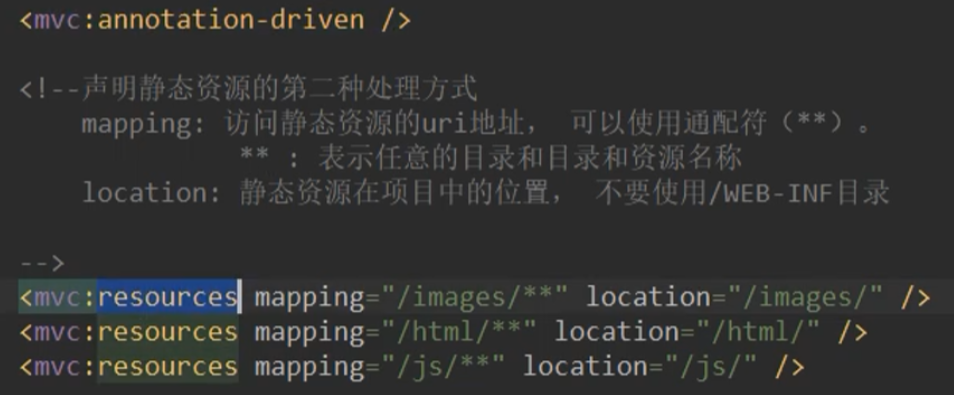
在springmvc組態檔中加入一個 mvc:resources標籤,框架會建立ResourceHttpRequestHandler控制器物件,使用這個物件處理靜態資源的存取,不依賴tomcat伺服器。推薦使用!
-
一句話設定靜態資源
<mvc:resources mapping="/static/**" location="/static/" />

五、SpringMVC核心技術
5.1 攔截器
WEB-INF目錄下的資源無法通過瀏覽器的url直接存取。都是通過controller的請求轉發進行存取
但是這樣也並不安全,因為我可以把它的請求路徑記住,所以我們就需要用到了攔截器
攔截器的定義:
-
建立類實現攔截器介面 HandlerInterceptor,實現介面中的方法3個
-
preHandle():在請求被處理之前進行操作
-
postHandle():在請求被處理之後,但結果還沒有渲染前進行操作,可以改變響應結果
-
afterCompletion:所有的請求響應結束後執行善後工作,清理物件、關閉資源、最終處理
-
-
在springmvc的組態檔中,宣告攔截器物件,並置頂攔截的url地址
<!-- 註冊攔截器 -->
    <mvc:interceptors>
        <mvc:interceptor>
            <mvc:mapping path="/**"/>
            <!-- 設定放行的請求 -->
            <mvc:exclude-mapping path="/shouLogin"/>
            <mvc:exclude-mapping path="/login"/>
            <!-- 設定具體的攔截器實現功能類 -->
            <bean class="com.meteor.interceptor.LoginInterceptor"/>
        </mvc:interceptor>
    </mvc:interceptors>
//攔截器
public class MyInterceptor implements HandlerInterceptor {
    @Override
    public boolean preHandle(HttpServletRequest request, HttpServletResponse response, Object handler) throws Exception {
        System.out.println("preHandle先處理");
        return true;
    }
}
-
多個攔截器的時候也採用的是責任鏈設計模式,和我們JavaWeb部分的Filter過濾器一樣,可以跳轉到我的Tomcat深入淺出文章去了解一下
-
先執行過濾器、在執行中央排程器、最後才是攔截器。
-
一般攔截器都是用作登入攔截
5.2 例外處理機制
框架使用的是集中的例外處理。把各個Controller中丟擲的異常集中到一個地方處理。處理異常的叫做例外處理器。
-
@ControllerAdvice:放在類的上面,表示這個類中有異常的處理方法。相當於aop中的@Aspect
-
@ExceptionHandler:放在方法的上面,表示此方法可以處理某個型別的異常。當異常發生時,執行這個方法。
@ControllerAdvice
public class GlobalExceptionHandler {
    //定義處理異常的方法,當異常發生後,執行這個方法
    /**
     *處理NameException型別的異常
     * 引數:
     *  @ExceptionHandler: 表示Controller丟擲的異常物件
     *        屬性: value 異常的型別
     */
    @ExceptionHandler(value = NameException.class)
    public ModelAndView doNameException(Exception e) {
        //給使用者友好的提示
        ModelAndView mv = new ModelAndView();
        mv.addObject("tips","姓名只能是zs");
        mv.setViewName("nameError");
        return mv;
    }
}
- 我們可以通過這種方式去設定一個全域性例外處理,也可以給某個單個異常進行處理。
六、SSM整合
6.1 整合思路
-
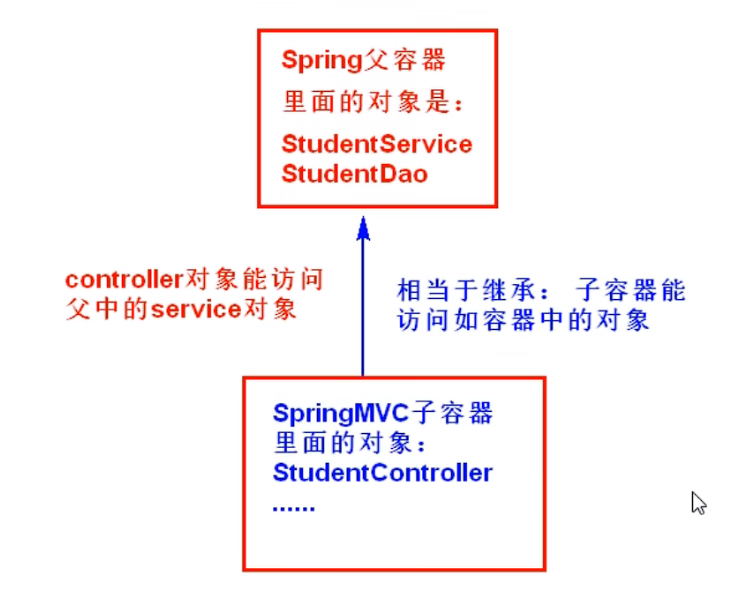
我們需要把java物件放到容器裡,我們現在有兩個容器
-
Spring容器:管理service和dao等物件的,是業務層物件的容器。
-
SpringMVC容器:管理控制器controller物件的,是檢視層物件。
6.2 容器建立
Spring容器建立: 在web.xml中宣告了ContextLoaderListener,這個功能是框架寫好的,建立spring容器物件WebApplicationContext。在建立WebApplicationContext的時,就讀取了spring的組態檔,當遇到bean標籤的時候就將service、dao等物件建立好放到容器中。
SpringMVC容器建立: SpringMVC是Spring的子容器,它是用於將pojo實體類的物件建立出來的,操作的是Controller層

6.3 三層架構組態檔
application_mapper.xml
<?xml version="1.0" encoding="UTF-8"?>
<beans xmlns="http://www.springframework.org/schema/beans"
       xmlns:xsi="http://www.w3.org/2001/XMLSchema-instance"
       xmlns:context="http://www.springframework.org/schema/context"
       xsi:schemaLocation="http://www.springframework.org/schema/beans http://www.springframework.org/schema/beans/spring-beans.xsd http://www.springframework.org/schema/context https://www.springframework.org/schema/context/spring-context.xsd">

    <!-- 讀取屬性檔案-->
    <context:property-placeholder location="classpath:jdbc.properties"/>
    <!-- 設定資料來源-->
    <bean id="dataSource" class="com.alibaba.druid.pool.DruidDataSource">
        <property name="driverClassName" value="${jdbc.driverClassName}"/>
        <property name="url" value="${jdbc.url}"/>
        <property name="username" value="${jdbc.username}"/>
        <property name="password" value="${jdbc.password}"/>
    </bean>


    <!-- 設定SqlSessionFactoryBean-->
    <bean class="org.mybatis.spring.SqlSessionFactoryBean">

        <!--設定資料來源-->
        <property name="dataSource" ref="dataSource"/>

        <!--        設定SqlMapConfig.xml核心組態檔-->
        <property name="configLocation" value="classpath:SqlMapConfig.xml"/>

        <!--註冊實體類-->
        <property name="typeAliasesPackage" value="com.meteor.pojo"/>
    </bean>


    <!-- 註冊mapper.xml檔案-->
    <bean class="org.mybatis.spring.mapper.MapperScannerConfigurer">
        <property name="basePackage" value="com.meteor.mapper"/>
    </bean>
</beans>
application_service.xml
<?xml version="1.0" encoding="UTF-8"?>
<beans xmlns="http://www.springframework.org/schema/beans"
       xmlns:xsi="http://www.w3.org/2001/XMLSchema-instance"
       xmlns:context="http://www.springframework.org/schema/context" xmlns:tx="http://www.springframework.org/schema/tx"
       xmlns:aop="http://www.springframework.org/schema/aop"
       xsi:schemaLocation="http://www.springframework.org/schema/beans http://www.springframework.org/schema/beans/spring-beans.xsd http://www.springframework.org/schema/context https://www.springframework.org/schema/context/spring-context.xsd http://www.springframework.org/schema/tx http://www.springframework.org/schema/tx/spring-tx.xsd http://www.springframework.org/schema/aop https://www.springframework.org/schema/aop/spring-aop.xsd">

    <!--新增包掃描-->
    <context:component-scan base-package="com.meteor.service.impl"></context:component-scan>
    <!--新增事務管理器-->
    <bean id="transactionManager" class="org.springframework.jdbc.datasource.DataSourceTransactionManager">
        <!--切記切記:設定資料來源-->
        <property name="dataSource" ref="dataSource"></property>
    </bean>
    <!--設定事務切面-->
    <tx:advice id="myadvice" transaction-manager="transactionManager">
        <tx:attributes>
            <tx:method name="*select*" read-only="true"/>
            <tx:method name="*find*" read-only="true"/>
            <tx:method name="*serach*" read-only="true"/>
            <tx:method name="*get*" read-only="true"/>
            <tx:method name="*insert*" propagation="REQUIRED"/>
            <tx:method name="*add*" propagation="REQUIRED"/>
            <tx:method name="*save*" propagation="REQUIRED"/>
            <tx:method name="*set*" propagation="REQUIRED"/>
            <tx:method name="*update*" propagation="REQUIRED"/>
            <tx:method name="*change*" propagation="REQUIRED"/>
            <tx:method name="*modify*" propagation="REQUIRED"/>
            <tx:method name="*delete*" propagation="REQUIRED"/>
            <tx:method name="*drop*" propagation="REQUIRED"/>
            <tx:method name="*remove*" propagation="REQUIRED"/>
            <tx:method name="*clear*" propagation="REQUIRED"/>
            <tx:method name="*" propagation="SUPPORTS"/>
        </tx:attributes>
    </tx:advice>
    <!--設定切入點+繫結-->
    <aop:config>
        <aop:pointcut id="mycut" expression="execution(* com.meteor.service.impl.*.*(..))"></aop:pointcut>
        <aop:advisor advice-ref="myadvice" pointcut-ref="mycut"></aop:advisor>
    </aop:config>
</beans>
springmvc.xml
    //新增包掃描
    <context:component-scan base-package="com.meteor.controller"/>
    //便於使用ajax
    <mvc:annotation-driven/>
- 分頁的基本公式:基礎分頁公式:limit (當前頁面-1)*每頁條數,每頁條數
七、結尾
- 這些只是SpringMVC的基礎入門知識,畢竟筆者也僅僅二刷,待筆者閉關修煉,後續會繼續更新原始碼底層知識。
- 對於SpringMVC內容就總結這麼多,若想深入學習等待後續更新。
- 我將會繼續更新關於Java方向的學習知識,感興趣的小夥伴可以關注一下。
- 文章寫得比較走心,用了很長時間,絕對不是copy過來的!
- 尊重每一位學習知識的人,同時也尊重每一位分享知識的人。
- 你的點贊與關注,是我努力前行的無限動力。