一文解析Pinia和Vuex,帶你全面理解這兩個Vue狀態管理模式
Pinia和Vuex一樣都是是vue的全域性狀態管理器。其實Pinia就是Vuex5,只不過為了尊重原作者的貢獻就沿用了這個看起來很甜的名字Pinia。
本文將通過Vue3的形式對兩者的不同實現方式進行對比,讓你在以後工作中無論使用到Pinia還是Vuex的時候都能夠遊刃有餘。
既然我們要對比兩者的實現方式,那麼我們肯定要先在我們的Vue3專案中引入這兩個狀態管理器(實際專案中千萬不要即用Vuex又用Pinia,不然你會被同事請去喝茶的。下面就讓我們看下它們的使用方式吧
安裝
- Vuex
npm i vuex -S
- Pinia
npm i pinia -S
掛載
Vuex
在src目錄下新建vuexStore,實際專案中你只需要建一個store目錄即可,由於我們需要兩種狀態管理器,所以需要將其分開並建立兩個store目錄
新建vuexStore/index.js
import { createStore } from 'vuex'

export default createStore({
    //全域性state,類似於vue種的data
    state() {
      return {
        vuexmsg: "hello vuex",
        name: "xiaoyue",
      };
    },


    //修改state函數
    mutations: {
    },

    //提交的mutation可以包含任意非同步操作
    actions: {
    },

    //類似於vue中的計算屬性
    getters: {
    },

    //將store分割成模組(module),應用較大時使用
    modules: {
    }
})
main.js引入
import { createApp } from 'vue'
import App from './App.vue'
import store from '@/store'
createApp(App).use(store).mount('#app')
App.vue測試
<template>
  <div></div>
</template>
<script setup>
import { useStore } from 'vuex'
let vuexStore = useStore()
console.log(vuexStore.state.vuexmsg); //hello vuex
</script>
頁面正常列印hello vuex說明我們的Vuex已經掛載成功了
Pinia
- main.js引入
import { createApp } from "vue";
import App from "./App.vue";
import {createPinia} from 'pinia'
const pinia = createPinia()
createApp(App).use(pinia).mount("#app");
- 建立Store
src下新建piniaStore/storeA.js
import { defineStore } from "pinia";

export const storeA = defineStore("storeA", {
  state: () => {
    return {
      piniaMsg: "hello pinia",
    };
  },
  getters: {},
  actions: {},
});
- App.vue使用
<template>
  <div></div>
</template>
<script setup>
import { storeA } from '@/piniaStore/storeA'
let piniaStoreA = storeA()
console.log(piniaStoreA.piniaMsg); //hello pinia
</script>
從這裡我們可以看出pinia中沒有了mutations和modules,pinia不必以巢狀(通過modules引入)的方式引入模組,因為它的每個store便是一個模組,如storeA,storeB... 。 在我們使用Vuex的時候每次修改state的值都需要呼叫mutations裡的修改函數(下面會說到),因為Vuex需要追蹤資料的變化,這使我們寫起來比較繁瑣。而pinia則不再需要mutations,同步非同步都可在actions進行操作,至於它沒有了mutations具體是如何最終到state變化的,這裡我們不過多深究,大概好像應該是通過hooks回撥的形式解決的把(我也沒研究過,瞎猜的。
修改狀態
獲取state的值從上面我們已經可以一目瞭然的看到了,下面讓我們看看他倆修改state的方法吧
vuex
vuex在元件中直接修改state,如App.vue
<template>
  <div>{{vuexStore.state.vuexmsg}}</div>
</template>
<script setup>
import { useStore } from 'vuex'
let vuexStore = useStore()
vuexStore.state.vuexmsg = 'hello juejin'
console.log(vuexStore.state.vuexmsg)

</script>
可以看出我們是可以直接在元件中修改state的而且還是響應式的,但是如果這樣做了,vuex不能夠記錄每一次state的變化記錄,影響我們的偵錯。當vuex開啟嚴格模式的時候,直接修改state會丟擲錯誤,所以官方建議我們開啟嚴格模式,所有的state變更都在vuex內部進行,在mutations進行修改。例如vuexStore/index.js:
import { createStore } from "vuex";

export default createStore({
  strict: true,
  //全域性state,類似於vue種的data
  state: {
    vuexmsg: "hello vuex",
  },

  //修改state函數
  mutations: {
    setVuexMsg(state, data) {
      state.vuexmsg = data;
    },
  },

  //提交的mutation可以包含任意非同步操作
  actions: {},

  //類似於vue中的計算屬性
  getters: {},

  //將store分割成模組(module),應用較大時使用
  modules: {},
});
當我們需要修改vuexmsg的時候需要提交setVuexMsg方法,如App.vue
<template>
  <div>{{ vuexStore.state.vuexmsg }}</div>
</template>
<script setup>
import { useStore } from 'vuex'
let vuexStore = useStore()
vuexStore.commit('setVuexMsg', 'hello juejin')
console.log(vuexStore.state.vuexmsg) //hello juejin

</script>
或者我們可以在actions中進行提交mutations修改state:
import { createStore } from "vuex";
export default createStore({
  strict: true,
  //全域性state,類似於vue種的data
  state() {
    return {
      vuexmsg: "hello vuex",
    }
  },

  //修改state函數
  mutations: {
    setVuexMsg(state, data) {
      state.vuexmsg = data;
    },
  },

  //提交的mutation可以包含任意非同步操作
  actions: {
    async getState({ commit }) {
      //const result = await xxxx 假設這裡進行了請求並拿到了返回值
      commit("setVuexMsg", "hello juejin");
    },
  }
});
元件中使用dispatch進行分發actions
<template>
  <div>{{ vuexStore.state.vuexmsg }}</div>
</template>
<script setup>
import { useStore } from 'vuex'
let vuexStore = useStore()
vuexStore.dispatch('getState')

</script>
一般來說,vuex中的流程是首先actions一般放非同步函數,拿請求後端介面為例,當後端介面返回值的時候,actions中會提交一個mutations中的函數,然後這個函數對vuex中的狀態(state)進行一個修改,元件中再渲染這個狀態,從而實現整個資料流程都在vuex內部進行便於檢測。直接看圖,一目瞭然

Pinia
- 直接修改
相比於Vuex,Pinia是可以直接修改狀態的,並且偵錯工具能夠記錄到每一次state的變化,如App.vue
<template>
  <div>{{ piniaStoreA.piniaMsg }}</div>
</template>
<script setup>
import { storeA } from '@/piniaStore/storeA'
let piniaStoreA = storeA()
console.log(piniaStoreA.piniaMsg); //hello pinia

piniaStoreA.piniaMsg = 'hello juejin'
console.log(piniaStoreA.piniaMsg); //hello juejin

</script>
- $patch
使用$patch方法可以修改多個state中的值,比如我們在piniaStore/storeA.js中的state增加一個name
import { defineStore } from "pinia";

export const storeA = defineStore("storeA", {
  state: () => {
    return {
      piniaMsg: "hello pinia",
      name: "xiaoyue",
    };
  },
  getters: {},
  actions: {},
});
然後我們在App.vue中進行修改這兩個state
import { storeA } from '@/piniaStore/storeA'
let piniaStoreA = storeA()
console.log(piniaStoreA.name); //xiaoyue
piniaStoreA.$patch({
  piniaMsg: 'hello juejin',
  name: 'daming'
})
console.log(piniaStoreA.name);//daming
當然也是支援修改單個狀態的如
piniaStoreA.$patch({
  name: 'daming'
})
$patch還可以使用函數的方式進行修改狀態
import { storeA } from '@/piniaStore/storeA'
let piniaStoreA = storeA()
cartStore.$patch((state) => {
  state.name = 'daming'
  state.piniaMsg = 'hello juejin'
})
- 在actions中進行修改
不同於Vuex的是,Pinia的actions中的函數既可以是同步的,也可以是非同步的,所以在actions中修改state就行Vuex在mutations修改state一樣。其實這也是我比較推薦的一種修改狀態的方式,就像上面說的,這樣可以實現整個資料流程都在狀態管理器內部,便於管理。
在piniaStore/storeA.js的actions新增一個修改name的函數
import { defineStore } from "pinia";
export const storeA = defineStore("storeA", {
  state: () => {
    return {
      piniaMsg: "hello pinia",
      name: "xiao yue",
    };
  },
  actions: {
    setName(data) {
      this.name = data;
    },
  },
});
元件App.vue中呼叫不需要再使用dispatch函數,直接呼叫store的方法即可
import { storeA } from '@/piniaStore/storeA'
let piniaStoreA = storeA()
piniaStoreA.setName('daming')
- 重置state
Pinia可以使用$reset將狀態重置為初始值
import { storeA } from '@/piniaStore/storeA'
let piniaStoreA = storeA()
piniaStoreA.$reset()
Pinia解構(storeToRefs)
當我們元件中需要用到state中多個引數時,使用解構的方式取值往往是很方便的,但是傳統的ES6解構會使state失去響應式,比如元件App.vue,我們先解構取得name值,然後再去改變name值,然後看頁面是否變化
<template>
  <div>{{ name }}</div>
</template>
<script setup>
import { storeA } from '@/piniaStore/storeA'
let piniaStoreA = storeA()
let { piniaMsg, name } = piniaStoreA
piniaStoreA.$patch({
  name: 'daming'
})

</script>
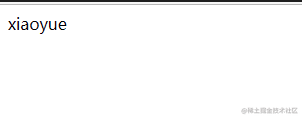
瀏覽器展示如下

我們可以發現瀏覽器並沒有更新頁面為daming
為了解決這個問題,Pinia提供了一個結構方法storeToRefs,我們將元件App.vue使用storeToRefs解構
<template>
  <div>{{ name }}</div>
</template>
<script setup>
import { storeA } from '@/piniaStore/storeA'
import { storeToRefs } from 'pinia'
let piniaStoreA = storeA()
let { piniaMsg, name } = storeToRefs(piniaStoreA)
piniaStoreA.$patch({
  name: 'daming'
})

</script>
再看下頁面變化

我們發現頁面已經被更新成daming了
getters
其實Vuex中的getters和Pinia中的getters用法是一致的,用於自動監聽對應state的變化,從而動態計算返回值(和vue中的計算屬性差不多),並且getters的值也具有快取特性
Pinia
我們先將piniaStore/storeA.js改為
import { defineStore } from "pinia";

export const storeA = defineStore("storeA", {
  state: () => {
    return {
      count1: 1,
      count2: 2,
    };
  },
  getters: {
    sum() {
      console.log('我被呼叫了!')
      return this.count1 + this.count2;
    },
  },
});
然後在元件App.vue中獲取sum
<template>
  <div>{{ piniaStoreA.sum }}</div>
</template>
<script setup>
import { storeA } from '@/piniaStore/storeA'
let piniaStoreA = storeA()
console.log(piniaStoreA.sum) //3

</script>
讓我們來看下什麼是快取特性。首先我們在元件多次存取sum再看下控制檯列印
import { storeA } from '@/piniaStore/storeA'
let piniaStoreA = storeA()
console.log(piniaStoreA.sum)
console.log(piniaStoreA.sum)
console.log(piniaStoreA.sum)
piniaStoreA.count1 = 2
console.log(piniaStoreA.sum)

從列印結果我們可以看出只有在首次使用用或者當我們改變sum所依賴的值的時候,getters中的sum才會被呼叫
Vuex
Vuex中的getters使用和Pinia的使用方式類似,就不再進行過多說明,寫法如下vuexStore/index.js
import { createStore } from "vuex";

export default createStore({
  strict: true,
  //全域性state,類似於vue種的data
  state: {
    count1: 1,
    count2: 2,
  },

  //類似於vue中的計算屬性
  getters: {
    sum(state){
      return state.count1 + state.count2
    }
  }


});
modules
如果專案比較大,使用單一狀態庫,專案的狀態庫就會集中到一個大物件上,顯得十分臃腫難以維護。所以Vuex就允許我們將其分割成模組(modules),每個模組都擁有自己state,mutations,actions...。而Pinia每個狀態庫本身就是一個模組。
Pinia
Pinia沒有modules,如果想使用多個store,直接定義多個store傳入不同的id即可,如:
import { defineStore } from "pinia";

export const storeA = defineStore("storeA", {...});
export const storeB = defineStore("storeB", {...});
export const storeC = defineStore("storeB", {...});
Vuex
一般來說每個module都會新建一個檔案,然後再引入這個總的入口index.js中,這裡為了方便就寫在了一起
import { createStore } from "vuex";
const moduleA = {
  state: () => ({
    count:1
   }),
  mutations: {
    setCount(state, data) {
      state.count = data;
    },
  },
  actions: {
    getuser() {
      //do something
    },
  },
  getters: { ... }
}

const moduleB = {
  state: () => ({ ... }),
  mutations: { ... },
  actions: { ... }
}

export default createStore({
  strict: true,
  //全域性state,類似於vue種的data
  state() {
    return {
      vuexmsg: "hello vuex",
      name: "xiaoyue",
    };
  },
  modules: {
    moduleA,
    moduleB
  },
});
使用moduleA
import { useStore } from 'vuex'
let vuexStore = useStore()
console.log(vuexStore.state.moduleA.count) //1
vuexStore.commit('setCount', 2)
console.log(vuexStore.state.moduleA.count) //2
vuexStore.dispatch('getuser')
一般我們為了防止提交一些mutation或者actions中的方法重名,modules一般會採用名稱空間的方式 namespaced: true 如moduleA:
const moduleA = {
  namespaced: true,
  state: () => ({
    count: 1,
  }),
  mutations: {
    setCount(state, data) {
      state.count = data;
    },
  },
  actions: {
    getuser() {
      //do something
    },
  },
}
此時如果我們再呼叫setCount或者getuser
vuexStore.commit('moduleA/setCount', 2)
vuexStore.dispatch('moduleA/getuser')
寫在最後
通過以上案例我們會發現Pinia比Vuex簡潔許多,所以如果我們的專案是新專案的話建議使用Pinia。 當然如果我們的專案體量不是很大,我們其實沒必要引入vue的狀態管理庫,盲目的使用反而會徒增心智負擔。
如果感覺這篇文章對你有幫助的話請點個贊吧orz。