初步認識低程式碼
初步認識低程式碼
本篇主要介紹低程式碼是什麼、低程式碼平臺的分類、低程式碼能力指標、低程式碼平臺的調查問卷,最後使用低程式碼前端框架 amis 初步搭建一個後臺系統。
低程式碼是什麼
低程式碼不是一個純粹的程式設計工具,把它叫做生產力提高工具更為合適。
以前人們會在簡歷中寫熟練使用 office等辦公軟體,以後人們可能會寫熟練使用低程式碼平臺(辦公自動化的一種新能力)
程式設計師可以跟各個部門配合,把各種重複性的、最常用的流程沉澱成服務模組,在加上低程式碼平臺或無程式碼平臺,普通的辦公人員(即非程式設計師,比如運營)就能用最簡單、人性化的方式把它呼叫出來解決問題(或流程自動化),而無需額外的程式設計師投入。
簡單的應用場景
某公司有個網上商城,每到大促期間,比如國慶節,運營就會要求開發許多活動頁,通常一個活動頁需要一個程式設計師約1天的時間,由於人力的限制,造成了開發需求和交付能力的差距。
該公司程式設計師小c通過和運營溝通,發現 90% 的活動頁都很相似的,可以把這部分需求沉澱下來變成一個服務,另外的 10% 的活動頁交由程式設計師客製化開發。
最終小c花了2個月做了一個活動生成器(基於圖形化拖拽、引數化設定,實現快速構建活動頁的工具),據公司的運營反饋,大促期間,絕大多數的常規活動由運營自己通過活動生成器生成,無需程式設計師的額外投入,提高了生產力,解決了問題。
低程式碼平臺的概念和分類
低程式碼這一概念由 Forrester 在 2014 年正式提出。
低程式碼,顧名思義,就是指開發者寫很少的程式碼,通過低程式碼平臺提供的介面、邏輯、物件、流程等視覺化編排工具來完成大量的開發工作,降低軟體開發中的不確定性和複雜性。實現軟體的高效構建,無需重複傳統的手動程式設計,同時兼顧業務人員和專業開發人員的更多參與。
廣義的低程式碼:指所有可以幫助缺少程式設計基礎的人員快速完成軟體開發的技術和工具。
高德納(Gartner) 認為,低程式碼主要有以下幾個分支(或細分市場):
- 無程式碼開發平臺
- 低程式碼應用平臺(
LCAP) - 多重體驗開發平臺(
MXDP) - 智慧業務流程管理套件(
iBPMS)
無程式碼開發平臺
無程式碼開發平臺(或「0程式碼」)屬於低程式碼平臺的一種,不提供或者僅支援有限的程式設計擴充套件能力。比如用來開發內部管理類或市場行銷類表單。
如果需要沒有專業開發人員協助的情況下進行「非程式設計開發」,可以考慮它。技術門檻低,需要注意工具的能力範圍(應用場景有限),它們是專門為非程式設計人員設計的。
低程式碼應用平臺(LCAP)
LCAP 屬於狹義的低程式碼平臺,是萬金油類(什麼都能應付)的產品,可用來開發前端和後端的應用。
這個市場囊括了大部分低程式碼技術供應商。
它通過宣告式的模型驅動和基於後設資料的服務來提供快速的應用開發、部署和執行。
多重體驗開發平臺(MXDP)
MXDP 提供快速開發跨平臺 APP 的工具,一般用來開發多平臺/多終端應用。
這類產品通常提供一套包含前端開發工具和後端服務的整合套件,使開發人員(有時甚至非開發人員)能夠跨各種數位裝置進行應用開發。
智慧業務流程管理套件(iBPMS)
整合了AI 等技術的業務流程管理系統突出後端流程定義和資料整合能力,一般用於解決大型企業的跨系統業務流程。
Tip:低程式碼平臺還可以根據其他維度進行分類,比如全棧平臺還是僅前端頁面、通用領域還是聚焦於 erp、crm、供應鏈等專業領域、開源的還是收費的、國內的還是國外的等等。
低程式碼的能力指標
高德納(Gartner) 列出了低程式碼平臺的 11 個關鍵能力指標。
Tip:在選擇低程式碼平臺的時候,這些指標可以給我們提供參考。
- 易用性
易用性是低程式碼平臺生產力的關鍵指標,指在不寫程式碼的情況下能完成功能的多少。
- 使用者體驗
這個指標能夠決定終端使用者對開發者的評價。
比如給企業的客戶或供應商的專案對使用者體驗的要求會高於企業內部使用者使用的專案,對於內部(B2E)應用程式,簡單的 web 表單或許就已滿足。
- 資料建模和管理的便利性
這個指標就是通常所講的」模型驅動「,模型驅動能夠提供滿足資料庫設計正規化的資料模型設計和管理能力。開發的應用複雜度越高,系統整合越高,這個能力就越關鍵。
- 流程與業務邏輯開發能力和效率
這個能力包含兩點:
① 該低程式碼平臺能否開發出複雜的工作流和業務。決定了專案是否可以成功交付
② 開發這些功能的便利性和易用性。決定了專案的開發成本。
- 開發平臺的生態系統
低程式碼平臺的本質是開發工具,內建的、開箱即用的功能無法覆蓋全部的應用場景。這時,就得基於該平臺的生態系統來提供更深入、更全面的開發能力。很多開發平臺都在建立自己的外掛機制,這也是平臺生態的一個典型體現。
- 程式設計介面和系統整合能力
為避免資料孤島,企業級應用通常需要與其他系統進行整合,協同增效。此時,內建的整合能力和程式設計介面就變得至關重要。除非確認在可預期的未來,專案不涉及系統整合和擴充套件開發。
- 支援更先進的架構和技術
開發出來的應用是否支援更先進的架構,比如對接IoT(物聯網)、機器學習
此時深入瞭解低程式碼平臺產品的架構就尤為重要
- 服務質量
服務質量指通常所說的」無故障使用時間「。
- 使用者模型與軟體生命週期的支援
軟體開發整個生命週期,除了開發和交付,還有設計、測試、運維等環節。比如系統開發早期的使用者模型建立和驗證過程通常需要快速模擬和迭代,投入的開發力量甚至不少於正式開發。
如果一套低程式碼平臺具備全生命週期所需的各項功能,將會大大簡化開發者的技術棧,進一步提高工作效率。
開發的系統規模越大,這一能力就越重要。
- 開發管理
開發管理用於幫助開發團隊負責人,降低軟體開發管理過程中的各種人為風險。例如程式碼庫許可權管理、版本許可權管理、釋出許可權管理。
現代軟體開發中的敏捷開發能否在低程式碼中落地,也是衡量開發管理的重要指標。
開發規模越大,該指標越應當關注。
- 安全與合規
大型企業、特定行業企業(如軍工、金融)通常對該指標的關注程度要更高一些。
該功能的具體體現有:支援本地部署、全SSL資料傳輸、密碼強度策略、跨域存取控制、細粒度的使用者許可權控制等等
低程式碼平臺的調查問卷
2018 年,高德納(Gartner)追蹤了 200 多家低程式碼開發工具供應商,對這些供應商進行了調查,發現在迴應的 82 家供應商中,有 40% 的低程式碼供應商,每年可以從超過 54,000 個終端使用者組織中收取 25 億美元的工具收入(包括許可和訂閱)。
在這些供應商中:
- 85% 的供應商認為自己是覆蓋了使用者體驗、邏輯和資料的
全棧,而不是專門處理應用程式的一部分 - 96% 的供應商認為自己提供了
完整的軟體開發生命週期(SDLC),而不僅僅是設計和開發的加速器 - 88% 的供應商提供了
公有云部署,62% 的供應商提供了私有云部署能力 - 84% 的供應商提供了 WebIDE(線上整合式開發環境),30% 的供應商提供了桌面 IDE
- 78% 的供應商將
資料庫作為其工具的一部分 - 47% 的供應商生成的程式碼在大多數情況下可以進行
手工編輯 - 79% 的供應商提供
基於表單的使用者介面,62% 的提供移動應用程式介面,而 5% 不到的提供了聊天機器人 - 95% 的供應商目標客戶是業務線開發人員(技術型非程式設計開發人員)的前三個開發人員角色,而 40% 的供應商選擇的頭部開發人員角色是業務高階使用者(業務型非程式設計開發人員)
- 55% 的供應商的主要終端使用者型別是 B2E(企業對僱員),而 B2B(企業與企業) 和 B2C 的佔比分別為 20% 和 25%
Tip:資料來源 Low-Code Development Technologies Evaluation Guide,僅作參考。
低程式碼平臺 amis
實踐出真理。我們嘗試使用 amis 做一個後臺系統。
amis 是什麼
amis 是一個低程式碼前端框架,它使用 JSON 設定來生成頁面,可以減少頁面開發工作量,極大提升效率。—— amis 官網
此刻(2022/07/08)在 github 上有 11.3k 的 Star。
amis 是百度的一個低程式碼平臺。它不是全棧平臺,僅處理應用程式的一部分,也就是前端頁面。
終端使用者型別不是B2C(企業對客戶),他專注於中後臺頁面。雖然提供了大量常規UI元件,但對於面向普通客戶(toC)的頁面,往往追求個性化的視覺效果。
易用性方面,通過 json 設定來生成頁面。
目標使用者包括普通使用者和開發者,據官網介紹:
- 沒寫過前端頁面的人員可以做出專業且複雜的後臺介面,做出來的頁面不需要經過二次開發就能直接上線。
- 支援擴充套件。支援90%低程式碼,10%程式碼開發的混合模式,既提升效率,又不失靈活。
檔案介紹
檔案直接看amis 官網。檔案內容很多,光元件倘若每個都用一下,至少得一天以上,筆者就不一一介紹,這裡稍微提幾個我們就馬上開始實戰:
快速開始
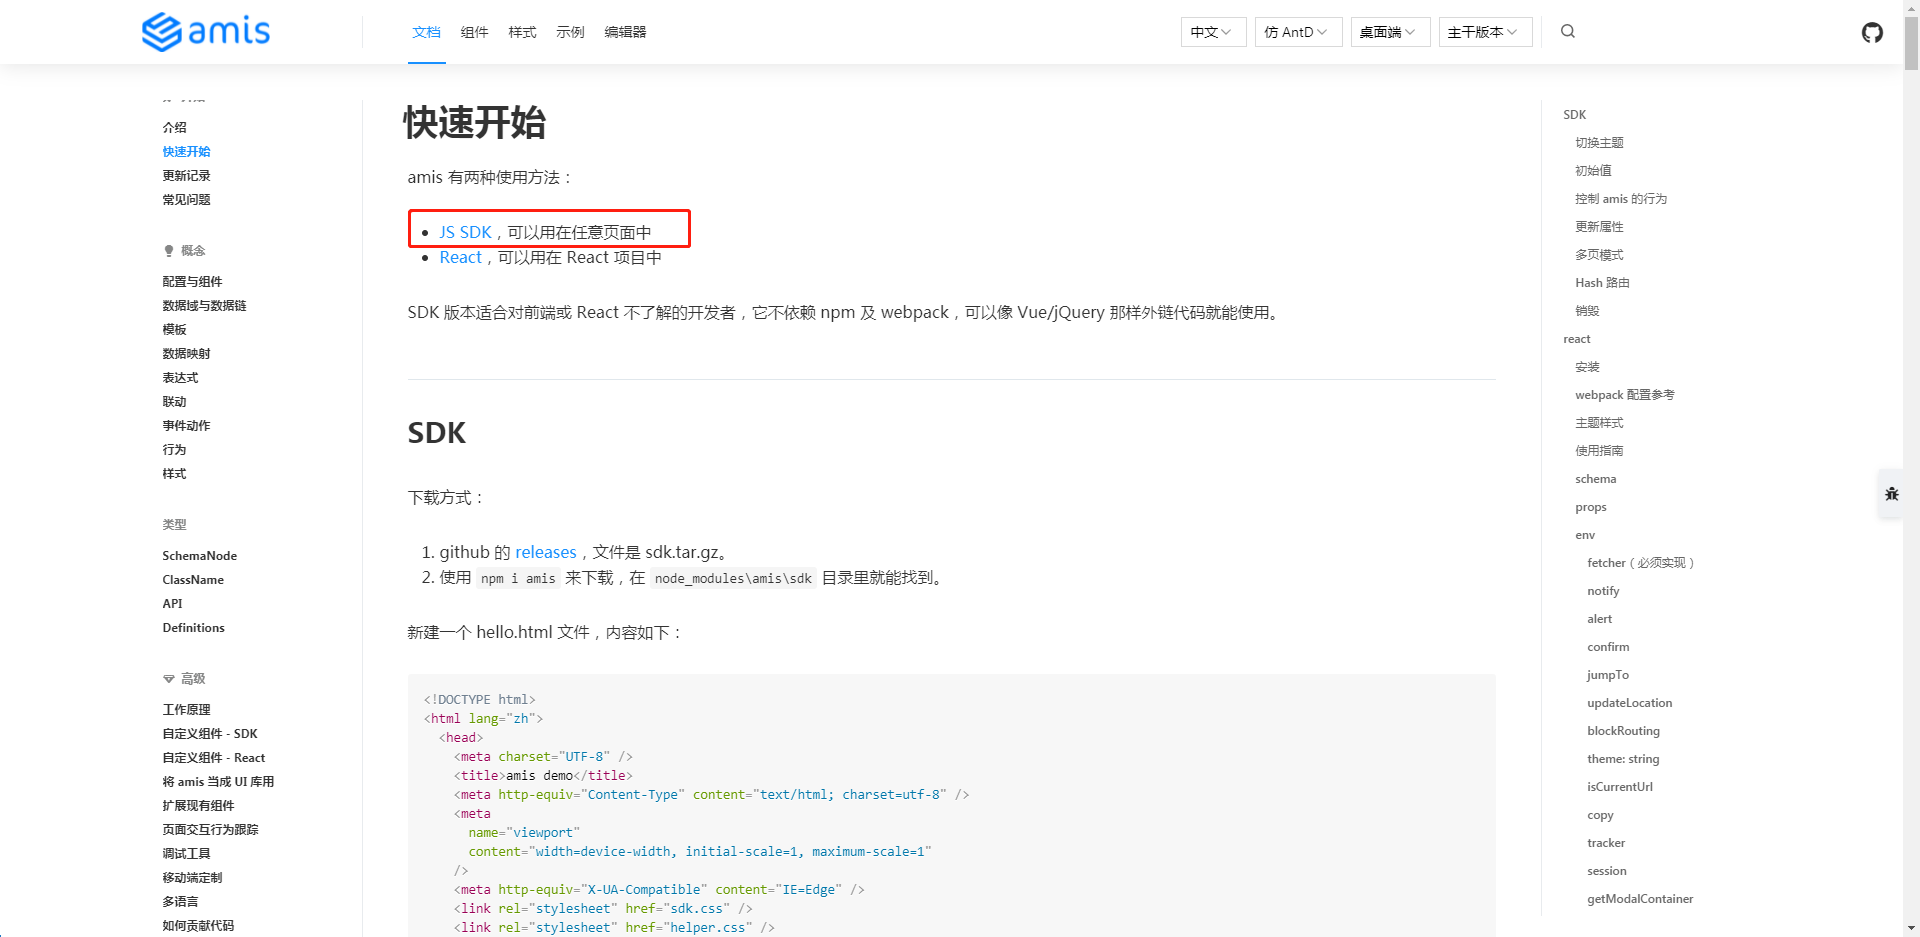
amis 有兩種使用方法,筆者這裡使用 JS SDK 的方式:
表單
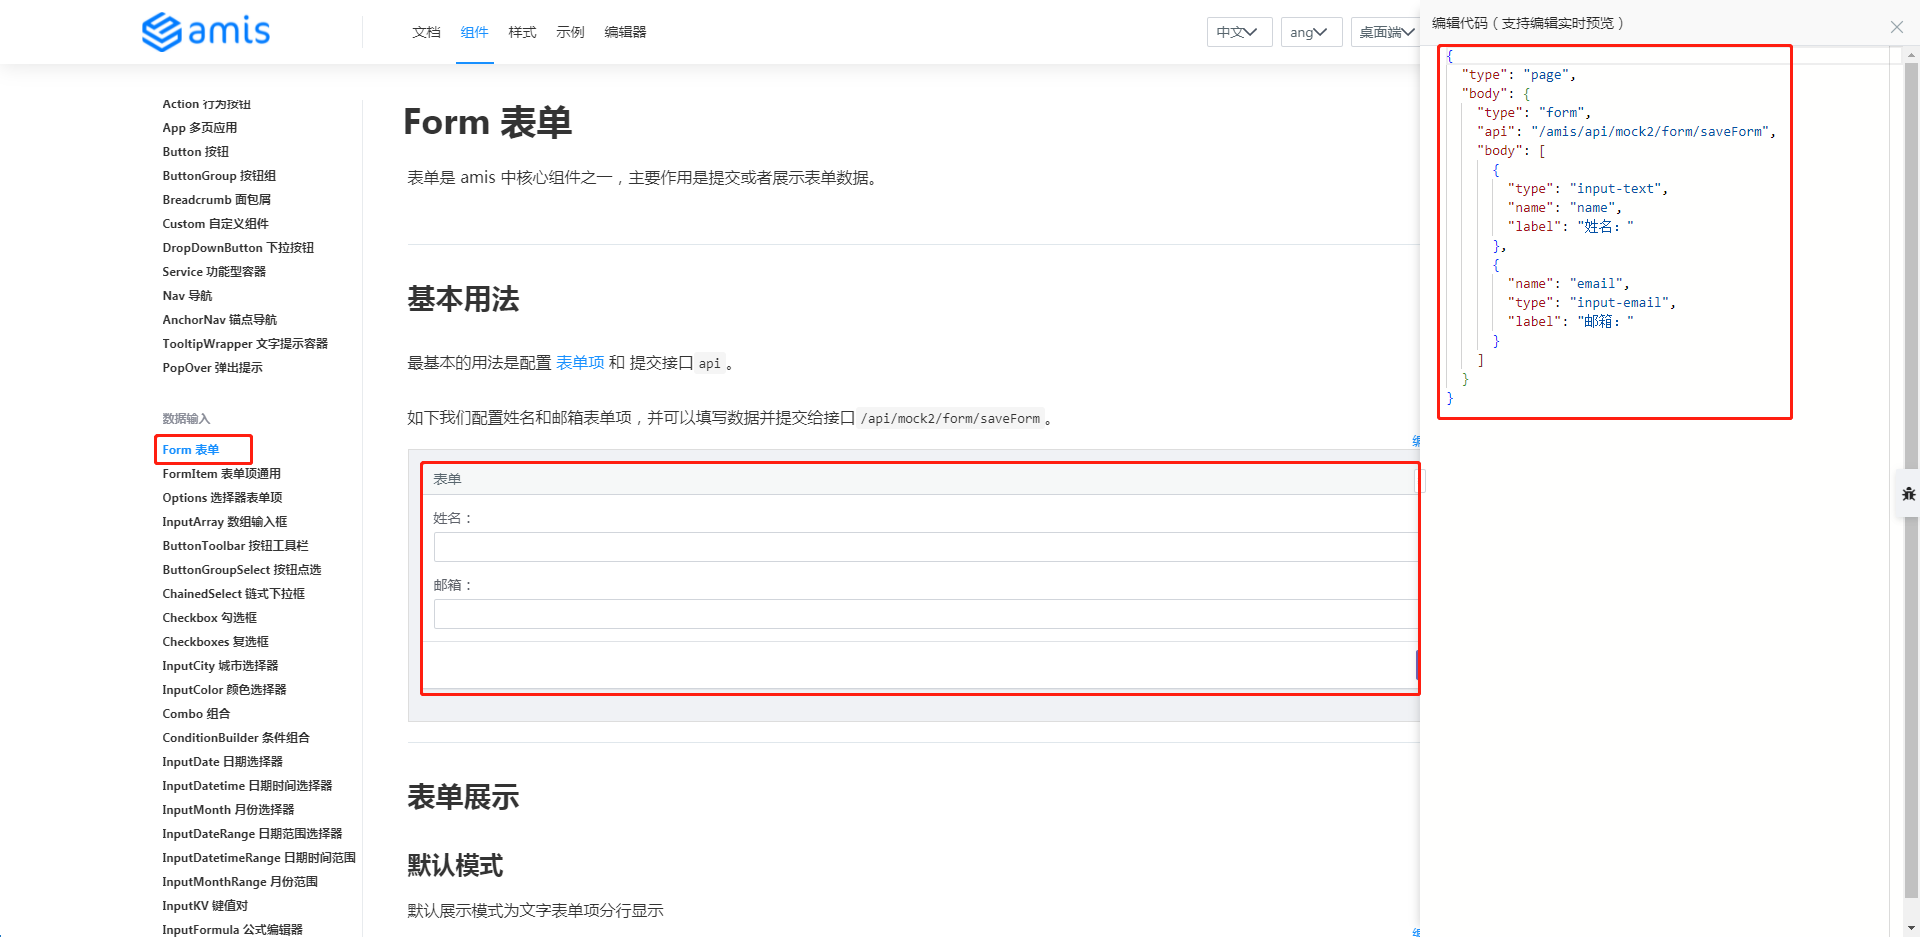
比如要實現某個樣式的表單,需要的 json 組態檔就在右側的編輯程式碼處:
介面請求
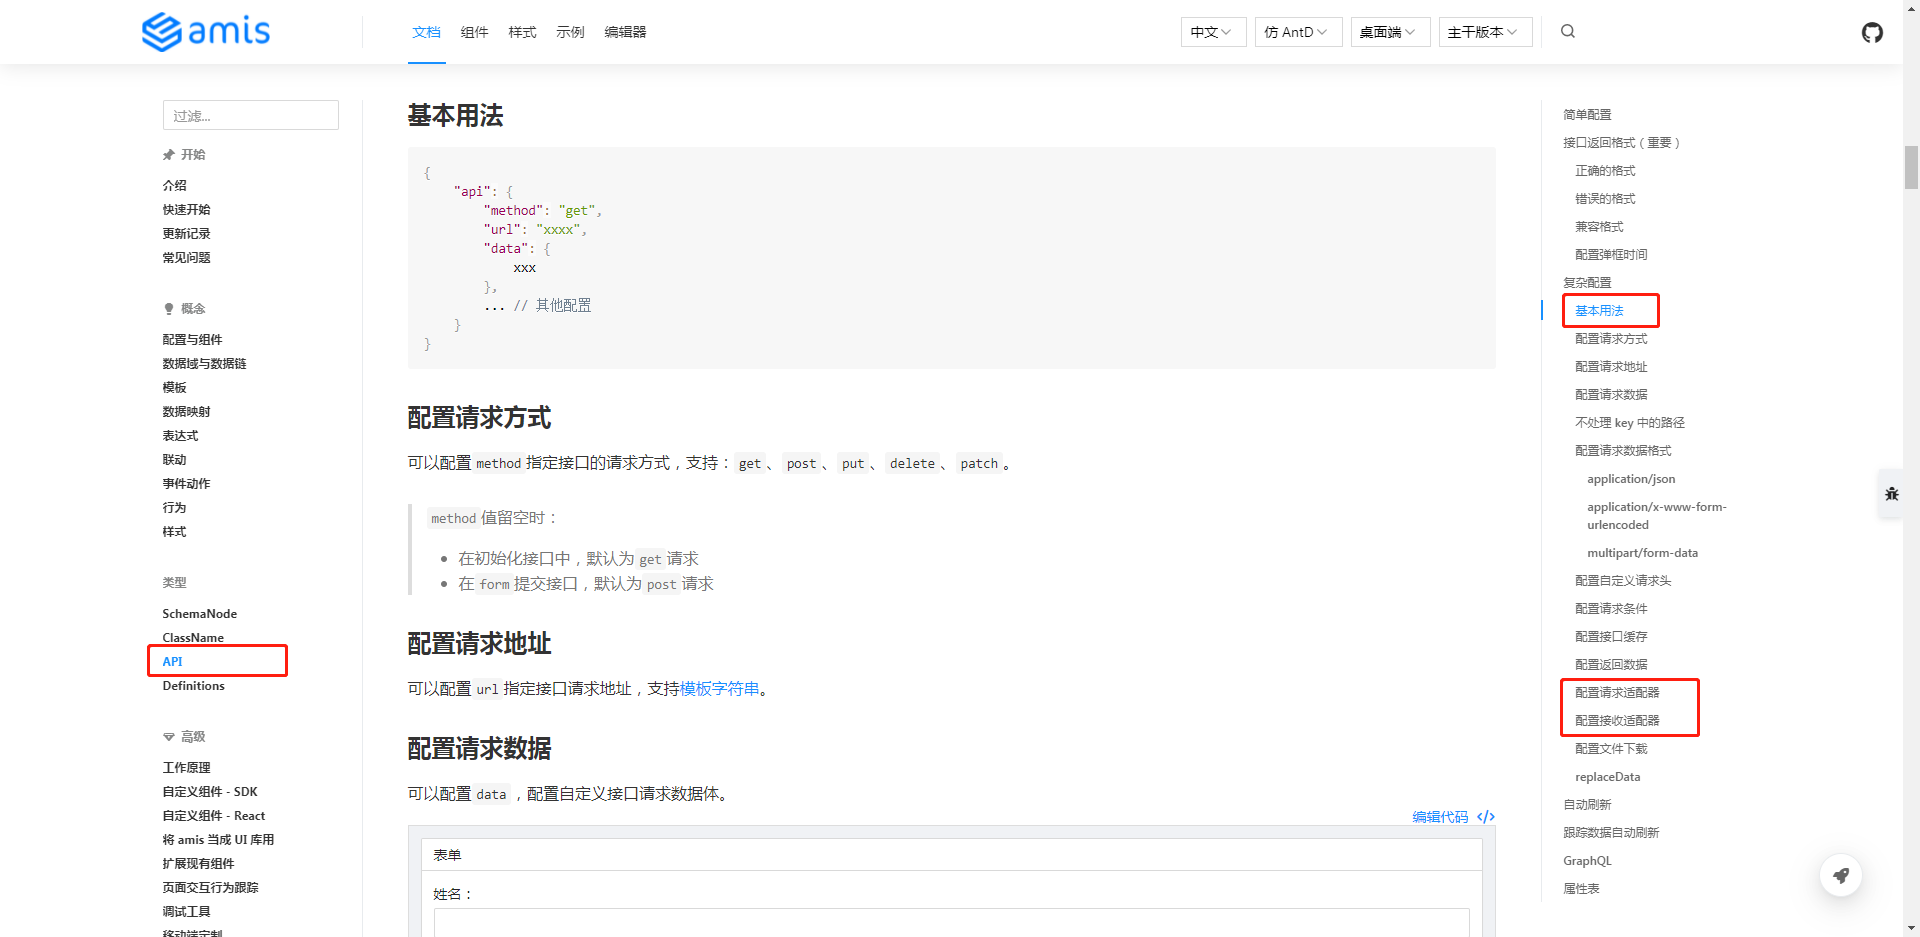
得傳送介面出去,所以 API 這一篇得看一下:
主題樣式
amis 提供了4種(雲舍、Antd、ang、Dark)主題樣式,比如選擇Dark,樣式變黑了:

專案需求
通過 amis 做初步搭建一個後臺系統,包含登入和一個一級模組(任務計劃),任務計劃中包含列表,還有增加、刪除、編輯和查詢。
專案初始化
amis 提供兩種使用方法:一種是用在 react(react 方式) 專案中,一種是對前端不甚瞭解的開發者(即 JS SDK 方式)。
筆者選用 JS SDK 方式。先用起來再說,筆者相信同樣的需求用另一種方式(react)應該也能夠實現。
新建專案 amis-test:
// 新建專案
$ mkdir amis-test

// 通過 npm 初始化專案
amis-test> npm init -y
通過 npm i amis 下載包,但報錯如下:
amis-test> npm i amis
npm ERR! code ERESOLVE
npm ERR! ERESOLVE unable to resolve dependency tree
npm ERR!
npm ERR! Found: [email protected]
npm ERR! node_modules/react
npm ERR!   peer react@">=16.8.6" from [email protected]
npm ERR!   node_modules/amis
npm ERR!     amis@"*" from the root project
npm ERR!   peer react@"^18.2.0" from [email protected]
npm ERR!   node_modules/react-dom
npm ERR!     peer react-dom@">=16.8.6" from [email protected]
npm ERR!     node_modules/amis
npm ERR!       amis@"*" from the root project
npm ERR!     peer react-dom@">=16.8.6" from [email protected]
npm ERR!     node_modules/amis-core
npm ERR!       amis-core@"*" from [email protected]
npm ERR!       node_modules/amis
npm ERR!         amis@"*" from the root project
npm ERR!       1 more (amis-ui)
npm ERR!     1 more (amis-ui)
npm ERR!   2 more (amis-core, amis-ui)
npm ERR!
npm ERR! Could not resolve dependency:
npm ERR! peer react@"^16.3.2 || ^17.0.0" from [email protected]
npm ERR! node_modules/amis/node_modules/ansi-to-react
npm ERR!   ansi-to-react@"^6.1.6" from [email protected]
npm ERR!   node_modules/amis
npm ERR!     amis@"*" from the root project
npm ERR!
npm ERR! Fix the upstream dependency conflict, or retry
npm ERR! this command with --force, or --legacy-peer-deps
npm ERR! to accept an incorrect (and potentially broken) dependency resolution.
npm ERR!
換一種下載方式:
github 的 releases,檔案是 sdk.tar.gz —— 官網_快速開始
chrome 下載失敗、edge 下載成功,解壓到專案根目錄。
hello-world
新建檔案 hello-world.html,內容直接拷貝於官網(快速開始):
<!DOCTYPE html>
<html lang="zh">
  <head>
    <meta charset="UTF-8" />
    <title>amis demo</title>
    <meta http-equiv="Content-Type" content="text/html; charset=utf-8" />
    <meta
      name="viewport"
      content="width=device-width, initial-scale=1, maximum-scale=1"
    />
    <meta http-equiv="X-UA-Compatible" content="IE=Edge" />
    <link rel="stylesheet" href="sdk.css" />
    <link rel="stylesheet" href="helper.css" />
    <link rel="stylesheet" href="iconfont.css" />
    <!-- 這是預設主題所需的,如果是其他主題則不需要 -->
    <!-- 從 1.1.0 開始 sdk.css 將不支援 IE 11,如果要支援 IE11 請參照這個 css,並把前面那個刪了 -->
    <!-- <link rel="stylesheet" href="sdk-ie11.css" /> -->
    <!-- 不過 amis 開發團隊幾乎沒測試過 IE 11 下的效果,所以可能有細節功能用不了,如果發現請報 issue -->
    <style>
      html,
      body,
      .app-wrapper {
        position: relative;
        width: 100%;
        height: 100%;
        margin: 0;
        padding: 0;
      }
    </style>
  </head>
  <body>
    <div id="root" class="app-wrapper"></div>
    <script src="sdk.js"></script>
    <script type="text/javascript">
      (function () {
        let amis = amisRequire('amis/embed');
        // 通過替換下面這個設定來生成不同頁面
        let amisJSON = {
          type: 'page',
          title: '表單頁面',
          body: {
            type: 'form',
            mode: 'horizontal',
            api: '/saveForm',
            body: [
              {
                label: 'Name',
                type: 'input-text',
                name: 'name'
              },
              {
                label: 'Email',
                type: 'input-email',
                name: 'email'
              }
            ]
          }
        };
        let amisScoped = amis.embed('#root', amisJSON);
      })();
    </script>
  </body>
</html>
Tip:amis-test 專案結構如下:
$ ls
hello-world.html  package.json  package-lock.json  sdk/
需要更改一下 css、js 資源參照路徑。更改內容:
$ git diff
diff --git a/hello-world.html b/hello-world.html
...
-    <link rel="stylesheet" href="sdk.css" />
-    <link rel="stylesheet" href="helper.css" />
-    <link rel="stylesheet" href="iconfont.css" />
+    <link rel="stylesheet" href="./sdk/sdk.css" />
+    <link rel="stylesheet" href="./sdk/helper.css" />
+    <link rel="stylesheet" href="./sdk/iconfont.css" />
...
-    <script src="sdk.js"></script>
+    <script src="./sdk/sdk.js"></script>
     ...
頁面效果如下:
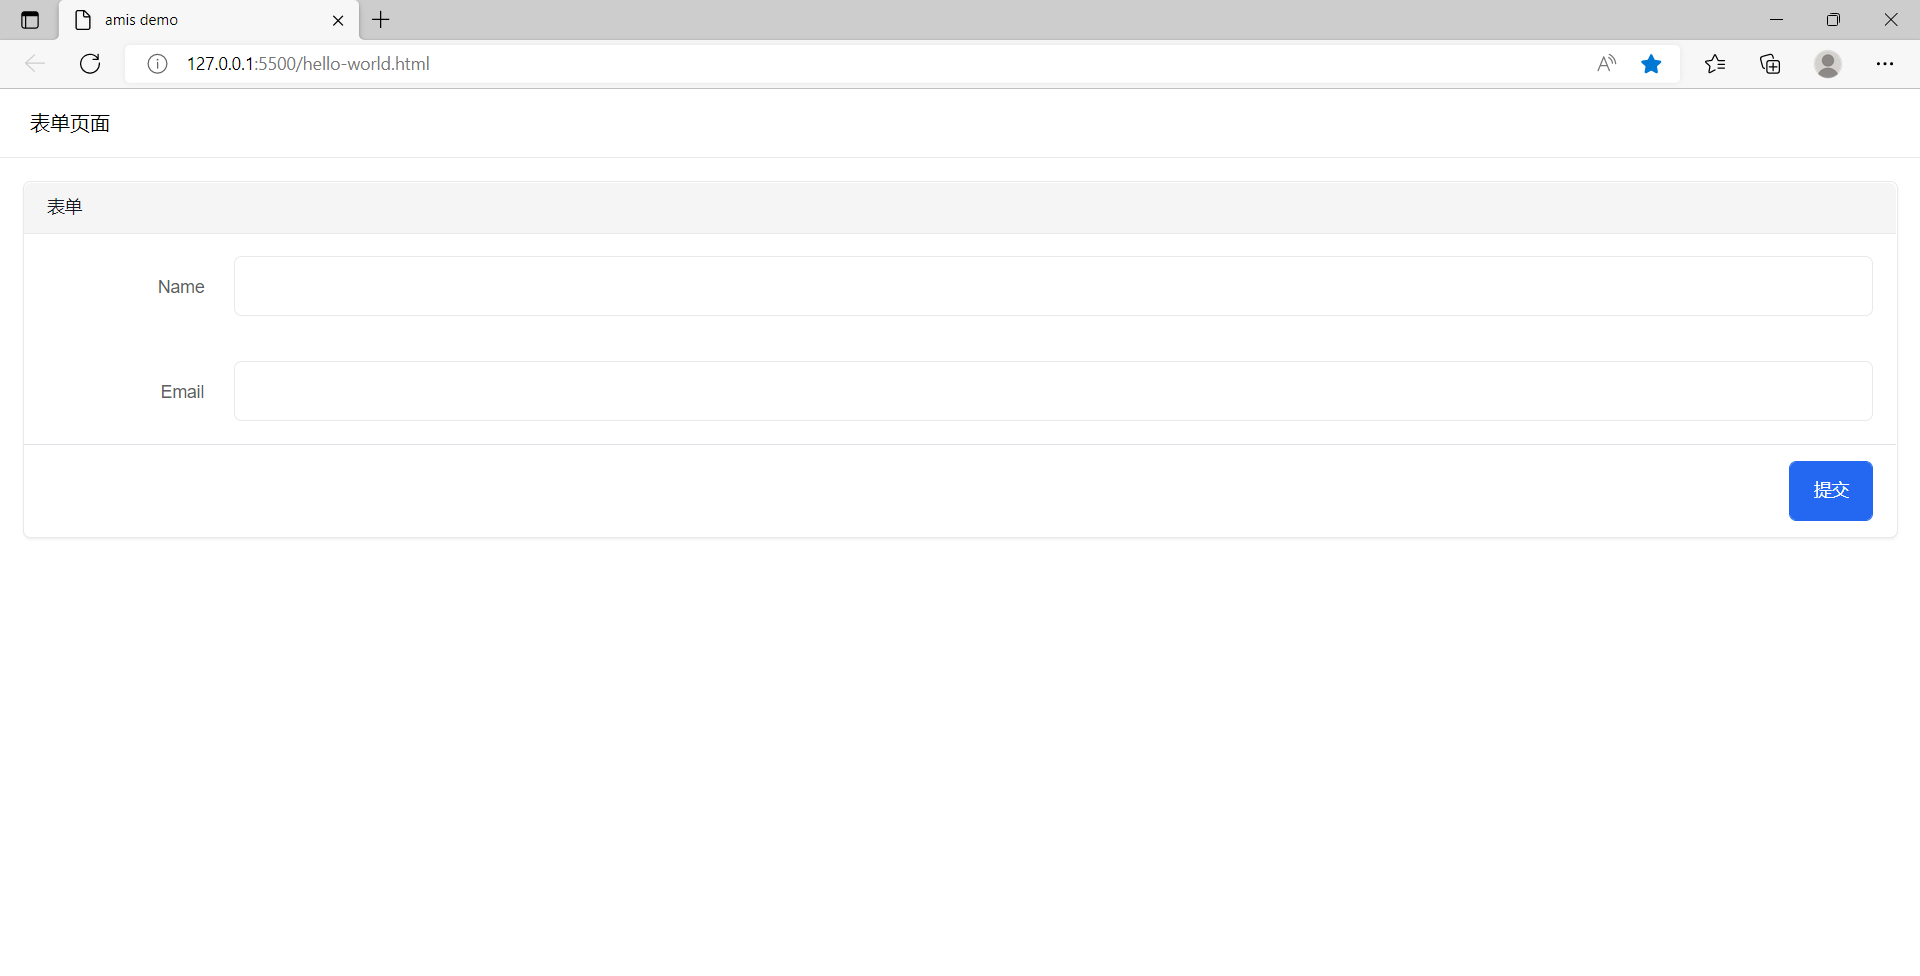
Tip:筆者使用 vscode 的 live Server 外掛,可直接右鍵啟動一服務預覽該頁面。
後端服務
為了方便演示,筆者使用 Node+Express 實現後端介面。
Tip: 用其他方式實現後端服務也是沒有問題的。有關 Express 的介紹可以看 這裡
目錄調整
最初目錄結構如下:
$ ls
hello-world.html  package.json  package-lock.json  sdk/
執行如下操作:
- 新建
public資料夾,並將 skd 目錄、hello-world.html 放到 public 資料夾中。 - 修改
hello-world.html的設定部分(amisJSON) - 新建
home.html。這是一個普通的 html 頁面,登入成功後跳轉至此頁 - 重寫服務
server.js,其中資料庫用物件模擬,直接放於記憶體。
調整後的目錄結構如下:
$ ll
total 125
drwxr-xr-x 1 Administrator 197121     0 Jun  4 13:49 node_modules/
-rw-r--r-- 1 Administrator 197121 56939 Jun  4 13:49 package-lock.json
-rw-r--r-- 1 Administrator 197121   348 Jun  4 13:49 package.json
drwxr-xr-x 1 Administrator 197121     0 Jun  4 14:38 public/
-rw-r--r-- 1 Administrator 197121  1002 Jun  4 15:08 server.js
Administrator@ /e/pengjiali/amis-test/public (master)
$ ll
total 13
-rw-r--r-- 1 Administrator 197121 3023 Jun  4 14:47 hello-world.html
-rw-r--r-- 1 Administrator 197121  278 Jun  4 11:24 home.html
drwxr-xr-x 1 Administrator 197121    0 Jun  3 16:35 sdk/
程式碼
伺服器
server.js 會開啟一個服務,並將 public目錄作為靜態資源對外開放,能接收前端請求,並存入資料庫並返回介面資料。
// server.js
const path = require('path')
const express = require('express')
const app = express()
const port = 3000

app.use(express.json()) // for parsing application/json
app.use(express.urlencoded({ extended: true })) // for parsing application/x-www-form-urlencoded

// 將靜態資源對外開放
app.use('/public', express.static(path.join(__dirname, 'public')))

// 登入介面
app.post('/api/login', function (req, res) {
    const {name, password} = req.body

    // 存在該使用者
    if(db.selectUser(name, password).length){
        res.json({"status": 0, "msg": "登入成功", data:{token: 'token00001'}})
    }else{
        res.json({"status": 1, "msg": "使用者名稱密碼錯誤。請試試 admin/123456"})
    }
});

// 開啟服務
app.listen(port, () => {
  console.log(`Example app listening at http://localhost:${port}`)
})

// 處理 404 響應
app.use(function (req, res, next) {
    res.status(404).send("404")
})

// 模擬資料庫
class DB{
    constructor(){
        this.database = {
            userTable: [
                {name: 'a', password: 'a'},
                {name: 'admin', password: '123456'},
            ]
        }
    }
    selectUser(name, password){
        const table = this.database.userTable
        return table.filter(item => item.name === name && item.password === password)
    }
}
const db = new DB()
登入頁
// public/hello-world.html
...
<body>
    <div id="root" class="app-wrapper"></div>
    <script src="./sdk/sdk.js"></script>
    <script type="text/javascript">
        (function () {
            let amis = amisRequire('amis/embed');
            // 通過替換下面這個設定來生成不同頁面
            let amisJSON = {
                type: 'page',
                title: '精美效能登入',
                body: {
                    type: 'form',
                    mode: 'horizontal',
                    api: {
                        method: 'post',
                        url: '/api/login',
                        adaptor: function (payload, response) {
                            if (payload.status === 0) {
                                localStorage.setItem('token', payload.data.token)
                            }
                            console.log('payload', payload)
                            return payload
                        }
                    },
                    // 官網 -> 元件 -> Form 表單 -> 頁面跳轉
                    redirect: "/public/home.html",
                    body: [
                        {
                            label: '姓名',
                            type: 'input-text',
                            name: 'name'
                        },
                        {
                            label: '密碼',
                            type: 'input-password',
                            name: 'password'
                        }
                    ]
                }
            };
            let amisScoped = amis.embed('#root', amisJSON);
        })();
    </script>
</body>
主頁
// public/home.html
<!DOCTYPE html>
<html lang="en">
<head>
    <meta charset="UTF-8">
    <meta http-equiv="X-UA-Compatible" content="IE=edge">
    <meta name="viewport" content="width=device-width, initial-scale=1.0">
    <title>主頁</title>
</head>
<body>
    主頁
</body>
</html>
測試效果
啟動服務:
Administrator@ /e/pengjiali/amis-test (master)
$ nodemon server.js
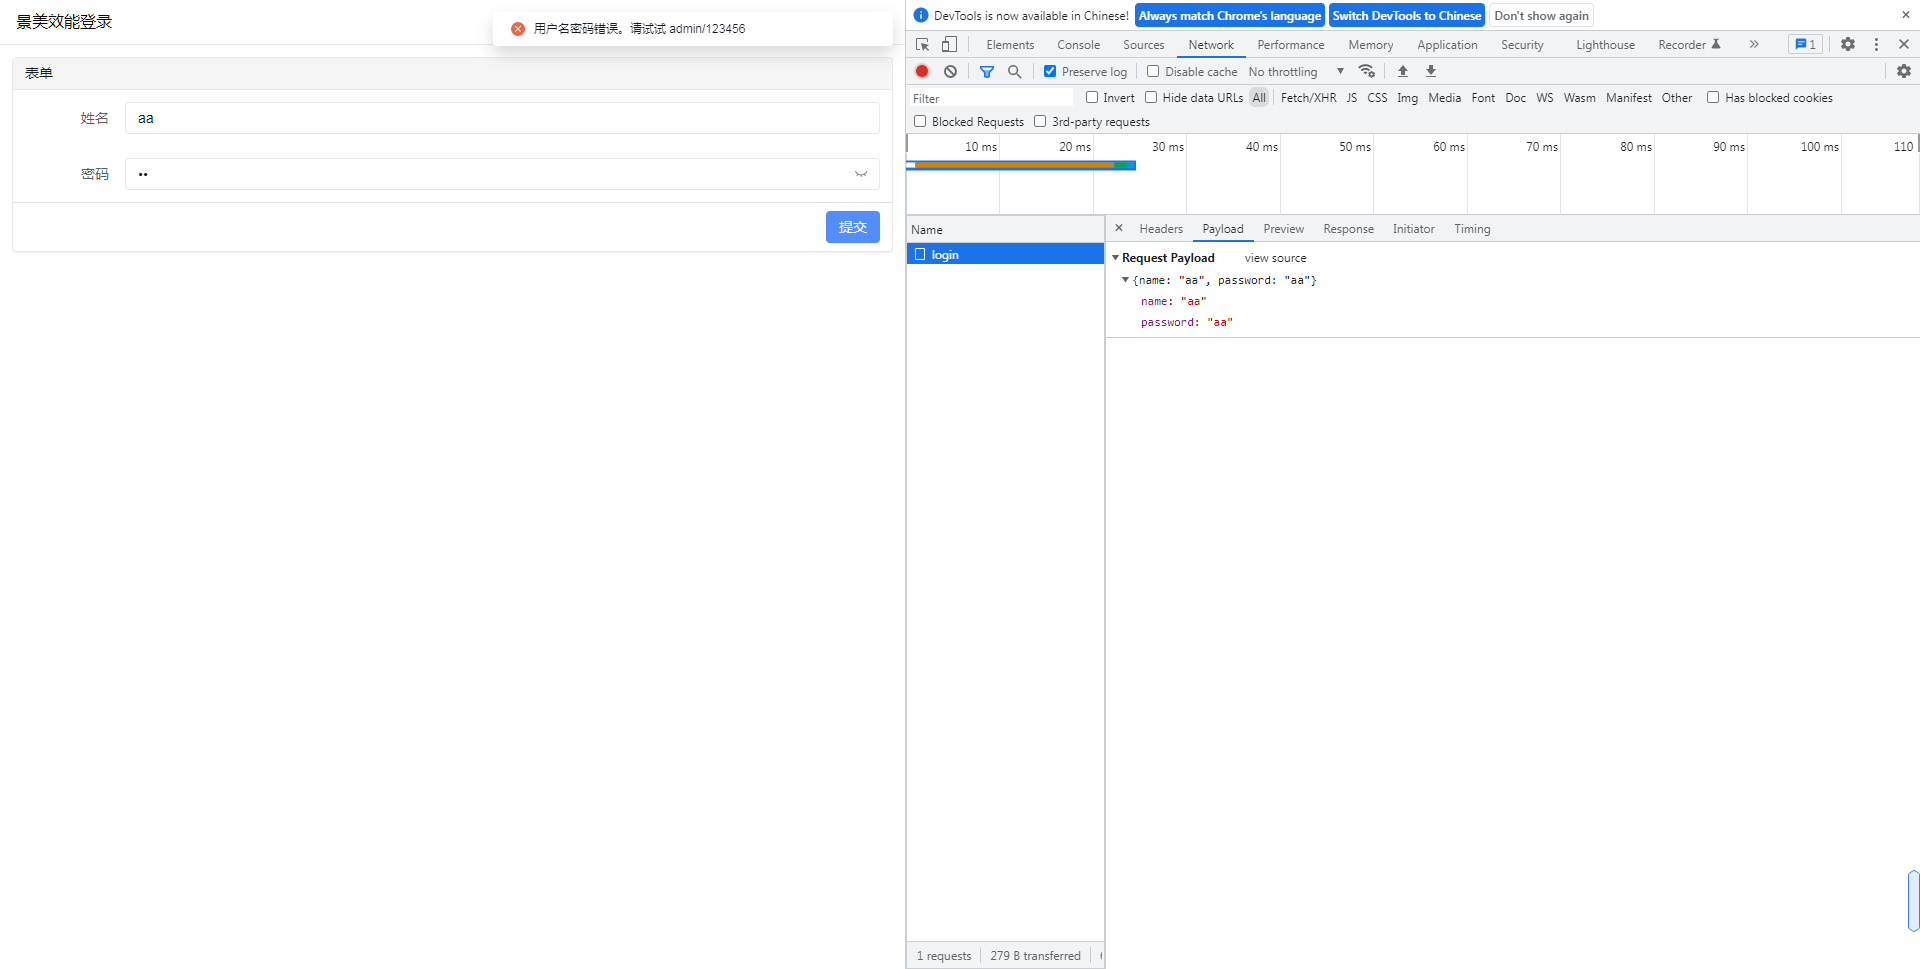
輸入正確的使用者名稱密碼,點選登入,就會跳轉到系統主頁。
跨域報錯
筆者最初是用 express 做一個服務,並想通過第三方外掛 cors(Node.js CORS middleware) 解決跨域問題,但終究未能成功。報錯如下:
Access to XMLHttpRequest at 'http://127.0.0.1:3000/login' from origin 'http://localhost:5500' has been blocked by CORS policy: Response to preflight request doesn't pass access control check: The value of the 'Access-Control-Allow-Origin' header in the response must not be the wildcard '*' when the request's credentials mode is 'include'. The credentials mode of requests initiated by the XMLHttpRequest is controlled by the withCredentials attribute.
於是筆者換一種方式:不跨域了。將前端和後端程式碼寫在一起。直接利用 Express 託管靜態檔案,也就是上面的解決方案。
引入後臺模板
amis 在 github 的 readme.md 中提供了一個後臺模板(amis-admin),我們將其引入。
解壓完畢後的目錄結構如下:
Administrator /d/Downloads/amis-admin-master
$ ll
total 22
-rw-r--r-- 1 Administrator 197121  458 Dec 21  2021 README.md
-rw-r--r-- 1 Administrator 197121 6184 Dec 21  2021 index.html
-rw-r--r-- 1 Administrator 197121   54 Dec 21  2021 nodemon.json
-rw-r--r-- 1 Administrator 197121  647 Dec 21  2021 package.json
drwxr-xr-x 1 Administrator 197121    0 Dec 21  2021 pages/
drwxr-xr-x 1 Administrator 197121    0 Dec 21  2021 public/
-rw-r--r-- 1 Administrator 197121 1077 Dec 21  2021 server.js
將 index.html 和 pages 拷貝到 public 目錄,並將 index.html 重新命名為 home.html。
直接存取 http://localhost:3000/home.html,介面如下:
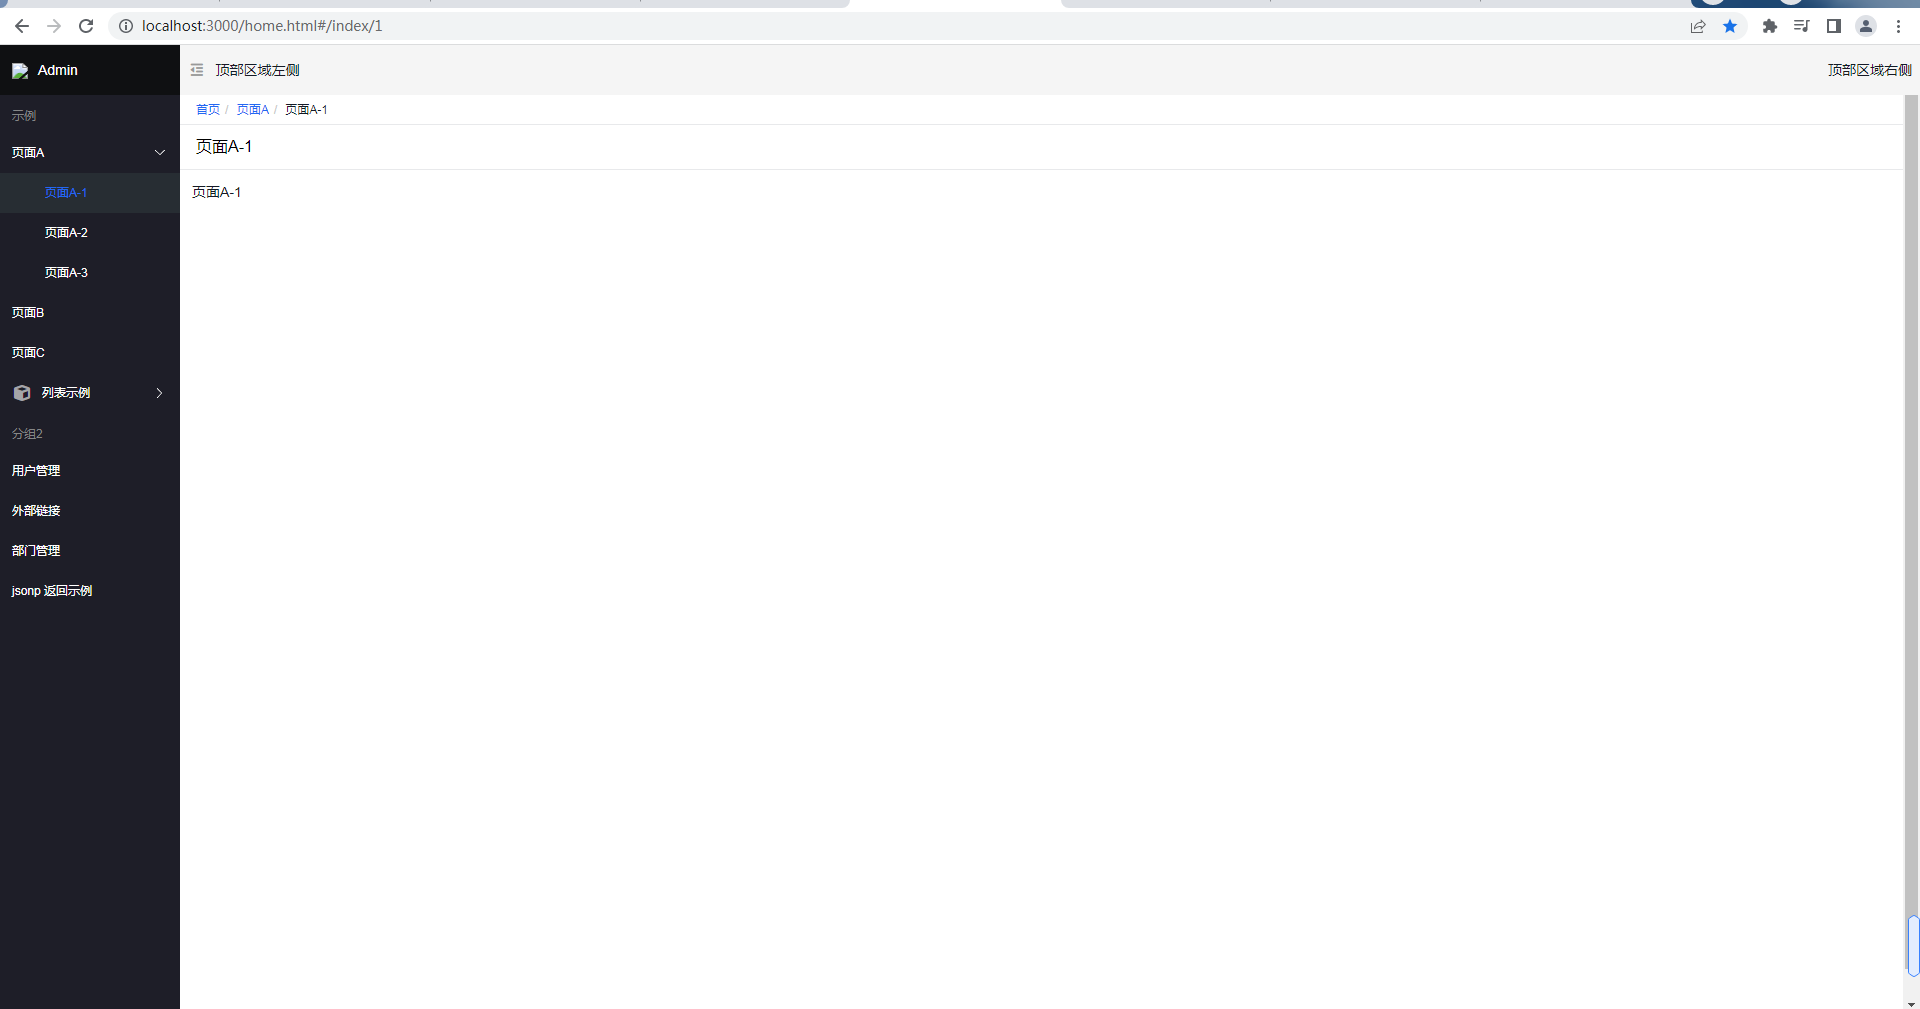
任務計劃初始化
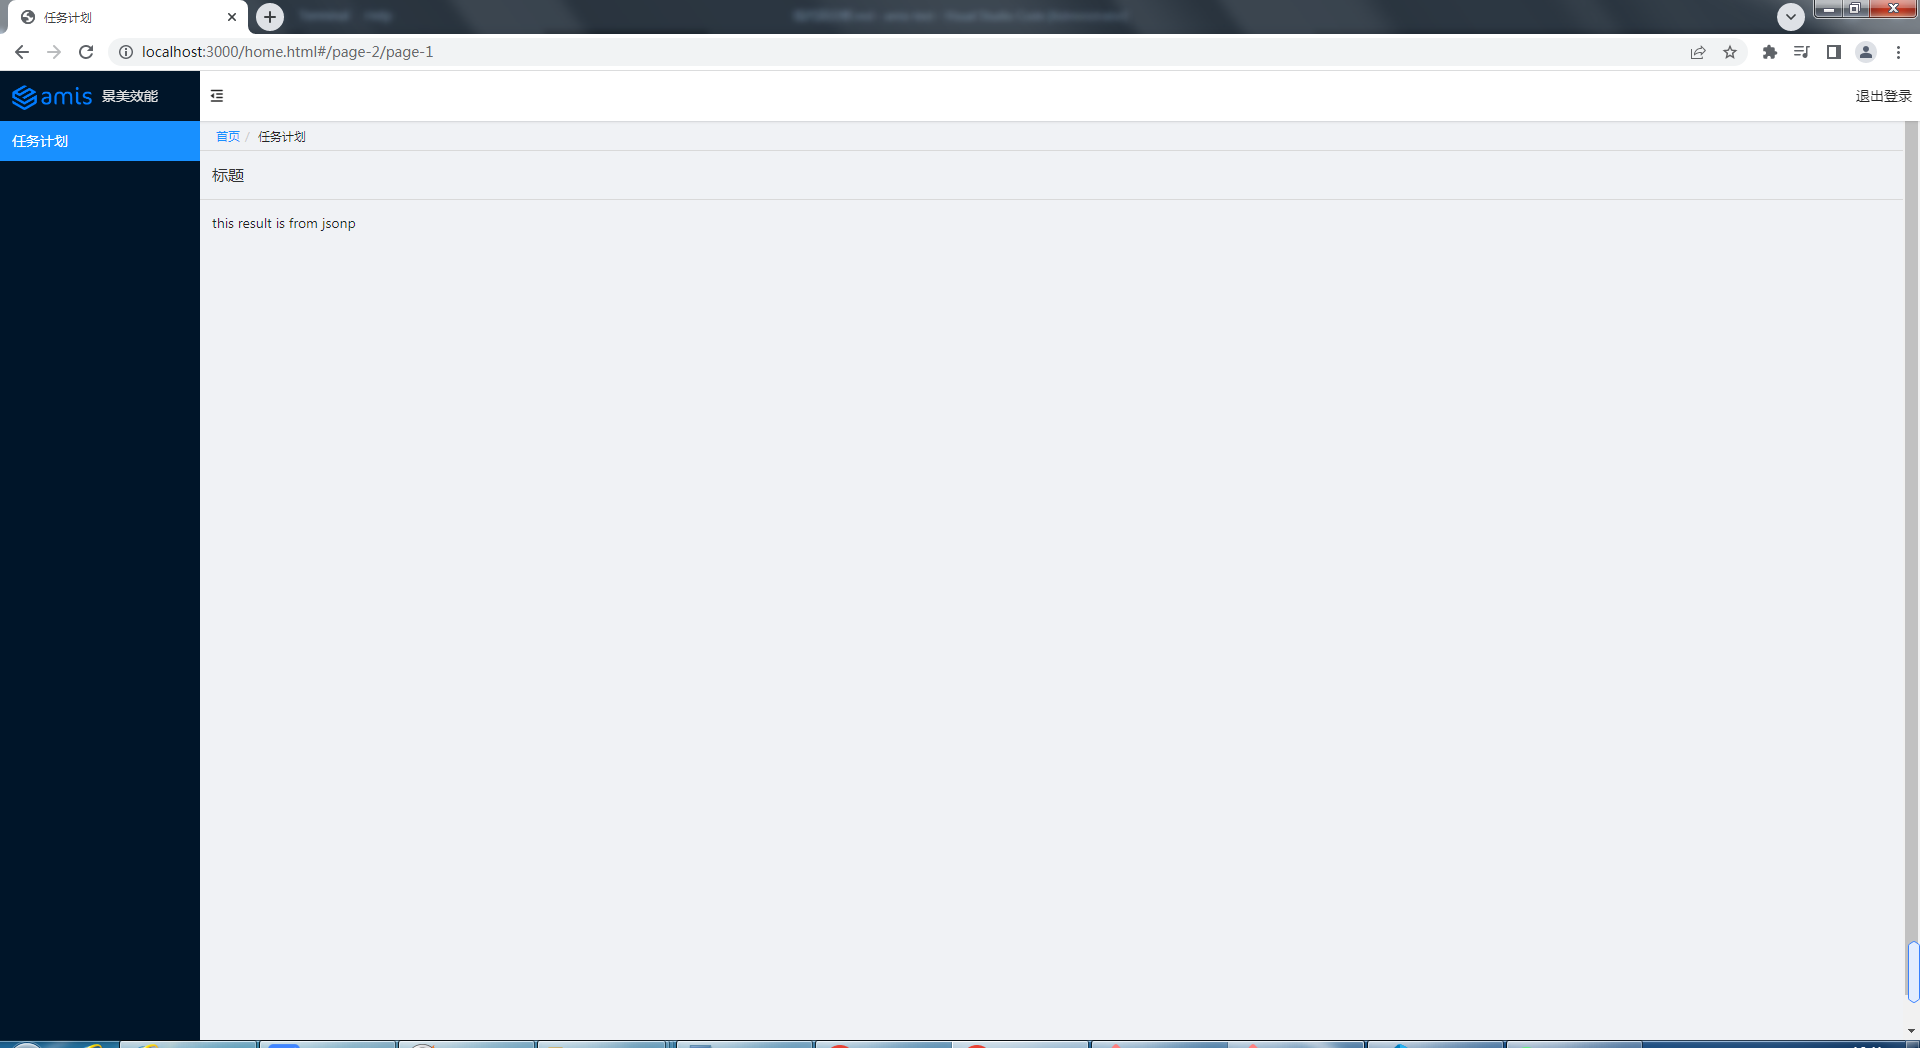
接著我們將後臺模板精簡一下,將任務計劃初始頁完成。
pages 中只有一個 js 檔案,其他都是 .json 檔案。
Administrator@ /e/pengjiali/amis-test/public/pages (master)
$ ll
total 43
-rw-r--r-- 1 Administrator 197121   66 Dec 21  2021 console.json
-rw-r--r-- 1 Administrator 197121 8023 Dec 21  2021 crud-advance.json
-rw-r--r-- 1 Administrator 197121 1385 Dec 21  2021 crud-edit.json
-rw-r--r-- 1 Administrator 197121 3966 Dec 21  2021 crud-list.json
-rw-r--r-- 1 Administrator 197121 1425 Dec 21  2021 crud-new.json
-rw-r--r-- 1 Administrator 197121 1341 Dec 21  2021 crud-view.json
-rw-r--r-- 1 Administrator 197121  368 Dec 21  2021 editor.json
-rw-r--r-- 1 Administrator 197121 5847 Dec 21  2021 form-basic.json
-rw-r--r-- 1 Administrator 197121  202 Dec 21  2021 jsonp.js
-rw-r--r-- 1 Administrator 197121 3282 Dec 21  2021 site.json
-rw-r--r-- 1 Administrator 197121 2636 Dec 21  2021 wizard.json
保留唯一的 js 檔案和 site.json,其他都刪除。並將 jsonp.js 重新命名為 schedule.js。
// site.json
{
  "status": 0,
  "msg": "",
  "data": {
    "pages": [
      {
        "label": "Home",
        "url": "/",
        "redirect": "/index/1"
      },
      {
        "children": [
          {
            "label": "任務計劃",
            "schemaApi": "jsonp:/pages/schedule.js?callback=jsonpCallback"
          }

        ]
      }

    ]
  }
}
// schedule.js
(function() {
	const response = {
		data: {
			type: "page",
			title: "標題",
			body: "this result is from jsonp"
		},
		status: 0
	}

	window.jsonpCallback && window.jsonpCallback(response);
})();
Tip: site.json 是網站設定,這裡只保留一個一級選單;schedule.js 是一級選單的組態檔,這裡單獨提取出來,方便維護。也能寫註釋,.json 檔案中不能寫註釋,頁面會報錯的;
最後稍微修改一下 home.html,比如 logo、主題改為antd:
$ git diff  ../home.html
warning: LF will be replaced by CRLF in public/home.html.
The file will have its original line endings in your working directory
diff --git a/public/home.html b/public/home.html
index 59ee0fa..bddb186 100644
--- a/public/home.html
+++ b/public/home.html
@@ -12,7 +12,7 @@
     <link
       rel="stylesheet"
       title="default"
-      href="https://unpkg.com/amis@beta/sdk/sdk.css"
+      href="https://unpkg.com/amis@beta/sdk/antd.css"
     />
     <link
       rel="stylesheet"
@@ -47,13 +47,13 @@

         const app = {
           type: 'app',
-          brandName: 'Admin',
-          logo: '/public/logo.png',
+          brandName: '後臺系統',
+          logo: 'https://aisuda.bce.baidu.com/amis/static/logo_408c434.png',
           header: {
             type: 'tpl',
             inline: false,
             className: 'w-full',
-            tpl: '<div class="flex justify-between"><div>頂部區域左側</div><div>頂部區域右側</div></div>'
+            tpl: '<div class="flex justify-between"><div></div><div>退出登入</div></div>'
           },
           // footer: '<div class="p-2 text-center bg-light">底部區域</div>',
           // asideBefore: '<div class="p-2 text-center">選單前面區域</div>',
@@ -183,7 +183,7 @@
               }
             },
             isCurrentUrl: isCurrentUrl,
-            theme: 'cxd'
+            theme: 'antd'
           }
         );
最終效果如下圖所示:
任務計劃列表
我們首先給任務計劃新增表格列表的功能。根據官網 table 範例,將設定賦值給 response 變數:
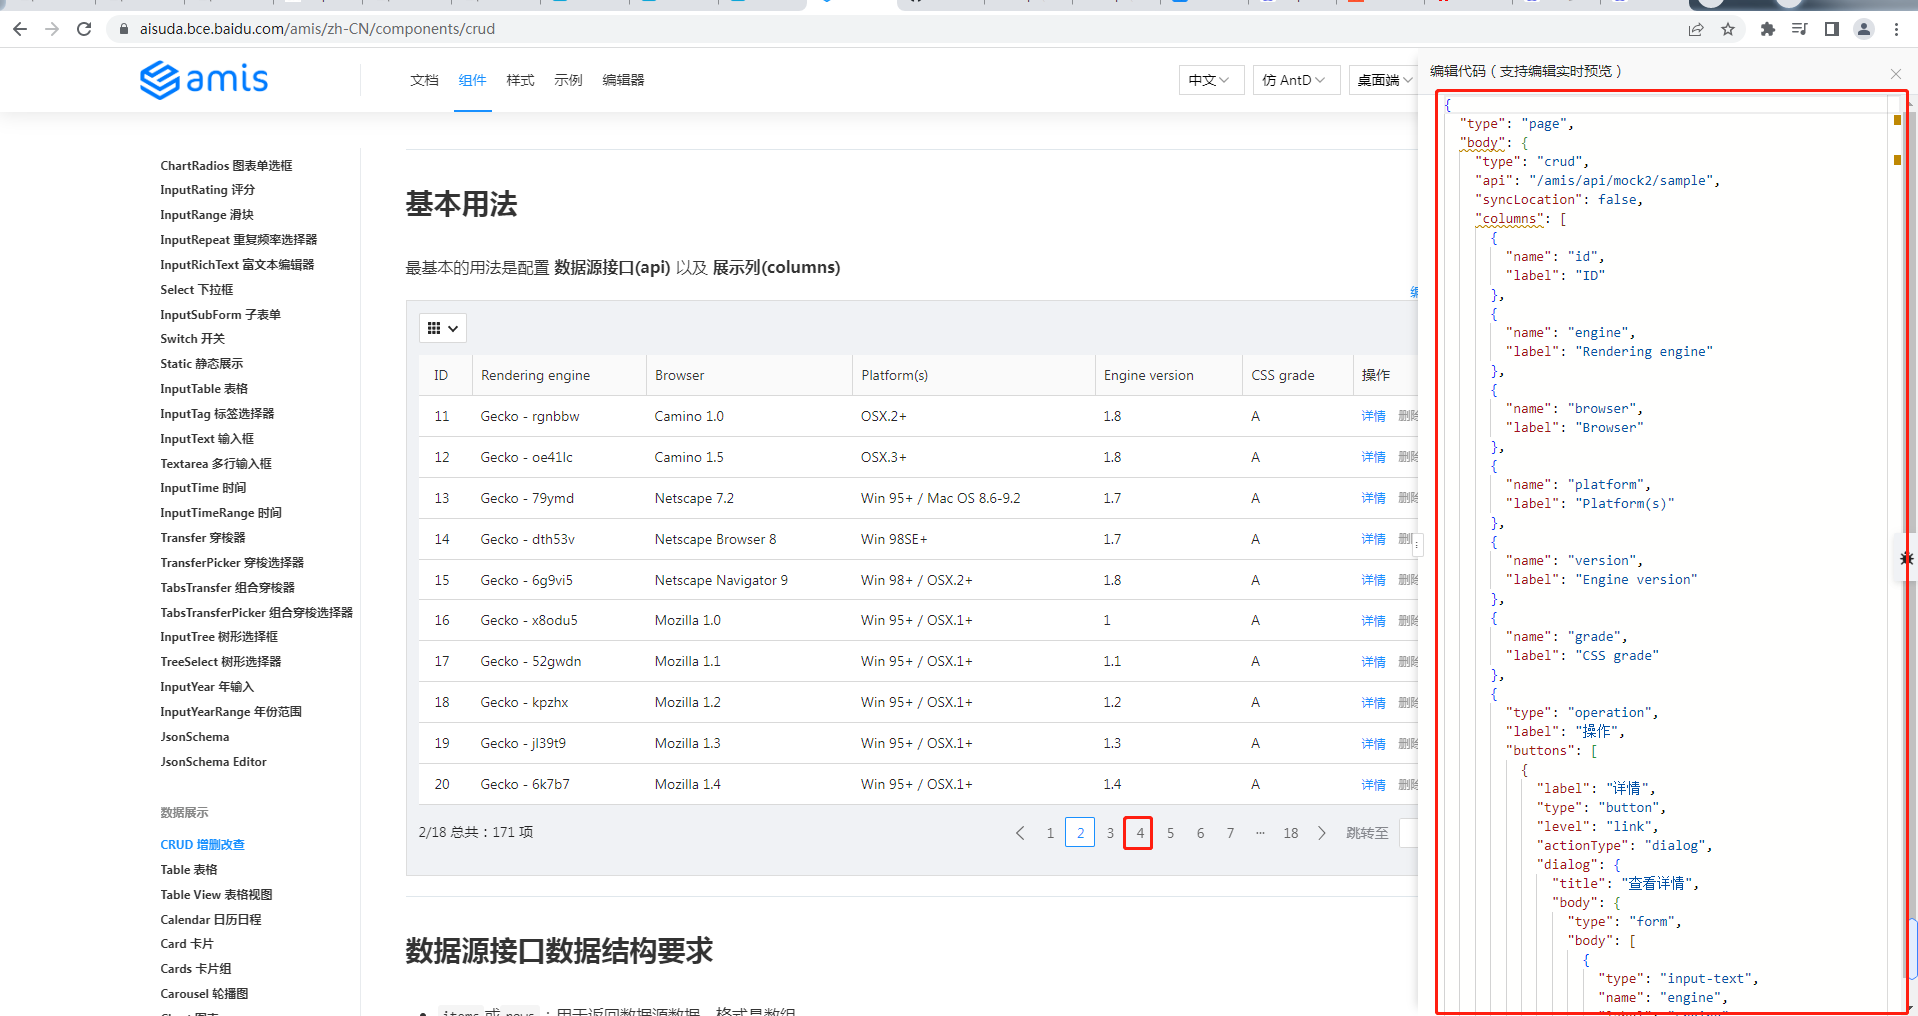
Administrator@ /e/pengjiali/amis-test/public/pages (master)
$ git diff  schedule.js
diff --git a/public/pages/schedule.js b/public/pages/schedule.js
index 9612fb8..5f133b8 100644
--- a/public/pages/schedule.js
+++ b/public/pages/schedule.js
@@ -1,12 +1,96 @@
 (function() {
        const response = {
-               data: {
-                       type: "page",
-                       title: "標題",
-                       body: "this result is from jsonp"
-               },
-               status: 0
-       }
+               "type": "page",
+               "body": {
+                 "type": "crud",
+                 "api": "/api/schedule",
+                 "syncLocation": false,
+                 "columns": [
+                       {
+                         "name": "id",
+                         "label": "ID"
+                       },
+                       {
+                         "name": "engine",
+                         "label": "Rendering engine"
+                       },
...
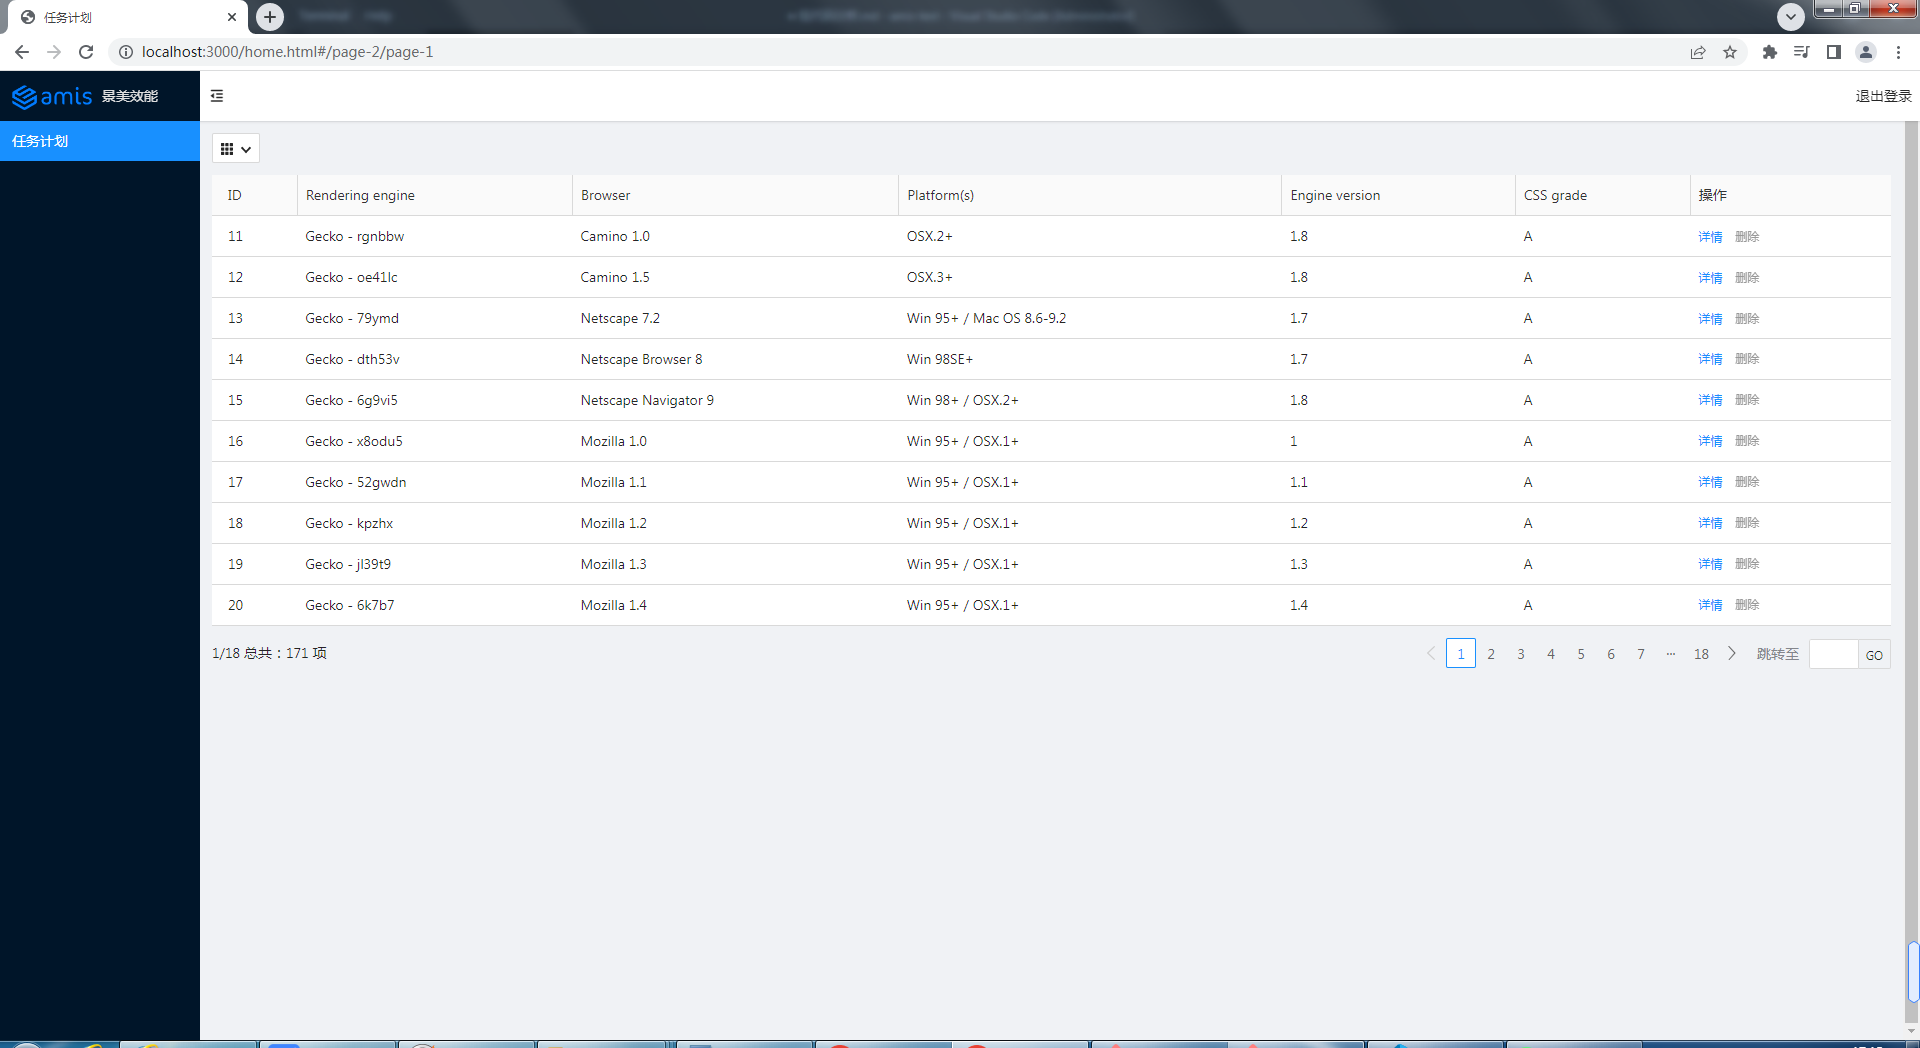
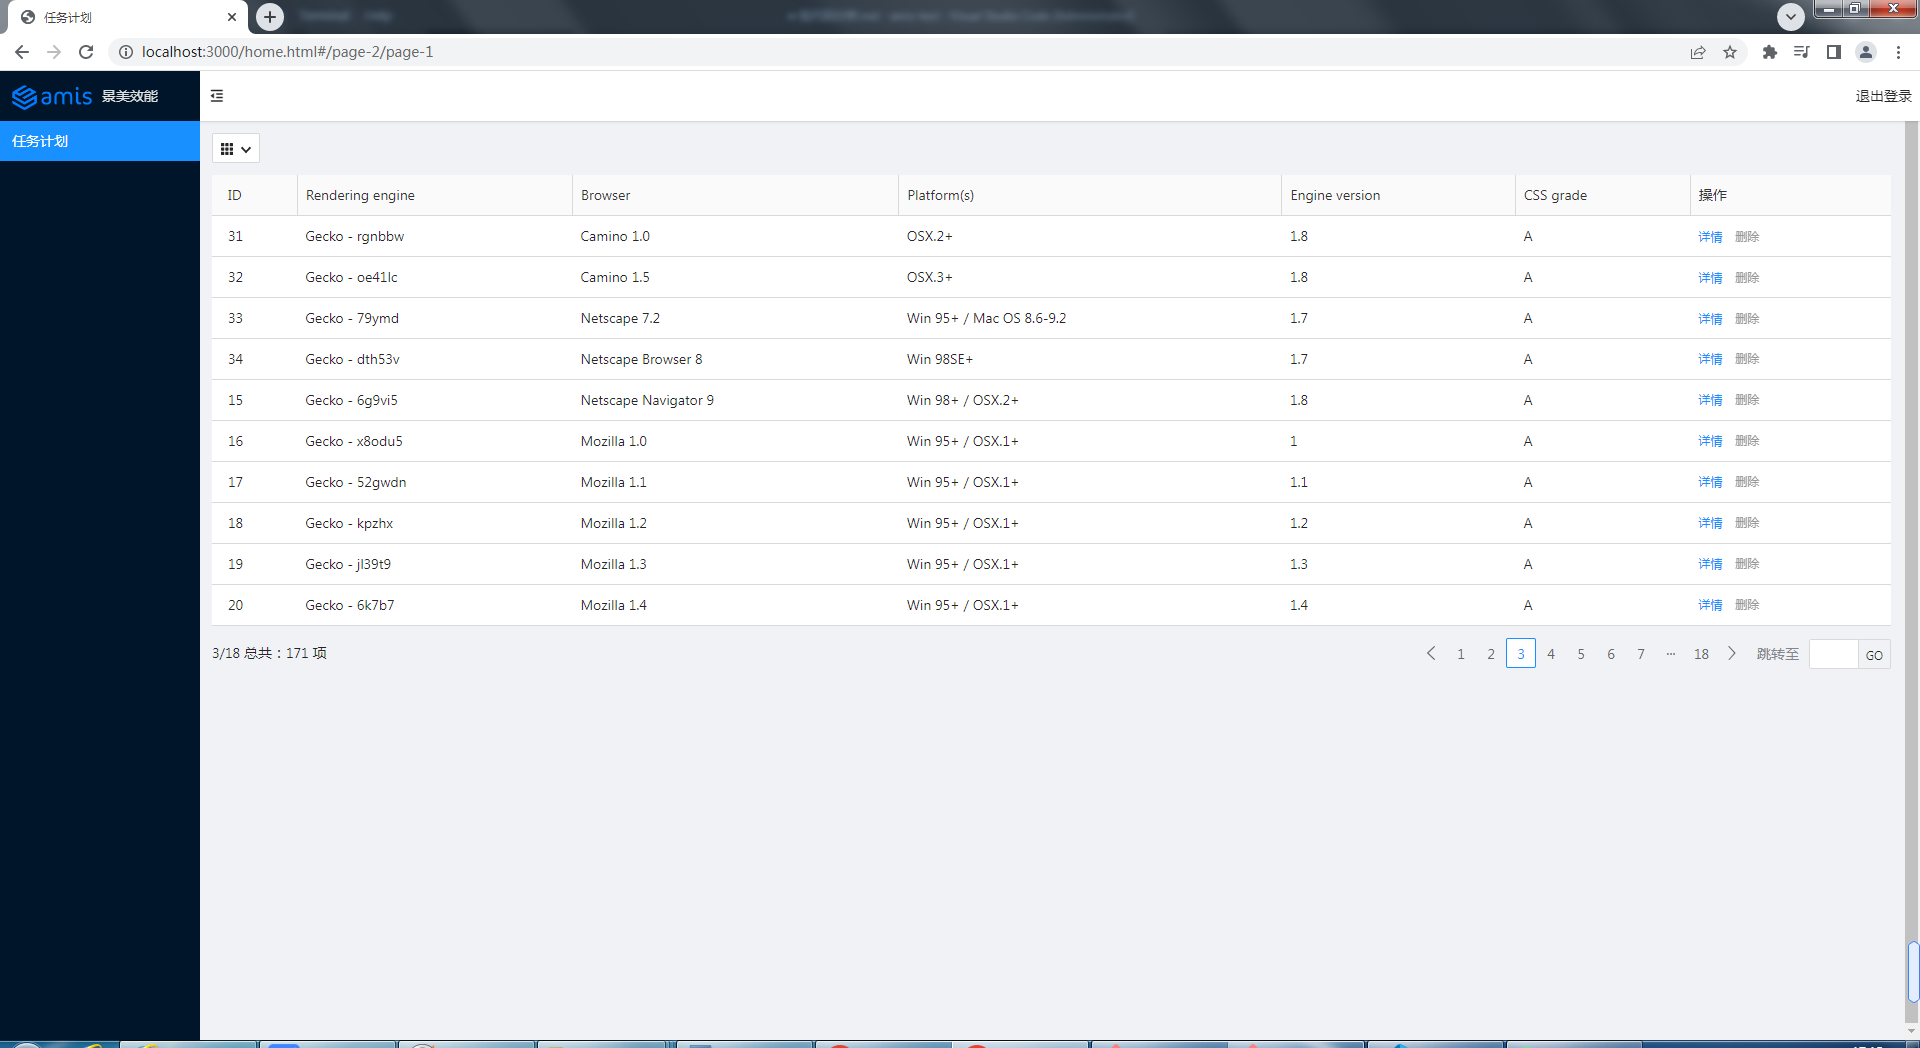
然後編寫獲取任務計劃的介面(/api/schedule),介面內容直接來自官網(點選下一頁,檢視源資料),筆者將 id 改為動態的。
Administrator@ /e/pengjiali/amis-test/public/pages (master)
$ git diff ../../server.js
diff --git a/server.js b/server.js
index a55a683..4cfb1b1 100644
--- a/server.js
+++ b/server.js
@@ -21,6 +21,11 @@ app.post('/api/login', function (req, res) {
     }
 });

+app.get('/api/schedule', function (req, res) {
+    const {page, perPage} = req.query
+    res.json({"status":0,"msg":"ok","data":{"count":171,"rows":[{"engine":"Gecko - rgnbbw","browser":"Camino 1.0","platform":"OSX.2+","version":"1.8","grade":"A","id":page*perPage + 1},{"engine":"Gecko - oe41lc","browser":"Camino 1.5","platform":"OSX.3+","version":"1.8","grade":"A","id":page*perPage + 2},{"engine":"Gecko - 79ymd","browser":"Netscape 7.2","platform":"Win 95+ / Mac OS 8.6-9.2","version":"1.7","grade":"A","id":page*perPage + 3},{"engine":"Gecko - dth53v","browser":"Netscape Browser 8","platform":"Win 98SE+","version":"1.7","grade":"A","id":page*perPage + 4},{"engine":"Gecko - 6g9vi5","browser":"Netscape Navigator 9","platform":"Win 98+ / OSX.2+","version":"1.8","grade":"A","id":15},{"engine":"Gecko - x8odu5","browser":"Mozilla 1.0","platform":"Win 95+ / OSX.1+","version":"1","grade":"A","id":16},{"engine":"Gecko - 52gwdn","browser":"Mozilla 1.1","platform":"Win 95+ / OSX.1+","version":"1.1","grade":"A","id":17},{"engine":"Gecko - kpzhx","browser":"Mozilla 1.2","platform":"Win 95+ / OSX.1+","version":"1.2","grade":"A","id":18},{"engine":"Gecko - jl39t9","browser":"Mozilla 1.3","platform":"Win 95+ / OSX.1+","version":"1.3","grade":"A","id":19},{"engine":"Gecko - 6k7b7","browser":"Mozilla 1.4","platform":"Win 95+ / OSX.1+","version":"1.4","grade":"A","id":20}]}})
+});
+
 // 開啟服務
 app.listen(port, () => {
   console.log(`Example app listening at http://localhost:${port}`)
效果如下圖所示:
授權(Token)
通常,只有登入後才能看到資料。比如我們給列表查詢介面新增如下許可權:
// schedule.js
app.get('/api/schedule', function (req, res) {
    res.json({status: 401, msg: '401 未授權'})
});
再次請求後端資料,效果如下圖所示:
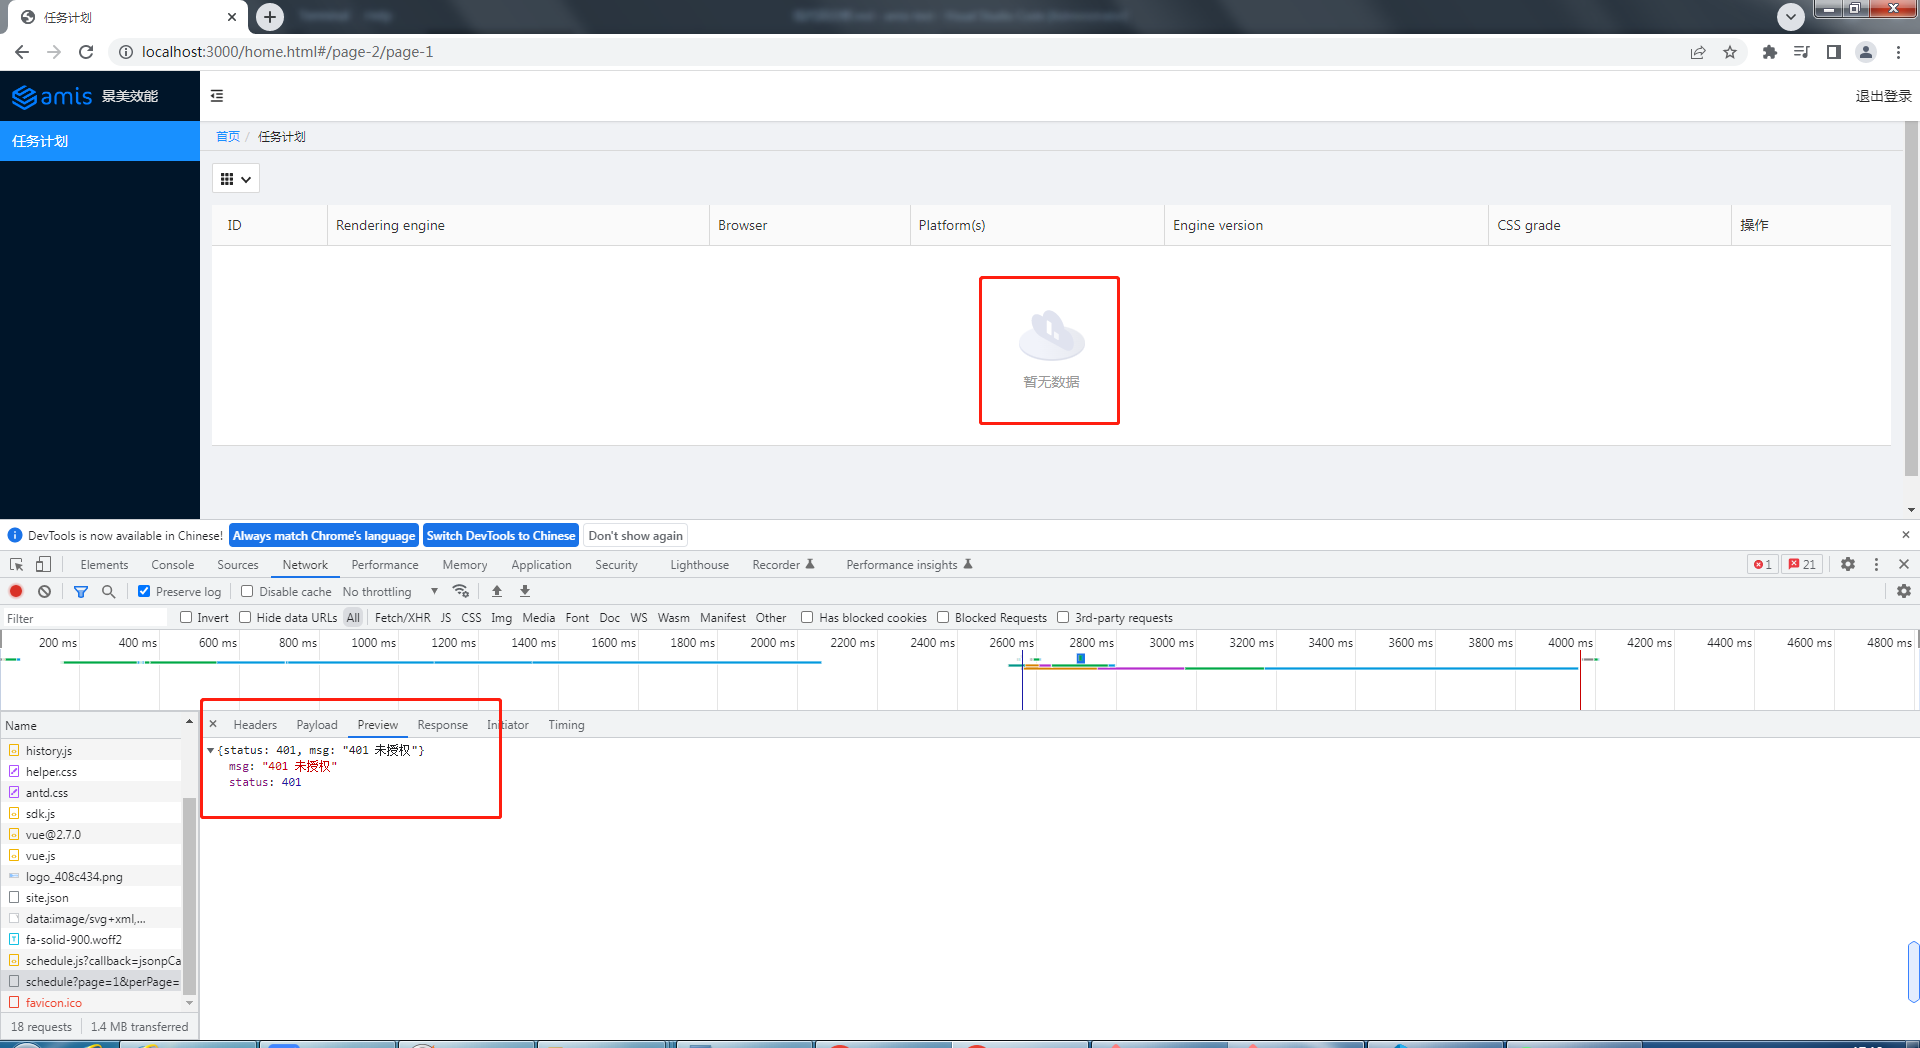
下面我們在傳送請求時新增 token(全域性新增),並給 api 加上授許可權制。程式碼如下:
Administrator@ /e/pengjiali/amis-test/public/pages (master)
$ git diff ../home.html
...
--- a/public/home.html
+++ b/public/home.html
@@ -120,6 +120,12 @@
           location: history.location
         },
         {
+          // 參考:官網 -> 快速開始 -> 控制 amis 的行為
+          requestAdaptor(api) {
+            api.headers.Authorization = localStorage.getItem('token')
+            console.log('api', api)
+            return api;
+          },
           // watchRouteChange: fn => {
           //   return history.listen(fn);
           // },
// server.js
app.get('/api/schedule', function (req, res) {
    // req.get(field) - 返回指定的HTTP請求檔頭欄位(不區分大小寫的匹配)
    const token = req.get('Authorization')
    if (token === 'null') {
        res.json({ status: 401, msg: '401 未授權' })
        return
    }
    const { page, perPage } = req.query
    res.json({ "status": 0, "msg": "ok", "data": { "count": 171, "rows": [{...}] } })
});
Tip:前面我們已經實現登入的時候將 token 存入 localStorage 中。
api: {
    method: 'post',
    url: '/api/login',
    adaptor: function (payload, response) {
        if (payload.status === 0) {
            // 存入 token
            localStorage.setItem('token', payload.data.token)
        }
        console.log('payload', payload)
        return payload
    }
},
現在,登入後就會將 token 存入 localStorage,再次請求「任務列表」,請求頭就能獲取 token 值,後端也就能返回資料。
如果在瀏覽器控制檯清空 token(localStorage.removeItem('token')),再次請求,就看不到任務列表資料了。
路徑美化 & 未登入的重定向
現在存在幾個問題:
- 登入頁和主頁的 url 有點醜。比如登入頁是
http://localhost:3000/login.html,希望改成http://localhost:3000/login - 期望輸入
http://localhost:3000/能直接到主頁去,如果沒有登入,就重定向到登入頁
修復共涉及 4 個檔案:
home.html,資源路勁的變化,新增一個全域性響應介面卡,未授權則重定向到登入頁login.html,資源路勁的變化,登入成功後跳轉至/homesite.json,url 的修改server.js,api 的修改
$ git diff
--- a/public/home.html
+++ b/public/home.html
@@ -50,7 +50,7 @@
         // footer: '<div class="p-2 text-center bg-light">底部區域</div>',
         // asideBefore: '<div class="p-2 text-center">選單前面區域</div>',
         // asideAfter: '<div class="p-2 text-center">選單後面區域</div>',
-        api: '/pages/site.json'
+        api: '/static/pages/site.json'
       };

       function normalizeLink(to, location = history.location) {
@@ -120,12 +120,20 @@
           location: history.location
         },
         {
-          // 官網 -> 快速開始 -> 控制 amis 的行為
+          // 全域性請求介面卡。參考:官網 -> 快速開始 -> 控制 amis 的行為
           requestAdaptor(api) {
             api.headers.Authorization = localStorage.getItem('token')
             console.log('api', api)
             return api;
           },
+          // 全域性響應介面卡。參考:官網 -> 快速開始 -> 控制 amis 的行為
+          responseAdaptor(api, payload, query, request, response) {
+            if(payload.status === 401){
+              console.log('未授權,請重新登入')
+              location.href = '/login'
+            }
+            return payload;
+          },
           // watchRouteChange: fn => {
           //   return history.listen(fn);
           // },
diff --git a/public/login.html b/public/login.html
index 4a58e4e..28a9fa0 100644
--- a/public/login.html
+++ b/public/login.html
@@ -7,9 +7,9 @@
     <meta http-equiv="Content-Type" content="text/html; charset=utf-8" />
     <meta name="viewport" content="width=device-width, initial-scale=1, maximum-scale=1" />
     <meta http-equiv="X-UA-Compatible" content="IE=Edge" />
-    <link rel="stylesheet" href="./sdk/sdk.css" />
-    <link rel="stylesheet" href="./sdk/helper.css" />
-    <link rel="stylesheet" href="./sdk/iconfont.css" />
+    <link rel="stylesheet" href="/static/sdk/sdk.css" />
+    <link rel="stylesheet" href="/static/sdk/helper.css" />
+    <link rel="stylesheet" href="/static/sdk/iconfont.css" />
     <!-- 這是預設主題所需的,如果是其他主題則不需要 -->
     <!-- 從 1.1.0 開始 sdk.css 將不支援 IE 11,如果要支援 IE11 請參照這個 css,並把前面那個刪了 -->
     <!-- <link rel="stylesheet" href="sdk-ie11.css" /> -->
@@ -29,7 +29,7 @@

 <body>
     <div id="root" class="app-wrapper"></div>
-    <script src="./sdk/sdk.js"></script>
+    <script src="/static/sdk/sdk.js"></script>
     <script type="text/javascript">
         (function () {
             let amis = amisRequire('amis/embed');
@@ -52,7 +52,7 @@
                         }
                     },
                     // 官網 -> 元件 -> Form 表單 -> 頁面跳轉
-                    redirect: "/home.html",
+                    redirect: "/home",
                     body: [
                         {
                             label: '姓名',
diff --git a/public/pages/site.json b/public/pages/site.json
index 1a9f63e..523258a 100644
--- a/public/pages/site.json
+++ b/public/pages/site.json
@@ -6,13 +6,14 @@
       {
         "label": "Home",
         "url": "/",
-        "redirect": "/index/1"
+        "redirect": "/schedule"
       },
       {
         "children": [
           {
             "label": "任務計劃",
-            "schemaApi": "jsonp:/pages/schedule.js?callback=jsonpCallback"
+            "schemaApi": "jsonp:/static/pages/schedule.js?callback=jsonpCallback",
+            "url": "/schedule"
           }

         ]
diff --git a/server.js b/server.js
index 225a4be..6591ea3 100644
--- a/server.js
+++ b/server.js
@@ -7,8 +7,19 @@ app.use(express.json()) // for parsing application/json
 app.use(express.urlencoded({ extended: true })) // for parsing application/x-www-form-urlencoded

 // 將靜態資源對外開放
-app.use('/', express.static(path.join(__dirname, 'public')))
+app.use('/static', express.static(path.join(__dirname, 'public')))

+app.get('/', function(req, res){
+    res.redirect('/home')
+})
+
+app.get('/home', function(req, res){
+    res.sendFile(path.join(__dirname, 'public', 'home.html'))
+})
+
+app.get('/login', function(req, res){
+    res.sendFile(path.join(__dirname, 'public', 'login.html'))
+})

 // 登入介面
 app.post('/api/login', function (req, res) {
(END)
Tip: url 跟資源路徑是沒有關係的。比如請求 /login,伺服器卻可以返回 home.html 的內容。
接下來測試:
首先在控制檯執行 localStorage.clear(),清空 token。
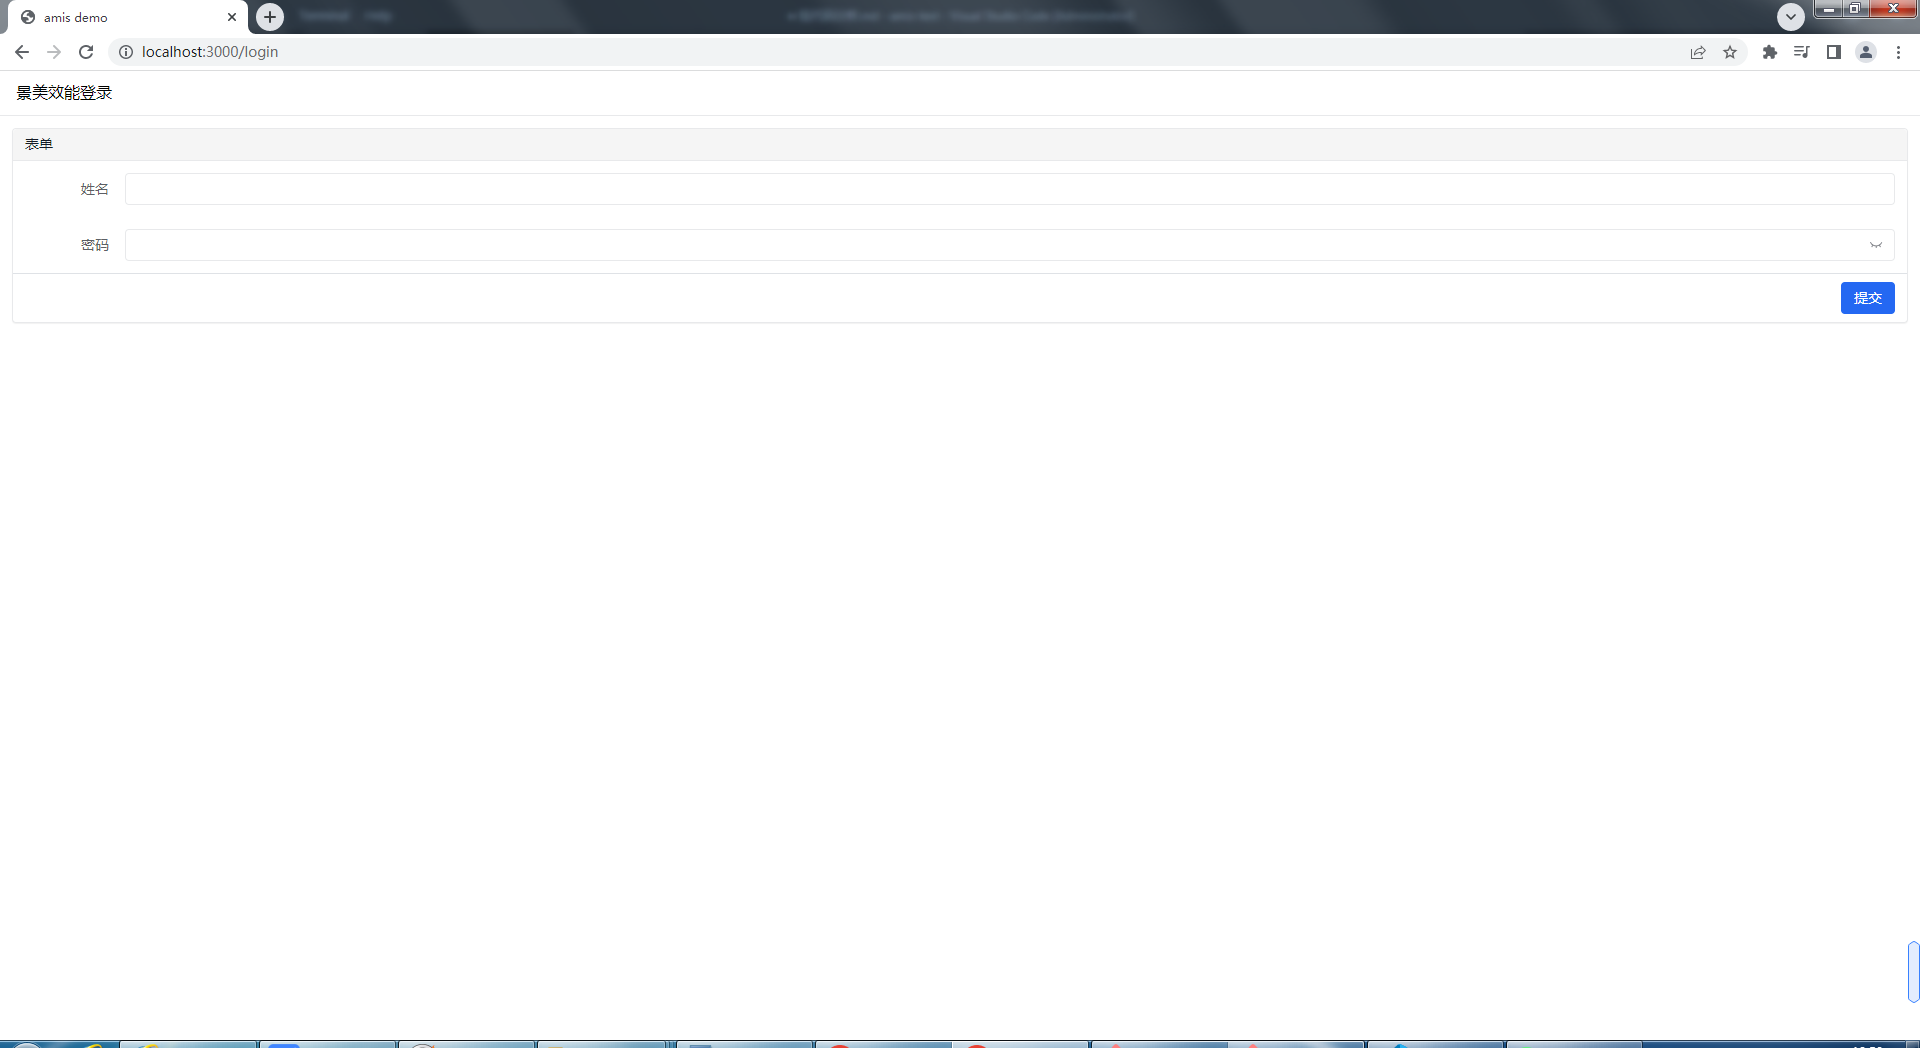
接著在瀏覽器中輸入 http://localhost:3000/,你會發現瀏覽器首先重定向到 http://localhost:3000/home,然後由於沒有 token,於是在重定向到 http://localhost:3000/login。如下圖所示:
輸入正確的使用者名稱和密碼(a/a),登入成功,直接來到任務計劃。請看下圖:
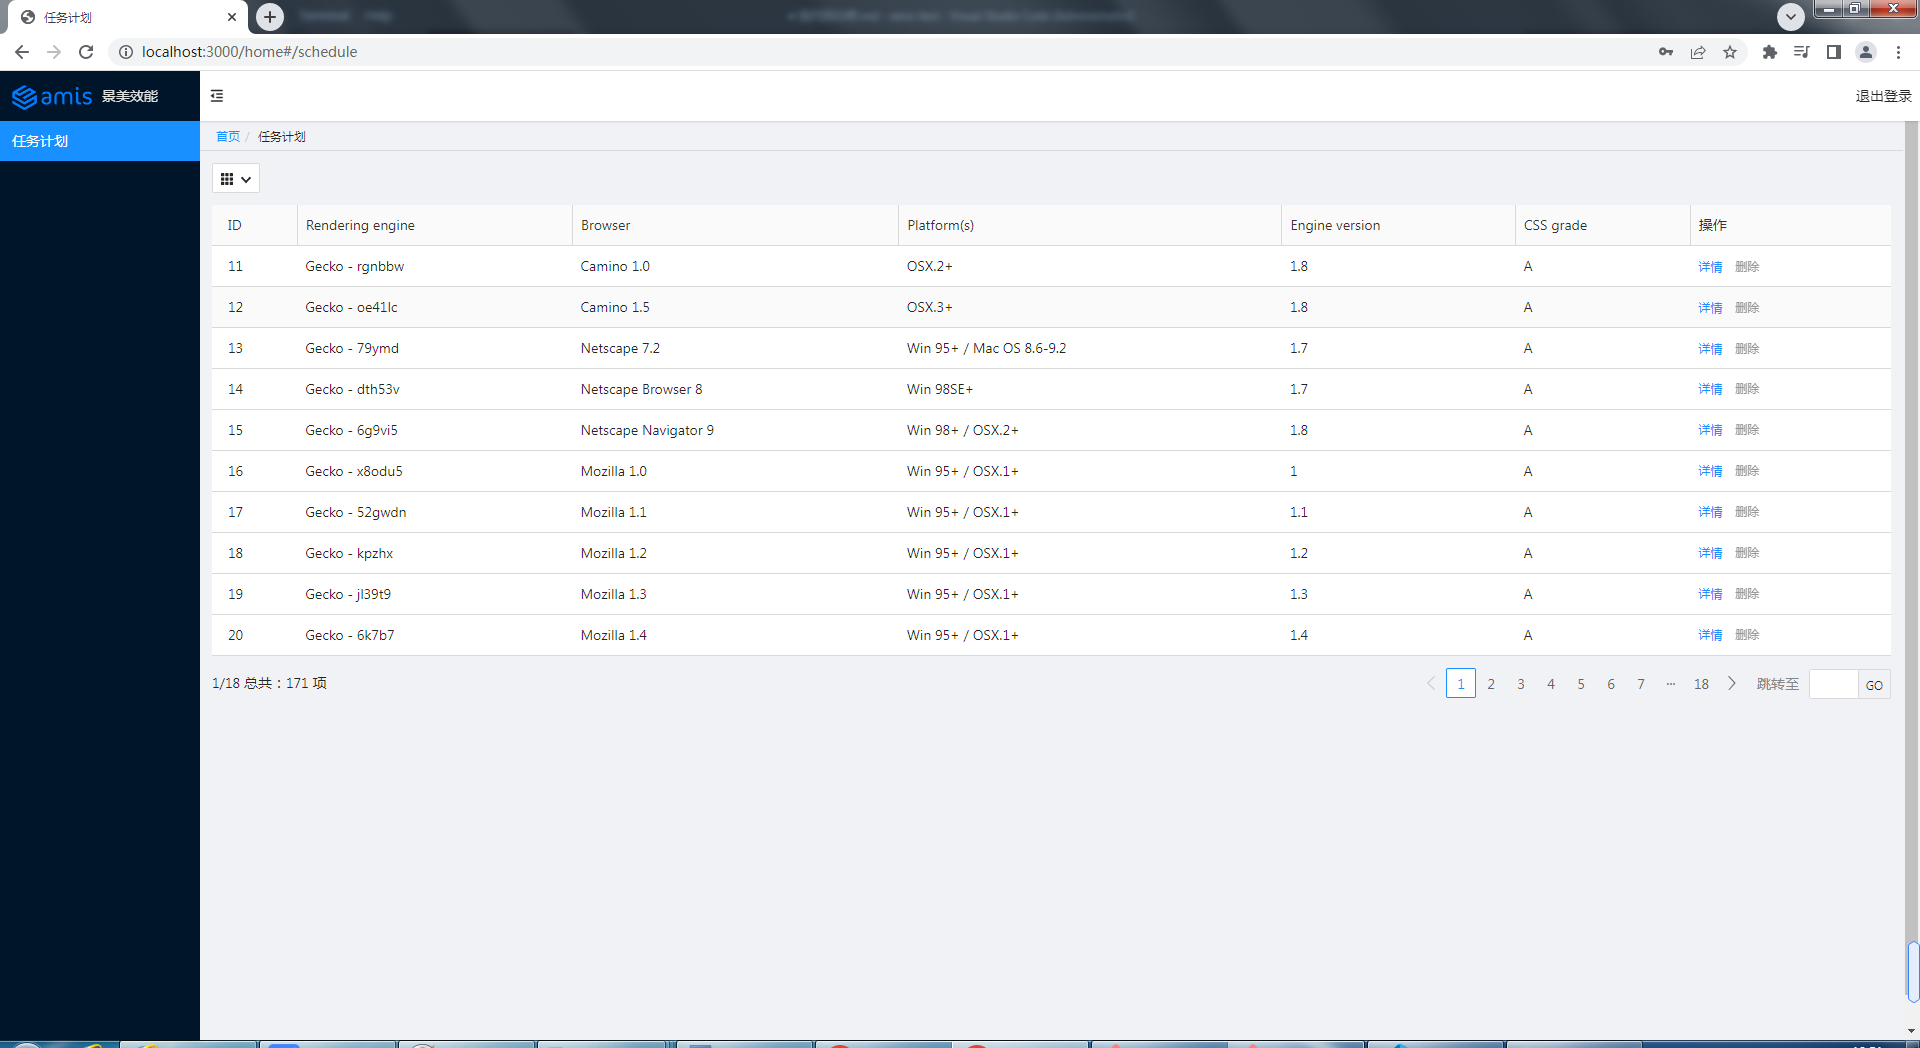
任務計劃的CURD
建立(Create)
直接將官網的新增程式碼拷貝到 schedule.js 中。
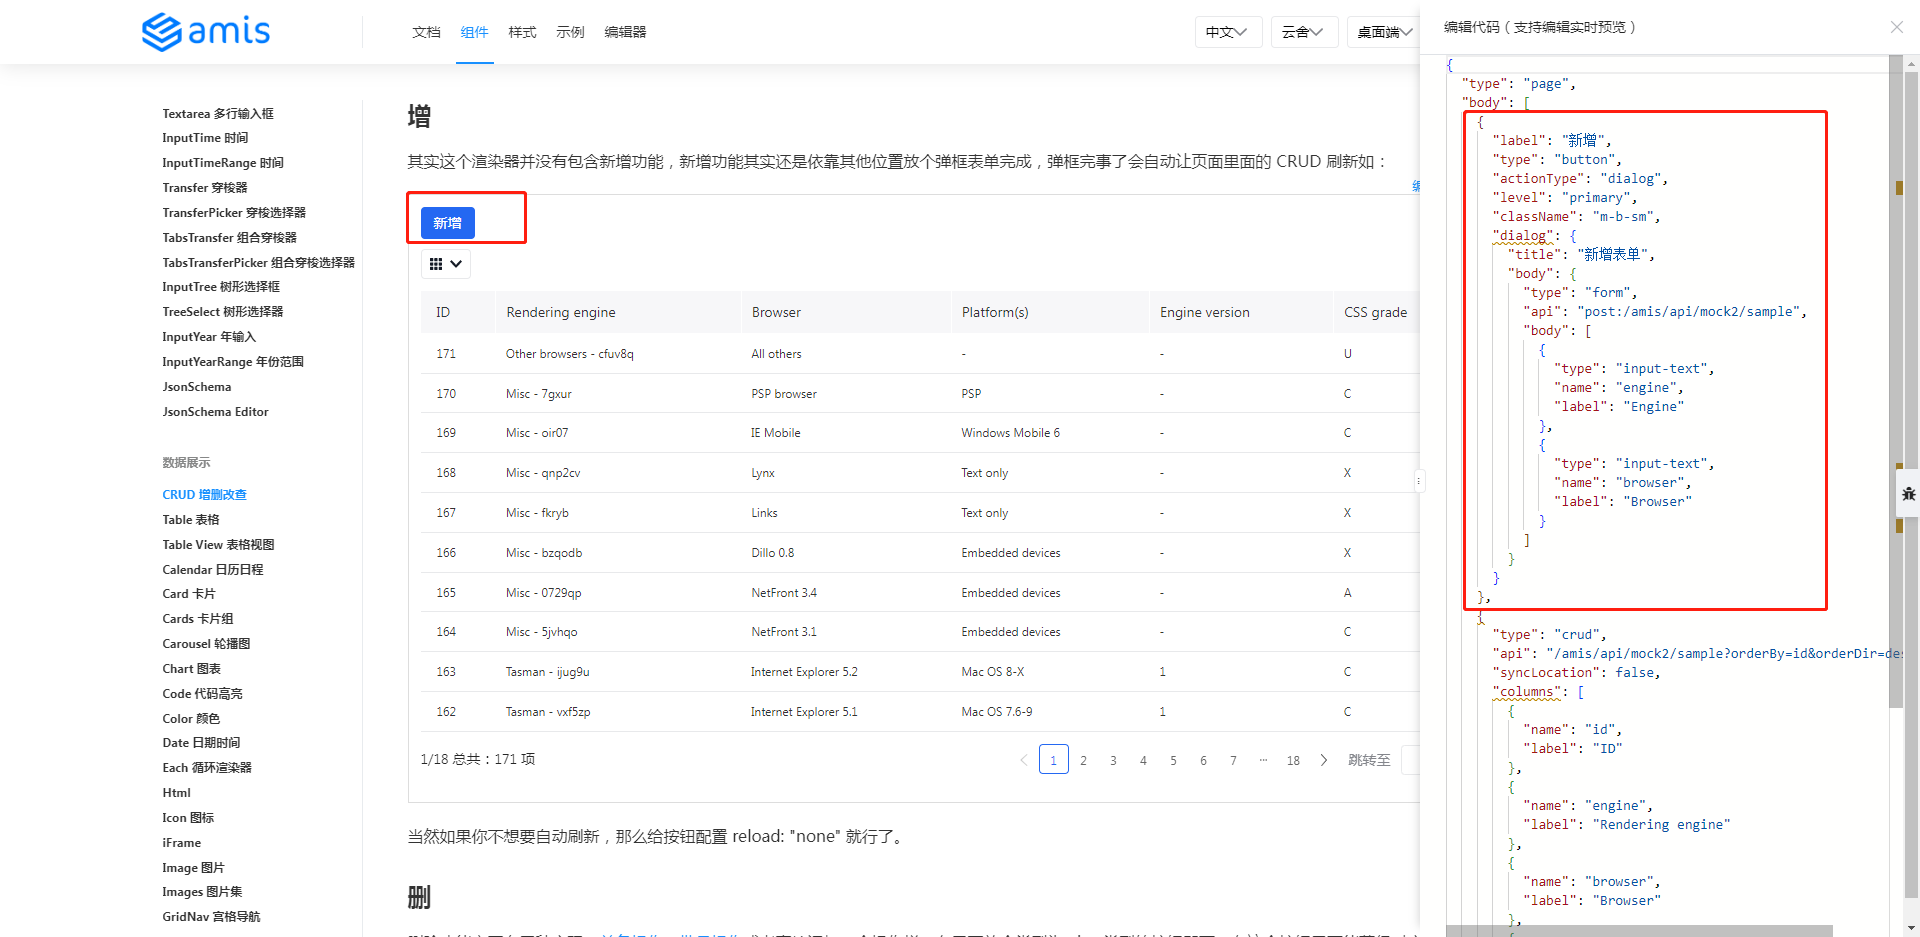
Administrator@ /e/pengjiali/amis-test (master)
$ git diff public/pages/schedule.js
...
-(function() {
+(function () {
        const response = {
                "type": "page",
-               "body": {
-                 "type": "crud",
-                 "api": "/api/schedule",
-                 "syncLocation": false,
-                 "columns": [
-                       {
-                         "name": "id",
-                         "label": "ID"
-                       },
...
+               "body": [{
+                       "label": "新增",
+                       "type": "button",
+                       "actionType": "dialog",
+                       "level": "primary",
+                       "className": "m-b-sm",
+                       "dialog": {
+                               "title": "新增表單",
+                               "body": {
+                                       "type": "form",
+                                       "api": "post:/amis/api/mock2/sample",
+                                       "body": [
                                                {
-                                                 "type": "input-text",
點選新增,效果如下圖所示:
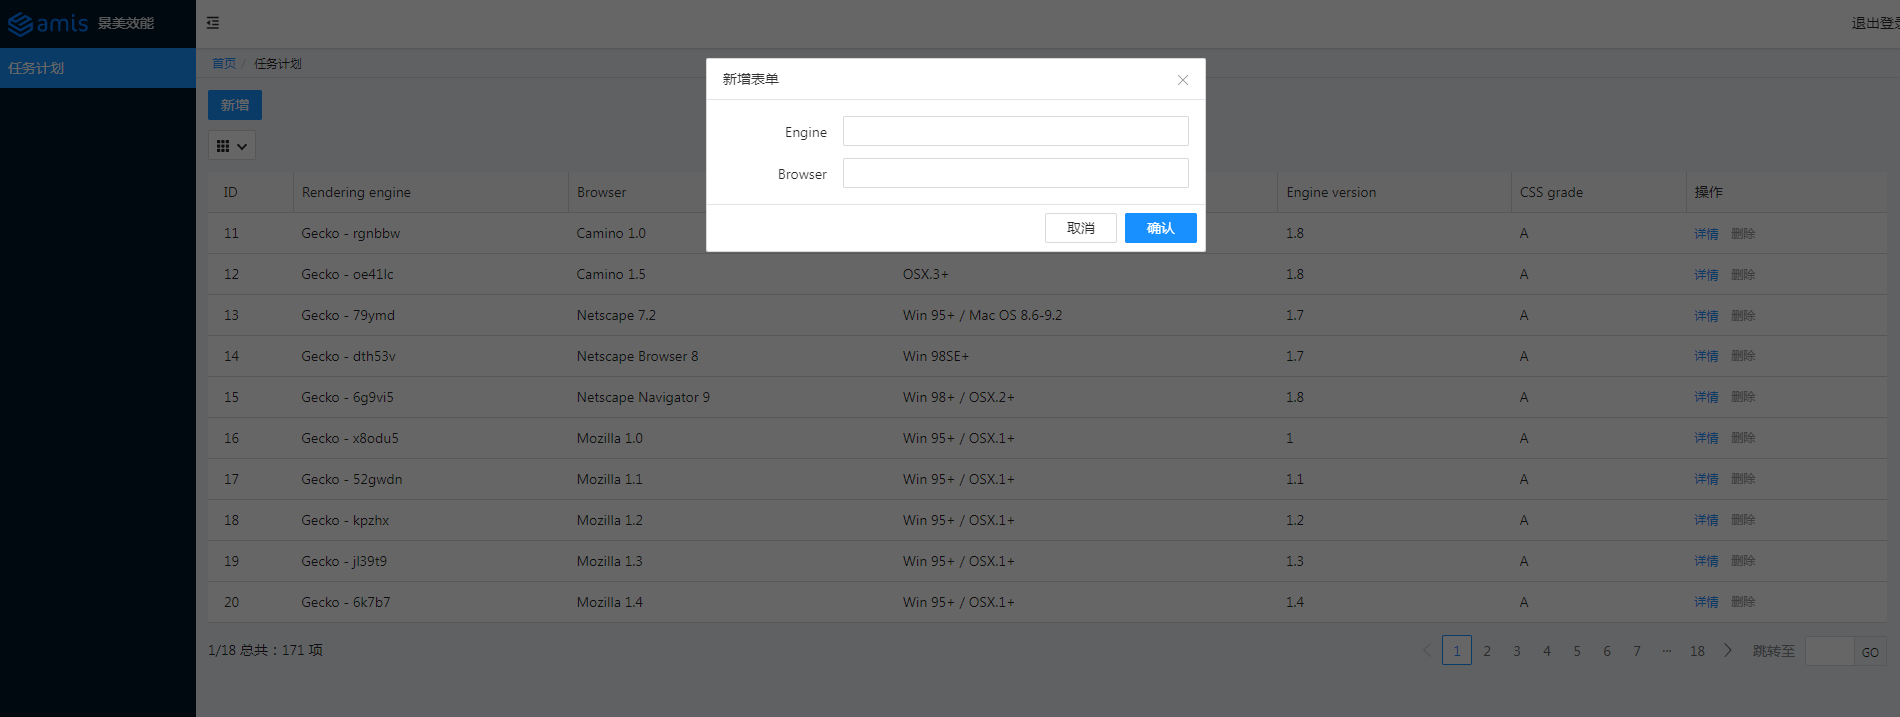
修改介面,後端接收到新增的資訊,在控制檯中輸入。程式碼如下所示:
Administrator@ /e/pengjiali/amis-test (master)
$ git diff public/pages/schedule.js
...
                                "title": "新增表單",
                                "body": {
                                        "type": "form",
-                                       "api": "post:/amis/api/mock2/sample",
+                                       "api": "post:/api/schedule",
                                        "body": [
                                                {
                                                        "type": "input-text",
// server.js
// 新增
app.post('/api/schedule', function (req, res) {
    const { engine, browser } = req.body
    // 授權部分應該可以提取到一個地方,這裡僅做演示
    const token = req.get('Authorization')
    if (token === 'null') {
        res.json({ status: 401, msg: '401 未授權' })
        return
    }

    console.log(`存入資料庫:engine=${engine} browser=${browser}`)
    res.json({ "status": 0, "msg": "儲存成功", "data": {} })
});
再次點選「新增」,輸入 engine11 和 browser11,點選儲存,介面提示儲存成功,同時表格也會重新整理當前頁。如下圖所示:

伺服器控制檯輸出如下資訊:
存入資料庫:engine=engine11 browser=browser11
更新(Update)
參考官網的範例,將對應程式碼拷貝至 schedule.js:
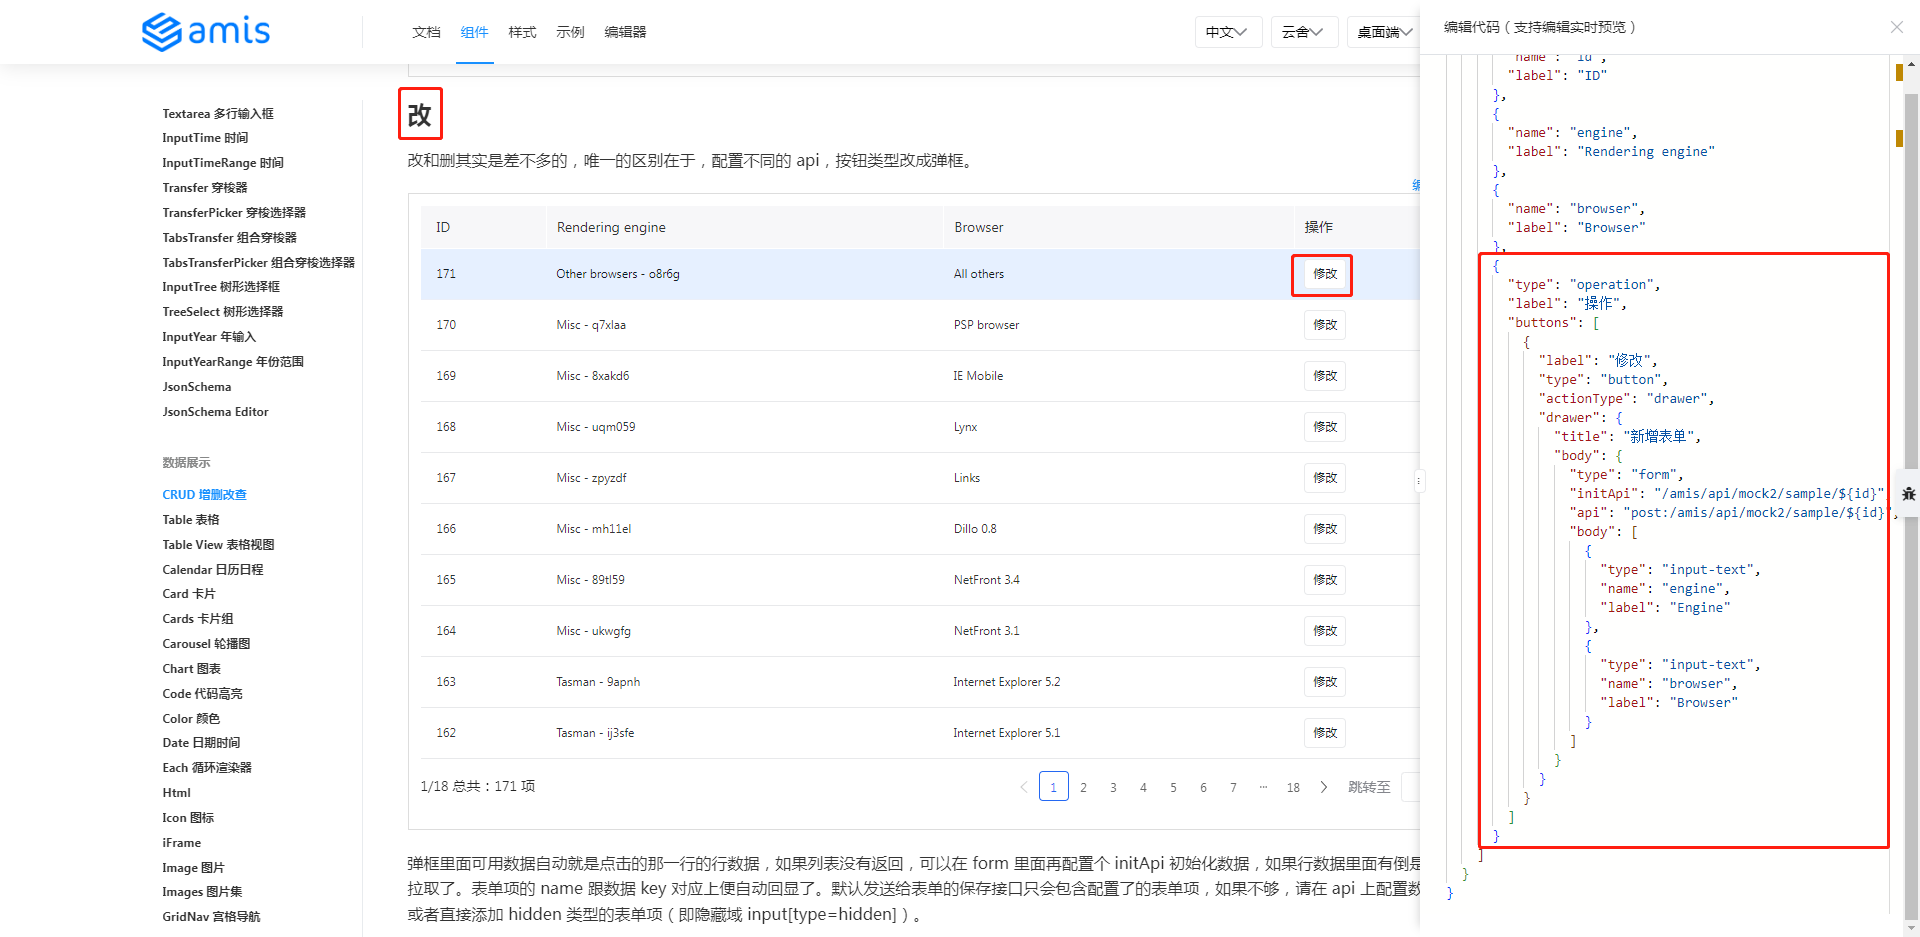
筆者新增兩個 api,一個是根據 id 查詢(如果不提供這個 api,amis 則使用前端的資料),一個是真正修改的 api。程式碼如下所示:
Administrator@ /e/pengjiali/amis-test (master)
$ git diff public/pages/schedule.js
...
    "type": "operation",
    "label": "操作",
    "buttons": [
+           {
+                   "label": "修改",
+                   "type": "button",
+                   // 預設是抽屜樣式,也提供了通常的彈框樣式
+                   "actionType": "drawer",
+                   "drawer": {
+                           "title": "新增表單",
+                           "body": {
+                                   "type": "form",
+                                   // 表單初始化。如果不設定,表單中的資料直接來自前端
+                                   "initApi": "/api/schedule/${id}",
+                                   "api": "post:/api/schedule/${id}",
+                                   "body": [
+       {
+               "type": "input-text",
+               "name": "engine",
+               "label": "Engine"
+       },
+       {
+               "type": "input-text",
+               "name": "browser",
+               "label": "Browser"
+       }
+                                   ]
+                           }
+                   }
+           },
            {
                    "label": "詳情",
                    "type": "button",
Administrator@ /e/pengjiali/amis-test (master)
$ git diff server.js
...

+// 修改-查詢
+app.get('/api/schedule/:id', function (req, res) {
+    // /api/schedule/:id { id: '11' }
+    console.log('/api/schedule/:id', req.params)
+
+    const {id} = req.params
+    // 資料來自官網
+    res.json({"status":0,"data":{"engine":"Other browsers" + id,"browser":"All others" + id,"platform":"-","version":"-","grade":"U","id":id}})
+})
+
+// 修改-提交
+app.post('/api/schedule/:id', function (req, res) {
+    const {id} = req.params
+    // post:/api/schedule/:id 11
+    console.log('post:/api/schedule/:id', id)
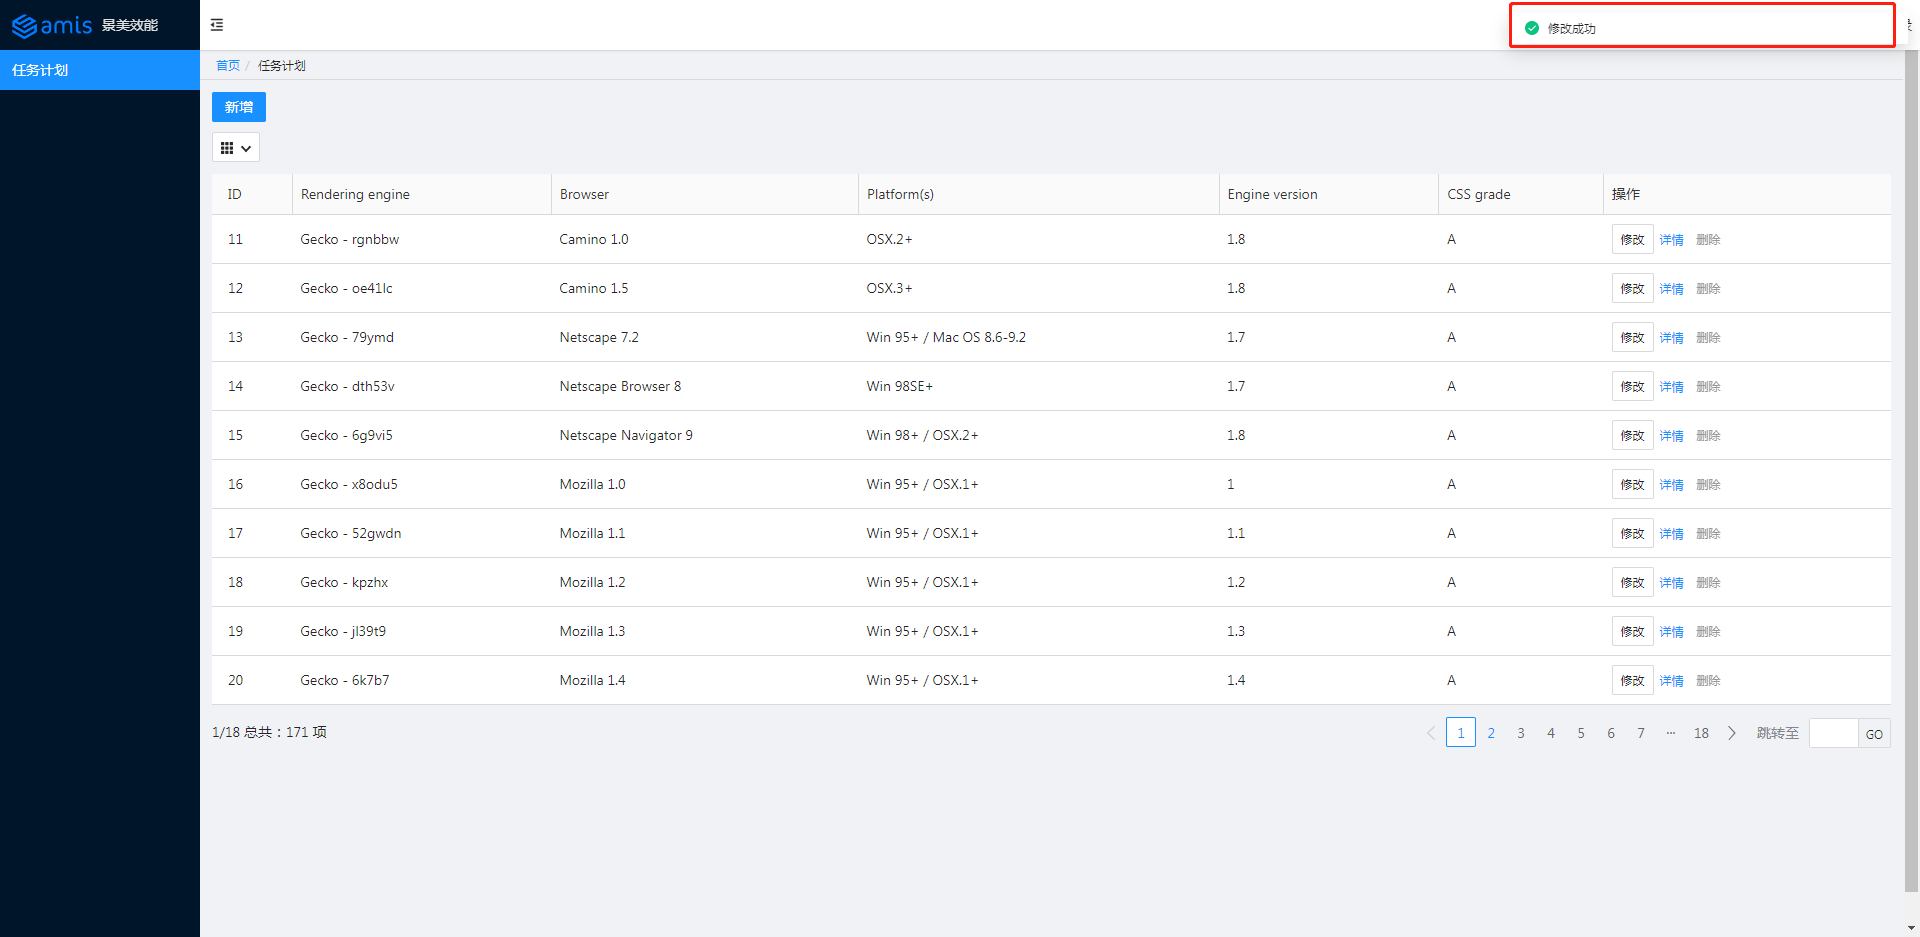
+    res.json({"status":0, "msg": "修改成功", "data":{}})
+})
點選修改按鈕,預設是抽屜式彈框。效果如下圖所示:
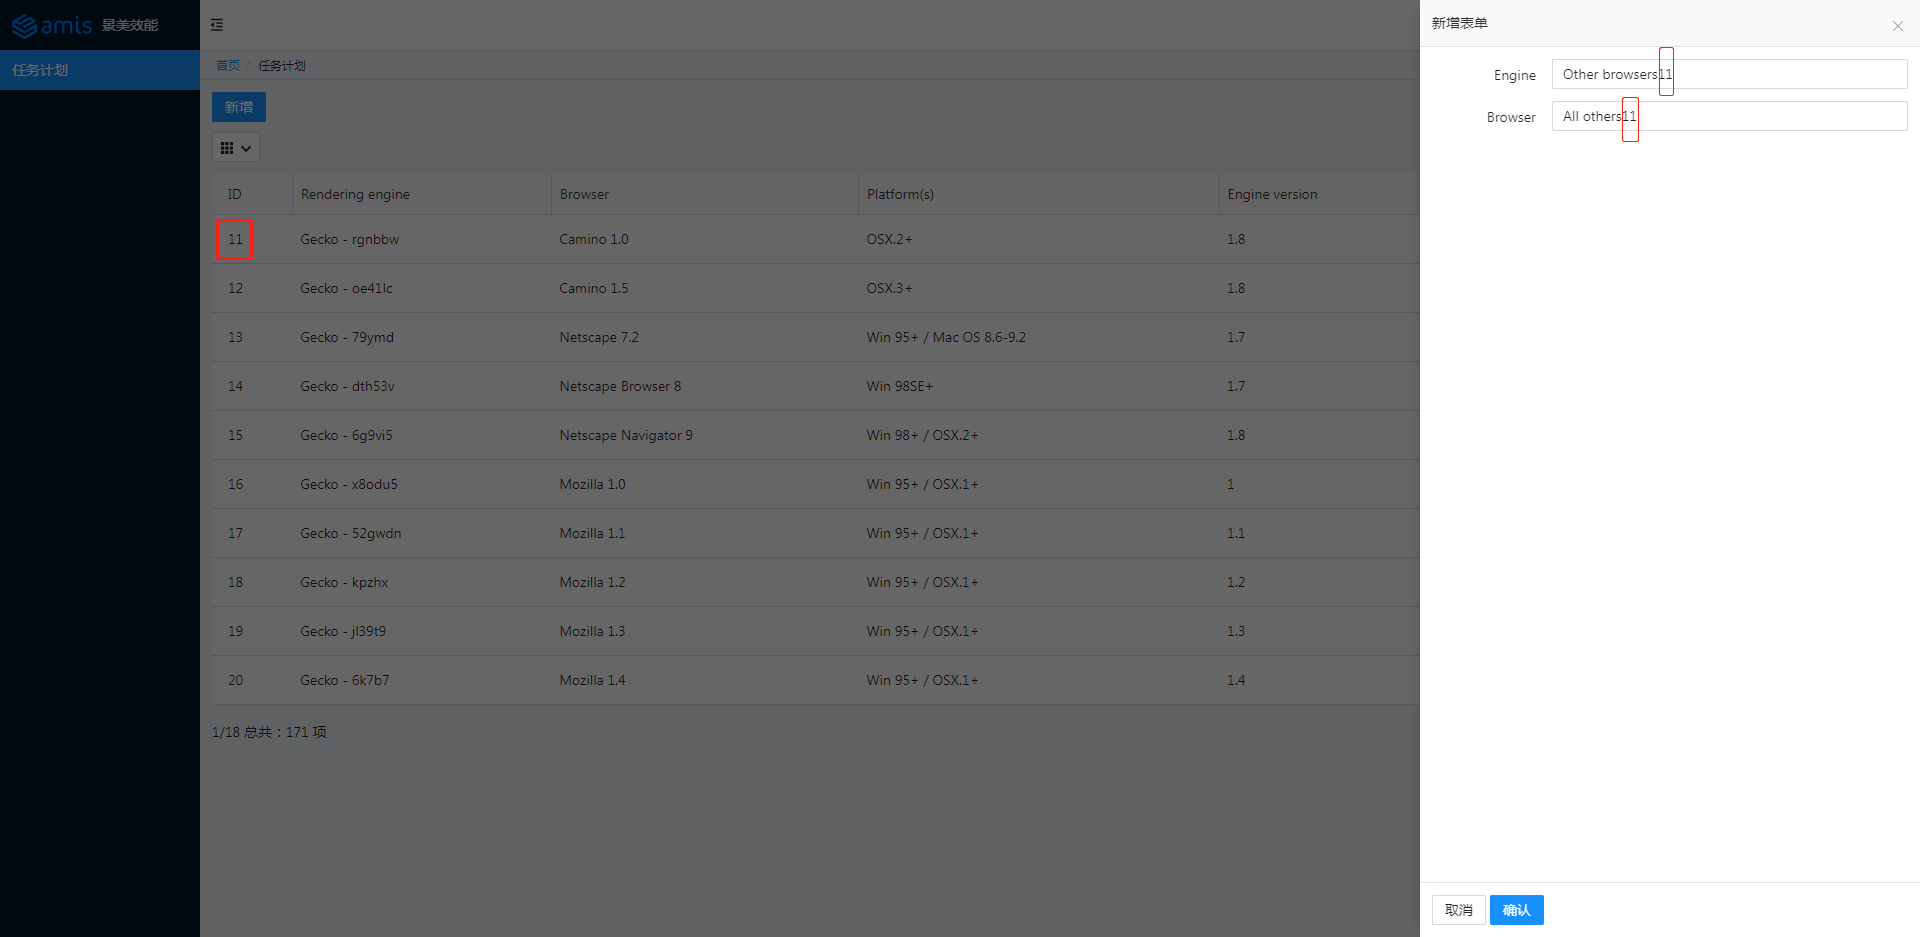
點選儲存。效果如下圖所示:
刪除(Delete)
參考官網的範例,將對應程式碼拷貝至 schedule.js:

程式碼修改如下:
// schedule.js
{
    "label": "刪除",
    "type": "button",
    "actionType": "ajax",
    "level": "danger",
    "confirmText": "確認要刪除?",
    "api": "delete:/api/schedule/${id}"
}
// server.js
// 刪除
app.delete('/api/schedule/:id', function (req, res) {
    const {id} = req.params
    // post:/api/schedule/:id 11
    console.log('delete:/api/schedule/:id', id)
    res.json({"status":0, "msg": "刪除成功", "data":{}})
})
效果如下圖所示:
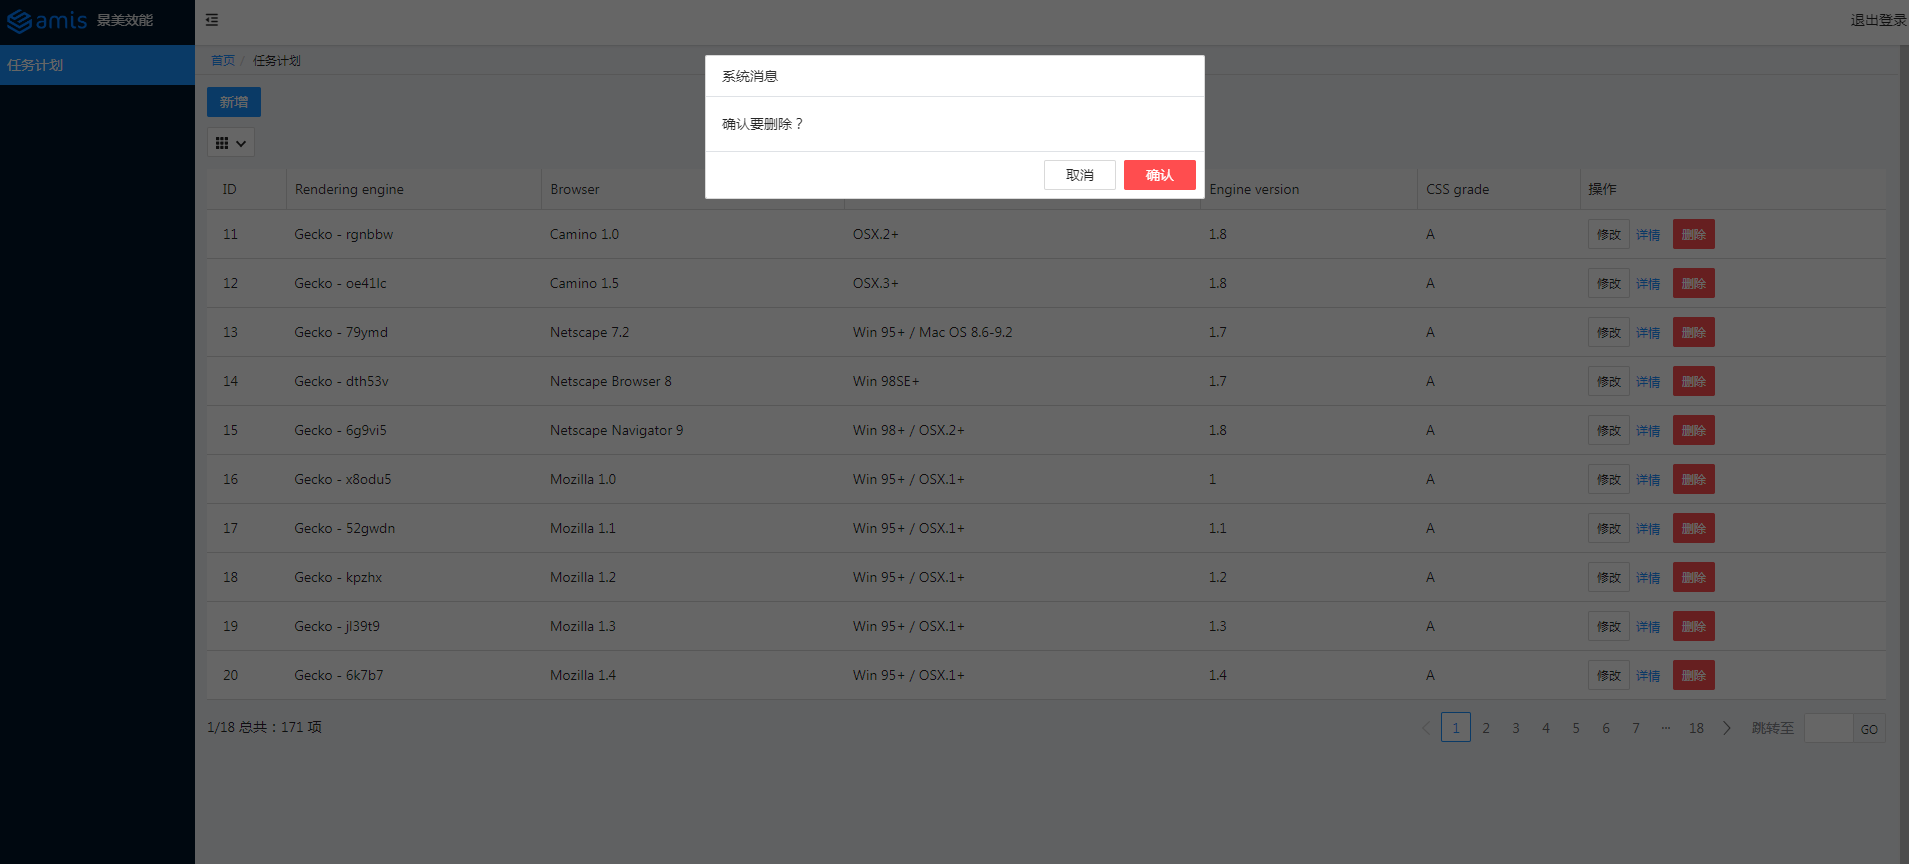
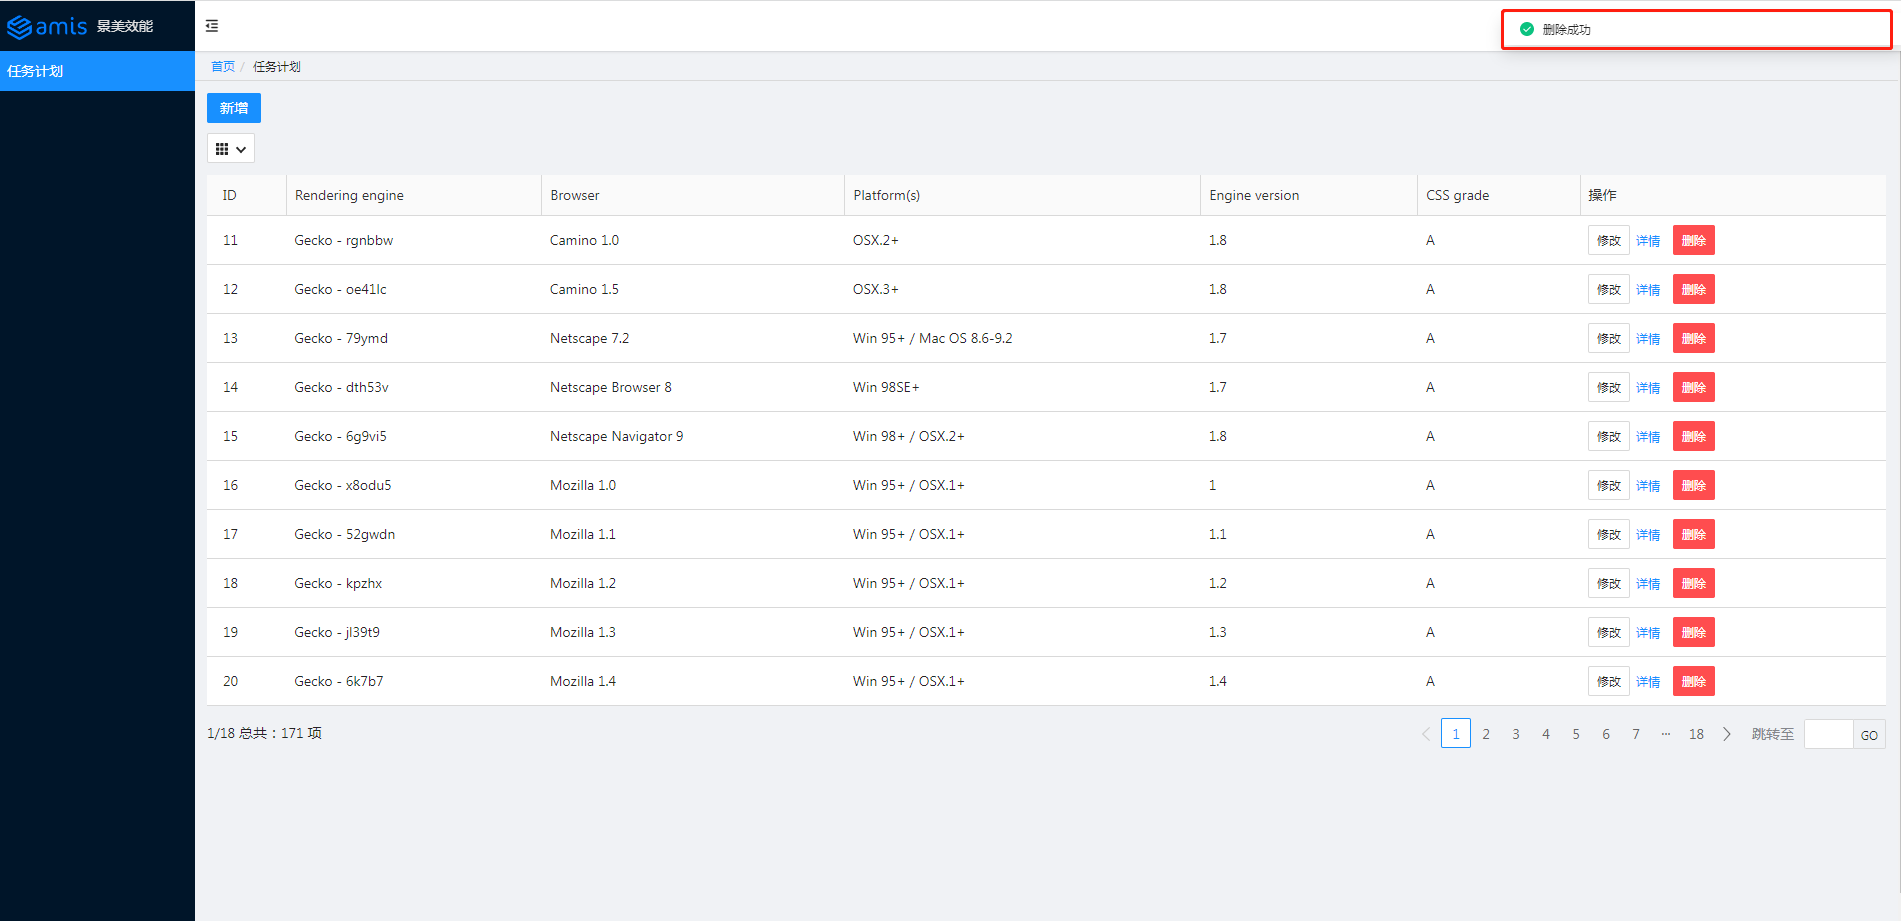
讀取(Retrieve)
參考官網的範例,將對應程式碼拷貝至 schedule.js,主要是 autoGenerateFilter 和 searchable:
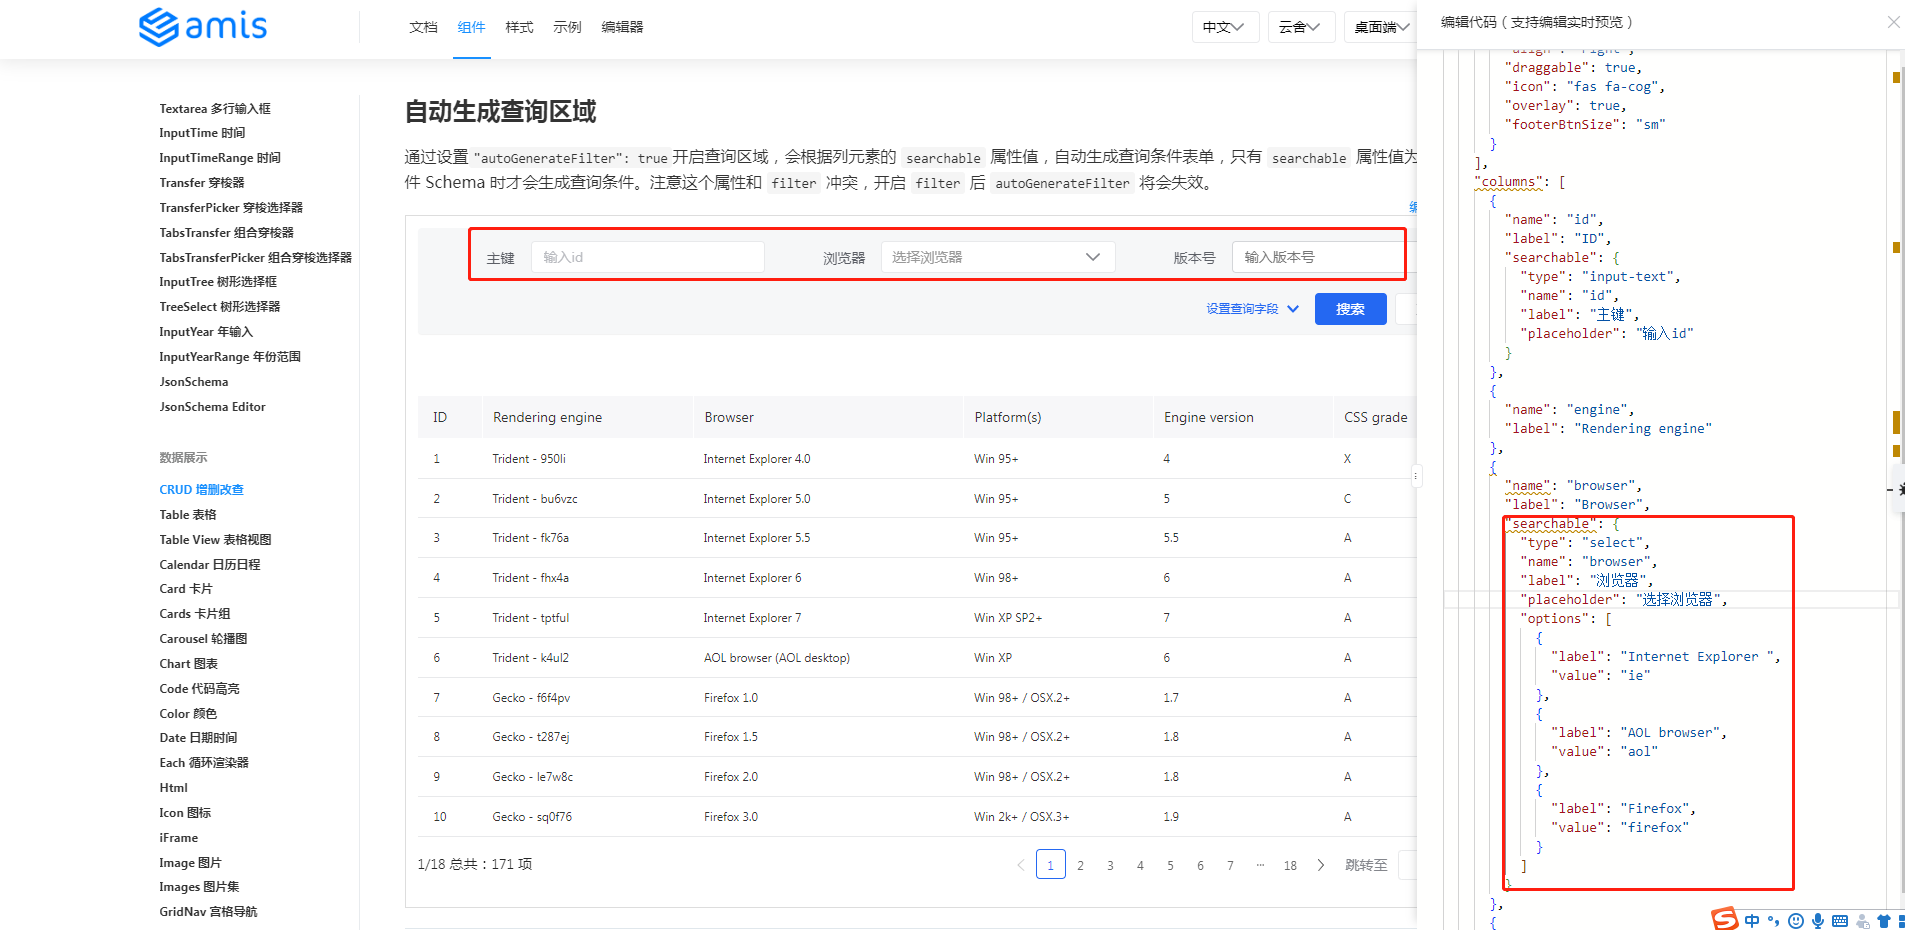
程式碼修改如下:
Administrator@ /e/pengjiali/amis-test (master)
$ git diff  public/pages/schedule.js
...
                        "type": "crud",
                        "api": "/api/schedule",
                        "syncLocation": false,
+                       // 通過設定"autoGenerateFilter": true開啟查詢區域
+                       "autoGenerateFilter": true,
                        "columns": [
                                {
                                        "name": "id",
@@ -37,11 +39,34 @@
                                },
                                {
                                        "name": "engine",
-                                       "label": "Rendering engine"
+                                       "label": "Rendering engine",
+                                       // 簡單型
+                                       "searchable": true,
                                },
                                {
                                        "name": "browser",
-                                       "label": "Browser"
+                                       "label": "Browser",
+                                       // 複製型。重新定義傳給後端的name等等
+                                       "searchable": {
+                                               "type": "select",
+                                               "name": "browser",
+                                               "label": "瀏覽器",
+                                               "placeholder": "選擇瀏覽器",
+                                               "options": [
+                                                 {
+                                                       "label": "Internet Explorer ",
+                                                       "value": "ie"
+                                                 },
+                                                 {
+                                                       "label": "AOL browser",
+                                                       "value": "aol"
+                                                 },
+                                                 {
+                                                       "label": "Firefox",
+                                                       "value": "firefox"
+                                                 }
+                                               ]
+                                         }
                                },
                                {
                                        "name": "platform",
效果如下圖所示:
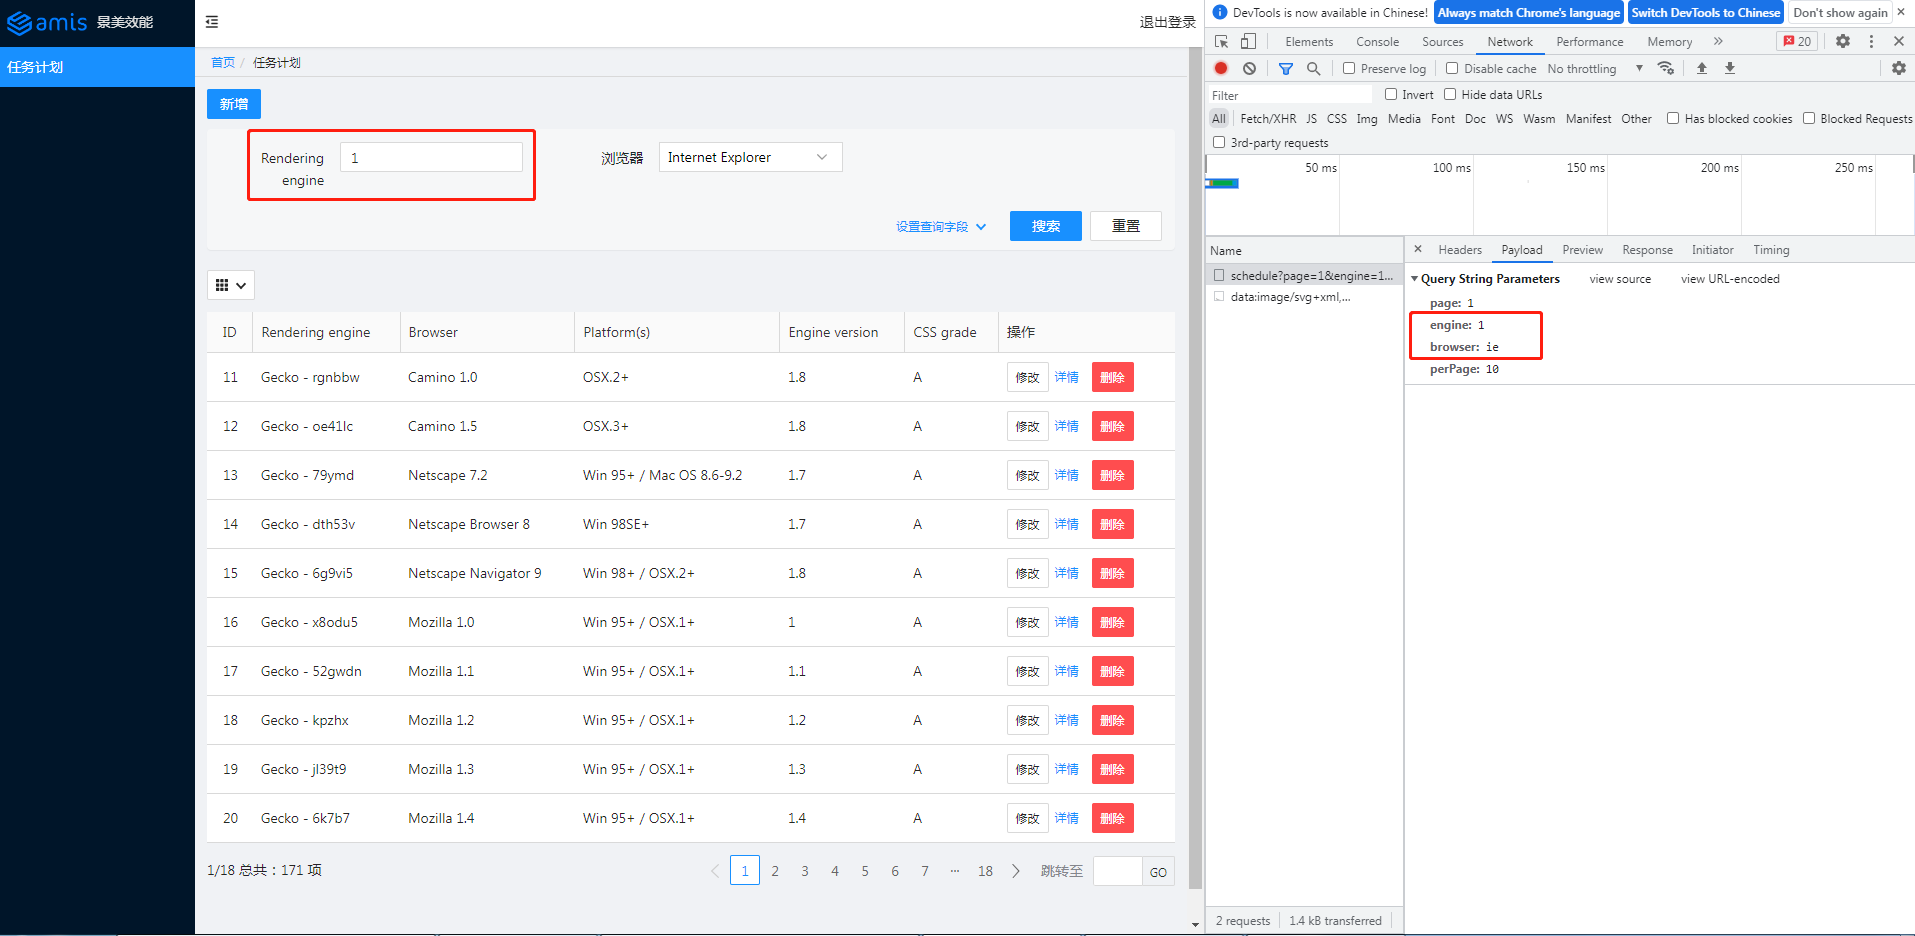
查詢欄位 1 和 ie 已傳送給後端。
amis 後臺系統完整程式碼
至此,我們就用 amis 搭建了一個後臺系統,包括登入頁、簡單的許可權控制以及任務計劃模組。
後續如果需要新增其他類似的模組,差不多隻需要寫設定。
這裡的任務計劃模組(schedule.js)不到 200 行,包含的功能卻比較豐富:分頁的表格列表、增加、刪除、修改、詳情和查詢。
schedule.js
(function () {
	const response = {
		"type": "page",
		"body": [{
			"label": "新增",
			"type": "button",
			"actionType": "dialog",
			"level": "primary",
			"className": "m-b-sm",
			"dialog": {
				"title": "新增表單",
				"body": {
					"type": "form",
					"api": "post:/api/schedule",
					"body": [
						{
							"type": "input-text",
							"name": "engine",
							"label": "Engine"
						},
						{
							"type": "input-text",
							"name": "browser",
							"label": "Browser"
						}
					]
				}
			}
		}, {
			"type": "crud",
			"api": "/api/schedule",
			"syncLocation": false,
			// 通過設定"autoGenerateFilter": true開啟查詢區域
			"autoGenerateFilter": true,
			"columns": [
				{
					"name": "id",
					"label": "ID"
				},
				{
					"name": "engine",
					"label": "Rendering engine",
					// 簡單型
					"searchable": true,
				},
				{
					"name": "browser",
					"label": "Browser",
					// 複製型。重新定義傳給後端的name等等
					"searchable": {
						"type": "select",
						"name": "browser",
						"label": "瀏覽器",
						"placeholder": "選擇瀏覽器",
						"options": [
						  {
							"label": "Internet Explorer ",
							"value": "ie"
						  },
						  {
							"label": "AOL browser",
							"value": "aol"
						  },
						  {
							"label": "Firefox",
							"value": "firefox"
						  }
						]
					  }
				},
				{
					"name": "platform",
					"label": "Platform(s)"
				},
				{
					"name": "version",
					"label": "Engine version"
				},
				{
					"name": "grade",
					"label": "CSS grade"
				},
				{
					"type": "operation",
					"label": "操作",
					"buttons": [
						{
							"label": "修改",
							"type": "button",
							// 預設是抽屜樣式,也提供了通常的彈框樣式
							"actionType": "drawer",
							"drawer": {
								"title": "新增表單",
								"body": {
									"type": "form",
									// 表單初始化。如果不設定,表單中的資料直接來自前端
									"initApi": "/api/schedule/${id}",
									"api": "post:/api/schedule/${id}",
									"body": [
										{
											"type": "input-text",
											"name": "engine",
											"label": "Engine"
										},
										{
											"type": "input-text",
											"name": "browser",
											"label": "Browser"
										}
									]
								}
							}
						},
						{
							"label": "詳情",
							"type": "button",
							"level": "link",
							"actionType": "dialog",
							"dialog": {
								"title": "檢視詳情",
								"body": {
									"type": "form",
									"body": [
										{
											"type": "input-text",
											"name": "engine",
											"label": "Engine"
										},
										{
											"type": "input-text",
											"name": "browser",
											"label": "Browser"
										},
										{
											"type": "input-text",
											"name": "platform",
											"label": "platform"
										},
										{
											"type": "input-text",
											"name": "version",
											"label": "version"
										},
										{
											"type": "control",
											"label": "grade",
											"body": {
												"type": "tag",
												"label": "${grade}",
												"displayMode": "normal",
												"color": "active"
											}
										}
									]
								}
							}
						},
						{
							"label": "刪除",
							"type": "button",
							"actionType": "ajax",
							"level": "danger",
							"confirmText": "確認要刪除?",
							"api": "delete:/api/schedule/${id}"
						}
					]
				}
			]
		}
		]
	}

	window.jsonpCallback && window.jsonpCallback(response);
})();
site.json
{
  "status": 0,
  "msg": "",
  "data": {
    "pages": [
      {
        "label": "Home",
        "url": "/",
        "redirect": "/schedule"
      },
      {
        "children": [
          {
            "label": "任務計劃",
            "schemaApi": "jsonp:/static/pages/schedule.js?callback=jsonpCallback",
            "url": "/schedule"
          }

        ]
      }

    ]
  }
}
home.html
<!DOCTYPE html>
<html>

<head>
  <meta charset="UTF-8" />
  <title>amis admin</title>
  <meta http-equiv="Content-Type" content="text/html; charset=utf-8" />
  <meta name="viewport" content="width=device-width, initial-scale=1, maximum-scale=1" />
  <meta http-equiv="X-UA-Compatible" content="IE=Edge" />
  <link rel="stylesheet" title="default" href="https://unpkg.com/amis@beta/sdk/antd.css" />
  <link rel="stylesheet" href="https://unpkg.com/amis@beta/sdk/helper.css" />
  <script src="https://unpkg.com/amis@beta/sdk/sdk.js"></script>
  <script src="https://unpkg.com/vue@2"></script>
  <script src="https://unpkg.com/[email protected]/umd/history.js"></script>
  <style>
    html,
    body,
    .app-wrapper {
      position: relative;
      width: 100%;
      height: 100%;
      margin: 0;
      padding: 0;
    }
  </style>
</head>

<body>
  <div id="root" class="app-wrapper"></div>
  <script>
    (function () {
      let amis = amisRequire('amis/embed');
      const match = amisRequire('path-to-regexp').match;

      // 如果想用 browserHistory 請切換下這處程式碼, 其他不用變
      // const history = History.createBrowserHistory();
      const history = History.createHashHistory();

      const app = {
        type: 'app',
        brandName: '後臺系統',
        logo: 'https://aisuda.bce.baidu.com/amis/static/logo_408c434.png',
        header: {
          type: 'tpl',
          inline: false,
          className: 'w-full',
          tpl: '<div class="flex justify-between"><div></div><div>退出登入</div></div>'
        },
        // footer: '<div class="p-2 text-center bg-light">底部區域</div>',
        // asideBefore: '<div class="p-2 text-center">選單前面區域</div>',
        // asideAfter: '<div class="p-2 text-center">選單後面區域</div>',
        api: '/static/pages/site.json'
      };

      function normalizeLink(to, location = history.location) {
        to = to || '';

        if (to && to[0] === '#') {
          to = location.pathname + location.search + to;
        } else if (to && to[0] === '?') {
          to = location.pathname + to;
        }

        const idx = to.indexOf('?');
        const idx2 = to.indexOf('#');
        let pathname = ~idx
          ? to.substring(0, idx)
          : ~idx2
            ? to.substring(0, idx2)
            : to;
        let search = ~idx ? to.substring(idx, ~idx2 ? idx2 : undefined) : '';
        let hash = ~idx2 ? to.substring(idx2) : location.hash;

        if (!pathname) {
          pathname = location.pathname;
        } else if (pathname[0] != '/' && !/^https?\:\/\//.test(pathname)) {
          let relativeBase = location.pathname;
          const paths = relativeBase.split('/');
          paths.pop();
          let m;
          while ((m = /^\.\.?\//.exec(pathname))) {
            if (m[0] === '../') {
              paths.pop();
            }
            pathname = pathname.substring(m[0].length);
          }
          pathname = paths.concat(pathname).join('/');
        }

        return pathname + search + hash;
      }

      function isCurrentUrl(to, ctx) {
        if (!to) {
          return false;
        }
        const pathname = history.location.pathname;
        const link = normalizeLink(to, {
          ...location,
          pathname,
          hash: ''
        });

        if (!~link.indexOf('http') && ~link.indexOf(':')) {
          let strict = ctx && ctx.strict;
          return match(link, {
            decode: decodeURIComponent,
            strict: typeof strict !== 'undefined' ? strict : true
          })(pathname);
        }

        return decodeURI(pathname) === link;
      }

      let amisInstance = amis.embed(
        '#root',
        app,
        {
          location: history.location
        },
        {
          // 全域性請求介面卡。參考:官網 -> 快速開始 -> 控制 amis 的行為
          requestAdaptor(api) {
            api.headers.Authorization = localStorage.getItem('token')
            console.log('api', api)
            return api;
          },
          // 全域性響應介面卡。參考:官網 -> 快速開始 -> 控制 amis 的行為
          responseAdaptor(api, payload, query, request, response) {
            if (payload.status === 401) {
              console.log('未授權,請重新登入')
              location.href = '/login'
            }
            return payload;
          },
          // watchRouteChange: fn => {
          //   return history.listen(fn);
          // },
          updateLocation: (location, replace) => {
            location = normalizeLink(location);
            if (location === 'goBack') {
              return history.goBack();
            } else if (
              (!/^https?\:\/\//.test(location) &&
                location ===
                history.location.pathname + history.location.search) ||
              location === history.location.href
            ) {
              // 目標地址和當前地址一樣,不處理,免得重複重新整理
              return;
            } else if (/^https?\:\/\//.test(location) || !history) {
              return (window.location.href = location);
            }

            history[replace ? 'replace' : 'push'](location);
          },
          jumpTo: (to, action) => {
            if (to === 'goBack') {
              return history.goBack();
            }

            to = normalizeLink(to);

            if (isCurrentUrl(to)) {
              return;
            }

            if (action && action.actionType === 'url') {
              action.blank === false
                ? (window.location.href = to)
                : window.open(to, '_blank');
              return;
            } else if (action && action.blank) {
              window.open(to, '_blank');
              return;
            }

            if (/^https?:\/\//.test(to)) {
              window.location.href = to;
            } else if (
              (!/^https?\:\/\//.test(to) &&
                to === history.pathname + history.location.search) ||
              to === history.location.href
            ) {
              // do nothing
            } else {
              history.push(to);
            }
          },
          isCurrentUrl: isCurrentUrl,
          theme: 'antd'
        }
      );

      history.listen(state => {
        amisInstance.updateProps({
          location: state.location || state
        });
      });
    })();
  </script>
</body>

</html>
login.html
<!DOCTYPE html>
<html lang="zh">

<head>
    <meta charset="UTF-8" />
    <title>amis demo</title>
    <meta http-equiv="Content-Type" content="text/html; charset=utf-8" />
    <meta name="viewport" content="width=device-width, initial-scale=1, maximum-scale=1" />
    <meta http-equiv="X-UA-Compatible" content="IE=Edge" />
    <link rel="stylesheet" href="/static/sdk/sdk.css" />
    <link rel="stylesheet" href="/static/sdk/helper.css" />
    <link rel="stylesheet" href="/static/sdk/iconfont.css" />
    <!-- 這是預設主題所需的,如果是其他主題則不需要 -->
    <!-- 從 1.1.0 開始 sdk.css 將不支援 IE 11,如果要支援 IE11 請參照這個 css,並把前面那個刪了 -->
    <!-- <link rel="stylesheet" href="sdk-ie11.css" /> -->
    <!-- 不過 amis 開發團隊幾乎沒測試過 IE 11 下的效果,所以可能有細節功能用不了,如果發現請報 issue -->
    <style>
        html,
        body,
        .app-wrapper {
            position: relative;
            width: 100%;
            height: 100%;
            margin: 0;
            padding: 0;
        }
    </style>
</head>

<body>
    <div id="root" class="app-wrapper"></div>
    <script src="/static/sdk/sdk.js"></script>
    <script type="text/javascript">
        (function () {
            let amis = amisRequire('amis/embed');
            // 通過替換下面這個設定來生成不同頁面
            let amisJSON = {
                type: 'page',
                title: 'amis 後臺系統登入',
                body: {
                    type: 'form',
                    mode: 'horizontal',
                    api: {
                        method: 'post',
                        url: '/api/login',
                        adaptor: function (payload, response) {
                            if (payload.status === 0) {
                                localStorage.setItem('token', payload.data.token)
                            }
                            console.log('payload', payload)
                            return payload
                        }
                    },
                    // 官網 -> 元件 -> Form 表單 -> 頁面跳轉
                    redirect: "/home",
                    body: [
                        {
                            label: '姓名',
                            type: 'input-text',
                            name: 'name'
                        },
                        {
                            label: '密碼',
                            type: 'input-password',
                            name: 'password'
                        }
                    ]
                }
            };
            let amisScoped = amis.embed('#root', amisJSON);
        })();
    </script>
</body>

</html>
後臺服務
server.js:
// server.js

const path = require('path')
const express = require('express')
const app = express()
const port = 3000

app.use(express.json()) // for parsing application/json
app.use(express.urlencoded({ extended: true })) // for parsing application/x-www-form-urlencoded

// 將靜態資源對外開放
app.use('/static', express.static(path.join(__dirname, 'public')))

app.get('/', function(req, res){
    res.redirect('/home')
})

app.get('/home', function(req, res){
    res.sendFile(path.join(__dirname, 'public', 'home.html'))
})

app.get('/login', function(req, res){
    res.sendFile(path.join(__dirname, 'public', 'login.html'))
})

// 登入介面
app.post('/api/login', function (req, res) {
    const { name, password } = req.body

    // 存在該使用者
    if (db.selectUser(name, password).length) {
        res.json({ "status": 0, "msg": "登入成功", data: { token: 'token00001' } })
    } else {
        res.json({ "status": 1, "msg": "使用者名稱密碼錯誤。請試試 admin/123456" })
    }
});

// 修改-查詢
app.get('/api/schedule/:id', function (req, res) {
    // /api/schedule/:id { id: '11' }
    console.log('/api/schedule/:id', req.params)

    const {id} = req.params
    // 資料來自官網
    res.json({"status":0,"data":{"engine":"Other browsers" + id,"browser":"All others" + id,"platform":"-","version":"-","grade":"U","id":id}})
})

// 修改-提交
app.post('/api/schedule/:id', function (req, res) {
    const {id} = req.params
    // post:/api/schedule/:id 11
    console.log('post:/api/schedule/:id', id)
    res.json({"status":0, "msg": "修改成功", "data":{}})
})

// 刪除
app.delete('/api/schedule/:id', function (req, res) {
    const {id} = req.params
    // post:/api/schedule/:id 11
    console.log('delete:/api/schedule/:id', id)
    res.json({"status":0, "msg": "刪除成功", "data":{}})
})

// 列表
app.get('/api/schedule', function (req, res) {
    console.log('/api/schedule')
    // req.get(field) - 返回指定的HTTP請求檔頭欄位(不區分大小寫的匹配)
    const token = req.get('Authorization')
    if (token === 'null') {
        res.json({ status: 401, msg: '401 未授權' })
        return
    }
    const { page, perPage } = req.query
    res.json({ "status": 0, "msg": "ok", "data": { "count": 171, "rows": [{ "engine": "Gecko - rgnbbw", "browser": "Camino 1.0", "platform": "OSX.2+", "version": "1.8", "grade": "A", "id": page * perPage + 1 }, { "engine": "Gecko - oe41lc", "browser": "Camino 1.5", "platform": "OSX.3+", "version": "1.8", "grade": "A", "id": page * perPage + 2 }, { "engine": "Gecko - 79ymd", "browser": "Netscape 7.2", "platform": "Win 95+ / Mac OS 8.6-9.2", "version": "1.7", "grade": "A", "id": page * perPage + 3 }, { "engine": "Gecko - dth53v", "browser": "Netscape Browser 8", "platform": "Win 98SE+", "version": "1.7", "grade": "A", "id": page * perPage + 4 }, { "engine": "Gecko - 6g9vi5", "browser": "Netscape Navigator 9", "platform": "Win 98+ / OSX.2+", "version": "1.8", "grade": "A", "id": 15 }, { "engine": "Gecko - x8odu5", "browser": "Mozilla 1.0", "platform": "Win 95+ / OSX.1+", "version": "1", "grade": "A", "id": 16 }, { "engine": "Gecko - 52gwdn", "browser": "Mozilla 1.1", "platform": "Win 95+ / OSX.1+", "version": "1.1", "grade": "A", "id": 17 }, { "engine": "Gecko - kpzhx", "browser": "Mozilla 1.2", "platform": "Win 95+ / OSX.1+", "version": "1.2", "grade": "A", "id": 18 }, { "engine": "Gecko - jl39t9", "browser": "Mozilla 1.3", "platform": "Win 95+ / OSX.1+", "version": "1.3", "grade": "A", "id": 19 }, { "engine": "Gecko - 6k7b7", "browser": "Mozilla 1.4", "platform": "Win 95+ / OSX.1+", "version": "1.4", "grade": "A", "id": 20 }] } })
});

// 新增
app.post('/api/schedule', function (req, res) {
    const { engine, browser } = req.body
    // 授權部分應該可以提取到一個地方,這裡僅做演示
    const token = req.get('Authorization')
    if (token === 'null') {
        res.json({ status: 401, msg: '401 未授權' })
        return
    }

    console.log(`存入資料庫:engine=${engine} browser=${browser}`)
    res.json({ "status": 0, "msg": "儲存成功", "data": {} })
});

// 開啟服務
app.listen(port, () => {
    console.log(`Example app listening at http://localhost:${port}`)
})

// 處理 404 響應
app.use(function (req, res, next) {
    res.status(404).send("404")
})

// 模擬資料庫
class DB {
    constructor() {
        this.database = {
            userTable: [
                { name: 'a', password: 'a' },
                { name: 'admin', password: '123456' },
            ]
        }
    }
    selectUser(name, password) {
        const table = this.database.userTable
        return table.filter(item => item.name === name && item.password === password)
    }
}
const db = new DB()
package.json:
// package.json
{
  "name": "amis-test",
  "version": "1.0.0",
  "description": "",
  "main": "index.js",
  "scripts": {
    "test": "echo \"Error: no test specified\" && exit 1"
  },
  "keywords": [],
  "author": "",
  "license": "ISC",
  "dependencies": {
    "cors": "^2.8.5",
    "express": "^4.18.1"
  },
  "devDependencies": {
    "nodemon": "^2.0.18"
  }
}
低程式碼平臺
github 這裡羅列了許多低程式碼平臺,可自行檢視。
出處:https://www.cnblogs.com/pengjiali/p/16458405.html
本文版權歸作者和部落格園共有,歡迎轉載,但未經作者同意必須保留此段宣告,且在文章頁面明顯位置給出原文連線。