[自制作業系統] 第15回 實現核心執行緒
目錄
一、前景回顧
二、執行緒的實現
三、執行緒的切換
四、執行測試
上一回我們實現了記憶體管理系統,說實話程式碼還是比較多,看起來還是比較頭疼的,不過為了知識這都是小事。這一節終於可以來實現我們的執行緒了,以前學作業系統的時候,聽到的最多的就是什麼執行緒,程序等,這一回我們來自己動手實現一下,加深對執行緒的理解。
我相信能認真去看這篇部落格的同學,不會是零基礎。所以我也就不再深入地去講解程序和執行緒的區別。這裡我引入書中的話:
執行緒是什麼?具有能動性、執行力、獨立的程式碼塊。
程序是什麼?程序=執行緒+資源。
先貼上程式碼,在project/kernel目錄下新建list.c、list.h以及thread.c和thread.h檔案。

  1 #include "list.h"
  2 #include "interrupt.h"
  3 #include "print.h"
  4
  5 void list_init(struct list*list)
  6 {
  7     list->head.prev = NULL;
  8     list->head.next = &list->tail;
  9     list->tail.prev = &list->head;
 10     list->tail.next = NULL;
 11 }
 12
 13 /*將連結串列元素elem插入到元素before之前*/
 14 void list_insert_before(struct list_elem *before, struct list_elem *elem)
 15 {
 16     enum intr_status old_state = intr_disable();
 17     before->prev->next = elem;
 18     elem->prev = before->prev;
 19
 20     elem->next = before;
 21     before->prev = elem;
 22     intr_set_status(old_state);
 23 }
 24
 25 /*新增元素到列表隊首,類似棧push操作*/
 26 void list_push(struct list *plist, struct list_elem *elem)
 27 {
 28     list_insert_before(plist->head.next, elem);//在隊頭插入elem
 29 }
 30
 31 /*追加元素到連結串列隊尾,類似佇列的先進先出*/
 32 void list_append(struct list *plist, struct list_elem *elem)
 33 {
 34     list_insert_before(&plist->tail, elem);
 35 }
 36
 37 /*使元素pelem脫離連結串列*/
 38 void list_remove(struct list_elem *elem)
 39 {
 40     enum intr_status old_state = intr_disable();
 41     elem->prev->next = elem->next;
 42     elem->next->prev = elem->prev;
 43     intr_set_status(old_state);
 44 }
 45
 46
 47 /*將連結串列第一個元素彈出並返回,類似棧的pop操作*/
 48 struct list_elem *list_pop(struct list *plist)
 49 {
 50     struct list_elem *elem = plist->head.next;
 51     list_remove(elem);
 52     return elem;
 53 }
 54
 55 /*從連結串列中查詢元素obj_elem,成功返回true,失敗返回false*/
 56 bool elem_find(struct list *plist, struct list_elem *obj_elem)
 57 {
 58     struct list_elem *elem = plist->head.next;
 59     while (elem != &plist->tail) {
 60         if (elem == obj_elem) {
 61             return true;
 62         }
 63         elem = elem->next;
 64     }
 65     return false;
 66 }
 67
 68 /*返回連結串列長度*/
 69 uint32_t list_len(struct list *plist)
 70 {
 71     struct list_elem *elem = plist->head.next;
 72     uint32_t length = 0;
 73     while (elem != &plist->tail) {
 74         length++;
 75         elem = elem->next;
 76     }
 77     return length;
 78 }
 79
 80 /*判斷連結串列是否為空,空時返回true,否則返回false*/
 81 bool list_empty(struct list *plist)
 82 {
 83     return (plist->head.next == &plist->tail ? true : false);
 84 }
 85
 86
 87 /*把列表plist中的每個元素elem和arg傳給回撥函數func*/
 88 struct list_elem *list_traversal(struct list *plist, function func, int arg)
 89 {
 90     struct list_elem *elem = plist->head.next;
 91     //如果佇列為空,就必然沒有符合條件的節點,直接返回NULL
 92     if (list_empty(plist)) {
 93         return NULL;
 94     }
 95
 96     while (elem != &plist->tail) {
 97         if (func(elem, arg)) {
 98             return elem;
 99         }
100         elem = elem->next;
101     }
102     return NULL;
103 }

 1 #ifndef  __LIB_KERNEL_LIST_H
 2 #define  __LIB_KERNEL_LIST_H
 3 #include "stdint.h"
 4
 5 #define offset(struct_type, member) (int)(&((struct_type *)0)->member)
 6 #define elem2entry(struct_type, struct_member_name, elem_ptr) \
 7         (struct_type *)((int)elem_ptr - offset(struct_type, struct_member_name))
 8
 9 struct list_elem {
10     struct list_elem *prev;  //前驅節點
11     struct list_elem *next;  //後繼節點
12 };
13
14 struct list {
15    struct list_elem head;
16    struct list_elem tail;
17 };
18
19 typedef bool function(struct list_elem *, int arg);
20
21 struct list_elem *list_traversal(struct list *plist, function func, int arg);
22 bool list_empty(struct list *plist);
23 uint32_t list_len(struct list *plist);
24 bool elem_find(struct list *plist, struct list_elem *obj_elem);
25 struct list_elem *list_pop(struct list *plist) ;
26 void list_remove(struct list_elem *elem);
27 void list_append(struct list *plist, struct list_elem *elem);
28 void list_push(struct list *plist, struct list_elem *elem);
29 void list_insert_before(struct list_elem *before, struct list_elem *elem);
30 void list_init(struct list*list);
31
32 #endif

#include "thread.h"
#include "string.h"
#include "memory.h"
#include "list.h"
#include "interrupt.h"
#include "debug.h"
#include "print.h"
#include "stddef.h"


struct task_struct *main_thread;         //主執行緒PCB
struct list thread_ready_list;           //就緒佇列
struct list thread_all_list;             //所有任務佇列
static struct list_elem *thread_tag;     //用於儲存佇列中的執行緒節點
extern void switch_to(struct task_struct* cur, struct task_struct* next);


/*獲取當前執行緒PCB指標*/
struct task_struct *running_thread(void)
{
    uint32_t esp;
    asm volatile ("mov %%esp, %0" : "=g" (esp));

    /*取esp整數部分,即PCB起始地址*/
    return (struct task_struct *)(esp & 0xfffff000);
}

/*由kernel_thread去執行function(func_arg)*/
static void kernel_thread(thread_func *function, void *func_arg)
{
    /*執行function前要開中斷,避免後面的時鐘中斷被遮蔽,而無法排程其他執行緒*/
    intr_enable();
    function(func_arg);
}

/*初始化執行緒PCB*/
void init_thread(struct task_struct *pthread, char *name, int prio)
{
    memset(pthread, 0, sizeof(*pthread));
    strcpy(pthread->name, name);

    /*由於main函數也封裝成了一個執行緒,並且他是一直在執行的,所以將其直接設定為TASK_RUNNING*/
    if (pthread == main_thread) {
        pthread->status = TASK_RUNNING;
    } else {
        pthread->status = TASK_READY;
    }
    //pthread->status = TASK_RUNNING;
    pthread->priority = prio;
    pthread->ticks = prio;
    pthread->elapsed_ticks = 0;
    pthread->pgdir = NULL;
    pthread->self_kstack = (uint32_t *)((uint32_t)pthread + PG_SIZE);
    pthread->stack_magic = 0x19870916;
}

void thread_create(struct task_struct *pthread, thread_func function, void *func_arg)
{
    pthread->self_kstack -= sizeof(struct intr_stack);
    pthread->self_kstack -= sizeof(struct thread_stack);

    //初始化執行緒棧
    struct thread_stack *kthread_stack = (struct thread_stack *)pthread->self_kstack;
    kthread_stack->eip = kernel_thread;
    kthread_stack->function = function;
    kthread_stack->func_arg = func_arg;
    kthread_stack->ebp = kthread_stack->ebx = kthread_stack->edi = kthread_stack->esi = 0;
}

/*建立一個優先順序為prio的執行緒,執行緒名字為name,執行緒所執行的函數為function(func_arg)*/
struct task_struct *thread_start(char *name, int prio, thread_func function, void *func_arg)
{
    /*建立執行緒的pcb,大小為4kb*/
    struct task_struct *thread = get_kernel_pages(1);
    init_thread(thread, name, prio);
    thread_create(thread, function, func_arg);

    /*確保之前不在佇列中*/
    ASSERT(!elem_find(&thread_ready_list, &thread->general_tag));

    /*加入就緒執行緒佇列*/
    list_append(&thread_ready_list, &thread->general_tag);

    /*確保之前不在佇列*/
    ASSERT(!elem_find(&thread_all_list, &thread->all_list_tag));

    /*加入全部執行緒佇列*/
    list_append(&thread_all_list, &thread->all_list_tag);

    return thread;
}

static void make_main_thread(void)
{
    main_thread = running_thread();
    init_thread(main_thread, "main", 31);

    /*main函數是當前執行緒,當前執行緒不在thread_ready_list,所以只能將其加在thread_all_list*/
    ASSERT(!elem_find(&thread_all_list, &main_thread->all_list_tag));
    list_append(&thread_all_list, &main_thread->all_list_tag);
}

/*實現任務排程*/
void schedule(void)
{
    //put_str("schedule\n");
    ASSERT(intr_get_status() == INTR_OFF);
    struct task_struct *cur = running_thread();
    if (cur->status == TASK_RUNNING) {
        ASSERT(!elem_find(&thread_ready_list, &cur->general_tag));
        list_append(&thread_ready_list, &cur->general_tag);
        cur->ticks = cur->priority;
        cur->status = TASK_READY;
    } else {
        /*阻塞等其他情況*/
    }

    ASSERT(!list_empty(&thread_ready_list));
    thread_tag = NULL;
    thread_tag = list_pop(&thread_ready_list);

    struct task_struct *next = elem2entry(struct task_struct, general_tag, thread_tag);
    next->status = TASK_RUNNING;
    switch_to(cur, next);
}

/*初始化執行緒環境*/
void thread_init(void)
{
    put_str("thread_init start\n");
    list_init(&thread_ready_list);
    list_init(&thread_all_list);
    /*將當前main函數建立為執行緒*/
    make_main_thread();
    put_str("thread_init done\n");
}

#ifndef  __KERNEL_THREAD_H
#define  __KERNEL_THREAD_H
#include "stdint.h"
#include "list.h"
#include "memory.h"

/*自定義通用函數型別,它將在很多執行緒函數中作為形參型別*/
typedef void thread_func (void *);
#define PG_SIZE 4096
/*程序或執行緒的狀態*/
enum task_status {
    TASK_RUNNING,
    TASK_READY,
    TASK_BLOCKED,
    TASK_WAITING,
    TASK_HANGING,
    TASK_DIED
};

/****************中斷棧intr_stack****************/
struct intr_stack {
    uint32_t vec_no;
    uint32_t edi;
    uint32_t esi;
    uint32_t ebp;
    uint32_t esp_dummy;
    uint32_t ebx;
    uint32_t edx;
    uint32_t ecx;
    uint32_t eax;
    uint32_t gs;
    uint32_t fs;
    uint32_t es;
    uint32_t ds;

/*以下由cpu從低特權級進入高特權級時壓入*/
    uint32_t err_code;
    void (*eip)(void);
    uint32_t cs;
    uint32_t eflags;
    void *esp;
    uint32_t ss;
};

/***************執行緒棧thread_stack**********/
struct thread_stack
{
    uint32_t ebp;
    uint32_t ebx;
    uint32_t edi;
    uint32_t esi;

    void (*eip) (thread_func *func, void *func_arg);
    void (*unused_retaddr);
    thread_func *function;
    void *func_arg;
};

/************程序或者執行緒的pcb,程式控制塊**********/
struct task_struct
{
    uint32_t *self_kstack;    //每個核心執行緒自己的核心棧
    enum task_status status;
    uint8_t priority;

    char name[16];
    uint8_t ticks;            //每次在處理器上執行的時間滴答數

    /*此任務自從上CPU執行至今佔用了多少滴答數,也就是這個任務執行了多久時間*/
    uint32_t elapsed_ticks;

    /*general_tag的作用是用於執行緒在一般的佇列中的節點*/
    struct list_elem general_tag;

    /*all_list_tag的作用是用於執行緒thread_all_list的節點*/
    struct list_elem all_list_tag;

    uint32_t *pgdir;//程序自己頁表的虛擬地址

    uint32_t stack_magic;
};

void schedule(void);
struct task_struct *running_thread(void);
static void kernel_thread(thread_func *function, void *func_arg);
void init_thread(struct task_struct *pthread, char *name, int prio);
void thread_create(struct task_struct *pthread, thread_func function, void *func_arg);
struct task_struct *thread_start(char *name, int prio, thread_func function, void *func_arg);
static void make_main_thread(void);
void thread_init(void);

#endif
不過我並不建議現在就去看程式碼,我當時看這一章看得雲裡霧裡,後面捋了好久,現在希望你能跟著我的思路從宏觀上了解執行緒的建立,再回去掐細節就很好理解了。
首先,我們先定義PCB結構,PCB結構由中斷棧、執行緒棧和task_struct組成:

 1 /****************中斷棧intr_stack****************/
 2 struct intr_stack {
 3     uint32_t vec_no;
 4     uint32_t edi;
 5     uint32_t esi;
 6     uint32_t ebp;
 7     uint32_t esp_dummy;
 8     uint32_t ebx;
 9     uint32_t edx;
10     uint32_t ecx;
11     uint32_t eax;
12     uint32_t gs;
13     uint32_t fs;
14     uint32_t es;
15     uint32_t ds;
16
17 /*以下由cpu從低特權級進入高特權級時壓入*/
18     uint32_t err_code;
19     void (*eip)(void);
20     uint32_t cs;
21     uint32_t eflags;
22     void *esp;
23     uint32_t ss;
24 };
25
26 /***************執行緒棧thread_stack**********/
27 struct thread_stack
28 {
29     uint32_t ebp;
30     uint32_t ebx;
31     uint32_t edi;
32     uint32_t esi;
33
34     void (*eip) (thread_func *func, void *func_arg);
35     void (*unused_retaddr);
36     thread_func *function;
37     void *func_arg;
38 };
39
40 /************程序或者執行緒的pcb,程式控制塊**********/
41 struct task_struct
42 {
43     uint32_t *self_kstack;     //每個核心執行緒自己的核心棧
44     enum task_status status;   //執行緒或程序狀態
45     uint8_t priority;          //執行緒或程序狀態
46
47     char name[16];             //執行緒或程序名稱
48     uint8_t ticks;            //每次在處理器上執行的時間滴答數
49
50     /*此任務自從上CPU執行至今佔用了多少滴答數,也就是這個任務執行了多久時間*/
51     uint32_t elapsed_ticks;
52
53     /*general_tag的作用是用於執行緒在一般的佇列中的節點*/
54     struct list_elem general_tag;
55
56     /*all_list_tag的作用是用於執行緒thread_all_list的節點*/
57     struct list_elem all_list_tag;
58
59     uint32_t *pgdir;                //程序自己頁表的虛擬地址
60
61     uint32_t stack_magic;           //魔數 邊緣檢測使用
62 };
有了PCB,那麼如何實現執行緒呢?在Linux中提供建立執行緒的函數為:
int pthread_create(pthread_t *id , pthread_attr_t *attr, void(*fun)(void*), void *arg);
其中fun就是執行緒將要執行的函數,arg就是要往函數裡面傳遞的引數。
照貓畫虎,我們也實現一個類似的函數,就叫做:
struct task_struct *thread_start(char *name, int prio, thread_func function, void *func_arg);
其中name表示執行緒名字,prio表示執行緒優先順序,function表示執行緒將要執行的函數,func_arg表示傳遞給函數的引數。
在這個函數中我們對執行緒PCB噼裡啪啦進行初始化等一系列操作之後,最後在記憶體中出現了這麼一塊東西:
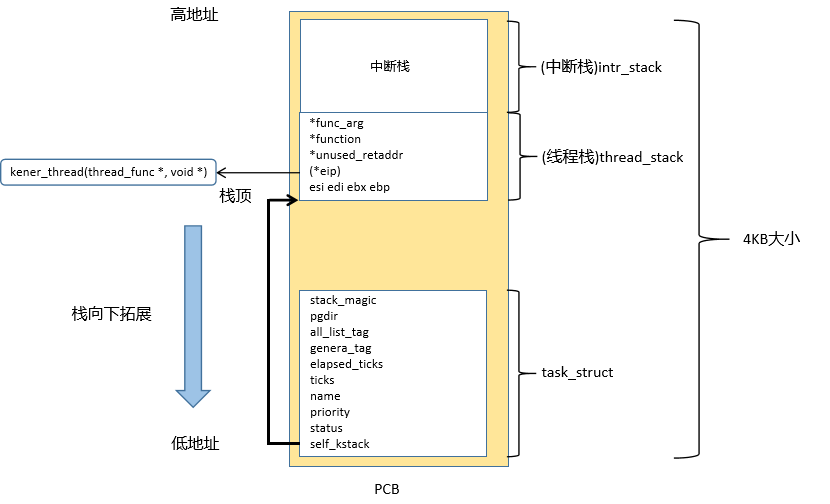
PCB在記憶體中的結構如上圖所示,從上往下,首先是intr_stack,中斷棧,它的作用是什麼呢?假設我們的執行緒被排程在CPU上執行,突然來了一箇中斷,這時CPU肯定不能馬上轉頭去處理中斷,需要先把執行緒當前的執行環境給儲存下來,然後才去處理中斷。儲存在哪裡呢?就儲存在這個中斷棧中,關於這部分後面章節還會詳細講到,這裡先不管;隨後是thread_stack,又叫執行緒棧,它的作用就是儲存執行緒需要執行的函數以及傳遞給該函數的引數,可以看到eip指向的函數:kernel_thread(thread_func *, void *)就是我們最終執行緒需要去執行的函數。至於其他的幾個引數,待會兒再說;最後是task_struct,它呢就是儲存了執行緒的一些基本資訊,比如執行緒名稱、優先順序、狀態等等。
執行緒是怎麼切換的呢?或者換句話說,執行緒是怎麼被排程上CPU,又怎麼被排程下CPU的呢?這裡就不賣關子了,還記得我們線上程的初始化中,有一個ticks的變數麼?這個ticks變數在初始化時就被賦了一定的值。另一邊,在我們的系統中開啟了一個定時器中斷,這個中斷每隔一段時間就會進入中斷處理常式,在中斷處理常式中將當前執行緒的ticks減1,當ticks被減為0後就呼叫schedule函數將當前執行緒調下,將下一個就緒執行緒排程上CPU,否則便從中斷處理常式返回繼續執行當前執行緒的程式。
現線上程的切換我們也講完了,不過我想你可能還是迷迷糊糊,心想就這?我還是不懂嘛。
不急,我們還是帶入具體情況來一步一步分析。現在我們來假想這麼一種情況,假如我們的執行緒A的ticks已經減為0,那麼意味著執行緒A要被換下,而下一個執行緒B要被換上,讓我們來看一下執行緒A是如何切換到執行緒B的。先來看看schedule()這個函數,schedule()定義在thread.c檔案中,這個函數就是排程函數。

/*實現任務排程*/
void schedule(void)
{
    //put_str("schedule\n");
    ASSERT(intr_get_status() == INTR_OFF);
    struct task_struct *cur = running_thread();
    if (cur->status == TASK_RUNNING) {
        ASSERT(!elem_find(&thread_ready_list, &cur->general_tag));
        list_append(&thread_ready_list, &cur->general_tag);
        cur->ticks = cur->priority;
        cur->status = TASK_READY;
    } else {
        /*阻塞等其他情況*/
    }

    ASSERT(!list_empty(&thread_ready_list));
    thread_tag = NULL;
    thread_tag = list_pop(&thread_ready_list);

    struct task_struct *next = elem2entry(struct task_struct, general_tag, thread_tag);
    next->status = TASK_RUNNING;
    switch_to(cur, next);
}
首先修改當前要被換下的執行緒A的資訊,將執行狀態改為TASK_READY,重新賦值ticks,然後新增到就緒佇列中去,供排程器下一次排程。隨後利用list_pop函數,將下一個準備就緒的執行緒B從就緒佇列中彈出,利用elem2entry函數得到執行緒B的PCB所在的地址,隨後修改執行緒B的執行狀態為TASK_RUNNING。此時執行緒B已經準備好了所有,就準備通過switch_to函數排程上CPU了。在project/kernel目錄下新建名為switch.S的檔案,在其中實現switch_to函數。

[bits 32]
section .text
global switch_to
switch_to:
    push esi            ;這裡是根據ABI原則保護四個暫存器 放到棧裡面
    push edi
    push ebx
    push ebp

    mov eax, [esp+20]    ;esp+20的位置是cur cur的pcb賦值給eax
    mov [eax], esp       ;[eax]為pcb的核心棧指標變數 把當前環境的esp值記錄下來

    mov eax, [esp+24]
    mov esp, [eax]       ;把要切換的執行緒的pcb 核心棧esp取出來

    pop ebp
    pop ebx
    pop edi
    pop esi
    ret                 ;這裡的返回地址為 kernel_thread的地址
關於這裡為什麼要連續通過四個push操作將esi、edi、ebx和ebp,以及後面新執行緒又要彈出這四個暫存器值,這是因為ABI的規定,這裡不詳細展開,想了解的話可以參考原書《作業系統真象還原》P411頁。總之現在通過四個push操作後,此時執行緒A棧裡的情況是這樣:
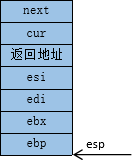
隨後通過mov eax, [esp + 20],將cur所指向的地址儲存在eax暫存器中,也就是將當前執行緒A的PCB地址賦給了eax暫存器。又通過mov [eax], esp指令,將當前執行緒A的esp存放於執行緒A的self_kstack中。隨後通過
mov eax, [esp+24]
mov esp, [eax]
這兩行命令將執行緒B的esp指標載入到esp暫存器中。這樣就完成了棧的切換。此時,請注意,由於棧已經發生變化了,現在是執行緒B的棧了,還記得前面說執行緒初始化後的那張記憶體分佈圖麼,在這裡:
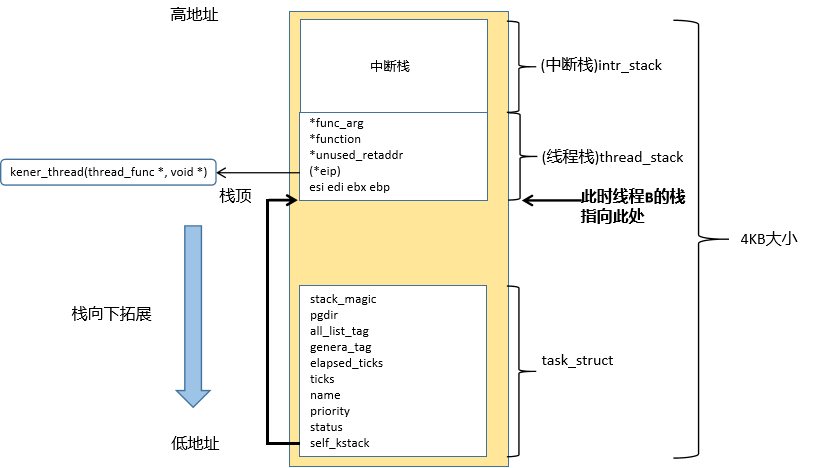
對於初始化好的執行緒B,它的PCB記憶體分佈圖就如上圖所示。此時執行緒B的棧的情況:
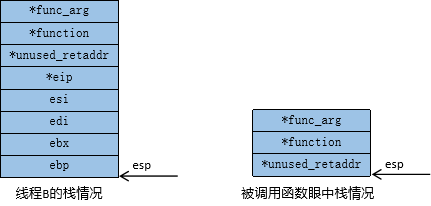
接著看switch_to函數中的程式碼,我們還有下面一部分沒有執行完。需要注意的是,棧已經發生變化了,所以接下來的pop操作都是針對執行緒B的棧,這裡切忌不要搞錯。所以我們可以看到,四個pop操作將ebp,ebx,edi和esi彈出到對應的暫存器中。隨後呼叫ret指令,該指令的作用是將棧頂處的資料*eip彈到eip暫存器中並且使esp+4,也就是說cpu接下來將從eip暫存器所指向的地址開始執行,而我們事先已將執行緒的執行函數kernel_thread儲存在*eip處。該函數實現如下:

/*由kernel_thread去執行function(func_arg)*/
static void kernel_thread(thread_func *function, void *func_arg)
{
    /*執行function前要開中斷,避免後面的時鐘中斷被遮蔽,而無法排程其他執行緒*/
    intr_enable();
    function(func_arg);
}
此時相當於是呼叫*eip所指向的函數,對於這個函數而言,棧中的情況如上右圖所示。這時我們事先設定的unused_retaddr就起到作用了,對於被調函數而言,*unused_retaddr就相當於是返回地址,只不過我們的函數永遠不會從這裡返回。所以被調函數會從esp+4開始取值作為函數的輸入引數。至此我們便完成了執行緒的切換過程。
我們又來分析一下,執行緒在執行時,如果時間片用光了,要被從CPU上排程下去的過程:
我們知道定時器在每次中斷中,都會將當前執行緒的ticks減1,並且檢測ticks是否為0,如果為0就呼叫schedule函數,也就是排程函數,也就回到了上面我們講解schedule的地方了。關於核心執行緒在執行過程中,遇到中斷後發生的壓棧情況,讀者可以參看第12回 實現中斷程式碼。在這一回我詳細地講解了中斷的壓棧和出棧過程。
所以,對於這部分程式碼,我建議讀者先從排程函數schedule出發,理清楚思路後,就很好理解整個執行緒的實現以及排程了。需要說明的是,為什麼叫核心執行緒呢?其實執行緒不應該有什麼核心,使用者之分的。確切地說應該是執行緒所處的執行態,就拿從本系列開始到本回合為止的程式碼來說,我們一直都是處於核心態的,也就是最高特權級0級下的,所以我們可以隨意存取任意地址的記憶體。我想會有讀者好奇我們現在實現的PCB中,有一塊中斷棧始終沒有講到,它其實就是給我們後面實現的使用者態的執行緒所使用的。我們使用者態下的執行緒如果需要被排程下CPU,首先需要通過定時器中斷進入中斷函數,完成3特權級到0特權級的轉變。一旦發生中斷,處理器會將執行緒的相關執行環境儲存在0特權級下的棧中,這個0特權級的棧就是我們前面所構建的這個中斷棧,因為不同特權級下所用的棧是不同的。所以它的作用在此,這裡就不展開講,等我們到後面的章節再細說。
將thread_init()加入到init.c中,修改main.c,在main.c中建立多個執行緒。除此之外還要修改makefile,time.c下的定時器中斷函數。

#include "init.h"
#include "print.h"
#include "interrupt.h"
#include "timer.h"
#include "memory.h"
#include "thread.h"
#include "list.h"

void init_all(void)
{
    put_str("init_all\n");
    idt_init();
    timer_init();
    mem_init();
    thread_init();
}

#include "print.h"
#include "init.h"
#include "memory.h"
#include "thread.h"
#include "list.h"
#include "interrupt.h"

void k_thread_a(void *arg);
void k_thread_b(void *arg);

int main(void)
{
    put_str("HELLO KERNEL\n");
    init_all();
    thread_start("k_thread_a", 31, k_thread_a, "A ");
    thread_start("k_thread_b", 8, k_thread_b, "B ");
    intr_enable();
    while(1) {
        put_str("Main: ");
    }
}

/*線上程中執行的函數k_thread_a*/
void k_thread_a(void *arg)
{
    char *para = arg;
    while (1) {
        put_str(para);
    }
}

/*線上程中執行的函數k_thread_b*/
void k_thread_b(void *arg)
{
    char *para = arg;
    while (1) {
        put_str(para);
    }
}

#include "timer.h"
#include "io.h"
#include "print.h"
#include "interrupt.h"
#include "thread.h"
#include "debug.h"

#define IRQ0_FREQUENCY         100
#define INPUT_FREQUENCY     1193180
#define COUNTER0_VALUE        INPUT_FREQUENCY / IRQ0_FREQUENCY
#define COUNTER0_PORT        0x40
#define COUNTER0_NO         0
#define COUNTER_MODE        2
#define READ_WRITE_LATCH    3
#define PIT_COUNTROL_PORT    0x43

uint32_t ticks;   //ticks是核心自中斷開啟以來總共的滴答數

/*時鐘的中斷處理常式*/
static void intr_timer_handler(void)
{
    struct task_struct *cur_thread = (struct task_struct *)running_thread();
    ASSERT(cur_thread->stack_magic == 0x19870916); //檢查棧是否溢位
    cur_thread->elapsed_ticks++;
    ticks++;
    if (cur_thread->ticks == 0) {
        schedule();
    } else {
        cur_thread->ticks--;
    }
}


static void frequency_set(uint8_t counter_port ,uint8_t counter_no,uint8_t rwl,uint8_t counter_mode,uint16_t counter_value)
{
    outb(PIT_COUNTROL_PORT, (uint8_t) (counter_no << 6 | rwl << 4 | counter_mode << 1));
    outb(counter_port, (uint8_t)counter_value);
    outb(counter_port, (uint8_t)counter_value >> 8);
}

void timer_init(void)
{
    put_str("timer_init start!\n");
    frequency_set(COUNTER0_PORT, COUNTER0_NO, READ_WRITE_LATCH, COUNTER_MODE, COUNTER0_VALUE);
    register_handler(0x20, intr_timer_handler);
    put_str("timer_init done!\n");
}

 1 BUILD_DIR = ./build
 2 PATH1 = project/kernel
 3 PATH2 = project/lib/kernel
 4 PATH3 = project/lib/user
 5 PATH4 = project/userprog
 6 PATH5 = project/lib
 7 INCLUDE = -I $(PATH1) -I $(PATH2) -I $(PATH3) -I $(PATH4) -I $(PATH5)
 8 SRC = $(wildcard $(PATH1)/*.c $(PATH2)/*.c $(PATH3)/*.c $(PATH4)/*.c $(PATH5)/*.c)
 9 OBJ = $(patsubst %.c, $(BUILD_DIR)/%.o, $(notdir $(SRC))) $(BUILD_DIR)/print.o $(BUILD_DIR)/kernel.o $(BUILD_DIR)/switch.o
10
11 kernel.bin: $(OBJ)
12     ld -m elf_i386 -Ttext 0xc0001500 -e main -o ./kernel.bin ./build/main.o ./build/print.o ./build/interrupt.o \
13     ./build/kernel.o ./build/timer.o ./build/init.o ./build/debug.o ./build/string.o ./build/bitmap.o ./build/list.o \
14     ./build/memory.o ./build/switch.o ./build/thread.o
15
16 mbr.bin: mbr.S
17     nasm -I include/ mbr.S -o mbr.bin
18
19 loader.bin: loader.S
20     nasm -I include/ loader.S -o loader.bin
21
22 install: mbr.bin loader.bin
23     dd if=./mbr.bin of=./hd60M.img bs=512 count=1 conv=notrunc
24     dd if=./loader.bin of=./hd60M.img bs=512 count=4 seek=2 conv=notrunc
25     dd if=./kernel.bin of=./hd60M.img bs=512 count=200 seek=9 conv=notrunc
26     ./bin/bochs -f bochsrc.disk
27
28 #編譯print.S
29 $(BUILD_DIR)/print.o : ./project/lib/kernel/print.S
30     nasm -f elf -o $(BUILD_DIR)/print.o ./project/lib/kernel/print.S
31
32 #編譯kernel.S
33 $(BUILD_DIR)/kernel.o : ./project/kernel/kernel.S
34     nasm -f elf -o $(BUILD_DIR)/kernel.o ./project/kernel/kernel.S
35
36 #編譯switch.S
37 $(BUILD_DIR)/switch.o : ./project/kernel/switch.S
38     nasm -f elf -o $(BUILD_DIR)/switch.o ./project/kernel/switch.S
39
40 #編譯四個目錄下的.c檔案為對應的.o檔案
41 $(BUILD_DIR)/%.o : $(PATH1)/%.c
42     gcc -m32 $(INCLUDE) -c -fno-builtin $< -o $@
43
44 $(BUILD_DIR)/%.o : $(PATH2)/%.c
45     gcc -m32 $(INCLUDE) -c -fno-builtin $< -o $@
46
47 $(BUILD_DIR)/%.o : $(PATH3)/%.c
48     gcc -m32 $(INCLUDE) -c -fno-builtin $< -o $@
49
50 $(BUILD_DIR)/%.o : $(PATH4)/%.c
51     gcc -m32 $(INCLUDE) -c -fno-builtin $< -o $@
52
53 $(BUILD_DIR)/%.o : $(PATH5)/%.c
54     gcc -m32 $(INCLUDE) -c -fno-stack-protector -fno-builtin $< -o $@
55
56 .PHONY:clean #防止 外面有clean檔案 阻止執行clean
57 clean:
58     -rm -rf $(BUILD_DIR)/*.o
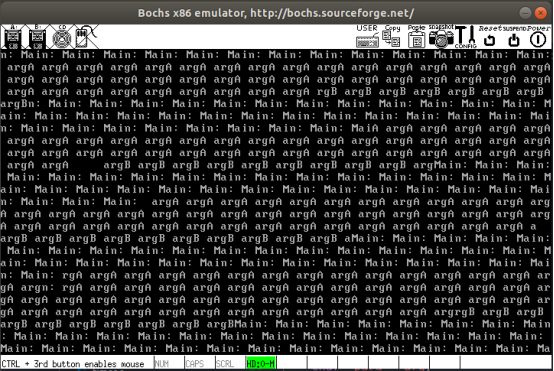
執行起來還算符合預期效果,可以看到argA列印的次數大概是argB的4倍,這跟我們所設定的時間片關係有關。不過可以看到字元列印的不連續性,這個留到下回再說。
本回到此結束,預知後事如何,請看下回分解。
