pytest多程序/多執行緒執行測試用例
前言:
- 實際專案中的用例數量會非常多,幾百上千;如果採用
單程序序列執行的話會非常耗費時間。假設每條用例耗時2s,1000條就需要2000s $\approx$ 33min;還要加上用例載入、測試前/後置套件等耗時;導致測試執行效率會相對低。 - 想象一下如果開發改動一塊程式碼,我們需要回歸一下,這時候執行一下自動化用例需要花費大半個小時或者好幾個小時的時間,這是我們無法容忍的。
- 為了節省專案測試時間,需要多個測試用例同時
並行執行;這就是一種分散式場景來縮短測試用例的執行時間,提高效率。
分散式執行用例的原則:
- 用例之間是相互獨立的,沒有依賴關係,完全可以獨立執行;
- 用例執行沒有順序要求,隨機順序都能正常執行;
- 每個用例都能重複執行,執行結果不會影響其他用例。
專案結構
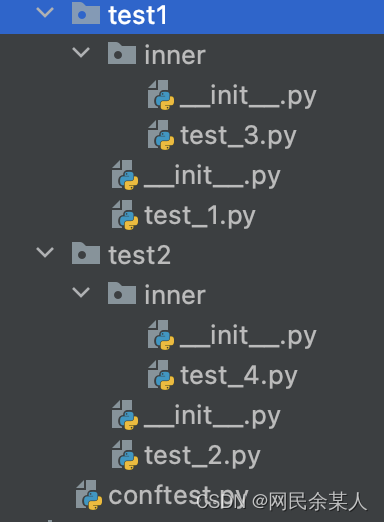
測試指令碼
# test1/test_1.py
import time

def test1_test1():
	time.sleep(1)
	assert 1 == 1, "1==1"


def test1_test2():
	time.sleep(1)
	assert 1 == 1, "1==1"


class TestDemo1:
	def test_inner_1(self):
		time.sleep(1)
		assert 1 == 1, "1==1"


class TestDemo2:
	def test_inner_2(self):
		time.sleep(1)
		assert 1 == 1, "1==1"
# test1/inner/test_3.py
import time

def test3_test1():
	time.sleep(1)
	assert 1 == 1, "1==1"


def test3_test2():
	time.sleep(1)
	assert 1 == 1, "1==1"

# test2/test_2.py
import time

def test2_test1():
	time.sleep(1)
	assert 1 == 1, "1==1"


def test2_test2():
	time.sleep(1)
	assert 1 == 1, "1==1"

# test2/inner/test_3.py
import time

def test4_test1():
	time.sleep(1)
	assert 1 == 1, "1==1"


def test4_test2():
	time.sleep(1)
	assert 1 == 1, "1==1"
正常執行:需要8.10s 
多程序執行用例之 pytest-xdist
多cpu並行執行用例,直接加個-n引數即可,後面num引數就是並行數量,比如num設定為3
pytest -v -n num
引數:
- -n auto : 自動偵測系統裡的CPU數目
- -n num : 指定執行測試的處理器程序數
多程序並行執行:耗時2.66s大大的縮短了測試用例的執行時間。
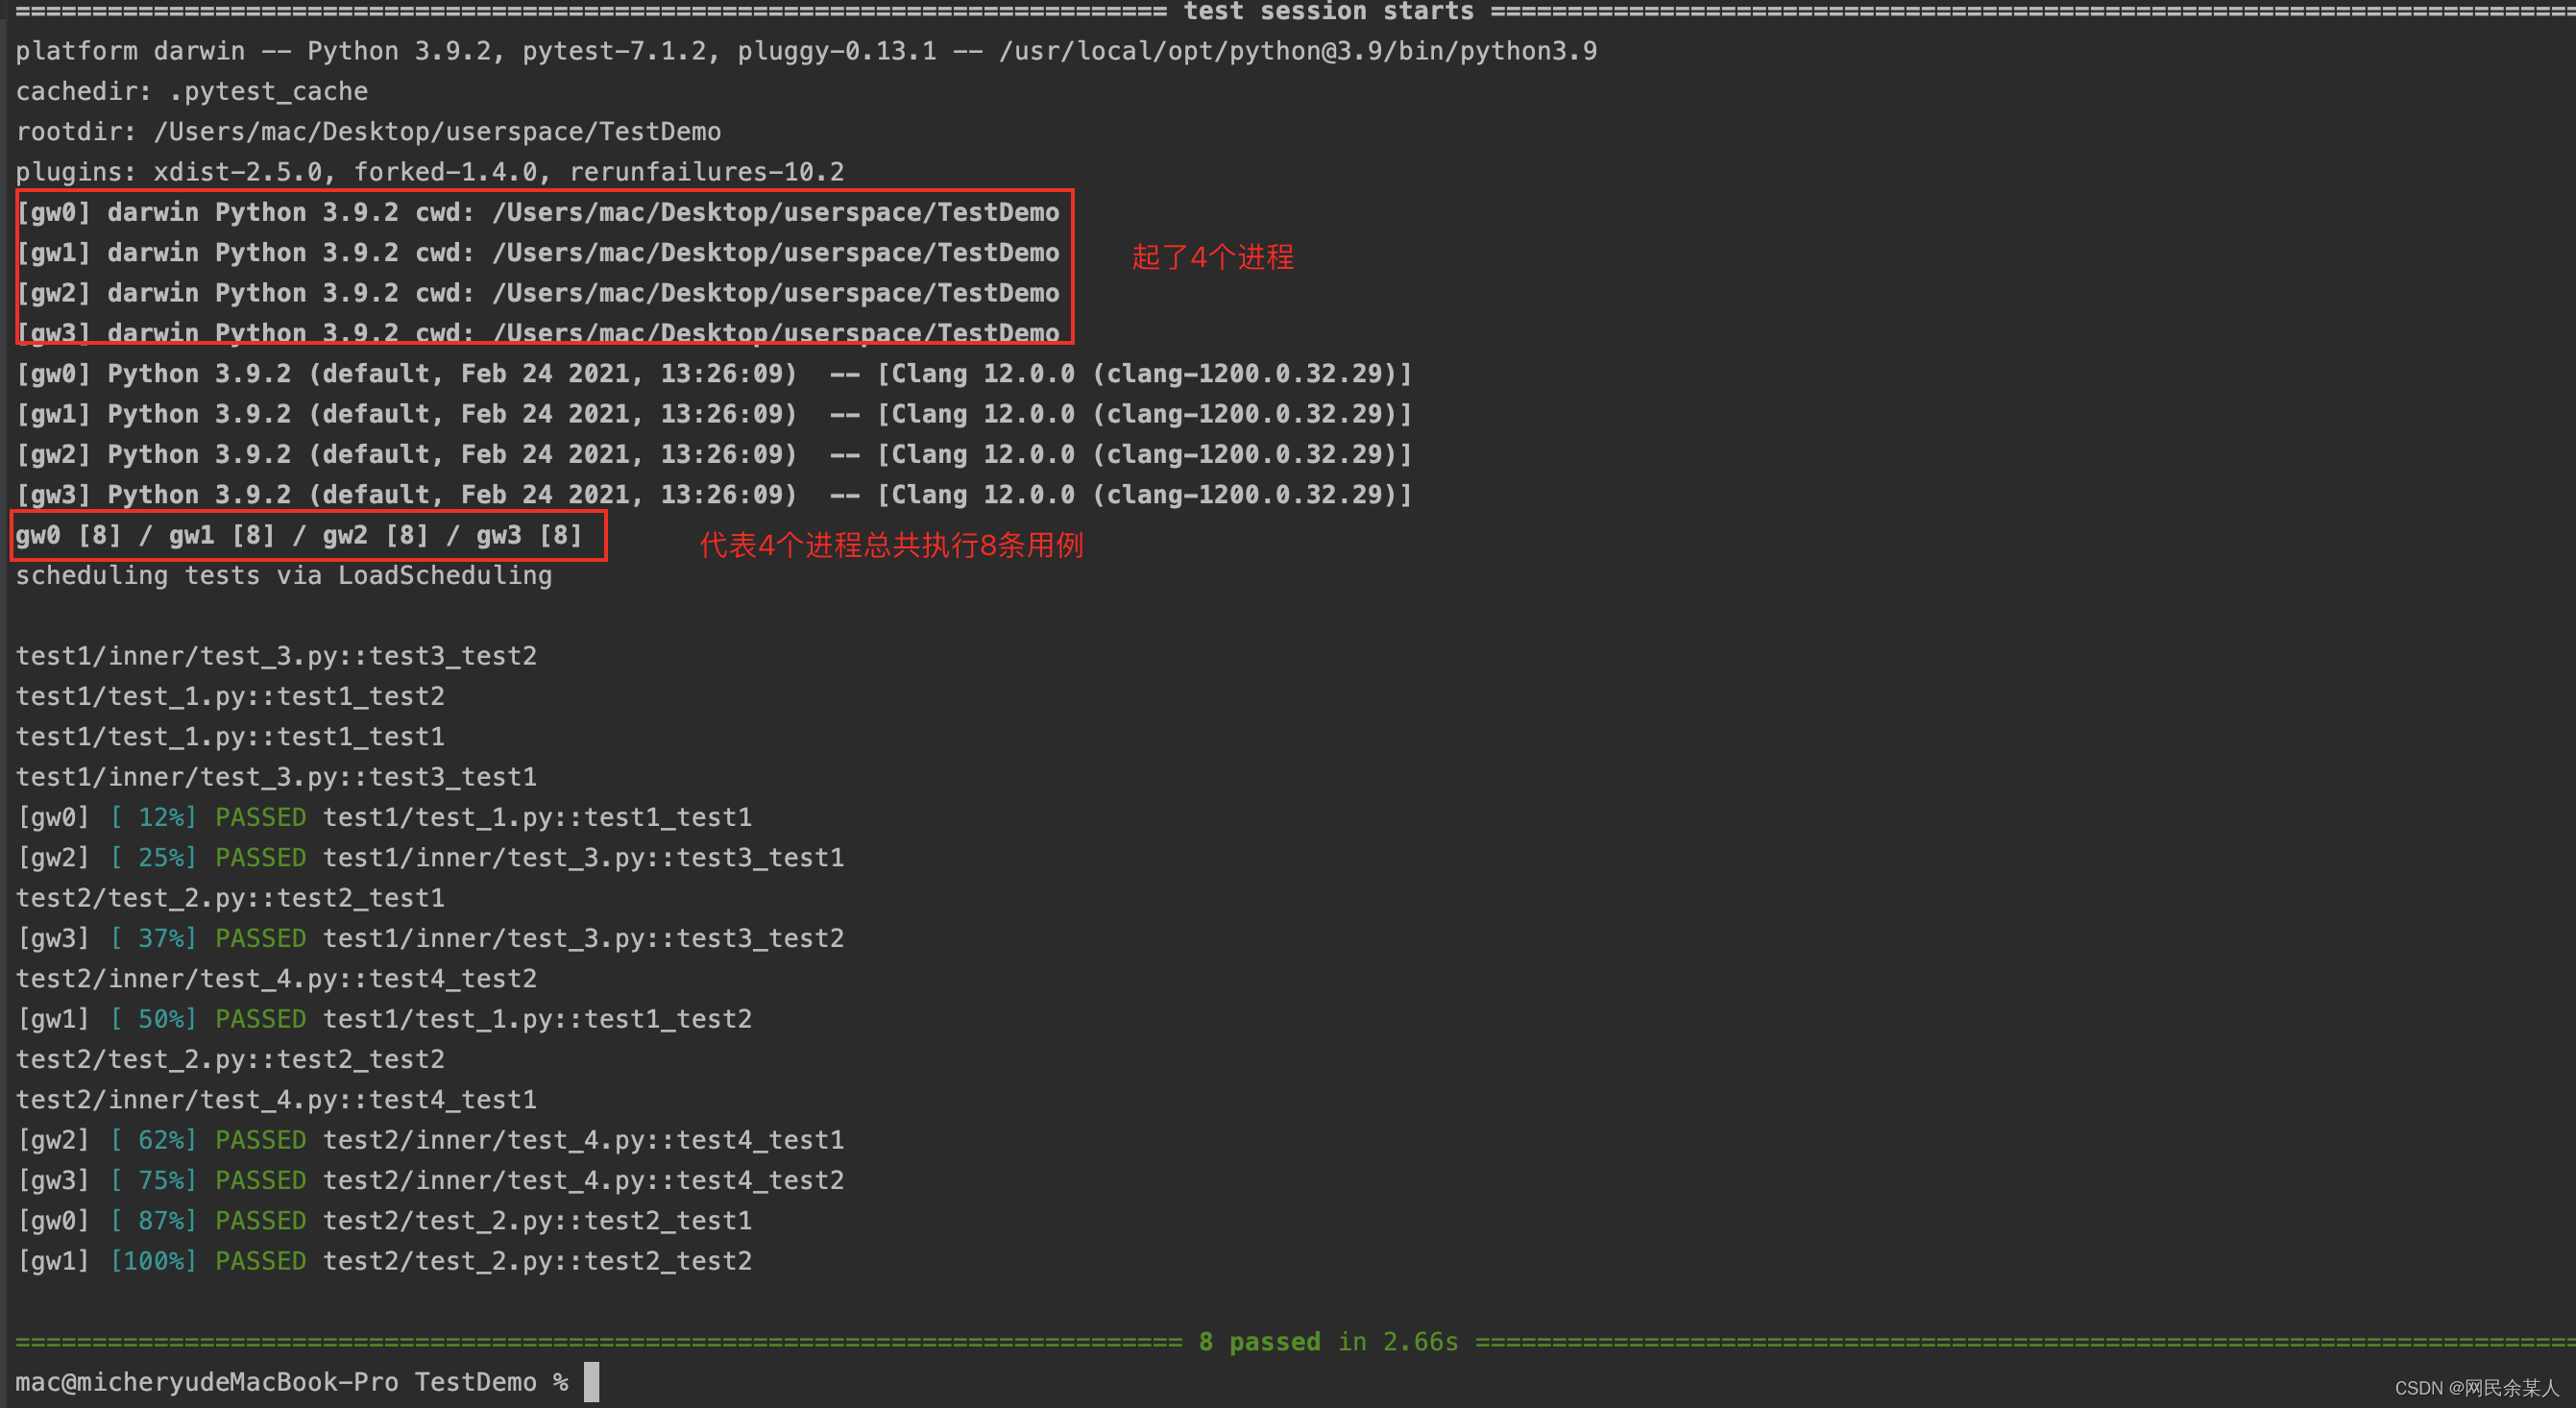
pytest-xdist分散式測試的原理:
-
xdist的分散式類似於一主多從的結構,master負責下發命令,控制slave;slave根據master的命令執行特定測試任務。
-
在xdist中,主是master,從是workers;xdist會產生一個或多個workers,workers都通過master來控制,每個worker相當於一個
mini版pytest執行器。 -
master不執行測試任務,只對worker收集到的所有用例進行分發;每個worker負責執行測試用例,然後將執行結果反饋給master;由master統計最終測試結果。
pytest-xdist分散式測試的流程:
第一步:master建立worker
-
master在
測試對談(test session)開始前產生一個或多個worker。 -
實際編譯執行測試程式碼的worker可能是本地機器也可能是遠端機器。
第二步:workers收集測試項用例
-
每個worker類似一個迷你型的
pytest執行器。 -
worker會執行一個完整的
test collection過程。【收集所有測試用例的過程】 -
然後把測試用例的
ids返回給master。【ids表示收集到的測試用例路徑】 -
master不執行任何測試用例。
注意:分散式測試(pytest-xdist)方式執行測試時不會輸出測試用例中的print內容,因為master並不執行測試用例。
第三步:master檢測workers收集到的測試用例集
-
master接收到所有worker收集的測試用例集之後,master會進行一些完整性檢查,以確保所有worker都收集到一樣的測試用例集(包括順序)。
-
如果檢查通過,會將測試用例的ids列表轉換成簡單的索引列表,每個索引對應一個測試用例的在原來測試集中的位置。
-
這個方案可行的原因是:所有的節點都儲存著相同的測試用例集。
-
並且使用這種方式可以節省頻寬,因為master只需要告知workers需要執行的測試用例對應的索引,而不用告知完整的測試用例資訊。
第四步:master分發測試用例
有以下四種分發策略:命令列引數 --dist=mode選項(預設load)
-
each:master將完整的測試索引列表分發到每個worker,即每個worker都會執行一遍所有的用例。
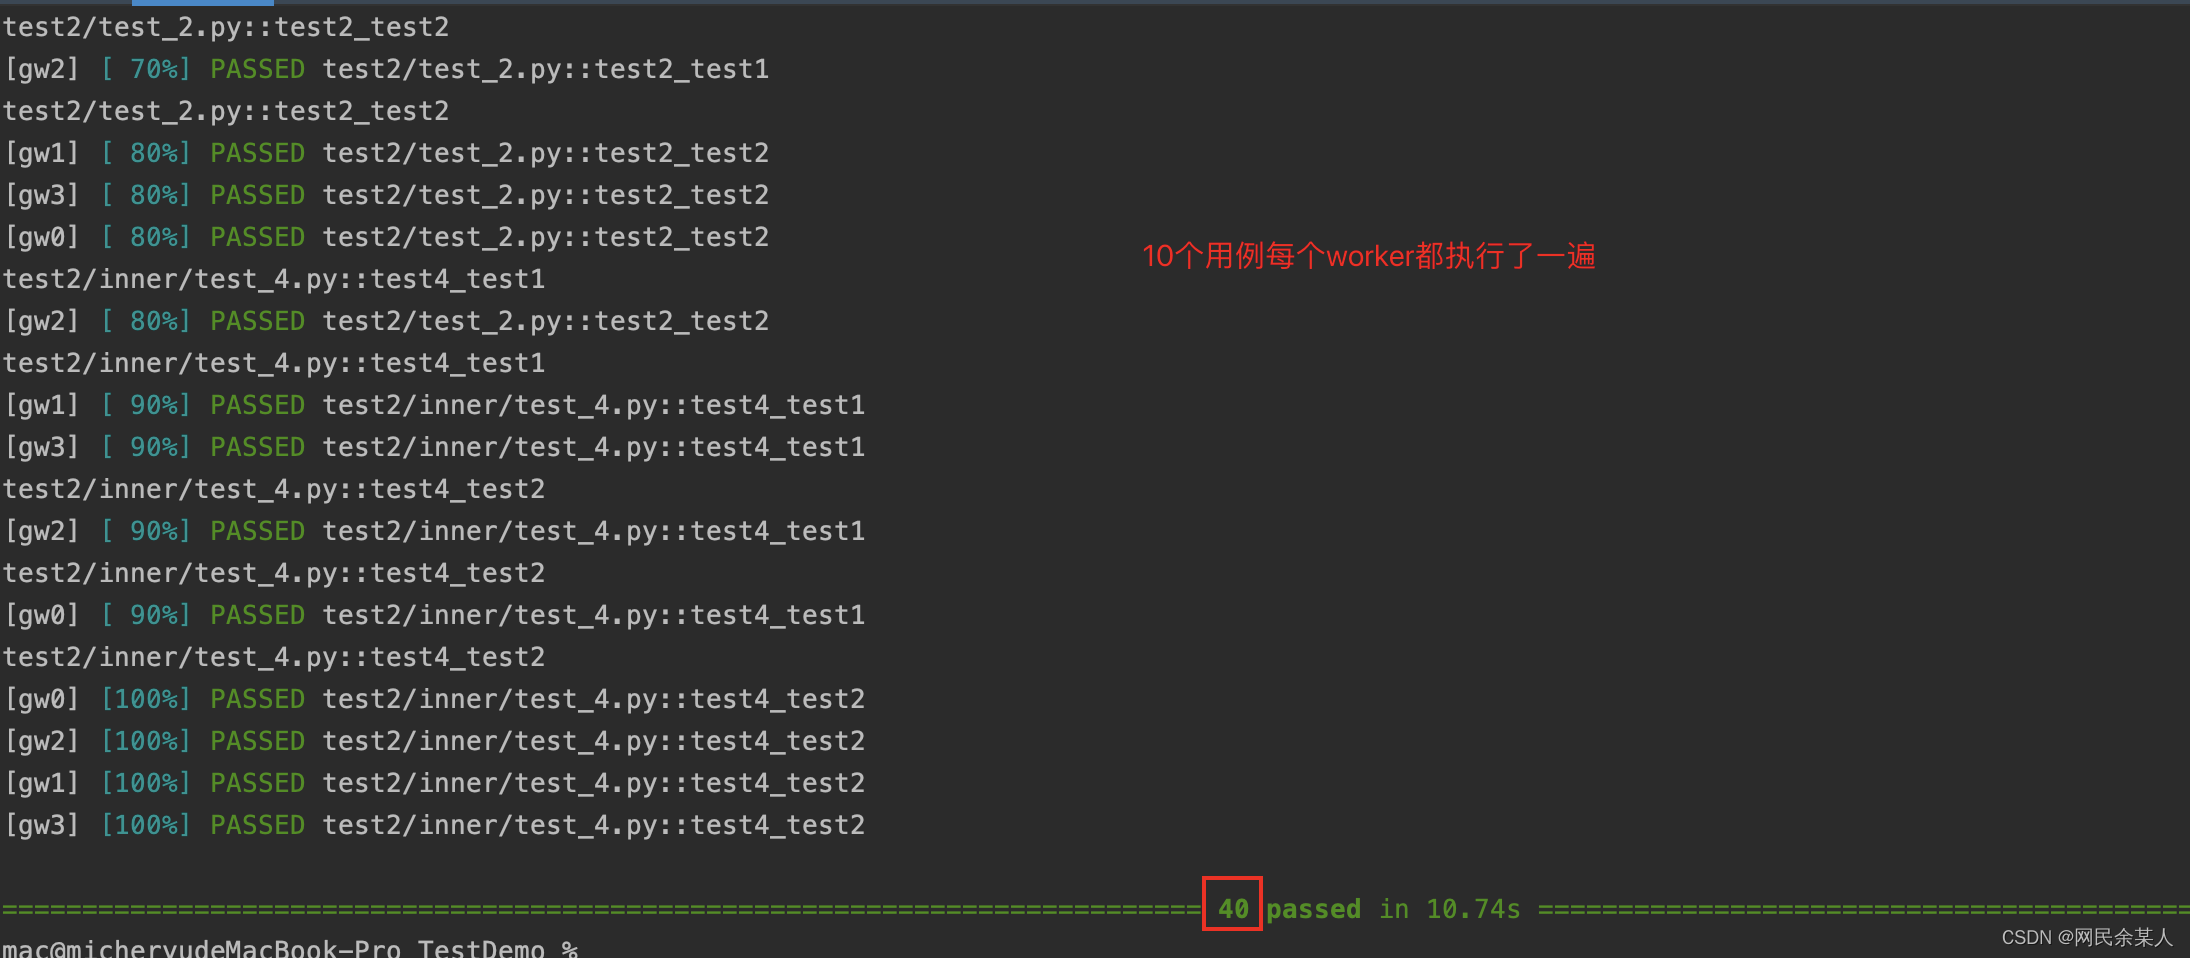
-
load:master將大約$\frac{1}{n}$的測試用例以輪詢的方式分發到各個worker,剩餘的測試用例則會等待worker執行完測試用例以後再分發;每個用例只會被其中一個worker執行一次。
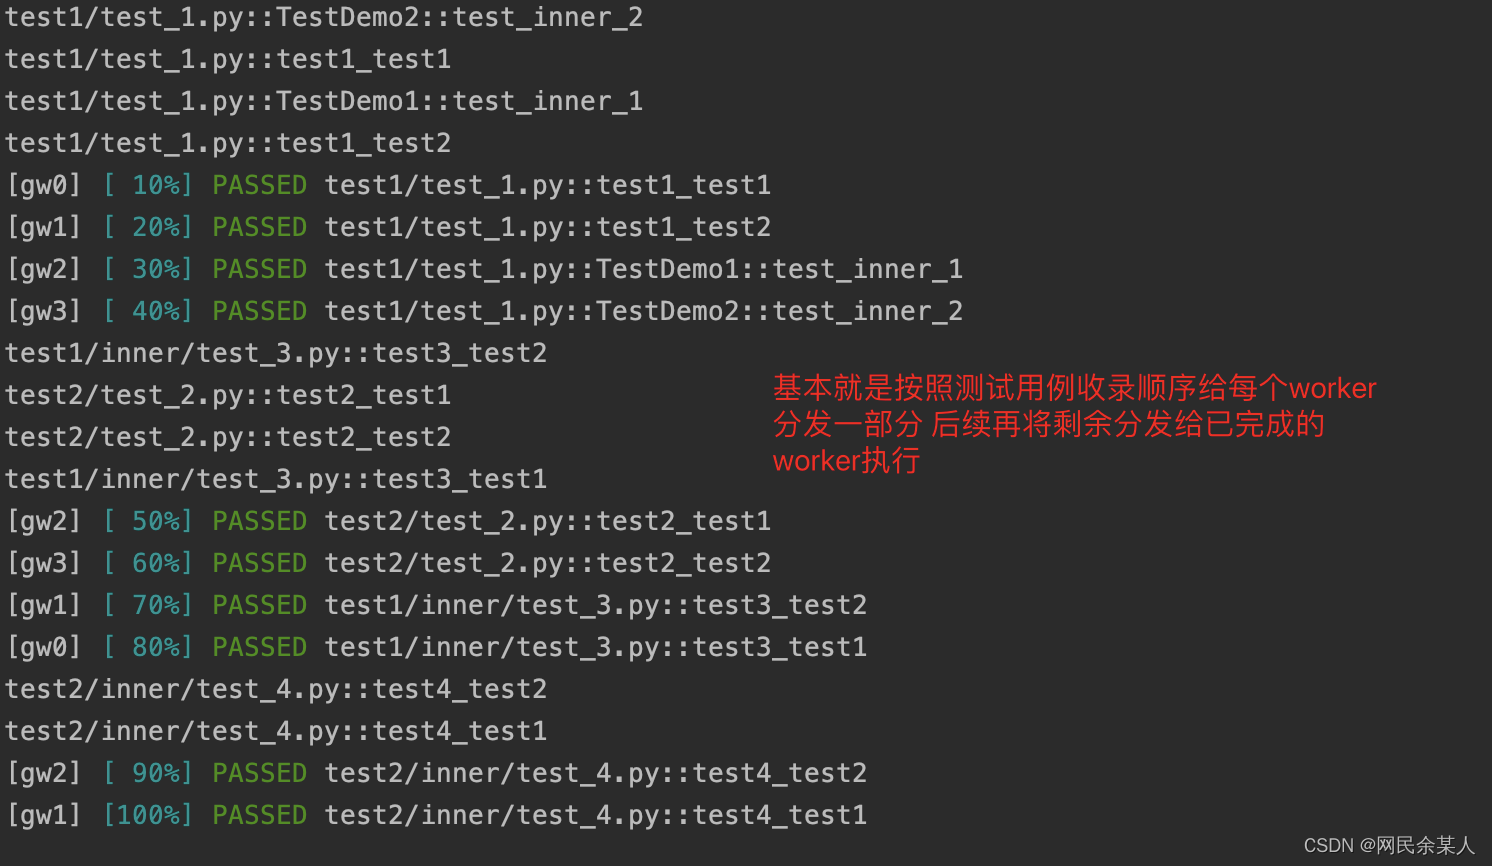
-
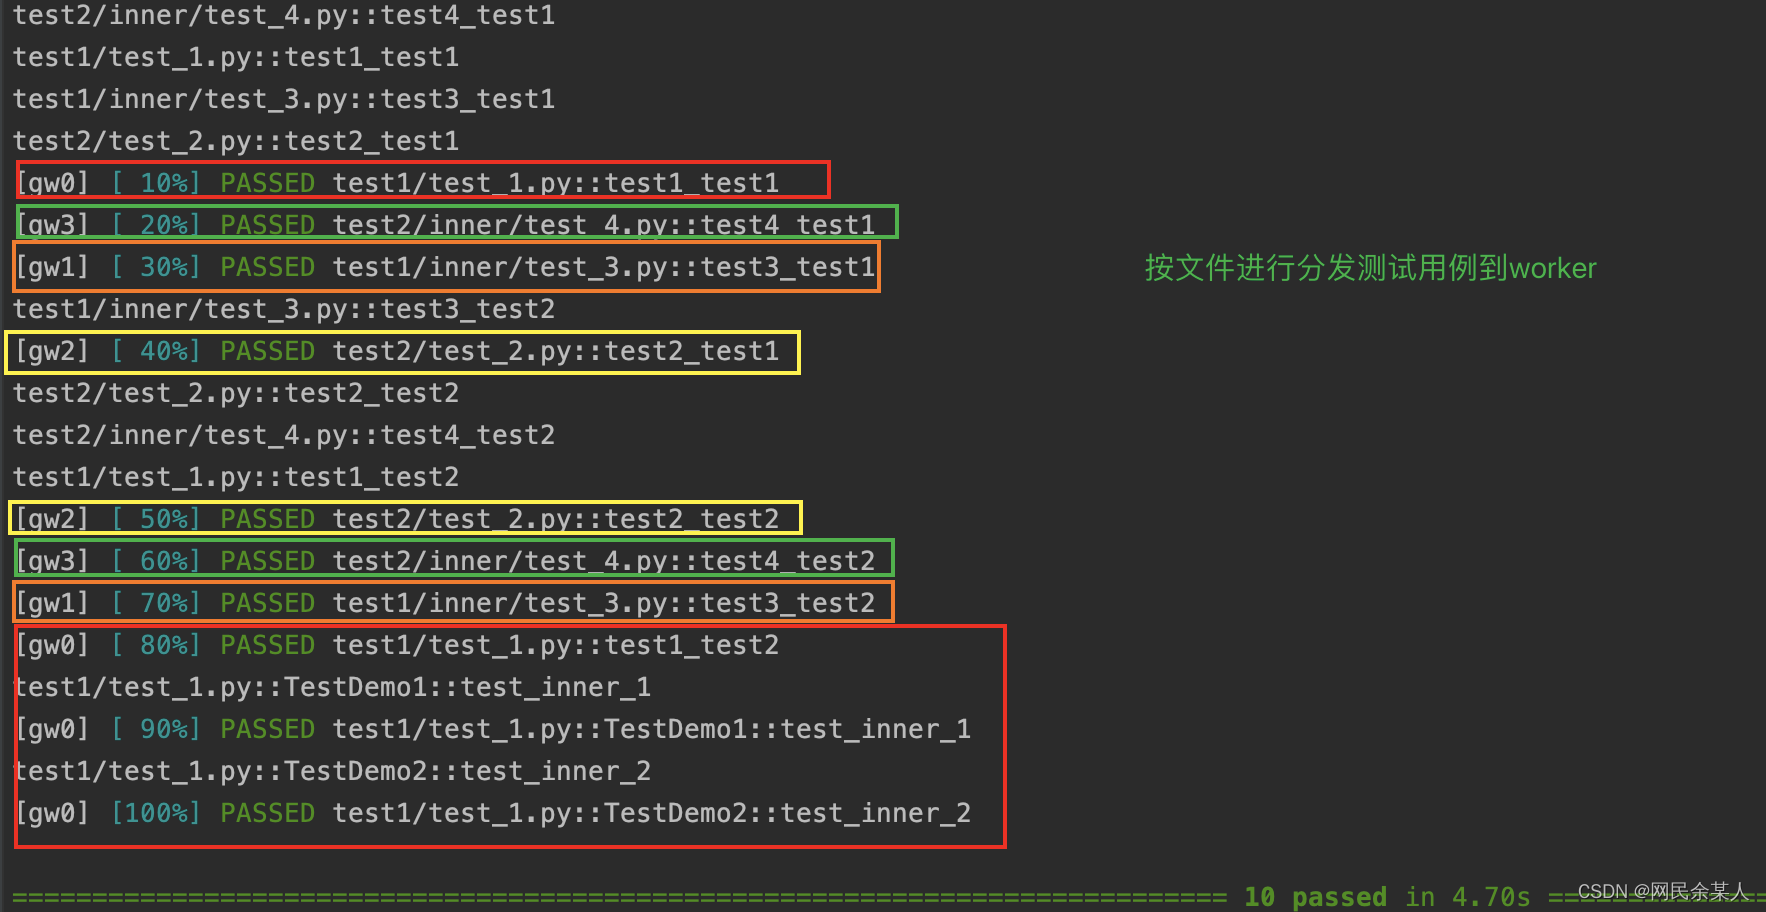
loadfile:master分發用例的策略為按
ids中的檔名(test_xx.py/xx_test.py)進行分發,即同一個測試檔案中的測試用例只會分發給其中一個worker;具有一定的隔離性。
-
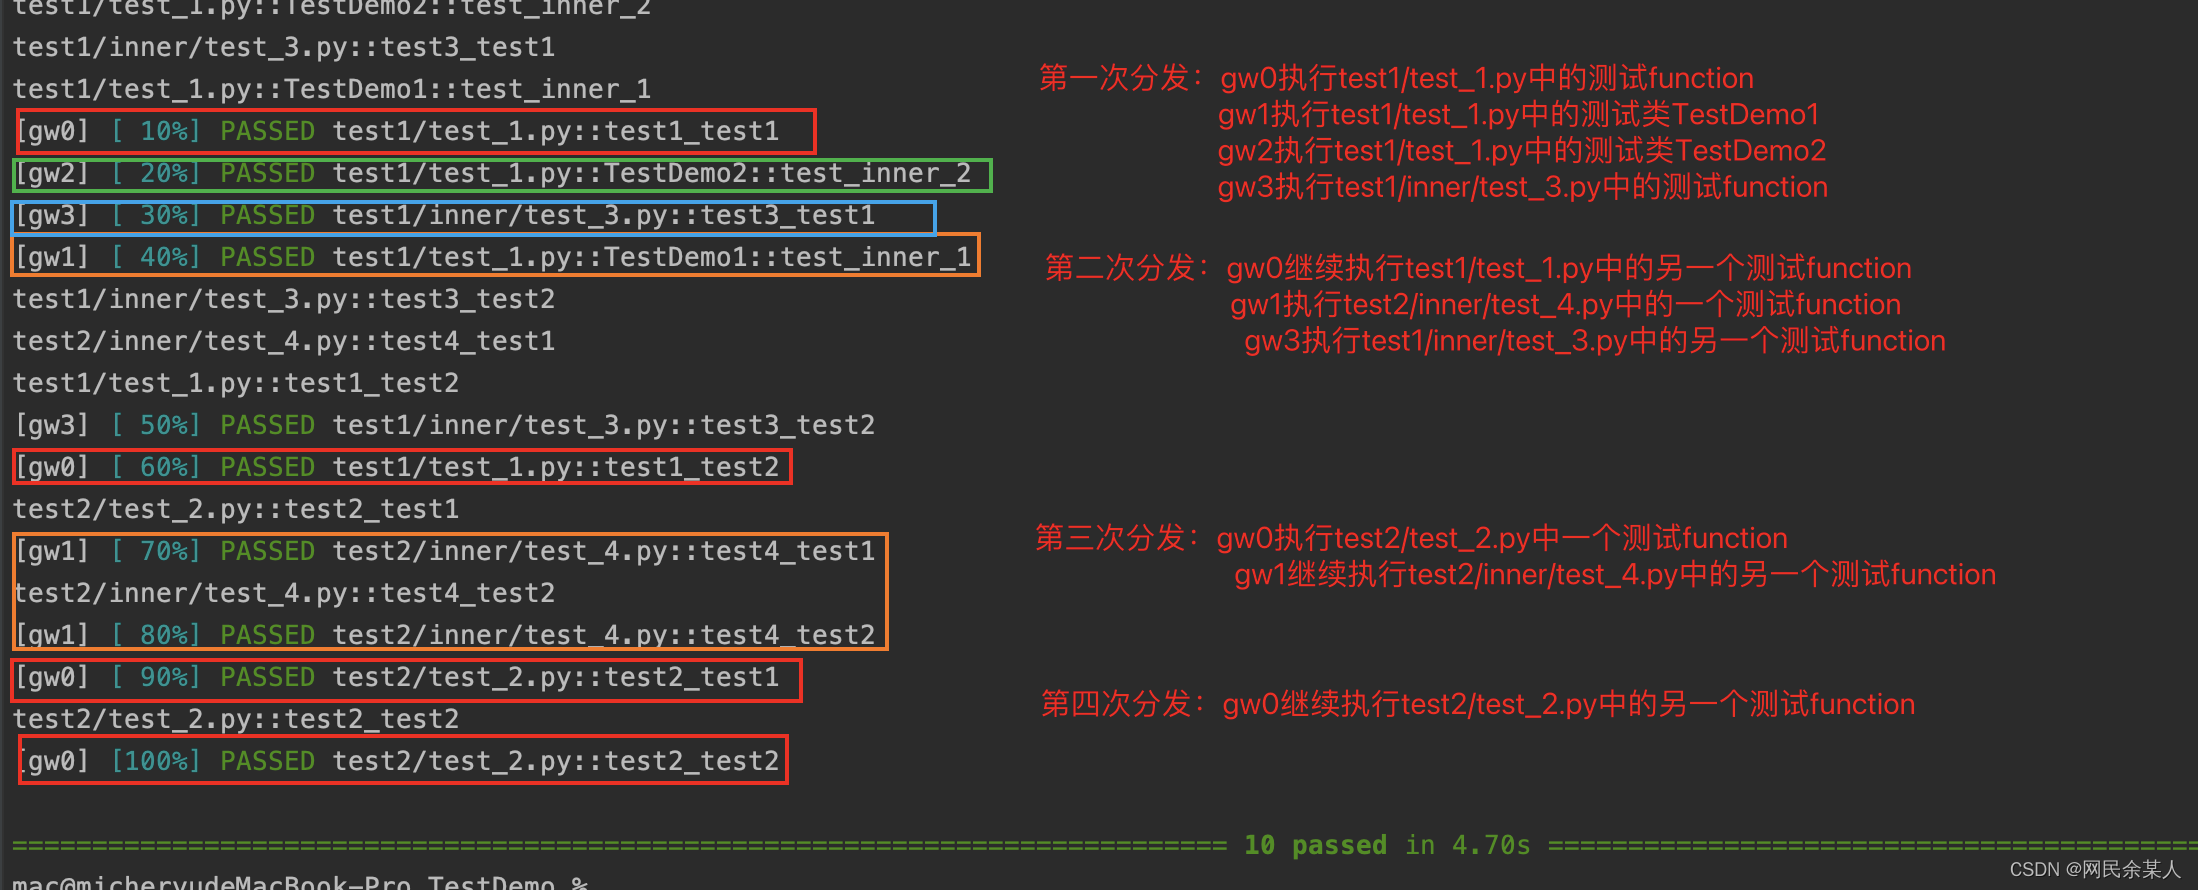
loadscope:master分發用例對策略為按作用域進行分發,同一個模組下的測試函數或某個測試類中的測試函數會分發給同一個worker來執行;即py檔案中無測試類的話(只有測試function)將該模組分發給同一個worker執行,如果有測試類則會將該檔案中的測試類只會分發給同一個worker執行,多個類可能分發給多個worker;目前無法自定義分組,按類 class 分組優先於按模組 module 分組。
注意:可以使用pytest_xdist_make_scheduler這個hook來實現自定義測試分發邏輯。
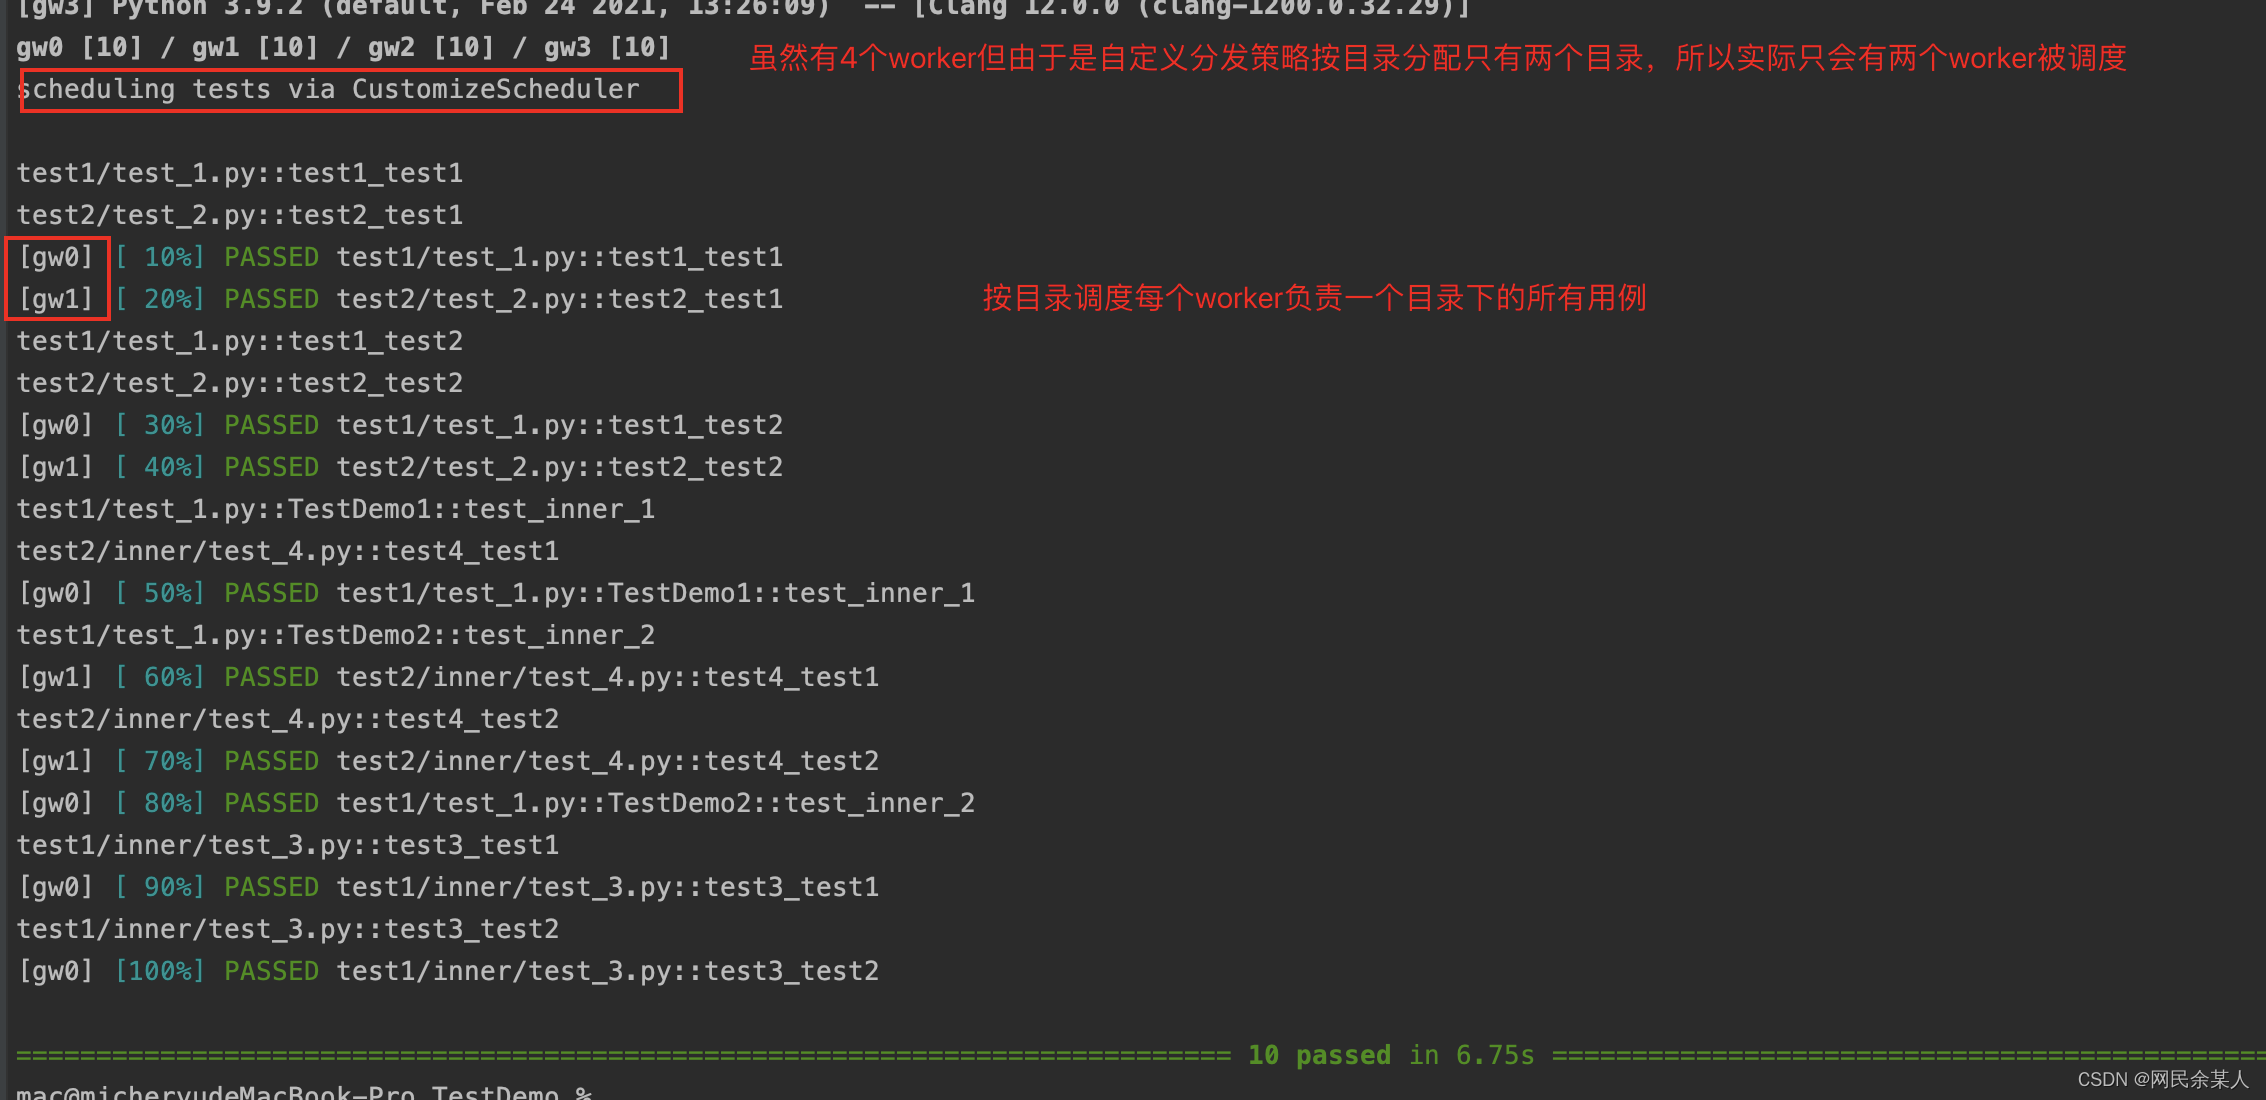
如:想按目錄級別來分發測試用例:
from xdist.scheduler import LoadScopeScheduling


class CustomizeScheduler(LoadScopeScheduling):
	def _split_scope(self, nodeid):
		return nodeid.split("/", 1)[0]


def pytest_xdist_make_scheduler(config, log):
	return CustomizeScheduler(config, log)
- 只需在最外層conftest中繼承
xdist.scheduler.LoadScopeScheduling並重寫_split_scope方法 - 重寫勾點函數
pytest_xdist_make_scheduler
pytest -v -n 4 --dist=loadfile
第五步:worker執行測試用例
- workers 重寫了
pytest_runtestloop:pytest的預設實現是迴圈執行所有在test_session這個物件裡面收集到的測試用例。 - 但是在xdist裡, workers實際上是等待master為其傳送需要執行的測試用例。
- 當worker收到測試任務, 就順序執行
pytest_runtest_protocol。 - 值得注意的一個細節是:workers 必須始終保持至少一個測試用例在的任務佇列裡, 以相容
pytest_runtest_protocol(item, nextitem)hook的引數要求,為了將nextitem傳給hook。 - master在worker執行完分配的一組測試後,基於測試執行時長以及每個worker剩餘測試用例綜合決定是否向這個worker傳送更多的測試用例。
- worker會在執行最後一個測試項前等待master的更多指令。
- 如果它收到了更多測試項, 那麼就可以安全的執行
pytest_runtest_protocol,因為這時nextitem引數已經可以確定。 - 如果它收到一個
shutdown訊號, 那麼就將nextitem引數設為None, 然後執行pytest_runtest_protocol
第六步:測試結束
- 當master沒有更多執行測試任務時,它會傳送一個
shutdown訊號給所有worker。 - 當worker將剩餘測試用例執行完後退出程序。
- 當workers在測試執行結束時,會將結果被傳送回master,然後master將結果轉發到其他
pytest hooks比如:pytest_runtest_logstart、pytest_runtest_logreport確保整個測試活動進行正常運作。 - master等待所有worker全部退出並關閉測試對談。
注意:pytest-xdist 是讓每個 worker 程序執行屬於自己的測試用例集下的所有測試用例。這意味著在不同程序中,不同的測試用例可能會呼叫同一個 scope 範圍級別較高(例如session)的 fixture,該 fixture 則會被執行多次,這不符合 scope=session 的預期。
pytest-xdist 沒有內建的支援來確保對談範圍的 fixture 僅執行一次,但是可以通過使用鎖定檔案進行程序間通訊來實現;讓scope=session 的 fixture 在 test session 中僅執行一次。
範例:需要安裝 filelock 包,安裝命令pip install filelock
- 比如只需要執行一次login(或定義設定選項、初始化資料庫連線等)。
- 當第一次請求這個fixture時,則會利用
FileLock僅產生一次fixture資料。 - 當其他程序再次請求這個fixture時,則不會重複執行fixture。
import pytest
from filelock import FileLock


@pytest.fixture(scope="session")
def login(tmp_path_factory, worker_id):
    # 代表是單機執行
    if worker_id == "master":
        token = str(random())
        print("fixture:請求登入介面,獲取token", token)
        os.environ['token'] = token

        return token

    # 分散式執行
    # 獲取所有子節點共用的臨時目錄,無需修改【不可刪除、修改】
    root_tmp_dir = tmp_path_factory.getbasetemp().parent
    fn = root_tmp_dir / "data.json"
    with FileLock(str(fn) + ".lock"):
        if fn.is_file():  # 代表已經有程序執行過該fixture
            token = json.loads(fn.read_text())
        else:  # 代表該fixture第一次被執行
            token = str(random())
            fn.write_text(json.dumps(token))
        # 最好將後續需要保留的資料存在某個地方,比如這裡是os的環境變數
        os.environ['token'] = token
	return token
多執行緒執行用例之 pytest-parallel
用於並行和並行測試的 pytest 外掛
pip install pytest-parallel
常用引數設定
-
--workers=n:多程序執行需要加此引數, n是程序數。預設為1 -
--tests-per-worker=n:多執行緒需要新增此引數,n是執行緒數
如果兩個引數都設定了,就是程序並行;每個程序最多n個執行緒,匯流排程數:程序數*執行緒數
【注意】
-
在windows上程序數永遠為1。
-
需要使用
if name == 「main」 :在命令列視窗執行測試用例會報錯
範例:
- pytest test.py --workers 3 :3個程序執行
- pytest test.py --tests-per-worker 4 :4個執行緒執行
- pytest test.py --workers 2 --tests-per-worker 4 :2個程序並行,且每個程序最多4個執行緒執行,即總共最多8個執行緒執行。
import pytest


def test_01():
    print('測試用例1操作')

def test_02():
    print('測試用例2操作')

def test_03():
    print('測試用例3操作')

def test_04():
    print('測試用例4操作')

def test_05():
    print('測試用例5操作')

def test_06():
    print('測試用例6操作')

def test_07():
    print('測試用例7操作')

def test_08():
    print('測試用例8操作')


if __name__ == "__main__":
    pytest.main(["-s", "test_b.py", '--workers=2', '--tests-per-worker=4'])
pytest-parallel與pytest-xdist對比說明:
- pytest-parallel 比 pytst-xdist 相對好用,功能支援多;
- pytst-xdist 不支援多執行緒;
- pytest-parallel 支援python3.6及以上版本,所以如果想做多程序並行在linux或者mac上做,在Windows上不起作用(Workers=1),如果做多執行緒linux/mac/windows平臺都支援,程序數為workers的值。
- pytest-xdist適用場景為:
- 不是執行緒安全的
- 多執行緒時效能不佳的測試
- 需要狀態隔離
- pytest-parallel對於某些用例(如 Selenium)更好:
- 可以是執行緒安全的
- 可以對 http 請求使用非阻塞 IO 來提高效能
簡而言之,pytest-xdist並行性pytest-parallel是並行性和並行性。