爬蟲(2)
1.Requests 安裝與請求方法
requests官方檔案:https://docs.python-requests.org/zh_CN/latest/,官方檔案不知道為什麼掛了,存取不了。我找了個類似的,可以借鑑參考學習,requests檔案:https://www.w3cschool.cn/requests2/requests2-gzsd3fj9.html
requests模組安裝
pip install requests

requests模組支援的http方法
- GET:當用戶端向Web伺服器請求一個資源的時候使用
- GET方法是最簡單最常用的請求方法
- 它被用來存取靜態資源,比如HTML檔案和圖片等
- HEAD:當用戶端向Web伺服器請求一個資源的一些資訊而不是資源的全部資訊的時候使用
- 主要用於確認URL的有效性以及資源更新的日期時間等
- POST:當用戶端向伺服器端傳送資訊或者資料的時候用
- 用於表單提交(向Web伺服器傳送大量的複雜的資料)
- PUT:當用戶端向Web伺服器端指定URL傳送一個替換的檔案或者上傳一個新檔案的時候使用
- DELETE:當用戶端嘗試從Web伺服器端刪除一個由請求URL唯一標識的檔案的時候使用
- TRACE:當用戶端要求可用的代理伺服器或者中間服務更改請求來宣佈自己的時候使用
- OPTIONS:當用戶端想要決定其他可用的方法來檢索或者處理Web伺服器端的一個檔案時使用
- CONNECT:當用戶端想要確定一個明確的連線到遠端主機的時候使用,通常便於通過Http代理伺服器進行SSL加密通訊(Https)連線使用
2.Requests 傳送請求
requests模組支援眾多的http請求方法,其中get和post是我們需要掌握的。其它的請求方法,需要使用時,參照官方說明檔案即可。
get請求
import requests

r=requests.get('http://httpbin.org/ip')
print(r.text)
使用 Requests 傳送網路請求非常簡單。
一開始要匯入 Requests 模組:
import requests
然後,嘗試獲取某個網頁。本例子中,我們來存取上述地址獲取原生的IP:
r=requests.get('http://httpbin.org/ip')
post請求
Requests 簡便的 API 意味著所有 HTTP 請求型別都是顯而易見的。可以這樣傳送一個 HTTP POST 請求:
r = requests.post('http://httpbin.org/post', data={'name':'zhangsan'})
漂亮,對吧?那麼其他 HTTP 請求型別:PUT,DELETE,HEAD 以及 OPTIONS 又是如何的呢?都是一樣的簡單:
r = requests.put('http://httpbin.org/put', data = {'key':'value'})
r = requests.delete('http://httpbin.org/delete')
r = requests.head('http://httpbin.org/get')
r = requests.options('http://httpbin.org/get')
3.Requests 傳遞URL引數
你也許經常想為 URL 的查詢字串(query string)傳遞某種資料。如果你是手工構建 URL,那麼資料會以鍵/值對的形式置於 URL 中,跟在一個問號的後面。例如, httpbin.org/get?key=val。 Requests 允許你使用 params 關鍵字引數,以一個字串字典來提供這些引數。舉例來說,如果你想傳遞 key1=value1 和 key2=value2 到 httpbin.org/get ,那麼你可以使用如下程式碼:
payload = {'key1': 'value1', 'key2': 'value2'}
r = requests.get("http://httpbin.org/get", params=payload)
通過列印輸出該 URL,你能看到 URL 已被正確編碼:
>>> print(r.url)
http://httpbin.org/get?key2=value2&key1=value1
注意字典裡值為 None 的鍵都不會被新增到 URL 的查詢字串裡。
你還可以將一個列表作為值傳入:
>>> payload = {'key1': 'value1', 'key2': ['value2', 'value3']}

>>> r = requests.get('http://httpbin.org/get', params=payload)
>>> print(r.url)
http://httpbin.org/get?key1=value1&key2=value2&key2=value3
4.Requests 響應內容
我們能讀取伺服器響應的內容。以 httpbin.org為例:
>>> import requests
>>> r = requests.get('http://httpbin.org/ip')
>>> r.text
{"origin": "1.1.1.1"}
Requests 會自動解碼來自伺服器的內容。大多數 unicode 字元集都能被無縫地解碼。
請求發出後,Requests 會基於 HTTP 頭部對響應的編碼作出有根據的推測。當你存取 r.text 之時,Requests 會使用其推測的文字編碼。你可以找出 Requests 使用了什麼編碼,並且能夠使用 r.encoding 屬性來改變它:
>>> r.encoding
'utf-8'
>>> r.encoding = 'ISO-8859-1'
如果你改變了編碼,每當你存取 r.text ,Request 都將會使用 r.encoding 的新值。你可能希望在使用特殊邏輯計算出文字的編碼的情況下來修改編碼。比如 HTTP 和 XML 自身可以指定編碼。這樣的話,你應該使用 r.content 來找到編碼,然後設定 r.encoding 為相應的編碼。這樣就能使用正確的編碼解析 r.text 了。
在你需要的情況下,Requests 也可以使用客製化的編碼。如果你建立了自己的編碼,並使用 codecs 模組進行註冊,你就可以輕鬆地使用這個解碼器名稱作為 r.encoding 的值, 然後由 Requests 來為你處理編碼。
二進位制響應內容
你也能以位元組的方式存取請求響應體,對於非文字請求:
>>> r.content
b'{\n  "origin": "1.1.1.1"\n}\n'
Requests 會自動為你解碼 gzip 和 deflate 傳輸編碼的響應資料。
例如,以請求返回的二進位制資料建立一張圖片,你可以使用如下程式碼:
>>> from PIL import Image
>>> from io import BytesIO

>>> i = Image.open(BytesIO(r.content))
JSON 響應內容
Requests 中也有一個內建的 JSON 解碼器,助你處理 JSON 資料:
>>> import requests

>>> r = requests.get('http://httpbin.org/ip')
>>> r.json()
{'origin': '1.1.1.1'}
如果 JSON 解碼失敗, r.json() 就會丟擲一個異常。例如,響應內容是 401 (Unauthorized),嘗試存取 r.json() 將會丟擲 ValueError: No JSON object could be decoded 異常。
需要注意的是,成功呼叫 r.json() 並**不**意味著響應的成功。有的伺服器會在失敗的響應中包含一個 JSON 物件(比如 HTTP 500 的錯誤細節)。這種 JSON 會被解碼返回。要檢查請求是否成功,請使用 r.raise_for_status() 或者檢查 r.status_code 是否和你的期望相同。
原始響應內容
在罕見的情況下,你可能想獲取來自伺服器的原始通訊端響應,那麼你可以存取 r.raw。 如果你確實想這麼幹,那請你確保在初始請求中設定了 stream=True。具體你可以這麼做:
>>> r = requests.get('http://httpbin.org/ip', stream=True)
>>> r.raw
<urllib3.response.HTTPResponse object at 0x0000025E07177777>
>>> r.raw.read(10)
b''
但一般情況下,你應該以下面的模式將文字流儲存到檔案:
with open(filename, 'wb') as fd:
    for chunk in r.iter_content(chunk_size):
        fd.write(chunk)
使用 Response.iter_content 將會處理大量你直接使用 Response.raw 不得不處理的。 當流下載時,上面是優先推薦的獲取內容方式。 Note that chunk_size can be freely adjusted to a number that may better fit your use cases.
5.Requests 客製化請求頭
如果你想為請求新增 HTTP 頭部,只要簡單地傳遞一個 dict 給 headers 引數就可以了。
例如,在一個請求中我們沒有指定 content-type:
>>> url = 'https://api.github.com/some/endpoint'
>>> headers = {'user-agent': 'my-app/0.0.1'}

>>> r = requests.get(url, headers=headers)
注意: 客製化 header 的優先順序低於某些特定的資訊源,例如:
- 如果在
.netrc 中設定了使用者認證資訊,使用 headers= 設定的授權就不會生效。而如果設定了 auth= 引數,``.netrc`` 的設定就無效了。 - 如果被重定向到別的主機,授權
header 就會被刪除。 - 代理授權
header 會被 URL 中提供的代理身份覆蓋掉。 - 在我們能判斷內容長度的情況下,
header 的 Content-Length 會被改寫。
更進一步講,Requests 不會基於客製化 header 的具體情況改變自己的行為。只不過在最後的請求中,所有的 header 資訊都會被傳遞進去。
注意: 所有的 header 值必須是 string、bytestring 或者 unicode。儘管傳遞 unicode header 也是允許的,但不建議這樣做。
6.Requests POST請求用法
通常,你想要傳送一些編碼為表單形式的資料——非常像一個 HTML 表單。要實現這個,只需簡單地傳遞一個字典給 data 引數。你的資料字典在發出請求時會自動編碼為表單形式:
>>> payload = {'key1': 'value1', 'key2': 'value2'}

>>> r = requests.post("http://httpbin.org/post", data=payload)
>>> print(r.text)
{
  ...
  "form": {
    "key2": "value2",
    "key1": "value1"
  },
  ...
}
你還可以為 data 引數傳入一個元組列表。在表單中多個元素使用同一 key 的時候,這種方式尤其有效:
>>> payload = (('key1', 'value1'), ('key1', 'value2'))
>>> r = requests.post('http://httpbin.org/post', data=payload)
>>> print(r.text)
{
  ...
  "form": {
    "key1": [
      "value1",
      "value2"
    ]
  },
  ...
}
很多時候你想要傳送的資料並非編碼為表單形式的。如果你傳遞一個 string 而不是一個 dict,那麼資料會被直接釋出出去。
例如,Github API v3 接受編碼為 JSON 的 POST/PATCH 資料:
>>> import json

>>> url = 'https://api.github.com/some/endpoint'
>>> payload = {'some': 'data'}

>>> r = requests.post(url, data=json.dumps(payload))
此處除了可以自行對 dict 進行編碼,你還可以使用 json 引數直接傳遞,然後它就會被自動編碼。這是 2.4.2 版的新加功能:
>>> url = 'https://api.github.com/some/endpoint'
>>> payload = {'some': 'data'}

>>> r = requests.post(url, json=payload)
POST一個多部分編碼(Multipart-Encoded)的檔案
Requests 使得上傳多部分編碼檔案變得很簡單:
>>> url = 'http://httpbin.org/post'
>>> files = {'file': open('report.xls', 'rb')}

>>> r = requests.post(url, files=files)
>>> r.text
{
  ...
  "files": {
    "file": "<censored...binary...data>"
  },
  ...
}
你可以顯式地設定檔名,檔案型別和請求頭:
>>> url = 'http://httpbin.org/post'
>>> files = {'file': ('report.xls', open('report.xls', 'rb'), 'application/vnd.ms-excel', {'Expires': '0'})}

>>> r = requests.post(url, files=files)
>>> r.text
{
  ...
  "files": {
    "file": "<censored...binary...data>"
  },
  ...
}
如果你想,你也可以傳送作為檔案來接收的字串:
>>> url = 'http://httpbin.org/post'
>>> files = {'file': ('report.csv', 'some,data,to,send\nanother,row,to,send\n')}

>>> r = requests.post(url, files=files)
>>> r.text
{
  ...
  "files": {
    "file": "some,data,to,send\\nanother,row,to,send\\n"
  },
  ...
}
如果你傳送一個非常大的檔案作為 multipart/form-data 請求,你可能希望將請求做成資料流。預設下 requests 不支援, 但有個第三方包 requests-toolbelt 是支援的。你可以閱讀 toolbelt 檔案 來了解使用方法。
在一個請求中傳送多檔案參考 高階用法 一節。
警告
我們強烈建議你用二進位制模式(binary mode)開啟檔案。這是因為 Requests 可能會試圖為你提供 Content-Length header,在它這樣做的時候,這個值會被設為檔案的位元組數(bytes)。如果用文字模式(text mode)開啟檔案,就可能會發生錯誤。
7.Requests 響應狀態碼
我們可以檢測響應狀態碼:
>>> r = requests.get('http://httpbin.org/get')
>>> r.status_code
200
為方便參照,Requests還附帶了一個內建的狀態碼查詢物件:
>>> r.status_code == requests.codes.ok
True
如果傳送了一個錯誤請求(一個 4XX 使用者端錯誤,或者 5XX 伺服器錯誤響應),我們可以通過 Response.raise_for_status() 來丟擲異常:
>>> bad_r = requests.get('http://httpbin.org/status/404')
>>> bad_r.status_code
404

>>> bad_r.raise_for_status()
Traceback (most recent call last):
  File "requests/models.py", line 832, in raise_for_status
    raise http_error
requests.exceptions.HTTPError: 404 Client Error
但是,由於我們的例子中 r 的 status_code 是 200 ,當我們呼叫 raise_for_status() 時,得到的是:
>>> r.raise_for_status()
None
8.Requests 響應頭
我們可以檢視以一個 Python 字典形式展示的伺服器響應頭:
>>> r.headers
{
    'content-encoding': 'gzip',
    'transfer-encoding': 'chunked',
    'connection': 'close',
    'server': 'nginx/1.0.4',
    'x-runtime': '148ms',
    'etag': '"e1ca502697e5c9317743dc078f67693f"',
    'content-type': 'application/json'
}
但是這個字典比較特殊:它是僅為 HTTP 頭部而生的。根據 RFC 2616, HTTP 頭部是大小寫不敏感的。
因此,我們可以使用任意大寫形式來存取這些響應頭欄位:
>>> r.headers['Content-Type']
'application/json'

>>> r.headers.get('content-type')
'application/json'
它還有一個特殊點,那就是伺服器可以多次接受同一 header,每次都使用不同的值。但 Requests 會將它們合併,這樣它們就可以用一個對映來表示出來,參見 RFC 7230:
A recipient MAY combine multiple header fields with the same field name into one "field-name: field-value" pair, without changing the semantics of the message, by appending each subsequent field value to the combined field value in order, separated by a comma.接收者可以合併多個相同名稱的 header 欄位,把它們合為一個 "field-name: field-value" 配對,將每個後續的欄位值依次追加到合併的欄位值中,用逗號隔開即可,這樣做不會改變資訊的語意。
9.Requests Cookie
如果某個響應中包含一些 cookie,你可以快速存取它們:
>>> url = 'http://example.com/some/cookie/setting/url'
>>> r = requests.get(url)

>>> r.cookies['example_cookie_name']
'example_cookie_value'
要想傳送你的cookies到伺服器,可以使用 cookies 引數:
>>> url = 'http://httpbin.org/cookies'
>>> cookies = dict(cookies_are='working')

>>> r = requests.get(url, cookies=cookies)
>>> r.text
'{"cookies": {"cookies_are": "working"}}'
Cookie 的返回物件為 RequestsCookieJar,它的行為和字典類似,但介面更為完整,適合跨域名跨路徑使用。你還可以把 Cookie Jar 傳到 Requests 中:
>>> jar = requests.cookies.RequestsCookieJar()
>>> jar.set('tasty_cookie', 'yum', domain='httpbin.org', path='/cookies')
>>> jar.set('gross_cookie', 'blech', domain='httpbin.org', path='/elsewhere')
>>> url = 'http://httpbin.org/cookies'
>>> r = requests.get(url, cookies=jar)
>>> r.text
'{"cookies": {"tasty_cookie": "yum"}}'
10.Requests 重定向與請求歷史
預設情況下,除了 HEAD, Requests 會自動處理所有重定向。
可以使用響應物件的 history 方法來追蹤重定向。
Response.history 是一個 Response 物件的列表,為了完成請求而建立了這些物件。這個物件列表按照從最老到最近的請求進行排序。
例如,Github 將所有的 HTTP 請求重定向到 HTTPS:
>>> r = requests.get('http://github.com')

>>> r.url
'https://github.com/'

>>> r.status_code
200

>>> r.history
[<Response [301]>]
如果你使用的是GET、OPTIONS、POST、PUT、PATCH 或者 DELETE,那麼你可以通過 allow_redirects 引數禁用重定向處理:
>>> r = requests.get('http://github.com', allow_redirects=False)
>>> r.status_code
301
>>> r.history
[]
如果你使用了 HEAD,你也可以啟用重定向:
>>> r = requests.head('http://github.com', allow_redirects=True)
>>> r.url
'https://github.com/'
>>> r.history
[<Response [301]>]
11.Requests 超時
你可以告訴 requests 在經過以 timeout 引數設定的秒數時間之後停止等待響應。基本上所有的生產程式碼都應該使用這一引數。如果不使用,你的程式可能會永遠失去響應:
>>> requests.get('http://github.com', timeout=0.001)
Traceback (most recent call last):
  File "<stdin>", line 1, in <module>
requests.exceptions.Timeout: HTTPConnectionPool(host='github.com', port=80): Request timed out. (timeout=0.001)
注意
timeout 僅對連線過程有效,與響應體的下載無關。 timeout 並不是整個下載響應的時間限制,而是如果伺服器在 timeout 秒內沒有應答,將會引發一個異常(更精確地說,是在 timeout 秒內沒有從基礎通訊端上接收到任何位元組的資料時)If no timeout is specified explicitly, requests do not time out.
12.Requests 錯誤與異常
遇到網路問題(如:DNS 查詢失敗、拒絕連線等)時,Requests 會丟擲一個 ConnectionError 異常。
如果 HTTP 請求返回了不成功的狀態碼, Response.raise_for_status() 會丟擲一個 HTTPError 異常。
若請求超時,則丟擲一個 Timeout 異常。
若請求超過了設定的最大重定向次數,則會丟擲一個 TooManyRedirects 異常。
所有Requests顯式丟擲的異常都繼承自 requests.exceptions.RequestException 。
13.Requests 對談物件
對談物件讓你能夠跨請求保持某些引數。它也會在同一個 Session 範例發出的所有請求之間保持 cookie, 期間使用 urllib3 的 connection pooling 功能。所以如果你向同一主機傳送多個請求,底層的 TCP 連線將會被重用,從而帶來顯著的效能提升。
對談物件具有主要的 Requests API 的所有方法。
我們來跨請求保持一些 cookie:
s = requests.Session()

s.get('http://httpbin.org/cookies/set/sessioncookie/123456789')
r = s.get("http://httpbin.org/cookies")

print(r.text)
# '{"cookies": {"sessioncookie": "123456789"}}'
對談也可用來為請求方法提供預設資料。這是通過為對談物件的屬性提供資料來實現的:
s = requests.Session()
s.auth = ('user', 'pass')
s.headers.update({'x-test': 'true'})

# both 'x-test' and 'x-test2' are sent
s.get('http://httpbin.org/headers', headers={'x-test2': 'true'})
任何你傳遞給請求方法的字典都會與已設定對談層資料合併。方法層的引數覆蓋對談的引數。
不過需要注意,就算使用了對談,方法級別的引數也不會被跨請求保持。下面的例子只會和第一個請求傳送 cookie ,而非第二個:
s = requests.Session()

r = s.get('http://httpbin.org/cookies', cookies={'from-my': 'browser'})
print(r.text)
# '{"cookies": {"from-my": "browser"}}'

r = s.get('http://httpbin.org/cookies')
print(r.text)
# '{"cookies": {}}'
如果你要手動為對談新增 cookie,就使用 Cookie utility 函數 來操縱 Session.cookies。
對談還可以用作前後文管理器:
with requests.Session() as s:
    s.get('http://httpbin.org/cookies/set/sessioncookie/123456789')
這樣就能確保 with 區塊退出後對談能被關閉,即使發生了異常也一樣。
從字典引數中移除一個值
有時你會想省略字典引數中一些對談層的鍵。要做到這一點,你只需簡單地在方法層引數中將那個鍵的值設定為 None ,那個鍵就會被自動省略掉。
包含在一個對談中的所有資料你都可以直接使用。
14.Requests 請求與響應物件
任何時候進行了類似 requests.get() 的呼叫,你都在做兩件主要的事情。其一,你在構建一個 Request 物件, 該物件將被傳送到某個伺服器請求或查詢一些資源。其二,一旦 requests 得到一個從伺服器返回的響應就會產生一個 Response 物件。該響應物件包含伺服器返回的所有資訊,也包含你原來建立的 Request 物件。如下是一個簡單的請求,從 Wikipedia 的伺服器得到一些非常重要的資訊:
>>> r = requests.get('http://en.wikipedia.org/wiki/Monty_Python')
如果想存取伺服器返回給我們的響應頭部資訊,可以這樣做:
>>> r.headers
{'content-length': '56170', 'x-content-type-options': 'nosniff', 'x-cache':
'HIT from cp1006.eqiad.wmnet, MISS from cp1010.eqiad.wmnet', 'content-encoding':
'gzip', 'age': '3080', 'content-language': 'en', 'vary': 'Accept-Encoding,Cookie',
'server': 'Apache', 'last-modified': 'Wed, 13 Jun 2012 01:33:50 GMT',
'connection': 'close', 'cache-control': 'private, s-maxage=0, max-age=0,
must-revalidate', 'date': 'Thu, 14 Jun 2012 12:59:39 GMT', 'content-type':
'text/html; charset=UTF-8', 'x-cache-lookup': 'HIT from cp1006.eqiad.wmnet:3128,
MISS from cp1010.eqiad.wmnet:80'}
然而,如果想得到傳送到伺服器的請求的頭部,我們可以簡單地存取該請求,然後是該請求的頭部:
>>> r.request.headers
{'Accept-Encoding': 'identity, deflate, compress, gzip',
'Accept': '*/*', 'User-Agent': 'python-requests/0.13.1'}
15.Requests 準備的請求
當你從 API 或者對談呼叫中收到一個 Response 物件時,request 屬性其實是使用了 PreparedRequest。有時在傳送請求之前,你需要對 body 或者 header (或者別的什麼東西)做一些額外處理,下面演示了一個簡單的做法:
from requests import Request, Session

s = Session()
req = Request('GET', url,
    data=data,
    headers=header
)
prepped = req.prepare()

# do something with prepped.body
# do something with prepped.headers

resp = s.send(prepped,
    stream=stream,
    verify=verify,
    proxies=proxies,
    cert=cert,
    timeout=timeout
)

print(resp.status_code)
由於你沒有對 Request 物件做什麼特殊事情,你立即準備和修改了 PreparedRequest 物件,然後把它和別的引數一起傳送到 requests.* 或者 Session.*。
然而,上述程式碼會失去 Requests Session 物件的一些優勢, 尤其 Session 級別的狀態,例如 cookie 就不會被應用到你的請求上去。要獲取一個帶有狀態的 PreparedRequest, 請用 Session.prepare_request() 取代 Request.prepare() 的呼叫,如下所示:
from requests import Request, Session

s = Session()
req = Request('GET',  url,
    data=data
    headers=headers
)

prepped = s.prepare_request(req)

# do something with prepped.body
# do something with prepped.headers

resp = s.send(prepped,
    stream=stream,
    verify=verify,
    proxies=proxies,
    cert=cert,
    timeout=timeout
)

print(resp.status_code)
16.Requests SSL證書驗證
Requests 可以為 HTTPS 請求驗證 SSL 證書,就像 web 瀏覽器一樣。SSL 驗證預設是開啟的,如果證書驗證失敗,Requests 會丟擲 SSLError:
>>> requests.get('https://requestb.in')
requests.exceptions.SSLError: hostname 'requestb.in' doesn't match either of '*.herokuapp.com', 'herokuapp.com'
在該域名上我沒有設定 SSL,所以失敗了。但 Github 設定了 SSL:
>>> requests.get('https://github.com', verify=True)
<Response [200]>
你可以為 verify 傳入 CA_BUNDLE 檔案的路徑,或者包含可信任 CA 證書檔案的資料夾路徑:
>>> requests.get('https://github.com', verify='/path/to/certfile')
或者將其保持在對談中:
s = requests.Session()
s.verify = '/path/to/certfile'
註解
如果 verify 設為資料夾路徑,資料夾必須通過 OpenSSL 提供的 c_rehash 工具處理。
你還可以通過 REQUESTS_CA_BUNDLE 環境變數定義可信任 CA 列表。
如果你將 verify 設定為 False,Requests 也能忽略對 SSL 證書的驗證。
>>> requests.get('https://kennethreitz.org', verify=False)
<Response [200]>
預設情況下, verify 是設定為 True 的。選項 verify 僅應用於主機證書。
# 對於私有證書,你也可以傳遞一個 CA_BUNDLE 檔案的路徑給 verify。你也可以設定 # REQUEST_CA_BUNDLE 環境變數。
17.Requests 證書
使用者端證書
指定一個本地證書用作使用者端證書,可以是單個檔案(包含金鑰和證書)或一個包含兩個檔案路徑的元組:
>>> requests.get('https://kennethreitz.org', cert=('/path/client.cert', '/path/client.key'))
<Response [200]>
或者保持在對談中:
s = requests.Session()
s.cert = '/path/client.cert'
如果你指定了一個錯誤路徑或一個無效的證書:
>>> requests.get('https://kennethreitz.org', cert='/wrong_path/client.pem')
SSLError: [Errno 336265225] _ssl.c:347: error:140B0009:SSL routines:SSL_CTX_use_PrivateKey_file:PEM lib
警告:
本地證書的私有 key 必須是解密狀態。目前,Requests 不支援使用加密的 key。
CA 證書
Requests 預設附帶了一套它信任的根證書,來自於 Mozilla trust store。然而它們在每次 Requests 更新時才會更新。這意味著如果你固定使用某一版本的 Requests,你的證書有可能已經 太舊了。
從 Requests 2.4.0 版之後,如果系統中裝了 certifi 包,Requests 會試圖使用它裡邊的 證書。這樣使用者就可以在不修改程式碼的情況下更新他們的可信任證書。
18.Requests 設定代理
為什麼要設定代理?
為了解決我們需要爬取的網站對我們的IP進行封禁的問題(解決對方反爬)
設定代理
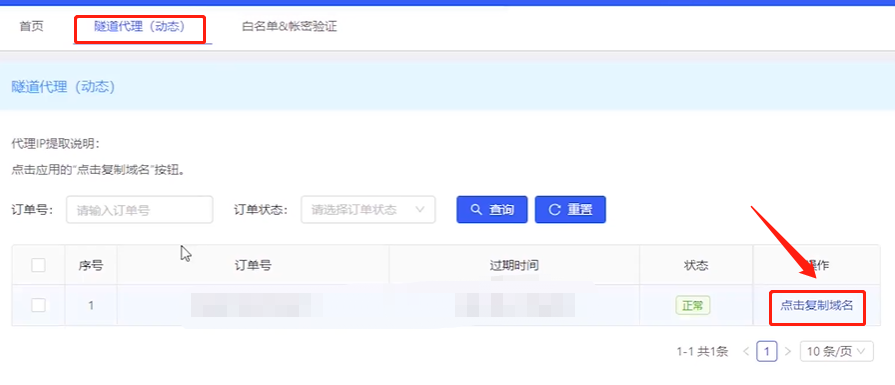
在百度搜尋,「代理ip」關鍵字,有免費提供ip代理的廠商,但是個人覺得,免費的不好用

個人推薦

IP池和隧道代理的區別:
- IP池:動態IP池中獲取的是大量的IP,需要爬蟲自己切換代理IP,並行送請求
- 隧道:只需要將請求傳送給隧道,由隧道自行選擇可用代理並轉發請求
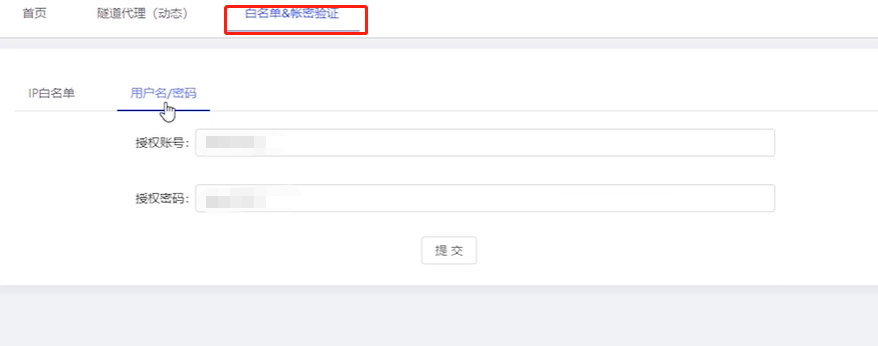
星速雲參照官方檔案設定即可:https://yr6dkm0rue.feishu.cn/docs/doccnWNxID61Y2hhe7cmAXiS3Pc
指令碼設定代理格式:
proxy={
      "http":"http://username:password@代理地址:埠"
       "https":"https://username:password@代理地址:埠"
}
代理地址:埠

username:password
就是星速雲白名單中設定的使用者名稱密碼

範例

19.案例:Requests 抓取葛老頭部落格園4頁資料
 1 import requests
 2
 3 # 構造4頁連線
 4 # 傳送請求,請求4頁連線資料
 5 # 獲取response資料response.text
 6 # with open檔案,把response.text寫入html檔案
 7
 8 for i in range(1,5):
 9     # 構造4頁連線
10     url="https://www.cnblogs.com/gltou/default.html?page={}".format(i)
11     # 傳送請求,請求4頁連線資料
12     response=requests.get(url=url)
13     # 獲取response資料response.text
14     # with open檔案,把response.text寫入html檔案
15     html_file_name="page_{}.html".format(i)
16     with open(html_file_name,"w",encoding="utf-8") as f:
17         f.write(response.text)
18     print("{}檔案已下載好".format(html_file_name))