CesiumJS 2022^ 原始碼解讀[6]
三維模型架構(即 Scene/ModelExperimental 目錄下的模組)有別於舊版模型 API(即 Scene/Model.js 模組為主的一系列處理 glTF 以及處理 3DTiles 點雲檔案的原始碼),它重新設計了 CesiumJS 中的場景模型載入、解析、渲染、排程架構,更合理,更強大。
這套新架構專門為 下一代 3DTiles(1.1版本,當前暫時作為 1.0 版本的擴充套件)設計,接入了更強大的 glTF 2.0 生態,還向外暴露了 CustomShader API。
ModelExperimental 的尾綴 Experimental 單詞即「實驗性的」,等待這套架構完善,就會去掉這個尾綴詞(截至發文,CesiumJS 版本為 1.95)。
接下來,我想先從這套架構的快取機制說起。
1. ModelExperimental 的快取機制
1.1. 快取池 ResourceCache
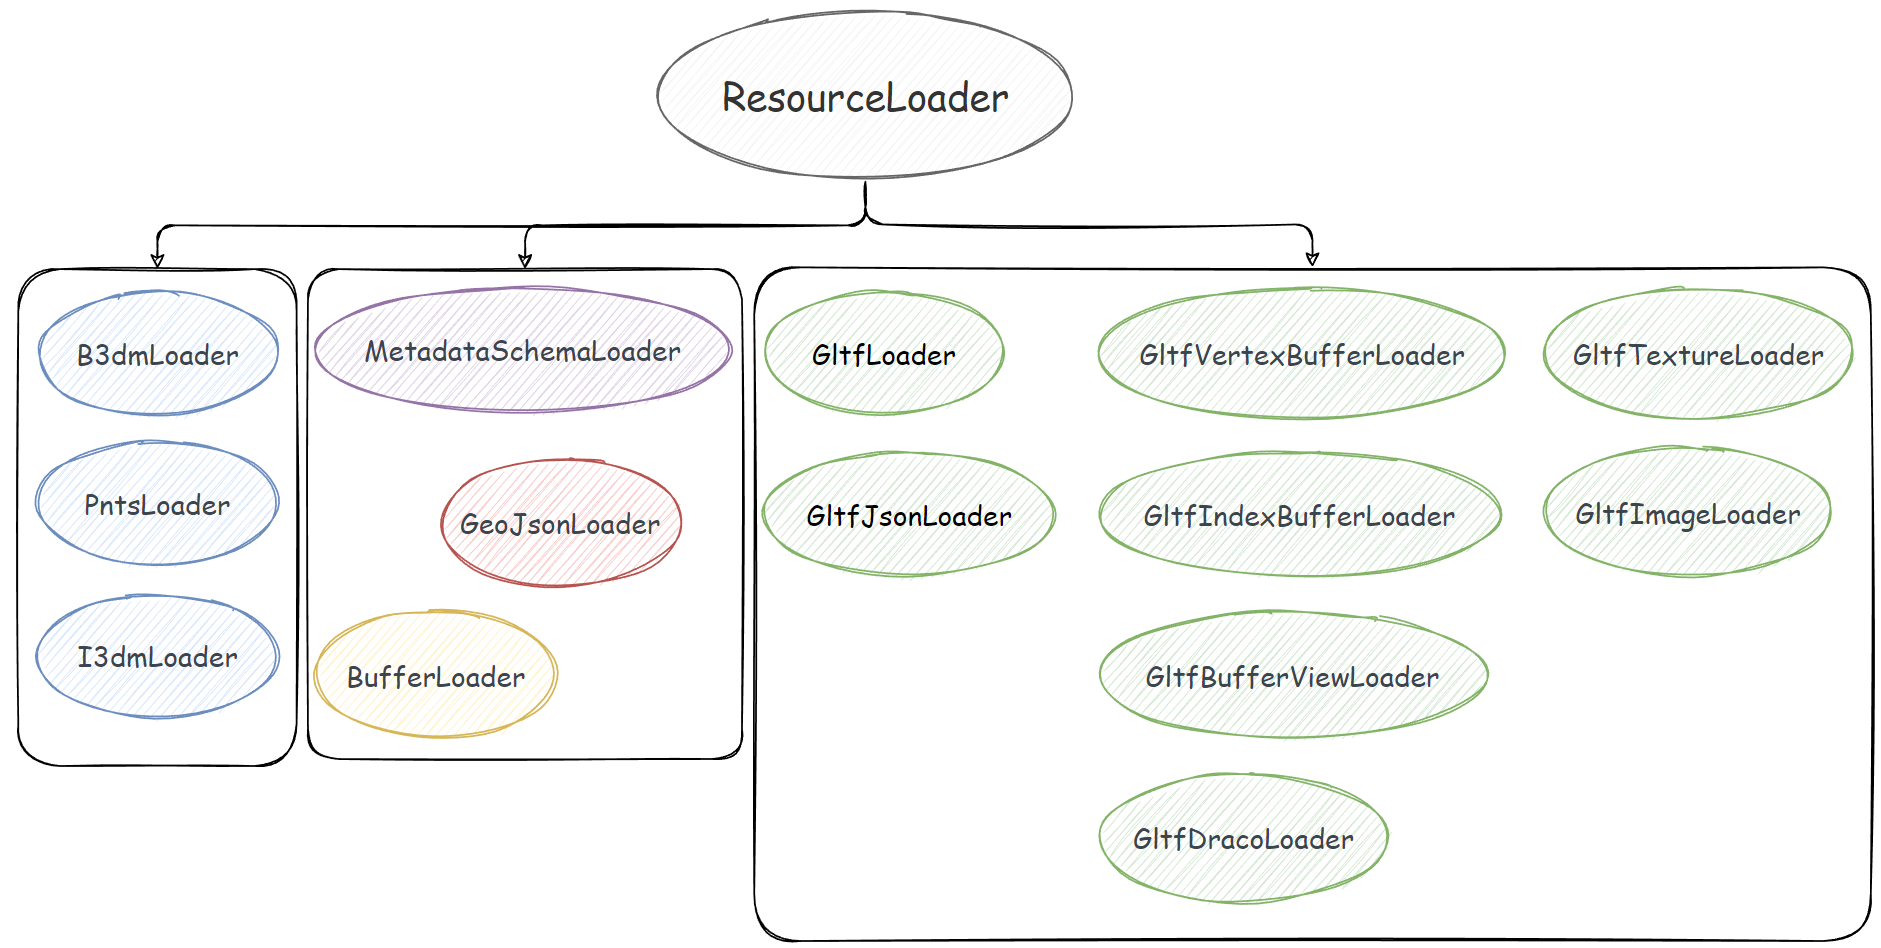
快取機制由兩個主管理類 ResourceCache 和 ResourceCacheKey 負責,快取的可不是 Resource 類範例,而是由 ResourceLoader 這個基礎類別派生出來的 N 多個子類:

ResourceCache 類被設計成一個類似於「靜態類」的存在,很多方法都是在這個類身上使用的,而不是 new 一個 ResourceCache 範例,用範例去呼叫。例如:
ResourceCache.get("somecachekey...") // 使用鍵名獲取快取的資源
ResourceCache.loadGltfJson({
  /* . */
}) // 根據設定物件載入 glTF 的 json
上面提到,ResourceCache 快取的是各種 ResourceLoader,實際上為了統計這些 loader 被使用的次數,Cesium 團隊還做了一個簡單的裝飾器模式封裝,即使用 CacheEntry 這個在 ResourceCache.js 模組內的私有類:
function CacheEntry(resourceLoader) {
  this.referenceCount = 1;
  this.resourceLoader = resourceLoader;
}
你可以在 ResourceLoader.js 原始碼中找到一個靜態成員 cacheEntries:
function ResourceCache() {}
ResourceCache.cacheEntries = {};
它只是一個簡單的 JavaScript 物件,key 是字串,也就是等會要講的 ResourceCacheKey 部分,值即 CacheEntry 的範例。
在 ResourceCache.load 這個靜態方法中可以看到是如何快取的:
ResourceCache.load = function (options) {
  // ...
  const cacheKey = resourceLoader.cacheKey;
  // ...

  if (defined(ResourceCache.cacheEntries[cacheKey])) {
    throw new DeveloperError(
      `Resource with this cacheKey is already in the cache: ${cacheKey}`
    );
  }

  ResourceCache.cacheEntries[cacheKey] = new CacheEntry(resourceLoader);
  resourceLoader.load();
}
設計上,快取的 loader 只允許 load 一次,之後在取的時候都是使用 ResourceCache.get 方法獲得。
1.2. 快取物件的鍵設計 ResourceCacheKey
Cesium 團隊在鍵的設計上充分利用了待快取資源的自身資訊,或唯一資訊,或 JSON 字串本身,但是我覺得這有些不妥,較長的字串會帶來較大的記憶體佔用。
ResourceCacheKey 也是一個類似靜態類的設計,它有很多個 getXXXKey 的靜態方法:
ResourceCacheKey.getSchemaCacheKey // return "external-schema:..."
ResourceCacheKey.getExternalBufferCacheKey // return "external-buffer:..."
ResourceCacheKey.getEmbeddedBufferCacheKey // return "embedded-buffer:..."
ResourceCacheKey.getGltfCacheKey // return "gltf:..."
ResourceCacheKey.getBufferViewCacheKey // return "buffer-view:..."
ResourceCacheKey.getDracoCacheKey // return "draco:..."
ResourceCacheKey.getVertexBufferCacheKey // return "vertex-buffer:..."
ResourceCacheKey.getIndexBufferCacheKey // return "index-buffer:..."
ResourceCacheKey.getImageCacheKey // return "image:..."
ResourceCacheKey.getTextureCacheKey // return "texture:...-sampler-..."
這些方法均返回一個字串,有興趣的讀者可以自己跟進原始碼瞭解它是如何從資源本身的資訊「計算」出 key 的。
我認為這裡存在優化的可能性,三維場景的資源會非常多,對記憶體容量是一個不小的要求,減小 key 的記憶體大小或許能提升記憶體消耗表現,這需要優秀的軟體設計,等待官方團隊優化或者大手子提交 PR。(2022年6月)
2. 三維模型的載入與解析
ModelExperimental API 的主要入口就是 ModelExperimental 類,它有幾個靜態方法可供載入不同的模型資源(glTF/b3dm/i3dm/pnts...):
ModelExperimental.fromGltf = function (options) { /* ... */ }
ModelExperimental.fromB3dm = function (options) { /* ... */ }
ModelExperimental.fromPnts = function (options) { /* ... */ }
ModelExperimental.fromI3dm = function (options) { /* ... */ }
ModelExperimental.fromGeoJson = function (options) { /* ... */ }
均返回一個 ModelExperimental 範例。從這幾個方法可以看出,還是相容了 3DTiles 1.0 中的三個主要瓦片格式的。其中,fromGeoJson 方法是一個尚未完全實現的規範,允許使用 geojson 作為瓦片的內容,有興趣可以看 CesiumGS/3d-tiles 倉庫中的一個提案。
以 glTF 為例,先看範例程式碼:
import {
  ModelExperimental,
  Transforms,
  Cartesian3
} from 'cesium'

const origin = Cartesian3.fromDegrees(113.5, 22.4)
const modelPrimitive = ModelExperimental.fromGltf({
  gltf: "path/to/glb_or_gltf_file",
  modelMatrix: Transforms.eastNorthUpToFixedFrame(origin)
})
viewer.scene.primitives.add(modelPrimitive)
以 glTF 模型(檔案格式 glb 或 gltf)為例,從流程上來看,建立 ModelExperimental 範例的過程是這樣的:
ModelExperimental.fromGltf
  new GltfLoader()
  new ModelExperimental()
    fn initialize
      GltfLoader.prototype.load
        ~promise.then → new ModelExperimentalSceneGraph
大部分的初始化工作是由 GltfLoader 去完成的,現在就進入 GltfLoader 中看看吧。
2.1. GltfLoader 的初步載入
GltfLoader 的 load 方法本身是同步的,但是它裡面的過程卻是一些非同步的寫法,使用了 ES6 的 Promise。
GltfLoader 把載入結果允諾給 Promise 成員變數 promise,可以看到在 ModelExperimental.js 模組內的 initialize 函數中,then 連結收初步載入完畢的各種 glTF 元件:
// ModelExperimental.js

function initialize(model) {
  const loader = model._loader;
  const resource = model._resource;

  loader.load();

  loader.promise
    .then(function (loader) {
      const components = loader.components;
      const structuralMetadata = components.structuralMetadata;
      /* ... */
    })
    .catch(/* ... */);

  /* ... */
}
從而建立一個叫「模型場景圖結構」(ModelExperimentalSceneGraph)的物件,這個物件待會會講。
進入到 GltfLoader.prototype.load 方法中,會發現它實際上建立了一個 GltfJsonLoader,這個時候第 1 節中介紹的快取機制就上場了:
GltfLoader.prototype.load = function () {
  const gltfJsonLoader = ResourceCache.loadGltfJson(/* ... */);

  /* ... */

  gltfJsonLoader.promise
    .then(/* ... */)
    .catch(/* ... */);
}
ResourceCache.loadGltfJson 這個方法中快取器就派上用場了,首先使用 ResourceCache.get 方法獲取快取池中是否有這個 GltfJsonLoader,有則直接返回,無則 new 一個新的,並呼叫 ResourceCache.load 方法作快取並載入。
熟悉 glTF 格式規範的人應該都清楚,glTF 格式有一個 JSON 部分作為某個 glTF 模型檔案的描述資訊,GltfJsonLoader 其實就是載入這部分 JSON 並簡單處理成 Cesium 所需的資訊的。
ResourceCache.load 實際上是直接呼叫傳進來的某個 ResourceLoader(此處即 GltfJsonLoader)的 load 方法,並作了一次快取。
2.2. GltfJsonLoader 請求並解析 glTF 的 JSON 部分
從 2.2 得知,ResourceCache.load 執行的是 ResourceLoader,也即本節關心的 GltfJsonLoader 原型鏈上的 load 方法,這個方法的作用就是分情況去處理傳進來的引數,在非同步的 Promise 鏈中儲存處理的結果,這個結果也就是 glTF 模型的 JSON 部分。
GltfJsonLoader.prototype.load = function () {
  this._state = ResourceLoaderState.LOADING;

  let processPromise;
  if (defined(this._gltfJson)) {
    processPromise = processGltfJson(this, this._gltfJson);
  } else if (defined(this._typedArray)) {
    processPromise = processGltfTypedArray(this, this._typedArray);
  } else {
    processPromise = loadFromUri(this);
  }

  const that = this;

  return processPromise
    .then(function (gltf) {
      if (that.isDestroyed()) {
        return;
      }
      that._gltf = gltf;
      that._state = ResourceLoaderState.READY;
      that._promise.resolve(that);
    })
    .catch(/* ... */);
}
函數體中間的三個邏輯分支,分別處理了傳參為 glTF JavaScript 物件、glb 或 glTF JSON 檔案二進位制陣列、網路地址三種型別的 glTF。
對應的 5 種情況如下:
ModelExperimental.fromGltf({
  url: {
    // glTF JSON 本體
  },
  url: new Uint8Array(glTFJsonArrayBuffer),
  url: new Uint8Array(glbArrayBuffer),
  url: "path/to/model.glb",
  url: "path/to/model.gltf"
})
5 種情況均可,但是一般比較常規的還是給網路路徑,5 種情況由幾個 GltfJsonLoader.js 模組內的函數來處理。
- 第 1 種情況,由
processGltfJson處理; - 第 2、3 種情況,由
processGltfTypedArray處理; - 第 4、5 種情況,由
loadFromUri處理。
這三個函數均為非同步函數,返回一個 Promise。而 glTF 的處理過程,Cesium 團隊還官方設計了一個 GltfPipeline 目錄,位於 Source/Scene 目錄下。
loadFromUri 會繼續執行 processGltfTypedArray,進而繼續執行 processGltfJson,processGltfJson 函數就會呼叫 GltfPipeline 目錄下的各種處理常式來應付靈活多變的 glTF 資料。
我簡單地看了一下,大概就是升級 glTF 1.0 版本的資料、補全 glTF 規範中的預設值、載入內嵌為 base64 編碼的緩衝資料等操作,返回一個統一的 glTF JSON 物件。
到 processPromise 的 then 為止,glTF 的初步解析就算完成了,相當於買來的食材摘掉了發黃的菜葉,燒洗了五花肉的豬毛,清潔了瓜果的表皮,切掉了不需要的枝幹,本身對食材(glTF)還沒有開始做任何處理。
2.3. 狀態判斷
根據 glTF 設計的靈活性,glTF 資料可能存在二級載入的過程,也就是要先獲取 glTF JSON,然後才獲取這個 JSON 上定義的 Buffer、Image 等資訊,所以非同步是不可避免的。(甚至有三級載入過程,也就是二級載入到 Buffer、Image 後,仍需非同步解碼 Draco 緩衝或者壓縮紋理資料等)
但是 CesiumJS 又是一個渲染迴圈程式,所以使用列舉狀態值來輔助判斷當前幀下,各種 loader 的狀態是怎麼樣的,資源處理到哪一步,就分支去呼叫哪一步的處理常式。
譬如,GltfLoader.prototype.load 方法中,會對 GltfJsonLoader 的 promise 成員欄位(ES6 Promise 型別)進行 then 鏈式操作,修改 GltfLoader 的狀態:
GltfLoader.prototype.load = function () {
  /* ... */
  const that = this;
  this._promise = gltfJsonLoader.promise
    .then(function () {
      /* ... */
      that._state = GltfLoaderState.LOADED;
      that._textureState = GltfLoaderState.LOADED;
      /* ... */
    })
    .catch(/* ... */)
  /* ... */
}
上面這段簡化後的程式碼,意思就是在 gltfJsonLoader.promise 的 then 中,glTF JSON 部分已經載入完畢,那麼此時就可以標記 GltfLoader 的 _state 和 _textureState 為「已載入(但未處理)」,也就是 GltfLoaderState.LOADED。
你還可以在 Scene/ResourceLoaderState.js 模組中找到 ResourceLoaderState 這個適用於全部 ResourceLoader 的狀態列舉。
2.4. glTF 的延遲處理機制 - 使用 ES6 Promise
根據 2.3 小節的內容,glTF 有多級載入、處理的過程,Cesium 團隊在 ES6 釋出之前,用的是 when.js 庫提供的 Promise,現在 1.9x 版本早已換成了原生的 Promise API,也就是用 Promise 來處理這些非同步過程。
注意到 ModelExperimental.js 模組內的 initialize 函數有一段 Promise then 鏈,是 GltfLoader(仍以 ModelExperimental.fromGltf 為例)的一個 promise,then 鏈內接收 GltfLoader 上的各種元件,從而建立出 ModelExperimentalSceneGraph:
function initialize(model) {
  const loader = model._loader;
  /* ... */

  loader.load();
  const loaderPromise = loader.promise.then(function (loader) {
    const components = loader.components;
    /* ... */
    model._sceneGraph = new ModelExperimentalSceneGraph(/* ... */);
    /* ... */
  });
  /* ... */
}
那麼,loader.promise 是何方神聖呢?
程式碼定位到 GltfLoader.prototype.load 方法,它返回的是一個 Promise:
GltfLoader.prototype.load = function () {
  /* ... */
  const that = this;
  let textureProcessPromise;
  const processPromise = new Promise(function (resolve, reject) {
    textureProcessPromise = new Promise(function (
      resolveTextures,
      rejectTextures
    ) {
      that._process = function (loader, frameState) { /* ... */ };
      that._processTextures = function (loader, frameState) { /* ... */ };
    };
  }); // endof processPromise

  this._promise = gltfJsonLoader.promise
    .then(function () {
      if (that.isDestroyed()) {
        return;
      }
      that._state = GltfLoaderState.LOADED;
      that._textureState = GltfLoaderState.LOADED;

      return processPromise;
    })
    .catch(/* ... */)

  /* ... */
  return this._promise;
}
this._promise 是 gltfJsonLoader.promise 的 then 鏈返回的 processPromise,是一個位於程式碼稍上方的另一個 Promise。我覺得,為了邏輯上不那麼混亂,暫到這一步為止,可以先下一個結論:
ModelExperimental 建立模型場景圖的
then鏈所在的 Promise 物件,追根溯源,其實是GltfLoader.prototype.load方法內部 new 的一個名為processPromise的 Promise 物件。便於討論,不妨設建立場景圖這個 Promise 為「A」。
我們在 ModelExperimental.js 模組內的 initialize 函數內,對「A」這個 Promise 進行 then 鏈式操作,then 鏈內收到的 loader 在本小節的背景下,就是 GltfLoader,所以才能獲取到 GltfLoader 上的 components,這意味著「A」肯定能找到一個 resolve() 語句,把 GltfLoader 給 resolve 出去。
果不其然,在 GltfLoader.prototype.load 方法內,processPromise 內,new 了一個 textureProcessPromise,在這個 textureProcessPromise 內,就找到了 processPromise 的 resolve 語句:
GltfLoader.prototype.load = function () {
  /* ... */
  const that = this;
  let textureProcessPromise;
  const processPromise = new Promise(function (resolve, reject) {
    textureProcessPromise = new Promise(function (
      resolveTextures,
      rejectTextures
    ) {
      that._process = function (loader, frameState) {
        /* ... */
        if (loader._state === GltfLoaderState.PROCESSED) {
          /* ... */
          resolve(loader); // 在這兒
        }
      };
      that._processTextures = function (loader, frameState) { /* ... */ };
    };
  });

  /* ... */
}
可以看到,它是在 that._process 這個方法上的 GltfLoaderState.PROCESSED(處理完畢)狀態分支上 resolve 的。
that就是GltfLoader本身,_process是一個初始化GltfLoader時定義的空函數,直到在此時才會完全定義。這個方法,實際上是下一小節(2.5)的內容,也即處理由GltfJsonLoader初步處理的 glTF JSON,產出用於建立ModelExperimentalSceneGraph的元件。
為什麼要層層封裝呢?這對於閱讀原始碼的人來說心智負擔略大。
原因就是 glTF 規範的定義,很靈活,有多級載入的可能性。Cesium 團隊在邏輯上是這樣順序組織 Promise 程式碼的:
- 先由
GltfJsonLoader載入、解析 glTF 的 JSON 部分,升級 glTF 版本、補全預設值、解析內嵌緩衝資料後,向下傳遞這個初步解析的 glTF JSON 物件; - 向下傳遞是藉助
GltfJsonLoader的一個promise欄位成員,接收者位於GltfLoader.prototype.load方法中,then鏈首先會標記GltfLoader的兩個狀態為「已載入」,然後返回 load 方法中建立的一個用於下一步加工操作的processPromise,這個 Promise 最終 resolve 的值即GltfLoader本身;而這個processPromise,是處理 glTF 的 JSON 的,要把 JSON 轉換為元件 - 也就是建立ModelExperimentalSceneGraph的原材料,基於 glTF 資料的特徵,這一步處理又要分兩步:先處理紋理,再處理其餘的資料; - 由此,
processPromise內只有一個操作,那就是 new 一個textureProcessPromise,確保材質紋理的處理優先順序最高; textureProcessPromise中補全了GltfLoader的兩個處理方法的定義,即_process和_processTextures,前者將會 resolveprocessPromise,後者將會 resolvetextuerProcessPromise
請注意,此時還未正式執行處理常式,也就是 GltfLoader 的 _process 和 _processTextures 方法。
在同步操作上來說,最外層的 ModelExperimental 已經由模組內的函數 initialize 走完了,也就是 ModelExperimental 已經建立出來了,但是由於 glTF 只初步載入了 JSON 部分,所有的資源都還沒準備齊全,還沒加工成元件,也就建立不了 ModelExperimentalSceneGraph,沒有這個模型場景圖結構物件,也就建立不出 DrawCommand。
但是,到現在為止,GltfJsonLoader 的使命已經完成,下一步將由 GltfLoader 使用處理好的 glTF JSON 建立模型元件,即 2.5 小節的內容。
這裡講的有點超前,但是這些都是下文的內容,請耐心往下看,我承認這部分使用 Promise 確實有點麻煩。
一旦 GltfLoader 的 _process 流程走到了 GltfLoaderState.PROCESSED,也就是glTF JSON 全部處理完畢,就意味著元件已建立完畢,可以建立 ModelExperimentalSceneGraph 了;而紋理一邊則由 _processTextures 方法來完成。
所以說為什麼 glTF 使用了延遲處理機制呢?是因為根自 ModelExperimental.js 模組內的 initialize 函數已經執行完畢,只完成了第一步:範例化了一個 ModelExperimental,就算隨著時間推向前,最多能達到的狀態也只是 GltfJsonLoader 初步載入解析完畢 glTF JSON,不會發起下一步。
那麼下一步的 GltfLoader 的 _process 和 _processTextures 由誰執行呢?這裡先漏一點,是由 scene.primitives.update(),也就是場景的更新過程觸發的 ModelExperimental.prototype.update 過程來執行的,見本文第 3 節。
2.5. 模型元件建立
恭喜你,2.4 小節算是一個頭腦風暴,如果你成功地看下來了。
這一步在 2.4 小節尾已經透露了,實際上就是 GltfLoader 接過了 GltfJsonLoader 的大旗,進一步隨場景的更新過程執行 _process、_processTextures 的過程。
這個過程,將建立出模型元件,也就是 ModelExperimentalSceneGraph 的原材料。
還記得我在前面是怎麼描述 GltfJsonLoader 的行為的嗎?
本文 2.2 小節
相當於買來的食材摘掉了發黃的菜葉,燒洗了五花肉的豬毛,清潔了瓜果的表皮,切掉了不需要的枝幹,本身對食材(glTF)還沒有開始做任何處理。
這一步由 GltfLoader 加工出來的模型元件,相當於是把初步處理的食材進行了切割、吸乾血水,乃至焯水等正式炒菜前的「前置步驟」。
模型元件,由 Scene/ModelComponents.js 模組定義,元件有如下數種:
Quantization
Attribute
Indices
FeatureIdAttribute
FeatureIdTexture
FeatureIdImplicitRange
MorphTarget
Primitive
Instances
Skin
Node
Scene
AnimatedPropertyType
AnimationSampler
AnimationTarget
AnimationChannel
Animation
Asset
Components
TextureReader
MetallicRoughness
SpecularGlossiness
Material
實際上很接近 glTF JSON 的各個物件,畢竟只是簡單的切割、去血水、焯水。這一步沒什麼太特殊的操作,由於之前的文章講過 Scene 是如何更新 Primitive 的,就省去這個前置流程,直接看到 ModelExperimental.prototype.update 方法:
ModelExperimental.prototype.update = function (frameState) {
  processLoader(this, frameState);

  /* ... */
}

function processLoader(model, frameState) {
  if (!model._resourcesLoaded || !model._texturesLoaded) {
    model._loader.process(frameState);
  }
}
上來第一步就是呼叫 ResourceLoader 原型上的 process 函數,這裡仍以 ModelExperimental.fromGltf 為例,那麼應該執行的就是 GltfLoader.prototype.process:
GltfLoader.prototype.process = function (frameState) {
  /* ... */

  this._process(this, frameState);
  this._processTextures(this, frameState);
};
由於 2.4 小節已經介紹了這兩個處理方法的具體定義位置,我們直接轉到 GltfLoader.prototype.load 方法,找到他們的定義。不難發現,他們內部還是做了狀態判斷,進行不同狀態的邏輯分叉:
that._process = function (loader, frameState) {
  if (!FeatureDetection.supportsWebP.initialized) { /**/ }
  if (loader._state === GltfLoaderState.LOADED) { /**/ }
  if (loader._state === GltfLoaderState.PROCESSING) { /**/ }
  if (loader._state === GltfLoaderState.PROCESSED)  { /**/ }
}

that._processTextures = function (loader, frameState) {
  if (loader._textureState === GltfLoaderState.LOADED) { /**/ }
  if (loader._textureState === GltfLoaderState.PROCESSING) { /**/ }
  if (loader._textureState === GltfLoaderState.PROCESSED) { /**/ }
}
對 GltfLoader 不同的狀態走不同的路線。
生成模型元件的分叉位於 if (loader._state === GltfLoaderState.LOADED) 分支下的 parse 函數呼叫內。這個 parse 函數,定義在 GltfLoader.js 模組內。
簡單過一下這個函數,大部分的解析邏輯分散在 loadNodes、loadSkins、loadAnimations、loadScene 這幾個模組內的函數中,其中 loadNodes 是從 glTF JSON 中的 nodes 成員開始的,經過 meshes、primitives,然後是 loadMaterial、loadVertexAttribute 等齊上陣,把 glTF JSON 中關於幾何圖形的資訊全部拆解出來,生成 ModelComponents 名稱空間下的各種元件物件。
在 parse 函數的下半部分,有對額外資料的非同步處理 promise 進行並行執行的語句:
Promise.all(readyPromises)
  .then(function () {
    if (loader.isDestroyed()) {
      return;
    }
    loader._state = GltfLoaderState.PROCESSED;
  })
  .catch(rejectPromise);

Promise.all(loader._texturesPromises)
  .then(function () {
    if (loader.isDestroyed()) {
      return;
    }
    loader._textureState = GltfLoaderState.PROCESSED;
  })
  .catch(rejectTexturesPromise);
是這兩個並行操作決定了 GltfLoader 的狀態為「處理完畢」的。
而一旦被設為 GltfLoaderState.PROCESSED,那麼在 _process 和 _processTextures 這兩個函數中,就會執行 2.4 小節中提及的兩個 Promise —— processPromise 和 processTexturesPromise 給 resolve 掉,進行下一步建立場景圖結構,也就是 2.6 小節。
2.6. 模型場景圖結構的建立
有了 GltfLoader.prototype.process 方法處理出來的各種元件後,就可以進一步建立模型場景圖結構物件了,也就是 ModelExperimentalSceneGraph 範例。
相關程式碼位於 ModelExperimental.js 模組內的 initialize 函數中:
function initialize(model) {
  const loader = model._loader;
  /* ... */
  const loaderPromise = loader.promise.then(function (loader) {
    const components = loader.components;
    /* ... */

    model._sceneGraph = new ModelExperimentalSceneGraph({
      model: model,
      modelComponents: components,
    });
    model._resourcesLoaded = true;
  });
  /* ... */
}
ModelExperimentalSceneGraph 的建立其實比較簡單,GltfLoader 已經把最繁重的處理和解析任務完成了,剩下的工作,就是把食材放進鍋裡炒熟,出菜即 ModelExperimentalSceneGraph,它的初始化函數只是把模型元件做了一些簡單的處理。
glTF 模型有靜態的模型,也有帶骨骼、蒙皮動畫的模型,恰恰是這些動態的模型還需要再一次根據「執行時」來獲得當前幀的靜態數值,才能交給 WebGL 繪圖,負責這部分任務的,就是這個 ModelExperimentalSceneGraph。這部分在第 3 節中會簡單提及,此處省略 ModelExperimental 的更新過程。
2.7. 本節小結
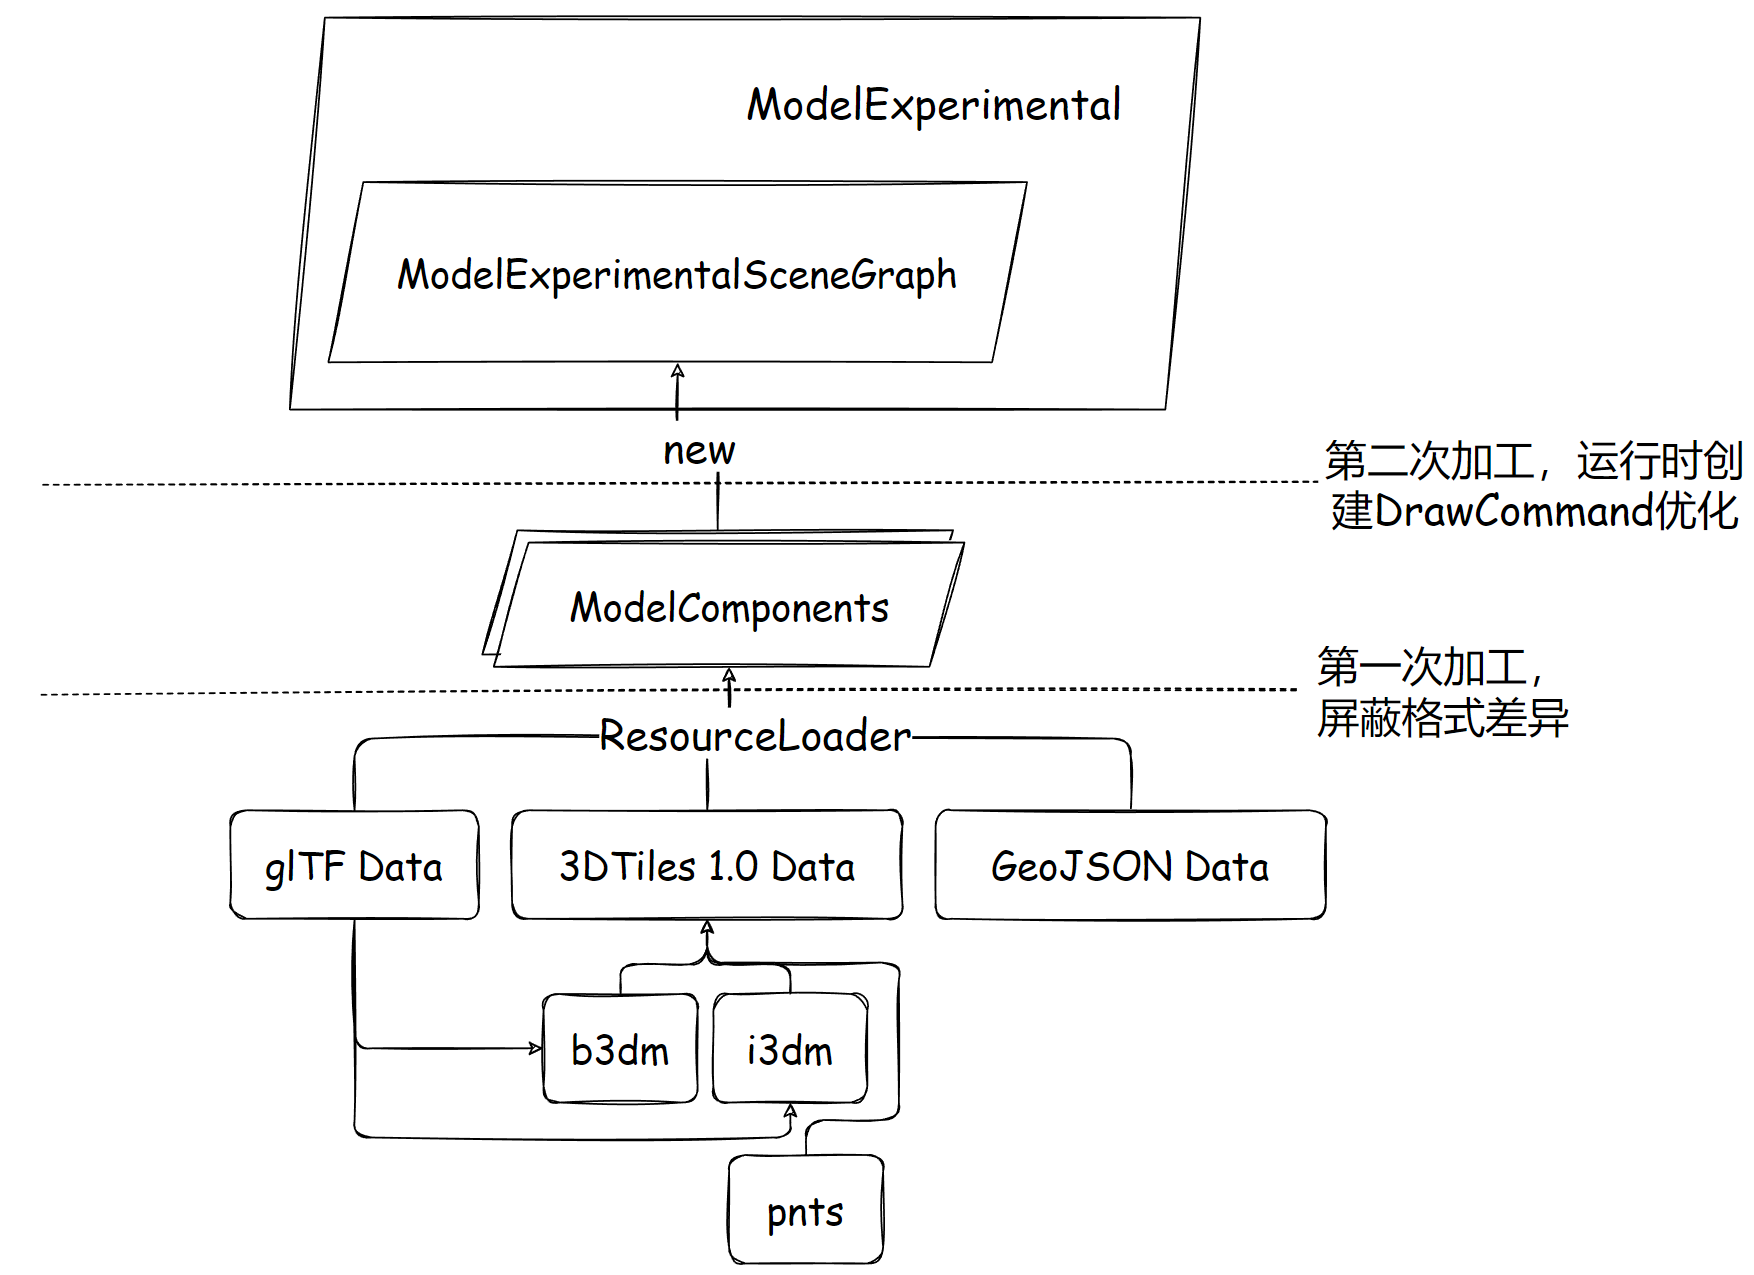
多種格式拼裝成元件,這是一次加工的結果。然後元件建立場景圖結構,這是二級加工的結果。本節以 glTF 模型為例,穿過層層 Promise 交叉呼叫,理清了 Cesium 為了相容性做出的新邏輯。簡單的說,可以順次為如下流程(以 glTF 為例):
ModelExperimental.fromGltf入場,建立ModelExperimental,執行初始化,建立GltfLoader、GltfJsonLoaderGltfJsonLoader先行,初步載入並清潔了 glTF JSONGltfLoader接過初步處理的 glTF JSON,建立模型元件- 在 Promise 鏈的終點,建立出
ModelExperimentalSceneGraph
別忘了狀態機制和快取機制的功勞!
3. 模型的更新與 DrawCommand 建立
CesiumJS 沒有選用 ES6 的類繼承,也沒有用原型鏈繼承,ModelExperimental 是一種「似 Primitive(PrimitiveLike)」,它與原生 Primitive 類似,有 update 方法來建立 DrawCommand。
Scene 的更新過程不贅述,可以參考系列的第 2 篇。此處直接跳轉至更新方法:
ModelExperimental.prototype.update = function (frameState) {
  /* 長長的更新狀態過程 */
  buildDrawCommands(this, frameState);
  /* ... */
  submitDrawCommands(this, frameState);
}
這個過程非常複雜,但 Cesium 團隊封裝地還挺清晰的,這套模型新架構既要相容非 glTF 格式的 pnts,還要考慮到時間相關的 glTF 骨骼、蒙皮內建動畫。
別忘了,這個 update 方法第一步是呼叫
GltfLoader.prototype.process方法,見 2.5 小節。
簡單的說,在更新的過程中,繪圖指令(DrawCommand)由 ModelExperimentalSceneGraph.prototype.buildDrawCommands 方法建立,這個方法會遍歷場景圖結構物件下所有 ModelComponents.Primitive 的狀態,最終是由 buildDrawCommands.js 模組使用這些狀態建立出 DrawCommand 的。
著色器也有專門的新設計,有興趣的可以去看
Source/Shaders/ModelExperimental下面為這套模型新架構設計的著色器,你會發現好多「XXXStage.glsl」程式碼,這是一種可延伸的設計,即為完整的模型著色器新增中間階段,實現多種效果。待會在 3.1 小節中還會介紹這些階段哪來的。
具體一點來說,ModelExperimental.prototype.update 還包括瞭如下專案:
- 自定義著色器更新
- 更新光照貼圖
- 點雲相關更新
- 有要素表的模型則更新要素表
- 有裁剪面的則更新裁剪面資訊
- 建立繪圖指令(DrawCommand)
- 更新模型矩陣
- 更新場景圖結構物件
- 提交繪圖指令到 frameState,結束戰鬥
詳細的過程便不再深入討論,還是建議 有 glTF 規範基礎 去閱讀這部分原始碼,會更容易一些。
3.1. 建立 DrawCommand 及一些有趣的設計
既然建立 DrawCommand 是場景圖結構物件最重要的使命,那麼就看看這個過程有什麼有趣的東西:
ModelExperimental.prototype.update = function (frameState) {
  /* 長長的更新狀態過程 */
  buildDrawCommands(this, frameState);
  /* ... */
  submitDrawCommands(this, frameState);
}

function buildDrawCommands(model, frameState) {
  if (!model._drawCommandsBuilt) {
    model.destroyResources();
    model._sceneGraph.buildDrawCommands(frameState);
    model._drawCommandsBuilt = true;
  }
}

function submitDrawCommands(model, frameState) {
  /* ... */
  if (showModel) {
    /* ... */
    const drawCommands = model._sceneGraph.getDrawCommands(frameState);
    frameState.commandList.push.apply(frameState.commandList, drawCommands);
  }
}
也就這些,主要的任務還是在場景圖物件上的。
實際上,靜態資源可以不考慮那麼多「場景圖物件中的設計」,這些額外的設計主要還是為動態模型考慮的。
一個是「模型元件執行時再次封裝物件」,另一個是「分階段」。
前者有好幾個類,和幾何圖形相關的是 ModelExperimentalNode、ModelExperimentalPrimitive、ModelExperimentalSkin 等,很顯然,這些就是對應模型元件的動態化封裝,例如 ModelExperimentalNode 對應的是 ModelComponents.Node。它們與模型元件物件是共存的:
function ModelExperimentalSceneGraph(options) {
  /* ... */

  this._components = components;
  this._runtimeNodes = [];
  this._runtimeSkins = [];

  /* ... */
}
這些執行時物件由模組內的初始化函數 initialize 遞迴遍歷建立而來。
「階段」是什麼?你在 Scene/ModelExperimental 目錄下可以找到挺多「Stage」類的,它們的作用相當於給「模型元件執行時再次封裝物件」增加一些可選的功能,每個「階段」物件都會隨著 buildDrawCommands 函數觸發一次處理方法,這樣就能影響最終建立出來的 DrawCommand。
不僅「模型元件執行時再次封裝物件」允許有「階段」,場景圖結構物件自己也有:
function ModelExperimentalSceneGraph(options) {
  /* ... */

  this._pipelineStages = [];
  this._updateStages = [];
  this.modelPipelineStages = [];

  /* ... */
}
在呼叫 ModelExperimentalSceneGraph.prototype.buildDrawCommands 方法建立 DrawCommand 時,這些「執行時物件」會呼叫自己原型上的 configurePipeline 方法(如果有),決定當前幀要選用那些階段影響生成的繪製指令。
以 ModelExperimentalPrimitive 為例,它的可設定的階段就很多了:
ModelExperimentalPrimitive.prototype.configurePipeline = function (frameState) {
  const pipelineStages = this.pipelineStages;
  pipelineStages.length = 0;
  /* ... */

  // Start of pipeline --------------------------------
  if (use2D) {
    pipelineStages.push(SceneMode2DPipelineStage);
  }

  pipelineStages.push(GeometryPipelineStage);

  /* 很長,很長... */

  pipelineStages.push(AlphaPipelineStage);
  pipelineStages.push(PrimitiveStatisticsPipelineStage);

  return;
};
階段的具體執行,就請讀者自行閱讀 ModelExperimental.js 模組內的 buildDrawCommands 函數了。
這就是場景圖物件的一些輔助設計,不難,目的只是更好地降低耦合,增強這套 API 的可延伸性。
3.2. 可能有幫助的切入點
這裡就長話短說了,有了上述提綱挈領的主幹程式碼,我想這些更適合有特定優化或學習需求的讀者,自行研究:
- 剔除優化:可以通過設定
ModelExperimental的顏色透明度為全透明,或者直接設定show屬性為false,就可以粗暴地不建立 DrawCommand 了;DrawCommand 本身是會被View篩選的,參考本系列文章的第 2 篇; - 渲染順序排程:即最終傳遞給 DrawCommand 的
Pass列舉值,這些受 3.1 小節中各種階段處理器的影響,見ModelExperimentalSceneGraph.prototype.buildDrawCommands方法內的ModelRenderResources、NodeRenderResources、PrimitiveRenderResources的傳遞處理過程; - 要素表、屬性後設資料與樣式:要素表由屬性後設資料建立而來,參考
ModelExperimental.js模組內的createModelFeatureTables函數(初始化時會判斷是否需要呼叫),會根據屬性後設資料建立ModelFeatureTable,屬性後設資料參考 3DTiles 規範中的屬性後設資料(Metadata)部分;ModelExperimental物件是可以應用Cesium3DTileStyle的,但是樣式不能與CustomShader共存; - 模型渲染統計資訊:定義在
ModelExperimental物件的statistics成員上,型別是ModelExperimentalStatistics; - 自定義著色器:隨
ModelExperimental的更新而更新,主要是更新紋理資源。
屬性後設資料、自定義著色器、光影渲染、裁剪平面、GPUPicking 這些可以成為專題的內容,以後考慮再寫,本篇主要介紹的是三維模型架構的主線脈絡。
4. 本文總結
模型架構的革新,使得原始碼在處理 3D 格式上具備更強大的可延伸性、可維護性。CesiumJS 選擇了 glTF 生態,為相容 glTF 1.0、2.0 做出了許多封裝。當然,還保留了 3DTiles 1.0 原生的幾種瓦片格式的解析,並正在設計 GeoJSON 為瓦片的解析途徑。
整個模型架構,單從各種類的封裝角度看,為了統一能在更新時生成 DrawCommand,勢必有一個統一的內建資料類封裝,也就是 ModelExperimentalSceneGraph,模型場景圖,它由某個 ResourceLoader 非同步載入完成的 元件 建立而來,這些元件是各種格式(glTF 1.0/2.0、3DTiles 1.0 瓦片格式、GeoJSON)使用不同的 loader 解析而來,大致分層如下:

快取池 + ResourceLoader + 執行時場景圖多階段 的設計使得未來擴充套件其它格式有了可延伸、高效能的可能,但是其中的一些倉促未優化的部分仍待解決。
也許有人會拿 ThreeJS 來比較,但是我認為要在同等條件下才能比較。ThreeJS 也能載入 glTF,但是它的主庫並沒有載入、解析的功能,這部分功能拆到 Loader 裡去了,滿血版的 ThreeJS 估計程式碼量也挺可觀的。CesiumJS 的側重點與 ThreeJS 不一樣,魚是新鮮,熊掌是硬核,看你怎麼選,二者得兼,必然付出巨大的代價。
如果說 ModelExperimental 這套架構是 Primitive API 的特定資料格式具象化上層封裝,那麼下一篇 3DTiles 將是 Cesium 團隊對 Web3DGIS 的最大貢獻,也是 CesiumJS 中三維資料技術的集大成者。