Spring Data JPA系列2:SpringBoot整合JPA詳細教學,快速在專案中熟練使用JPA
大家好,又見面了。
這是Spring Data JPA系列的第2篇,在上一篇《Spring Data JPA系列1:JDBC、ORM、JPA、Spring Data JPA,傻傻分不清楚?給你個選擇SpringDataJPA的理由!》中,我們對JPA的基本概念有了一個整體的瞭解,也對JAVA中進行DB操作的一些周邊框架、概念等有了初步的感知。同時也給出了SpringData JPA與MyBatis的選擇判斷依據。
那麼,如果你已經決定使用SpringData JPA來作為專案中DB操作的框架,具體應該如何去做呢?
作為SpringData JPA系列內容的第二篇,此處以SpringBoot專案為基準,講一下整合SpringData JPA的相關要點,帶你快速的上手SpringData JPA,並用範例演示常見的DB操作場景,讓你分分鐘輕鬆玩轉JPA。
SpringBoot整合SpringData JPA
依賴引入
SpringBoot專案工程,在pom.xml中引入相關依賴包即可:
<!-- 資料庫相關操作 -->
<dependency>
    <groupId>org.springframework.boot</groupId>
    <artifactId>spring-boot-starter-data-jpa</artifactId>
</dependency>
<dependency>
    <groupId>mysql</groupId>
    <artifactId>mysql-connector-java</artifactId>
    <scope>runtime</scope>
</dependency>
入口註解
SpringData JPA提供了部分註解,可以新增在Application入口程式類上方,來滿足相關訴求。當然如果沒有額外的特殊訴求,則可以什麼都不需要加。
@SpringBootApplication
// 可選,指定掃描的表對映實體Entity的目錄,如果不指定,會掃描全部目錄
//@EntityScan("com.veezean.demo.entity")
// 可選,指定掃描的表repository目錄,如果不指定,會掃描全部目錄
//@EnableJpaRepositories(basePackages = {"com.veezean.demo.repository"})
// 可選,開啟JPA auditing能力,可以自動賦值一些欄位,比如建立時間、最後一次修改時間等等
@EnableJpaAuditing
public class Application {
    public static void main(String[] args) {
        SpringApplication.run(Application.class, args);
    }
}
這裡@EntityScan和@EnableJpaRepositories被註釋掉了,且預設的情況下是不需要新增這個設定的,JPA會自動掃描程式所在包內的所有定義的Entity和Repository物件並載入。但是,某些比較大型的專案裡面,我們可能會封裝一個common jar作為專案公共依賴,然後再分出若干子專案,每個子專案裡面依賴common jar,這個時候如果想要載入common jar裡面定義的Entity和Repository,就需要用到這兩個註解。
引數設定
在application.properties中設定一些資料庫連線資訊,如下:
spring.datasource.url=jdbc:mysql://<ip>:<port>/vzn-demo?useUnicode=true&characterEncoding=UTF-8&rewriteBatchedStatements=true&serverTimezone=Asia/Shanghai
spring.datasource.username=vzn-demo
spring.datasource.password=<password>

#Java程式碼實體欄位命名與資料庫表結構欄位之間的名稱對映策略
spring.jpa.hibernate.naming.implicit-strategy=org.hibernate.boot.model.naming.ImplicitNamingStrategyLegacyJpaImpl
#下面設定開啟後,會禁止將駝峰轉為下劃線
#spring.jpa.hibernate.naming.physical-strategy=org.hibernate.boot.model.naming.PhysicalNamingStrategyStandardImpl
spring.jpa.open-in-view=false
spring.jpa.properties.hibernate.enable_lazy_load_no_trans=true
# 控制是否可以基於程式中Entity的定義自動建立或者修改DB中表結構
spring.jpa.properties.hibernate.hbm2ddl.auto=update
# 控制是否列印執行時的SQL語句與引數資訊
spring.jpa.show-sql=true

spring.datasource.driver-class-name=com.mysql.cj.jdbc.Driver
spring.datasource.type=com.zaxxer.hikari.HikariDataSource
spring.datasource.hikari.minimum-idle=10
spring.datasource.hikari.maximum-pool-size=20
spring.datasource.hikari.idle-timeout=600000
spring.datasource.hikari.max-life-time=1800000
基礎編碼實操
通過前面的幾個步驟的操作,便完成了SpringData JPA與專案的整合對接。本章節介紹下在業務程式碼裡面應該如何使用SpringData JPA來完成一些DB互動操作。
Table對應Entity編寫
編寫資料庫中Table對應的JAVA實體對映類,並通過相關注解,來描述欄位的一些附加約束資訊。
- 使用者表實體
@Data
@Entity
@Table(name = "user")
@EntityListeners(value = AuditingEntityListener.class)
public class UserEntity {
    @Id
    @GeneratedValue(strategy = GenerationType.IDENTITY)
    private Long id;
    private String workId;
    private String userName;
    @ManyToOne(optional = false)
    @JoinColumn(name = "department")
    private DepartmentEntity department;
    @CreatedDate
    private Date createTime;
    @LastModifiedDate
    private Date updateTime;

}
- 部門表實體
@Data
@Entity
@Table(name = "department")
@EntityListeners(value = AuditingEntityListener.class)
public class DepartmentEntity {
    @Id
    @GeneratedValue(strategy = GenerationType.IDENTITY)
    private Long id;
    private String deptName;
    @CreatedDate
    private Date createTime;
    @LastModifiedDate
    private Date updateTime;
}
這裡可以看到,所謂的Entity,其實也就是一個普通的JAVA資料類,只是與普通的JAVA資料類相比,多了一些註解。沒錯!SpringData JPA正式通過各種註解,來完成對各個欄位的定義與行為約束,以及完成表間關聯關係(比如外來鍵)。
常見的一些註解以及含義功能說明,在本文的末尾表格裡面進行了梳理,此處不贅述。
自定義Repository編寫
繼承JpaRepository介面提供自定義Repository介面類,在自定義介面類中,新增業務需要的客製化化的DB操作介面。這裡客製化的時候,可以基於SpringData JPA的命名規範進行介面方法的命名即可,無需關注其具體實現,也不需要提供實現類。
- 使用者repository
@Repository
public interface UserRepository extends JpaRepository<UserEntity, Long> {
    List<UserEntity> findAllByDepartment(DepartmentEntity department);
    UserEntity findFirstByWorkId(String workId);
    List<UserEntity> findAllByDepartmentInAndUserNameLike(List<DepartmentEntity> departmentIds, String userName);

    @Query(value = "select * from user where user_name like ?1", nativeQuery = true)
    List<UserEntity> fuzzyQueryByName(String userName);
}
上述程式碼裡面,演示了2種自定義介面的策略:
- 基於SpringData JPA的命名規範,直接定義介面
- 使用自定義的SQL語句進行個性化客製化,這種適用於一些需要高度客製化化處理的場景
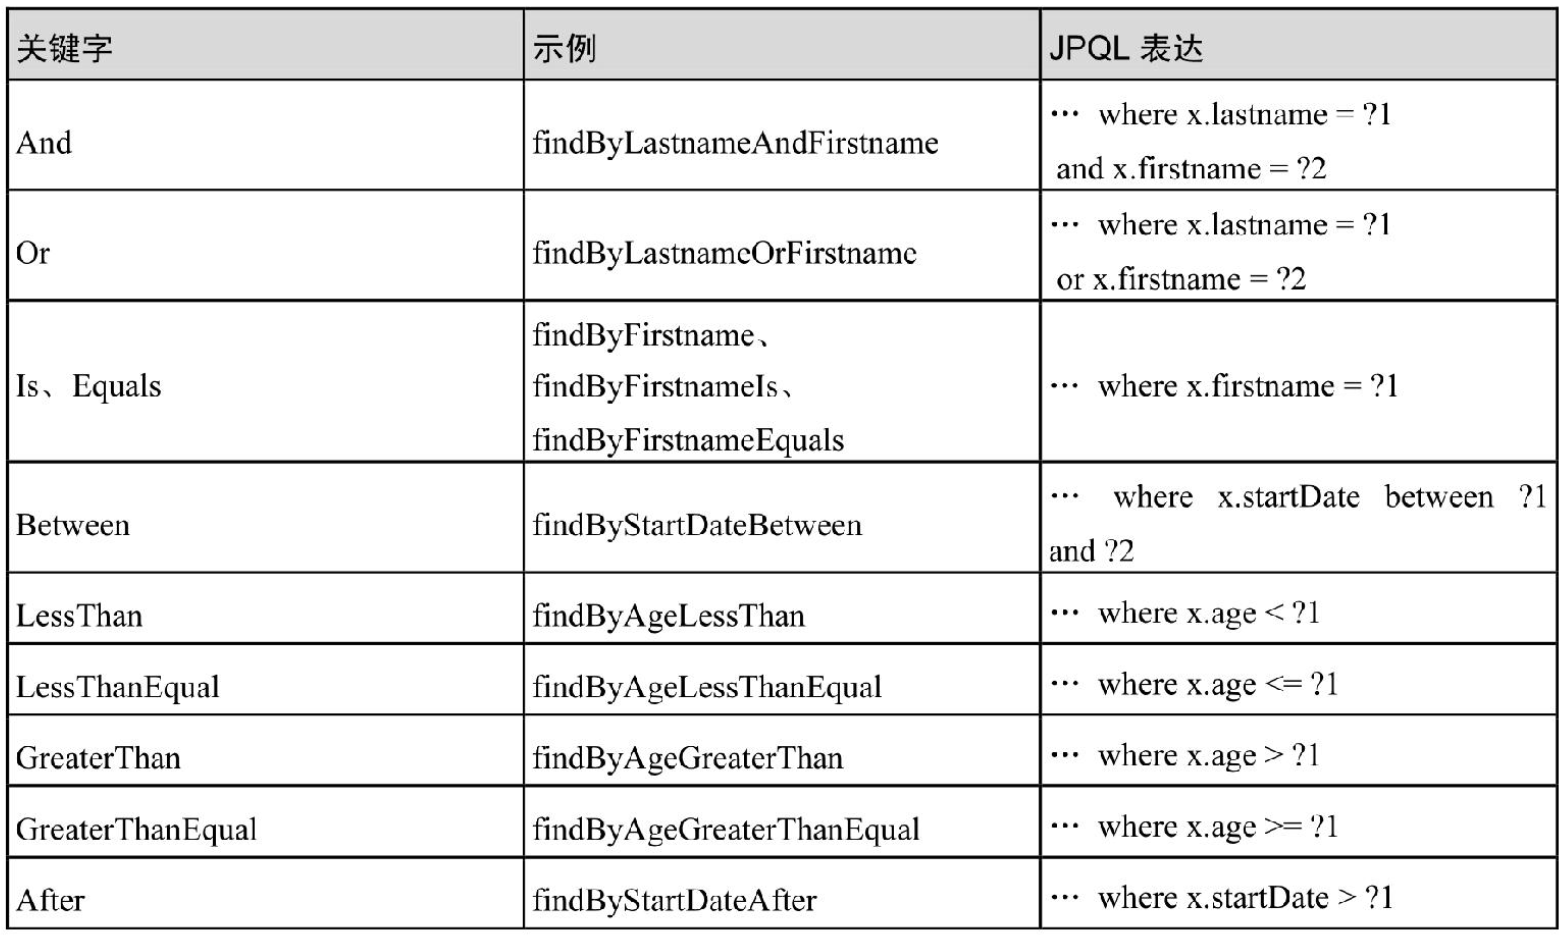
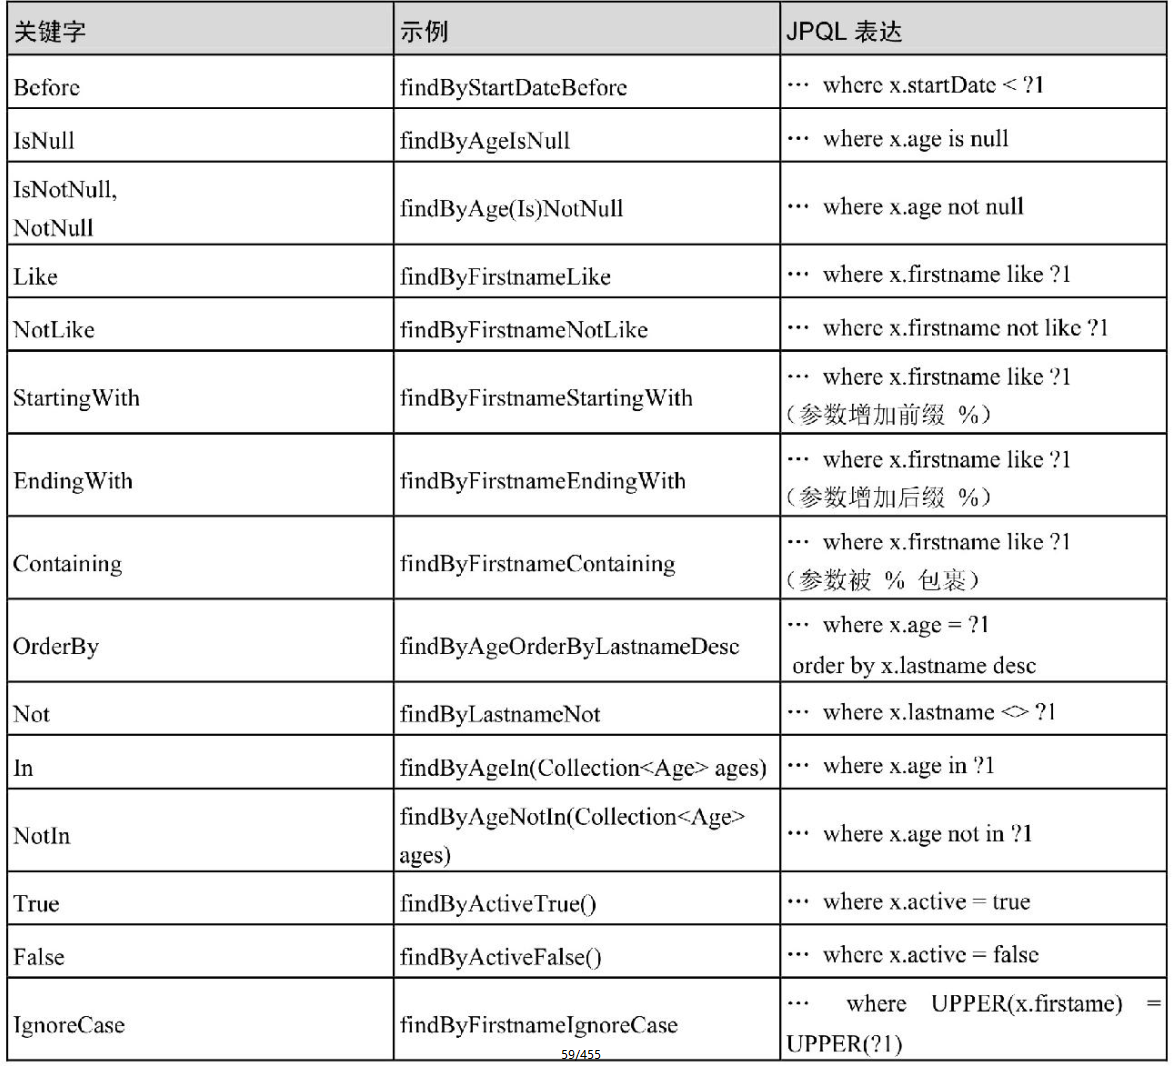
JPA中支援的一些命名關鍵字與命名範例,參見本文後面梳理的表格。
業務層執行DB操作
寫入資料
SpringData JPA寫操作邏輯很簡單,只有一個save方法即可,如果批次寫入操作,使用saveAll方法即可。
- 會判斷ID,如果唯一ID已存在,則按照update邏輯執行;
- 如果唯一ID記錄不存在,則按照insert邏輯執行。
public void testUser() {
    DepartmentEntity deptEntity1 = new DepartmentEntity();
    deptEntity1.setDeptName("研發部門");
    deptEntity1.setId(1L);
    DepartmentEntity deptEntity2 = new DepartmentEntity();
    deptEntity2.setDeptName("產品部門");
    deptEntity2.setId(2L);
     // 寫入部門資訊
    departmentRepository.save(deptEntity1);
    departmentRepository.save(deptEntity2);
    departmentRepository.flush();

    UserEntity entity1 = new UserEntity();
    entity1.setWorkId("123456");
    entity1.setDepartment(deptEntity1);
    entity1.setUserName("王小二");
    UserEntity entity2 = new UserEntity();
    entity2.setWorkId("234567");
    entity2.setDepartment(deptEntity1);
    entity2.setUserName("王小五");
    UserEntity entity3 = new UserEntity();
    entity3.setWorkId("345678");
    entity3.setDepartment(deptEntity1);
    entity3.setUserName("劉大壯");
    UserEntity entity4 = new UserEntity();
    entity4.setWorkId("345678");
    entity4.setDepartment(deptEntity2);
    entity4.setUserName("張三");
     // 寫入使用者資訊
    userRepository.saveAll(Stream.of(entity1, entity2, entity3, entity4).collect(Collectors.toList()));
    userRepository.flush();
}
執行呼叫後,檢視資料庫,可見資料已經寫入DB中:
- Department表

- User表

從上面可以看出,程式碼裡面其實並沒有對create_time和update_time欄位進行賦值,但是資料儲存到DB的時候,這兩個欄位被自動賦值了,這個主要是因為開啟了自動Audit能力,主要2個地方的程式碼有關係:
1、Application啟動類上的註解,開啟允許JPA自動Audit能力
@EnableJpaAuditing

2、Entity類上新增註解
@EntityListeners(value = AuditingEntityListener.class)

3、Entity中具體欄位上加上對應註解:
@CreatedDate
private Date createTime;
@LastModifiedDate
private Date updateTime;
查詢資料
常見的資料查詢操作,程式碼層面實現呼叫如下:
public void testUser() {
    DepartmentEntity deptEntity1 = new DepartmentEntity();
    deptEntity1.setDeptName("研發部門");
    deptEntity1.setId(1L);
    DepartmentEntity deptEntity2 = new DepartmentEntity();
    deptEntity2.setDeptName("產品部門");
    deptEntity2.setId(2L);
    // 獲取所有使用者列表 --- JPA預設提供的方法
    List<UserEntity> userEntities = userRepository.findAll();
    log.info("findAll result :{}", userEntities);
    // 獲取符合條件使用者列表 --- 客製化方法: 根據部門欄位查詢符合條件列表
    List<UserEntity> userEntitiesInDept = userRepository.findAllByDepartment(deptEntity1);
    log.info("findAllByDepartment result count:{}", userEntitiesInDept);
    // 獲取符合條件使用者 --- 客製化方法: 根據工號查詢使用者資訊
    UserEntity userEntity = userRepository.findFirstByWorkId("123456");
    log.info("findFirstByWorkId result: {}", userEntity);
    // 多條件查詢符合條件使用者列表 --- 客製化方法: 根據部門與名稱欄位複合查詢
    List<UserEntity> fuzzyQueryUsers = userRepository.findAllByDepartmentInAndUserNameLike(Stream.of(deptEntity1,
            deptEntity2).collect(Collectors.toList()),
            "王%");
    log.info("findAllByDepartmentInAndUserNameLike result count: {}", fuzzyQueryUsers);
}
從上面的演示程式碼可以看出,SpringData JPA的一個很大的優勢,就是Repository層可以簡化大部分場景的程式碼編碼事務,遵循一定的方法命名規範,即可實現相關的能力。
比如:
List<UserEntity> findAllByDepartmentInAndUserNameLike(List<DepartmentEntity> departmentIds, String userName);
看方法名就直接可以知道這個具體的DB操作邏輯:在給定的部門列表裡面查詢所有名稱可以模糊匹配上的人員列表!至於如何去具體實現,這個開發人員無需關注、也不需要去寫對應SQL語句!
藏在設定中的小技能
在前面章節中有介紹整合SpringData JPA涉及到的一些常見設定,此處對其中部分設定的含義與功能進行一個補充介紹。
控制是否自動基於程式碼Entity定義自動建立變更資料庫表結構
spring.jpa.properties.hibernate.hbm2ddl.auto=update
如果設定為update,程式執行之後,會自動在DB中將Table建立出來,並且相關約束條件(比如自增主鍵、關聯外來鍵之類的)也會一併建立並設定上去,如下示意,左側的程式碼自動建立出右側DB中的表結構:
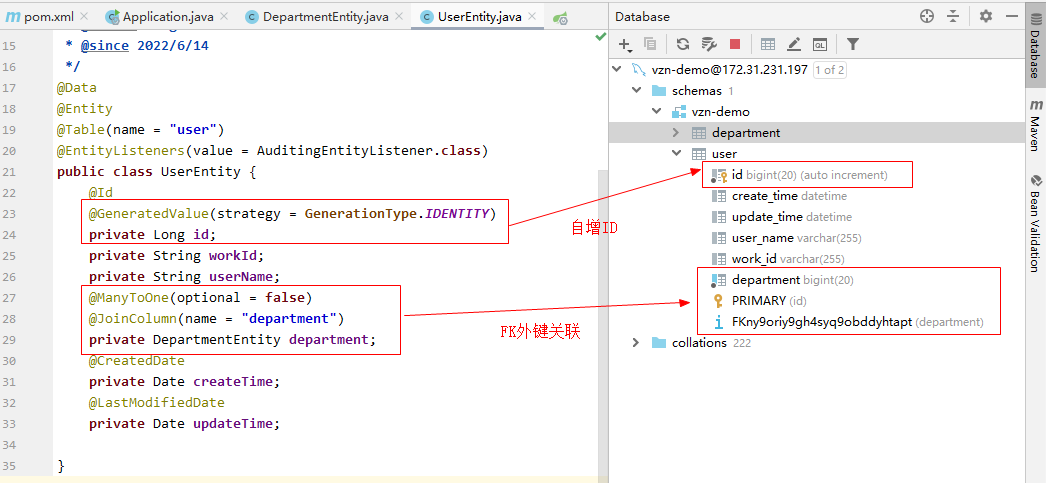
補充說明:
雖然這個功能比較方便,但是強烈建議在生產環境上關閉此功能。因為DB表結構改動變更,對於生產環境而言,是一個非常重大的操作,一旦出問題甚至會影響到實際資料。為了避免造成不可逆的危害,保險起見,還是人工手動操作變更下比較好。
控制是否列印相關操作的SQL語句
spring.jpa.show-sql=true
如果設定為true,則會在紀錄檔中列印每次DB操作所執行的最終SQL語句內容,這個比較適合與開發過程中的問題定位分析,生產環境上建議關閉(影響效能)。
如果開啟後,列印的紀錄檔範例如下:
2022-06-14 14:30:50.329  INFO 23380 --- [io-48080-exec-3] o.a.c.c.C.[.[localhost].[/veezean-demo]  : Initializing Spring DispatcherServlet 'dispatcherServlet'
2022-06-14 14:30:50.329  INFO 23380 --- [io-48080-exec-3] o.s.web.servlet.DispatcherServlet        : Initializing Servlet 'dispatcherServlet'
2022-06-14 14:30:50.337  INFO 23380 --- [io-48080-exec-3] o.s.web.servlet.DispatcherServlet        : Completed initialization in 8 ms
Hibernate: insert into department (create_time, dept_name, update_time) values (?, ?, ?)
Hibernate: insert into department (create_time, dept_name, update_time) values (?, ?, ?)
Hibernate: insert into user (create_time, department, update_time, user_name, work_id) values (?, ?, ?, ?, ?)
Hibernate: insert into user (create_time, department, update_time, user_name, work_id) values (?, ?, ?, ?, ?)
Hibernate: insert into user (create_time, department, update_time, user_name, work_id) values (?, ?, ?, ?, ?)
Hibernate: insert into user (create_time, department, update_time, user_name, work_id) values (?, ?, ?, ?, ?)
2022-06-14 14:30:50.544  INFO 23380 --- [io-48080-exec-3] o.h.h.i.QueryTranslatorFactoryInitiator  : HHH000397: Using ASTQueryTranslatorFactory
瞭解幾個"常識"概念
通過前面內容的介紹以及相關範例程式碼的演示,可以看出SpringData JPA中有很多情況都是藉助不同註解來約定一些屬性或者處理邏輯策略的,且在自定義介面方法的時候,需要遵循SpringData JPA固有的一套命名規範才行。
這裡對一些高頻易用的註解與常見的介面方法命名規範進行梳理介紹。
常用註解
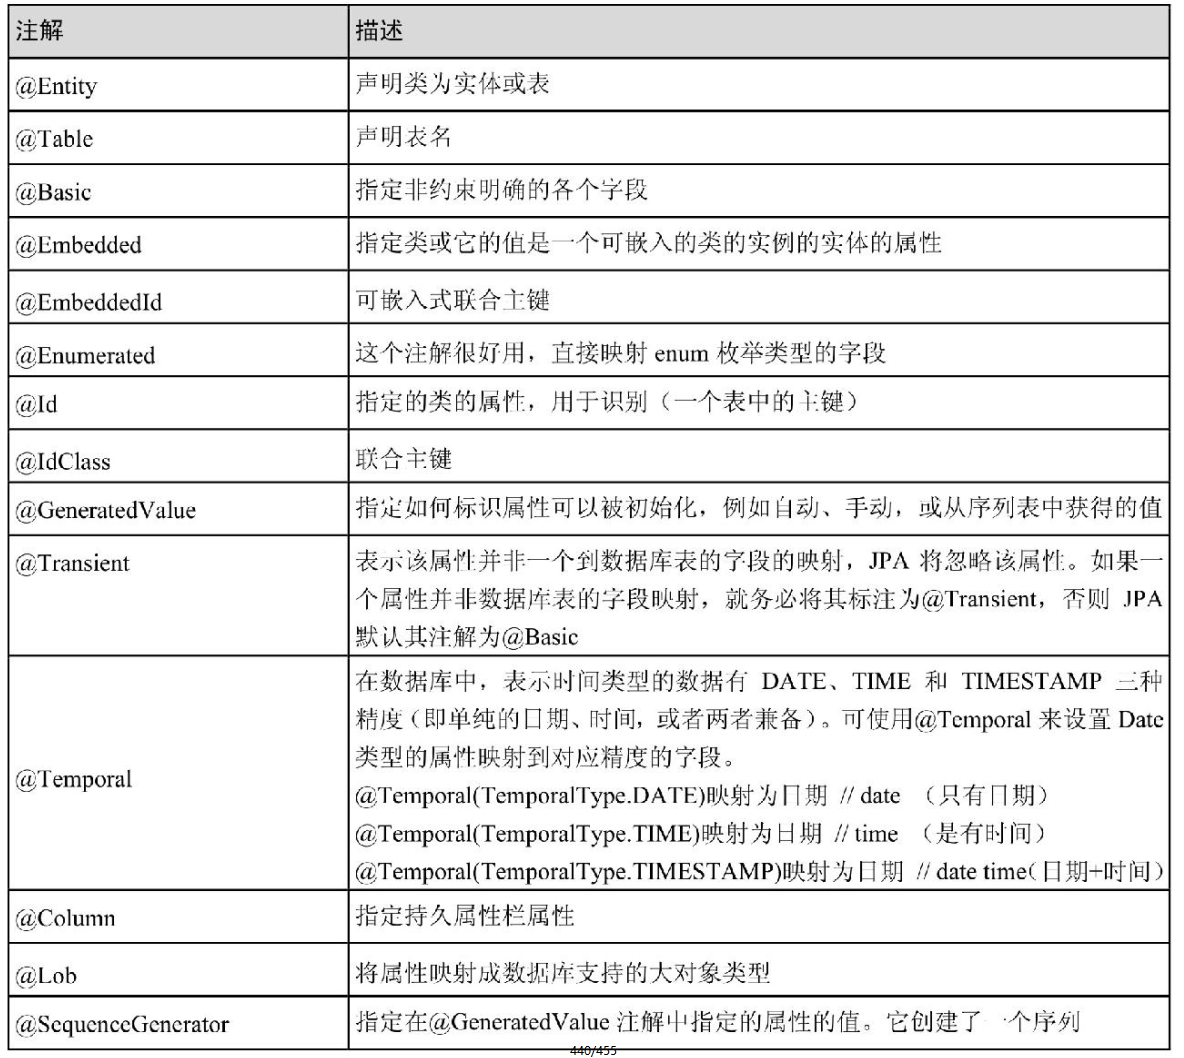
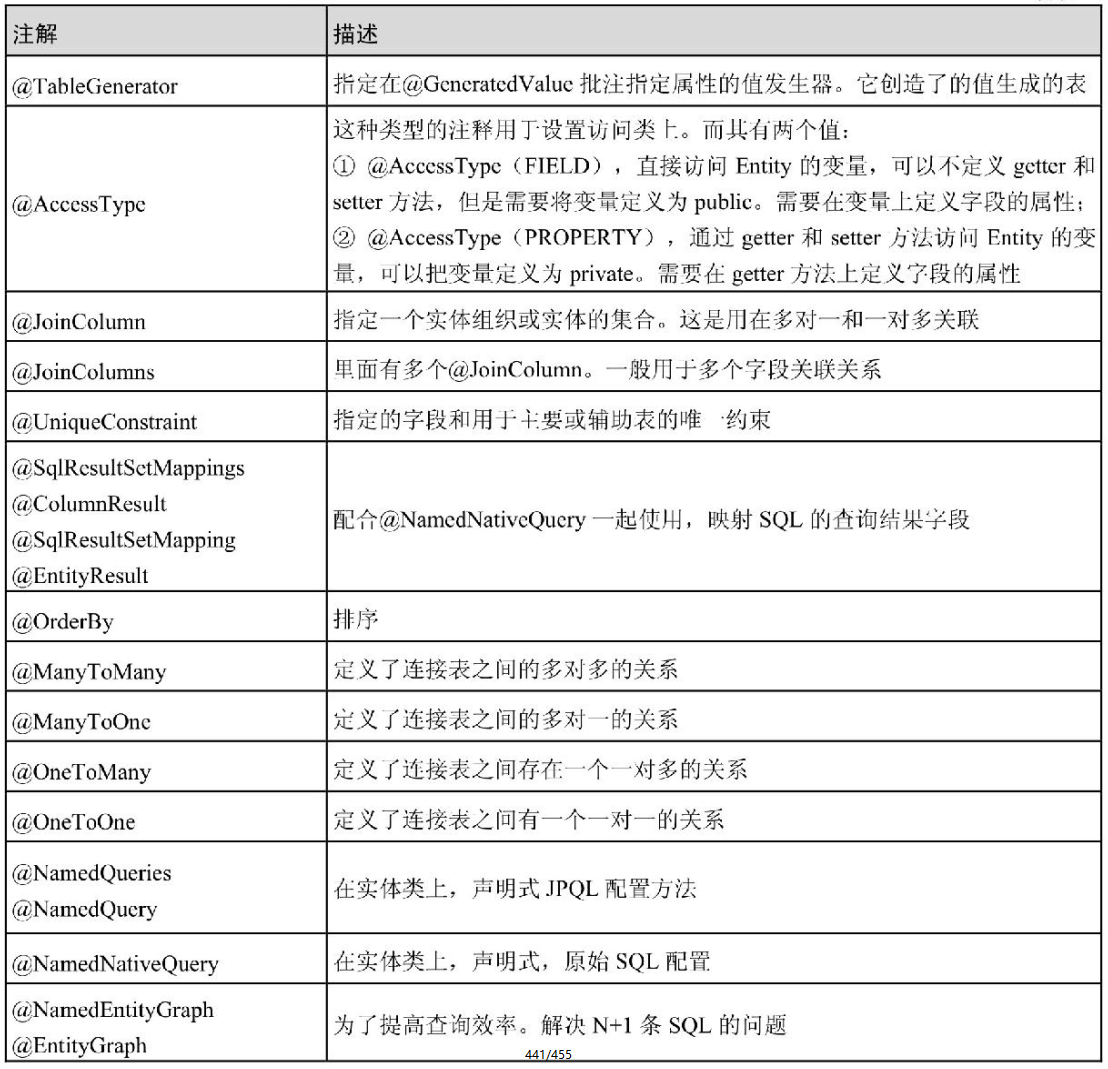

Repository方法命名約定
DB裡面一些關鍵字對應的SpringData JPA中命名關鍵字列舉如下:
小結,承上啟下
好啦,本篇內容就介紹到這裡。
跟著本篇內容,可以讓你順利的完成SpringBoot專案與JPA的整合設定,以及對專案中如何使用JPA進行程式碼開發有了個整體的感知,可以應付大部分場景的基礎業務程式碼開發訴求。
本系列教學是按照由面到點、由淺入深的邏輯進行內容編排的。在本系列的下一篇內容中,我會進一步對SpringData JPA中的一些核心型別與核心方法進行剖析,讓你不僅僅停留在簡單使用層面,更能對JPA有個深度的瞭解、達到精通級別。如果感興趣的話,歡迎關注我的後續系列檔案。
如果對本文有自己的見解,或者有任何的疑問或建議,都可以留言,我們一起探討、共同進步。
補充
Spring Data JPA作為Spring Data中對於關係型資料庫支援的一種框架技術,屬於ORM的一種,通過得當的使用,可以大大簡化開發過程中對於資料操作的複雜度。本檔案隸屬於《
Spring Data JPA用法與技能探究》系列的第二篇。本系列檔案規劃對Spring Data JPA進行全方位的使用介紹,一共分為5篇檔案,如果感興趣,歡迎關注交流。《Spring Data JPA用法與技能探究》系列涵蓋內容:
- 開篇介紹 —— 《Spring Data JPA系列1:JDBC、ORM、JPA、Spring Data JPA,傻傻分不清楚?給你個選擇SpringDataJPA的理由!》
- 快速上手 —— 《Spring Data JPA系列2:SpringBoot整合JPA詳細教學,快速在專案中熟練使用JPA》
- 深度進階 —— 《JPA核心型別與用法介紹》
- 可靠保障 —— 《聊一聊資料庫的事務,以及Spring體系下對事務的使用》
- 周邊擴充套件 —— 《JPA開發輔助效率提升方案介紹》
我是悟道,聊技術、又不僅僅聊技術~
如果覺得有用,請點個關注。
期待與你一起探討,一起成長為更好的自己。

本文來自部落格園,作者:架構悟道,歡迎關注公眾號[架構悟道]持續獲取更多幹貨,轉載請註明原文連結:https://www.cnblogs.com/softwarearch/p/16405566.html