全新升級的AOP框架Dora.Interception[2]: 基於約定的攔截器定義方式
Dora.Interception(github地址,覺得不錯不妨給一顆星)有別於其他AOP框架的最大的一個特點就是採用針對「約定」的攔截器定義方式。如果我們為攔截器定義了一個介面或者基礎類別,那麼攔截方法將失去任意註冊依賴服務的靈活性。除此之外,由於我們採用了動態程式碼生成的機制,我們可以針對每一個目標方法生成對應的方法呼叫上下文,所以定義在攔截上下文上針對引數和返回值的提取和設定都是泛型方法,這樣可以避免無謂的裝箱和拆箱操作,進而將引入攔截帶來的效能影響降到最低。(拙著《ASP.NET Core 6框架揭祕》於日前上市,加入讀者群享6折優惠)
目錄
一、方法呼叫上下文
二、攔截器型別約定
三、提取呼叫上下文資訊
四、修改輸出引數和返回值
五、控制攔截器的執行順序
六、短路返回
七、建構函式注入
八、方法注入
九、ASP.NET Core應用的適配
一、方法呼叫上下文
針對同一個方法呼叫的所有攔截器都是在同一個方法呼叫上下文中進行的,我們將這個上下文定義成如下這個InvocationContext基礎類別。我們可以利用Target和MethodInfo屬性得到當前方法呼叫的目標物件和目標方法。泛型的GetArgument和SetArgument用於返回和修改傳入的引數,針對返回值的提取和設定則通過GetReturnValue和SetReturnValue方法來完成。如果需要利用此上下文傳遞資料,可以將其置於Properties屬性返回的字典中。InvocationServices屬性返回針對當前方法呼叫範圍的IServiceProvider。如果在ASP.NET Core應用中,這個屬性將返回針對當前請求的IServiceProvider,否則Dora.Interception會為每次方法呼叫建立一個服務範圍,並返回該範圍內的IServiceProvider物件。
public abstract class InvocationContext
{
    public object Target { get; }
    public abstract MethodInfo MethodInfo { get; }
    public abstract IServiceProvider InvocationServices { get; }
    public IDictionary<object, object> Properties { get; }
    public abstract TArgument GetArgument<TArgument>(string name);
    public abstract TArgument GetArgument<TArgument>(int index);
    public abstract InvocationContext SetArgument<TArgument>(string name, TArgument value);
    public abstract InvocationContext SetArgument<TArgument>(int index, TArgument value);
    public abstract TReturnValue GetReturnValue<TReturnValue>();
    public abstract InvocationContext SetReturnValue<TReturnValue>(TReturnValue value);

    protected InvocationContext(object target);

    public ValueTask ProceedAsync() => Next.Invoke(this);
}
和ASP.NET Core的中介軟體管道類似,應用到同一個方法上的所有攔截器最終也會根據指定的順序構建成管道。對於某個具體的攔截器來說,是否需要指定後續管道的操作是由它自己決定的。我們知道ASP.NET Core的中介軟體最終體現為一個Func<RequestDelegate,RequestDelegate>委託,作為輸入的RequestDelegate委託代表後續的中介軟體管道,當前中介軟體利用它實現針對後續管道的呼叫。Dora.Interception針對攔截器採用了更為簡單的設計,將其表示為如下這個InvokeDelegate(相當於RequestDelegate),因為InvocationContext(相當於HttpContext)的ProceedAsync方法直接可以幫助我們完整針對後續管道的呼叫。
public delegate ValueTask InvokeDelegate(InvocationContext context);
二、攔截器型別約定
雖然攔截器最終體現為一個InvokeDelegate物件,但是我們傾向於將其定義成一個型別。作為攔截器的型別具有如下的約定:
- 必須是一個公共的範例型別;
- 必須包含一個或者多個公共建構函式,針對建構函式的選擇由依賴注入框架決定。被選擇的建構函式可以包含任意引數,引數在範例化的時候由依賴注入容器提供或者手工指定。
- 攔截方法被定義在命名為InvokeAsync的公共實體方法中,此方法的返回型別為ValueTask,其中包含一個表示方法呼叫上下文的InvocationContext型別的引數,能夠通過依賴注入容器提供的服務均可以注入在此方法中。
三、提取呼叫上下文資訊
由於攔截器型別的InvokeAsync方法提供了表示呼叫上下文的InvocationContext引數,我們可以利用它提取基本的呼叫上下文資訊,包括當前呼叫的目標物件和方法,以及傳入的引數和設定的返回值。如下這個FoobarInterceptor型別表示的攔截器會將上述的這些資訊輸出到控制檯上。
public class FoobarInterceptor
{
    public async ValueTask InvokeAsync(InvocationContext invocationContext)
    {
        var method = invocationContext.MethodInfo;
        var parameters = method.GetParameters();
        Console.WriteLine($"Target: {invocationContext.Target}");
        Console.WriteLine($"Method: {method.Name}({string.Join(", ", parameters.Select(it => it.ParameterType.Name))})");

        if (parameters.Length > 0)
        {
            Console.WriteLine("Arguments (by index)");
            for (int index = 0; index < parameters.Length; index++)
            {
                Console.WriteLine($"    {index}:{invocationContext.GetArgument<object>(index)}");
            }

            Console.WriteLine("Arguments (by name)");
            foreach (var parameter in parameters)
            {
                var parameterName = parameter.Name!;
                Console.WriteLine($"    {parameterName}:{invocationContext.GetArgument<object>(parameterName)}");
            }
        }

        await invocationContext.ProceedAsync();
        if (method.ReturnType != typeof(void))
        {
            Console.WriteLine($"Return: {invocationContext.GetReturnValue<object>()}");
        }
    }
}
我們利用InterceptorAttribute特性將這個攔截器應用到如下這個Calculator型別的Add方法中。由於我們沒有為它定義介面,只能將它定義成虛方法才能被攔截。
public class Calculator
{
    [Interceptor(typeof(FoobarInterceptor))]
    public virtual int Add(int x, int y) => x + y;
}
在如下這段演示程式中,在將Calculator作為服務註冊到建立的ServiceCollection集合後,我們呼叫BuildInterceptableServiceProvider擴充套件方法構建一個IServiceCollection物件。在利用它得到Calculator物件之後,我們呼叫其Add方法。
using App;
using Microsoft.Extensions.DependencyInjection;

var calculator = new ServiceCollection()
    .AddSingleton<Calculator>()
    .BuildInterceptableServiceProvider()
    .GetRequiredService<Calculator>();

Console.WriteLine($"1 + 1 = {calculator.Add(1, 1)}");
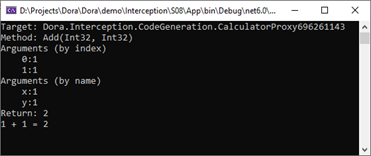
針對Add方法的呼叫會被FoobarInterceptor攔截下來,後者會將方法呼叫上下文資訊以如下的形式輸出到控制檯上(原始碼)。
四、修改輸出引數和返回值
攔截器可以篡改輸出的引數值,比如我們將上述的FoobarInterceptor型別改寫成如下的形式,它的InvokeAsync方法會將輸入的兩個引數設定為0(原始碼)。
public class FoobarInterceptor
{
    public ValueTask InvokeAsync(InvocationContext invocationContext)
    {
        invocationContext.SetArgument("x", 0);
        invocationContext.SetArgument("y", 0);
        return invocationContext.ProceedAsync();
    }
}
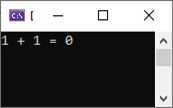
再次執行上面的程式後就會出現1+1=0的現象。
在完成目標方法的呼叫後,返回值會儲存到上下文中,攔截器也可以將其篡改。如下這個改寫的FoobarInterceptor選擇將返回值設定為0。程式執行後也會出現上面的輸出結果(原始碼)。
public class FoobarInterceptor
{
    public async ValueTask InvokeAsync(InvocationContext invocationContext)
    {
        await invocationContext.ProceedAsync();
        invocationContext.SetReturnValue(0);
    }
}
五、控制攔截器的執行順序
攔截器最終被應用到某個方法上,多個攔截器最終會構成一個由InvokeDelegate委託表示的執行管道,構造管道的攔截器的順序可以由指定的序號來控制。如下所示的程式碼片段定義了三個派生於同一個基礎類別的攔截器型別(FooInterceptor、BarInterceptor、BazInterceptor),它們會在目標方法之前後輸出當前的型別進而確定它們的執行順序。
public class InterceptorBase
{
    public async ValueTask InvokeAsync(InvocationContext invocationContext)
    {
        Console.WriteLine($"[{GetType().Name}]: Before invoking");
        await invocationContext.ProceedAsync();
        Console.WriteLine($"[{GetType().Name}]: After invoking");
    }
}

public class FooInterceptor : InterceptorBase { }
public class BarInterceptor : InterceptorBase { }
public class BazInterceptor : InterceptorBase { }
我們利用InterceptorAttribute特性將這三個攔截器應用到如下這個Invoker型別的Invoke方法上。指定的Order屬性最終決定了對應的攔截器在構建管道的位置,進而決定了它們的執行順序。
public class Invoker
{
    [Interceptor(typeof(BarInterceptor), Order = 2)]
    [Interceptor(typeof(BazInterceptor), Order = 3)]
    [Interceptor(typeof(FooInterceptor), Order = 1)]
    public virtual void Invoke() => Console.WriteLine("Invoker.Invoke()");
}
在如下所示的演示程式中,我們按照上述的方式得到Invoker物件,並呼叫其Invoke方法。
var invoker = new ServiceCollection()
    .AddSingleton<Invoker>()
    .BuildInterceptableServiceProvider()
    .GetRequiredService<Invoker>();

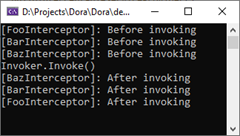
invoker.Invoke();按照標註InterceptorAttribute特性指定的Order屬性,三個攔截器執行順序依次是:FooInterceptor、BarInterceptor、BazInterceptor,如下所示的輸出結果體現了這一點(原始碼)。
六、短路返回
任何一個攔截器都可以根據需要選擇是否繼續執行後續的攔截器以及目標方法,比如入門範例中的快取攔截器將快取結果直接設定為呼叫上下文的返回值,並不再執行後續的操作。對上面定義的三個攔截器型別,我們將第二個攔截器BarInterceptor改寫成如下的形式。它的InvokeAsync在輸出一段指示性文字後,不再呼叫上下文的ProceedAsync方法,而是直接返回一個ValueTask物件。
public class BarInterceptor
{
    public virtual  ValueTask InvokeAsync(InvocationContext invocationContext)
    {
        Console.WriteLine($"[{GetType().Name}]: InvokeAsync");
        return ValueTask.CompletedTask;
    }
}
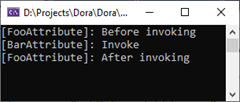
再次執行我們的演示程式後會發現FooInterceptor和BarInterceptor會正常執行,但是BazInterceptor目標方法均不會執行(原始碼)。
七、建構函式注入
由於攔截器是由依賴注入容器建立的,其建構函式中可以注入依賴服務。但是攔截器具有全域性生命週期,所以我們不能將生命週期模式為Scoped的服務物件注入到建構函式中。我們可以利用一個簡單的範例來演示這一點。我們定義瞭如下一個攔截器型別FoobarInspector,其建構函式中注入了依賴服務FoobarSerivice。FoobarInspector被採用如下的方式利用InterceptorAttribute特性應用到Invoker型別的Invoke方法上。
public class FoobarInterceptor
{
    public FoobarInterceptor(FoobarService foobarService)=> Debug.Assert(foobarService != null);
    public async  ValueTask InvokeAsync(InvocationContext invocationContext)
    {
        Console.WriteLine($"[{GetType().Name}]: Before invoking");
        await invocationContext.ProceedAsync();
        Console.WriteLine($"[{GetType().Name}]: After invoking");
    }
}

public class FoobarService { }

public class Invoker
{
    [Interceptor(typeof(FoobarInterceptor))]
    public virtual void Invoke() => Console.WriteLine("Invoker.Invoke()");
}
在如下的演示程式中,我們利用命令列引數(0,1,2)來指定依賴服務FoobarService採用的生命週期,然後將其作為引數呼叫輔助方法Invoke方法完成必要的服務註冊,利用構建的依賴注入容器提取Invoker物件,並呼叫應用了FoobarInspector攔截器的Invoke方法。
var lifetime = (ServiceLifetime)int.Parse(args.FirstOrDefault() ?? "0");
Invoke(lifetime);

static void Invoke(ServiceLifetime lifetime)
{
    Console.WriteLine(lifetime);
    try
    {
        var services = new ServiceCollection().AddSingleton<Invoker>();
        services.Add(ServiceDescriptor.Describe(typeof(FoobarService), typeof(FoobarService), lifetime));
        var invoker = services.BuildInterceptableServiceProvider().GetRequiredService<Invoker>();
        invoker.Invoke();
    }
    catch (Exception ex)
    {
        Console.WriteLine(ex.Message);
    }
}
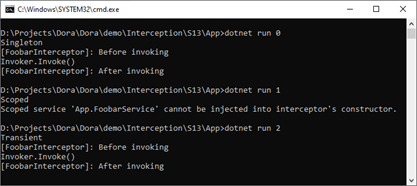
我們以命令列引數的形式啟動程式,並指定三種不同的生命週期模式。從輸出結果可以看出,如果註冊的FoobarService服務採用Scoped生命週期模式會丟擲異常(原始碼)。
八、方法注入
如果FoobarInspector依賴一個Scoped服務,或者依賴的服務採用Transient生命週期模式,但是希望在每次呼叫的時候建立新的物件(如果將生命週期模式設定為Transient,實際上是希望採用這樣的服務消費方式)。此時可以利用InvocationContext的InvocationServices返回的IServiceProvider物件。在如下的範例演示中,我們定義了派生於ServiceBase 的三個將會註冊為對應生命週期的服務型別SingletonService 、ScopedService 和TransientService 。為了確定依賴服務範例被建立和釋放的時機,ServiceBase實現了IDisposable介面,並在建構函式和Dispose方法中輸出相應的文字。在攔截器型別FoobarInterceptor的InvokeAsync方法中,我們利用InvocationContext的InvocationServices返回的IServiceProvider物件兩次提取這三個服務範例。FoobarInterceptor依然應用到Invoker型別的Invoke方法中。
public class FoobarInterceptor
{
    public async  ValueTask InvokeAsync(InvocationContext invocationContext)
    {
        var provider = invocationContext.InvocationServices;

        _ = provider.GetRequiredService<SingletonService>();
        _ = provider.GetRequiredService<SingletonService>();

        _ = provider.GetRequiredService<ScopedService>();
        _ = provider.GetRequiredService<ScopedService>();

        _ = provider.GetRequiredService<TransientService>();
        _ = provider.GetRequiredService<TransientService>();

        Console.WriteLine($"[{GetType().Name}]: Before invoking");
        await invocationContext.ProceedAsync();
        Console.WriteLine($"[{GetType().Name}]: After invoking");
    }
}

public class ServiceBase : IDisposable
{
    public ServiceBase()=>Console.WriteLine($"{GetType().Name}.new()");
    public void Dispose() => Console.WriteLine($"{GetType().Name}.Dispose()");
}

public class SingletonService : ServiceBase { }
public class ScopedService : ServiceBase { }
public class TransientService : ServiceBase { }

public class Invoker
{
    [Interceptor(typeof(FoobarInterceptor))]
    public virtual void Invoke() => Console.WriteLine("Invoker.Invoke()");
}
在如下的演示程式中,我們將三個服務按照對應的生命週期模式新增到建立的ServiceCollection集合中。在構建出作為依賴注入容器的IServiceProvider物件後,我們利用它提取出Invoker物件,並先後兩次呼叫應用了攔截器的Invoke方法。為了釋放所有由ISerivceProvider物件提供的服務範例,我們呼叫了它的Dispose方法。
var provider = new ServiceCollection()
    .AddSingleton<SingletonService>()
    .AddScoped<ScopedService>()
    .AddTransient<TransientService>()
    .AddSingleton<Invoker>()
    .BuildInterceptableServiceProvider();
using (provider as IDisposable)
{
   var invoker = provider .GetRequiredService<Invoker>();
    invoker.Invoke();
    Console.WriteLine();
    invoker.Invoke();
}
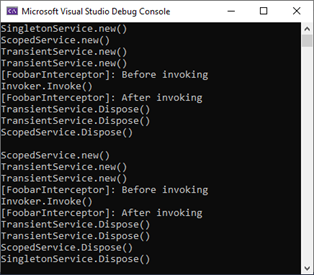
程式執行後會在控制檯上輸出如下的結果,可以看出SingletonService 物件只會建立一次,並最終在作為跟容器的ISerivceProvider物件被釋放時隨之被釋放。ScopedSerivce物件每次方法呼叫都會建立一次,並在呼叫後自動被釋放。每次提取TransientService 都會建立一個新的範例,它們會在方法呼叫後與ScopedSerivce物件一起被釋放(原始碼)。
其實利用InvocationServices提取所需的依賴服務並不是我們推薦的程式設計方式,更好的方式是以如下的方式將依賴服務注入攔截器的InvokeAsync方法中。上面演示程式的FoobarInterceptor改寫成如下的方式後,執行後依然會輸出如上的結果(原始碼)。
public class FoobarInterceptor
{
    public async  ValueTask InvokeAsync(InvocationContext invocationContext,
        SingletonService singletonService1, SingletonService singletonService2,
        ScopedService scopedService1, ScopedService scopedService2,
        TransientService transientService1, TransientService transientService2)
    {
        Console.WriteLine($"[{GetType().Name}]: Before invoking");
        await invocationContext.ProceedAsync();
        Console.WriteLine($"[{GetType().Name}]: After invoking");
    }
}
九、ASP.NET Core應用的適配
對於上面演示範例來說,Scoped服務所謂的「服務範圍」被繫結為單次方法呼叫,但是在ASP.NET Core應用應該繫結為當前的請求上下文,Dora.Interception對此做了相應的適配。我們將上面定義的FoobarInterceptor和Invoker物件應用到一個ASP.NET Core MVC程式中。為此我們定義瞭如下這個HomeController,其Action方法Index中注入了Invoker物件,並先後兩次呼叫了它的Invoke方法。
public class HomeController
{
    [HttpGet("/")]
    public string Index([FromServices] Invoker invoker)
    {
        invoker.Invoke();
        Console.WriteLine();
        invoker.Invoke();
        return "OK";
    }
}
MVC應用的啟動程式如下。
var builder = WebApplication.CreateBuilder(args);
builder.Host.UseInterception();
builder.Services
    .AddLogging(logging=>logging.ClearProviders())
    .AddSingleton<Invoker>()
    .AddSingleton<SingletonService>()
    .AddScoped<ScopedService>()
    .AddTransient<TransientService>()
    .AddControllers();
var app = builder.Build();
app
    .UseRouting()
    .UseEndpoints(endpint => endpint.MapControllers());
app.Run();
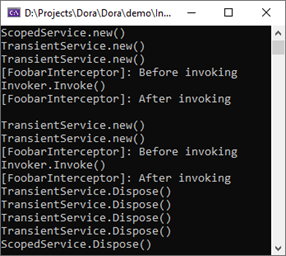
啟動程式後針對根路徑「/」(只想HomeController的Index方法)的請求(非初次請求)會在伺服器端控制檯上輸出如下的結果,可以看出ScopedSerivce物件針對每次請求只會被建立一次。
全新升級的AOP框架Dora.Interception[1]: 程式設計體驗
全新升級的AOP框架Dora.Interception[2]: 基於約定的攔截器定義方式
全新升級的AOP框架Dora.Interception[3]: 基於「特性標註」的攔截器註冊方式
全新升級的AOP框架Dora.Interception[4]: 基於「Lambda表示式」的攔截器註冊方式
全新升級的AOP框架Dora.Interception[5]: 實現任意的攔截器註冊方式
全新升級的AOP框架Dora.Interception[6]: 框架設計和實現原理
