【主流技術】ElasticSearch 在 Spring 專案中的實踐
前言
ElasticSearch簡稱es,是一個開源的高擴充套件的分散式全文檢索引擎。
它可以近乎實時的儲存、檢索資料,其擴充套件性很好,ElasticSearch是企業級應用中較為常見的技術。
下面和大家分享 ElasticSearch 整合在Spring Boot 專案的一些學習心得。
一、ElasticSearch概述
1.1基本認識
ElasticSearch 是基於 Lucene 實現的開源、分散式、RESTful介面的全文搜尋引擎。
Elasticsearch 還是一個分散式檔案資料庫,其中每個欄位均是被索引的資料且可被搜尋,它能夠擴充套件至數以百計的伺服器儲存以及處理PB級的資料。
Elasticsearch 可以通過簡單的 RESTful 風格 API 來隱藏 Lucene 的複雜性,讓搜尋變得更加簡單。
1.2核心概念
Elasticsearch 的核心概念是 Elasticsearch 搜尋的過程,在搜尋的過程中,Elasticsearch 的儲存過程、資料結構都會有所涉及。
-
對比關係型資料庫
表1 關係型資料庫 Elasticsearch 資料庫(DataBase) 索引(indices) 表(table) types(已棄用) 行(rows) documents 欄位(columns) fields
注:
- Elasticsearch (叢集)中可以包含多個indices(對應庫),每個索引中可以包含多個types(對應表),每個types下面又包含多個documents(對應行記錄),每個documents中又含有多個fields(對應欄位)。
- Elasticsearch 中一切資料的格式都是 JSON。
-
documents
-
fields
-
types(棄用)
-
indices
Elasticsearch 中的索引是一個非常大的檔案集合,儲存了對映型別的欄位和其它設定,被儲存在各個分片上。
1.3倒排索引
Elasticsearch 使用一種名為倒排索引的結構進行搜尋,一個索引由檔案中所有不重複的列表構成,對於每一個詞,都有一個包含它的檔案列表。
傳統資料庫的搜尋結構一般以id為主,可以一一對應資料庫中的所有內容,即key-value的形式。
而倒排索引則與之相反,以內容為主,將所有不重複的內容記錄按照匹配的程度(閾值)進行展示,即value-key的形式。
以下舉兩個例子來進行說明。
-
例一:
在關係型資料庫中,資料是按照id的順序進行約定的,記錄的id具有唯一性,方便人們使用id去確定內容,如表2所示:
表2 id label 1 java 2 java 3 java,python 4 python -
例二:
在 ElasticSearch 中使用倒排索引:資料是按照不重複的內容進行約定的,不重複的內容具有唯一性,這樣可以快速地找出符合內容的記錄,再根據匹配的閾值去進行展示,如表3所示:
label id java 1,2,3 python 4,3
1.4瞭解ELK
ELK 是 ElasticSearch、Logstash、Kibana這三大開源框架首字母大寫簡稱。
其中 Logstash 是中央資料流引擎,用於從不同目標(檔案/資料儲存/MQ)中收集不同的資料格式,經過過濾後支援輸送到不同的目的地(檔案/MQ/Redis/elasticsearch/kafka等)。
而 Kibana 可以將 ElasticSearch 的資料通過友好的視覺化介面展示出來,且提供實時分析的功能。
ELK一般來說是一個紀錄檔分析架構技術棧的總稱,但實際上 ELK 不僅僅適用於紀錄檔分析,它還可以支援任何其它資料分析和收集的場景,紀錄檔的分析和收集只是更具有代表性,並非 ELK 的唯一用途。
二、ElasticSearch(外掛)安裝
2.1安裝宣告
- 適用於JDK1.8及以上版本
- ElasticSearch使用者端
- 介面工具
- ElasticSearch版本與Maven依賴版本對應
2.2 ElasticSearch下載
下載地址(7.6.1版本):https://www.elastic.co/downloads/past-releases/elasticsearch-7-6-1,推薦迅雷下載(速度較快)。
2.3安裝ElasticSearch
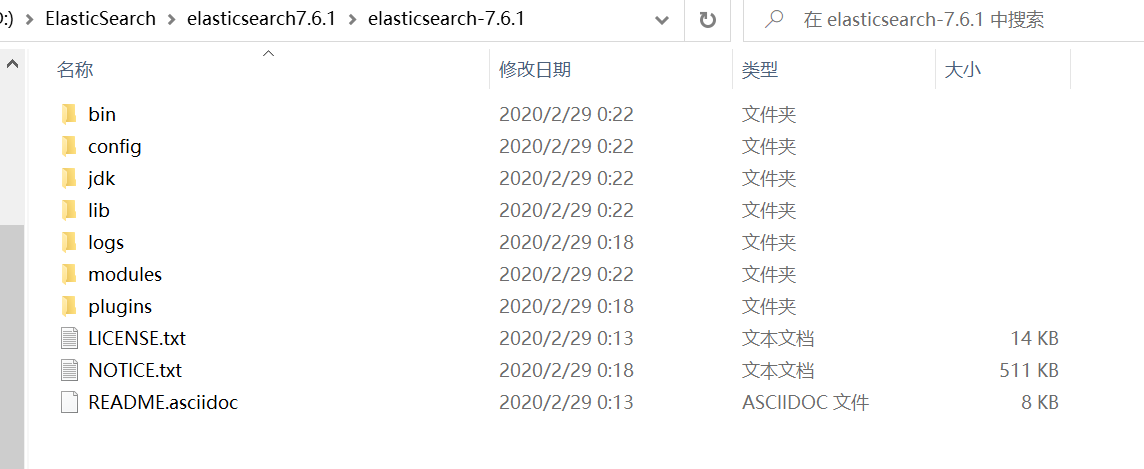
將下載好的壓縮包進行安裝即可,解壓後如下圖所示:
-
安裝目錄
-
bin 啟動檔案
-
config 組態檔
- log4j2:紀錄檔組態檔
- jvm.options:Java 虛擬機器器相關設定
- elasticsearch.yml:elasticsearch組態檔,預設 9200 埠,解決跨域問題。
-
lib 相關jar包
-
modules 功能模組
-
plugins 外掛(如IK分詞器)
-
2.4啟動ElasticSearch
開啟bin資料夾下的elasticsearch.bat檔案,雙擊啟動後存取預設地址:localhost:9200,即可得到以下json格式的資料:
{
  "name" : "ZHUZQC",
  "cluster_name" : "elasticsearch",
  "cluster_uuid" : "AMdLpCANStmY8kvou9-OtQ",
  "version" : {
    "number" : "7.6.1",
    "build_flavor" : "default",
    "build_type" : "zip",
    "build_hash" : "aa751e09be0a5072e8570670309b1f12348f023b",
    "build_date" : "2020-02-29T00:15:25.529771Z",
    "build_snapshot" : false,
    "lucene_version" : "8.4.0",
    "minimum_wire_compatibility_version" : "6.8.0",
    "minimum_index_compatibility_version" : "6.0.0-beta1"
  },
  "tagline" : "You Know, for Search"
}
2.5視覺化介面-head安裝
下載地址:https://github.com/mobz/elasticsearch-head/
安裝要求:先檢查計算機是否安裝node.js、npm
-
步驟一:在解壓後的檔案目錄下進入cmd,使用 cnpm install 命令安裝映象檔案;
-
步驟二:使用 npm run start 命令啟動,得到 http://localhost:9100
-
步驟三:解決跨域問題,開啟 elasticsearch.yml 檔案,輸入以下程式碼後儲存:
http.cors.enabled: true http.cors.allow-origin: "*" -
再次重啟elasticsearch,進入http://localhost:9200 驗證是否啟動成功
-
最後進入 http://localhost:9100,得到以下介面,則head啟動成功:

2.6初步建立索引
可以把索引當作一個資料庫來使用,具體的建立如下步驟所示:
-
步驟一:點選Indices,在彈出的提示框中填寫索引名稱,點選確認;
-
步驟二:可以在head介面中看到該索引,如下圖所示:
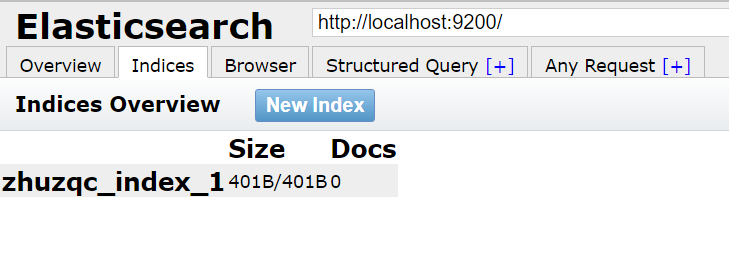
注:head僅可以當作一個資料視覺化的展示工具,對於查詢語句推薦使用Kibana。
2.7安裝Kibana工具
Kibana是一個針對 ElasticSearch 的開源分析、視覺化平臺,用於搜尋、檢視互動儲存在ElasticSearch中的資料。
Kibana 操作簡單,基於瀏覽器的的使用者介面可以快速建立儀表板(dashboard)並實時顯示資料。
官網下載:https://www.elastic.co/downloads/past-releases/kibana-7-6-1
注意事項:Kibana 版本需要和 ElasticSearch 的版本保持一致。
安裝步驟如下:
- 步驟一:開啟解壓縮後的bin資料夾,雙擊.bat檔案;
- 步驟二:開啟 http://localhost:5601 進入 Kibana 介面
2.8使用Kibana工具
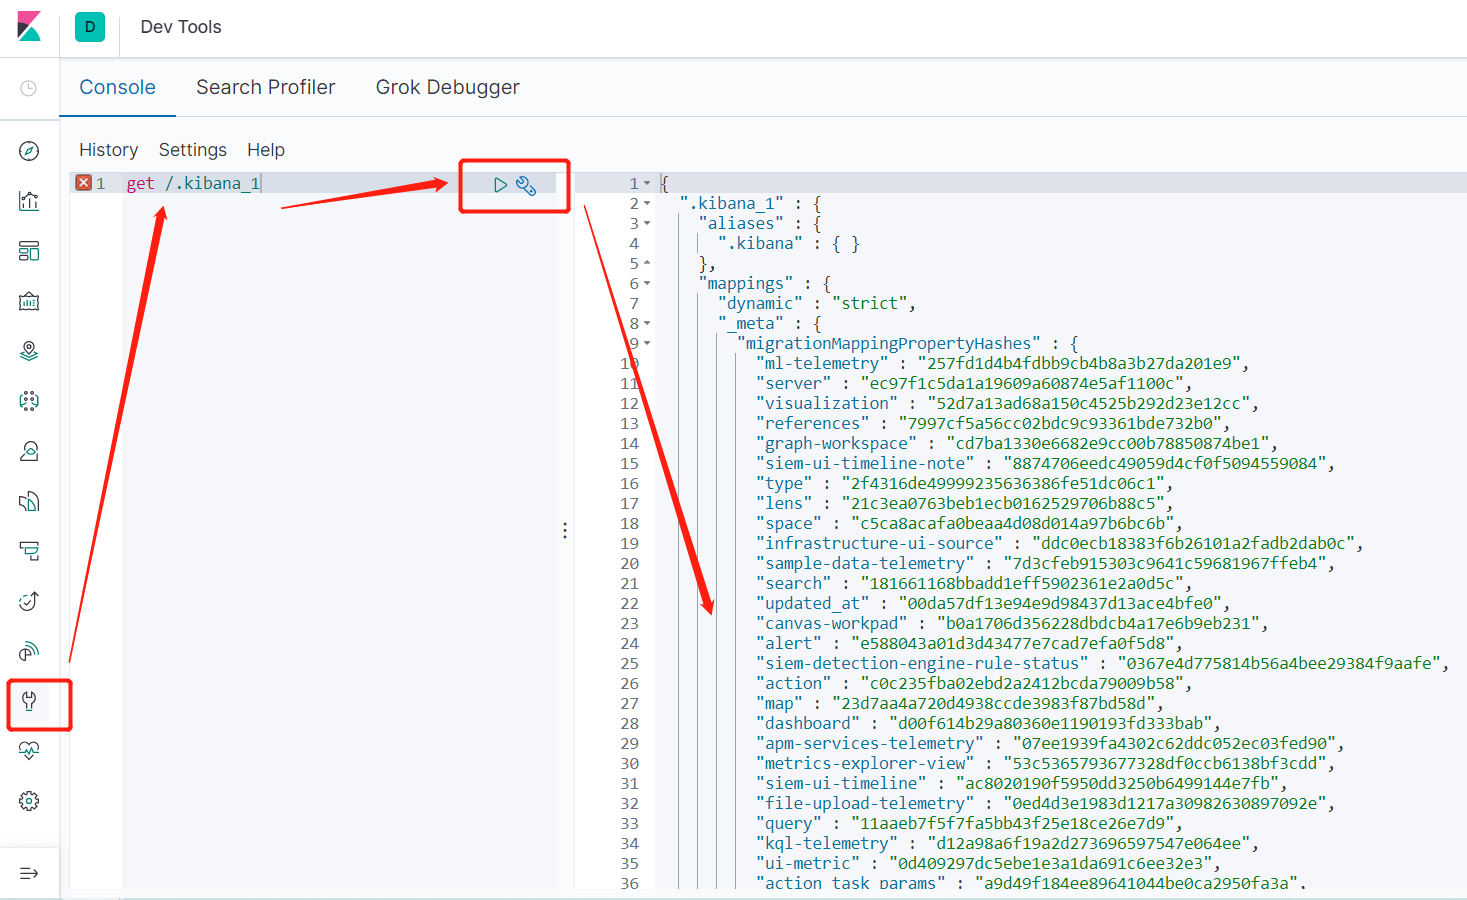
在開發的過程中,可供資料測試的工具有很多,比如postman、head、Chrome瀏覽器等,這裡推薦使用 Kibana 進行資料測試。
操作介面如下圖所示:
三、IK分詞器
3.1基本介紹
在使用中文進行搜尋時,我們會對要搜尋的資訊進行分詞:將一段中文分成一個個的詞語或者句子,然後將分出的詞進行搜尋。
預設的中文分詞是一個漢字一個詞,如:「你好世界」,會被分成:「你」,「好」,「世」,「界」。但這樣的分詞方式顯然並不全面,比如還可以分成:「你好」,「世界」。
ik分詞器就解決了預設分詞不全面的問題,可以將中文進行不重複的分詞。
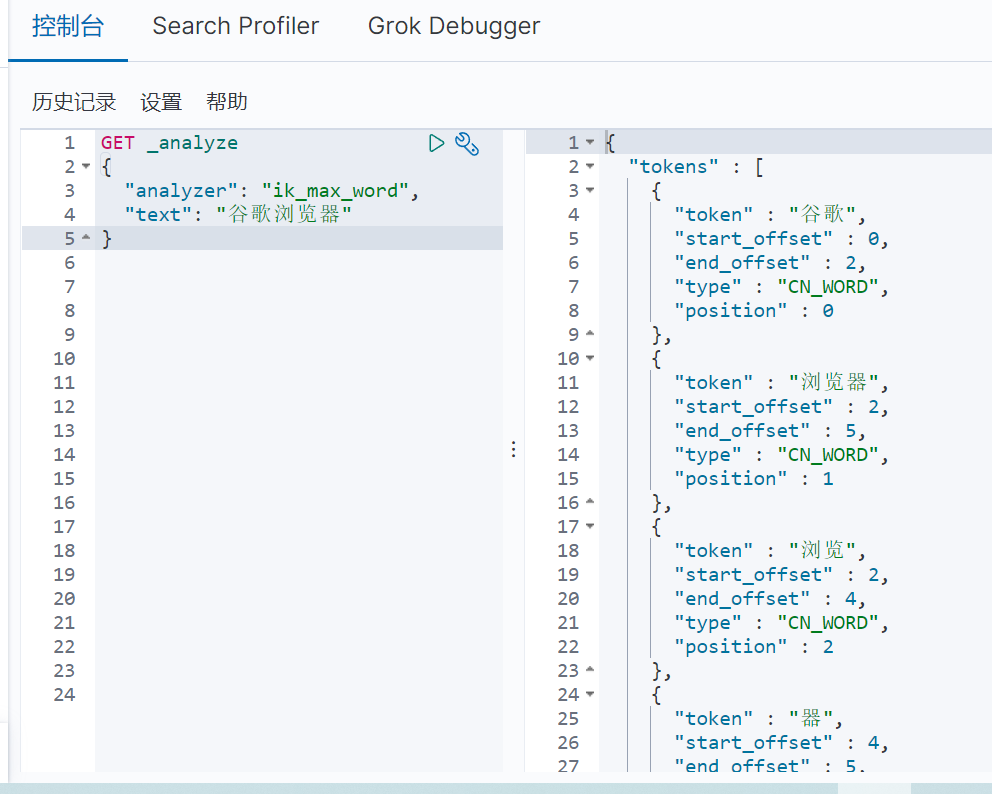
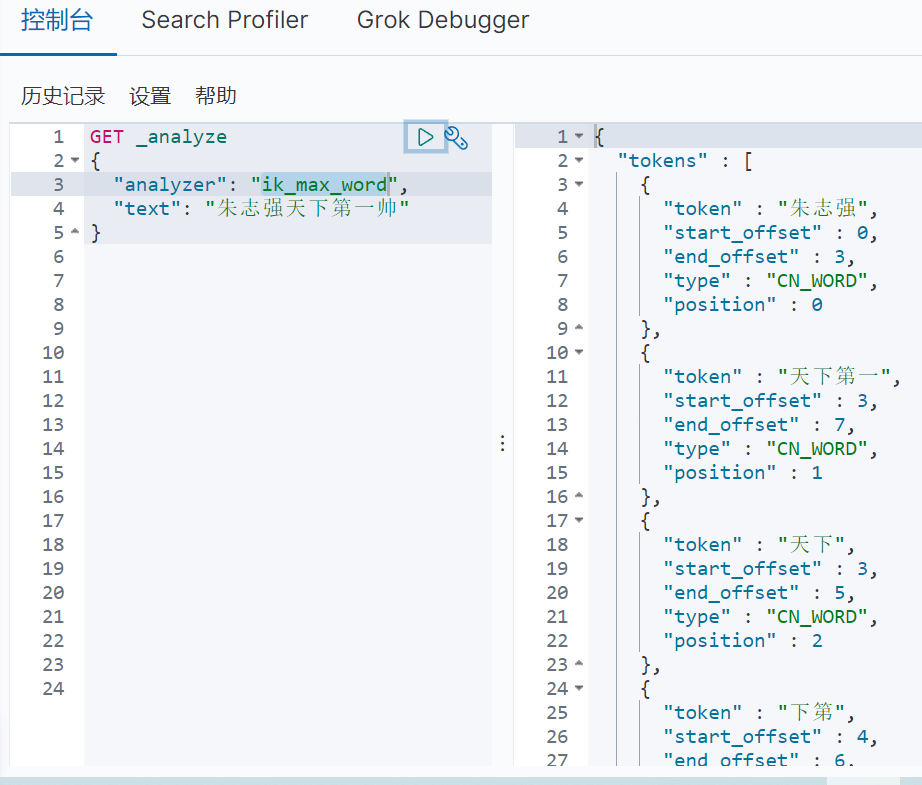
ik分詞器提供了兩種2演演算法:ik_smart(最少切分)以及ik_max_word(最細顆粒度劃分)。
github下載:https://github.com/medcl/elasticsearch-analysis-ik/releases/tag/v7.6.1
- 步驟一:將解壓後的所有檔案放置在 elasticsearch 下的plugins資料夾下;
- 步驟二:重啟 elasticsearch
3.2使用Kibana測試
-
首先測試 ik_smart(最少切分)演演算法的分詞效果,具體如圖3-1所示:

圖3-1 -
再測試 ik_max_word(最細顆粒度劃分)演演算法的分詞效果,具體如圖3-2所示:
3.3修改本地字典
ik分詞的預設字典並不能完全涵蓋所有的中文分詞,當我們想自定義分詞時,就需要修改ik分詞器的字典設定。
- 步驟一:開啟elasticsearch-7.6.1\plugins\ik\config資料夾,增加自定義dic檔案;
- 步驟二:在同一資料夾中的IKAnalyzer.cfg.xml裡,將上述步驟的dic檔案寫入自己的擴充套件字典;
具體效果如下圖3-3所示:
四、Rest風格操作
ElasticSearch 使用 Rest 風格來進行一系列操作,具體的命令如圖4-1所示:

4.1建立索引
PUT /test_1/type/1
{
  "name": "zhuzqc",
  "age": 35364
}
4.2修改索引內容
GET /test_1
{
  "mappings": {
    "properties": {
      "name": {
        "type": "text"
      },
      "age": {
        "type": "long"
      },
      "birthdy": {
        "type": "date"
      }
    }
  }
}
4.3更新索引內容
POST /test_1/_doc/1/_update
{
  "doc": {
  "name": "noone"
  }
}
4.4刪除索引
DELETE test_2
4.5關於documents的操作
4.5.1基本操作
documents 可以看作是資料庫中的行記錄;
- 首先先生產一些 documents 資料:
PUT zhuzqc/user/3
{
  "name": "李四",
  "age": 894,
  "desc": "影流之主",
  "tags": ["劫","刺客","中單"]
}
2.獲取資料:
GET zhuzqc/user/1
3.更新資料
// POST請求對指定內容進行更新
POST zhuzqc/user/1/_update
{
  "doc": {
  "name": "342rfd",
  "age": 243234
  }
}
4.簡單的條件查詢
// 查詢統一GET開頭,_search後接?,q代表query,屬性:內容
GET zhuzqc/user/_search?q=name:李

如:查詢zhuzqc索引中name為李四的資訊,其中李四遵循預設的分詞規則
GET zhuzqc/user/_search?q=name:李四
4.5.2複雜操作
上述的一些簡單查詢操作在企業級應用開發中使用地較少,更多地還是使用查詢實現複雜的業務。
隨著業務的複雜程度增加,查詢的語句也隨之複雜起來,在使用複雜查詢的過程中必然會涉及一些 elasticsearch 的進階語法。
對於複雜查詢的操作在下一章會詳細介紹。
五、查詢詳解
ElasticSearch引擎首先分析需要查詢的字串,根據分詞器規則對其進行分詞。分詞之後,才會根據查詢條件進行結果返回。
5.1關鍵字介紹
- query 關鍵字:將需要查詢的 JSON 引數體進行包裹,宣告這是一條查詢語句。
- bool 關鍵字:表明返回結果型別為布林型別。
- keyword 關鍵字:keyword代表一種分詞型別,表明該欄位的值不會被分詞器分詞。
- must 關鍵字:在 must 中的內容表明都是必須執行的內容,在 must 中可以建立多條語句,多條語句需同時滿足條件才能執行,作用相當於 SQL 語句中的 AND 。
- should 關鍵字:在 should 關鍵字裡的內容只要滿足其中一項就可以執行,作用相當於 SQL 語句中的 OR 。
- must_not 關鍵字:類似於 Java 中的 != 作用,展示查詢內容之外的內容。
- match 關鍵字:match 的作用是匹配查詢,首先經過分詞器的分詞,後再執行 match 查詢,預設情況下:欄位內容必須完整地匹配到任意一個詞條(分詞後),才會有返回結果。
- 注:如果需要查詢的詞有多個,可以用空格隔開。
- match_all 關鍵字:待補充。
- match_phrase 關鍵字:待補充。
- term 關鍵字:精確查詢關鍵字,使用 term 時首先不會對需要查詢的詞條進行分詞,只有精確地匹配到一模一樣的內容才會返回結果。
- terms 關鍵字:待補充。
- filter 關鍵字:對查詢的內容進行篩選過濾,常使用 gt(大於)、gte(大於等於)、lt(小於)和 lte (小於等於)來進行篩選。
GET product_cloud/_search
{
  "query": {
    "bool": {
      "must": [
        {
          "bool": {
            "should": [
              {"match": {"product_comment":"持續交付 工程師"}}
            ]
          }
        },
        {
          "bool": {
            "should": [
              {"terms": {"label_ids": [3]}}
            ]
          }
        }
      ],
      "filter": {
        "range": {
          "label_ids": {
            "gte": 0
          }
        }
      }
    }
  }
-
score 關鍵字:欄位內容與詞條的匹配程度,分數越高,表明匹配度越高,就越符合查詢結果。
-
hits 關鍵字:對應 Java 程式碼中的 hit 物件,包含了索引和檔案資訊,包括查詢結果總數,查詢出來的_doc內容(一串 JSON),分數(score)等。
-
source:需要展示的內容欄位,預設是展示索引的所有欄位,也可以自定義指定需要展示的欄位。
-
sort關鍵字:可以對欄位的展示進行排序;
"_source": ["product_comment","product_name","label_ids","product_solution","company_name"],
  "sort": [
    {
      "label_ids": {
        "order": "desc"
      }
    }
  ],
  "from": 0,
  "size": 3
5.2 highlight 高亮
使用 highlight 關鍵字可以在搜尋結果中對需要高亮的欄位進行高亮(可自定義樣式)展示,具體程式碼如下:
GET product_cloud/_search
{
  "query": {
    "term": {
      "product_comment": "世界"
    }
  },
  "highlight": {
    "pre_tags": "<p class='key' style='color:red'>",
    "post_tags": "</p>",
    "fields": {
      "product_comment": {}
    }
  }
}
六、Spring Boot整合ElasticSearch
在 Elasticsearch 的官方檔案中有對 Elasticsearch 使用者端使用的詳細介紹: https://www.elastic.co/guide/en/elasticsearch/client/java-api-client/8.0/installation.html
6.1新增依賴
<properties>
        <java.version>11</java.version>
        <!-- 自定義 ElasticSearch 依賴版本與安裝的版本一致 -->
        <elasticsearch.verson>7.6.1</elasticsearch.verson>
</properties>

        <dependency>
            <groupId>org.springframework.boot</groupId>
            <artifactId>spring-boot-starter-data-elasticsearch</artifactId>
        </dependency>
6.2建立物件
定義一個使用者端物件:
@Configuration
public class EsConfig {
    @Bean
    public RestHighLevelClient restHighLevelClient(){
        RestHighLevelClient restHighLevelClient = new RestHighLevelClient(
                RestClient.builder(
                        new HttpHost("127.0.0.1",9200,"http")
                )
        );
        return restHighLevelClient;
    }
}
6.3分析類中的方法(索引相關API)
-
建立索引
@Autowired private RestHighLevelClient restHighLevelClient; // 測試索引的建立 @Test void testCreateIndex() throws IOException { //1、建立索引請求 CreateIndexRequest request = new CreateIndexRequest("zhu_index"); //2、執行建立請求,並獲得響應 CreateIndexResponse createIndexResponse = restHighLevelClient.indices().create(request, RequestOptions.DEFAULT); System.out.println(createIndexResponse); } -
獲取索引
// 測試獲取索引 @Test void testExistIndex() throws IOException { GetIndexRequest getIndexRequest = new GetIndexRequest("zhu_index"); boolean exists = restHighLevelClient.indices().exists(getIndexRequest, RequestOptions.DEFAULT); System.out.println(exists); } -
刪除索引
  // 測試刪除索引
    @Test
    void testDeleteIndex() throws IOException {
        DeleteIndexRequest deleteIndexRequest = new DeleteIndexRequest();
        AcknowledgedResponse delete = restHighLevelClient.indices().delete(deleteIndexRequest, RequestOptions.DEFAULT);
        System.out.println(delete);
    }
七、相關API操作
API 的操作主要是將Spring Boot專案與 Elasticsearch 的 indices 與 docs 相關聯起來,這樣可以做到在 Elasticsearch 中對專案資料進行一系列的操作。
7.1檔案API
-
新增資料
    // 測試新增檔案
    @Test
    void testAddDocument() throws IOException {
        // 建立物件
        User user = new User("zzz",3);
        // 建立請求
        IndexRequest zhu_index_request = new IndexRequest("zhu_index");
        // 規則:put /zhu_index/_doc/1
        zhu_index_request.id("1");
        zhu_index_request.timeout(TimeValue.timeValueSeconds(1));
        // 將資料放入 ElasticSearch 請求(JSON格式)
        zhu_index_request.source(JSON.toJSONString(user), XContentType.JSON);
        // 使用者端傳送請求
        IndexResponse indexResponse = restHighLevelClient.index(zhu_index_request,
        RequestOptions.DEFAULT);
    }

    // 新增大批次的資料
    @Test
    void testBulkRequest() throws IOException {
        BulkRequest bulkRequest = new BulkRequest();
        bulkRequest.timeout("10s");
        //建立資料集合
        ArrayList<User> userList = new ArrayList<>();
        userList.add(new User("zzz2",22));
        userList.add(new User("zzz3",23));
        userList.add(new User("zzz4",24));
        userList.add(new User("zzz5",25));
        userList.add(new User("zzz6",26));
        //遍歷資料:批次處理
        for (int i = 0; i < userList.size(); i++) {
            // 批次新增(或更新、或刪除)
            bulkRequest.add(
                    new IndexRequest("zhu_index")
                    //.id(""+(i+1))
                    .source(JSON.toJSONString(userList.get(i)), XContentType.JSON));
        }
        BulkResponse bulkResponse = restHighLevelClient.bulk(bulkRequest, RequestOptions.DEFAULT);
    }
-
獲取_doc資訊
 @Test
    void testGetDocument() throws IOException {
        GetRequest getRequest = new GetRequest("zhu_index","1");
        GetResponse getResponse = restHighLevelClient.get(getRequest, RequestOptions.DEFAULT);
        // 返回_source的上下文
        getRequest.fetchSourceContext(new FetchSourceContext(true));
    }
-
更新資料
   // 更新檔案資訊
    @Test
    void testUpdateDocument() throws IOException {
        UpdateRequest updateRequest = new UpdateRequest("zhu_index","1");
        updateRequest.timeout("1s");

        User user = new User("ZhuZhuQC",18);
        updateRequest.doc(JSON.toJSONString(user), XContentType.JSON);
        UpdateResponse updateResponse = restHighLevelClient.update(updateRequest,
        RequestOptions.DEFAULT);

    }
-
刪除資料
與新增資料、更新資料類似,建立 DeleteRequest 物件即可。
-
查詢資料(重點)
    // 查詢資料
    @Test
    void testSearch() throws IOException {
        // 建立查詢物件
        SearchRequest searchRequest = new SearchRequest(EsConst.ES_INDEX);
        // 構建搜尋條件(精確查詢、全匹配查詢)
        TermQueryBuilder termQuery = QueryBuilders.termQuery("name","zzz2");
        MatchAllQueryBuilder matchAllQuery = QueryBuilders.matchAllQuery();

        // 執行構造器
        SearchSourceBuilder sourceBuilder = new SearchSourceBuilder();
        sourceBuilder.query(termQuery);
        sourceBuilder.query(matchAllQuery);

        // 設定查詢時間,3秒內
        sourceBuilder.timeout(new TimeValue(3, TimeUnit.SECONDS));

        // 設定分頁
        sourceBuilder.from(0);
        sourceBuilder.size(3);

        // 最後執行搜尋,並返回搜尋結果
        searchRequest.source(sourceBuilder);
        SearchResponse searchResponse = restHighLevelClient.search(searchRequest,
        RequestOptions.DEFAULT);
        searchResponse.getHits();

        // 列印結果
        System.out.println(JSON.toJSONString(searchResponse.getHits()));
        for (SearchHit documentFields : searchResponse.getHits().getHits()) {
            System.out.println(documentFields.getSourceAsMap());
        }
    }
八、實戰分析
實戰部分會模擬一個真實的 ElasticSearch 搜尋過程:從建立專案開始,到使用爬蟲爬取資料、編寫業務,再到前後端分離互動,最後搜尋結果高亮展示。
8.1建立專案
建立專案的步驟可如以下幾步:
-
步驟一:匯入相關依賴
<properties> <java.version>11</java.version> <!-- 自定義 ElasticSearch 依賴版本與安裝的版本一致 --> <elasticsearch.version>7.6.1</elasticsearch.version> </properties> <dependency> <groupId>com.alibaba</groupId> <artifactId>fastjson</artifactId> <version>1.2.83</version> </dependency> -
步驟二:編寫 properties 檔案
server.port=9090 # 關閉 thymeleaf 快取 spring.thymeleaf.cache=false #mysql連線設定 spring.datasource.username=root spring.datasource.password=password123 spring.datasource.url=jdbc:mysql://localhost:3306/elasticsearch-test?useSSL=false&useUnicode=true&characterEncoding=utf-8 spring.datasource.driver-class-name=com.mysql.cj.jdbc.Driver #mybatis-plus紀錄檔設定 mybatis-plus.configuration.log-impl=org.apache.ibatis.logging.stdout.StdOutImpl #mybatis-plus邏輯刪除設定,刪除為1,未刪除為0 mybatis-plus.global-config.db-config.logic-delete-value = 1 mybatis-plus.global-config.db-config.logic-not-delete-value = 0 -
步驟三:匯入前端樣式
這個步驟可以在網路硬碟
地址:https://pan.baidu.com/s/1yk_yekYoGXCuO0dc5B-Ftg
密碼: rwpq
獲取對應的 zip 包,裡面包括了一些前端的靜態資源和樣式,直接放入 resources 資料夾中即可。
-
步驟四:編寫controller
@Controller
public class IndexController {

    @GetMapping({"/","/index"})
    public String index(){
        return "index";
    }
}
8.2爬取資料
在真實的專案中,資料可以從資料庫獲得,也可以從MQ(訊息佇列)中獲得,也可以通過爬取資料(爬蟲)獲得,在這裡介紹一下使用爬蟲獲取專案所需資料的過程。
1.首先匯入網頁解析依賴:
        <!--網頁解析依賴-->
        <dependency>
            <groupId>org.jsoup</groupId>
            <artifactId>jsoup</artifactId>
            <version>1.11.2</version>
        </dependency>
2.編寫網頁解析工具類(返回爬取到的資料):
@Component
public class HtmlParseUtil {

    public static List<Content> parseJD(String keyword) throws IOException {
        // 1、獲取請求:https://search.jd.com/Search?keyword=java
        String reqUrl = "https://search.jd.com/Search?keyword=" + keyword;

        // 2、解析網頁,返回的document物件就是頁面的 js 物件
        Document document = Jsoup.parse(new URL(reqUrl), 30000);

        // 3、js 中使用的方法獲取頁面資訊
        Element j_goodList = document.getElementById("J_goodsList");

        // 4、獲取所有的 li 元素
        Elements liElements = j_goodList.getElementsByTag("li");

        //5、返回List封裝物件
        ArrayList<Content> goodsList = new ArrayList<>();

        //5、獲取元素中的內容,遍歷的 li 物件就是每一個 li 標籤
        for (Element el : liElements) {
            String price = el.getElementsByClass("p-price").eq(0).text();
            String title = el.getElementsByClass("p-name").eq(0).text();
            String img = el.getElementsByTag("img").eq(0).attr("data-lazy-img");
            // 將爬取的資訊放入 List 物件中
            Content content = new Content();
            content.setTitle(title);
            content.setImg(img);
            content.setPrice(price);
            goodsList.add(content);
        }
        return goodsList;
    }
}
8.3編寫業務
要編寫的業務只有兩部分:1、將上述獲取的資料放入 ElasticSearch 的索引中;2、實現 ElasticSearch 的搜尋功能;
步驟一:
1.controller層:
    @Autowired
    private ContentService contentService;

    @GetMapping("/parse/{keyword}")
    public Boolean parse(@PathVariable("keyword") String keyword) throws IOException {
        return contentService.parseContent(keyword);
    }
2.service層:
    @Autowired
    private RestHighLevelClient restHighLevelClient;

    /**
     *  1、將解析後的資料放入 ElasticSearch 的索引中
     * */
    public Boolean parseContent(String keyword) throws IOException {
        List<Content> contents = new HtmlParseUtil().parseJD(keyword);

        //批次插入 es
        BulkRequest bulkRequest = new BulkRequest();
        bulkRequest.timeout("2m");

        for (int i = 0; i < contents.size(); i++) {
            bulkRequest.add(
                    new IndexRequest("jd_goods")
                    .source(JSON.toJSONString(contents.get(i)), XContentType.JSON)
            );
        }
        BulkResponse bulk = restHighLevelClient.bulk(bulkRequest, RequestOptions.DEFAULT);
        return bulk.hasFailures();
    }
步驟二:
1.controller層:
    @GetMapping("/search/{keyword}/{pageNo}/{pageSize}")
    public List<Map<String, Object>> search(@PathVariable("keyword") String keyword,
                                            @PathVariable("pageNo") Integer pageNo,
                                            @PathVariable("pageSize") Integer pageSize) throws IOException {
        return contentService.searchPage(keyword, pageNo, pageSize);
    }
2.service層:
    /**
     * 2、獲取資料後實現搜尋功能
     * */
    public List<Map<String,Object>> searchPage(String keyword, Integer pageNo, Integer pageSize) throws IOException {
        if (pageNo <= 1){
            pageNo = 1;
        }
        //條件搜尋
        SearchRequest searchRequest = new SearchRequest("jd_goods");
        SearchSourceBuilder sourceBuilder = new SearchSourceBuilder();
        //精準匹配
        TermQueryBuilder titleTermQuery = QueryBuilders.termQuery("title", keyword);
        sourceBuilder.query(titleTermQuery);
        sourceBuilder.timeout(new TimeValue(3, TimeUnit.SECONDS));
        //分頁
        sourceBuilder.from(pageNo);
        sourceBuilder.size(10);
        //執行搜尋
        searchRequest.source(sourceBuilder);
        SearchResponse searchResponse = restHighLevelClient.search(searchRequest,RequestOptions.DEFAULT);
        //解析結果
        ArrayList<Map<String, Object>> list = new ArrayList<>();
        for (SearchHit documentFields : searchResponse.getHits().getHits()) {
            list.add(documentFields.getSourceAsMap());
        }
        return list;
    }
8.4前後端互動
前後端互動主要是通過介面查詢資料並返回:前端有請求引數(關鍵字、分頁引數)後,後端通過關鍵字去 elasticsearch 索引中進行篩選,最終將結果返回給前端現實的一個過程。
在這裡主要分析一下前端是怎麼獲得後端介面引數的,後端的介面在上述業務編寫中已經包含了。
-
引入Vue、axios
<!--前端使用Vue-->
<script th:src="@{/js/axios.min.js}"></script>
<script th:src="@{/js/vue.min.js}"></script>
-
在Vue中繫結
<script>
    new Vue({
        el: '#app',
        data:{
            // 搜尋鍵碼
            keyword: '',
            //返回結果
            results: []
        }
    })
</script>
-
對接後端介面並返回
<script>
       methods: {
            searchKey(){
                let keyword = this.keyword;
                console.log(keyword);
                //對接後端介面:關鍵字、分頁引數
                axios.get('search/' + keyword + '/1/20').then(response=>{
                      console.log(response);
                      //繫結資料
                      this.results = response.data;
                })
            }
        }
</script>
8.4搜尋高亮
關鍵字高亮總結來說,就是將原來搜尋內容中的關鍵字置換為加了樣式的關鍵字,進而展示出高亮效果。
主要邏輯在於,獲取到 Hits 物件後,遍歷關鍵字欄位,將高亮的關鍵字重新放入 Hits 集合中。
具體程式碼如下:
        //解析結果
        ArrayList<Map<String, Object>> list = new ArrayList<>();
        for (SearchHit documentFields : searchResponse.getHits().getHits()) {
            //解析高亮欄位,遍歷整個 Hits 物件
            Map<String, HighlightField> highlightFields = documentFields.getHighlightFields();
            //獲取到關鍵字的欄位
            HighlightField title = highlightFields.get("title");
            Map<String, Object> sourceAsMap = documentFields.getSourceAsMap();
            //置換為高亮欄位:將原來的欄位替換為高亮的欄位
            if(title != null){
                Text[] fragments = title.fragments();
                //定義新的高亮欄位
                String new_title = "";
                for (Text text : fragments) {
                    new_title += text;
                }
                //將高亮的欄位放入 Map 集合
                sourceAsMap.put("title",new_title);
            }
            list.add(sourceAsMap);
        }
九、總結
ElasticSearch 作為一個分散式全文檢索引擎,也可以應用在叢集當中(K8S、Docker)。
ElasticSearch 實現全文檢索的過程並不複雜,只要在業務需要的地方建立 ElasticSearch 索引,將資料放入索引中,就可以使用 ElasticSearch 整合在各個語言中的搜尋物件進行查詢操作了。
而在整合了 ElasticSearch 的 Spring Boot 專案中,無論是建立索引、精準匹配、還是欄位高亮等,都是使用 ElasticSearch 物件在操作,本質上還是一個物件導向的過程。
和 Java 中的其它「物件」一樣,只要靈活運用這些「物件」的使用規則和特性,就可以滿足業務上的需求,對這個過程的把控也是工程師能力 的一種體現。
在 Spring Boot 專案中整合 ElasticSearch 就和大家分享到這裡,如有不足,還望大家不吝賜教!