搭建個人部落格,Docsify+Github webhook+JGit解決方案
一開始部落格使用的 Halo,發現問題比較多啊,時不時的莫名其妙主題各種報錯,有時候還要升級,麻煩的要死,於是就想弄簡單點。
這兩天抽空反覆倒騰了一遍,不小心還把映象給尼瑪刪了,發的文章都沒了,痛定思痛,要做改變!
眾所周知,我懶出名了,我覺得這種事情你不要老是讓我操心啊,最好是一年都不要動一下才好,這搞的跟什麼一樣。
研究一會兒,最終還是決定 docsify+github 來弄,初步的想法是本地寫好 MD 檔案直接 push 到 github上,然後觸發 github 的webhook,觸發指令碼去 pull 程式碼到伺服器上。
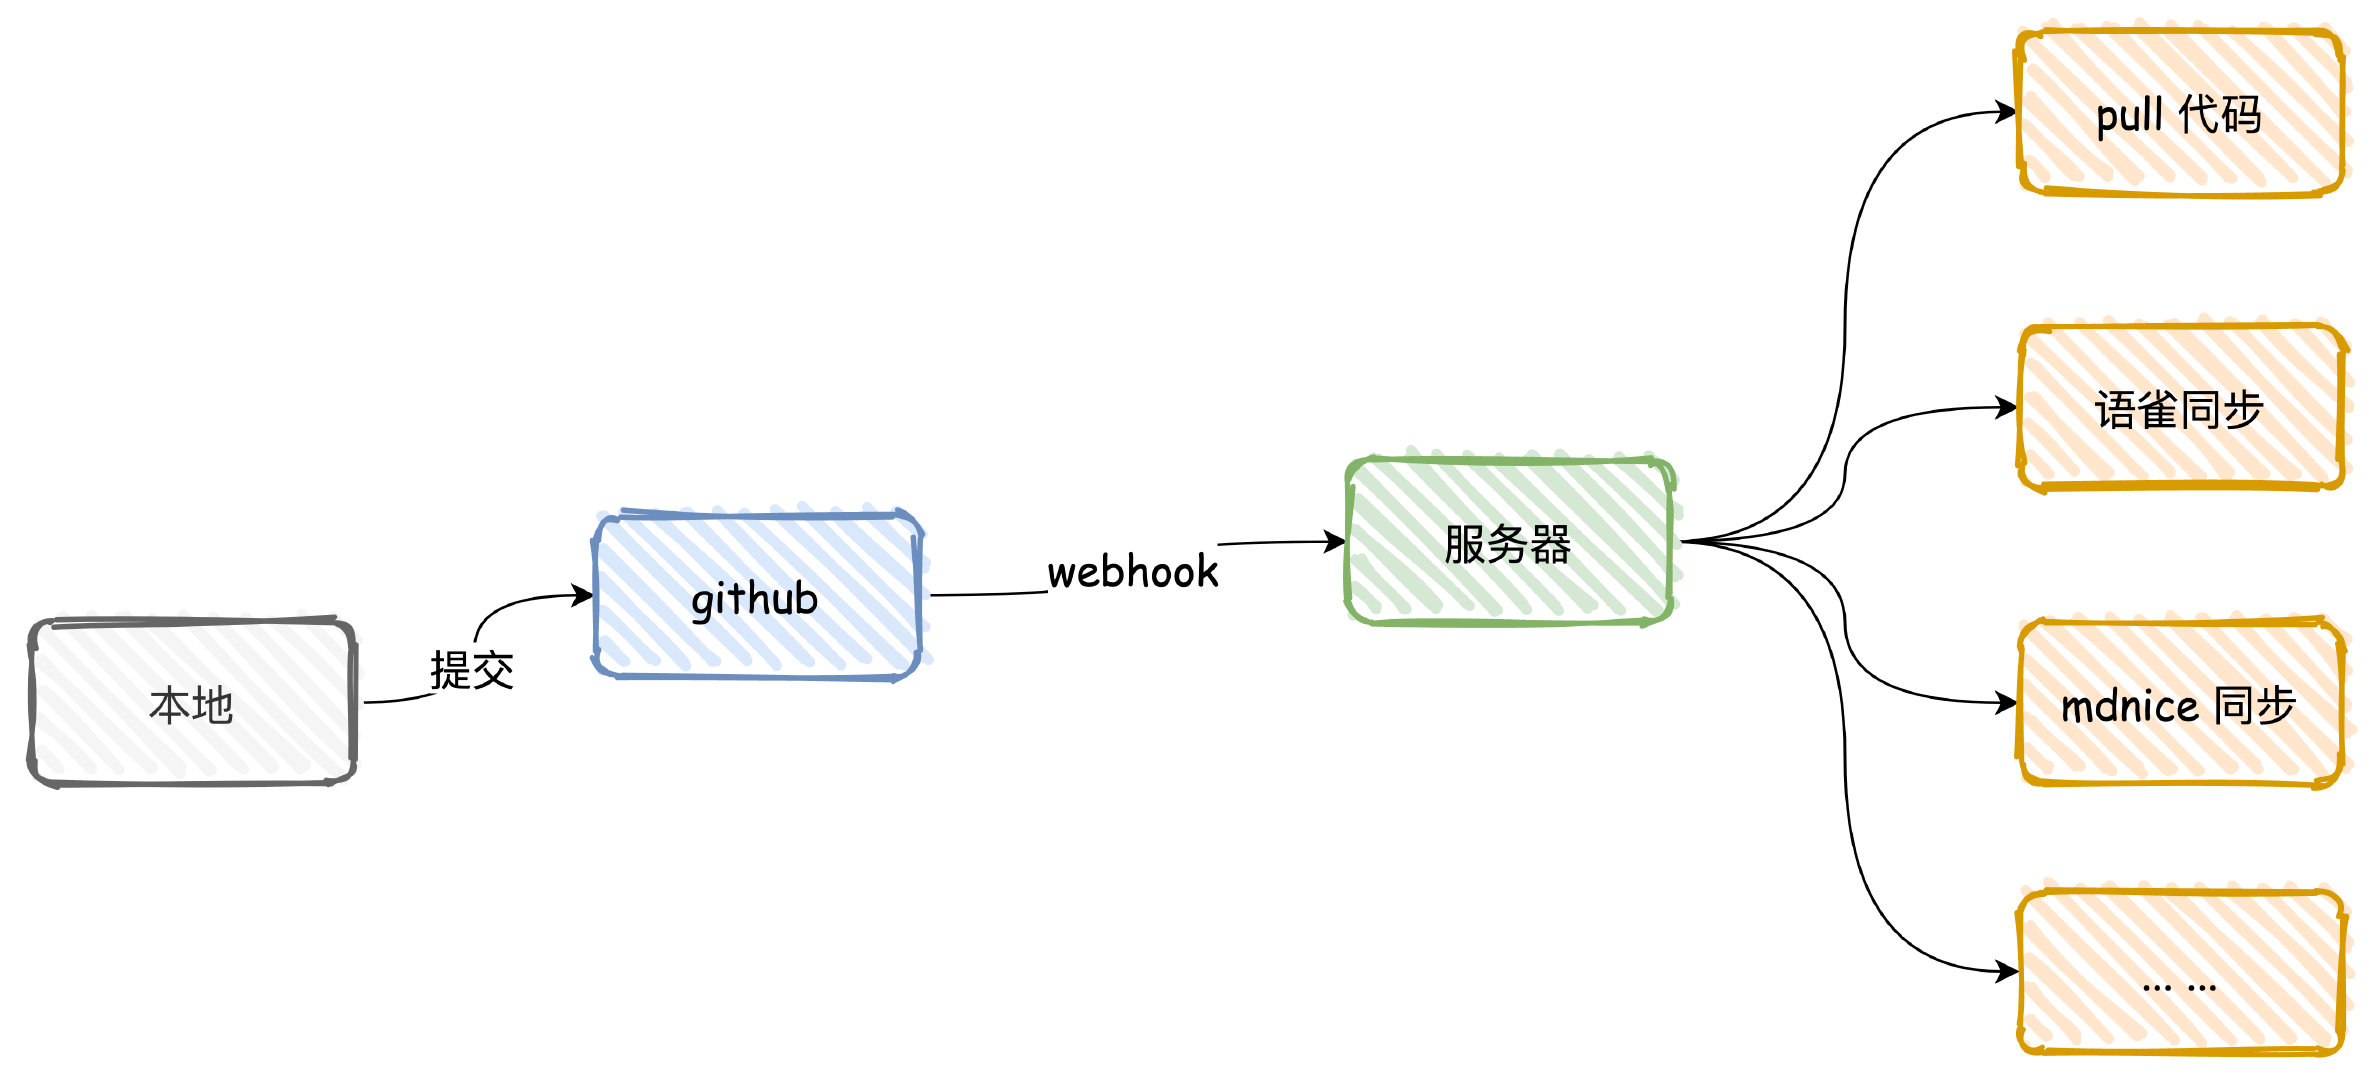
這樣的話還有點想象空間,以後可以省去一大部分同步文章的工作,都可以出發回撥去通過 API 同步,不過暫時還沒有調研這些平臺是否能支援,不過應該問題不大。
試試解決方案可不可行吧,我覺得很 nice。
docsify 搭建安裝
首先安裝 docsify-cli 工具
npm i docsify-cli -g
然後進入自己的目錄,初始化
docsify init ./
這樣就差不多了,多了幾個檔案,簡單修改一下 index.html,設定下名字和程式碼倉庫的資訊,開啟下左邊的側邊欄。
同時補充一點外掛,都從網上摟的。
<!DOCTYPE html>
<html lang="en">
<head>
<meta charset="UTF-8">
<title>Document</title>
<meta http-equiv="X-UA-Compatible" content="IE=edge,chrome=1" />
<meta name="description" content="Description">
<meta name="viewport" content="width=device-width, initial-scale=1.0, minimum-scale=1.0">
<link rel="stylesheet" href="//cdn.jsdelivr.net/npm/docsify@4/lib/themes/vue.css">
</head>
<body>
<div id="app"></div>
<script>
window.$docsify = {
name: '艾小仙',
repo: 'https://github.com/irwinai/JavaInterview.git',
loadSidebar: true,
autoHeader: true,
subMaxLevel: 3,
sidebarDisplayLevel: 1, // set sidebar display level
count:{
countable:true,
fontsize:'0.9em',
color:'rgb(90,90,90)',
language:'chinese'
},
search: {
maxAge: 86400000, // Expiration time, the default one day
paths: [], // or 'auto'
placeholder: '開始搜尋',
noData: '啥也沒有!'
},
copyCode: {
buttonText : '點選複製',
errorText : '錯誤',
successText: '複製成功'
},
footer: {
copy: '<span>艾小仙 © 2022</span>',
auth: '贛ICP備2021008029號-1',
pre: '<hr/>',
style: 'text-align: right;',
class: 'className'
}
}
</script>
<!-- Docsify v4 -->
<script src="//cdn.jsdelivr.net/npm/docsify@4"></script>
<!-- 搜尋 -->
<script src="//cdn.jsdelivr.net/npm/docsify/lib/plugins/search.min.js"></script>
<!-- 圖片放大縮小支援 -->
<script src="//cdn.jsdelivr.net/npm/docsify/lib/plugins/zoom-image.min.js"></script>
<!-- 拷貝文字內容 -->
<script src="//cdn.jsdelivr.net/npm/docsify-copy-code/dist/docsify-copy-code.min.js"></script>
<!-- 字數外掛 -->
<script src="https://cdn.jsdelivr.net/npm/docsify-count@latest/dist/countable.min.js"></script>
<!-- 分頁導航 -->
<script src="//unpkg.com/docsify-pagination/dist/docsify-pagination.min.js"></script>
<!-- 側邊欄擴充套件與摺疊 -->
<script src="//cdn.jsdelivr.net/npm/docsify-sidebar-collapse/dist/docsify-sidebar-collapse.min.js"></script>
<!-- 頁尾資訊 -->
<script src="//unpkg.com/docsify-footer-enh/dist/docsify-footer-enh.min.js"></script>
<!-- GitTalk評論 -->
<!-- <link rel="stylesheet" href="//cdn.jsdelivr.net/npm/gitalk/dist/gitalk.css">
<script src="//cdn.jsdelivr.net/npm/docsify/lib/plugins/gitalk.min.js"></script>
<script src="//cdn.jsdelivr.net/npm/gitalk/dist/gitalk.min.js"></script> -->
</body>
</html>
然後執行,本地會啟動 http://localhost:3000,直接看看效果
docsify serve
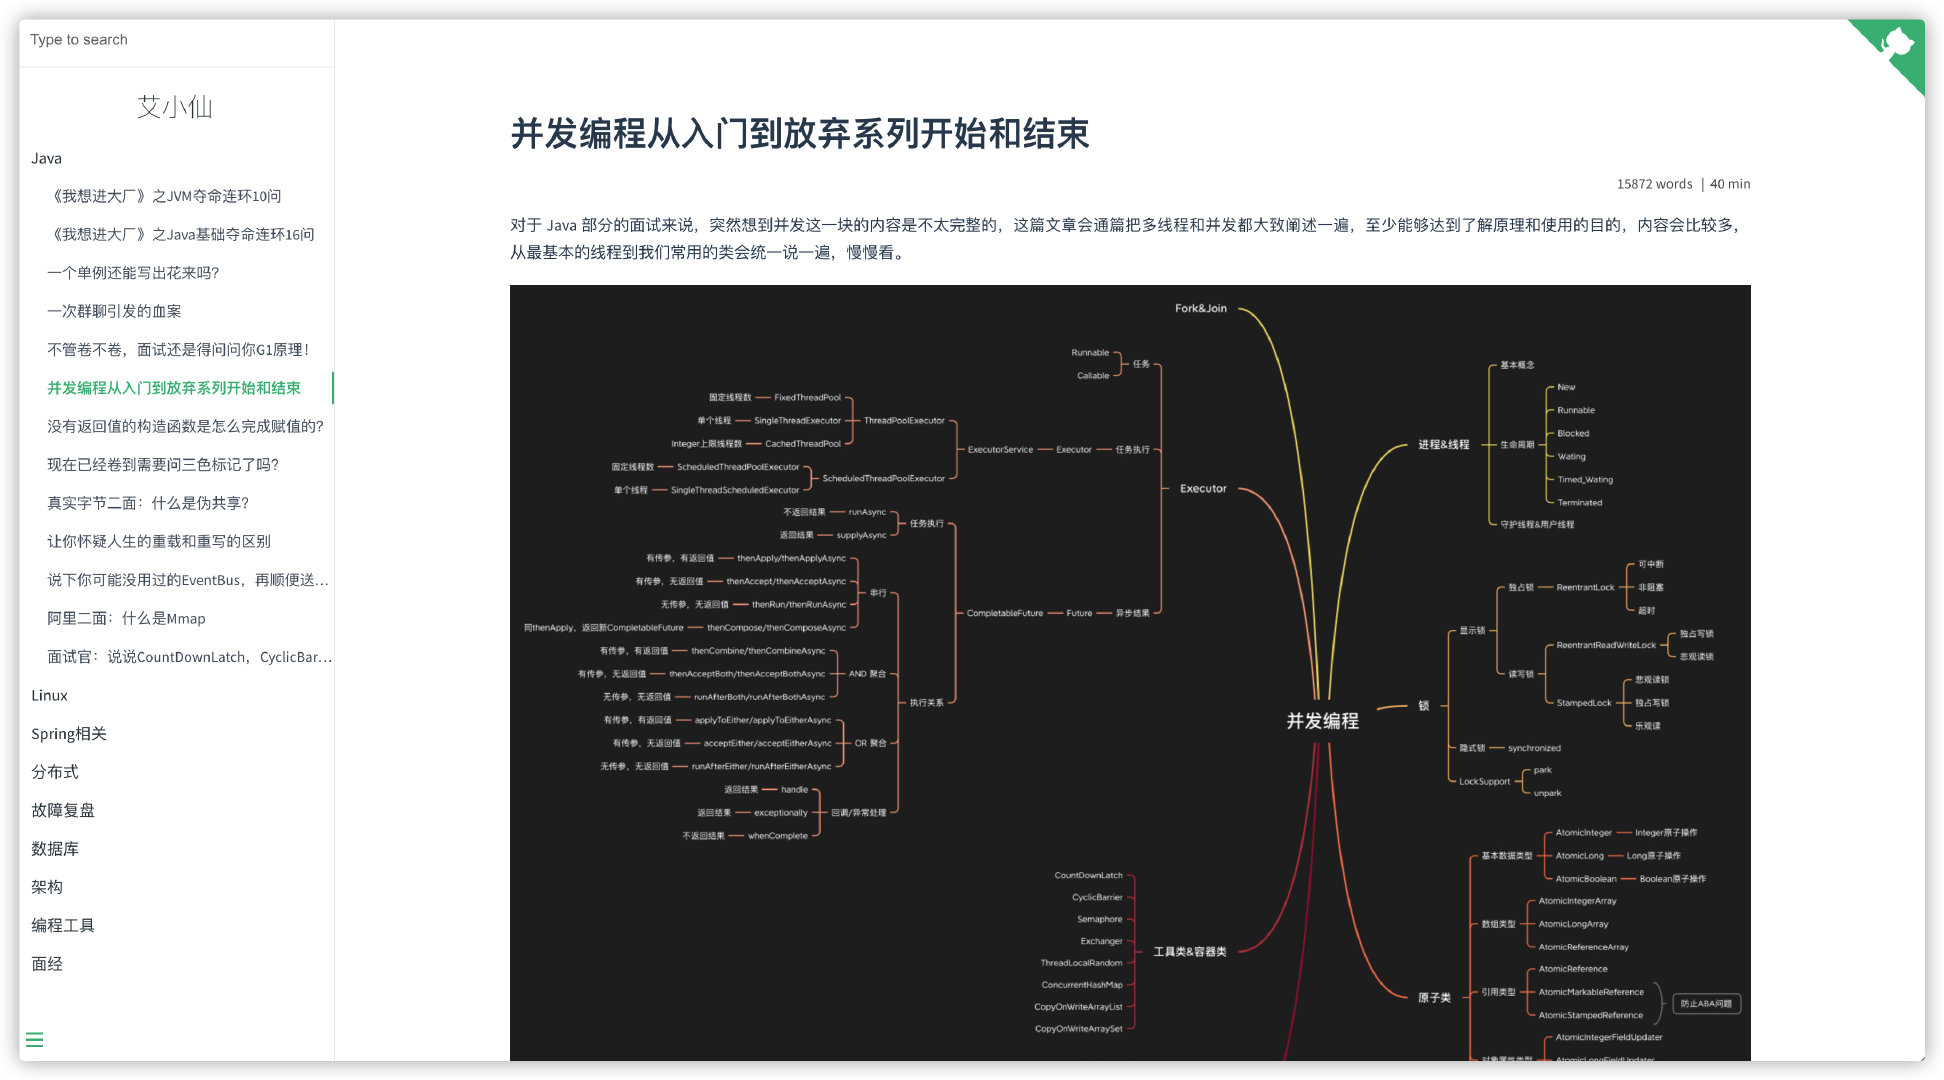
大概就這個樣子了

側邊欄還沒有,使用命令生成一下,會自動幫我們根據目錄建立一個_sidebar.md檔案,也就是我們的側邊欄了。
docsify generate .
然後再看看效果怎麼樣,差不多就這樣,需要注意的是檔名不能有空格,否則生成的側邊欄目錄會有問題,需要修改一下檔名使用中劃線或者下換線替換空格(我無法理解為什麼不能用空格)。
多級目錄生成問題
另外還有一個問題是無法生成多級目錄,也就是不能超過二級目錄,這個我自己隨便改了一下。
去 docsify-cli 官方 git 倉庫下載原始碼,然後把這個丟進去,在目錄下執行 node generate.js 就可以,底部測試目錄改成自己的目錄。
'use strict'

const fs = require('fs')
const os = require('os')
const {cwd, exists} = require('../util')
const path = require('path')
const logger = require('../util/logger')
const ignoreFiles = ['_navbar', '_coverpage', '_sidebar']

// eslint-disable-next-line
function test (path = '', sidebar) {
  // 獲取當前目錄
  const cwdPath = cwd(path || '.')

  // console.log('cwdPath', cwdPath, !!exists(cwdPath));

  // console.log('///////', cwdPath, path, cwd(path || '.'))
  if (exists(cwdPath)) {
    if (sidebar) {
      const sidebarPath = cwdPath + '/' + sidebar || '_sidebar.md';

      if (!exists(sidebarPath)) {
        genSidebar(cwdPath, sidebarPath)
        logger.success(`Successfully generated the sidebar file '${sidebar}'.`)
        return true
      }

      logger.error(`The sidebar file '${sidebar}' already exists.`)
      process.exitCode = 1
      return false
    }
    return false;
  }

  logger.error(`${cwdPath} directory does not exist.`)
}

let tree = '';
function genSidebar(cwdPath, sidebarPath) {
  // let tree = '';
  let lastPath = ''
  let nodeName = ''
  let blankspace = '';
  let test = 0;

  const files = getFiles(cwdPath);
  console.log(JSON.stringify(files));
  getTree(files);

  fs.writeFile(sidebarPath, tree, 'utf8', err => {
    if (err) {
      logger.error(`Couldn't generate the sidebar file, error: ${err.message}`)
    }
  })

  return;

  getDirFiles(cwdPath, function (pathname) {
    path.relative(pathname, cwdPath) // 找cwdPath的相對路徑
    pathname = pathname.replace(cwdPath + '/', '')
    let filename = path.basename(pathname, '.md') // 檔名
    let splitPath = pathname.split(path.sep) // 路徑分割成陣列
    let blankspace = '';

    if (ignoreFiles.indexOf(filename) !== -1) {
      return true
    }

    nodeName = '- [' + toCamelCase(filename) + '](' + pathname + ')' + os.EOL

    if (splitPath.length > 1) {
      if (splitPath[0] !== lastPath) {
        lastPath = splitPath[0]
        tree += os.EOL + '- ' + toCamelCase(splitPath[0]) + os.EOL
      }
      tree += '  ' + nodeName
      // console.error('tree=====', tree, splitPath, splitPath.length);
    } else {
      if (lastPath !== '') {
        lastPath = ''
        tree += os.EOL
      }

      tree += nodeName
    }
  })
  fs.writeFile(sidebarPath, tree, 'utf8', err => {
    if (err) {
      logger.error(`Couldn't generate the sidebar file, error: ${err.message}`)
    }
  })
}

function getFiles (dir) {
  // let path = require('path');
  // let fs = require('fs');
  let rootDir = dir;
  var filesNameArr = []
  let cur = 0
  // 用個hash佇列儲存每個目錄的深度
  var mapDeep = {}
  mapDeep[dir] = 0
  // 先遍歷一遍給其建立深度索引
  function getMap(dir, curIndex) {
    var files = fs.readdirSync(dir) //同步拿到檔案目錄下的所有檔名
    files.map(function (file) {
      //var subPath = path.resolve(dir, file) //拼接為絕對路徑
      var subPath = path.join(dir, file) //拼接為相對路徑
      var stats = fs.statSync(subPath) //拿到檔案資訊物件
      // 必須過濾掉node_modules資料夾
      if (file != 'node_modules') {
        mapDeep[file] = curIndex + 1
        if (stats.isDirectory()) { //判斷是否為資料夾型別
          return getMap(subPath, mapDeep[file]) //遞迴讀取資料夾
        }
      }
    })
  }
  getMap(dir, mapDeep[dir])
  function readdirs(dir, folderName, myroot) {
    var result = { //構造資料夾資料
      path: dir,
      title: path.basename(dir),
      type: 'directory',
      deep: mapDeep[folderName]
    }
    var files = fs.readdirSync(dir) //同步拿到檔案目錄下的所有檔名
    result.children = files.map(function (file) {
      //var subPath = path.resolve(dir, file) //拼接為絕對路徑
      var subPath = path.join(dir, file) //拼接為相對路徑
      var stats = fs.statSync(subPath) //拿到檔案資訊物件
      if (stats.isDirectory()) { //判斷是否為資料夾型別
        return readdirs(subPath, file, file) //遞迴讀取資料夾
      }
      if (path.extname(file) === '.md') {
        const path =  subPath.replace(rootDir + '/', '');
        // console.log(subPath, rootDir, '========', path);
        return { //構造檔案資料
          path: path,
          name: file,
          type: 'file',
          deep: mapDeep[folderName] + 1,
        }
      }
    })
    return result //返回資料
  }
  filesNameArr.push(readdirs(dir, dir))
  return filesNameArr
}

function getTree(files) {
  for (let i=0; i<files.length;i++) {
    const item = files[i];
    if (item) {
      if (item.deep === 0) {
        if (item.children) {
          getTree(item.children)
        }
      } else {
        let blankspace = ''
        for (let i = 1; i < item.deep; i++) {
          blankspace += '  '
        }
        // console.log('-' + blankspace + '-', item.deep)
        if (item.type === 'directory') {
          tree += os.EOL + blankspace + '- ' + toCamelCase(item.title) + os.EOL
        } else if (item.type === 'file') {
          tree += os.EOL + blankspace + '- [' + item.name + '](' + item.path + ')' + os.EOL
          // console.log('tree', tree);
        }
        if (item.children) {
          getTree(item.children)
        }
      }
    }
  }
}

function getDirFiles(dir, callback) {
  fs.readdirSync(dir).forEach(function (file) {
    let pathname = path.join(dir, file)

    if (fs.statSync(pathname).isDirectory()) {
      getDirFiles(pathname, callback)
    } else if (path.extname(file) === '.md') {
      callback(pathname)
    }
  })
}

function toCamelCase(str) {
  return str.replace(/\b(\w)/g, function (match, capture) {
    return capture.toUpperCase()
  }).replace(/-|_/g, ' ')
}


test("/Users/user/Documents/JavaInterview/", "sidebar.md");
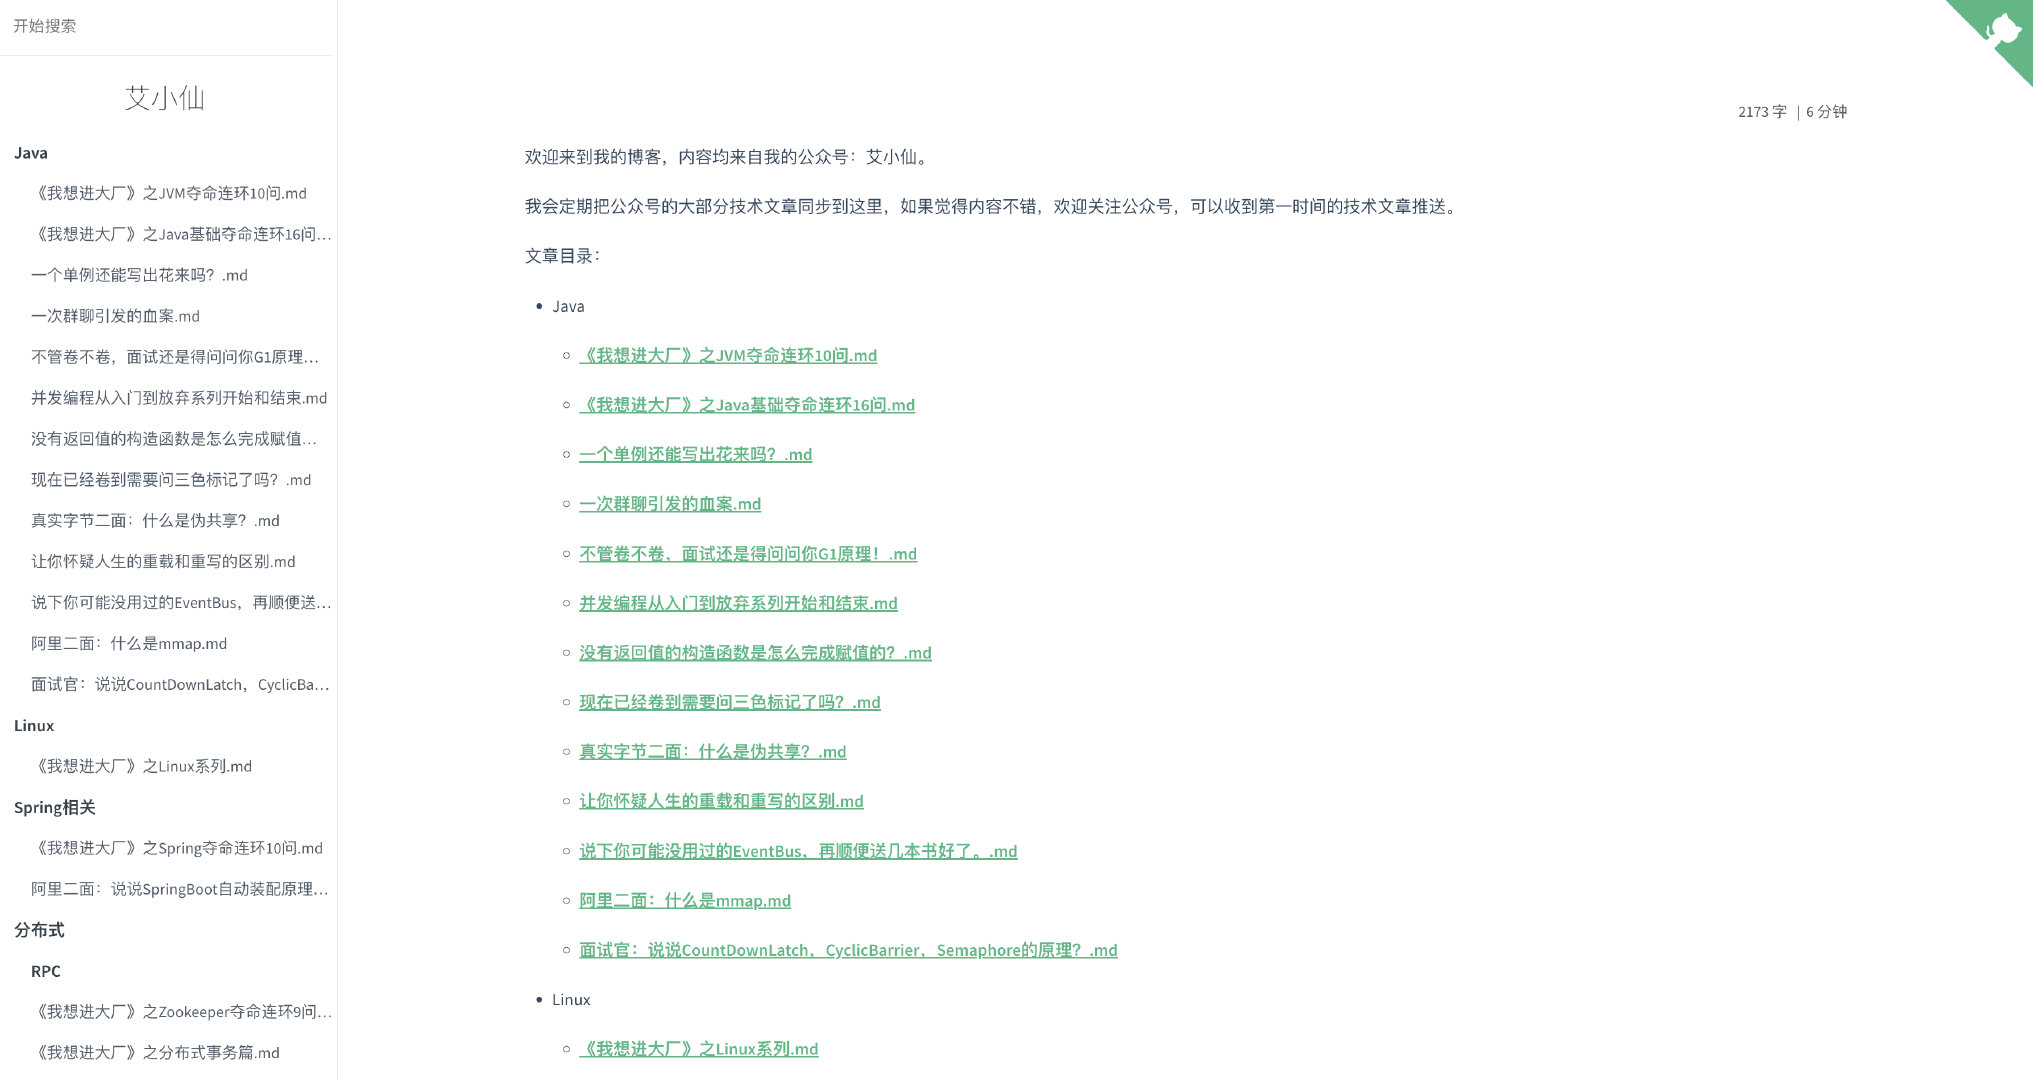
這樣的話一切不就都好起來了嗎?看看最終的效果。
nginx 設定
webhook 暫時還沒弄,先手動 push 上去然後把檔案都傳到伺服器上去,再設定一下 nginx 。
server {
    listen 80;
    listen [::]:80;
    server_name aixiaoxian.vip;
    client_max_body_size 1024m;
    location / {
        root /你的目錄;
        index index.html;
    }
}

server {
    listen       443 ssl;
    server_name  aixiaoxian.vip;
    root         /usr/share/nginx/html;

    ssl_certificate cert/aixiaoxian.pem;
    ssl_certificate_key cert/aixiaoxian.key;
    ssl_session_cache shared:SSL:1m;
    ssl_session_timeout  10m;
    ssl_ciphers ECDHE-RSA-AES128-GCM-SHA256:ECDHE:ECDH:AES:HIGH:!NULL:!aNULL:!MD5:!ADH:!RC4;
    ssl_prefer_server_ciphers on;
    ssl_protocols TLSv1 TLSv1.1 TLSv1.2; #表示使用的TLS協定的型別。
    include /etc/nginx/default.d/*.conf;

    location / {
        root /你的目錄;
        index index.html;
    }
}
這時候你去 reload nginx 會發現網站可能 403 了,把你的 ng 檔案第一行改了,甭管後面是啥,改成 root 完事兒。
user root;
這樣就 OK 了。
內網穿透
然後,就需要搞一個 webhook 的程式了,但是在此之前,為了本地能測試 webhook 的效果,需要設定個內網穿透的程式,我們使用 ngrok 。
先安裝。
brew install ngrok/ngrok/ngrok
然後需要註冊一個賬號,這裡沒關係,直接 google 登入就好了,之後進入個人頁面會提示你使用步驟。
按照步驟來新增 token,然後對映 80 埠。
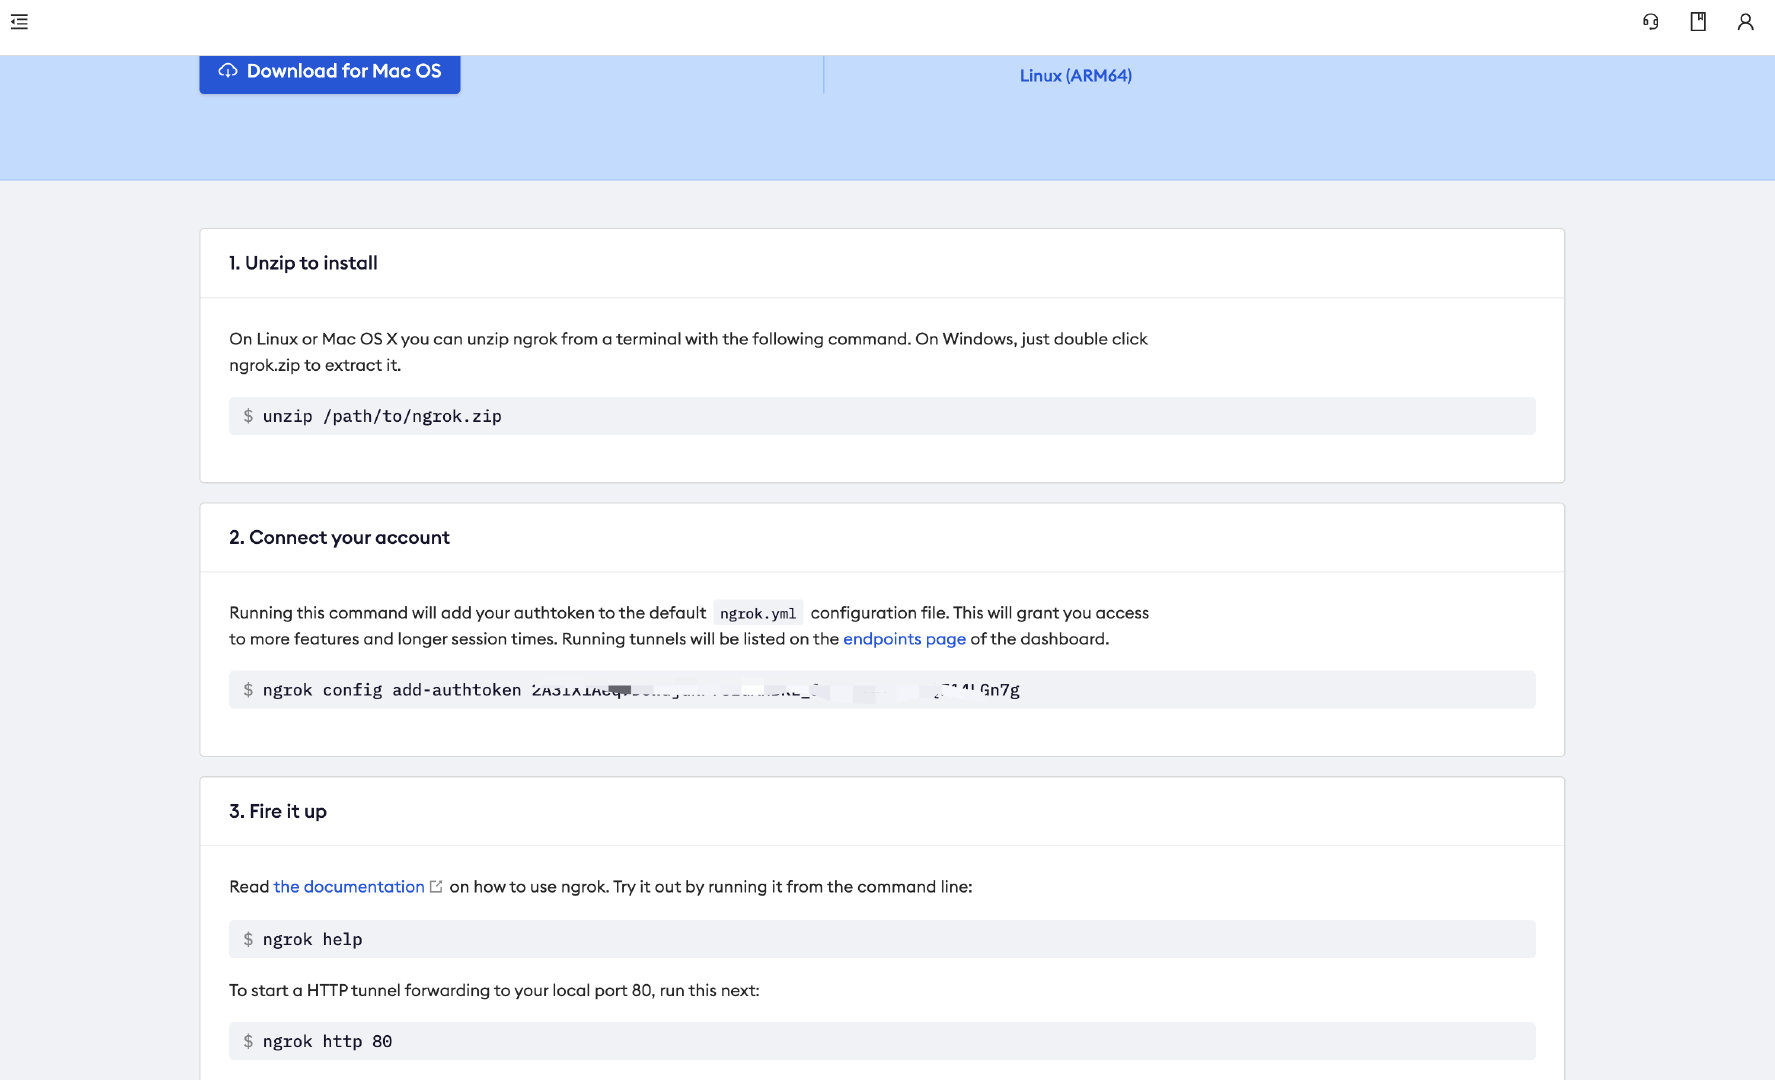
如果後面發現 ngrok 命令找不到,可以去官網手動下一個檔案,丟到/usr/local/bin目錄中就可以了。
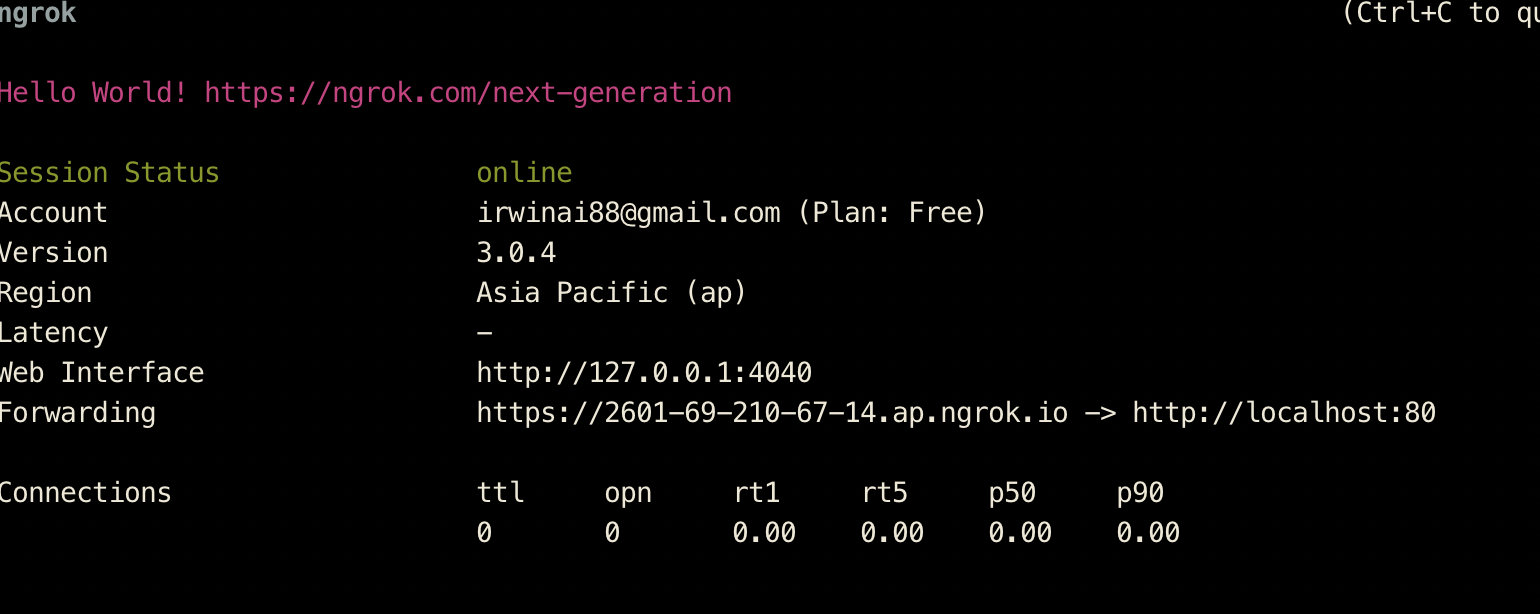
成功之後可以看到 ngrok 的頁面,使用他給我們提供的 Forwarding 地址,就是我們的公網地址。
我隨便弄了個 80 埠,這裡用自己到時候專案的埠號對映就行了,後面我們改成 9000。
webhook
設定好之後,就去我們的 github 專案設定 webhook,使用上面得到的地址。
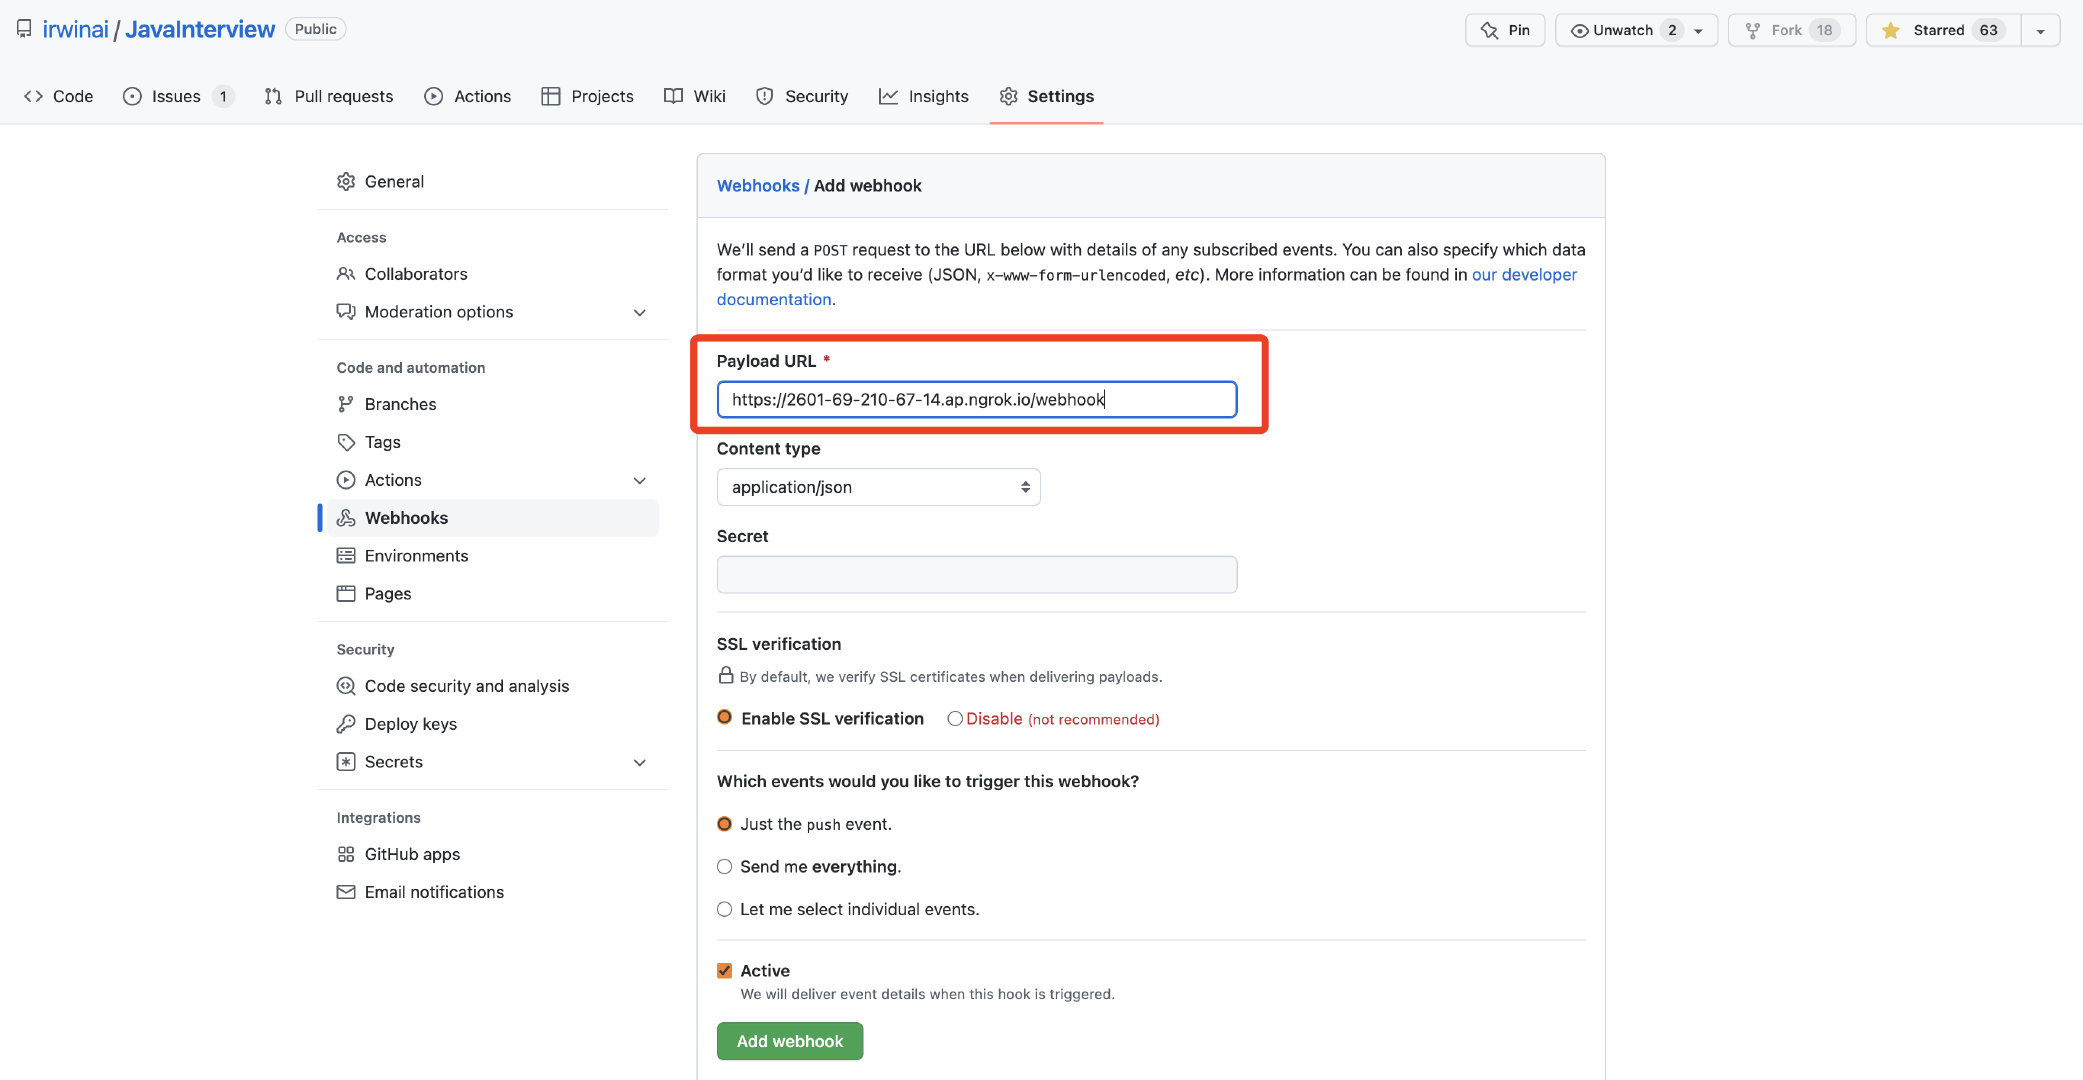
這樣就設定OK了,然後搞個 Java 程式去,監聽 9000 埠,隨便寫個 Controller。
@PostMapping("/webhook")
public void webhook(@RequestBody JsonNode jsonNode) {
	System.out.println("json===" + jsonNode);
}
然後隨便改點我們的檔案,push 一下,收到了 webhook 的回撥,其實我們根本不關注回撥的內容,我們只要收到這個通知,就去觸發重新拉取程式碼的指令就行。
{
    "repository": {
        "id": 306793662,
        "name": "JavaInterview",
        "full_name": "irwinai/JavaInterview",
        "private": false,
        "owner": {
            "name": "irwinai",
            "email": "[email protected]",
            "login": "irwinai"
        },
        "html_url": "https://github.com/irwinai/JavaInterview",
        "description": null,
        "fork": false
    },
    "pusher": {
        "name": "irwinai",
        "email": "[email protected]"
    },
    "sender": {
        "login": "irwinai",
        "id": 4981449
    }
}
接著,我們實現程式碼邏輯,根據回撥執行命令去拉取最新的程式碼到本地,為了能通過 Java 操作 Git,引入 JGit。
<dependency>
  <groupId>org.eclipse.jgit</groupId>
  <artifactId>org.eclipse.jgit</artifactId>
  <version>5.13.1.202206130422-r</version>
</dependency>
為了簡單,我每次都是重新 clone 倉庫下來,正常來說應該第一次 clone,後面直接 pull 程式碼,這裡為了省事兒,就先這樣操作。
@RestController
public class WebhookController {
    private static final String REMOTE_URL = "https://github.com/irwinai/JavaInterview.git";

    @PostMapping("/webhook")
    public void webhook(@RequestBody JsonNode jsonNode) throws Exception {
        File localPath = new File("/Users/user/Downloads/TestGitRepository");

        // 不管那麼多,先刪了再說
        FileUtils.deleteDirectory(localPath);

        //直接 clone 程式碼
        try (Git result = Git.cloneRepository()
                .setURI(REMOTE_URL)
                .setDirectory(localPath)
                .setProgressMonitor(new SimpleProgressMonitor())
                .call()) {
            System.out.println("Having repository: " + result.getRepository().getDirectory());
        }
    }

    private static class SimpleProgressMonitor implements ProgressMonitor {
        @Override
        public void start(int totalTasks) {
            System.out.println("Starting work on " + totalTasks + " tasks");
        }

        @Override
        public void beginTask(String title, int totalWork) {
            System.out.println("Start " + title + ": " + totalWork);
        }

        @Override
        public void update(int completed) {
            System.out.print(completed + "-");
        }

        @Override
        public void endTask() {
            System.out.println("Done");
        }

        @Override
        public boolean isCancelled() {
            return false;
        }
    }
}
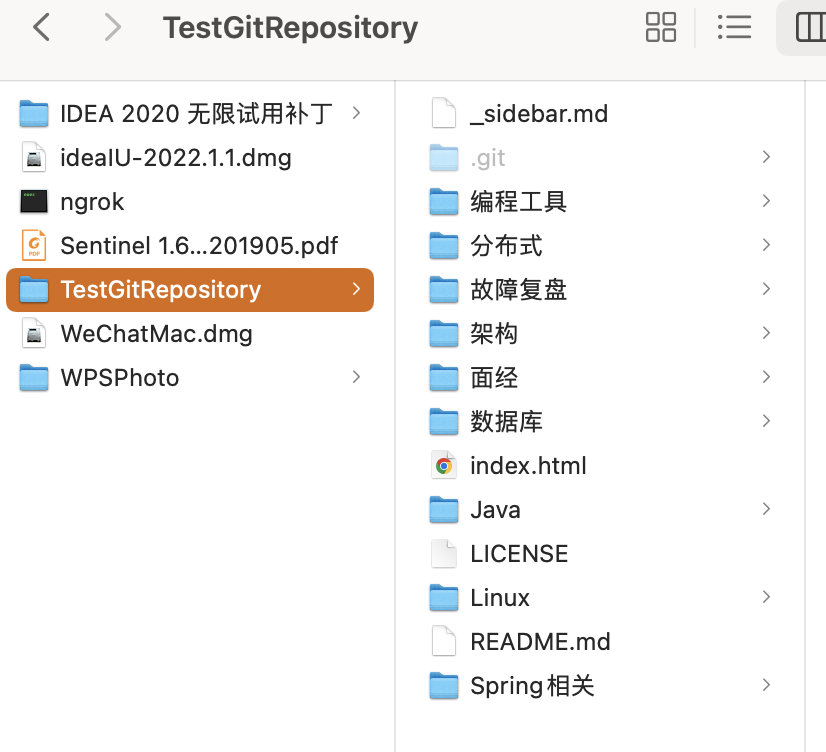
程式碼執行後已經是 OK 了,可以直接拉取到程式碼,那麼至此,差不多已經 OK 了,後面把程式碼直接丟伺服器上去跑著就拉倒了。
伺服器的問題
好了,你以為到這裡就結束了嗎?年輕了,年輕了。。。
這程式碼丟到伺服器上跑會發現報錯連不上 github,如果你是阿里雲伺服器的話。
解決方案是找到 /etc/ssh/ssh_config,刪掉 GSSAPIAuthentication no 這行前面的註釋,然後儲存,你才會發現真的是能下載了。
同時,nginx 我們對映另外一個域名作為回撥的域名,這裡需要主要以下你的 https 證書,因為我是免費版的,所以 https 這個域名無法生效,那 webhook 回撥注意用 http 就行。
server {
    listen 80;
    listen [::]:80;
    server_name test.aixiaoxian.vip;
    client_max_body_size 1024m;
    location / {
        proxy_pass http://127.0.0.1:9000;
        proxy_set_header HOST $host;
        proxy_set_header X-Forwarded-Proto $scheme;
        proxy_set_header X-Real-IP $remote_addr;
        proxy_set_header X-Forwarded-For $proxy_add_x_forwarded_for;
    }
}
server {
    listen       443 ssl;
    server_name  test.aixiaoxian.vip;
    root         /usr/share/nginx/html;

    ssl_certificate cert/aixiaoxian.pem;
    ssl_certificate_key cert/aixiaoxian.key;
    ssl_session_cache shared:SSL:1m;
    ssl_session_timeout  10m;
    ssl_ciphers ECDHE-RSA-AES128-GCM-SHA256:ECDHE:ECDH:AES:HIGH:!NULL:!aNULL:!MD5:!ADH:!RC4;
    ssl_prefer_server_ciphers on;
    ssl_protocols TLSv1 TLSv1.1 TLSv1.2; #表示使用的TLS協定的型別。
    include /etc/nginx/default.d/*.conf;

    location / {
        proxy_pass http://127.0.0.1:9000;
        proxy_set_header HOST $host;
        proxy_set_header X-Forwarded-Proto $scheme;
        proxy_set_header X-Real-IP $remote_addr;
        proxy_set_header X-Forwarded-For $proxy_add_x_forwarded_for;
    }
}
OK,如果你用上面的方式還無法解決,可以換一種方式,直接通過 Java 直接 shell 指令碼去處理。
rm -rf /root/docs/JavaInterview
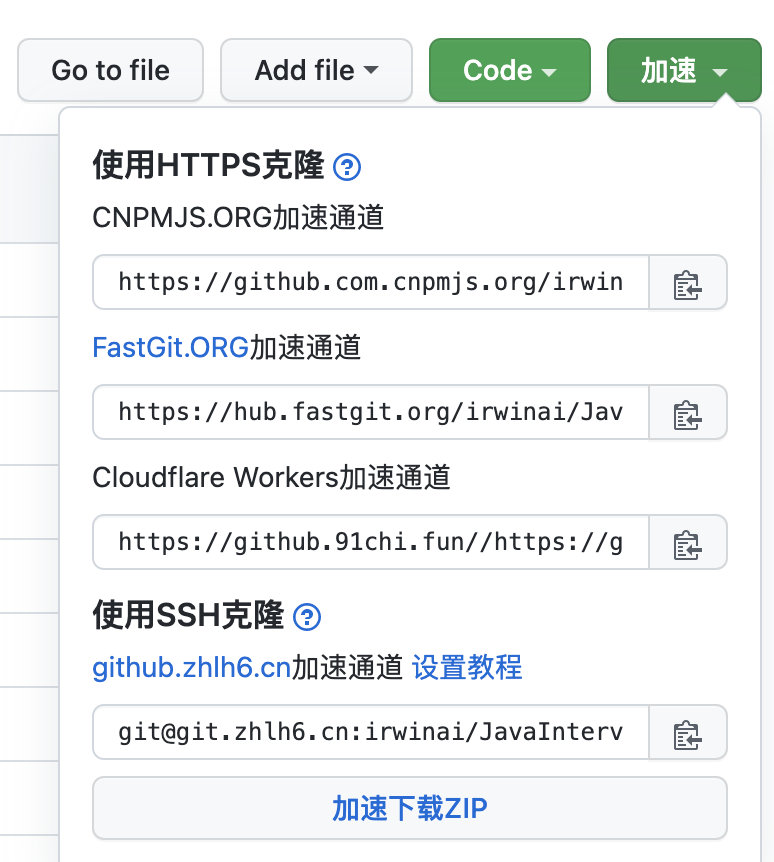
git clone https://github.91chi.fun//https://github.com/irwinai/JavaInterview.git
用指令碼的目的是可以用加速的 git 地址,否則伺服器存取經常會失敗,這個找個外掛就可以有加速地址了。
public class ShellCommandsHelper extends CommandHelper {
    private static final File file = new File(FILE_PATH);

    @Override
    public void exec() {
        try {
            FileUtils.forceMkdir(file);

            log.info("Starting clone repository...");

            Process process = Runtime.getRuntime().exec("sh " + SHELL_PATH, null, file);
            int status = process.waitFor();

            if (status != 0) {
                log.error("[ShellCommandsHelper] exec shell error {}", status);
            }
        } catch (Exception e) {
            log.error("[ShellCommandsHelper] exec shell error", e);
        }
    }

}
程式碼上傳的問題
好了,這樣通過手動上傳程式碼的方式其實已經可以用了,但是為了部署更方便一點,我建議安裝一個外掛Alibaba Cloud Toolkit,其他雲伺服器有的也有這種型別的外掛。
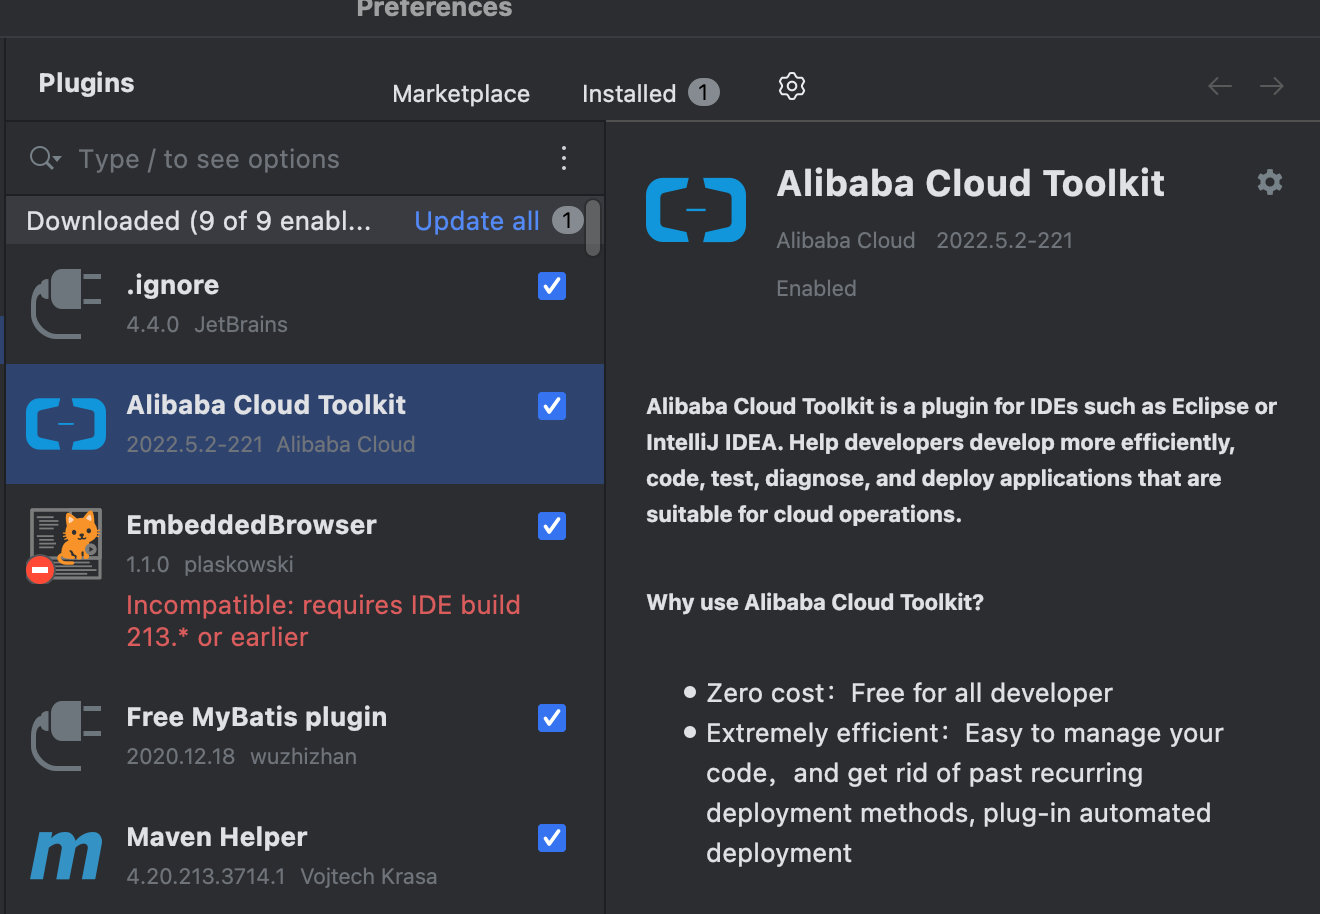
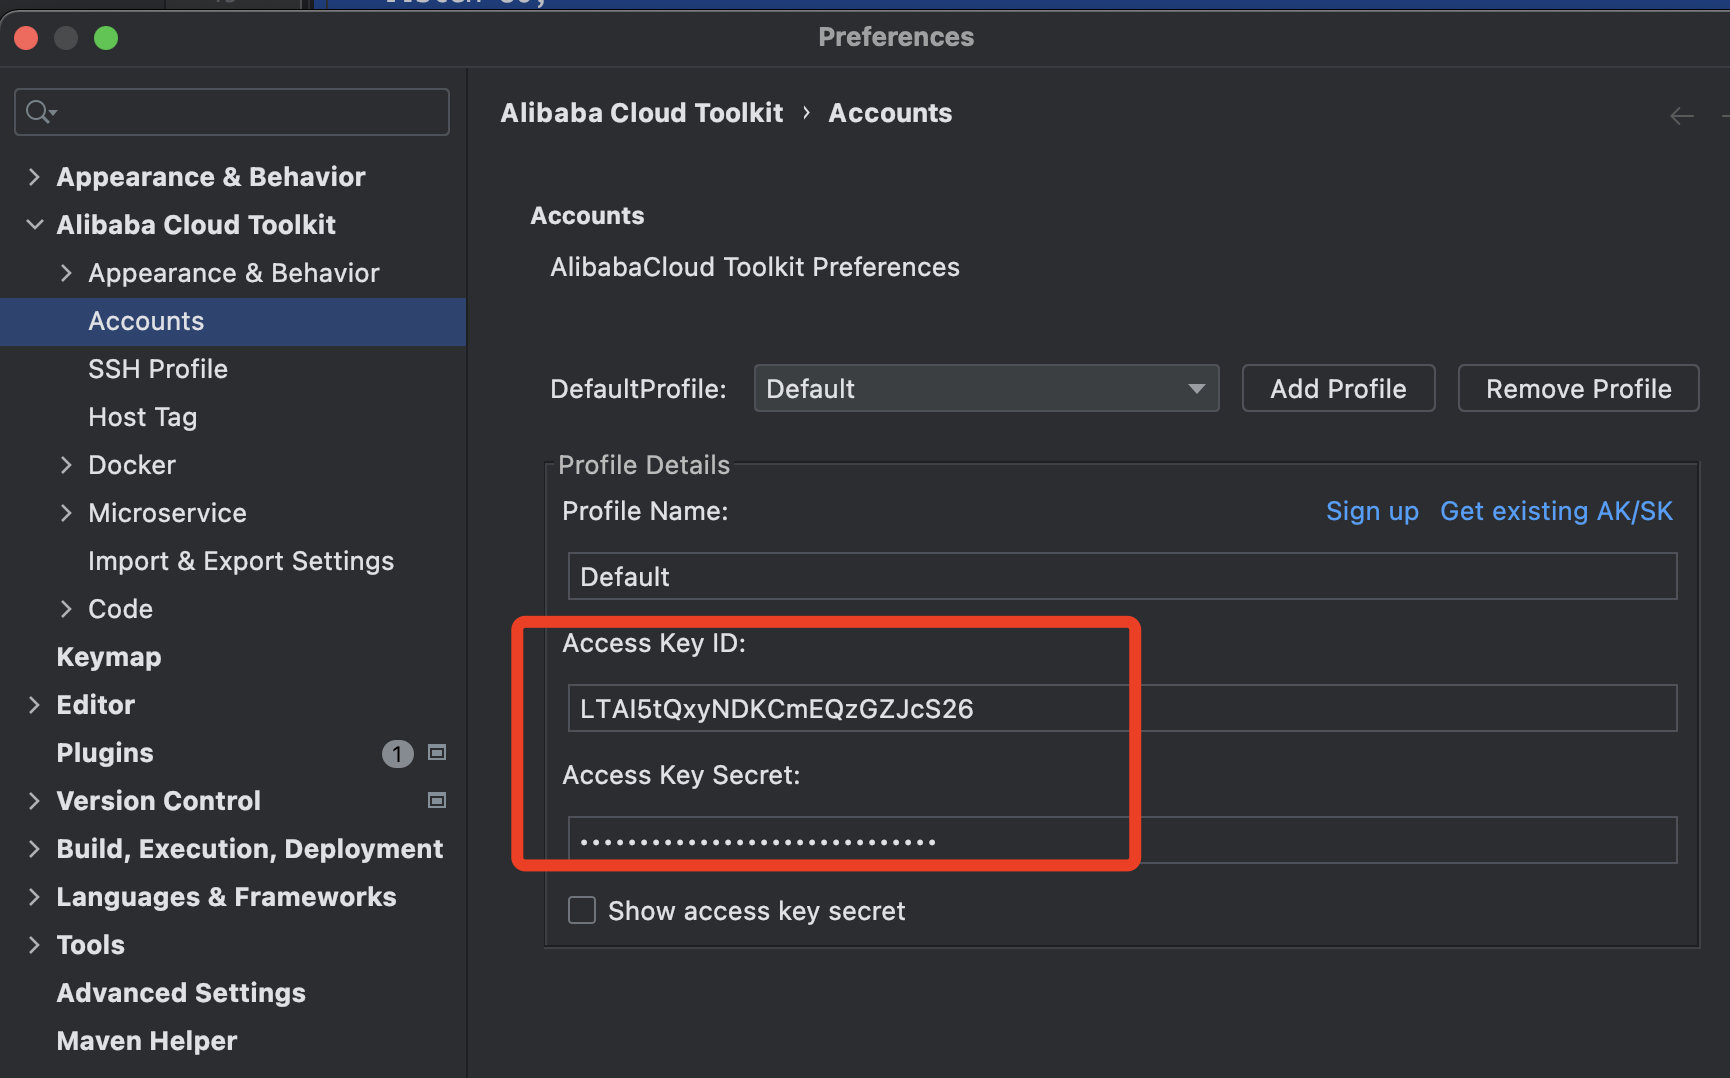
安裝好外掛之後會進入設定的頁面,需要設定一個accessKey。
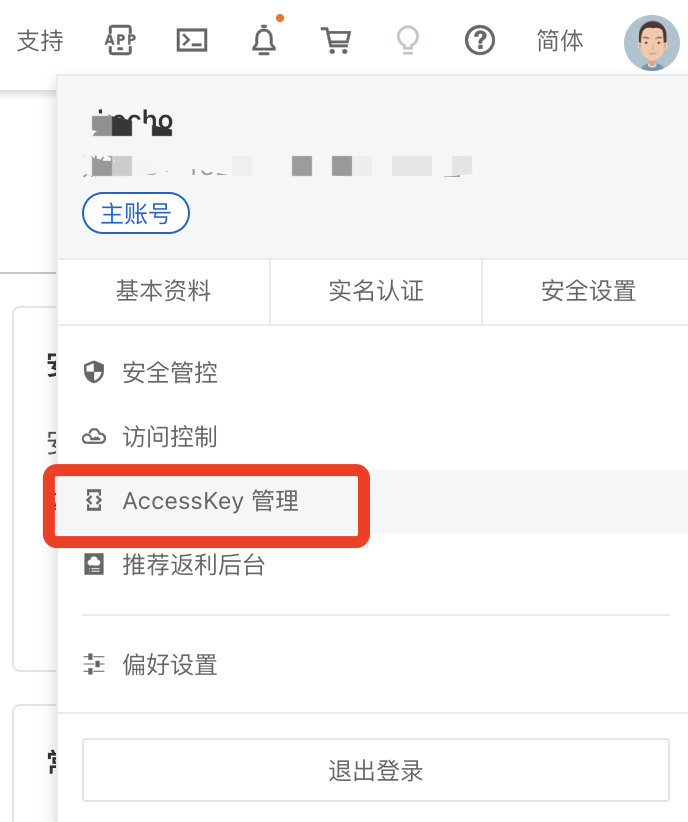
去自己的阿里雲賬號下面設定。
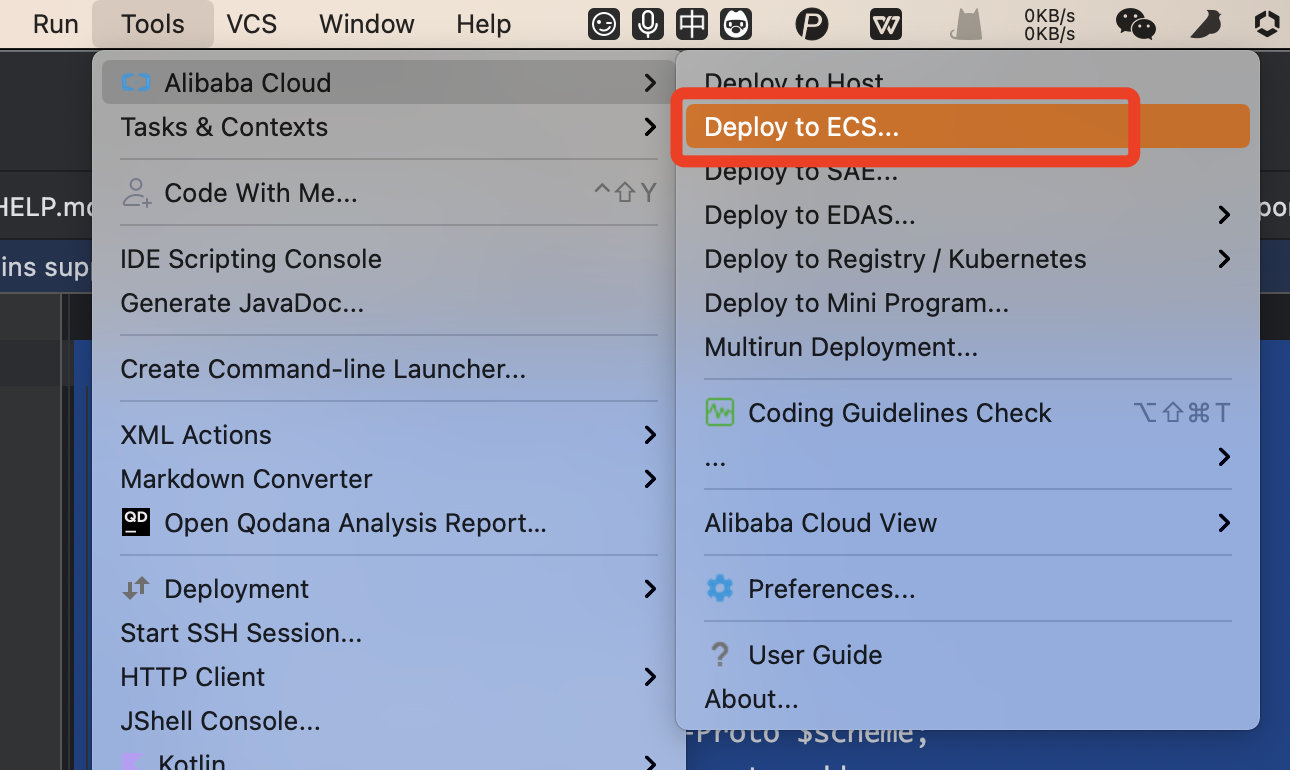
設定好了之後,點選Tools-Deploy to xxx,我是 ECS ,所以選擇 ECS 伺服器即可。
然後在這裡會自動載入出你的伺服器資訊,然後選擇自己的部署目錄,同時選擇一個 Command 也就是執行命令。
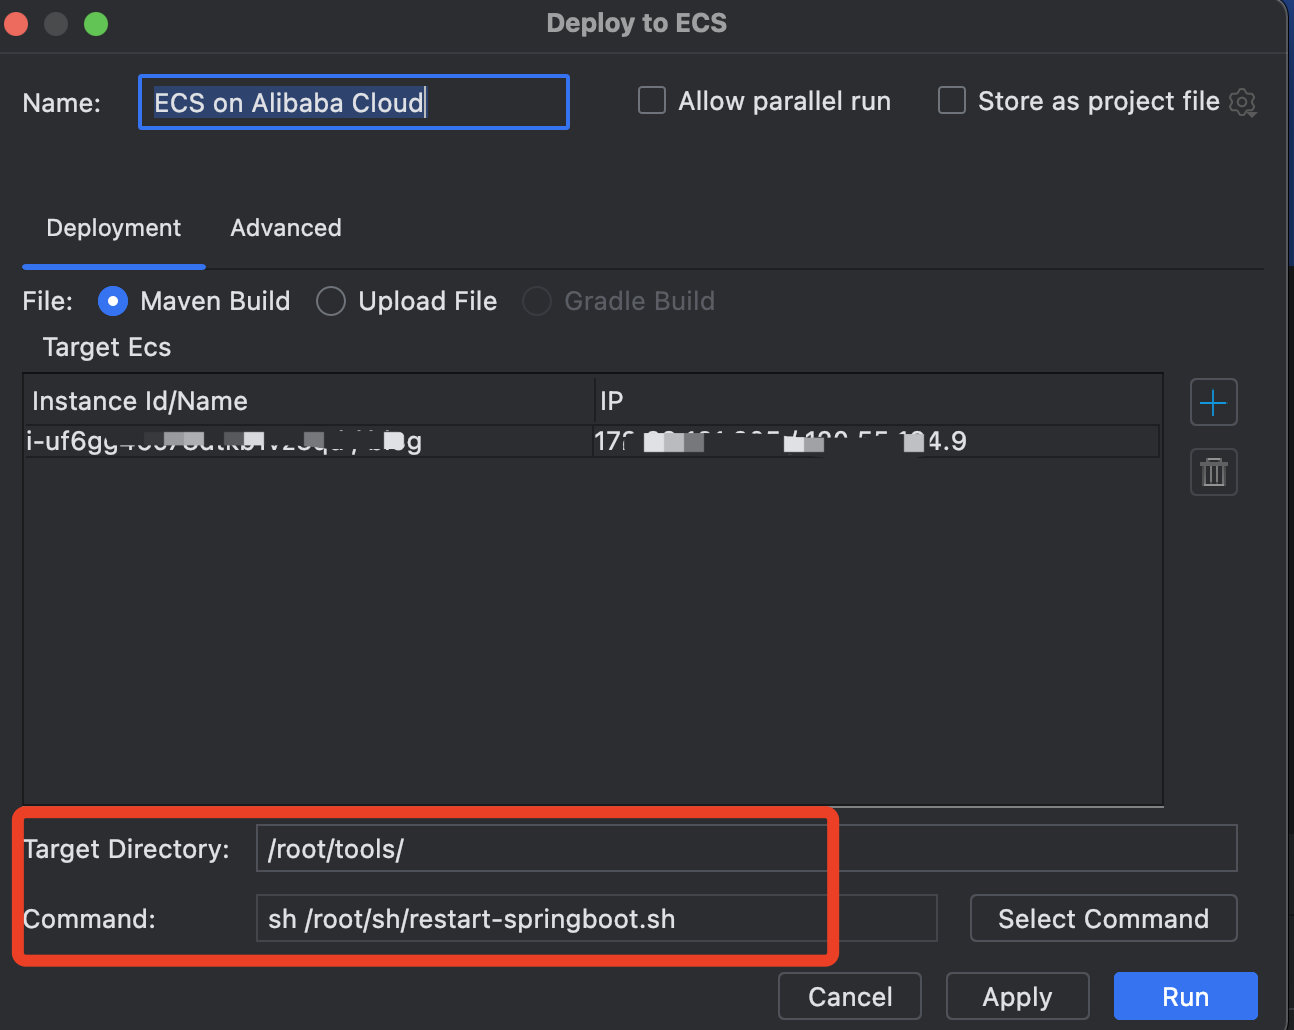
這個命令隨便找個目錄建立一個這個指令碼,放那裡就行了,最後點選 Run,程式碼就飛快的上傳了。
source /etc/profile
killall -9 java
nohup java -jar /root/tools/sync-tools-0.0.1-SNAPSHOT.jar > nohup.log 2>&1 &
結束
基本的工作已經做完了,那其實還有挺多細節問題沒有處理的,比如失敗重試、回撥鑑權等等問題,這只是一個非常初級的版本。
同步程式碼 git 地址:https://github.com/irwinai/sync-tools
文章倉庫地址:https://github.com/irwinai/JavaInterview
部落格地址:https://aixiaoxian.vip/